
Chapter 16
Introduction to Forensics
Chapter Objectives
After reading this chapter and completing the exercises, you will be able to do the following:
![]() Understand basic forensics principles.
Understand basic forensics principles.
![]() Make a forensic copy of a drive.
Make a forensic copy of a drive.
![]() Use basic forensics tools.
Use basic forensics tools.
Introduction
Throughout this book we have explored network security. We have examined threats and countermeasures, firewalls, antivirus, IDS, cyber terrorism, policies, and more. However, your network security knowledge is incomplete without at least a basic understanding of computer forensics. The reason for this is simple: The first responders to computer crimes are usually the network administrators and tech support personnel. If you fail to handle the basic forensic containment of the crime scene appropriately, you might render any evidence found to be inadmissible.
However, remember that the steps outlined in this chapter are general guidelines. You should definitely consult whatever forensics standards are used in your jurisdiction. If you are not a law enforcement officer, you will still want to familiarize yourself with the procedures used by local law enforcement and to follow the same steps. If for some reason you cannot acquire the procedures used by your local law enforcement agency, then you can find federal guidelines. Here are some sources:
![]() United States Secret Service: https://www.secretservice.gov/investigation/
United States Secret Service: https://www.secretservice.gov/investigation/
![]() FBI Computer Forensics: https://archives.fbi.gov/archives/news/stories/2009/august/rcfls_081809
FBI Computer Forensics: https://archives.fbi.gov/archives/news/stories/2009/august/rcfls_081809
Also keep in mind that a few jurisdictions have passed laws requiring that in order to extract the evidence the investigator must be either a law enforcement officer or a licensed private investigator. This law is controversial, given that private investigator training and licensing normally does not include computer forensics training. You should check with specifics in your state. However, many of those states will allow you to forensically examine a computer if you have the permission of the owner. So, this would not prohibit you from forensically examining computers in your company. However, forensics has become an integral part of response to network intrusions, so much so that the field is often called Digital Forensics Incident Response (DFIR).
General Forensics Guidelines
You should always follow some general guidelines in any forensic examination. You want to have as little impact on the evidence as possible, which means you want to examine it and not alter it. You want to have a clear document trail for everything that is done. Of course, you also want to secure your evidence.
EU Evidence Gathering
The Council of Europe Convention on Cybercrime, also called the Budapest Convention on Cybercrime or simply Budapest Convention, refers to electronic evidence as evidence that can be collected in electronic form of a criminal offence.
The Council of Europe’s Electronic Evidence Guide is a basic guide for police officers, prosecutors, and judges.
The EU also has five principles that establish a basis for all dealings with electronic evidence:
![]() Principle 1: Data Integrity: You must ensure that the data is valid and has not been corrupted.
Principle 1: Data Integrity: You must ensure that the data is valid and has not been corrupted.
![]() Principle 2: Audit Trail: Similar to the concept of chain of custody, you must be able to fully account for the evidence. That includes its location as well as what was done with it.
Principle 2: Audit Trail: Similar to the concept of chain of custody, you must be able to fully account for the evidence. That includes its location as well as what was done with it.
![]() Principle 3: Specialist Support: As needed, utilize specialists. For example, if you are a skilled forensic examiner but have limited experience with a Macintosh computer, get a Mac specialist should you need to examine a Mac.
Principle 3: Specialist Support: As needed, utilize specialists. For example, if you are a skilled forensic examiner but have limited experience with a Macintosh computer, get a Mac specialist should you need to examine a Mac.
![]() Principle 4: Appropriate Training: All forensic examiners and analysts should be fully trained and always expanding their knowledge base.
Principle 4: Appropriate Training: All forensic examiners and analysts should be fully trained and always expanding their knowledge base.
![]() Principle 5: Legality: Make certain all evidence is collected and handled in a manner consistent with all applicable laws.
Principle 5: Legality: Make certain all evidence is collected and handled in a manner consistent with all applicable laws.
Even if you don’t work within the European Union, these guidelines can be quite useful. Yes, they are rather broad, but they do provide guidance as to how to properly conduct a forensic examination.
Scientific Working Group on Digital Evidence
The Scientific Working Group on Digital Evidence, or SWGDE (www.swgde.org), creates a number of standards for digital forensics. According to SWGDE Model Standard Operation Procedures for Computer Forensics, there are four steps of examination:
STEP 1. Visual Inspection: The purpose of this inspection is just to verify the type of evidence, its condition, and relevant information to conduct the examination. This is often done in the initial evidence seizure. For example, if a computer is being seized, you would want to document whether the machine is running, what its condition is, and what the general environment is like.
STEP 2. Forensic Duplication: This is the process of duplicating the media before examination. It is always preferred to work with a forensic copy and not the original.
STEP 3. Media Examination: This is the actual forensic testing of the application. By media, we mean hard drive, RAM, SIM card—some item that can contain digital data.
STEP 4. Evidence Return: Exhibit(s) are returned to the appropriate location—usually some locked or secured facility.
These particular steps provide an overview of how a cyber forensic examination should proceed. SWGDE has a number of useful documents on its website (www.swgde.org) that you should consult to delve deeper into the nuances of a proper cyber forensic examination.
U.S. Secret Service Forensics Guidelines
The U.S. Secret Service is another federal agency tasked with combating cyber crime and with computer forensics. It has a website devoted to computer forensics that includes forensics courses (www.ncfi.usss.gov/ncfi/). These courses are usually for law enforcement personnel.
The Secret Service also has released a guide for first responders to computer crime. It has listed its “golden rules” to begin the investigation:
![]() Secure the scene and make it safe.
Secure the scene and make it safe.
![]() If you reasonably believe that the computer is involved in the crime you are investigating, take immediate steps to preserve the evidence.
If you reasonably believe that the computer is involved in the crime you are investigating, take immediate steps to preserve the evidence.
![]() Determine whether you have a legal basis to seize this computer (plain view, search warrant, consent, and so on).
Determine whether you have a legal basis to seize this computer (plain view, search warrant, consent, and so on).
![]() Avoid accessing computer files. If the computer is off, leave it off.
Avoid accessing computer files. If the computer is off, leave it off.
![]() If the computer is on, do not start searching through it. If the computer is on, go to the appropriate sections in this guide on how to properly shut down the computer and prepare it for transportation as evidence.
If the computer is on, do not start searching through it. If the computer is on, go to the appropriate sections in this guide on how to properly shut down the computer and prepare it for transportation as evidence.
![]() If you reasonably believe that the computer is destroying evidence, immediately shut down the computer by pulling the power cord from the back of the computer.
If you reasonably believe that the computer is destroying evidence, immediately shut down the computer by pulling the power cord from the back of the computer.
![]() If a camera is available and the computer is on, take pictures of the computer screen. If the computer is off, take pictures of the computer, the location of the computer, and any electronic media attached.
If a camera is available and the computer is on, take pictures of the computer screen. If the computer is off, take pictures of the computer, the location of the computer, and any electronic media attached.
![]() Determine whether special legal considerations apply (doctor, attorney, clergy, psychiatrist, newspapers, publishers, and so on).
Determine whether special legal considerations apply (doctor, attorney, clergy, psychiatrist, newspapers, publishers, and so on).
These are all important first steps to both preserving the chain of custody and ensuring the integrity of the investigation.
Don’t Touch the Suspect Drive
The first, and perhaps most important guideline, is to touch the system as little as possible. You do not want to make changes to the system in the process of examining it. Let’s look at one possible way to make a forensically valid copy of a drive. You can make a forensic copy with most major forensic tools such as AccessData’s Forensic Toolkit (FTK), Guidance Software’s EnCase, or PassMark Software’s OSForensics. However, you can also do it with free tools using Linux.
You need two bootable copies of Linux: one on the suspect machine and one on the target machine. You may use any Linux distribution you are comfortable with. Whichever version of Linux you use, the steps will be the same:
1. Completely wipe the target drive:
dd if=/dev/zero of=/dev/hdb1 bs=2048
2. Set up the target forensics server to receive the copy of the suspected drive you want to examine. The Netcat command helps with that. The specific syntax is as follows:
nc -l -p 8888 > evidence.dd
This tells the machine to listen on port 8888 and put whatever it receives into evidence.dd.
3. On the suspect machine, start sending the drive’s information to the forensics server:
dd if=/dev/hda1 | nc 192.168.0.2 8888 -w 3
Of course, this assumes that the suspect drive is hda1. If it’s not, then replace that part of the command with the partition you are using. This also assumes the server has an IP address of 192.168.0.2. If it’s not, replace it with whatever your forensics server’s IP address is.
4. You also want to create a hash of the suspect drive. Later you can hash the drive you have been working with and compare that to the hash of the original drive and confirm that nothing has been altered. You can make a hash using Linux shell commands:
md5sum /dev/hda1 | nc 192.168.0.2 8888 -w 3
After completing the steps, you have a copy of the drive. Making two copies is often a good idea: one you will work with, and another will simply be stored. Under no circumstances should you do your forensic analysis on the suspect drive.
Leave a Document Trail
Beyond not touching the actual drive, the next concern is documentation. If you have never worked in any investigative capacity, the level of documentation might seem onerous to you. However, the rule is simple: Document everything.
When you first discover a computer crime, you must document exactly what events occurred. Who was present and what where they doing? What devices were attached to the computer, and what connections did it have over the network/Internet? What hardware and operating system were being used?
When you begin your actual forensic investigation, you must document every step. Start with documenting the process you use to make a forensic copy. Document every tool you use and every test you perform. You must be able to show in your documentation everything that was done.
Secure the Evidence
First and foremost, the computer must be taken offline to prevent further tampering. In some limited circumstances a machine might be left online to trace down an active, ongoing attack, but the general rule is take it offline immediately.
The next step is to limit access to the machine. No one who does not absolutely need access to the evidence should have it. Hard drives should be locked in a safe or secure cabinet. Analysis should be done in a room with limited access.
You must also be able to document every person who had access to the evidence, how they interacted with it, and where the evidence was stored. There must be no period of time that you cannot account for the evidence. This is called chain of custody.
FBI Forensics Guidelines
Beyond the general guidelines just discussed, the FBI gives some specific guidelines. In most cases, they will overlap with the earlier discussion, but covering the FBI recommendations is still useful to do.
If an incident occurs, the FBI recommends that the first responder preserve the state of the computer at the time of the incident by making a backup copy of any logs, damaged or altered files, and, of course, any files left by the intruder. This last part is critical. Hackers frequently use various tools and might leave traces of their presence. Furthermore, the FBI warns that if the incident is in progress, activate any auditing or recording software you might have available. Collect as much data about the incident as you can. In other words, this might be a case where you do not take the machine offline, but rather analyze the attack in progress.
Another important step is to document the specific losses suffered due to the attack. Losses typically include the following:
![]() Labor cost spent in response and recovery. (Multiply the number of participating staff by their hourly rates.)
Labor cost spent in response and recovery. (Multiply the number of participating staff by their hourly rates.)
![]() If equipment was damaged, the cost of that equipment.
If equipment was damaged, the cost of that equipment.
![]() If data was lost or stolen, what was the value of that data? How much did it cost to obtain that data and how much will it cost to reconstruct it?
If data was lost or stolen, what was the value of that data? How much did it cost to obtain that data and how much will it cost to reconstruct it?
![]() Any lost revenue, including losses due to downtime, having to give customers credit due to inconvenience, or any other way in which revenue was lost.
Any lost revenue, including losses due to downtime, having to give customers credit due to inconvenience, or any other way in which revenue was lost.
Documenting the exact damages due to the attack is just as important as documenting the attack itself.
The FBI computer forensic guidelines stress the importance of securing any evidence. The FBI also stresses that you should not limit your concept of computer evidence to PCs and laptops. Computer evidence can include the following:
![]() Logs (system, router, chat room, IDS, firewall, and so on)
Logs (system, router, chat room, IDS, firewall, and so on)
![]() Portable storage devices (USB drives, external drives, and so on)
Portable storage devices (USB drives, external drives, and so on)
![]() E-mails
E-mails
![]() Devices capable of storing data such as iPod, iPad, tablets
Devices capable of storing data such as iPod, iPad, tablets
![]() Cell phones
Cell phones
The FBI guidelines also stress making a forensic copy of the suspect drive/partition to work with and creating a hash of that drive.
Finding Evidence on the PC
After you have secured the evidence and made a forensic copy, it is time to start looking for evidence. That evidence can come in many forms. First, remember that evidence is data that is relevant to the case. You might see lots of irrelevant information. Interesting data, in a forensic context, is data that provides insight into the facts of the case.
In the Browser
The browser can be a source of both direct evidence and circumstantial or supporting evidence. Obviously in cases of child pornography, the browser might contain direct evidence of the specific crime. You might also find direct evidence in the case of cyberstalking. However, if you suspect someone of creating a virus that infected a network, you would probably only find indirect evidence such as the person having searched virus creation/programming-related topics.
Even if the person erases his browsing history, retrieving it is still possible. Windows stores a lot of information in a file called index.dat (information such as web addresses, search queries, and recently opened files). You can download a number of tools from the Internet that enable you to retrieve and review the index.dat file. Here are a few:
![]() www.eusing.com/Window_Washer/Index_dat.htm
www.eusing.com/Window_Washer/Index_dat.htm
![]() www.acesoft.net/index.dat%20viewer/index.dat_viewer.htm
www.acesoft.net/index.dat%20viewer/index.dat_viewer.htm
![]() http://download.cnet.com/Index-dat-Analyzer/3000-2144_4-10564321.html
http://download.cnet.com/Index-dat-Analyzer/3000-2144_4-10564321.html
However, most forensics software will extract browser data for you. So, you should not need third-party utilities if you are using, for example, AccessData’s FTK, Guidance Software’s EnCase, or PassMark Software’s OSForensics.
In System Logs
Regardless of what operating system you are using, the operating system has logs. Those logs can be critical in any forensic investigation and you should retrieve them.
Windows Logs
Let’s start with Windows XP/Vista/7/8/8.1/10. With all of these versions of Windows, you find the logs by clicking on the Start button in the lower-left corner of the desktop and then clicking the Control Panel. You then click on Administrative Tools and double-click the Event Viewer. The following FYI outlines the logs you would check for. (Note that not all appear in every version of Windows.)
FYI: Logging
With all of these you have to turn the logging on; otherwise, there will be nothing in these logs.
![]() Security log: This is probably the most important log from a forensics point of view. It has both successful and unsuccessful login events.
Security log: This is probably the most important log from a forensics point of view. It has both successful and unsuccessful login events.
![]() Application log: This log contains various events logged by applications or programs. Many applications record their errors in the application log.
Application log: This log contains various events logged by applications or programs. Many applications record their errors in the application log.
![]() System log: This log contains events logged by Windows system components. This includes events such as driver failures. This particular log is not as interesting from a forensics perspective as the other logs are.
System log: This log contains events logged by Windows system components. This includes events such as driver failures. This particular log is not as interesting from a forensics perspective as the other logs are.
![]() Forwarded Events log: This log is used to store events collected from remote computers. This will only have data in it if event forwarding has been configured.
Forwarded Events log: This log is used to store events collected from remote computers. This will only have data in it if event forwarding has been configured.
![]() Applications and Services Logs: This log is used to store events from a single application or component rather than events that might have systemwide impact.
Applications and Services Logs: This log is used to store events from a single application or component rather than events that might have systemwide impact.
Windows servers have similar logs. However, with Windows systems you have an additional possible concern. The possibility exists that the attacker cleared the logs before leaving the system. Tools are available that will allow one to wipe out a log, such as auditpol.exe. Using auditpol \ipaddress /disable turns off logging. Then when the criminal exits he can use auditpol \ipaddress /enable to turn it back on. Tools such as WinZapper also allow one to selectively remove certain items from event logs in Windows. Simply turning off logging before an attack and turning it back on afterward is also possible.
Linux Logs
Obviously, Linux also has logs you can check. Depending on your Linux distribution and what services you have running on it (such as MySQL), some of these logs might not be present on a particular machine:
![]() /var/log/faillog: This log file contains failed user logins. This can be very important when tracking attempts to crack into the system.
/var/log/faillog: This log file contains failed user logins. This can be very important when tracking attempts to crack into the system.
![]() /var/log/kern.log: This log file is used for messages from the operating system’s kernel. This is not likely to be pertinent to most computer crime investigations.
/var/log/kern.log: This log file is used for messages from the operating system’s kernel. This is not likely to be pertinent to most computer crime investigations.
![]() /var/log/lpr.log: This is the printer log and can give you a record of any items that have been printed from this machine. That can be useful in corporate espionage cases.
/var/log/lpr.log: This is the printer log and can give you a record of any items that have been printed from this machine. That can be useful in corporate espionage cases.
![]() /var/log/mail.*: This is the mail server log and can be very useful in any computer crime investigation. E-mails can be a component in any computer crime, and even in some noncomputer crimes such as fraud.
/var/log/mail.*: This is the mail server log and can be very useful in any computer crime investigation. E-mails can be a component in any computer crime, and even in some noncomputer crimes such as fraud.
![]() /var/log/mysql.*: This log records activities related to the MySQL database server and will usually be of less interest to a computer crime investigation.
/var/log/mysql.*: This log records activities related to the MySQL database server and will usually be of less interest to a computer crime investigation.
![]() /var/log/apache2/*: If this machine is running the Apache web server, then this log will show related activity. This can be very useful in tracking attempts to hack into the web server.
/var/log/apache2/*: If this machine is running the Apache web server, then this log will show related activity. This can be very useful in tracking attempts to hack into the web server.
![]() /var/log/lighttpd/*: If this machine is running the Lighttpd web server, then this log will show related activity. This can be very useful in tracking attempts to hack into the web server.
/var/log/lighttpd/*: If this machine is running the Lighttpd web server, then this log will show related activity. This can be very useful in tracking attempts to hack into the web server.
![]() /var/log/apport.log: This records application crashes. Sometimes these can reveal attempts to compromise the system or the presence of a virus or spyware.
/var/log/apport.log: This records application crashes. Sometimes these can reveal attempts to compromise the system or the presence of a virus or spyware.
![]() /var/log/user.log: These contain user activity logs and can be very important to a criminal investigation.
/var/log/user.log: These contain user activity logs and can be very important to a criminal investigation.
Recovering Deleted Files
Criminals frequently attempt to destroy evidence, and this is also true with computer crimes. The criminals might delete files. However, you can use a variety of tools to recover such files, particularly in Windows. DiskDigger (https://diskdigger.org/) is a free tool that can be used to recover Windows files. This tool is very easy to use. More robust tools are available, but the fact that this is free and easy to use makes it perfect for students learning forensics. And again, the major forensics software programs like OSForensics, FTK, and EnCase, have built-in deleted file recovery. Let’s walk through DiskDigger’s basic operation.
On its first screen, shown in Figure 16-1, you simply select the drive/partition you want to recover files from.

FIGURE 16-1 Add a new scan
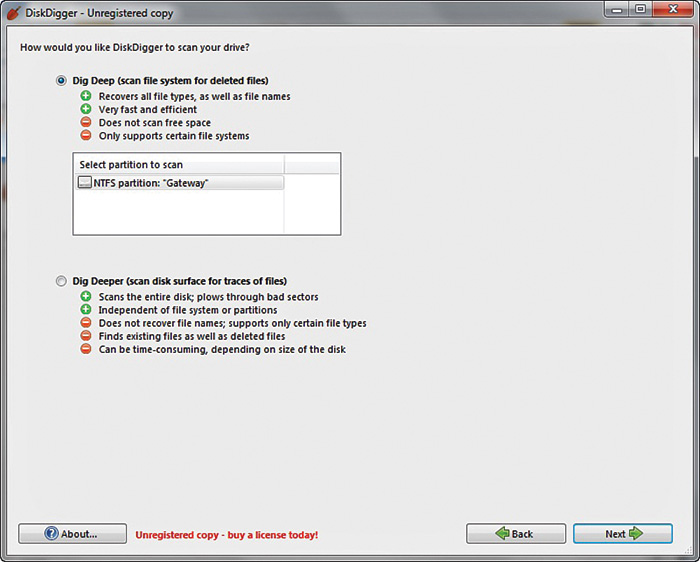
On the next screen you select the level of scan you want to do, as shown in Figure 16-2. Obviously the deeper the scan the longer it can take.
You then get a list of the files that were recovered, as shown in Figure 16-3.
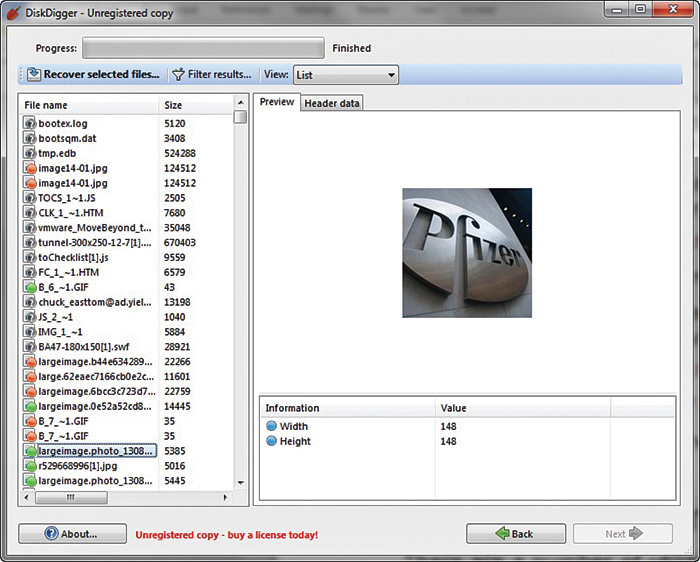
FIGURE 16-3 Recovered files
You can see the file and the file header. You can also choose to recover the file if you want. The possibility exists that DiskDigger will only recover a file fragment, but that can be enough for forensics.
Operating System Utilities
A number of utilities are built into the operating system that can be useful in gathering some forensic data. Given that Windows is the most commonly used operating system, we will focus on those utilities that work from the Windows command line. However, one of the key requirements when conducting forensics work is to be very familiar with the target operating system. You should also note that many of these commands are most useful on a live running system to catch attacks in progress.
net sessions
The net sessions command lists any active sessions connected to the computer you run it on. This can be very important if you think an attack is live and ongoing. If there are no active sessions, the utility will report that, as shown in Figure 16-4.
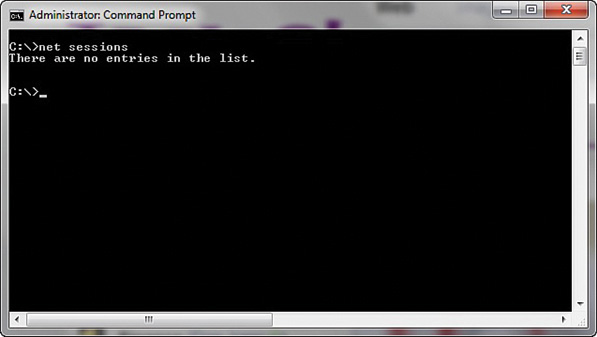
FIGURE 16-4 net sessions
openfiles
openfiles is another command useful for finding live attacks ongoing. This command lists any shared files that are currently open. You can see this utility in Figure 16-5.

FIGURE 16-5 openfiles
fc
fc is a command you can use with a forensic copy of a machine. It compares two files and shows the differences. If you think a configuration file has been altered, you can compare it to a known good backup. You can see this utility in Figure 16-6.

FIGURE 16-6 The fc command
netstat
The netstat command is also used to detect ongoing attacks. It lists all current network connections, not just inbound, but outbound as well. You can see this utility in Figure 16-7.

FIGURE 16-7 netstat
The Windows Registry
The Windows Registry is an incredible repository of potential valuable forensics information. It is the heart of the Windows machine. You can find a number of interesting pieces of data here. It is beyond the scope of this chapter to make you an expert in the Windows Registry, but it is hoped that you will continue on and learn more. One important thing you can find, from a forensics perspective, is any USB devices that have been connected to the machine.
The registry key HKEY_LOCAL_MACHINESYSTEMControlSetEnumUSBSTOR lists USB devices that have been connected to the machine. It is often the case that a criminal will move evidence to an external device and take it with him. This could indicate that there are devices you need to find and examine.
USB Information
There are other keys related to USBSTOR that provide related information. For example, SYSTEMMountedDevices allows investigators to match the serial number to a given drive letter or volume that was mounted when the USB device was inserted. This information should be combined with the information from USBSTOR in order to get a more complete picture of USB-related activities.
The registry key SOFTWAREMicrosoftWindowsCurrentVersionExplorerMountPoints2 will indicate what user was logged onto the system when the USB device was connected. This allows the investigator to associate a specific user with a particular USB device.
Wi-Fi
When an individual connects to a wireless network, the service set identifier (SSID) is logged as a preferred network connection. This information can be found in the Registry in the HKEY_LOCAL_MACHINESOFTWAREMicrosoftWZCSVCParametersInterfaces key.
The registry key HKLMSOFTWAREMicrosoftWindows NTCurrentVersionNetworkListProfiles gives you a list of all the Wi-Fi networks to which this network interface has connected. The SSID of the network is contained within the Description key. When the computer first connected to the network is recorded in the DateCreated field.
Uninstalled Software
This is a very important registry key for any forensic examination. An intruder who breaks into a computer might install software on that computer for various purposes such as recovering deleted files or creating a back door. He will then, most likely, delete the software he used. It is also possible that an employee who is stealing data might install steganography software so he can hide the data. He will subsequently uninstall that software. This key lets you see all the software that has been uninstalled from this machine: HKLMSOFTWAREMicrosoftWindowsCurrentVersionUninstall.
Gathering Evidence from a Cell Phone
In our modern times, cell phones are ubiquitous. As common as they are, it should be no surprise that cell phones might play a role in some computer crimes. As discussed in previous chapters, there are even some crimes that are primarily executed via cell phones. Sending pornographic images via cell phone is one such crime. Securing data from a suspect’s cell phone in any criminal investigation is often a good idea. Some of the kinds of data that might be retrieved and examined during a cell phone forensic investigation include
![]() Photos
Photos
![]() Videos
Videos
![]() Text messages or SMS messages
Text messages or SMS messages
![]() Call times, dialed and received calls, and call durations
Call times, dialed and received calls, and call durations
![]() Contact names and phone numbers
Contact names and phone numbers
Obviously photos, videos, and text messages could contain evidence of a crime. However, contact information can be valuable as well. You learned in the first few chapters of this book that criminals frequently work in concert. A contact list can help you track down other perpetrators.
Although dealing with the details of every model of cell phone is beyond the scope of this book, you should be aware of a few general forensics rules:
![]() Always document the cell phone make, model, and any details regarding its condition.
Always document the cell phone make, model, and any details regarding its condition.
![]() Photograph the initial screen of the phone.
Photograph the initial screen of the phone.
![]() The SIM card will be the location of most of what you need to find.
The SIM card will be the location of most of what you need to find.
Many software packages are available for getting information from a SIM card. There are several phone forensic tools available. The most widely used are:
![]() Cellebrite: https://www.cellebrite.com/en/home/
Cellebrite: https://www.cellebrite.com/en/home/
![]() MOBILedit Forensic Express: http://www.mobiledit.com/forensic-express
MOBILedit Forensic Express: http://www.mobiledit.com/forensic-express
![]() BlackBag Technologies: https://www.blackbagtech.com/
BlackBag Technologies: https://www.blackbagtech.com/
![]() Magnet Forensics: https://www.magnetforensics.com
Magnet Forensics: https://www.magnetforensics.com
![]() Oxygen Forensics: https://www.oxygen-forensic.com
Oxygen Forensics: https://www.oxygen-forensic.com
When selecting a tool, keep in mind that there are two methods for acquiring data from a phone or other mobile device: logical and physical. It is important to understand how these methods work and the differences between them, then make sure the tool you select supports the type of extraction you wish to perform.
Logical Acquisition
Logical imaging refers to copying the active file system from the device into another file. Using this method, the data from the actual device is recovered and can later be analyzed. Logical techniques are often the first type of examination forensic analysts will run because they are easier to execute. In many cases they will provide sufficient data for the case. But they won’t be enough in all cases. Physical techniques can provide far more data. The reason examiners don’t always use physical acquisition is that it is more difficult and takes considerably more time. Fortunately, many of the mobile forensics tools that support logical acquisitions will also provide a reporting mechanism.
In many cases, the tool will execute a logical acquisition of the device, and with this information, it will export commonly viewed files into a graphical user interface (GUI) or report. The problem with some of these tools is that the examiner can see the reported data, but cannot view the source of that data. It is preferable if an acquisition tool not only reports the data that was found but also allows the investigator to view the raw files from which it was derived. The overall steps involved in a logical image of a phone, regardless of the software or tool being used, include the following:
1. Run the forensic software of your choice.
2. Connect the device.
3. Begin acquiring an image. This will pull all data from the device that was explicitly backed up using Apple’s synchronization protocol (if it is an iPhone). Similar files will be retrieved as from an acquisition of a backup, except that with this method, they are being pulled directly from the device.
4. Depending on the software being used, some or all of this information will be displayed within the software and can later be exported into a report.
Physical Acquisition
Physical imaging has been widely used in forensics for many years but is relatively new to the mobile device world. Unfortunately for forensic analysts, iPhone security mechanisms prevent us from being able to extract a physical image from a stock device without first gaining privileged access. A physical acquisition creates a physical bit-by-bit copy of the file system, similar to the way a hard drive would be forensically imaged. For this reason, it has the greatest potential to recover large amounts of data, including deleted files.
Chip-off and JTAG
The chip-off technique describes the practice of removing a memory chip, or any chip, from a circuit board and reading it: literally unsoldering it. This necessitates specialized equipment to read the chip.
The IEEE Joint Test Action Group (JTAG) method is a less extreme method but still requires some specialized equipment. Mobile devices that are implementing the BGA-style memory incorporate JTAG for test and debugging. That means the JTAG ports can be used to retrieve a physical image of the data without requiring the removal of the chip. Essentially you are taking advantage of communications directly with the chip that were designed for engineers testing the device. Cellebrite now supports JTAG and there are a variety of JTAG kits one can purchase.
Cellular Networks
In addition to understanding the cell phones themselves, it is necessary to understand the networks. All cell phone networks are based on radio towers. The strength of that radio signal is purposefully regulated to limit its range. Each cell tower base station consists of an antenna and radio equipment. Below is a brief description of the different types of networks.
GSM: Global System for Mobile Communications
This is an older technology, what is commonly called 2G. This is a standard developed by the European Telecommunications Standards Institute (ETSI). Originally GSM was developed just for digital voice, but was expanded to include data. GSM operates at many different frequencies, but the most common are 900 MHz and 1800 MHz. In Europe most 3G networks use the 2100 MHz frequency.
EDGE: Enhanced Data Rates for GSM Evolution
Many consider this an in-between level between 2G and 3G. It is technically considered pre-3G but was an improvement on GSM (2G). It was specifically designed to deliver media such as television over the cellular network.
UMTS: Universal Mobile Telecommunications System
This is 3G and is essentially an upgrade to GSM (2G). UMTS provides text, voice, video, and multimedia at data rates up to and possibly higher than 2 megabits per second (Mbps).
LTE: Long Term Evolution
LTE is what is commonly called 4G. LTE provides broadband internet, multimedia, and voice. LTE is based on the GSM/EDGE technology. It can, theoretically support speeds of 300 Mbps. Unlike GSM and GSM-based networks, LTE is based in IP, just like a typical computer network.
Cell Phone Terms
There are some basic devices and terminology you will need to know when working with cell phones. Some of these, such as SIM, are probably at least somewhat familiar to you.
Subscriber Identity Module (SIM)
This SIM is the heart of the phone. It is a circuit, usually a removable chip. The SIM is how you identify a phone. If you change the SIM in a phone, you change the phone’s identity. The SIM stores the International Mobile Subscriber Identity (IMSI). The IMSI, which we will discuss in detail next, uniquely identifies a phone. So if you change the SIM, you effectively change the IMSI, and thus change the phone’s identity. This SIM will also usually have network information, services the user has access to, and two passwords. Those passwords are the personal identification number (PIN) and the personal unblocking code (PUK). The PUK is a code used to reset a forgotten PIN. However, using the code wipes the phone and resets it to its factory state, thus destroying any forensic evidence. If the code is entered incorrectly ten times in a row, the device becomes permanently blocked and unrecoverable.
International Mobile Subscriber Identity (IMSI)
The IMSI is usually a 15-digit number but can be shorter in some cases (some countries use a shorter number). It is used to uniquely identify a phone. The first three digits are a mobile country code (MCC), and the next digits represent the mobile network code. In North America that is three digits, and in Europe it is two digits. The remaining digits are the mobile subscription identifier number (MSIN) that identifies the phone within a given network. To prevent tracking and cloning, the IMSI is only sent rarely. Instead a temporary value or TMSI is generated and sent.
ICCID: Integrated Circuit Card Identification
While the IMSI is used to identify the phone, the SIM chip itself is identified by the ICCID. The ICCID is engraved on the SIM during manufacturing, so it cannot be removed. The first seven digits identify the country and issuer, and are called the Issuer Identification Number (IIN). After that is a variable-length number that identifies this chip/SIM, then a check digit.
International Mobile Equipment Identity (IMEI)
This number is a unique identifier used to identify GSM, UMTS, LTE, and satellite phones. It is printed on the phone, often inside the battery compartment. You can display it on most phones by entering #06# on the dial pad. Using this number, a phone can be “blacklisted” or prevented from connecting to a network. This works even if the user changes the SIM card.
Forensic Tools to Use
There are many forensic tools to choose from, but some are more widely used than others. In this section we will discuss tools that are widely used.
AccessData Forensic Toolkit
AccessData FTK is a very popular computer forensic tool. It is able to deliver analysis, decryption, and password cracking all within an intuitive, customizable, and user-friendly interface. Two very important features of this tool are its ability to analyze the Windows Registry and its ability to crack passwords. The Windows Registry is where Windows stores all information regarding any programs installed. This includes viruses, worms, Trojan horses, hidden programs, and spyware. The ability to effectively and efficiently scan the registry for evidence is critical. The ability to break passwords for common applications is important. Evidence might be stored in a password-protected Adobe PDF, Excel spreadsheet, or other application. FTK can crack passwords from more than 100 commonly used applications.
Another feature about this toolkit is its distributed processing ability. Scanning an entire hard drive, searching the registry, and doing a complete forensic analysis of a computer can be a very time-intensive task. With FTK that processing and analysis can be distributed on up to three computers. This lets all three computers process the analysis in tandem, thus significantly speeding up the forensics process.
FTK is also available for the Macintosh. Many commercial products are only available for Windows, and the open source community usually focuses on Unix and Linux, so the Macintosh compatibility is very important. In addition to that, FTK has an Explicit Image Detection add-on that automatically detects pornographic images, useful in cases involving allegations of child pornography. More information on FTK is available at https://accessdata.com/products-services/forensic-toolkit-ftk.
EnCase
EnCase from Guidance Software is a well-known, well-respected tool. Guidance Software has been in business for many years, and their tool is widely used by law enforcement. The tool is rather expensive, and can have a steep learning curve, but is very effective. You can find out more at https://www.guidancesoftware.com/.
The Sleuth Kit
The Sleuth Kit (TSK) is a collection of command-line tools that are available as a free download. You can get them from this site, http://www.sleuthkit.org/sleuthkit/, as well as others. This toolset is not as feature rich nor as easy to use as EnCase, but can be a good option for a budget-conscious agency. The most obvious of the utilities included is ffind.exe.
There are options to search for a given file or to search for only deleted versions of a file. This particular utility is best used when you know the specific file you are searching for. It is not a good option for a general search. A number of utilities are available in The Sleuth Kit; however, many readers might find using command-line utilities to be cumbersome. Fortunately, a GUI has been created for The Sleuth Kit named Autopsy: http://www.sleuthkit.org/autopsy/.
OSForensics
OSForensics is a very robust and easy to use tool, and is also affordable. You can even download a free trial from https://www.osforensics.com/. Many forensic tools don’t give you a free trial, and many cost thousands of dollars. This tool has a 30-day free trial, and the full version is under $1000 USD. More importantly it is very easy to use, and they have free videos on their website to help you, as well as an online course. The course is not free, but is very affordable and includes OSForensics certifications.
Forensic Science
Regardless of what tool you use, or why you are doing forensics (incidence response, criminal investigation, etc.) it is important to understand that forensics is a science, and must be conducted as such. The scientific method starts with formulating a hypothesis. That hypothesis is a question that can be tested. Non-testable questions have no place in science. Once you have performed the test, you have a fact. Once you have performed many tests, you will have many facts. The explanation for all of those facts is a theory. This is very different from the colloquial use of the word theory, which often denotes a guess.
In digital forensics each test establishes some fact. Let’s assume you are investigating a network virus outbreak. One test might show a virus was downloaded to a specific workstation at a specific time. That is a fact. But you cannot yet develop a theory. You cannot decide this was something intentional on the part of that employee, part of some nefarious plot by foreign hackers, or any other sort of attack. You just don’t have enough facts yet. You will need to conduct many more tests, and accumulate more data. When you have a sufficient body of data, now you can form a theory of the incident.
One legal principle that is key to doing forensics in a scientifically sound manner, and is all too often overlooked in forensic books, is the Daubert standard. The Legal Information Institute at Cornell University Law School defines the Daubert standard as follows:
Standard used by a trial judge to make a preliminary assessment of whether an expert’s scientific testimony is based on reasoning or methodology that is scientifically valid and can properly be applied to the facts at issue. Under this standard, the factors that may be considered in determining whether the methodology is valid are: (1) whether the theory or technique in question can be and has been tested; (2) whether it has been subjected to peer review and publication; (3) its known or potential error rate; (4) the existence and maintenance of standards controlling its operation; and (5) whether it has attracted widespread acceptance within a relevant scientific community.
What this means, in layman’s terms, is that any scientific evidence presented in a trial has to have been reviewed and tested by the relevant scientific community. For a computer forensic investigator, that means that any tools, techniques, or processes you utilize in your investigation should be ones that are widely accepted in the computer forensics community. You cannot simply make up new tests or procedures.
To Certify or Not to Certify?
Certifications are a controversial topic in IT in general, and specifically in security. Some people will tell you that certifications are completely useless, whereas others will tell you that they are the most important things to look for. I think the controversy stems from misunderstanding what certifications are, and this leads to these extreme views. First, understand that a certification, in and of itself, does not make you an expert. A certification indicates you have demonstrated at least a minimum level of competence according to some set of criteria. If you understand that, then you can accept that a certification can be useful in determining if someone has a minimal skillset, but it cannot determine that person is an expert. In forensics, it is always possible that your investigation will lead to some court proceedings. These can be civil or even criminal. I have personally been involved in multiple cases that began as a simple internal incident investigation and became civil litigation and even criminal trials. With that in mind, having a certification or two will help show the court that you actually know forensics. The following list provides a general view of several major certifications in computer forensics:
![]() Computer Hacking Forensic Investigator (CHFI): This certification from the EC-Council tests general forensic knowledge; it is not specific to a particular tool. For more information about this certification, go to https://www.eccouncil.org/programs/computer-hacking-forensic-investigator-chfi/.
Computer Hacking Forensic Investigator (CHFI): This certification from the EC-Council tests general forensic knowledge; it is not specific to a particular tool. For more information about this certification, go to https://www.eccouncil.org/programs/computer-hacking-forensic-investigator-chfi/.
![]() Certified Forensic Computer Examiner (CFCE): This certification is from the International Association of Computer Investigative Specialists (IACIS). It is also a general knowledge test rather than a specific tool test. See https://www.iacis.com/2016/02/23/cfce/ for details.
Certified Forensic Computer Examiner (CFCE): This certification is from the International Association of Computer Investigative Specialists (IACIS). It is also a general knowledge test rather than a specific tool test. See https://www.iacis.com/2016/02/23/cfce/ for details.
![]() SANS certifications: The SANS Institute has a number of forensics certifications, including GIAC Certified Forensic Analyst (GCFA), GIAC Certified Forensic Examiner (GCFE), and others. The SANS Institute certifications are very well-respected in the industry, but they are also the single most expensive classes and certifications in all of IT. Check out https://www.giac.org/certifications/digital-forensics for an overview of the various forensics certifications that are available.
SANS certifications: The SANS Institute has a number of forensics certifications, including GIAC Certified Forensic Analyst (GCFA), GIAC Certified Forensic Examiner (GCFE), and others. The SANS Institute certifications are very well-respected in the industry, but they are also the single most expensive classes and certifications in all of IT. Check out https://www.giac.org/certifications/digital-forensics for an overview of the various forensics certifications that are available.
![]() Tool certifications: The preceding certifications are all general forensic knowledge. If you intend to use a specific tool, it is worthwhile to be certified in that tool. All the major tool products (OSForensics, FTK, EnCase, Cellebrite, etc.) have certifications in their tool.
Tool certifications: The preceding certifications are all general forensic knowledge. If you intend to use a specific tool, it is worthwhile to be certified in that tool. All the major tool products (OSForensics, FTK, EnCase, Cellebrite, etc.) have certifications in their tool.
Summary
This chapter covered the basics of computer forensics. The most important things you have learned are to first make a forensic copy to work with, and second, to document everything. You simply cannot overdocument an incident. You have also learned how to retrieve browser information and recover deleted files, as well as some commands that might be useful forensically. Finally, you learned the forensics value of the Windows Registry.
Test Your Skills
MULTIPLE CHOICE QUESTIONS
1. In a computer forensic investigation, what describes the route that evidence takes from the time you find it until the case is closed or goes to court?
A. Rules of evidence
B. Law of probability
C. Chain of custody
D. Policy of separation
2. Where does Linux store e-mail server logs?
A. /var/log/mail.*
B. /etc/log/mail.*
C. /mail/log/mail.*
D. /server/log/mail.*
3. Why should you note all cable connections for a computer you want to seize as evidence?
A. To know what outside connections existed
B. In case other devices were connected
C. To know what peripheral devices exist
D. To know what hardware existed
4. What is in the index.dat file?
A. Internet Explorer information
B. General Internet history, file browsing history, and so on for a Windows machine
C. All web history for Firefox
D. General Internet history, file browsing history, and so on for a Linux machine
5. What is the name of the standard Linux command that is also available as a Windows application that can be used to create bitstream images and make a forensic copy?
A. mcopy
B. image
C. MD5
D. dd
6. When cataloging digital evidence, the primary goal is to do what?
A. Make bitstream images of all hard drives
B. Preserve evidence integrity
C. Not remove the evidence from the scene
D. Not allow the computer to be turned off
7. The command openfiles shows what?
A. Any files that are opened
B. Any shared files that are opened
C. Any system files that are opened
D. Any files open with ADS
8. “Interesting data” is what?
A. Data relevant to your investigation
B. Pornography
C. Documents, spreadsheets, and databases
D. Schematics or other economic-based information
9. Which of the following are important to the investigator regarding logging?
A. The logging methods
B. Log retention
C. Location of stored logs
D. All of the above
EXERCISES
EXERCISE 16.1: DiskDigger
Download DiskDigger (https://diskdigger.org/download) and search your computer for deleted files. Attempt to recover one file of your choice.
EXERCISE 16.2: Making a Forensic Copy
This exercise requires two computers. You must also download either Kali Linux (formerly Backtrack) or Knoppix (both are free), and then attempt to make a forensic copy of computer A by sending its data to computer B.
PROJECTS
PROJECT 15:1
Download a trial of OSForensics from https://www.osforensics.com/download.html. Examining your own computer, perform the following:
1. Select Recent Activity from the menu on the left.
2. Choose Live Acquisition of Current Machine. Do not select any configuration or filters.
3. Click the Scan button.
4. Notice that the results come primarily from the Windows Registry. First, see which registry keys you remember from the lesson on Windows Registry.
5. Review the items you found. You should be seeing recent browser history, USB, mounted volumes, and more. Take several minutes to familiarize yourself with the output.
6. Now repeat the search, but first use the Config button to do a search only for USB devices and mounted volumes. When that search has completed, review the findings.
7. Now repeat the search, but first use the Config button to do a search only for browser data. When that search has completed, review the findings.
PROJECT 16:2
Examining your own computer with your trial copy of OSForensics, perform the following:
1. Select Deleted Files Search from the menu on the left. Do not use any filters.
2. When the Deleted File List is complete, select two or three files that have a green icon, and attempt to recover them to your desktop. You do this by right clicking on the file(s) in question and selecting Save Deleted File.
3. Select several files, then right-click and select Add to Case.
4. Now repeat your deleted file recovery, but this time use the Config button to include only files that are excellent and smaller than 5000 KB.
5. Select several files, then right click and select Add to Case.