
7. Landscape Photography

Tips, Tools, and Techniques to Get the Most Out of Your Landscape Photography
There has always been something about shooting landscapes that has brought a sense of joy to my photography. It might have something to do with being outdoors and working at the mercy of Mother Nature. Maybe it’s the way it challenges me to visualize the landscape and try to capture it with my camera. It truly is a celebration of light, composition, and the world we live in.
In this chapter, we will explore some of the features of the D3100 that not only improve the look of your landscape photography, but also make it easier to take great shots. We will also explore some typical scenarios and discuss methods to bring out the best in your landscape photography.
Poring Over the Picture
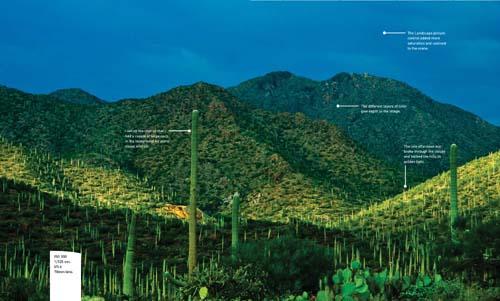
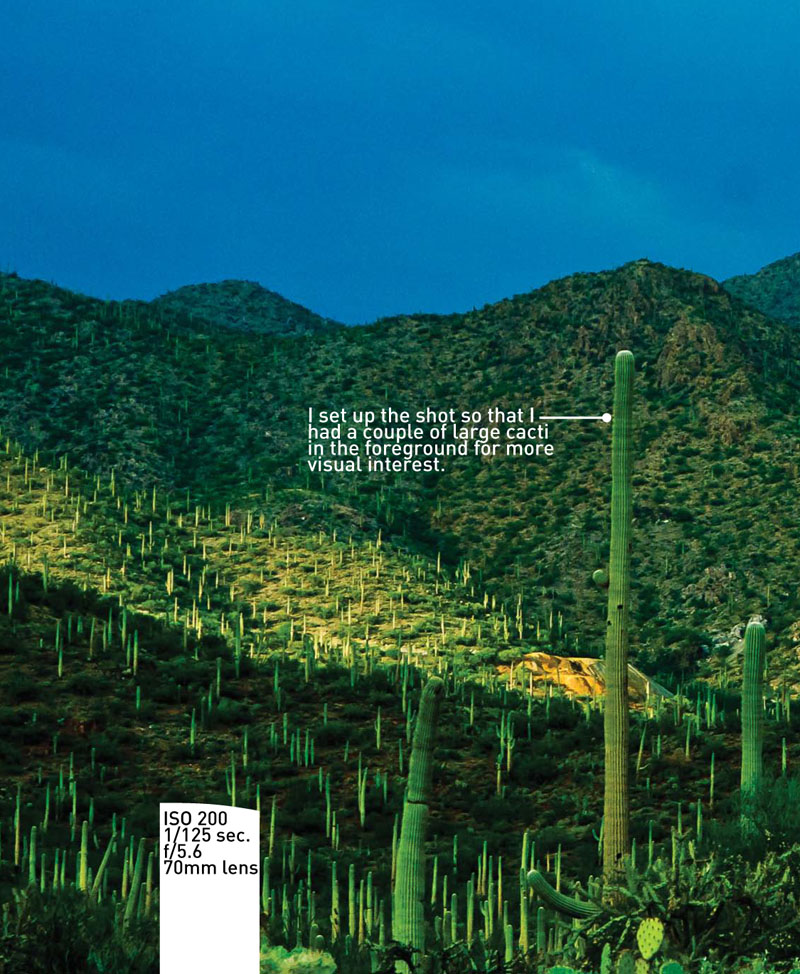
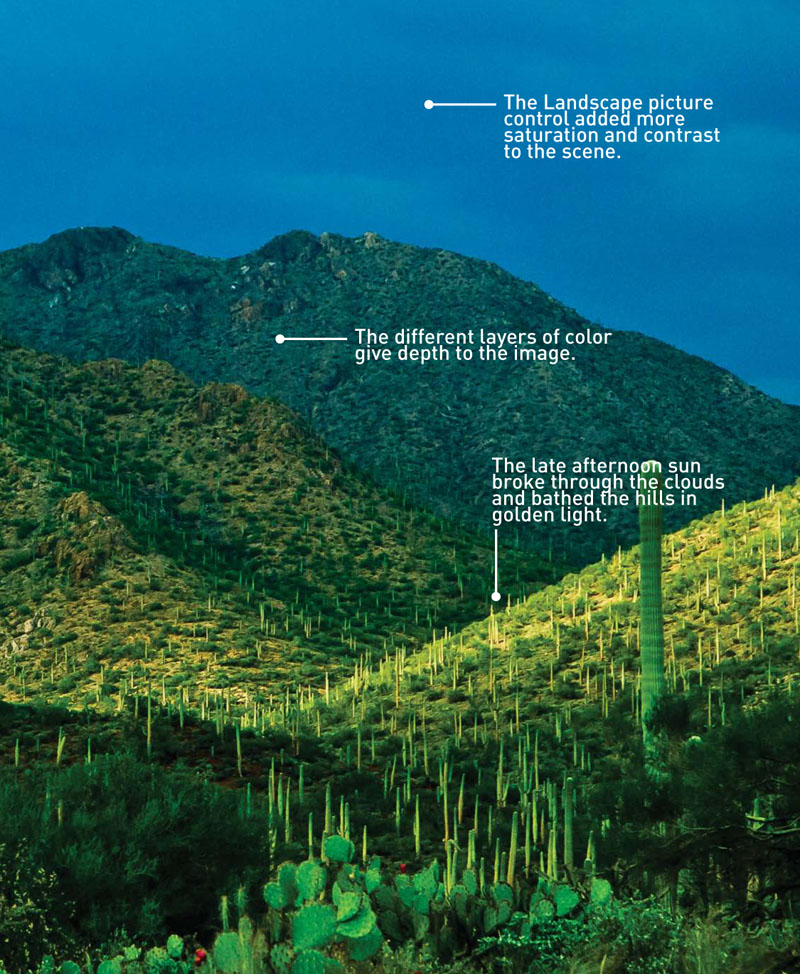
During a visit to the state of Arizona, I had several locations that I knew I wanted to visit. One of those locations was Saguaro National Park near Tucson. Specifically, I went there to photograph the Saguaro cactus. It is an icon for the Southwest and I knew it would provide me with some great photographic opportunities. It just so happened that the day I visited, a large summer storm rolled by and gave me a very dramatic background for some sunset shots.
Poring Over the Picture
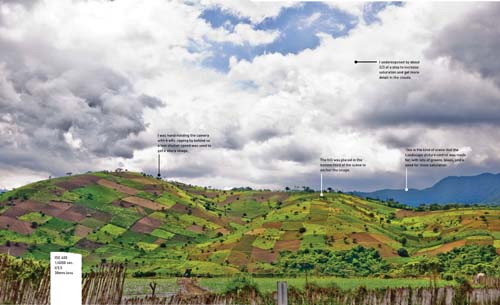
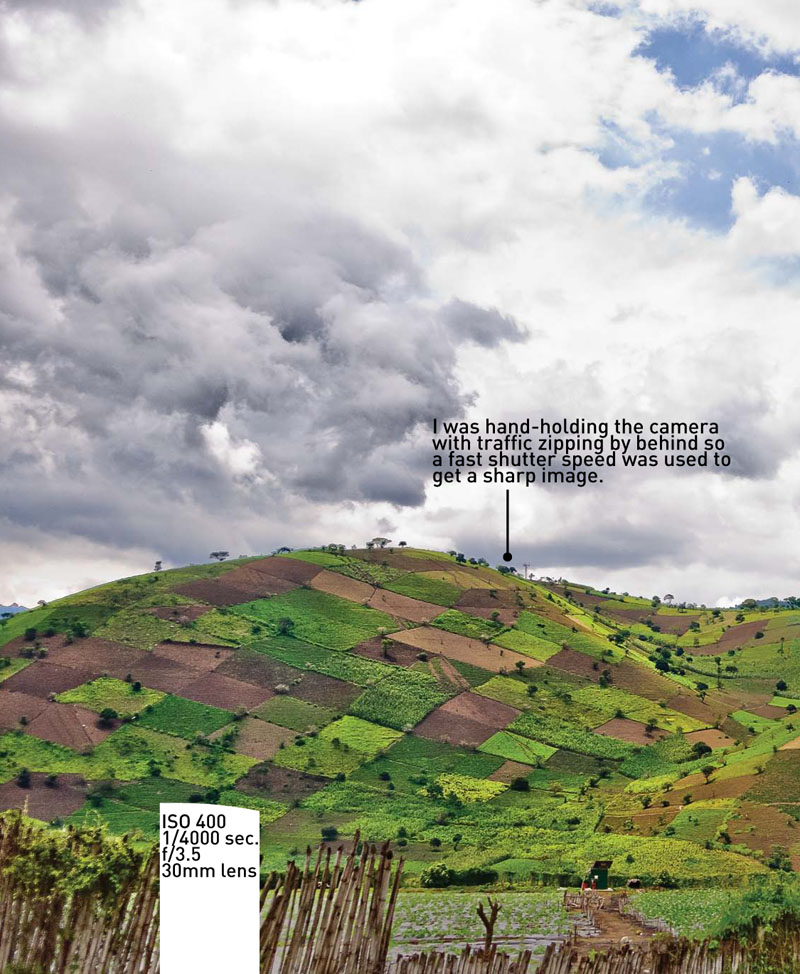
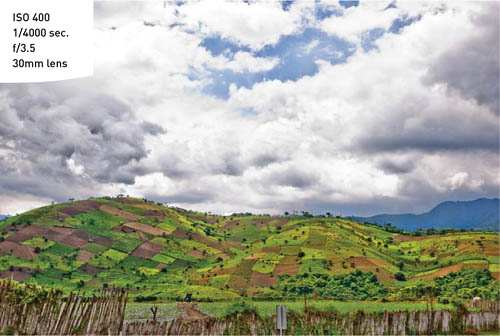
Sometimes the best shots come from unexpected locations. This is why it’s always great to have your own transportation when traveling from place to place. That way, if you see something unexpected along the way, you can stop and get your shot right then and there. That was the case with this image. I didn’t plan on finding this hillside covered in a patchwork of color. But when I did see it, you can bet that the next thing I looked for was a place to pull over.

Sharp and In Focus: Using Tripods
Throughout the previous chapters we have concentrated on using the camera to create great images. We will continue that trend through this chapter, but there is one additional piece of equipment that is crucial in the world of landscape shooting: the tripod. There are a couple of reasons why tripods are so critical to your landscape work, the first being the time of day that you will be working. For reasons that will be explained later, the best light for most landscape work happens at sunrise and just before sunset. While this is the best time to shoot, it’s also kind of dark. That means you’ll be working with slow shutter speeds. Slow shutter speeds mean camera shake. Camera shake equals bad photos.
The second reason is also related to the amount of light that you’re gathering with your camera. When taking landscape photos, you will usually want to be working with very small apertures, as they give you lots of depth of field. This also means that, once again, you will be working with slower-than-normal shutter speeds.
Slow shutter = camera shake = bad photos.
Do you see the pattern here? The one tool in your arsenal to truly defeat the camera shake issue and ensure tack-sharp photos is a good tripod (Figure 7.1).
Figure 7.1. A sturdy tripod is the key to sharp landscape photos.
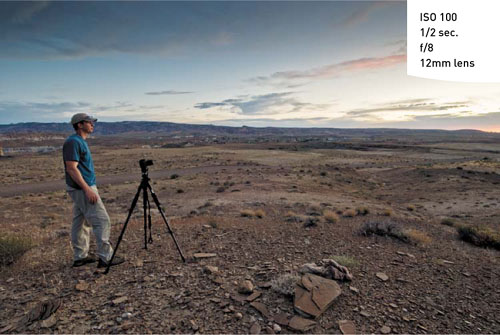
(Photo: Scott Kelby)
So what should you look for in a tripod? Well, first make sure it is sturdy enough to support your camera and any lens that you might want to use. Next, check the height of the tripod. Bending over all day to look through the viewfinder of a camera on a short tripod can wreak havoc on your back. Finally, think about getting a tripod that utilizes a quick-release head. This usually employs a plate that screws into the bottom of the camera and then quickly snaps into place on the tripod. This will be especially handy if you are going to move between shooting by hand and using the tripod. You’ll find more information about tripods in the bonus chapter.
Selecting the Proper ISO
When shooting most landscape scenes, the ISO is the one factor that should only be increased as a last resort. While it is easy to select a higher ISO to get a smaller aperture, the noise that it can introduce into your images can be quite harmful. The noise is not only visible as large grainy artifacts; it can also be multi-colored, which further degrades the image quality and color balance.
Take a look at Figures 7.3 and 7.4, which show a photograph taken with an ISO of 1600. The purpose was to shorten the shutter speed and still use a small aperture setting of f/22. The problem is that the noise level is so high that, in addition to being distracting, it is obscuring fine details in the canyon wall.
Figure 7.3. A high ISO setting created a lot of digital noise in the shadows.
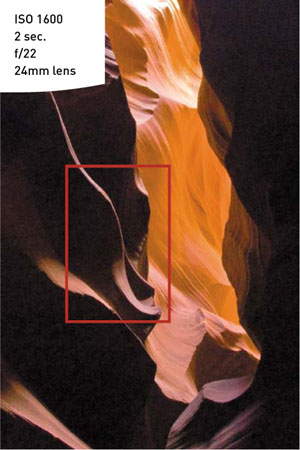
Figure 7.4. When the image is enlarged, the noise is even more apparent.

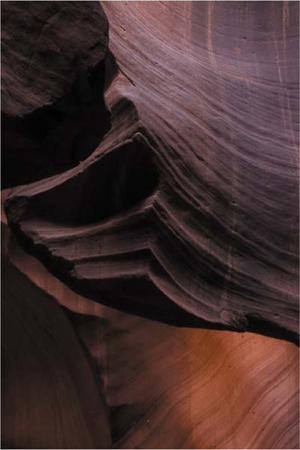
Now check out another image that was taken in the same canyon light but with a much lower ISO setting (Figures 7.5 and 7.6). As you can see, the noise levels are much lower, which means that my blacks look black, and the fine details are beautifully captured.
Figure 7.5. By lowering the ISO to 100, I was able to avoid the noise and capture a clean image.
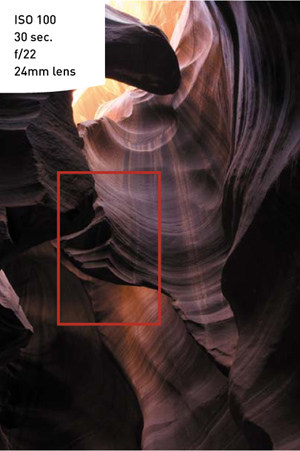
Figure 7.6. Zooming in shows that the noise levels for this image are almost nonexistent.
When shooting landscapes, set your ISO to the lowest possible setting at all times. Between the use of Vibration Reduction lenses (if you are shooting handheld) and a good tripod, there should be few circumstances where you would need to shoot landscapes with anything above an ISO of 400.
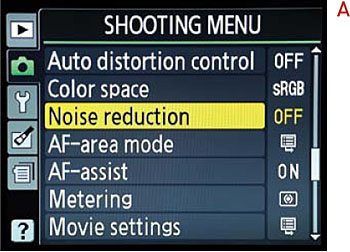
As you start shooting with shutter speeds that exceed one second, the level of image noise can increase. Your camera has a feature called Noise Reduction that you can turn on to combat noise from long exposures and high ISOs.
Setting Up Noise Reduction
- Press the Menu button, then use the Multi-selector to get to the Shooting Menu.
- Using the Multi-selector, locate the Noise reduction menu item and then press OK (A). Change this option to On (B) and press the OK button.

That’s all there is to it. Now when you shoot, your camera will be aware of the settings and work towards minimizing unwanted noise in your images.
Selecting a White Balance
This probably seems like a no-brainer. If it’s sunny, select Daylight. If it’s overcast, choose the Shade or Cloudy setting. Those choices wouldn’t be wrong for those circumstances, but why limit yourself? Sometimes you can actually change the mood of the photo by selecting a white balance that doesn’t quite fit the light for the scene that you are shooting.
Figure 7.7 is an example of a correct white balance. It was late afternoon and the sun was starting to move low in the sky, giving everything that warm afternoon glow. The white balance for this image was set to Daylight.
Figure 7.7. Using the “proper” white balance yields predictable results.
But what if I want to make the scene look like it was shot in the early morning hours? Simple, I just change the white balance to Fluorescent, which is a much cooler setting (Figure 7.8).
Figure 7.8. Changing the white balance to Fluorescent gives the impression that the picture was taken at a different time of day than it really was.
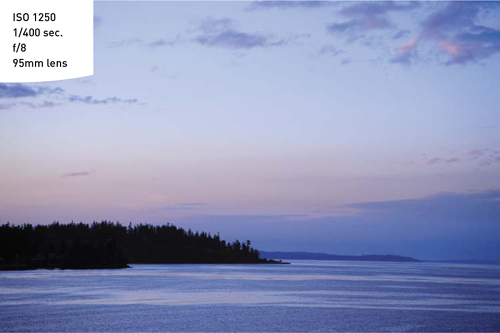
So how do you know what a good white balance selection is? You could just take a guess, but the easiest way is to take a shot, review it on the LCD, and keep the one you like. Of course, you would need to take one for each white balance setting, which means that you would have to change the white balance using the menu or info edit screen (i button). There is, of course, an easier way to preview the white balance without ever taking a shot. Just turn on your Live View and change the white balance setting while previewing the effect on the LCD screen. You’ll need to set up a shortcut to bring up the white balance selection by using the Function (Fn) button.
Customizing the Function Button for White Balance
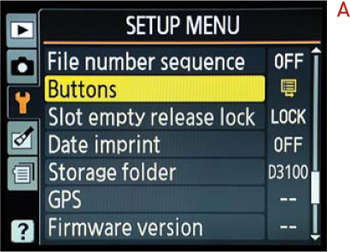
- Press the Menu button and use the Multi-selector to access the Setup Menu.
- Now highlight the item called Buttons and press OK (A).
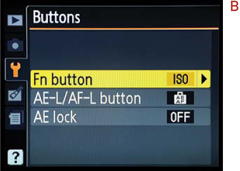
- Select the Fn button and press OK (B).
- Now select White balance and press OK (C).
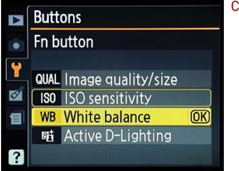
Now you can quickly change the white balance setting by holding in the Function button and spinning the Command dial with your thumb.
Using the Landscape Picture Control
When shooting landscapes, I always look for great color and contrast. This is one of the reasons that so many landscape shots are taken in the early morning or during sunset. The light is much more vibrant and colorful at these times of day and adds a sense of drama to an image. There are also much longer and deeper shadows due to the angle of the light. These shadows are what give depth to your image.
You can help boost the vibrancy and contrast, especially in the less-than-golden hours of the day, by using the Landscape picture control (Figure 7.9). Just as in the Landscape mode found in the automatic scene modes, you can set up your landscape shooting so that you capture images with increased sharpness and a slight boost in blues and greens. This control will add some pop to your landscapes without the need for additional processing in any software.
Figure 7.9. Using the Landscape picture control can add sharpness and more vivid color to skies and vegetation.
Setting Up the Landscape Picture Control
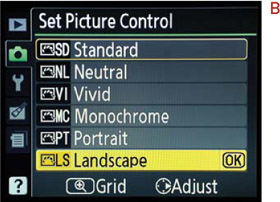
- Press the Menu button, then use the Multi-selector to highlight the Set Picture Control item found in the Shooting Menu (this is normally set to SD [Standard]) and then press OK (A).
- Now use the Multi-selector to scroll down to the Landscape option and press OK to lock in your change (B).

The camera will now apply the Landscape picture control to all of your photos. This style will be locked in to the camera even after turning it off and back on again, so make sure to change it back to Standard when you are done with your landscape shoot.
Taming Bright Skies with Exposure Compensation
Balancing exposure in scenes that have a wide contrast in tonal ranges can be extremely challenging. The one thing you should try to avoid is overexposing your skies to the point of blowing out your highlights (unless, of course, that is the look you are going for). It’s one thing to have white clouds, but it’s a completely different and bad thing to have no detail at all in those clouds. This usually happens when the camera is trying to gain exposure in the darker areas of the image (Figure 7.10). The one way to tell if you have blown out your highlights is to turn on the Highlight Alert, or “blinkies,” feature on your camera (see the “How I Shoot” section in Chapter 4). When you take a shot where the highlights are exposed beyond the point of having any detail, that area will blink in your LCD display. It is up to you to determine if that particular area is important enough to regain detail by altering your exposure. If the answer is yes, then the easiest way to go about it is to use some exposure compensation.
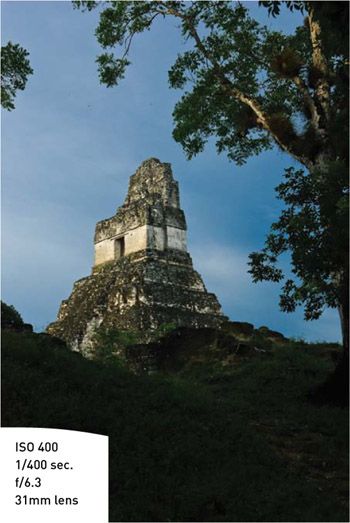
Figure 7.10. The trees in the foreground are properly exposed but the temple and sky look washed out and lack saturation.

With this feature, you can force your camera to choose an exposure that ranges, in 1/3-stop increments, from five stops over to five stops under the metered exposure (Figure 7.11).
Figure 7.11. A compensation of 1 2/3 stops of underexposure brought back the color and detail in the highlights.
Using Exposure Compensation to Regain Detail in Highlights
- Activate the camera meter by lightly pressing the shutter release button.
- Using your index finger, press and hold the Exposure Compensation button to change the over-/underexposure setting by rotating the Command dial.
- Rotate the Command dial to the right one click and take another picture (each click of the Command dial is a 1/3-stop exposure change).
- If the blinkies are gone, you are good to go. If not, keep subtracting from your exposure by 1/3 of a stop until you have a good exposure in the highlights.
I generally keep my camera set to –1/3 stop for most of my landscape work unless I am working with a location that is very dark or low key.
You can also change the Exposure Compensation setting by using the i button on the rear of the camera.
Adjusting Exposure Compensation Using the I Button
- Press the i button to activate the cursor in the information display.
- Use the Multi-selector to move the cursor to the Exposure Compensation position and press OK.
- Now press in a downward direction on the Multi-selector to lower the compensation by 1/3 of a stop. Each press downward will continue to reduce the exposure in 1/3-stop increments for up to five stops (although I rarely need to go past one stop).
It should be noted that any exposure compensation will remain in place even after turning the camera off and then on again. Don’t forget to reset it once you have successfully captured your image. Also, exposure compensation only works in the Program, Shutter Priority, Aperture Priority, and Manual modes. Changing between these four modes will hold the compensation you set while switching from one to the other. When you change the Mode dial to one of the automatic scene modes, the compensation will set itself to zero.
If you want to use exposure compensation while using the Manual shooting mode, you need to use the i button method described above to make the change. This is due to the fact that the Exposure Compensation button acts as the Aperture Change button when the mode is set to Manual.
Shooting Beautiful Black and White Landscapes
There’s nothing as timeless as a beautiful black and white landscape photo. For many, it is the purest form of photography. The genre conjures up thoughts of Ansel Adams out in Yosemite Valley, capturing stunning monoliths with his 8×10 view camera. Well, just because you are shooting with a digital camera doesn’t mean you can’t create your own stunning photos using the power of the Monochrome picture control. (See the “Classic Black and White Portraits” section in Chapter 6 for instructions on setting up this feature.) Not only can you shoot in black and white, you can also customize the camera to apply built-in filters to lighten or darken different elements within your scene, as well as add contrast and definition.
The four filter colors are red, yellow, green, and orange. The most typically used filters in black and white photography are red and yellow. This is because the color of these filters will darken opposite colors and lighten similar colors. So if you want to darken a blue sky, you would use a yellow filter because blue is the opposite of yellow. To darken green foliage, you would use a red filter. Check out the series of shots in Figure 7.12 with different filters applied.
Figure 7.12. Adding color filter settings to the Monochrome picture control allows you to lighten or darken elements in your scene. The top right image has no filter applied to it. The bottom left has a green filter, and the bottom right has a yellow filter.
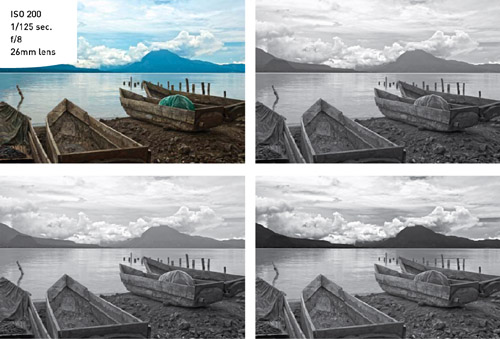
You can see that there is no real difference in contrast between the color and the black and white image with no filter. The green filter has the effect of darkening the skies slightly and giving a significantly lighter look to the vegetation. Using the yellow filter makes the vegetation darker but dramatically darkens the sky. There is no right or wrong to choosing a filter for your black and white shots. It’s pretty much whatever you prefer. In this instance, I think I prefer the image with the green filter.
Other options in the Monochrome picture control enable you to adjust the sharpness, contrast, and even add some color toning like Sepia to the final image. This information is also in the “Classic Black and White Portraits” section of Chapter 6. I like to have Sharpness set to 5 and Contrast set to +1 for my landscape images. This gives an overall look to the black and white image that is reminiscent of the classic black and white films. Experiment with the various settings to find the combination that is most pleasing to you.
The Golden Light
If you ask any professional landscape photographer what their favorite time of day to shoot is, chances are they will tell you it’s the hours surrounding daybreak and sunset (Figures 7.13 and 7.14). The reason for this is that the light is coming from a very low angle to the landscape, which creates shadows and gives depth and character. There is also a quality to the light that seems cleaner and is more colorful than the light you get when shooting at midday. One thing that can dramatically improve any morning or evening shot is the presence of clouds. The sun will fill the underside of the clouds with a palette of colors and add drama to your image.
Figure 7.13. The right subject can come alive with color during the few minutes after sunrise.
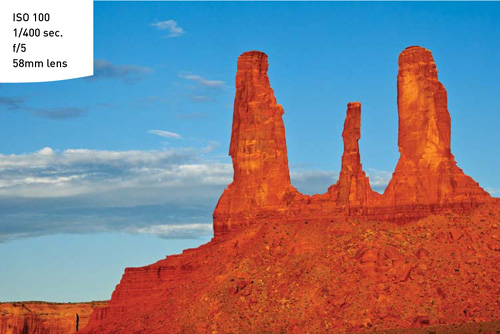
Figure 7.14. Late afternoon sun is usually warmer and adds drama and warmth to the landscape.

Where to Focus
Large landscape scenes are great fun to photograph, but they can present a problem: where exactly do you focus when you want everything to be sharp? Since our goal is to create a great landscape photo, we will need to concentrate on how to best create an image that is tack sharp, with a depth of field that renders great focus throughout the scene.
I have already stressed the importance of a good tripod when shooting landscapes. The tripod lets you concentrate on the aperture portion of the exposure without worrying how long your shutter will be open. This is because the tripod provides the stability to handle any shutter speed you might need when shooting at small apertures. I find that for most of my landscape work I set my camera to Aperture Priority mode and the ISO to 100 (for a clean, noise-free image).
However, shooting with the smallest aperture on your lens doesn’t necessarily mean that you will get the proper sharpness throughout your image. The real key is knowing where in the scene to focus your lens to maximize the depth of field for your chosen aperture. To do this, you must utilize something called the “hyper focal distance” of your lens.
Hyper focal distance, also referred to as HFD, is the point of focus that will give you the greatest acceptable sharpness from a point near your camera all the way out to infinity. If you combine good HFD practice in combination with a small aperture, you will get images that are sharp to infinity.
There are a couple of ways to do this, and the one that is probably the easiest, as you might guess, is the one that is most widely used by working pros. When you have your shot all set up and composed, focus on an object that is about one-third of the distance into your frame (Figure 7.15). It is usually pretty close to the proper distance and will render favorable results. When you have the focus set, take a photograph and then zoom in on the preview on your LCD to check the sharpness of your image.
Figure 7.15. To get maximum focus from near to far, the focus was set one-third of the way into the scene, on the trees to the right. I then recomposed before taking the picture. using this point of focus with an aperture of f/16 gave me a sharply focused image all the way back to the distant volcano. This is another excellent place to use the AF-S focus mode as well.
One thing to remember is that as your lens gets wider in focal length, your HFD will be closer to the camera position. This is because the wider the lens, the greater depth of field you can achieve. This is yet another reason why a good wide angle lens is indispensable to the landscape shooter.
Easier Focusing
There’s no denying that the automatic focus features on the D3100 are great, but sometimes it just pays to turn them off and focus manually. This is especially true if you are shooting on a tripod: once you have your shot composed in the viewfinder and you are ready to focus, chances are that the area you want to focus on is not going to be in the area of one of the focus points. Often this is the case when you have a foreground element that is fairly low in the frame. You could use a single focus point set low in your viewfinder and then pan the camera down until it rests on your subject. But then you would have to press the shutter button halfway to focus the camera and then try to recompose and lock down the tripod. It’s no easy task.
But you can have the best of both worlds by having the camera focus for you, then switching to manual focus to comfortably recompose your shot (Figure 7.16).
Figure 7.16. Using the HFD (Hyper Focal Distance) one-third rule, I focused on the pool area in front of me, then switched the lens to manual focus before recomposing for the final shot.

Getting Focused While Using a Tripod
- Set up your shot and find the area that you want to focus on.
- Pan your tripod head so that your active focus point is on that spot.
- Press the shutter button halfway to focus the camera.
- Switch the camera to manual focus by sliding the switch on the lens barrel from A to M.
- Recompose the composition on the tripod and then take the shot.

The camera will fire without trying to refocus the lens. This works especially well for wide-angle lenses, which can be difficult to focus in manual mode.
Making Water Fluid
There’s little that is quite as satisfying for the landscape shooter as capturing a silky waterfall shot. Creating the smooth-flowing effect is as simple as adjusting your shutter speed to allow the water to be in motion while the shutter is open. The key is to have your camera on a stable platform (such as a tripod) so that you can use a shutter speed that’s long enough to work (Figure 7.17). To achieve a great effect, use a shutter speed that is at least 1/15 of a second or longer.
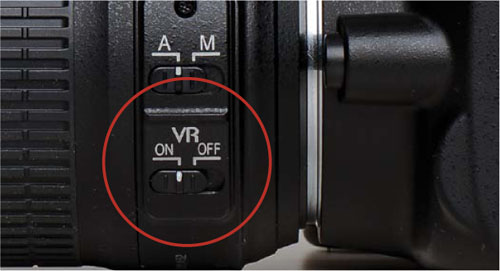
Figure 7.17. The Vibration reduction feature allowed me to handhold for this shot. If the exposure were any longer, I would have definitely needed to use a tripod.

Setting Up for a Waterfall Shot
- Attach the camera to your tripod, then compose and focus your shot.
- Make sure the ISO is set to 100.
- Using Aperture Priority mode, set your aperture to the smallest opening (such as f/22 or f/36).
- Press the shutter button halfway so the camera takes a meter reading.
- Check to see if the shutter speed is 1/15 or slower.
- Take a photo and then check the image on the LCD.
You can also use Shutter Priority mode for this effect by dialing in the desired shutter speed and having the camera set the aperture for you. I prefer to use Aperture Priority to ensure that I have the greatest depth of field possible.
If the water is blinking on the LCD, indicating a loss of detail in the highlights, then use the Exposure Compensation feature (as discussed earlier in this chapter) to bring details back into the waterfall. You will need to have the Highlight Alert feature turned on to check for overexposure (see “How I Shoot” in Chapter 4).
There is a possibility that you will not be able to have a shutter speed that is long enough to capture a smooth, silky effect, especially if you are shooting in bright daylight conditions. To overcome this obstacle, you need a filter for your lens—either a polarizing filter or a neutral density filter. The polarizing filter redirects wavelengths of light to create more vibrant colors, reduce reflections, and darken blue skies, as well as lengthening exposure times by about two stops due to the darkness of the filter (this amount can vary depending on the brand of filter used). It is a handy filter for landscape work. The neutral density filter is typically just a dark piece of glass that serves to darken the scene by one, two, or three stops (Figure 7.18). This allows you to use slower shutter speeds during bright conditions. Think of it as sunglasses for your camera lens. You will find more discussion on filters in the bonus chapter.
Figure 7.18. I used a neutral density filter to add two stops of exposure, thus allowing for a longer exposure time.

Directing the Viewer: A Word About Composition
As a photographer, it’s your job to lead the viewer through your image. You accomplish this by utilizing the principles of composition, which is the arrangement of elements in the scene that draw the viewer’s eyes through your image and holds their attention. As the director of this viewing, you need to understand how people see, and then use that information to focus their attention on the most important elements in your image.
There is a general order at which we look at elements in a photograph. The first is brightness. The eye wants to travel to the brightest object within a scene. So if you have a bright sky, it’s probably the first place the eye will travel to. The second order of attention is sharpness. Sharp, detailed elements will get more attention than soft, blurry areas. Finally, the eye will move to vivid colors while leaving the dull, flat colors for last. It is important to know these essentials in order to grab—and keep—the viewer’s attention and then direct them through the frame.
In Figure 7.19, the eye is drawn to the bright white cloud in the middle of the frame. From there, it is pulled toward the sharpness and color of the large boulder that is anchoring the lower-left portion of the image. The eye moves around the curved section of stone at the bottom of the frame, where it is then lifted back up to the sky and clouds, right back to the beginning. The elements within the image all help to keep the eye moving but never leave the frame.
Figure 7.19. The composition of the elements pulls the viewer’s eyes around the image, leading from one element to the next in a circular pattern.

Rule of Thirds
There are, in fact, quite a few philosophies concerning composition. The easiest one to begin with is known as the “rule of thirds.” Using this principle, you simply divide your viewfinder into thirds by imagining two horizontal and two vertical lines that divide the frame equally.
The key to using this method of composition is to have your main subject located at or near one of the intersecting points (Figure 7.20).
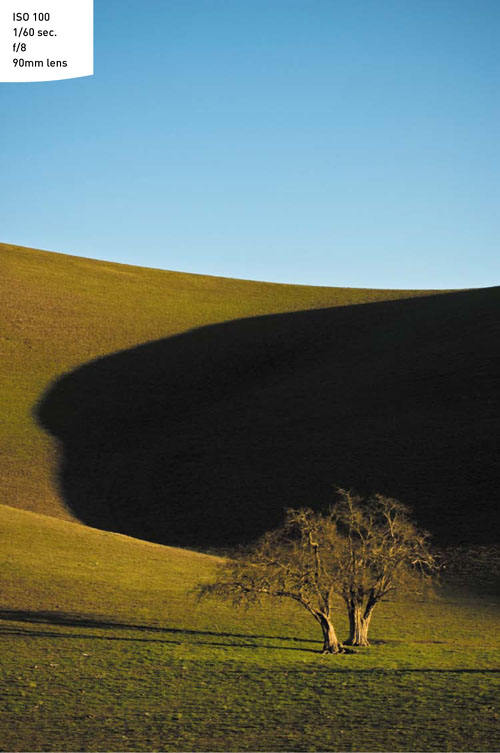
Figure 7.20. Placing the tree in the lower-right portion of the image creates a much more interesting composition than having it dead center in the frame. Additionally, the horizon line is running across the bottom third of the frame.
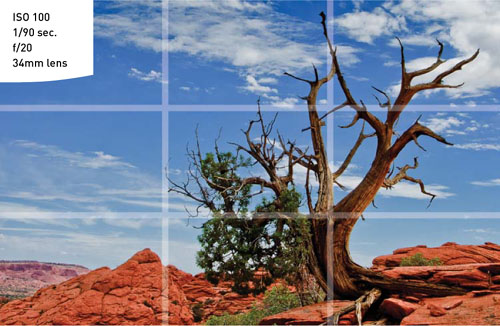
By placing your subject near these intersecting lines, you are giving the viewer space to move within the frame. The one thing you don’t want to do is place your subject smack dab in the middle of the frame. This is sometimes referred to as “bull’s eye” composition, and it requires the right subject matter for it to work. It’s not always wrong, but it will usually be less appealing and may not hold the viewer’s attention.
Speaking of the middle of the frame: the other general rule of thirds deals with horizon lines. Generally speaking, you should position the horizon one third of the way up or down in the frame. Splitting the frame in half by placing your horizon in the middle of the picture is akin to placing the subject in the middle of the frame; it doesn’t lend a sense of importance to either the sky or the ground.
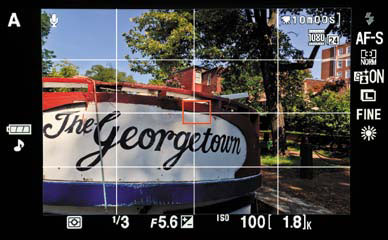
The D3100 has a visual tool for assisting you in composing your photo in the viewfinder in the form of a grid overlay. The grid can be turned on when using the Live View mode so that a 3 × 3 grid appears in the viewfinder. This won’t necessarily help in aligning your scene in thirds, but it will assist you keeping your horizons straight as well as giving you some visual alignment cues.
Using a Grid Overlay in Live View Mode
- Activate Live View by using the Live View switch on the back of the camera.
- Press the info button on the top of the camera to change the display mode on the Live View screen. There are three different display modes, so keep pressing the button until you see the grid.
Creating Depth
Because a photograph is a flat, two-dimensional space, you need to create a sense of depth by using the elements in the scene to create a three-dimensional feel. This is accomplished by including different and distinct spaces for the eye to travel: a foreground, middle ground, and background. By using these three spaces, you draw the viewer in and render depth to your image.
The hilly scene in northern California, shown in Figure 7.21, illustrates this well. The tree strongly defines the foreground area. The shadowy hills help separate the tree from the middle ground, and the sky gives a great blue background that contrasts with the warm tones of the late afternoon sun.
Figure 7.21. The tree, shadow, sloping hills, and sky all add to the feeling of depth in the image.
Advanced Techniques to Explore
This section comes with a warning attached. All of the techniques and topics up to this point have been centered on your camera. The following two sections, covering panoramas and high dynamic range (HDR) images, require you to use image-processing software to complete the photograph. They are, however, important enough that you should know how to correctly shoot for success, should you choose to explore these two popular techniques.
Shooting Panoramas
If you have ever visited the Grand Canyon, you know just how large and wide open it truly is—so much so that it would be difficult to capture its splendor in just one frame. The same can be said for a mountain range, or a cityscape, or any extremely wide vista. There are two methods that you can use to capture the feeling of this type of scene.
The “Fake” Panorama
The first method is to shoot with your lens set to its widest focal length, and then crop out the top and bottom portion of the frame in your imaging software. Panoramic images are generally two or three times wider than a normal image.
Creating a Fake Panorama
- To create the look of the panorama, find your widest lens focal length. In my case, it might be the 18mm setting on the 18–55mm AF-S kit lens.
- Using the guidelines discussed earlier in the chapter, compose and focus your scene, and select the smallest aperture possible.
- Shoot your image using whichever technique and shooting mode you desire. That’s all there is to it, from a photography standpoint.
- Then, open the image in your favorite image-processing software and crop the extraneous foreground and sky from the image, leaving you with a wide panorama of the scene.
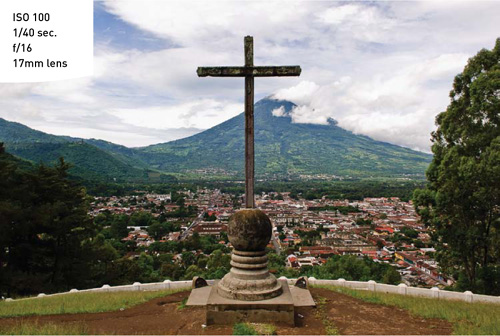
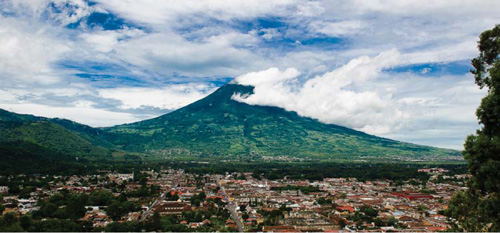
Figure 7.22 shows an example using a photo taken in Antigua, Guatemala.
Figure 7.22. This is a nice image but it lacks visual impact.

As you can see, the image was shot with a wide perspective, using a 17mm lens. While it is not a bad photo, it lacks visual impact. This isn’t a problem, though, because it was shot for the express purpose of creating a “fake” panorama. Now look at the same image, cropped for panoramic view (Figure 7.23). As you can see, it makes a huge difference in the image and gives much higher visual impact by reducing the uninteresting foreground as well as the sky, and it draws your eyes across the length of the horizon.
Figure 7.23. Cropping gives the feeling of a sweeping vista and makes the shot visually appealing.
The Multiple-Image Panorama
The reason the previous method is sometimes referred to as a “fake” panorama is because it is made with a standard-size frame and then cropped down to a narrow perspective. To shoot a true panorama, you need to use either a special panorama camera that shoots a very wide frame, or the following method, which requires the combining of multiple frames.
The multiple-image pano has gained in popularity in the past few years; this is principally due to advances in image-processing software. Many software options are available now that will take multiple images, align them, and then “stitch” them into a single panoramic image. The real key to shooting a multiple-image pano is to overlap your shots by about 30 percent from one frame to the next (Figures 7.24 and 7.25). It is possible to handhold the camera while capturing your images, but the best method for capturing great panoramic images is to use a tripod.
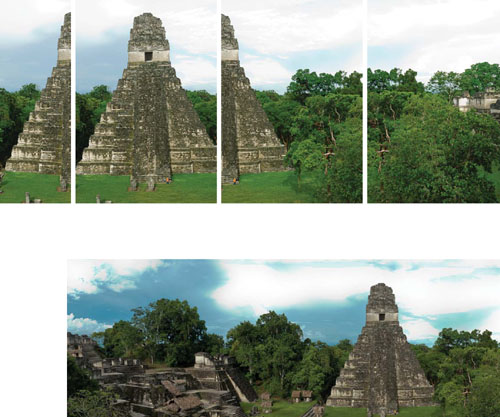
Figure 7.24. Here you see the makings of a panorama, with seven shots overlapping by about 30 percent from frame to frame.
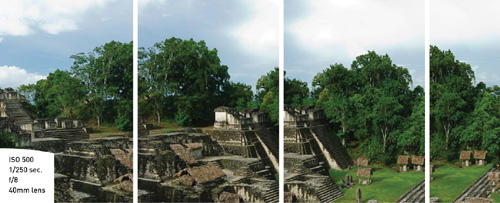
Figure 7.25. I used Adobe Photoshop to combine all of the exposures into one large panoramic image.
Now that you have your series of overlapping images, you can import them into your image-processing software to stitch them together and create a single panoramic image.
Shooting Properly for a Multiple-Image Panorama
- Mount your camera on your tripod and make sure it is level.
- Choose a focal length for your lens that is somewhere between 35mm and 50mm.
- In Aperture Priority mode, use a very small aperture for the greatest depth of field. Take a meter reading of a bright part of the scene, and make note of it.
- Now change your camera to Manual mode (M), and dial in the aperture and shutter speed that you obtained in the previous step.
- Set your lens to manual focus, and then focus your lens for the area of interest using the HFD method of finding a point one-third of the way into the scene. (If you use the autofocus, you risk getting different points of focus from image to image, which will make the image stitching more difficult for the software.)
- While carefully panning your camera, shoot your images to cover the entire area of the scene from one end to the other, leaving a 30-percent overlap from one frame to the next.
- The final step would involve using your favorite imaging software to take all of the photographs and then combine them into a single panoramic image.
Shooting High Dynamic Range (HDR) Images
One of the more recent trends in digital photography is the use of high dynamic range (HDR) to capture the full range of tonal values in your final image. Typically, when you photograph a scene that has a wide range of tones from shadows to highlights, you have to make a decision regarding which tonal values you are going to emphasize, and then adjust your exposure accordingly. This is because your camera has a limited dynamic range, at least as compared to the human eye. HDR photography allows you to capture multiple exposures for the highlights, shadows, and midtones, and then combine them into a single image using software (Figures 7.26–7.29). A number of software applications allow you to combine the images and then perform a process called “tonemapping,” whereby the complete range of exposures is represented in a single image. I will not be covering the software applications, but I will explore the process of shooting a scene to help you render properly captured images for the HDR process. Note that using a tripod is absolutely necessary for this technique, since you need to have perfect alignment of each image when they are combined.
Figure 7.26. Underexposing two stops will render more detail in the highlight areas of the clouds.

Figure 7.27. This is the normal exposure as dictated by the camera meter.

Figure 7.28. Overexposing by two stops ensures that the darker areas are exposed for detail in the shadows.

Figure 7.29. This is the final HDR image that was rendered from the three other exposures you see here.

Setting Up for Shooting an HDR Image
- If possible, set your ISO to 100 to ensure clean, noise-free images.
- Set your program mode to Aperture Priority. During the shooting process, you will be taking three shots of the same scene, creating an overexposed image, an underexposed image, and a normal exposure. Since the camera is going to be adjusting the exposure, you want it to make changes to the shutter speed, not the aperture, so that your depth of field is consistent.
- Set your camera file format to RAW. This is extremely important because the RAW format contains a much larger range of exposure values than a JPEG file, and the HDR software needs this information.
- Focus the camera using the manual focus method discussed earlier in the chapter, compose your shot, and secure the tripod.
- Press the shutter button halfway to activate the meter and the set your exposure.
- Press the Exposure Compensation button and turn the Command dial six clicks to the right to get your first exposure of –2 stops. Take one photo.
- Now press the Exposure Compensation button again and turn the Command dial six clicks to the left and take a picture. This will put the camera back to the normal exposure setting.
- Finally, repeat the last step and go six more clicks to the left and take a photo to get your two-stop overexposure.
A software program, such as Photoshop CS5, Photomatix Pro, or HDR PhotoStudio 2 can now process your exposure-bracketed images into a single HDR file. You can find more information on HDR photography and creating HDR images in the Tutorials section at www.photowalkpro.com.
Chapter 7 Assignments
We’ve covered a lot of ground in this chapter, so it’s definitely time to put this knowledge to work in order to get familiar with these new camera settings and techniques.
Comparing depth of field: Wide-angle vs. telephoto
Speaking of depth of field, you should also practice using the hyper focal distance of your lens to maximize the depth of field. You can do this by picking a focal length to work with on your lens. If you have a zoom lens, try using the longest length. Compose your image and find an object to focus on. Set your aperture to f/22 and take a photo.
Now do the same thing with the zoom lens at its widest focal length. Use the same aperture and focus point. Review the images and compare the depth of field when using wide angle as opposed to a telephoto lens. Try this again with a large aperture as well.
Applying hyper focal distance to your landscapes
Pick a scene that once again has objects that are near the camera position and something that is clearly defined in the background. Try using a wide to medium-wide focal length for this (18–35mm). Use a small aperture and focus on the object in the foreground; then recompose and take a shot. Without moving the camera position, use the object in the background as your point of focus and take another shot. Finally, find a point that is one-third of the way into the frame from near to far and use that as the focus point.
Compare all of the images to see which method delivered the greatest range of depth of field from near to infinity.
Placing your horizons
Finally, find a location with a defined horizon and, using the rule-of-thirds grid overlay, shoot the horizon along the top third of the frame, in the middle of the frame, and along the bottom third of the frame.
Share your results with the book’s Flickr group!
Join the group here: flickr.com/groups/nikond3100fromsnapshotstogreatshots