
6. Say Cheese!
Settings and Features to Make Great Portraits
Taking pictures of people is one of the great joys of photography. You will experience a great sense of accomplishment when you capture the spirit and personality of someone in a photograph. At the same time, you have a great responsibility because the person in front of the camera is depending on you to make them look good. You can’t always change how someone looks, but you can control the way you photograph that individual. In this chapter, we will explore some camera features and techniques that can help you create great portraits.
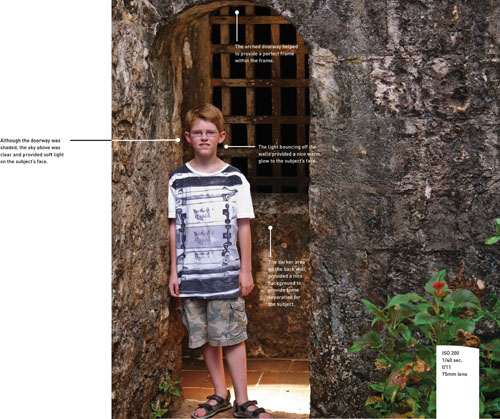
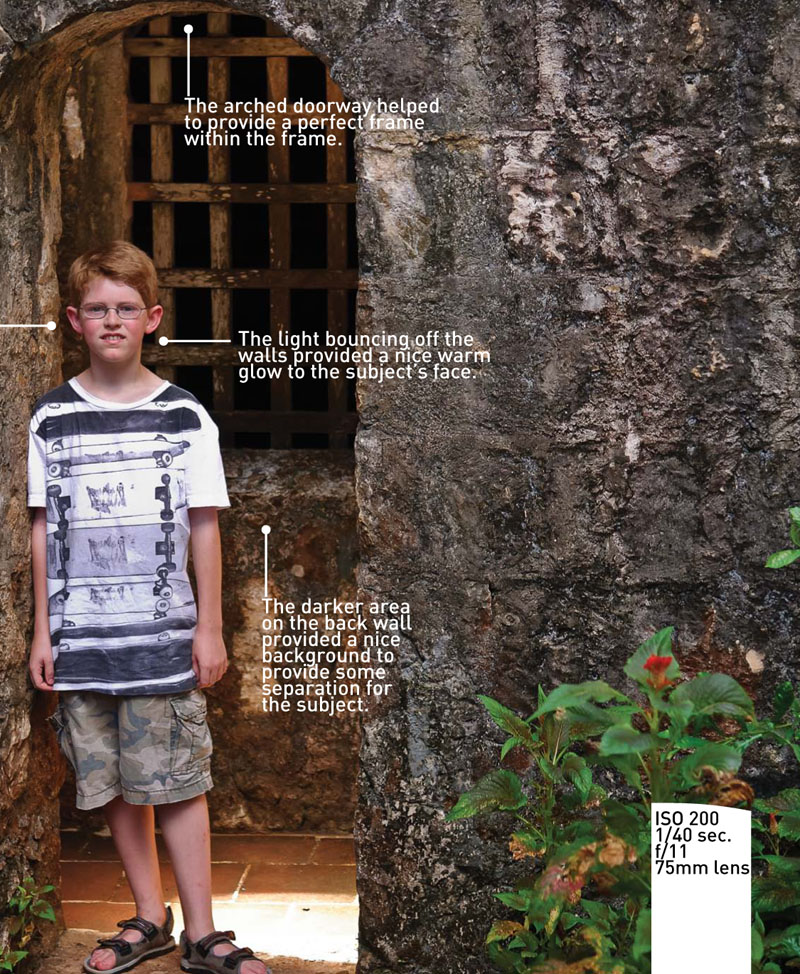
Poring Over the Picture
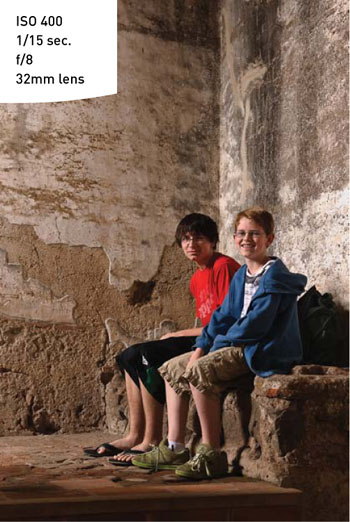
While exploring the Castillo de San Felipe in Guatemala, I found this great doorway that was the perfect background for a photo of my son. It provided the perfect amount of light shade, while still being bright enough for a great picture.

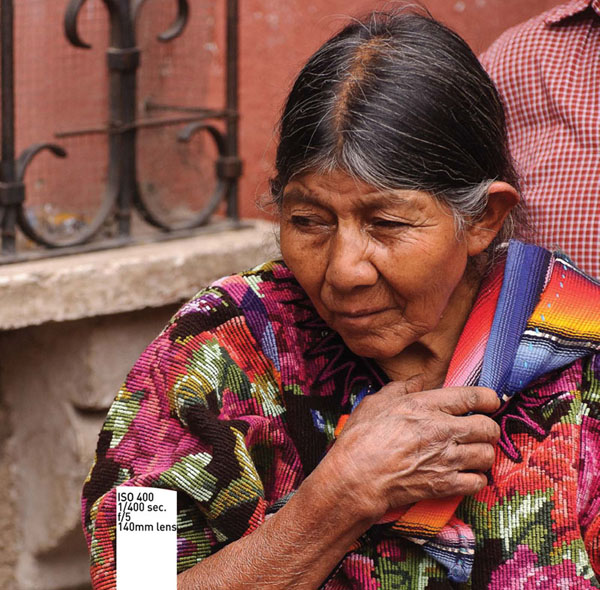
Poring Over the Picture
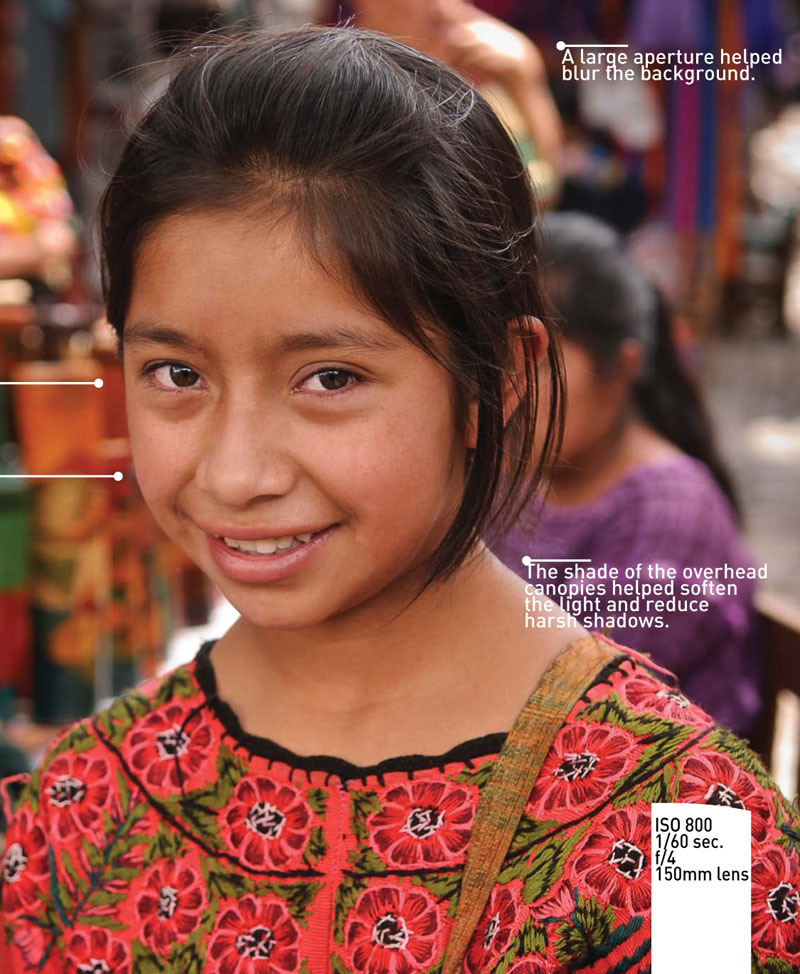
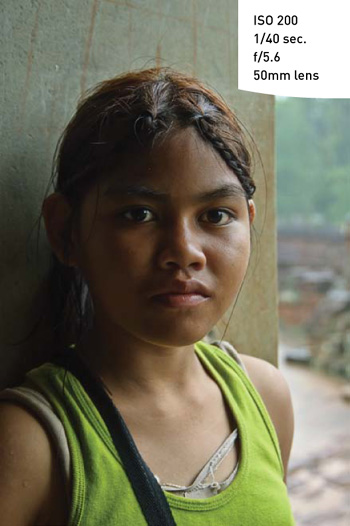
One of the things I love most about traveling is meeting new people. Of course, I love architecture and beautiful landscapes but people are what give life to a location. And that was truly the case in the market of Chichicastenango, Guatemala. The market is amazing, but for me it’s the people that really bring it to life. I met this cute girl when she came over to skillfully sell her little handmade dolls. We got her to throw in a photo as part of the bargain.

Automatic Portrait Mode
In Chapter 3, we reviewed all of the automatic scene modes. One of them, Portrait mode, is dedicated to shooting portraits. While this is not my preferred camera setting, it is a great jumping-off point for those who are just starting out. The key to using this mode is to understand what is going on with the camera so that when you venture further into portrait photography, you can expand on the settings and get the most from your camera and, more importantly, your subject.
Whether you are photographing an individual or a group, the emphasis should always be on the subject. Portrait mode utilizes a larger aperture setting to keep the depth of field very narrow, which means that the background will appear slightly blurred or out of focus. To take full advantage of this effect, use a medium- to telephoto-length lens. Also, keep a pretty close distance to your subject. If you shoot from too far away, the narrow depth of field will not be as effective.
Using Aperture Priority Mode
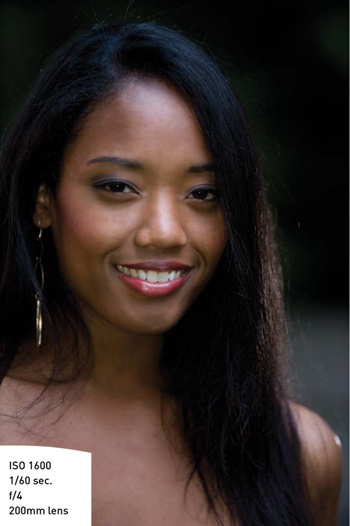
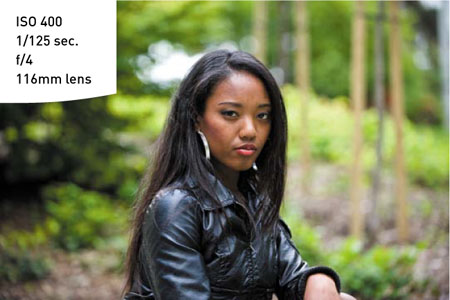
If you took a poll of portrait photographers to see which shooting mode was most often used for portraits, the answer would certainly be Aperture Priority (A) mode. Selecting the right aperture is important for placing the most critically sharp area of the photo on your subject, while simultaneously blurring all of the distracting background clutter (Figure 6.1). Not only will a large aperture give the narrowest depth of field, it will also allow you to shoot in lower light levels at lower ISO settings.
Figure 6.1. Using a large aperture, especially with a longer lens, blurs distracting background details.
This isn’t to say that you have to use the largest aperture on your lens. A good place to begin is f/5.6. This will give you enough depth of field to keep the entire face in focus, while providing enough blur to eliminate distractions in the background. This isn’t a hard-and-fast setting; it’s just a good, all-around number to start with. Your aperture might change depending on the focal length of the lens you are using and on the amount of blur that you want for your foreground and background elements.
Go Wide for Environmental Portraits
There will be times when your subject’s environment is of great significance to the story you want to tell. This might mean using a smaller aperture to get more detail in the background or foreground. Once again, by using Aperture Priority mode, you can set your aperture to a higher f-stop, such as f/8 or f/11, and include the important details of the scene that surrounds your subject.
Using a wider-than-normal lens can also assist in getting more depth of field as well as showing the surrounding area. A wide-angle lens requires less stopping down of the aperture (making the aperture smaller) to achieve an acceptable depth of field. This is due to the fact that wide-angle lenses are covering a greater area, so the depth of field appears to cover a greater percentage of the scene.
A wider lens might also be necessary to relay more information about the scenery (Figure 6.2). Select a lens length that is wide enough to tell the story but not so wide that you distort the subject. There’s little in the world of portraiture quite as unflattering as giving someone a big, distorted nose (unless you are going for that sort of look). When shooting a portrait with a wide-angle lens, keep the subject away from the edge of the frame. This will reduce the distortion, especially in very wide focal lengths. As the lens length increases, distortion will be reduced. I generally don’t like to go wider than about 24mm for portraits.
Figure 6.2. A wide-angle lens allows you to capture more of the environment in the scene without having to increase the distance between you and the subject.
Metering Modes for Portraits
For most portrait situations, the Matrix metering mode is ideal. (For more on how metering works, see the “Metering Basics” sidebar.) This mode measures light values from all portions of the viewfinder and then establishes a proper exposure for the scene. The only problem that you might encounter when using this metering mode is when you have very light or dark backgrounds in your portrait shots.
Figure 6.3. The Matrix metering mode uses the entire frame.

Figure 6.4. The Spot metering mode uses a very small area of the frame.

Figure 6.5. The Center-weighted metering mode looks at the entire frame but emphasizes the center of it.
In these instances, the meter might be fooled into using the wrong exposure information because it will be trying to lighten or darken the entire scene based on the prominence of dark or light areas (Figure 6.6). You can deal with this in one of two ways. You can use the Exposure Compensation feature, which we cover in Chapter 7, to dial in adjustments for over- and underexposure. Or you can change the metering mode to Center-weighted metering. The Center-weighted metering mode concentrates on the center area of the viewfinder (about 9 percent) to get its exposure information. This is the best way to achieve proper exposure for most portraits; metering off skin tones, averaged with hair and clothing, will often give a more accurate exposure (Figure 6.7). This metering mode is also great to use when the subject is strongly backlit.
Figure 6.6. (left) The light background color and clothing fooled the meter into choosing a slightly underexposed setting for the photo.
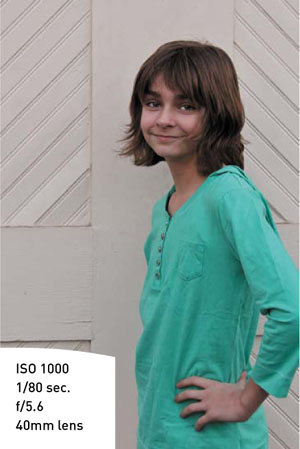
Figure 6.7. (right) When I switched to the Center-weighted metering mode, my camera was able to ignore much of the background and add a little more time to the exposure.

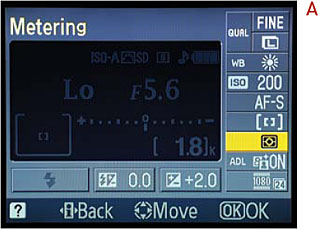
Setting Your Metering Mode to Center-Weighted Metering
- Press the i button to activate the cursor in the information screen.
- Use the Multi-selector to move the cursor to the Metering icon and press the OK button (A).
- Select the Center-weighted icon and press the OK button to lock in the change (B).

Using the AE-L (Auto Exposure Lock) Feature
There will often be times when your subject is not in the center of the frame but you still want to use the Center-weighted metering mode. So how can you get an accurate reading if the subject isn’t in the center? Try using the AE-L (Auto Exposure Lock) feature to hold the exposure setting while you recompose.
AE Lock lets you use the exposure setting from any portion of the scene that you think is appropriate, and then lock that setting in regardless of how the scene looks when you recompose. An example of this would be when you’re shooting a photograph of someone and a large amount of blue sky appears in the picture. Normally, the meter might be fooled by all that bright sky and try to reduce the exposure. Using AE Lock, you can establish the correct metering by zooming in on the subject (or even pointing the camera toward the ground), taking the meter reading and locking it in with AE-L feature, and then recomposing and taking your photo with the locked-in exposure.
Shooting with the AE Lock Feature
- Find the AE Lock button on the back of the camera and place your thumb on it.
- While looking through the viewfinder, place the focus point on your subject and press the shutter release button halfway to get a meter reading, and focus the camera.
- Press and hold the AE Lock button to lock in the meter reading. You should see the AE-L indicator in the viewfinder.
- While holding in the AE-L button, recompose your shot and take the photo.
- To take more than one photo without having to take another meter reading, just hold down the AE Lock button until you are done using the meter setting.
Focusing: The Eyes Have It
It has been said that the eyes are the windows to the soul, and nothing could be truer when you are taking a photograph of someone (Figure 6.8). You could have the perfect composition and exposure, but if the eyes aren’t sharp the entire image suffers. While there are many different focusing modes to choose from on your D3100, for portrait work you can’t beat AF-S (Single-Servo AF) mode using a single focusing point. AF-S focusing will establish a single focus for the lens and then hold it until you take the photograph; the other focusing modes continue focusing until the photograph is taken. The single-point selection lets you place the focusing point right on your subject’s eye and set that spot as the critical focus spot. Using AF-S mode lets you get that focus and recompose all in one motion.
Figure 6.8. When photographing people, you should almost always place the emphasis on the eyes.

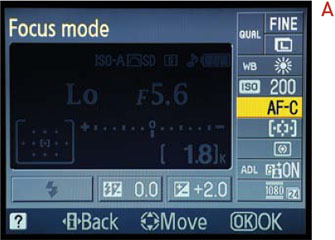
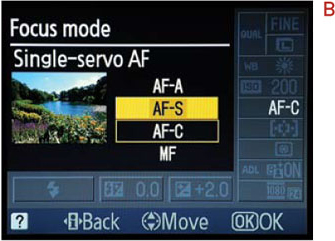
Setting Up for AF-S Focus Mode
- Press the i button to activate the cursor in the information screen.
- Use the Multi-selector to move the cursor to the Focus mode icon and press the OK button (A).
- Select the AF-S setting and then press the OK button (B).
Setting Your Focus to a Single Point
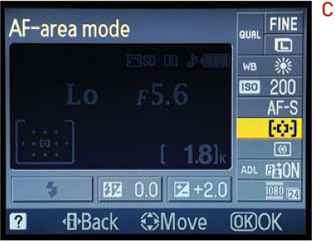
- Press the i button to activate the cursor in the information screen.
- Use the Multi-selector to move the cursor to the AF-area mode icon and press the OK button (C).
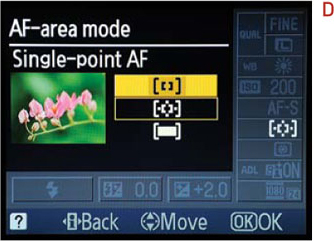
- Select the Single-point AF icon and press the OK button (D).
- When you are back in shooting mode, use the Multi-selector to move the focus point to one of the eleven available positions. This is visible while looking through the viewfinder but also on the information screen.
Now, to shoot using this focus point, place that point on your subject’s eye, and press the shutter button halfway until you hear the chirp. While still holding the shutter button down halfway, recompose if necessary and take your shot.
I typically use the center point for focus selection. I find it easier to place that point directly on the location where my critical focus should be established and then recompose the shot. Even though the single point can be selected from any of the focus points, it typically takes longer to figure out where that point should be in relation to my subject. By using the center point, I can quickly establish focus and get on with my shooting.
Classic Black and White Portraits
There is something timeless about a black and white portrait. It eliminates the distraction of color and puts all the emphasis on the subject. To get great black and whites without having to resort to any image-processing software, set your picture control to Monochrome (Figure 6.9). You should know that the picture controls are automatically applied when shooting with the JPEG file format. If you are shooting in RAW, the picture that shows up on your rear LCD display will look black and white, but it will appear as a color image when you open it in your software. You can use the software to apply the Monochrome—or any other—picture control to your RAW image within the image-editing software.
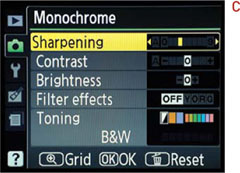
Figure 6.9. Getting high-quality black and white portraits is as simple as setting the picture control to Monochrome.

The real key to using the Monochrome picture control is to customize it for your portrait subject. The control can be changed to alter the sharpness and contrast. For women, children, puppies, and anyone else who should look somewhat soft, set the Sharpness setting to 0 or 1. For old cowboys, longshoremen, and anyone else who you want to look really detailed, try a setting of 6 or 7. I typically like to leave Contrast at a setting of around –1 or –2. This gives me a nice range of tones throughout the image.
The other adjustment that you should try is to change the picture control’s Filter effect from None to one of the four available settings (Yellow, Orange, Red, and Green). Using the filters will have the effect of either lightening or darkening the skin tones. The Red and Yellow filters usually lighten skin, while the Green filter can make skin appear a bit darker. Experiment to see which one works best for your subject.
Setting Your Picture Control to Monochrome
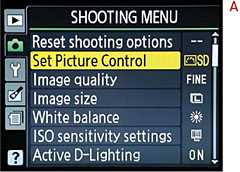
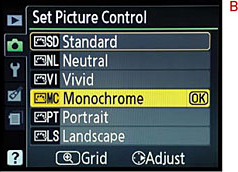
- Press the Menu button and use the Multi-selector to move the cursor to the Set Picture Control icon in the Shooting Menu and press the OK button (A).
- Select the Monochrome setting, then press the OK button (B).
Customizing Your Monochrome Picture Control
- Follow the previous steps to get to the Set Picture Control menu and highlight Monochrome, but instead of pressing the OK button, press the Multi-Selector to the right to enter the customization menu (C).
- Press the OK button to save your changes. When you return to the Picture Control menu, you will now see a small star next to the MC. This is your clue that you have altered the default settings for that particular control.
The Portrait Picture Control for Better Skin Tones
As long as we are talking about picture controls for portraits, there is another control on your D3100 that has been tuned specifically for this type of shooting. Oddly enough, it’s called Portrait. To set this control on your camera, simply follow the same directions as earlier, except this time, select the Portrait control (PT) instead of Monochrome. There are also individual options for the Portrait control that, like the Monochrome control, include sharpness and contrast. You can also change the saturation (how intense the colors will be) and hue, which lets you change the skin tones from more reddish to more yellowish. I prefer brighter colors, so I like to boost the Saturation setting to +2 and leave everything else at the defaults. You won’t be able to use the same adjustments for everyone, especially when it comes to color tone, so do some experimenting to see what works best.
Detect Faces with Live View
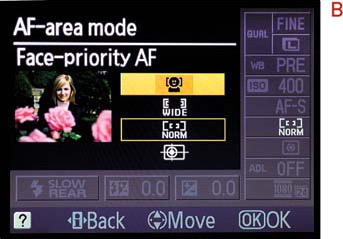
Face detection in digital cameras has been around for a few years, but it’s still a new concept in the world of the dSLR. Your D3100 has four different autofocus modes for Live View: Wide area, Normal area, Subject Tracking, and my personal favorite, Face Priority. These modes are different from the standard modes like AF-S, AF-C, and AF-A. Face Priority mode is probably the slowest of the Live View focusing modes, so I use it mostly when I am working with a tripod or my subjects are going to remain fairly still. When you turn on Live View with Face Priority focusing, the camera does an amazing thing: it zeroes in on any face appearing on the LCD and places a box around it (Figure 6.10). I’m not sure how it works; it just does.
Figure 6.10. The Live View Face Priority mode can lock in on your subject’s face for easy focusing.

If there is more than one face in the frame, a box will appear over each of them, but it will only use one to focus. The box that has the small corners outlined inside is the one the camera is currently using for focus (this is usually the closest face to the camera).
Setting Up and Shooting with Live View and Face Priority Focusing
- Put the camera in Live View mode by using the Live View switch on the back of the camera.
- Press the i button and move the cursor to the AF-area mode icon and then press the OK button (A).
- Use the Multi-selector to select Face-priority AF, then press the OK button (B).
- Press the i button to go back to the Live View mode.
- Point your camera at a person and watch as the frame appears over the face in the LCD.
- Depress and hold the shutter release button halfway to focus on the face and wait until you hear the confirmation chirp.
- Press the shutter button fully to take the photograph.

If you are having difficulty getting a face to focus, you can simply place the standard focus box over the person’s face and then press the shutter button to focus. Sometimes the Face Priority mode has difficulty on faces of people wearing glasses.
If you are taking a photograph of more than one person and you’re using Face Priority mode, you will see boxes appear over each face. To switch the focus priority from one face to another, simply press left or right on the Multi-selector.
Live View can be used with any of the shooting modes, but if you want to use the Guide Mode, you need to select it in the Start Shooting section.
Use Fill Flash for Reducing Shadows
A common problem when taking pictures of people outside, especially during the midday hours, is that the overhead sun can create dark shadows under the eyes and chin. You could have your subject turn his or her face to the sun, but that is usually considered cruel and unusual punishment. So how can you have your subject’s back to the sun and still get a decent exposure of the face? Try turning on your flash to fill in the shadows (Figure 6.11). This also works well when you are photographing someone with a ball cap on. The bill of the hat tends to create heavy shadows over the eyes, and the fill flash will lighten up those areas while providing a really nice catchlight in the eyes.
Figure 6.11. I used a little fill flash to lighten the subject—who was standing in a shaded area—and add a catchlight to her eyes.
The key to using the flash as a fill is to not use it on full power. If you do, the camera will try to balance the flash with the daylight, and you will get a very flat and featureless face.
Setting Up and Shooting with Fill Flash
- Press the pop-up flash button to raise your pop-up flash into the ready position.
- Press the i button to activate the cursor in the information screen.
- Use the Multi-selector to navigate to the Flash Compensation icon located along the bottom of the screen and press the OK button (A).
- Select a flash setting of –0.3 and press OK (B).
- Take a photograph and check your playback LCD to see if it looks good. If not, try reducing power in one-third stop increments.


One problem that can quickly surface when using the on-camera flash is red-eye. Not to worry, though—we will talk about that in Chapter 8.
Portraits on the Move
Not all portraits are shot with the subject sitting in a chair, posed and ready for the picture. Sometimes you might want to get an action shot that says something about the person, similar to an environmental portrait. Children, especially, just like to move. Why fight it? Set up an action portrait instead.
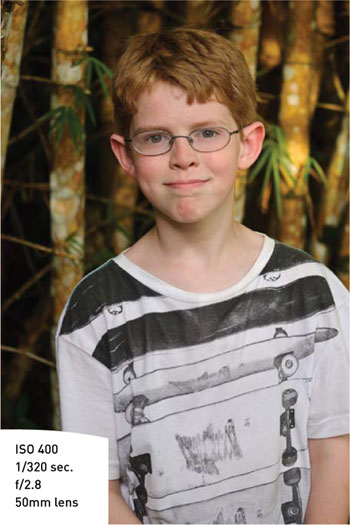
For the photo in Figure 6.12, I used the Portrait picture control and set my camera to Shutter Priority mode. I knew that there would be a good deal of movement involved, and I wanted to make sure that I had a fairly high shutter speed to freeze the action, so I set it to 1/320 of a second. I set the focus mode to AF-C, the drive mode to Continuous, and just let it rip. There were quite a few throwaway shots, but I was able to capture one that conveyed the energy and action.
Figure 6.12. A high ISO allowed me to use a fast shutter speed to stop the action, along with a small aperture to increase depth of field.

Tips for Shooting Better Portraits
Before we get to the assignments for this chapter, I thought it might be a good idea to leave you with a few extra pointers on shooting portraits that don’t necessarily have anything specific to do with your camera. There are entire books that cover things like portrait lighting, posing, and so on. But here are a few pointers that will make your people pics look a lot better.
Avoid the Center of the Frame
This falls under the category of composition. Place your subject to the side of the frame (Figure 6.13)—it just looks more interesting than plunking them smack dab in the middle (Figure 6.14).
Figure 6.13. Try cropping in a bit, and place the subject’s face off center to improve the shot.
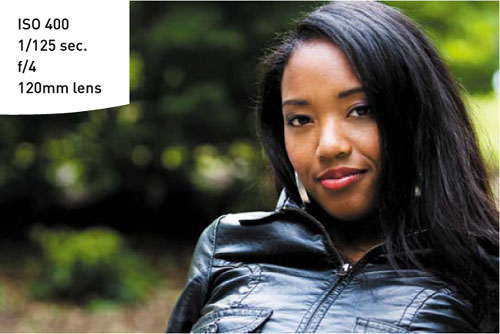
Figure 6.14. Having the subject in the middle of the frame with so much empty space on the sides can make for a less-than-interesting portrait.
Choose the Right Lens
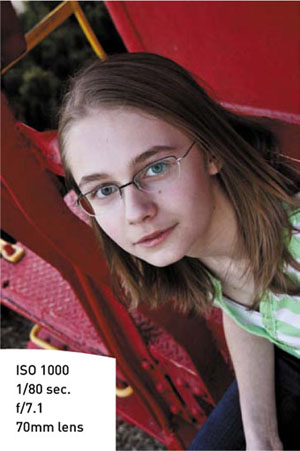
Choosing the correct lens can make a huge impact on your portraits. A wide-angle lens can distort features of your subject, which can lead to an unflattering portrait (Figure 6.15). Select a longer focal length if you will be close to your subject (Figure 6.16).
Figure 6.15. (left) At this close distance, the 18mm lens is distorting the subject’s face.
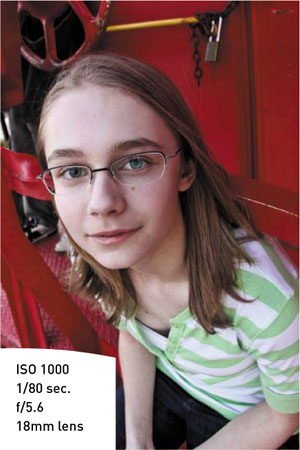
Figure 6.16. (right) By zooming out to 70mm, I am able to remove the distortion for a much better photo.
Don’t Cut Them Off at the Knees
There is an old rule about photographing people: never crop the picture at a joint. This means no cropping at the ankles, knees, or waist. If you need to crop at the legs, the proper place to crop is mid-shin or mid-thigh (Figure 6.17).
Figure 6.17. A good crop for people is when it intersects at mid-thigh or mid-shin.

Use the Frame
Have you ever noticed that most people are taller than they are wide? Turn your camera vertically for a more pleasing composition (Figure 6.18).
Figure 6.18. Get in the habit of turning your camera to a vertical position when shooting portraits. This is also referred to as portrait orientation.

Sunblock for Portraits
The midday sun can be harsh and can do unflattering things to people’s faces (Figure 6.19). If you can, find a shady spot out of the direct sunlight. You will get softer shadows, smoother skin tones, and better detail (Figure 6.20). This holds true for overcast skies as well. Just be sure to adjust your white balance accordingly.
Figure 6.19. The dappled sunlight does unflattering things to this subject’s face.
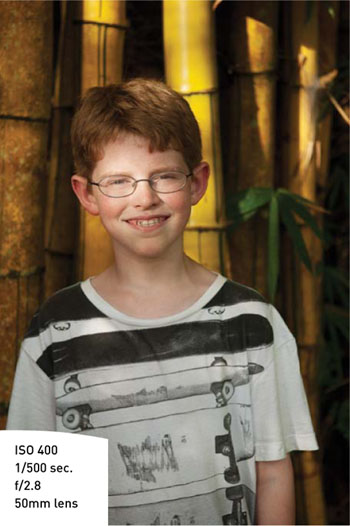
Figure 6.20. By moving him over just a couple of feet, I was able to get him out of the direct light and into a much more flattering situation.
Give Them a Healthy Glow
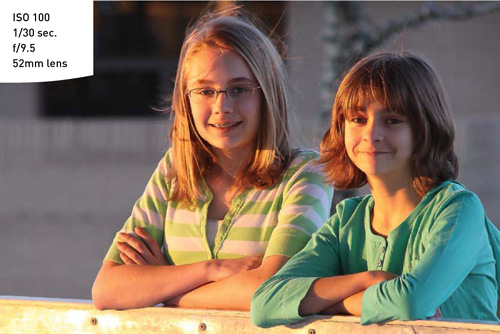
Nearly everyone looks better with a warm, healthy glow. Some of the best light of the day happens just a little before sundown, so shoot at that time if you can (Figure 6.21).
Figure 6.21. You just can’t beat the glow of the late afternoon sun for adding warmth to your portraits.
Keep an Eye on Your Background
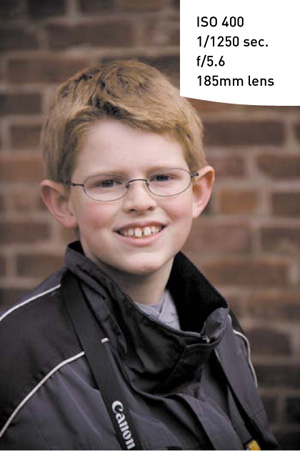
Sometimes it’s so easy to get caught up in taking a great shot that you forget about the smaller details. Try to keep an eye on what is going on behind your subject so they don’t end up with things popping out of their heads (Figures 6.22 and 6.23).
Figure 6.22. A downspout in the background is going right into the subject’s head.
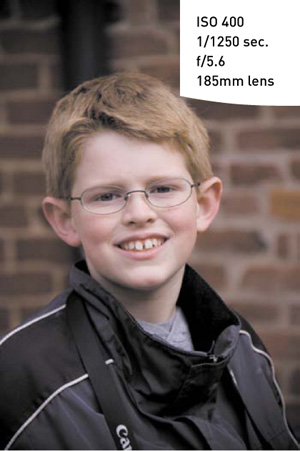
Figure 6.23. By moving the camera position a little to the left, I was able to remove the distracting pipe from the photo.
Frame the Scene
Using elements in the scene to create a frame around your subject is a great way to draw the viewer in. You don’t have to use a window frame to do this. Just look for elements in the foreground that could be used to force the viewer’s eye toward your subject (Figure 6.24).
Figure 6.24. I’ll often look for elements of the surrounding background to use as compositional elements in my portraits. This arched doorway made a great frame for my subject.

Get Down on Their Level
If you want better pictures of children, don’t shoot from an adult’s eye level. Getting the camera down to the child’s level will make your images look more personal (Figure 6.25).
Figure 6.25. Sometimes taking photographs of children means taking a knee to get the camera down on their level, but the end result is a much better image.

Don’t Be Afraid to Get Close
When you are taking someone’s picture, don’t be afraid of getting close and filling the frame (Figure 6.26). This doesn’t mean you have to shoot from a foot away; try zooming in to capture the details.
Figure 6.26. Filling the frame with the subject’s face can lead to a much more intimate portrait.
Chapter 6 Assignments
Depth of field in portraits
Let’s start with something simple. Grab your favorite person and start experimenting with using different aperture settings. Shoot wide open (the widest your lens goes, such as f/3.5 or f/5.6) and then really stopped down (like f/22). Look at the difference in the depth of field and how it plays an important role in placing the attention on your subject. (Make sure you don’t have your subject standing against the background. Give some distance so that there is a good blurring effect of the background at the wide f-stop setting.)
Discovering the qualities of natural light
Pick a nice sunny day and try shooting some portraits in the midday sun. If your subject is willing, have them turn so the sun is in their face. If they are still speaking to you after blinding them, have them turn their back to the sun. Try this with and without the fill flash so you can see the difference. Finally, move them into a completely shaded spot and take a few more.
Picking the right metering method
Find a very dark or light background and place your subject in front of it. Now take a couple of shots, giving a lot of space around your subject for the background to show. Now switch metering modes and use the AE Lock feature to get a more accurate reading of your subject. Notice the differences in exposure between the metering methods.
Picture controls for portraits
Have some fun playing with the different picture controls. Try the Portrait control as compared to the Standard. Then try out Monochrome and play with the different color filter options to see how they affect skin tones.
Share your results with the book’s Flickr group!
Join the group here: flickr.com/groups/nikond3100fromsnapshotstogreatshots