

Flash Photography
Why Shoot With a Flash?
With the low light capability of today’s cameras, I often hear many newcomers to the art of photography declare that they do not like using a flash; instead, they will just crank up the ISO on the camera. There are two problems with this approach. Firstly, removing the use of a flash from your arsenal sorely limits your creativity. Secondly, as good as the camera’s low-light capability may be, there is always a trade-of. Higher ISO settings produce more digital noise in the image, and at high ISOs the accuracy of the camera’s white balance system is compromised. Learning to use your flash, whether it is the built-in variety, or one of the Nikon Speedlites, will expand your capabilities and your enjoyment of the entire picture taking process.
Keeping It Natural
The real art to flash photography is learning to adjust the camera and the flash to the situation. Good flash photography actually belies the use of an additional lighting source. The subject will look natural without the telltale harsh look an improperly used flash will produce. You must learn to boost or enhance the existing light situation with your flash rather than try to supplant it. Figure 8.3 shows how the use of

fill flash in an outdoor situation results in a natural and evenly lit face without the shadows that would normally occur outdoors in the sun.
Flash m etering systems for the early digital SLR cameras were based on the TTL (through the lens) systems of film cameras, and proved to be inaccurate a great deal of the time. I well remember taking three to four shots of the same subject, with the same setting, and with different results. The flash output was based on the main object in focus with little, if any, regard given to the total composition. With auto focus systems, this would really wreak havoc if the photographer locked focus and then recomposed. With Nikon’s innovative i-TTL system even an amateur can quickly learn how to get professional results using a flash.
Nikon’s Creative Lighting System
Nikon’s research and attention to this area of the market has paid of in a large way for both the amateur and the professional

photographer alike. The Creative Lighting System was designed to eliminate many of the problems traditionally inherent in flash photography. This is one of those cases where Nikon truly listened to the professional photographer and designed an outstanding state-of-the-art system for flash photography.
i-TTL Balanced Fill Flash
A pre-flash is emitted from the Speedlite prior to the main flash and refected of every object in the frame. Either the five-segment TTL flash sensor or an RGB sensor picks up the information from these pre-flashes. This information, along with data from the Matrix Metering System is analyzed to adjust flash output for the most balanced background/foreground exposure possible. This technology takes Nikon’s flash control System to unprecedented levels of precision and performance. The addition of distance information delivered by many Nikon lenses combines to deliver a wealth of information to the flash system, delivering unprecedented accuracy.
Flash Color Information Communication
Getting proper white balance with flash photography has always been an issue as the color temperature varies with the type of ambient light, and mixing this with flash color temperature was a complicated process. Thanks to Nikon’s Creative Lighting System color accuracy is now better than ever. Using voltage, flash duration and other variables such as ambient light color temperature, the master unit attached to the Nikon Digital I SLR cameras transmits flash color information to the camera. This allows the Auto White Balance System to achieve optimum results.
Multi-Area AF Assist Illuminator
In all Nikon cameras compatible with Nikon’s Creative Lighting System, the Multi-Area AF Assist Illuminator can be used with all the focus areas of the camera. This allows auto focus shooting in extreme low light situations, regardless of which focus area you select.
Flash Value Lock
The FV Lock (Flash Value Lock) maintains the same flash exposure for your main subject when shooting a sequence of photos, allowing you to zoom in on your subject, change the composition or adjust the aperture, all without changing the original exposure. This allows the photographer to focus on the subject rather than the mechanics of the Speedlite.
Auto FP High Speed Sync
This feature enables stop-action shutter speeds with fill flash. The camera will automatically set itself to this mode if your selected shutter speed is above the camera’s top flash sync speed. This is indispensable for outdoor portraiture as it allows the use of narrower aperture settings to achieve the desired focus on the subject. For a sports photographer it allows flash photography and the use of stop-action shutter speeds.
Advanced Wireless Lighting
The Nikon Creative Lighting System supports Advanced Wireless Lighting. This allows the user to utilize up to four i-TTL Speedlite groups controlled via a master unit, which can be an SB-900 or SB-800 Speedlite, or a Wireless Speedlite Commander SU-800. The Advanced Wireless Lighting System is as easy to use as an on-camera Speedlite. There is no limit to the number of Speedlites in each group, giving you almost complete control over how you light the subject.
Using the Built-in Flash
If your camera has a built-in flash, you can often use it as a great fill flash tool both indoors and out. You will often find, particularly with outdoor portraiture, that there is plenty of ambient light for a shot but also lots of harsh shadowing, especially in the facial area. In such situations, the built-in flash, judiciously used, can deliver more professional results. For outdoor shots, you may have to manually turn the flash on by pressing the flash button. Otherwise, the camera’s metering System may sense there is enough light and fail to automatically engage the flash. You can also use your camera’s flash exposure compensation function to vary the output by plus or minus

Figure 8.4
three stops, in increments of 1/3 stop. By adjusting the output depending on the lighting situation and the subject matter, you can make your images much more natural in appearance.
There are several downsides to using the camera’s built-in flash. The proximity of the flash to the lens increases the tendency to produce hard light and red eye. In addition, the harsher, more pronounced light produced by the smaller flash units tends to give your images a flat look; your images look more like everyone else’s snapshots. Vertical shots using the built-in flash are near impossible as the proximity to the lens causes huge shadowing. For flash photography beyond the occasional snapshot and fill flash situation consider one of the Nikon Speedlites.
Nikon Speedlites
Your two main choices in the Speedlite department are the SB-600 and the SB-900. Price aside, the one you choose should be based on intended use, both current and future. Study the features and specifcations of each unit and decide if you need (or will need) more power, a flash head with zoom capability, remote control of other flash units, or if you just plan to use your flash for family pictures and the occasional portrait.
SB-600
The Nikon SB-600 is a compact, portable i-TTL Speedlite optimized for use with Nikon’s Creative Lighting System. The SB-600 can be operated as a wireless remote unit by the SB-800 or SB-900. The SB-600 is ideal for the vast majority of shooting situations, and also makes a great second, or back-up, flash for the working professional.
SB-900
The SB-900 is considered Nikon’s flagship Creative Lighting System Speedlite. It can be operated as a stand-alone unit or as a wireless command or receiver unit. As a wireless command unit, the SB-900 can control up to four other flash groups. The SB-900’s auto zoom capability provides coverage from 17 to 200 mm in the FX-format and 12 to 200 mm coverage in the DX-format, and automatic switching from one DX to FX format.
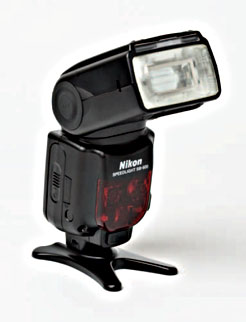
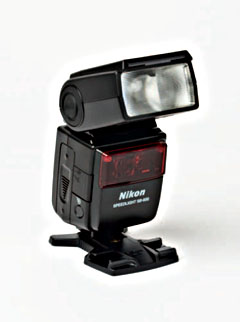
Figure 8.6
With certain Nikon Digital SLR cameras, the SB-900 also automatically identifies mounted color gel filters and adjusts the camera’s auto white balance setting.
One of the big new selling points for this Speedlite is its firmware upgrade capability. This allows the user to download and update the SB-900 with any new performance enhancements released by Nikon.
R1C1 Wireless Close-Up Speedlite System
Although arguably not a necessity for most photographers, this unit certainly merits a mention. If you take the leap into close-up or macro photography, this type of setup is indispensable. The R1C1 is a creative delight. It delivers the ability to easily and evenly illuminate many types of dificult subject matter, including micro, macro, and product photography.
The R1C1 is basically a true miniature macro studio. As in traditional portraiture, one of the flashes can be set at full power and the second one at — 1 to create a modeling look for macro subjects. Fill flash can be achieved using a setting of 1:1 ratio and — 1.7 flash exposure. Using TTL, aperture priority and matrix metering all work quite well. Any issues with exposure can be adjusted by setting the exposure compensation dial or by adjusting the flash exposure.
One of the great advantages of the R1C1 is the ability to remove one or both of the flashes and hand hold for precise placement.
Flash Photography With a Speedlite
Whatever Speedlite you end up with, there are some basic guidelines that will apply to the use of it.
■ Bouncing the Flash: Often shooting head on with a Speedlite will produce a hard light and harsh shadows. An easy solution is to‘bounce’ the light of the ceiling or the wall by titling the flash head up, to the side, or both (see Figure 8.7). This bouncing of the light serves to dif use the harshness of the light as well as spread the light over a large area. Pumping light in behind the subject reduces or eliminates the harsh shadows that result from shooting with the flash in the standard position.

■ Flash Exposure Compensation: One of the great advantages of the digital SLR is the ability to immediately see results and make appropriate adjustments. If you see that your settings are delivering too much or too little light, it is easy to adjust the flash compensation in 1/3 stop increments, plus or minus, until you have it dialed in.
■ Shooting Mode: While shooting in Program mode will usually deliver a technically correct exposure, the Program mode naturally opts for a narrow aperture — with a shallow depth of field being the result. For that reason, we choose to shoot in manual mode. There is a learning curve, but the payoff is worth it. Choosing your own aperture and depth of field pays huge dividends creatively. Usually shutter speeds of 1/30, 1/60, and 1/125 will deliver good results in most situations. The longer the shutter speed, the more ambient light captured. Many photographers consider f/8 to be a magic aperture in that it provides enough depth of field to garner the entire subject but not so much as to detract from it.
The secret is to practice and experiment. Take the time to learn about the interaction of shutter speed, aperture, and the flash. Your ability as a photographer will take a giant leap forward.
George Schoeber
‘NIKON … I have always suspected that the translation in Japanese must mean or stand for ‘brand loyalty’ as most Nikon photographers have a long and very loyal devotion to their equipment and the legendary company that produces these fine photographic instruments.

Figure 8.8
My personal history with Nikon started in 1970 when I purchased (and still have) a black Nikon Photomic FTN with a 55 mm F1.2 lens. The Nikon F was the body that most professional 35 mm photographers used at that time for their work.
The Nikon F was lovingly referred to as ‘the hockey puck’ due to its incredible durability and reliability.
The Nikon F had a vast selection of accessories that Nikon produced to keep professional photographers happy with any assignment they could imagine. Nikons traveled in space with NASA, hung from the rafters at sports arenas and produced most of the memorable journalistic images of the 1960s and 1970s. But the real strength behind the photographers who used the Nikon system was the Nikkor lenses.
From 1959, when the first Nikkor SLR lenses were produced, to the 40 plus million that have been manufactured since, Nikon shooters have had a near reverence for their favorite Nikkor lenses. They became our photographic eyes that allowed us to express and create our individual vision.
Through the almost 50 years of Nikkor lens production and lens technology that has given us multi-coatings, floating rear elements, zoom lenses, Auto Focus, Vibration Reduction, ED glass, Nano Coatings and other advances, the Nikon F lens mount allows virtually every lens Nikon ever made (sometimes with a slight modif cation) to fit every Nikon professional camera ever made, including the most recent digital models.
My modern lens selection includes the 17–35 mm f/2.8, the 70–200 mm f/2.8, the 80–400 mm VR, the 17–55 mm DX f/2.8, the 12–24 mm DX f/4 and the 18–200 DX VR. A few of my favorite ‘old’ lenses include the 55 mm 3.5 micro, the 28 mm f/2.0 and my all-time favorite, the 105 mm f/2.5. The 105 mm is still my lens of choice for portrait work.
While Nikkor lenses have always received most of the accolades from Nikon shooters, the professional camera bodies have been the perfect complement to the great Nikkor optics. I have used the F, F3, F4, and my favorite film cameras of all time, the fabulous F5, and the possibly even better, the F100. The Nikon F100 is considered by many to be the best film camera

Nikon ever built. I always carried two F100s with me on all my photographic travels; it was durable, ergonomically perfect and the matrix metering is incredibly accurate.
I continued to shoot film up until the release of the Nikon D200. The D200 was the digital camera that reminded me the most of my beloved F100 and I purchased one as soon as they became available. The transition from film to digital was seamless and easy. Within 30 minutes of familiarization with the new camera, I was shooting images easily and quickly.
I was amazed at how easy Nikon had made it for photographers familiar with their professional film cameras to enter digital imaging. The D200 convinced me that digital capture was going to be my future in photography. I had set up a digital darkroom 2 years prior to my purchase of the D200, to scan transparencies and negatives to produce digital files and output prints. The

D200 showed me that by shooting high-quality RAW camera files, I could use this as either my color transparency or convert it to a B&W file if I decided to take the image in that direction. While aesthetically I loved film, and still do, the many benefits of digital capture won me over as a photographer.
I have since added the wonderful Nikon D300, and most recently the awesome D700 full-frame camera. The files from both of these cameras are truly amazing. Resolution and detail in prints of 48 inches, and even larger, are superb.
I find that the DX and the FX sensor sizes give me the options of using the wide-angle FX format or the far-reaching DX telephoto advantage. My compact 80–400VR lens becomes a 120–600 mm lens when used on the D300 camera.
The D700 with its very high ISO capability allows me to shoot in low light conditions that were previously taboo. Both the D300

and D700 are small, low profile cameras that can easily be carried together during travel or hiking.
While Nikon took their time in delivering a full-frame sensor DSLR, they seem to have made the wait for the Nikon faithful worthwhile. The cameras broaden the options that Nikon shooters have come to expect from the company that has always delivered the most comprehensive photographic systems and integrated lens compatibility in the history of camera manufacturing.’