

Getting Your Best Shot from
the Digital Negative
Overview
There are numerous editing programs available for adjusting and processing files from your digital SLR camera. Preferences are based on such variables as user interface, ease of use, and, of course, image quality. Most of the software out there does a good job, but at some point you have to make a decision to use a specific program and move ahead. Most programs can be downloaded as a trial, which gives you a chance to ‘try before you buy.’ This is a great policy and we encourage you to take advantage of it. In this chapter we will focus on Nikon’s proprietary editing program, Capture NX 2, but we will also discuss a few of the other popular programs as well.
Nikon Capture NX 2
Nikon Capture NX 2 is the newest version of Nikon’s proprietary software for processing Nikon RAW (NEF) files. Even if you plan to make adjustments later or print from another image editing program, using Capture NX will assure you get the best output possible from your RAW (NEF) files. Although Capture NX 2 was designed for Nikon RAW (NEF) files, you can also use it to process TIFF and JPEG files.
Version NX 2 brings important upgrades to Capture, including major improvements and revisions to the interface and workflow in addition to some important new editing tools.
The Browser
The primary purpose of the browser is to provide a convenient interface for viewing and editing files. By first examining image thumbnails in your browser, you can quickly choose the keepers and toss out the rejects. This avoids the laborious process of opening large files in order to sort them. There are various tools available to help in the process such as the Label, Rating, Filter, and Sort tools.
Double -clicking on a thumbnail in the browser automatically opens the image in the Capture NX editor. You can also open

Figure 9.2
an image as you would in any other image editor: by dragging and dropping an image into the application, by using the Open dialog box, and so forth.
Non-Destructive Editing
Capture NX 2 is a non-destructive file editor, meaning any adjustments or changes are stored as a separate set of instructions rather than applied to the original file. This holds true with NEF, TIFF, and JPEG files. This is the same approach used by Adobe Photoshop Camera Raw, Lightroom, Aperture, and others.
The huge advantage of non-destructive editing is the ability to change or remove your edits at any time. If you’ve worked with Adjustment Layers in Photoshop, you understand the value of non-destructive editing.
Whenever one of the Capture NX 2’s editing tools is used or an editing tool is chosen from the menu, a new entry is made in the Edit List, one of the main palettes that sit on the right side of the screen. In this Edit List you can adjust an edit’s parameters, delete the edit, temporarily hide it, and change the order in which edits are applied.
The Edit List in NX 2 has been greatly improved. With NX 2, the Edit List simply lists controls that you can adjust. There’s no extra submenu to deal with, which streamlines editing and allows more control of the Edit List. The Edit List is now divided into two major areas: Develop and Adjust. Develop is where you perform all of the basic adjustments to globally tone- and color-correct an image. Adjust is for additional, refined edits. Capture NX 2 automatically puts the edit in the appropriate pane within the Edit List.
Global Editing
Tone and color adjustments are controlled via sliders and buttons in the Edit Menu. New to NX 2 are Highlight Protection and Shadow Protection, which work similar to the Shadows/ Highlights tool in Photoshop. Capture NX 2 identifies these regions as shadow or highlight areas and darkens or lightens only those areas.
As with the previous version, Capture NX ofers highlight recovery for RAW files. Working with RAW files, it’s possible
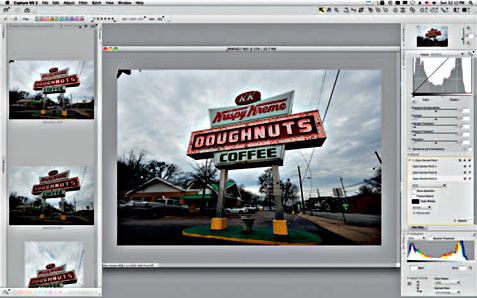
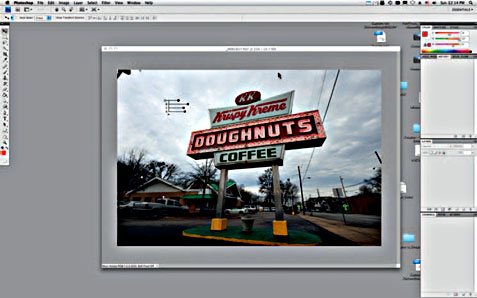
Figure 9.4

to recover overexposed highlights, restoring image detail to blown-out areas of an image. This should be a standard feature in any good RAW conversion program as it is essential for the photographer shooting RAW format.
Selective Editing
Capture NX’s already excellent localized editing tools are now even better. Actually, Capture NX 2’s biggest strength is its selective editing capability. Using the control points found in Capture NX 2, you can easily create precise multiple selections and masks that can be individually adjusted. This is a much easier process than it is in Photoshop. Using a control point is as simple as clicking it on the adjustment area of the image and using the sliders to adjust brightness, contrast, and saturation. You can even adjust the size or radius of the adjustment area. The color is sampled beneath the area of the control point, and this information, along with the radius area of the control point,
is used to calculate the scope of the adjustments. Using color in addition to the selected radius area keeps the adjustments extremely well localized.
Batch Processing
Any edits can be copied and applied to any number of images in the group. This is particularly handy when you have a large number of images shot under the same parameters. You can literally copy and paste any edits, including selective edits, from any image to another or to a whole folder of images. This dramatically speeds up the workflow process.
Even if you are not planning to shoot in the RAW format, and you primarily work in JPEG mode, Capture NX 2 is a good alternative to some of the other stock editing programs out there. Most Nikon cameras come with a 30 day trial, or you can download trial versions from the Nikon web site. It is certainly worth a look on your part as Capture NX 2 is a powerful editor for processing NEF RAW or JPEG files.
Other Considerations
There are several other popular image editors out there and in our opinion any one of them will deliver professional quality results when properly used. Workflow has become more and more of an issue with the digital age. Unlike the film days, many photographers today finish a wedding with anywhere from 800 to 2000 images that they have to process themselves! Consequently, good results with minimal time investment have become foremost in the minds of many. It usually comes down to what you are comfortable using and which image editor delivers the desired results with the least hassle.
Adobe Camera Raw
One of the first, and consequently more popular, digital image editors is Adobe Camera Raw, which is built in to Adobe Photoshop and now Adobe Photoshop Elements. If you already own one of these programs and you are familiar with the operation of it, it’s certainly tempting to stick with what you know.
The Camera Raw user interface is intuitive but, more importantly, keyboard shortcuts, editing tools, and the menus all behave in

the familiar Photoshop fashion so anyone already familiar with Adobe’s programs will easily acclimate to Camera Raw. Cropping and resizing, and adjustments to exposure, contrast, saturation, and white balance are easily accomplished with the intuitive toolbar.
Batch editing is a simple matter as well. You can control or command click on multiple images, make adjustments to one, and have the adjustments applied to all selected images. This is particularly handy when setting white balance and exposure to large numbers of studio shots with the same lighting. You can even save a set of adjustments and load them later to apply to a different image or set of images.
Adobe Lightroom
Although the Camera Raw engine is the same, Lightroom ofers many features above and beyond what’s found in Photoshop’s

Camera Raw. Many photographers have flocked to Lightroom as a sort of ‘one-stop-shopping’ application. In addition to the non-destructive editing and processing of digital files, Lightroom is engineered with storage and archiving in mind. Images from your Library can be stored in Collections. With the use of Keyword Tags, management of large digital archives can be a simple task. If you commit to learning and using the Lightroom system you will be able to locate any image in your archive quickly.
Other great features include the convenience of browsing images in a slideshow format and the ability to export slideshows. Output options include print and web layout, with automatic gallery creation and upload capability.
For those who do not have Photoshop and shy from the steep price or the learning curve, Lightroom is a great solution for archiving and taking your files all the way from the camera to print and/or web.


Figure 9.9
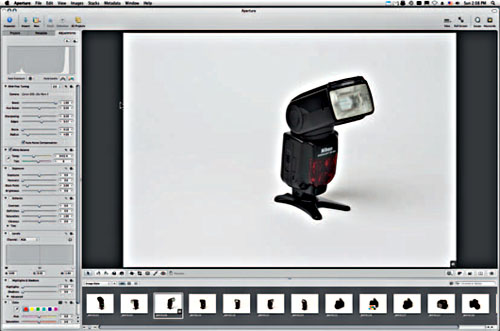
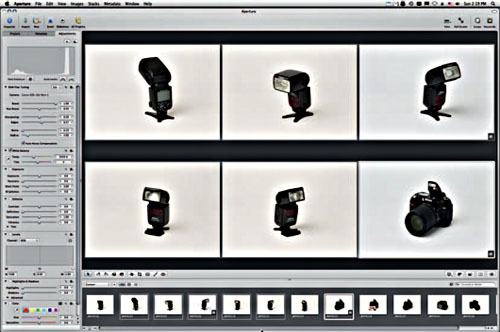
Aperture
Apple’s entry in the digital editing arena was widely anticipated, but the first version proved to be a bit less than many photographers had hoped for. Version 2, however, has proved to be an excellent program for managing and editing digital files. Like Lightroom, many photographers find an attraction to editing, archiving, and managing output from one source program. As with Lightroom, the ability to add keywords to an image, and save each work session as a separate project, definitely speeds the digital workflow process. Aperture also makes global or batch-style editing an easy process. Aperture’s interface is both intuitive and user friendly making it an all-round good choice for any photographer with a Macintosh computer (no Windows version at the time of writing).
In Conclusion
For the sake of a good solid workflow (and your sanity) we recommend finding and sticking with an image editor that
is easy to use, and that suits your needs as a photographer. Constantly changing to a new image editor, because you hear it’s the latest and the greatest, becomes tiresome, counterproductive, and it cuts into time you could be out there shooting great images.
Peter B. Kaplan
Peter B. Kaplan was born in Manhattan, NYC and raised in Great Neck, Long Island. He has lived in New York City, NY, and Chilmark, Martha’s Vineyard, MA and at present resides in Hockessin, Delaware. He still maintains a studio in New York City where he resided for over 30 years. After his military obligation, he continued his college education majoring in photography at Sam Houston State in Huntsville, TX. He assisted many of New York’s top commercial photographers and, because of his avid interest in nature and wildlife photography, studied under Ansel Adams, Bob Sisson and Doug Faulkner.

His interest started to shift to architecture upon completion of the World Trade Center in 1974 when his specialty of ‘Height Photography’ was born. Mr. Kaplan’s photographs have been placed in time capsules under the Empire State Building for its 50th Anniversary and the Brooklyn Bridge for its 100th Anniversary, and also in the spire of the Chrysler Building during its 50th Anniversary Restoration. He was awarded the title of the ‘Preferred Photographer’ of the Statue of Liberty/Ellis Island Foundation, Inc. where he was a volunteer for 10 years, starting in 1982 when they began the restoration for the 100th Anniversaries of these two world renowned monuments. He has created over 125,000 images, while painstakingly documenting every aspect of the Statue of Liberty’s historic restoration. To date, he has the most extensive and complete story on the Statue. These photographs were used to raise over $500 million for the restoration of these two national monuments.

He has been featured numerous times on the Today Show, Good Morning America, Sunday Morning with Charles Karult, P.M. Magazine, Cable News Network and Real People just to name a few. He has appeared as a spokesperson for Eastman Kodak, Nimslo 3D Camera, Soligar Lens and Nikon Cameras. His photographs have appeared in almost every major magazine in the world and have hung in shows at the Canton Art Institute, Ohio; Cooper-Hewitt Museum, NYC, Municipal Arts Society of New York City, New York Historical Society, NYC; N.Y. State Museum, Albany: Nikon House, NYC; Museum of Modern Art, NYC; Smithsonian, Washington DC and International Center for Photography, NYC; to name a few.
He was honored when the United States and French Governments selected his image for the Statue of Liberty 100th Anniversary Commemorative Stamp issued July 4, 1986. His images were also selected to appear on 170 different commemorative stamps in 13 other nations.
Harry N. Abrams published his first book, High on New York. ‘These unusual pictures combine the skill of a professional photographer, the perception of a fine painter and the daring of a trapeze artist,’ said Paul Goldberger, Architectural critic for The New York Times. His Statue of Liberty photos were used exclusively in two books published for the centennial of The Statue: A Celebration of Freedom and Liberty, The Statue and The American Dream published by the National Geographic Society.
In May 1987, the Friends of the Golden Gate Bridge appointed Mr. Kaplan the ‘Official Photographer’ for the 50th Anniversary Celebration of the Golden Gate Bridge. Eastman Kodak created a limited edition of dye transfer prints from this assignment and presented these to various dignitaries.
In 1990 he was sponsored by Eastman Kodak to produce a one-man show called Three Coasts, which was on display for over a year, at the Museum in the St. Louis Arch for their 25th Anniversary. In the summer of 1991, the ‘Operation Welcome Home, NYC’ committee named him the official photographer for the parade. In 1992, he created the advertising photos for the World’s Fair in Seville, Spain. The following year he created advertising photos for the German Bundapost. Both of these images were created from cranes with his signature 16 mm fish-eye overview.

In 1985, he married Sharon Rosenbush in a ceremony held on the 96th story ledge of the Empire State Building. Their wedding bands were created from scrap copper of the new torch of the Statue of Liberty. They have a daughter, Ricki Liberty, and a son, Gabriel Liberty. In 1995, Mr. Kaplan moved his corporate headquarters to Hockessin, Delaware, where at present he resides with his family. Since moving to Delaware, he has had several one-man shows and in 1997 he was awarded a State Fellowship and an NEA grant to work on his newest Statue of Liberty book, released in December 2002, called Liberty for All written with his co-author Lee Iaoccoa.
In the spring of 1998, the US Postal Service released the Art Deco Commemorative Stamp in the Century series using Mr. Kaplan’s Chrysler Building image. In November 1998, he did the first pull-out cover for the 90th Anniversary issue of Philadelphia Magazine, along with an eight-page essay inside showing his height and special technique called ‘Pole Shots’ of Philadelphia. In 2002 he had more images selected than any

other photographer to use in the one-year commemorative book of 9/11 published by Rizzoli called Eleven. In 2003, his work was selected to be used in America 24/7. In 2004, as well as having many images selected for inside use, his image was used as the cover of the Delaware—America 24/7 state book.