
5
SOLVING PROBLEMS AND SETTING PRIORITIES
This first group of designs addresses the most common team activities we find in the working environment—solving problems and figuring out what to do first, with our ever-shrinking time and personnel resources. Problem solving on an individual basis is relatively straightforward—you just have to make a decision (or a series of decisions) and then see it through. Simple. But group problem solving is an entirely different animal. Without facilitation, even a group that is highly skilled in problem-solving techniques will struggle to make decisions efficiently, because we are all human beings with our own agendas, egos, and ways of seeing the world. The facilitator’s role is crucial in both mediating individual personalities and keeping the group on track.
There are many approaches you can take to complete these activities, but the ones we are about to show you are different in that they engage the brainpower of the whole team. This is built on the assumption that most groups are undisciplined when they engage in a group-oriented problem-solving discussion. Not only do a few people tend to dominate the discussion, but some individuals are often in a hurry and leap prematurely to predetermined decisions, wasting the group’s time justifying their ideas. Any good problem-solving process provides a structured approach that first diagnoses the problem and then ensures a rigorous discussion among the participants. This usually demands a facilitator who can guide the team through a step-by-step process and allows a thoughtful process to unfold. And they must help the group decide on an effective decision-making process so that no one person or small cabal of individuals can manipulate the situation. Thus, the facilitator acts as guide, arbiter, and educator of the group, helping to establish rules of engagement that can keep the members on track.
We believe in having choices to fit the needs found in most efforts of group problem solving. Here we provide five methods, all with unique selling points. Take time to familiarize yourself with all the designs, their strengths and their limitations, and the different skills and behaviors to which the participants will be introduced. All these are important factors to bear in mind when the time comes to decide which design you will use. Also, your familiarity with all aspects of these designs will expand your capacity to eventually create your own designs to meet the unique needs of teams or groups you work with.
Future Search
The Future Search design (Figure 5-1) takes its name from seeking out all-new possibilities for a better future by canvassing ideas from a large number of people (ranging from eight to 40) in a short amount of time. It is also known as the Interview Design or Speed Dating because of its layout. It is one of the easiest designs to facilitate as a novice because it is so structured. You do not have to be a charismatic facilitator. The process is highly engaging and grabs the interest of the participants as long as the problem is relevant and the diagnostic questions are stimulating and interesting. Follow the structure and you are guaranteed a positive result and a fun experience. But be warned—miss a step and you may have trouble. Thus, while the design can be used with many kinds of problems, it does have a stepwise process that has to be followed. So, please be extra careful to follow the detailed instructions, because this process can be very challenging to explain to participants.
The design is a creative way to collect and organize ideas from your team, by having them “speed date” their way through a series of up to six questions. It can be used as a diagnostic tool within a team or larger organization to uncover difficult issues, while also beginning the exploration of solutions to those issues. It is adaptable to a wide range of situations, is easy to replicate once the design is understood, and perhaps most important, it’s enjoyable for those participating. We know this because our meeting evaluations show this design consistently receiving the highest marks. Following is a demonstration of how to harness the collective brainpower of your team in five easy steps.
Figure 5-1. Future Search

Let’s use an example: Imagine that you are a facilitator within a division of a large service organization. Six months ago, there was a reorganization of this larger organization that led to some negative influences in both productivity and morale within your division. Many of your leaders are dissatisfied with the new organization and severe restrictions on spending that came with it; while they understand the financial constraints, they also want to do something to fix the situation. You have been asked to facilitate a session using the Future Search design to help these top leaders remedy some of the issues.
Step 1: The Pre-Work
You schedule a half day for your team of leaders, realizing that this may be the first of several sessions required to resolve the issues. You believe the Future Search design will initiate a process of true engagement, after a period of top-down crisis reactive management during the months following the reorganization. Given the acknowledged problems in the transition period, you ask the leaders of the organization to each submit an anonymous list of the six issues they believe need to be addressed by the group in the half-day session. From that information, you craft six questions that will provide the focus of the group’s effort.
Here are some example questions based on this organization:
1. What factors in the current reorganization are not working and need to be addressed? Please be specific.
2. What advice would you give [the division boss] as they attempt to improve the organization’s effectiveness?
3. What factors are undermining our productivity?
4. Given the challenges of the past few months, what are three things you would do immediately to increase morale?
5. We’ve been told that communications have suffered as of late. What would you suggest specifically to remedy this situation?
6. What are the two toughest questions we should be addressing as a division, but people might be reluctant to ask?
The questions must be challenging, relevant, interesting, and able to be answered by the participants in a short amount of time.
Step 2: The Setup
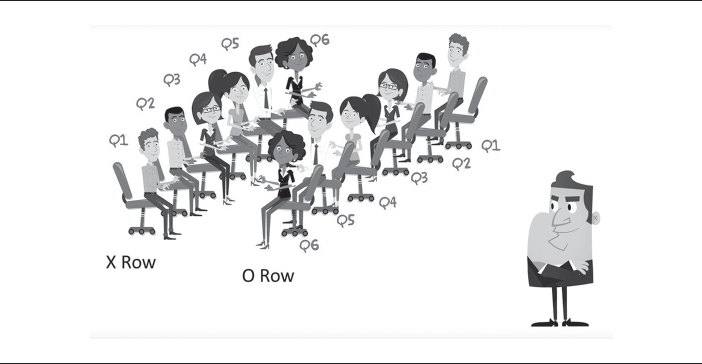
There will be 24 participants for the session, and you arrange the large room with the chairs in four rows of six, facing each other and close together (Figure 5-2). It is important that the chairs stay close together throughout the design. We have found this provides the participants a more personal experience, almost as if they are sharing a secret. On each chair, you have placed a pad of paper, a pen, and a sheet of paper with a single question lying facedown. The format for the question sheets is the question number, the actual question, and a large letter X or O. The X or O simply denotes which row the question sheet will be placed on and will be helpful later, when we describe to the participants who should be doing what. As you will see in the detail of the design, there will always be an equal number of Xs and Os.
Figure 5-2. Future Search Setup

Step 3: The Speed Dating
Ask the participants (who have having been waiting in another room, with coffee and snacks), to sit in any chair, but not to look at their questions yet.
Explain that they each have a question numbered from 1 to 6. Also, on their question sheet they have a large letter X or O. Those who have an X on their paper will, when you say go, lean forward to the person sitting across from them and read their question to the individual (an O person) and, at the same time, show it to them. Some people have an easier time processing the question when they can read it, while others do better when it is read to them, so it’s important to include both options (Figure 5-3).
| TOP TIP | If one of the six questions is about the boss, do not place participants in the position of having to answer that particular question directly to the boss. Make sure the boss has a different question to ask. |
The individual receiving the question will then have three minutes to answer the question as best they can. In the first three-minute round, all the Xs will be listening at once. Then in the second round, all the Os will be listening and the Xs sharing their responses to the question—so be prepared for the room to get noisy.
As the facilitator, encourage the interviewers (those asking the questions) to probe for examples, getting the best information possible. All the information gathered is anonymous, therefore no names will be attached to any statements made. It is important to emphasize this, especially when the group has lost some trust, as in this example. Also, tell the group that later each participant will search for patterns among the data they have written down; thus, taking good notes is important.
At the end of the first three-minute round, indicate that it’s time to switch, and the people in the O row will then ask their question to the X person. Again, it is best that they both read and show the question and seek examples whenever possible.
Figure 5-3. Each Participant Will Ask One of Six Questions
After the second three-minute round, have the participants rotate. The people in the O row will move one chair to their left. The person at the end will move around to the back end of their row, as you can see in Figure 5-4. The people in the X row will remain still throughout the process, and everyone keeps their same question for the next round.
Once all the Os have moved, start the next round of three minutes, with the Xs asking their question to a new individual. This process continues until the Xs have had the opportunity to talk to every person in the opposite row.
Figure 5-4. O Row Movement

| TOP TIP | Make sure that the chairs stay close together once people have moved. Some people will try to shuffle themselves farther apart while you are not looking, because they are uncomfortable being in such close proximity to others. |
Tell the participants that at some point they will have the opportunity to answer their own question because every question is duplicated. This means they should focus on capturing only what other people say—without putting their own spin on things.
It is important to give the directions twice. While nothing in the directions is particularly difficult to understand, it might be an unusual event for the participants. Also expect to answer many questions about the process and who should be doing what and when.
Step 4: Organizing the Data
In about an hour (including the setup, explanations, and all the moving around), the Future Search process provides a complete sample from those present. Now the challenge is to make sense of the information. Ask the participants to take another 20 minutes to individually organize the data from their question. A best practice is to use the process of truths, trends, and unique ideas—the same process that you’ll see in other designs such as Genie in the Bottle or The Carousel.
Truths: A truth is a response to a question that cannot be denied. It is mentioned or agreed to by at least four of the six individuals interviewed. It is so powerful that it seems to leap off the page. Sometimes there is no truth. In the situation in our example, one would anticipate that some truths will exist.
Trends: A trend is mentioned by two or three of those interviewed and if not addressed might turn into a truth or become a bigger problem in the future.
Unique Ideas: A unique idea is one that the interviewer believes is important to discuss, adds dimension to a problem, or warrants further examination. Clearly this can be a somewhat subjective process. Nevertheless, such creative and potentially valuable ideas shouldn’t be lost. Often brilliance does not come from the view of the majority.
Step 5: The Presentation
Once the participants have organized their data individually, you should create new groups of four, based on the question numbers people have been working with. All the individuals who interviewed with question 1 will get together, share their conclusions, and reach a consensus about the information to be presented to the larger group. If one person has an issue as a trend and another has it as a truth, the group of four must negotiate for the final categorization. If they can’t come to some agreement, the idea won’t be presented. The negotiations take about 20 minutes, and at the end, each group of four will have agreed on one set of truths, trends, and unique ideas that they believe must be presented to the larger group and reflects the current reality for that organization.
Then each presenting group selects the most important issue that they agree must be addressed to present to the large group. Again, they need to agree on which one. To make this issue memorable, they design a brief three- to five-minute skit or vignette that demonstrates it. It can be a serious or humorous depiction of the issue, and they can use props, exaggerate—whatever will make it resonate with the group. This should take about 20 minutes to design. Asking people to design a skit may generate a bit of resistance, because it forces people to choose a difficult issue and puts them into a performance role. The surprise is that these vignettes tend to be the most memorable parts of the entire activity.
Finally, each group has about five minutes to present their information to the large group. They read their question. Then, without discussion, they present their skit. And then, one or more people present the truths, trends, and unique ideas for their question.
It is not uncommon for similar issues to arise from very different questions. Obviously uncovering the issues is the first step. You will need to schedule additional follow-up work to figure out what to do to address these issues, but you could immediately take a quick vote to try to prioritize them. Planning a follow-up activity using a design like our 6-Step Problem Solving would be a good way to engage the group in solving them, whether immediately or at a later date. While this is primarily a diagnostic design, some of the responses may have solutions embedded in them.
Here is a summary of the steps with the time needed for each.
| Step 1: The Pre-Work | 60 Minutes (before the session) |
| Step 2: The Setup | 30 Minutes (before the session) |
| Step 3: The Speed Dating | 60 Minutes |
| Step 4: Organizing the Data | 20 Minutes |
| Step 5: The Presentation | 70 Minutes |
| Total Design: | 2.5 Hours |
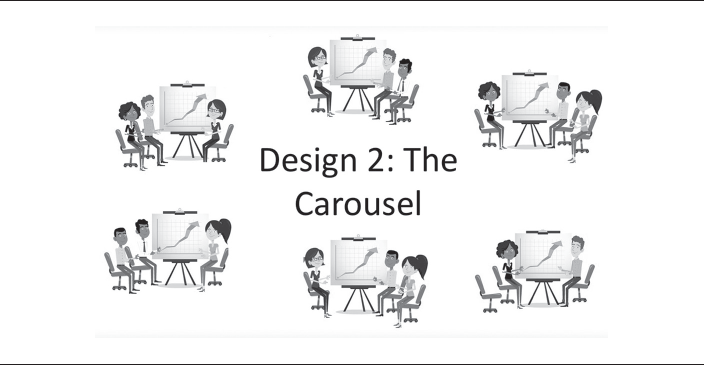
The Carousel
The Carousel (Figure 5-5) is a simple yet creative design for engaging up to 30 people in problem solving by seeking their answers to as many as six challenging questions. One of the concerns with group problem solving is that participants can show up with the solution already in their minds. When this happens, it can be difficult for people to hear solutions different from their own cunning plans. The trick for facilitators is to expect this to happen, and to have a great design up their sleeves to deal with it. There are two things in particular you need to watch out for:
1. If you put people in a group and tell them to explore solutions to a problem without first uncovering all the underlying causes, you may generate solutions that might be fixing the wrong problem.
2. It is important that you harness the collective brainpower in the room by making sure you hear all the different perspectives of those present.
If we can do this without a few people dominating the discussion, then we are giving ourselves the best chance of creating truly brilliant solutions. The Carousel design is just the ticket for achieving this.
Figure 5-5. The Carousel
Step 1: The Pre-Work
As in the Future Search design, the first step is about creating powerful questions that will be used to challenge the group. Do not underestimate how important this step is. The quality of your questions will dictate how successful the problem solving actually is.
| TOP TIP | Carefully choose a couple of people to help you craft the questions. You need to use people you can trust and who know the situation well enough to be honest about what the real issues are. |
Let’s use an example to demonstrate how to create really great questions. Two small companies have recently merged. The financial and business rationale for the merger is sound. But, as often is the case, the merging of the two cultures has proven to be a challenge. The new leader decides to use the Carousel design to get people talking about the kind of culture they should be striving for in the new business. He engages a couple of highly trusted leaders from each of the two former companies, and together they create six tough questions to be addressed by the group:
1. What behaviors do you believe must be part of our new company to ensure a climate of trust and candor? This question sets out to reveal culture, trust, and candor, which are not things you can easily see. If the question asks about behavior, then the answers to the question will demonstrate the invisible culture you are looking for.
2. Given our fresh start, what dysfunctional behaviors have you experienced previously that you hope are not part of our new company? This question works because you are not asking them to “out” anybody doing anything dysfunctional—it’s a question focused on the future that they can all answer.
3. What sources of stress should we try to diminish as we move forward? People love to talk about their stress, but rarely do they get a chance to do something about it.
4. In any merger, there are barriers that can reduce success. Which of these do you think are affecting us and how? This question helps set the tone because it assumes that such barriers will occur and people are experiencing them now. Thus, people are safe to talk about them because they are systemic.
5. What have you most valued about people from the other organization? This question forces people to look for positives from the other side, which helps get people out of their entrenched positions.
6. If you were the leader, what would you and your new leadership team need to do differently to be truly high performing? This is a good question because people love to criticize and give advice to their leaders.
The final part of step 1 is to decide who will be attending the meeting. It is essential to choose enough people from different parts of the organization to provide an end-to-end view of the problem you are trying to solve. In the example, the new leader invites a selection of 18 individuals from each former organization, the bulk of the new leadership team, and perhaps a few suppliers or customers who have longstanding relationships with each of the old companies.
Step 2: The Setup
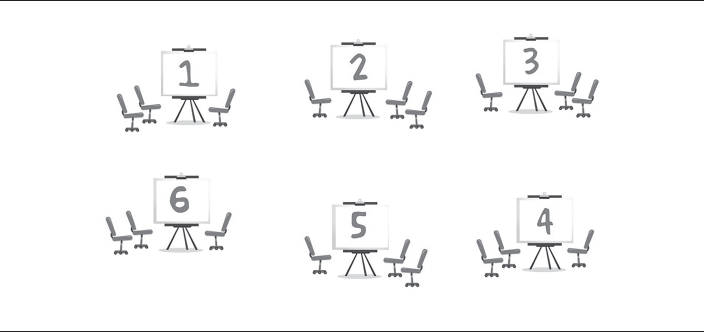
Arrange for a large open room without tables. Place six easels at various points around the room, perhaps 20 feet apart. Place chairs around each easel, according to the size of the group you have. If your group is 18 people, divide that by six questions and you will have three chairs per easel. On each easel, write the station number (1, 2, 3, 4, 5, or 6) on the top flipchart page, then turn the page over, and write the corresponding question on the next sheet. Don’t forget to turn back over to the number page once you are done writing the question, and make sure you leave plenty of masking tape and markers at each easel (Figure 5-6). Repeat until you have set up all your questions.
Place enough additional chairs to seat everybody, either at one end of the room or in a separate room, depending on your venue size. When the participants arrive, ask them to sit in these chairs for a 10- to 15-minute introduction. It is important that the leader provides this introduction, even if you or someone else is facilitating the design. This shows the group that the leader is committed to both the process and the outcome. They need to set the scene for the problem to be solved, give as much context as possible, and encourage the group to be completely honest.
Step 3: The Carousel
Now it’s time for the facilitator to set the design in motion. Tell the group that in order to explore what their new culture needs to be, you’ve developed six questions. Tell them that in a moment they will move over to the working area, where they will find six numbered easels, each containing one question. After this brief explanation, divide the group into six groups of three—the more random the better, but also with a good mix of people from the two previous organizations. Have three to five individuals at each easel.
Figure 5-6. Carousel Setup
Ask everyone to go to their assigned easel. Expect at this point for people to be moving in all directions, and a few to not move at all, looking confused. Your job as the facilitator is to keep calm, repeat the directions clearly, and generally help shepherd them all to the six new subgroups. Once they are all in position, tell them they will have 10 minutes to take turns writing down all their answers for this question, before they move on to the next question. If one person, for example, has three ideas, the second person can make a check mark next to any idea that is similar to their own (instead of writing the idea down again), and then write down their “new” or additional ideas. The third member would then follow suit, checking off any ideas they have in common, and adding any additional ideas.
| TOP TIP | Try to identify the most outspoken or influential people—and in this example, which of the two organizations people are from—before you implement the design. This is so you can discreetly tweak the makeup of the subgroups to ensure a balance of assertive people in each one. A good way of doing this would be to prepare name tags for everyone and print their subgroup numbers on the back. If they ask how the groups were selected, simply tell them that you attempted to ensure heterogeneity. |
You can also suggest that they nominate one person to scribe in their subgroup and capture one idea at a time from each person, so they all get a chance to contribute from the get-go (Figure 5-7). Once they are clear on the instructions, tell them to turn over the page and start answering their question.
Figure 5-7. Answering the First Question

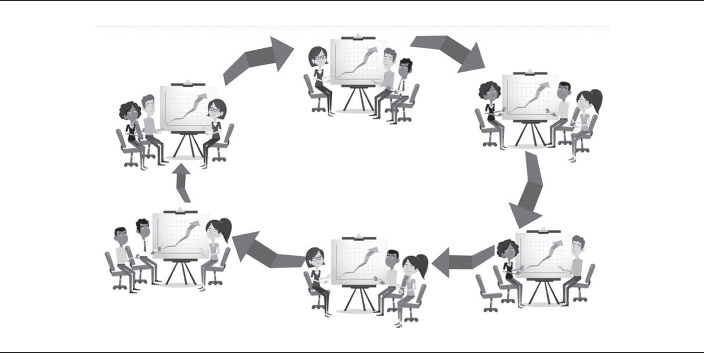
After this first 10 minutes, regardless of whether they’ve finished, tell the subgroups to move to the next easel to their right (Figure 5-8). Tell them they now have 10 minutes to add their new ideas to the information already captured by the previous subgroup. If they agree with any statements already on the sheet, they should again make a check mark against these. Having each group write in a different color can be a good idea so you can see the differences in input as they are created. It’s a good idea for each group to have a different individual start the process for each round.
Keep the subgroups moving around until they end up at the easel where they started. They will probably need to use several sheets of paper, so tell them to stick any filled sheets on the wall and start a new sheet. As the design progresses, you can normally shorten the time spent at each easel, because there is less to write down. If all the groups have finished writing at, say, seven minutes, you can tell them to move on—so make sure you are paying attention as they finish.
Please note that the way this section is explained is intentional: The instructions were very clear and concise, they were given in very small chunks, and only at the exact time they were needed by the participants. People who are not used to working in this way might either misunderstand what is required of them, or just flat-out panic. Running the design in this way will greatly reduce the amount of chaos—and help you make sure the participants have fun in the process. In many new groups, it’s difficult for some people to ask clarifying questions because they don’t want to feel stupid.
Figure 5-8. Groups Moving Around the Room
Step 4: The Summarization
Each of the six subgroups now has 20 minutes to create a one-page summary of the information provided on the sheets for their question (this is the one they started with and are now once again standing in front of). They must identify the areas of greatest agreement and any unique statements that are important to them. For example, a brilliant idea may have been posted toward the end, and there might be only a few check marks of agreement. If the members of the original group believe the idea is worthy of being presented to the larger group, then they can make certain this happens by adding more check marks to it. The idea is to have a list in some order of importance that is composed of discrete issues that need to be addressed.
Similarly, the original subgroup may have new ideas of their own to add after completing the whole circuit. As they go through the summarization process, the main guideline is that all members of the subgroup must agree on what is presented to the larger group. It might make sense to organize the data into truths, trends, and unique ideas, using the process described in the Future Search design. This is the facilitator’s call.
Step 5: The Report Back
The subgroups have five minutes to present their one page of conclusions to the entire group and take questions as necessary. This is not the time to debate the findings, but an opportunity to clarify the points being presented.
Step 6: The “So What”
The leaders are now armed with a range of suggestions and beliefs in relation to the questions posed. You, as facilitator, will need to have the division leader close the meeting, making sure they thank the participants for their time, ideas, and honesty. They also need to explain that this is a great starting point and to specify what will happen next with their data. It is common for facilitators to forget this final point.
You could plan to immediately engage this same group in turning their data into specific recommendations and action plans by choosing a follow-up activity from one of the other 12 designs. Or, you could do this later, perhaps with a different group. Either way, detailed strategies will need to be developed to bring these initial ideas to fruition. You (with the leader’s blessing) could also develop a task force—one person chosen by members from each group. These six and the boss would meet with the facilitator’s help to frame the issues generated in each of the six groups. How and when these issues would be addressed can differ, but often this group becomes a design group for further problem solving. This is a good way to educate others in the organization with concepts of design. If you take this approach, ensure that these ideas are reported back to all the participants of the original Carousel activity.
The biggest error that the leader of this event could make is to not act after such a collaborative process. As the facilitator, you might want to remind them of this fact and the disillusionment and cost to group morale this would create.
Here is a summary of the steps with the time needed for each.
| Step 1: The Pre-Work | Up to 60 Minutes (before the session) |
| Step 2: The Setup | 15 Minutes (not including setup) |
| Step 3: The Carousel | 45 Minutes |
| Step 4: The Summarization | 20 Minutes |
| Step 5: The Report Back | 30 Minutes |
| Step 6: The “So What” | 10 Minutes |
| Total Design: | 2 Hours |
SCALING THE DESIGN
This example included a group of 18 people, which gave the new leader subgroups of three. If the leader had chosen 30 people, this would result in six groups of five. While five groups of six is an option, avoid having any more than six people in a subgroup. Even six people in a subgroup makes it challenging to engage them all in the 10-minute sessions. The ideal number of people in a subgroup is four, giving you a group size of 24 with six stations. As the group starts to get smaller, instead of having only one or two people in a subgroup, it is better to reduce the number of questions to four or five. After all, one of the benefits of this design is that the subgroup members can build on the ideas of others.
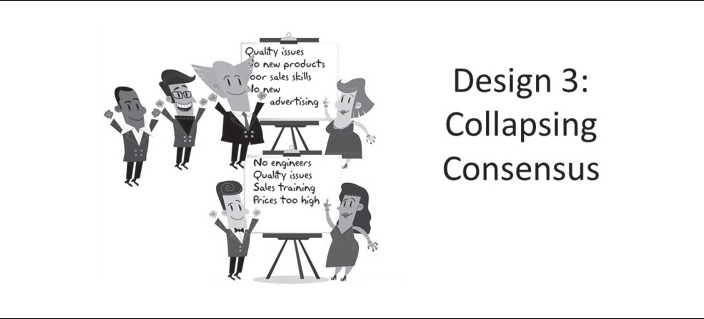
Collapsing Consensus
The Collapsing Consensus (Figure 5-9) is a simple but incredibly effective design for collecting and organizing ideas from a group that cleverly ensures a high degree of engagement from participants. The design can be used in many different ways, such as a stand-alone event or as part of a more complex design strategy. Its use can make any facilitator stronger, because it can move a stalled group toward action, be a useful diagnostic, help in creating consensus, ensure greater participation from low talkers (while limiting the participation of those who predictably hog center stage), and optimize the use of everyone’s limited time. It can be used with as few as four people and with as many as 100—and so it is a critical part of your design repertoire.
Figure 5-9. Collapsing Consensus
Basically, it’s a listing process. So many times, a starting point of problem solving includes having a group make a list of possibilities or, perhaps, a list of issues. You can start by brainstorming, but our experience shows that in a group of, say, eight to 10 people, two or three will dominate the session. This is because these two or three might react faster than others, or are less reserved, and others will keep quiet out of habit, respect, intimidation, or annoyance: “Why bother? There they go again; just let them do it.”
We have discovered over many years and considerable trial and error that clusters of three or four are optimal for ensuring maximum participation in a listing process. However, even when we use clusters of four, good ideas might still be lost because some individuals don’t respond well under pressure, or one super enthusiastic individual gives their ideas while the other three pull back. Using a tool called the Nominal Technique (step 2) within our Collapsing Consensus design can improve the responses dramatically.
Step 1: The Setup
Split your group into clusters of four—the magic number. If your group does not evenly divide into four, you can use a bit of artistic license and have a leftover trio or a pair to make it work.
| TOP TIP | Find out who the most outspoken or influential people are before you execute the design so you can discreetly tweak the makeup of the clusters to limit their power. For example, you could put two high talkers in the same group so they cancel each other out, allowing more participation in the other groups. |
Let’s consider an example group of salespeople from a small medical supply company. There are 13 people in the group, and you divide them into four clusters—A, B, C, and D (Figure 5-10). You could have three groups of three people and one of four, but you need to put your two high talkers together to minimize their domination effects on the whole group. So in this case, we have two groups of four, a trio, and a pair.
Figure 5-10. The Example Group

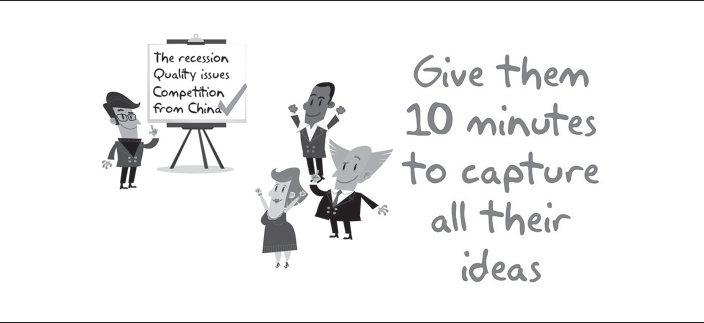
Step 2: The Nominal Technique
Here’s an example question to help demonstrate the nominal technique: “List all the reasons sales have declined by 30 percent since this time last year.” Tell the group to do this first individually in their notebooks, with no talking, and give everyone five minutes to write their top 10 ideas.
Then, nominate one person in each cluster to act as a scribe who will go around their cluster taking one idea at a time from everyone. The scribe will post each idea on a flipchart until all the ideas are captured. If others in the cluster have the same idea, this can be shown by putting one or more check marks next to the idea (Figure 5-11). Give them 10 minutes to capture their ideas.
With our group of 13, we could conceivably get 130 responses. But by putting people in their clusters to work, the numbers are often reduced to about 10 or 12 ideas per cluster, because there will be considerable overlap.
SCALING THE DESIGN
The nominal technique can also be used with a single large group of 10 to 15 people, by asking only for each individual’s top five ideas. Limiting the number of ideas per person like this can still potentially give us 50-plus ideas, but it is manageable due to the many duplicates that will occur and the agreement you will get on themes.
Figure 5-11. Capturing Ideas From the Cluster
Step 3: The Prioritization of Ideas in Each Cluster
Now that each of your clusters has a list of ideas, it’s time to prioritize them. Give each cluster 15 minutes to agree on the best four ideas on their list. In the process, they must create a rationale for why these are the best. It’s OK if cluster members negotiate to enlist support for one idea or another. For example, a member could say something like, “I’m willing to go with idea number three if you can buy idea number nine.” If the cluster can’t agree on four, have them present the ones they can agree to, but no more than four in the time available.
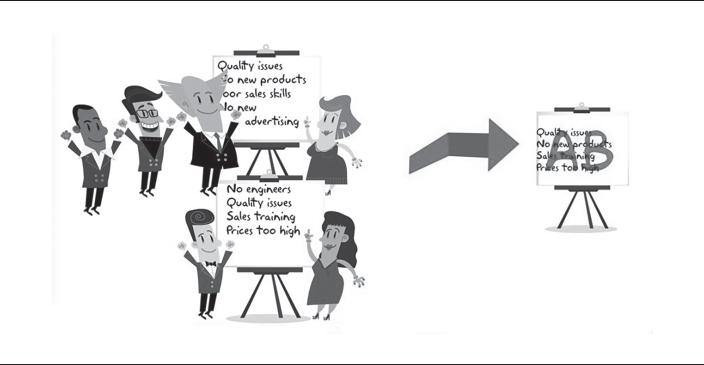
Step 4: The Collapsing Consensus
Now it’s time for the design to get to work. Ask clusters A and B to come together, and clusters C and D to similarly join. Give each new group 20 minutes to do the following: Cluster A will show their four prioritized ideas to B and present why each is important. B members can ask questions for clarification but not for debate. Then, B will give A their four ideas in a similar fashion (Figure 5-12).
There’s almost always at least one item of agreement. If not, cluster A will look for areas of “gentle agreement” on the other team’s list—ideas that resonate with them. The goal is to negotiate as a group until they can agree on a single list of four.
Meanwhile, the same process occurs among members of C and D clusters, with them eventually agreeing on their four best ideas. All group members must agree on any idea that makes their final list, meaning they are willing to live with all the ideas that make it.
Figure 5-12. The Collapsing Consensus
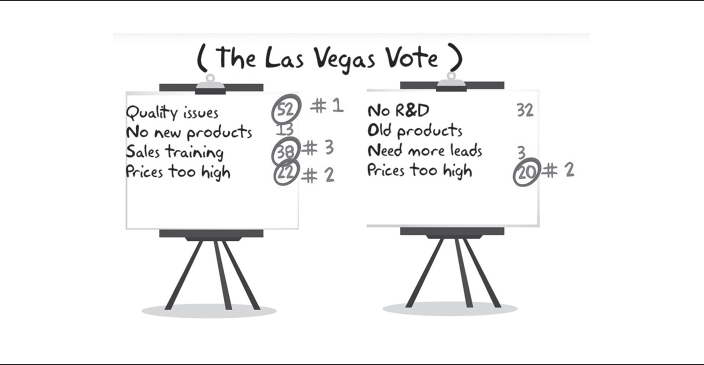
Step 5: The Las Vegas Vote, With a Twist
After groups A and B have agreed on their top four ideas, and groups C and D also have their list of four, have them all come together once again. Individuals from the AB group will now be asked to advocate (with some passion) for one idea from the CD group’s list. Repeat with individuals from the CD group advocating for one idea from the AB group’s list. This can be very challenging for individuals who are particularly entrenched in their own solutions or believe that the other cluster is wrong. The purpose of this is to remind people that the group is after the best for the whole and it’s not a win-lose situation. This is the twist. Make sure the advocating from each individual goes pretty quickly—ideally about 30 seconds per person.
Then, give each individual 10 points that they can distribute across the eight ideas as they wish (Figure 5-13). If they want, they can put all 10 points on one idea—it’s up to them. This is the Las Vegas Vote; it is slightly different from a regular vote because the participants can place all their votes on one idea to sway opinion in a particular direction. It is akin to going all in on a particular number of the roulette wheel. The result of the vote will give the large group some sense of which items have the greatest support, to help prioritize areas of further work. As a final, alternative twist to the vote, you could ask each individual to place at least three votes on ideas that did not come from their cluster or subgroup. It depends how much you want to challenge the participants to rally behind ideas other than their own.
Figure 5-13. The Las Vegas Vote
Here is a summary of the steps with the time needed for each.
| Step 1: The Setup | 5 Minutes |
| Step 2: The Nominal Technique | 15 Minutes |
| Step 3: The Prioritization of Ideas in Each Cluster | 15 Minutes |
| Step 4: The Collapsing Consensus | 20 Minutes |
| Step 5: The Las Vegas Vote, With a Twist | 20 Minutes |
| Total Design: | 75 Minutes |
SCALING THE DESIGN
In this example, we used a group of 13 people. It would be pretty much the same design with as many as 40 members, resulting in 10 groups of four. With a larger group like this, you would keep collapsing the clusters together, multiple times, until you end up with no more than about 12 ideas for the whole group to consider. Also, to save time, we encourage only a couple of people to advocate for each of the final 12 or so ideas. The vote then occurs as before, with each individual spreading their 10 points across the final ideas.
Executives and the Common Person
The Executives and the Common Person design is based on one undeniable fact: The more people feel engaged in their organizations, the better their performance will be in terms of productivity, morale, and profit. Here, engagement represents increasing the collaboration of people with higher-level managers, participating in solving problems that influence their work lives, and having their opinions sought in their areas of expertise (Figure 5-14). Engagement is synonymous with involvement and purposeful behavior. The question is, how can leaders increase feelings of engagement so they can reap the benefits of higher productivity and performance?
Figure 5-14. Executives and the Common Person

This design, although complex and time consuming, has proven to increase engagement, due to the executive team reaching out to other leaders down the chain of command. It works because people love to talk, love to be experts, and love to respond to important questions. However, the questions being asked must help gain information leaders truly want, and the data must be used in meaningful ways.
Step 1: The Setup
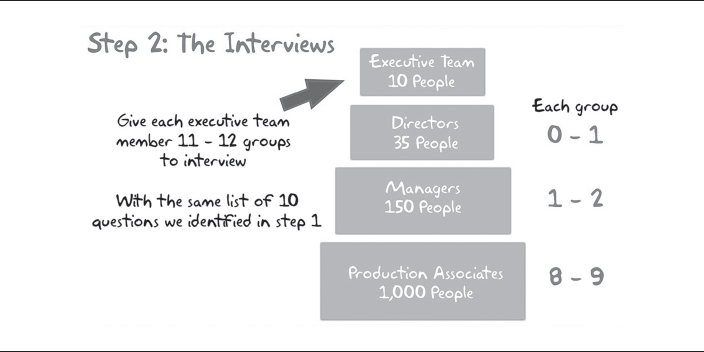
Good questions are the key to meaningful answers, and the way to create good questions is to invest in designing them. Let’s use an example company: Gravitron is a high-tech manufacturing company with good performance, but the executive team now want to take this to the next level and truly engage their associates to help achieve superior results. The company has a well-regarded executive team of 10, 35 directors at the next level down, then 150 managers, and finally 1,000 production associates (Figure 5-15). Because you are an experienced facilitator within the company, your help has been requested to design a way for the executives to learn what is really going on, and what needs to be done to make the company better.
Figure 5-15. Gravitron Management Hierarchy

First, ask everyone in the top two tiers of the organization for their five toughest questions that need to be answered about the current state of the organization. A good way of ensuring participation is to have the executive team explain the project and how much they value everyone’s input. If the request for help comes directly and personally from each individual’s manager, the likelihood that people will respond increases greatly. Once you get the 45 or so responses from this group, select a representative sample of the people involved to help sort the questions. In Gravitron’s case, the facilitator might make up three groups of two executives and four or five directors to review the questions and decide on the top five to be used for the organizational assessment sought by the leadership team (Figure 5-16).
Here are some sample questions the groups might select:
• What are things we should be doing but aren’t that would strengthen us as an effective manufacturing organization?
• What are things we should stop doing to increase our effectiveness?
• If you were the boss, what two things would you do immediately to improve morale? The more specific, the better.
• On a 10-point scale, with 1 being low, how much do you believe your opinions are solicited in your area of work interest? Please explain.
• Respect is one of our five core values. On a 10-point scale, to what degree do you feel respected in your role as a member of this work community? Please explain.
Figure 5-16. Gathering and Sorting Questions

| TOP TIP | When you choose the top five questions, make sure you have some scaled questions as well as open-ended ones. This will help greatly when it comes to making sense of all the data. |
Step 2: The Interviews
Divide up the organization from director level downward into groups of about 10 people from all different levels. In this case, you would have more than 100 groups, each with possibly a director, one or two managers, and eight or nine production associates. Then divide these groups so that you give each executive team member 11 or 12 groups to interview, with the list of five questions we identified in step 1. Each executive will then ask all five questions to each of their interview groups, holding 11 or 12 focus group–style meetings to get the data collected (Figure 5-17).
Because you are acting as a consultant when facilitating this process, it’s a good idea for you to interview the members of the executive team with the same five questions. You can then compare their responses with the other data you’ll receive.
Figure 5-17. The Interviews
| TOP TIP | When you assign the groups to each executive team member, make sure they are not interviewing people directly in their chain of command. |
Step 3: Compiling the Data
With more than 100 interviews, each consisting of five questions, you are going to end up with a ton of data. If you can, engage the executive team to help make sense of the information. This will also help when it comes to deciphering their hastily scribbled interview responses and other shorthand.
As the facilitator of this design, you are responsible for determining the best way of tabulating and presenting the data. One way would be to create a spreadsheet for all the scaled items and graph the responses for each question as a bar chart. This will make it clear where the majority of the responses lie and whether there is a big spread in people’s experiences. The open-ended data are more difficult to organize. One possibility is to load the responses into a Word document and then use word-cloud software, available online, to create a word cloud for each question. Another option would be to turn the open-ended data into scaled data by assigning the responses to themes and then counting the number of hits for each theme. Finally, you might have associates within your company who are good at organizing data, so if this is not your forte, find somebody to help you.
Once you have figured out how best to present the data and have developed templates for capturing them, put the executive team members into pairs and teach them how to organize their data. If you are going to use the executives to help you organize the data, you must make sure the methods you choose are easy to understand, easy to use, and produce similar data independent of individual skill level. This comes back to how you design the data capture templates up front—so be aware.
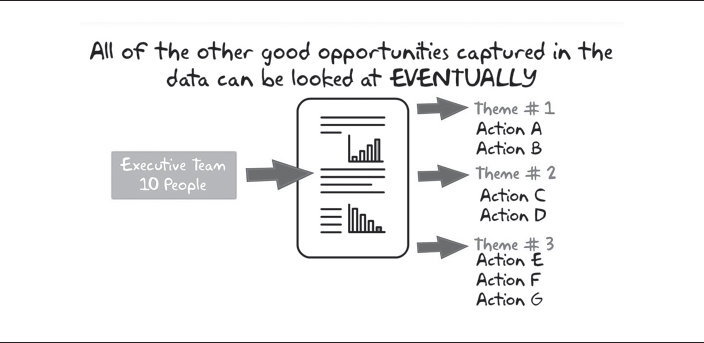
Step 4: Making Meaning
Bring the executive team together and look for similarities and differences across the different data sets. What are the common themes? Where are people’s experiences vastly different? Choosing another design, such as Collapsing Consensus, or a method like truths, trends, and unique ideas to help with making sense of the data might be useful at this point. Make sure you create a summary of the findings that is easy to understand and explains the headlines of the data to be shared across the entire organization. This will provide transparency around the process and reassure people that their opinions have been heard.
Step 5: The “So What”
This step is all about establishing the organizational priorities: what to do first to make things better. Get the executive team together to determine which themes are the most important to them, and under each theme, which actions will make the biggest impact (Figure 5-18). At this stage, keep the actions to a very high level; later, each will likely require their own designs to problem solve and fully define the details.
Figure 5-18. The “So What”
It will be hard to decide on only two or three things to work on in the short term, but you must get them to be disciplined in choosing these. If you try to do it all at once, then the organization will be overwhelmed. The Las Vegas Vote, With a Twist would help with this decision making.
Step 6: Closing the Loop
Once the priorities and action plans have been established, schedule a series of town hall–type meetings to communicate them throughout the organization. To make this process less arduous, you can use the pairs of executive team members from step 3 to lead the different meetings. Make sure you think about how to make these meetings more engaging than a traditional town hall. For example, using the News Conference design (which we’ll cover later in the book) would be a great way to engage the participants in asking questions in a safe environment. Most town hall meetings are not done well at all. They are not easy meetings to facilitate to engage the sheer number of people who attend, so invest the time necessary to design the communication meeting well. Not many executives can present their data in a manner that feels authentic and is effective in communicating the true feelings of the organization. As the facilitator, you will need to help the executive team get this piece right; otherwise, the meeting could feel manipulative or like the executives didn’t really want to hear the feedback they received.
Whatever design you choose for the town hall, try to communicate the priorities and action plans a few days prior to the meeting, so that people have time to digest them and prepare any questions. The town hall meeting then becomes much more interactive than a traditional information broadcast, and the questions asked much more meaningful. After all this effort invested in this design, wouldn’t you rather have an exciting presentation of the process and results, with lots of exciting questions?
Here is a summary of the steps with the time needed for each.
| Step 1: The Setup | 7 Days |
| Step 2: The Interviews | 7 Days |
| Step 3: Compiling the Data | 4 Days |
| Step 4: Making Meaning | 1 Day |
| Step 5: The “So What” | 1 Day |
| Step 6: Closing the Loop | 4 Days |
| Total Design: | 24 Days |
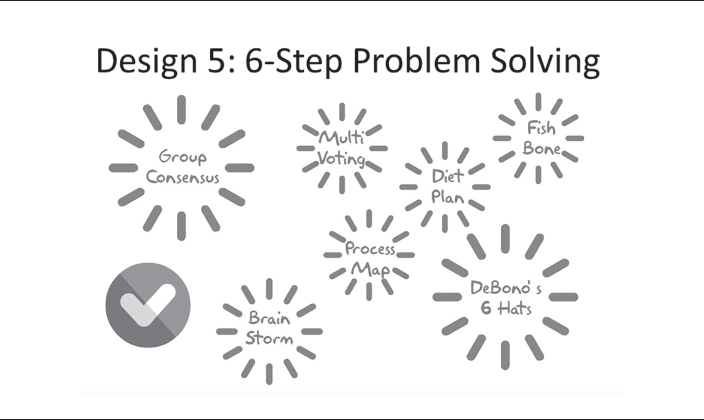
6-Step Problem Solving
6-Step Problem Solving is an adaptable and creative means of solving a problem, while dramatically reducing the possibility of conflict in a group. There are hundreds of approaches to problem solving, and many can be used successfully in group settings. This design not only solves the problem, but does so while building a greater sense of trust through collaboration (Figure 5-19). And you can use the design individually, or in groups of two, 10, or even 20. It is that adaptable.
You can complete this design in an hour, or it could take several. It depends on what you are trying to solve. Two hours is usually enough for most problems, but make sure this is enough time to fully cover all the issues. Please note that if the group is completely unskilled in problem solving or the problem is especially contentious, this activity might take closer to three hours to complete.
Figure 5-19. 6-Step Problem Solving
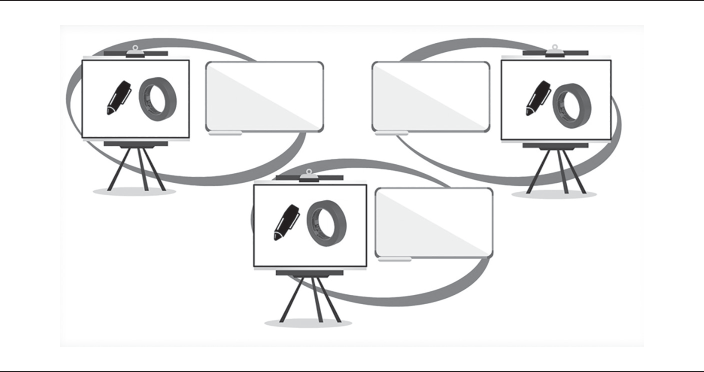
Ensure that you have enough physical space to be able to work in smaller groups, with each subgroup having some wall space, a flipchart on an easel, markers, and tape (Figure 5-20) for displaying the ongoing work of the problem-solving process.
Let’s use an example for demonstrating the 6-Step Problem Solving design. A small college has been losing increasing numbers of students after their second year. The impact on the college is approaching $1.5 million annually in lost revenues. There has also been an impact on morale of the remaining students and faculty, leading to reduced levels of productivity on both sides. A group of four faculty members, three administrators, three students, and two recent alumni have been selected to assess the problem and make specific recommendations for improvement.
The facilitator’s first job is to establish a clear problem statement from which to work. This defines the condition that exists and needs to be addressed. It is stated objectively, descriptively, and as specifically as possible. The more specific the problem, the easier it is to attack. Develop an initial statement for the group, like this one: “An increasing number of students are leaving the college between their first and second years.”
Figure 5-20. Supplies for Working Group
| TOP TIP | Make sure the statement does not identify whether the reality of the condition is good or bad or suggest what things would be like if the problem were solved. Beginning with a description of the current reality reduces the tendency to jump prematurely to solutions, prior to the hard work of the diagnosis. The statement is the first step in the problem-solving process. |
Divide the group into clusters of three and ask them to discuss the problem statement for about five minutes. This can lead to changes in the statement, or some clarification. Both are good. Next, the facilitator should give a preview of the six steps:
• Step 1: The Diagnostic
• Step 2: The Benefits
• Step 3: The Blocks
• Step 4: Dealing With Emotion
• Step 5: Generating Alternatives
• Step 6: Next Steps
It’s important to set some ground rules up front before you dive into the steps. Things like sticking to each step, in order, and not criticizing one another’s input or ideas will reduce almost all of the argument and acrimony that can occur. There are many more that the group can generate.
Now divide the group into three different subgroups with a balanced mix of the participants: faculty, administrators, students, and alumni (Figure 5-21). These might be different groups from before because you now want to ensure that they are homogeneous in their makeup. (The representation of the initial groups does not matter because the purpose is just to increase the amount of talking among the participants.)
Figure 5-21. The Subgroups

Step 1: The Diagnostic
Instruct the participants to use the flipchart and list as much as they know about the condition of student attrition. Exactly what is the current reality? Why do they leave? What has changed? Why do people stay? What do people say privately that they might not say publicly? And what other kinds of information might the group need to gather before it can reach a final recommendation?
The groups should remain focused on generating information about the problem and stay away from any premature problem solving or criticism. Encourage them to ask as many questions as they need to within the 20 minutes you’ve given them. It is helpful to stroll around and be certain that the groups are generating information and not spending time or energy with involved discussions.
At the end of the 20 minutes, ask the groups to select the three most interesting and useful pieces of information they came up with and share these with the whole group. Creating a vivid understanding of the current reality is key to an effective and comprehensive diagnosis.
Step 2: The Benefits
Have the group divide into their subgroups again and take 15 minutes to explore the ideal situation and the benefits to students and the institution if changes were made to the current situation. What exactly would the ideal situation be? What changes must be made from the diagnostic step to move to the ideal state? What would the campus be like if the ideal situation was realized and many of these students stayed? If they were happier? Describe the positive drivers that would propel any change effort forward. It is this discrepancy between the current and ideal realities that creates the tension and motivation to solve the problem.
At the end of the 15 minutes, ask the groups to select the three most interesting and useful pieces of information they came up with and share these with the whole group.
Step 3: The Blocks
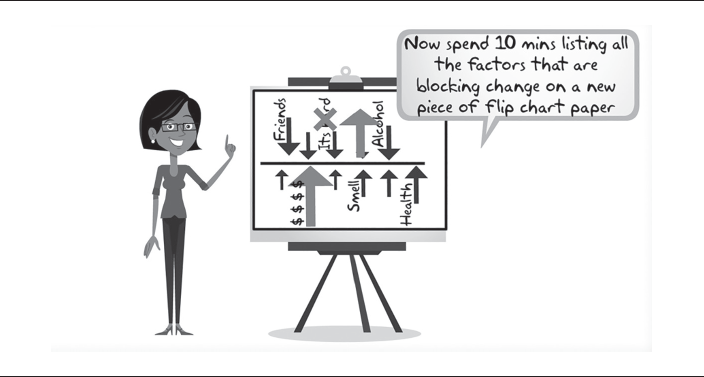
Now draw a force field analysis diagram (based on Kurt Lewin’s work) on a flipchart, like in Figure 5-22.
Pick an individual problem that would be familiar to people as an example to demonstrate the force field analysis (Figure 5-23). Outline some of the benefits for change on the upward arrows, then suggest a few blocks for the downward arrows. Explain that if the group can create new impetus on the benefits (or upward) side of the equation, then there will be movement. Even better, if they can remove some of the resistances (the downward forces), the balance will change and they will be able to make more progress toward a useful solution.
Figure 5-22. Force Field Analysis

Ask the subgroups to spend 10 minutes listing the factors blocking the change (getting more students to stay after their first year) on a new piece of flipchart paper.
Once that’s done, it’s time to get the group thinking in another direction. Ask them to consider this powerful question: What are the benefits of not changing? This helps the participants to realize change is not that easy. For example, if an individual is not a smoker anymore, it may change their identity and their accessible social groups. Add this to the force field analysis diagram from before. Now tell them to spend another 10 minutes listing as many benefits to not changing as they can. Tell the groups that this is a difficult but essential question. It is the blocks and the benefits of not changing that keep the ideal state from being reached.
If they appear to be struggling, you can ask if somebody has an example to stimulate everyone’s thinking. But be sure to have an example of your own ready, in case everyone is struggling, and you end up being left with no examples.
| TOP TIP | As they are working on each question, walk among the groups and encourage them to build their lists of responses. Make sure they don’t get bogged down in premature solutions or unfocused discussion. The idea is to dig out the factors that cause the identified problem. |
Figure 5-23. Force Field Analysis in Action
At the end of the second 10 minutes, ask the groups to select the three most powerful benefits for not changing and share these with the whole group.
Step 4: Dealing With Emotion
At this point, it is more than likely that some strong feelings have risen within people, but they’ve not yet shared them in their groups. Emotions drive change and the resistance to change. Our experience with change management suggests that people are naturally averse to conflict and emotion, which is why the facilitator should address the pivotal place of emotions in the change process.
Ask the groups to shift gears a bit and move away from the structured, rational way they have been assessing the problem and into another important dimension of problem solving. Have them discuss their strongest feelings about the problem and anything that has occurred to this point. They may have strong positive or negative feelings or emotions about what’s happening, or they may not even believe the problem warrants the energy they’re putting into it, or any of a hundred other factors that can get their emotions going.
| TOP TIP | Check on the groups and stop them from attempting to “solve” each other’s feelings. Also, depending on the level of emotion in the room, you might need to let them have a quick break after they have finished this part. It is possible that you will get emotions coming out that have been bottled up for years, so this process can get intense. A break afterward will interrupt the intensity and allow everyone to move on to the next step. |
Give them five minutes total in their subgroups to take turns describing how they feel. Anything at all (that is not an attack on another person) is legitimate. It is not a time for discussion, but it is OK for other members of the group to ask clarifying questions. You will find that five minutes can be a long time for people who are not used to talking about their emotions.
Step 5: Generating Alternatives
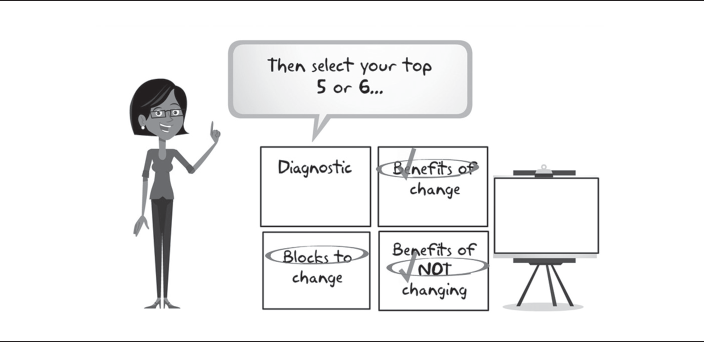
Tell the groups to stick all their sheets on the wall side by side, so they can see all their data at once. Now have them take about 10 minutes to circle on their sheets the forces that can and must be altered if they are going to change the current condition (Figure 5-24). They should select their top five or six. It’s imperative that there is no interest in solving all the underlying issues. At this point, building priorities should be their focus.
Figure 5-24. Generating Alternatives
Now take about 30 minutes to write down the most creative next steps the group could take to start solving their top five or six priorities only. Getting them to focus on these will make solving the whole problem much more manageable and stop them from getting overwhelmed. Get them to use all the information they have on their sheets to help generate strategies that will overcome resistance or blocks and move toward the ideal state. Then write the following on flipchart paper:
• What is your goal, or the desired outcome?
• Who is to be involved and responsible for the outcome?
• When is the outcome expected?
Ask the groups to identify all three of these things for each action. Also get them to consider the consequences of any potential solution. What new resistance might result? What other actions would they need to take to overcome this new resistance?
Have each group present their ideas to the other two groups. They can ask any questions for clarification, but not for debate or criticism. Only once every group has presented their ideas can you move to negotiating the very best solutions. Can ideas from different groups be combined to form even more powerful solutions? Does an idea from one group precede another good idea from a different group? The more you can use the ideas to build on one another, the more engaged all the members will be and the more likely the ideas will be implemented. It is impossible to be prescriptive here about how to achieve this, so the facilitator will need to be creative in the moment to get the best results.
Step 6: Next Steps
The problem with problem solving usually occurs during the implementation of our good ideas. Once we leave the meeting, we can easily be swallowed up by other demands and commitments. As the facilitator, you can minimize the risk of this happening by making some plans to consolidate the gains of the problem-solving session and establishing the necessary follow-up.
One way to do this would be to ask each subgroup for a volunteer, then have these people get together to integrate the lists of ideas. They need to be converted to tangible, prioritized actions, with the details of who will be responsible for what and when. These actions would then be presented to senior management in the form of recommendations that simply need to be approved. The more concrete you can make the next steps toward implementation, the greater the chance that senior management will buy in and the ultimate objectives will be met.
Here is a summary of the steps with the time needed for each.
| Problem Statement | 10 Minutes |
| Step 1: The Diagnostic | 20 Minutes |
| Step 2: The Benefits | 15 Minutes |
| Step 3: The Blocks | 20 Minutes |
| Step 4: Dealing With Emotion | 15 Minutes |
| Step 5: Generating Alternatives | 40 Minutes |
| Step 6: Next Steps | 10 Minutes |
| Total Design: | 2 Hours and 10 Minutes |
This chapter described five designs that can be used to solve problems and set priorities. While different in approach, they all have common threads. For example, most of these designs will help with data analysis and communication. The very act of experiencing them will improve the team’s communication skills and willingness to speak up. They will also learn concrete and reusable tools for analyzing data. Of course, the overarching thread that links the designs is that they engage the brainpower of the whole team.
Which design you end up using in any given situation will depend on your goals for the team. Each has its own strengths and limitations and will require different skills and behaviors from the participants. As you increase your confidence in facilitating these designs and understand why each approach works, you will be able to use individual parts of them, blending them together in your own way, to create unique designs.