
9
TAKING YOUR FIRST LEAP
The purpose of this chapter is to prepare yourself to use these materials with your own groups and teams. The 13 designs and accompanying animated videos will guide you in the proper implementation, so please allow ample time to review them and become familiar with all aspects of each design.
Steps to Use These Materials
1. Write down your specific, outcome-based goals for the meeting. These should include task (what needs to get done) and process (how you want people to feel) goals for the group. It’s critical to consider what you want the meeting to achieve before setting out with a particular design.
2. Decide which design to choose. We have developed a design selection tool to help you with this (Table 9-1).
3. To help you visualize the design in action, watch the animated video for your chosen design (www.TD.org/NotJustAnotherMeeting). You might even want to watch a couple of videos if there are similar designs you could use. This way you can compare the advantages of each design side by side. Note that while the animations greatly enhance your likelihood of implementing these designs in your workplace, the detailed design descriptions in chapters 5-7 convey all the necessary steps to successfully facilitate using the designs.
4. As you watch the video, take notes to help you remember important points. You can pause, fast forward, and rewind as necessary.
5. Schedule the meeting.
6. Take any notes with you to act as a script when you facilitate the meeting.
7. Learn with a partner—somebody who is facing the same challenges of facilitating differently, and who can be an advocate for you as you step forward into these new practices.
8. Use your learning partner as a sounding board. Talk through your design ideas, practice with them before the actual event, and plan for things that might go wrong. Having an ally builds confidence and reduces errors.
Even the most skilled facilitators will be in new territory at this point. Most will question their capability and competence—it is a natural part of the process. So, the key is to be easy on yourself. Prepare yourself well and realize that most errors that occur will not influence the overall outcome. There is always something new to learn from any design.
Design Selection Tool
This tool will help to address one of the main challenges people face when starting to use designs in meetings of any kind: their lack of confidence about which design to use. When you are familiar with the designs, this tool will help you make these decisions by comparing the purpose, group size, time required, and minimum trust level for each one.
For the purposes of the tool, we have categorized trust into three groups: not much, some, and a good amount. Trust is a complicated, hard-to-measure commodity. These categories are meant to help assess roughly how much you have in any group, versus how much trust is required for the design to be successful:
• Not Much: This is the easiest category, because it covers everything from a brand-new team to one that doesn’t talk or even like each other much. Even groups with little or no trust fall into this category, so if you are unsure how much trust there is in your group, use this as your estimate.
• Some: This is a team that has been together for some time, works together on a regular basis, and easily engages in social conversation. The members know one another reasonably well and share stories about their families, weekend activities, and so on. With this level of trust, there is likely to be some conflict avoidance and a lack of willingness to raise uncomfortable issues.
• A Good Deal: This is a team that has been together for a long time and endured hardship together. It could also be a team that has specifically worked on building trust together with some kind of external facilitation. It is rare to find teams with this level of trust. The members will readily and openly give each other feedback (both good and bad), and they will engage in unrestrained problem solving and debate.
If team or committee members have positive relationships, collaborate effectively with colleagues, directly address conflict as it arises, and give and receive feedback as needed, there is evidence that trust will be steady or on the rise. While there is no valid and consistent measure of such trust, these ideas along with the three levels of trust noted here provide a helpful perspective when considering the use of a particular design.
Let’s use an example to illustrate the thinking behind design selection:
Start by writing down your specific, outcome-based goals for the meeting. What do you need to get done (task goals)? Say you want to collect and organize ideas from a group of 12 people. What behaviors, skills, and psychological benefits do you want the team members to come away with (process goals)? You might want every member to feel as if they had their ideas considered as part of the final group decision. You might also want them to learn a new method for putting their ideas on the table.
Next, you need to choose a design. Using the design tool to help with the selection process, first look at which designs will satisfy your task goals. Designs 1, 2, and 3 are all about collecting and organizing ideas. Design 5 also has this as a secondary function. Next, look at group size; with your team of 12 people, all four designs would be suitable.
Next, you look at the level of trust in the group. Say there is some level of trust because you have worked with this group before and know them to be very social together. They still have some reluctance to fully air all their issues together, so they do not qualify for the higher level of trust. With an estimated level of some trust in the group, again all four designs (1, 2, 3, and 5) would be suitable.
Table 9-1. Design Selection Tool
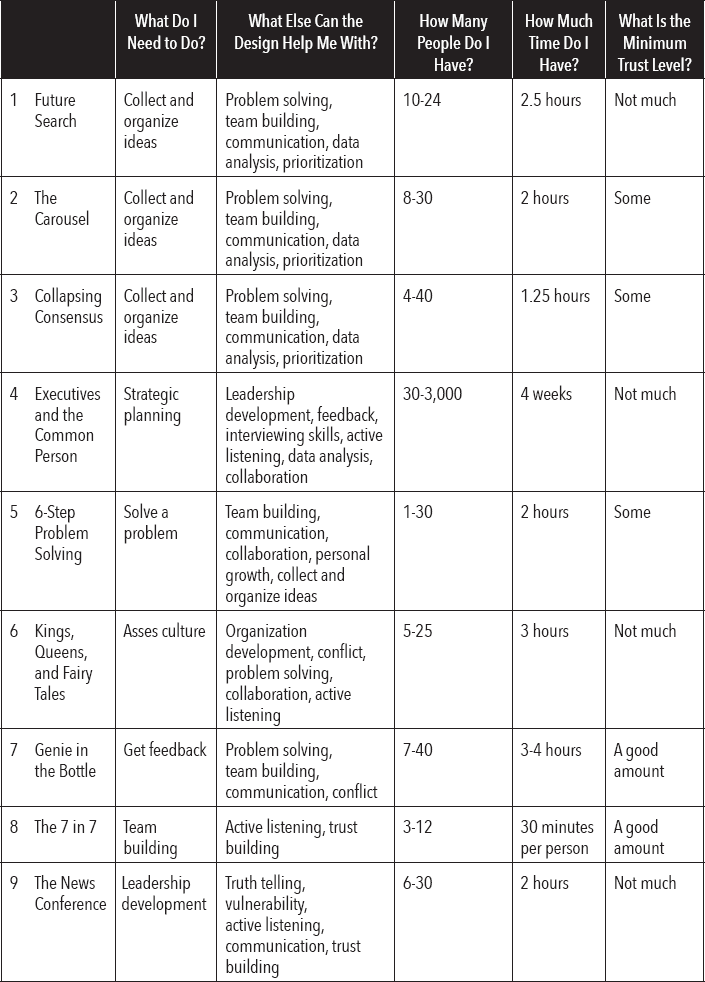
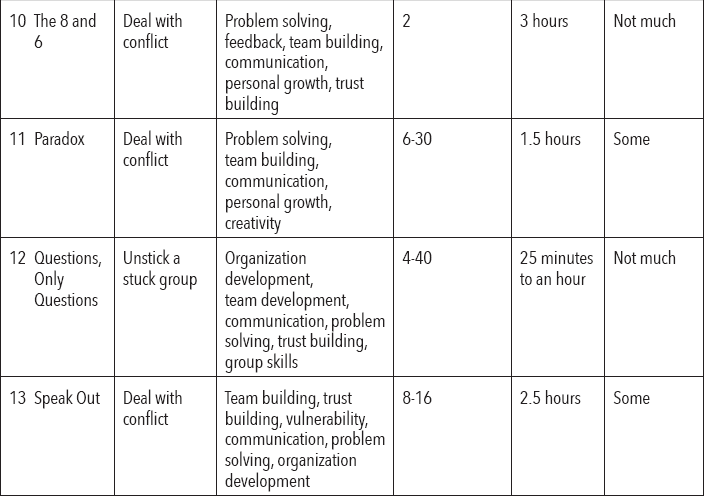
Finally, look at the time required for each design. Because you have been given 1.5 hours in which to achieve your goals, there is now only one design suitable: design 3, Collapsing Consensus. If you think that this design will not deliver on your process goals, one option would be to postpone the meeting until at least two hours are available, so you could use designs 2 or 5 as well. If the group’s trust level was at “not much,” you would have no choice but to postpone the meeting until 2.5 hours were available, because design 1 is the only one that can be used with a group at this trust level. Please note that it is much easier to adjust time and group size than to increase trust. If you truly needed to increase trust, you would have to use another design first (like design 10 or 12) to specifically work on this aspect.
With your design picked out, you might choose to watch the animated video to get a feel for how it’ll look with your team. Although you chose Collapsing Consensus, you might also watch design 2—The Carousel—because of their similarities. After watching the videos and taking notes, if you think that The Carousel is a better fit to achieve your process goals, you might want to renegotiate the current time available up to two hours. In the example here, you decide to stick with the Collapsing Consensus design, because it gives your group members more discussion time for each of their ideas.
Now it’s time to schedule the meeting. You send out invitations to all the group members and include a high-level agenda.
Using your notes as a prompt, you feel more comfortable facilitating the meeting. Because you didn’t have a learning partner beforehand, you ask a couple of the group members for their feedback once the meeting is over. What did they like about it? What didn’t they like about it? How useful was it for them? Did they have any specific feedback on the facilitation? This is always a good idea to start evaluating your performance as a facilitator to ensure your professional development.
Next Steps
One final thought as you transition into trying these designs out: You will inevitably have to deal with one or two difficult people. They might be an obstructionist, or someone who sucks the oxygen out of the room by talking all the time and interrupting others. The design you choose can help to neutralize these difficult people, but how you handle the individual takes the same kind of thinking and preparation as the design for the entire team. For example, using pairs for discussion would be a great way to ensure that the difficult person does not disrupt the entire group. However, you must be prepared to handle the difficult person in the moment to maintain your credibility. As facilitator, the meeting is yours to control and maintain. Setting clear rules of engagement, getting agreement by participants in advance of a problem from members, and then calling out individuals when they are not following the agreed-upon rules of engagement is an essential part of your role. Without an understanding that this is the responsibility of the facilitator, any meeting can be undermined.