
Chapter 6 Understanding Common eDirectory Processes
Chapter 1, “The Four Basics of eDirectory Troubleshooting,” defines Novell’s directory services (DS) implementation as a loosely consistent distributed database. Several autonomous background processes ensure the integrity of the data in the DS database and must run smoothly to provide consistent operation. There are also several processes you initiate with administration tools such as ConsoleOne and NDS iMonitor when managing objects, partitions, and replicas.
This chapter looks at the most common of these processes, to help you develop a better understanding of how they work. A thorough understanding of how they work makes it easier to determine a proper course of action to take to resolve DS problems.
NOTE
The various DS processes discussed in this chapter exist in all versions of NDS, including eDirectory. There are some subtle differences in how the processes function internally (such as the frequency at which a process runs) depending on the version of DS in question. These differences are highlighted in this chapter as applicable.
TIP
This chapter goes into some detail about the DS processes themselves. For step-by-step detail of the operation of a specific process, refer to Novell’s CD-ROMs LogicSource II for NDS and LogicSource for eDirectory. These CD-ROMs were once available for purchase as part of the LogicSource offering, but now are offered as part of the Novell Professional Resource Suite and as part of the Novell Product Toolkits. For more information about Novell Technical Subscriptions, visit http://support.novell.com/subscriptions.
Before we talk about the background processes, we need to discuss DS name resolution, tree-walking, and obituaries, which DS uses to locate information in the tree and to keep track of the state of some of the operations, respectively.
NDS name resolution is the process of DS navigating through the different partitions in the tree—using tree-walking—until it finds the requested object. When DS finds the object, it retrieves the object ID and returns it to the caller. All DS information requests can be broken down into one or more names that identify the objects. In pursuing each name component in a request, DS searches for a partition that contains some part of the name path associated with the request. When a partition is found, the search moves from that partition to the partition that actually contains the object. Until a relevant partition is found, the search proceeds upward toward [Root]; any request can be pursued successfully by beginning at [Root] and working downward.
Consider the sample tree shown in Figure 6.1. Let’s assume that your currently context is at O=East_Coast. In order to locate the User object Dilbert, looking down the current tree branch does not find him. By moving upward to [Root], you have two additional tree branches (O=West_Coast and O=Central) from which to pursue the object.

Tree-walking is the process of a NetWare Core Protocol (NCP) client, commonly referred to as the DS agent (DSA), walking through the NDS tree to locate a server hosting the partition that has a particular object. Each DS server (be it a NetWare server or Linux system running eDirectory) has a built-in client agent to facilitate DS name resolution and tree-walking.
NOTE
The name resolution process is initiated by the DS DSAResolveName “verb.” (DS verbs are predefined functions within the DS engine. Refer to Appendix B, “DS Verbs,” for a complete list of DS verbs.)
An application may disable the tree-walking component of the name resolution process by setting the DCV_DISALLOW_REFERRALS flag to TRUE and calling the NWDSSetContext API. This is useful if the application wants to search only the database local to the server it is communicating with. When you set the DCV_DISALLOW_REFERRALS flag to TRUE, the DSA returns a failure (-601 error [object not found]) if the object being sought is not located in the local database.
The tree-walking process relies on Subordinate Reference (SubRef) partitions to connect the tree. If a server can provide no other DS information, the least it can offer is a reference to another server higher in the tree that has a partition with information about objects. When walking the tree, a server is given the object name of interest. Based on the name, the server decides whether it needs to move upward toward [Root] or downward away from [Root] in order to access the next partition in its efforts to locate the object.
NOTE
Tree-walking can go up or down a DS tree, depending on the location of the partition that holds the desired object.
NOTE
eDirectory 8.5 introduced a new feature called referral hints to help make tree-walking more efficient. Prior to eDirectory 8.5, NDS may have had to walk through a large portion of the tree, which could span slow WAN links, before locating the server holding a real replica of the desired object. This could consume a lot of time and overhead. With referral hints, the network addresses of servers that “should” have a real copy of the partition are kept on the External Reference (ExRef) partition root object. eDirectory simply walks to the partition root object and uses the referrals listed on that object to contact the servers directly and see whether they have real copies of the partition of interest. If this fails, the old way of walking the tree is then used to try to locate the desired partition.
The act of the workstation locating the server that holds the partition with the desired object constitutes half the name-resolution process. Up to this halfway point, the tree-walking process is solely carried out by the server on behalf of the workstation. The second half of name resolution is complete when the client retrieves the object ID from the server containing the partition. There are three ways in which this second half of the process is accomplished, depending on the DSA’s request setting (NWC_DS_PREFER_ONLY_REFERRALS, NWC_DS_PREFER_REFERRALS, or not set).
If the DSA has the resolve name request flag set to NWC_DS_PREFER_ONLY_REFERRALS (0x00004000) and the requested distinguished name (DN) is not in the local database, the agent returns to the caller a list of referrals of servers that will have real copies of the DN in question. If the DSA has the resolve name request flag set to NWC_DS_PREFER_REFERRALS (0x00002000) instead, the agent returns only one referral (the first entry in the list) instead of the entire list.
NOTE
When the resolve name request flag is set, the behavior of the DSAResolveName process is very similar to the LDAP referral process: The client is given a list of referrals, and it is up to the caller to decide what to do with that information.
When the referral information is returned to the call, it is up to the caller to make a new request to the new servers. If the caller (such as the Novell Client for Windows on a workstation) did not previously have a connection to the referred server, an authenticated-but-not-licensed connection is created in order to retrieve the (server-centric) object ID from the server.
NOTE
One of the steps in the DSAResolveName process in eDirectory 8.5 and higher checks whether the object has a global unique identifier (GUID). If a GUID value is not found, one will be created. eDirectory 8.7 requires that every object have a GUID. Therefore, DSAResolveName is a process that ensures that the objects have GUIDs because this routine is used often.
Many processes (such as file system trustee assignments on Novell Storage Service [NSS] version 3 volumes on NetWare 6 servers) are starting to use GUIDs instead of the server-centric IDs of the objects. To maintain backward compatibility with previous versions of NDS, however, the server-centric IDs are still being maintained and used.
If the DSA request flag did not specify referrals, a temporary external reference will be created on the local server (the one the workstation sent the initial request to), and its object ID will be returned to the caller. (If the server no longer needs an ExRef, background processes will have it removed after 192 hours [eight days]. See the section “The Backlink Process,” later in this chapter.)
NOTE
If the object ID of the real object is desired, the calling application should set the request flags for one of the two referral options discussed previously.
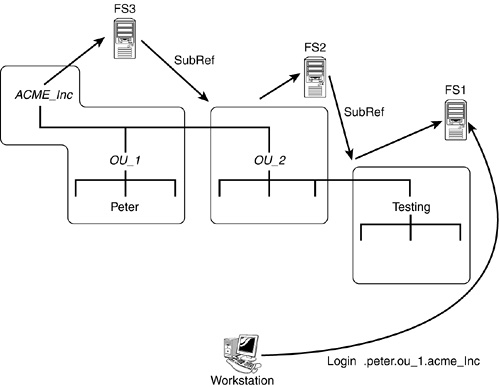
The name resolution and tree-walking processes are best illustrated by the following login example. In this example, three different partitions in the DS tree are located on three separate servers (see Figure 6.2), and the replica placement is as follows:
|
|
|
|
|
|
Server FS1 |
— |
— |
Master |
|
Server FS2 |
— |
Master |
SubRef |
|
Server FS3 |
Master |
SubRef |
— |
Suppose the workstation is initially attached to FS1. The user logs in as .peter.ou_1.acme_inc. Server FS1 does not contain information for this User object, nor does it have information about OU_1 or ACME_Inc. Rather than immediately returning an error message (indicating that the object is not found) to the workstation, however, FS1 passes the query up the tree—using its internal DS client agent—to FS2. (It knows FS2 is closer to [Root] because of the SubRef pointer.)
If FS2 does not contain information for the object (which it does not in this example), it passes the name of the server containing a parent partition of itself—in this case, FS3—back to FS1. Then FS1 queries FS3 for the desired information; FS1 has “walked” up the DS tree structure, toward [Root]. In this instance, FS3 holds the partition that contains the User object. Therefore, FS1 redirects the workstation (transparently to the user) to query server FS3 directly; if the workstation did not previously have a connection to FS3, an authenticated-but-not-licensed connection will be created in order to retrieve the information from the server. (The redirection here is a function of the Novell Client, and the behavior is hard-coded and cannot be changed.)
Tree-walking gives a DS client the ability to log in or authenticate without having to attach to the specific server holding the partition (or replica of the partition) that contains the User object. Tree-walking is also used to locate services—such as servers and print queues—anywhere within a DS tree. You might have noticed the similarities between DS’s tree-walking and LDAP’s chaining process. The main difference between the two is the DS’s tree-walking does not require the requesting server to authenticate to the target server every time it connects, whereas LDAP’s chaining process does.
NOTE
In an NDS/eDirectory environment, after a client is authenticated to a DS tree, that client can locate any (DS-aware) service within the tree without the use of a SAP packet or an SLP packet. NetWare 2 and NetWare 3 services, such as print servers and database servers, must broadcast the services’ availability (over IPX) on a regular basis (the default is 60 seconds) so clients that can locate these services.
This feature is especially beneficial for networks that have many services. The use of DS to locate services significantly reduces the amount of network broadcast or multicast traffic due to SAP or SLP. This reduction in network traffic is also of importance to companies that have WAN links. It is one of the many reasons NDS/eDirectory works well in large networks where other DS failed to deliver the expected performance.
Some of the most common problems in NDS/eDirectory are caused by obituaries (commonly referred to as obits) not being processed properly. Any number of reasons can cause obituaries to not be processed (resulting in what is known as stuck obits), ranging from a down server or communication link to an invalid backlink list in an object. If you understand the background processes and how certain processes use obituaries, you may find it easier to determine the best course of action for correcting a problem.
NOTE
Many of the most common DS problems are caused by problems with obituaries purging, but they initially appear to be caused by something else.
Obituaries are operational attributes (that is, not attributes that can be controlled by the user) that DS uses to ensure referential integrity between objects during certain operations—such as object and partition move operations, object deletions, and object restorations. DS uses the obit attribute internally, with the syntax type SYN_OCTET_STRING. The attribute has the DS_READ_ONLY_ATTR constraint flag that restricts its access to only the DS servers.
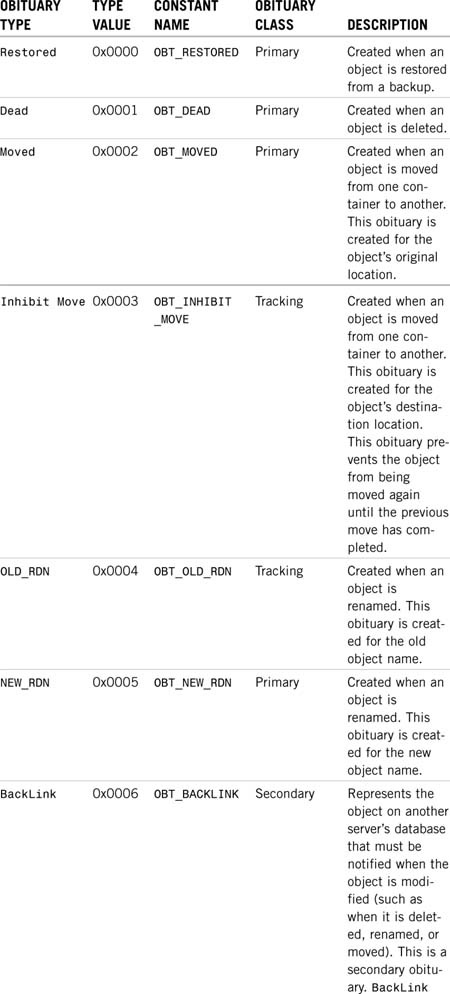
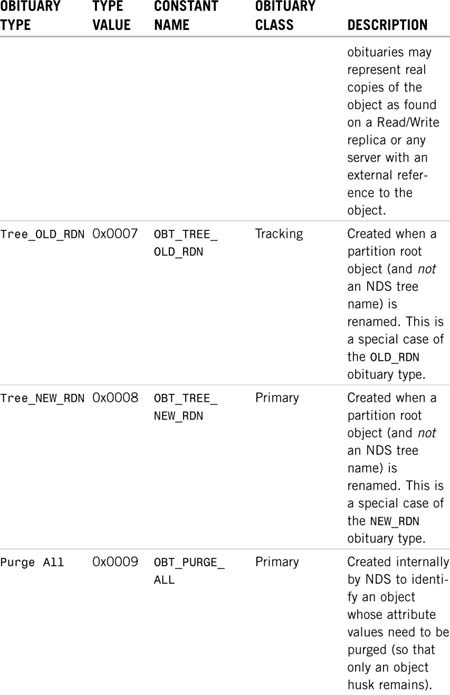
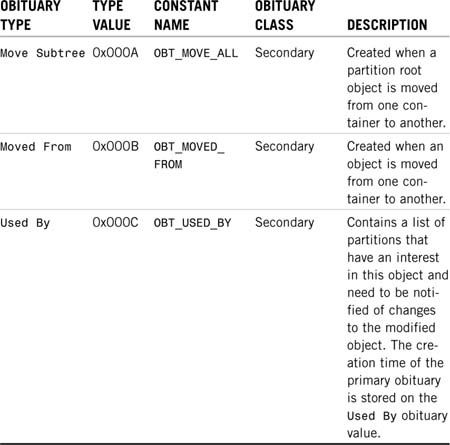
There are three obituary type classes: primary, secondary, and tracking. A primary obituary indicates an action on an object. A secondary obituary indicates the servers that must be contacted and informed of the primary obituary’s action. A tracking obituary is an informational obituary that is associated with certain primary obituaries. A tracking obit does not go through the same process as the primary and secondary obits.
Table 6.1 shows the different obituary types and when DS generates them.
NOTE
Some Novell documentation and TIDs refers to the Used By obit as the Type C obit because of its value.
In addition to the obituary types and classes, obituaries move through four distinct states or stages. These states are always executed in the same order to ensure that the servers process obituaries properly and then purge them from the system. Obituary advancement through the four states occurs during the synchronization process. By observing the synchronization process, you can see the obituaries actually being purged. Listing 6.1 shows where obituaries appear in the synchronization process. Notice that the object User1.West.XYZCorp has two obituary entries: one of Type 2 (Moved) and one of Type 6 (BackLink). The obituary stage is shown in the flags= field.
Listing 6.1 Obituary State Advancement
SYNC: Start sync of partition <[Root]> state:[0] type:[0]
SYNC: Start outbound sync with (#=2, state=0, type=1)
![]() [010000C3] <RIGEL.West.XYZCorp>
[010000C3] <RIGEL.West.XYZCorp>
SYNC: Using version 5 on server <CN=RIGEL>
SENDING TO ------> CN=RIGEL
SYNC: sending updates to server <CN=RIGEL>
SYNC:[010000B8][(22:20:00),2,1] ORION.East.XYZCorp
![]() (NCP Server)
(NCP Server)
SYNC:[010002A4][(19:49:49),2,1] JimH.West.XYZCorp(User)
SYNC:[010000C3][(08:31:47),1,1] RIGEL.West.XYZCorp
![]() (NCP Server)
(NCP Server)
SYNC: [150002E4] obituary for User1.West.XYZCorp
valueTime=36905EB9,1,20 type=2, flags=0,![]() oldCTS=36905E6F,1,1
oldCTS=36905E6F,1,1
valueTime=36905EB9,1,21 type=6, flags=0,![]() oldCTS=36905E6F,1,1
oldCTS=36905E6F,1,1
SYNC:[150002E4][(00:04:05),1,1] User1.West.XYZCorp (User)
SYNC: [0E0002BC] obituary for User1.East.XYZCorp
valueTime=36905EB9,1,17 type=3, flags=0,![]() oldCTS=36905EB9,1,1
oldCTS=36905EB9,1,1
SYNC:[0E0002BC][(23:24:57),1,1] User1.East.XYZCorp (User)
SYNC: Objects: 7, total changes: 74, sent to server ![]() <CN=RIGEL>
<CN=RIGEL>
SYNC: update to server <CN=RIGEL> successfully completed
Merged transitive vector for [010000C3] <RIGEL.West.XYZCorp>
succeeded
SYNC: SkulkPartition for <[Root]> succeeded
SYNC: End sync of partition <[Root]> All processed = YES.
The stages that an obituary passes through before it is deleted are shown in Table 6.2. The four stages are always followed in the order presented. When an obituary is marked Flags=0004 (Purgeable), it is then up to each server to purge it from its local database.

You might notice a couple weird things about the information in Table 6.2. The first oddity is the flag values—the progression is 0, 1, 2, 4. This field is referred to as a bit field. The software checks specific bits rather than looking for specific integer values.
The second thing that may appear strange is the Issued (flags=0) and Ok_to_Purge (flags=2) states; these states indicate the beginning or end of another stage rather than their own processing procedure. Stage 0 is initially set when an obituary is set; this change is then replicated to all servers. When the replication cycle is complete, DS knows that all servers are at Stage 0, and it can go ahead and start the notification process (Stage 1). A change in the obituary is made, and that information is replicated to the other servers that need to be notified. After all servers have been notified, the obituary is set to Stage 2, meaning that Stage 1 (notification) has completed. When all servers have received a flag indicating that it is okay to purge (flags=2), the servers mark the obituaries as purgeable (flags=4), and that change is replicated to all the servers. At this point, the individual servers process the actual purge process, but because all servers have to know that the obituary is now purgeable, no additional notification needs to be done after the obituaries have actually been purged.
NOTE
The four obituary processing stages actually describe a multiserver transaction processing system. You can think of the processing of obituaries as a synchronized transaction that takes place nearly simultaneously on multiple servers.
Before an obituary (regardless of its class) can move to the next state, the current state must have been synchronized to all replicas of the real object. In order to determine whether all replicas in the replica ring have seen a given obituary state, a time is computed from the Transitive Vector attribute of the partition that contains the obituary. If the modification timestamp (MTS) on the obituary is older than this time, the server responsible for that obituary can advance it to the next state.
NOTE
eDirectory 8.5 and previous versions of NDS use the Purge Vector attribute’s time as the time to indicate when an obituary’s state should be advanced. (Purge Vector is a nonsynchronizing, single-valued attribute of the partition root object whose value, according to the Transitive Vector attribute (NetWare 5 and higher) or the Synchronized Up To attribute (NetWare 4) of this partition represents the oldest state in time that has been seen by each DSA in the replica ring. Purge Vector is updated only if the partition has a successful sync cycle. On the other hand, eDirectory 8.6 and higher use the Obituary Time Vector attribute—a value stored in server memory that is recalculated each time the Janitor process runs (every two minutes, by default).
Primary obituaries can be advanced in their states only after all associated secondary obituaries have advanced through all their states. After the primary obituary reaches its last state and that state synchronizes to all servers in the replica ring, all that remains is the object “husk,” which is an object without attributes—an object that can subsequently be purged from the database by the Purge process. Tracking obituaries are removed after the primary obituary is ready to be removed or, in the case of OBT_INHIBIT_MOVE, the tracking obituary is removed after the primary obituary has moved to the flags=1 (Notified) state on the Master replica.
For a secondary obituary of type BackLink, the server that holds the Master replica of the object with the obituary is responsible for advancing the states. For a secondary obituary of type Used By, the server that created it is responsible for advancing the obituary states as long as that replica still exists. If it does not still exist, the server holding the Master of that partition takes over advancing the obituary states for the Used By obituary. For a Move Subtree obituary, the Master replica of the parent partition is responsible for advancing the states.
NOTE
The Obituary process is scheduled on a per-partition basis, after the partition finishes a successful inbound sync. If only one replica (the Master) of a partition exists, the Heartbeat interval still schedules an Outbound Replication process, which in turns kicks off the Obituary process.
The type of the obituary determines the replica responsible for processing the obits (the sender). With the exception of OBT_USED_BY, the Master replica is responsible for starting the background process. The processing of a Used By obit is started by the replica that actually modified the object. If this replica no longer exists, the Master replica then kicks off the background process.
The steps involved in obituary processing are complicated. However, the basic concept can be illustrated by using a somewhat simplified example. eDirectory performs the following operations when an object is deleted:
1. eDirectory adds a primary obituary of type Dead to the “deleted” object and sets the flag to Issued. This takes place on the Master replica.
2. eDirectory creates a secondary obit of the type BackLink and sets the stage flag to Issued for every server that has an external reference to this object; the server DNs are listed in the BackLink attribute of the object. Store the creation time of the Dead obit as part of this secondary obit.
3. eDirectory creates a secondary obit of type BackLink and sets the stage flag to Issued for every server that holds a real replica of the object—not an external reference. Store the creation time of the Dead obit as part of this secondary obit.
4. eDirectory creates a secondary obit of type Used By and sets the stage flag to Issued for every DN listed in the Used By attribute of the deleted object. The Used By attribute contains a list of partitions (not servers) that have an interest in this object and need to be notified of changes to this entry. Store the creation time of the Dead obit as part of this secondary obit.
5. eDirectory removes all attributes except the obituaries, which results in an object husk. The flag on the entry’s Object Class attribute is set to Non Present, making the object “invisible” in most of the standard management tools, such as ConsoleOne (but not in DSBrowse or NDS iMonitor).
6. The Outbound Replication process synchronizes the deletion of attributes to all other servers in the replica ring.
7. After the next successful inbound synchronization of this partition, the Obituary process is started.
The Obituary process does the following:
![]() Computes a time vector that is equivalent to the minimum
Computes a time vector that is equivalent to the minimum Transitive Vector attribute, referred to as the Purge Vector attribute. eDirectory 8.6 and higher compute a second minimum vector, called the Obituary Time Vector attribute, which does not include timestamp values from Subordinate Reference replicas.
![]() Categorizes each obituary in this partition and takes appropriate action:
Categorizes each obituary in this partition and takes appropriate action:
![]() If the obituary is a
If the obituary is a Used By obit and this server is the server where the deletion occurred (determined by comparing the replica number in the obituary’s MTS to the replica number), this server is responsible for processing this obituary. Therefore, the main server notifies the other servers about this obit and sets the stage flag to Notified. The next time the Obituary process runs, this state flag is advanced to the next stage, until it reaches Purgeable (that is, after all partitions in the Used By attribute have been notified), and then it is purged.
![]() If the obituary is a
If the obituary is a BackLink obit and this server has the Master replica, this server is responsible for processing this obituary. Therefore, the xxx notifies the other servers about this obit and sets the stage flag to Notified. The next time the Obituary process runs, this state flag is advanced to the next stage, until it reaches Purgeable (that is, after all servers in the BackLink attribute have been notified), and then it is purged.
![]() If the obituary is a primary obituary (such as a
If the obituary is a primary obituary (such as a Dead obit, in this example), there are no secondary obituaries outstanding for this primary obit, and the attribute’s MTS on the obituary is older than the Purge Vector/Obit Time Vector attribute, the obit’s flag value can be set to Purgeable because all servers have seen the change.
![]() When the obit value flag on the primary obit is set to
When the obit value flag on the primary obit is set to Purgeable, the Purger process, also known as the Flat Cleaner process, removes the object’s record (which is no longer flagged as Present) from the database and completes the deletion action.
Because stuck obits—that is, servers not clearing out obits from their local databases, thus preventing certain operations from being performed—are the source of many NDS/eDirectory problems, your having a good grasp of obituaries’ dependency of other DS processes is important to understanding DS background processes, which are discussed next.
The DS module maintains the database through several background processes running on each server. These processes run automatically and generally do not need to be manually invoked. There are cases in which there is benefit in forcing a process to run, but as a general rule, you should not force them to run unless necessary. As discussed in Chapter 4, “Don’t Panic,” doing something just for the sake of doing it is frequently not a good idea.
The Synchronization process, sometimes referred to as the Skulker process, keeps the information in multiple replicas of the DS database current on all servers. The process is event driven, meaning it is kicked off after an object has been modified. Listing 6.2 shows a sample of the Sync process in the DSTrace screen.
NOTE
The exact format of DSTrace output varies, depending on the version of NDS/eDirectory (thus, the version of the utilities), flag settings, and sometimes the operating system platform. Therefore, the DSTrace, DSRepair, and other listings shown in this and other chapters in this book may not exactly match what you find on your systems, but they serve as a guide to the correct information.
Listing 6.2 A Sample Synchronization Process
SYNC: Start sync of partition <[Root]> state:[0] type:[0]
SYNC: Start outbound sync with (#=2, state=0, type=1)
[010000C3]<RIGEL.West.XYZCorp>
(21:11:57) SYNC: failed to communicate with server
<CN=RIGEL> ERROR: -625
SYNC: SkulkPartition for <[Root]> succeeded
SYNC: End sync of partition <[Root]> All processed = NO.
Listing 6.2 demonstrates a failed synchronization condition. The local server is attempting to contact the server named CN=Rigel.OU=West.O=XYZCorp but is unable to complete the Synchronization process. The error -625 indicates a transport failure—also known as a communications failure. To correct this problem, the easiest way to proceed is to verify that the target server is up and that the communications links between the two servers are working properly.
A successful synchronization cycle of the [Root] partition between the two servers is shown in Listing 6.3.
Listing 6.3 A Successful Synchronization
SYNC: Start sync of partition <[Root]> state:[0] type:[0]
SYNC: Start outbound sync with (#=2, state=0, type=1)
[010000C3]<RIGEL.West.XYZCorp>
SYNC: Using version 5 on server <CN=RIGEL>
SENDING TO ------> CN=RIGEL
SYNC: sending updates to server <CN=RIGEL>
SYNC:[010000B7][(20:02:16),1,3] XYZCorp (Organization)
SYNC:[010000B8][(22:20:00),2,1] ORION.East.XYZCorp
![]() (NCP Server)
(NCP Server)
SYNC:[0100029A][(20:02:50),2,1] Jim.East.XYZCorp (User)
SYNC:[0100029B][(19:50:43),2,1] Amy.East.XYZCorp (User)
SYNC:[010002A4][(19:49:49),2,1] Kenny.East.XYZCorp (User)
SYNC:[010002A8][(19:58:46),2,1] WINNT.Scripts.East.XYZCorp
![]() (Profile)
(Profile)
SYNC:[100002E1][(02:36:26),1,1] WIN98.Scripts.East.XYZCorp
![]() (Profile)
(Profile)
SYNC: Objects: 7, total changes: 25, sent to server
<CN=RIGEL>
SYNC: update to server <CN=RIGEL> successfully completed
Merged transitive vector for [010000C3]<RIGEL.West.XYZCorp>
succeeded
SYNC: SkulkPartition for <[Root]> succeeded
SYNC: End sync of partition <[Root]> All processed = YES.
This time the servers are talking to each other, and there are a few updates that need to be sent from one server to the other.
NOTE
Unlike many other DS implementations, NDS/eDirectory sends only the changed attribute values (the deltas) of a given object, even if they are part of a multivalued attribute.
The frequency at which the Sync process runs depends on the object attribute being changed. Each attribute has a flag called that determines whether it is “high convergence.” This flag has one of two possible values:
![]()
Sync Immediate (DS_SYNC_IMMEDIATE_ATTR)—With this flag, the attribute value is scheduled for immediate synchronization (with a 10-second holding time after the first event is detected so that if there are subsequent events within this time window, they can be processed at the same time). This is required on some attributes, such as the Password Required attribute of a User object, to either maintain proper data integrity or security.
![]()
Sync Never (DS_SCHEDULE_SYNC_NEVER)—The name of this flag is a little misleading. This flag indicates that a change to the attribute’s value does not trigger synchronization (immediately). The attribute can wait to propagate the change until the next regularly scheduled synchronization cycle (30 minutes for NetWare 4 servers and 60 minutes for NetWare 5 servers and higher, including eDirectory servers) or some other event triggers synchronization.
NOTE
If the Sync Immediate flag is not specified for an attribute, DS automatically assumes the attribute to be Sync Never.
A Per Replica (DS_PER_REPLICA) flag also exists and can be defined for attributes. When an attribute is defined as Per Replica, the information of the attribute is not synchronized with other servers in the replica ring. Most of the DirXML-related attributes are defined with this flag.
TIP
Appendix C, “eDirectory Classes, Objects, and Attributes,” lists all the attributes defined for eDirectory 8.7.3, along with synchronization flag information.
In NetWare 4.x any server that holds a replica of an NDS partition has to communicate with all the other servers that hold a replica of that partition. Figure 6.3 shows the type of communication that has to take place in order for synchronization to be completely successful on all NetWare 4.x servers.
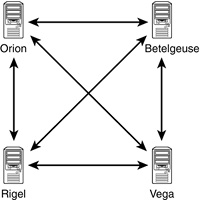
As you can guess, the number of synchronization processes (or vectors, as they are sometimes called) that must complete grows exponentially as replicas are added. The amount of traffic generated can be tremendous. In fact, the number of communications vectors is n × (n–1), where n represents the number of replicas in the replica ring. Thus, at 27 replicas, a total of 27 × 26, or 702, communications vectors exist.
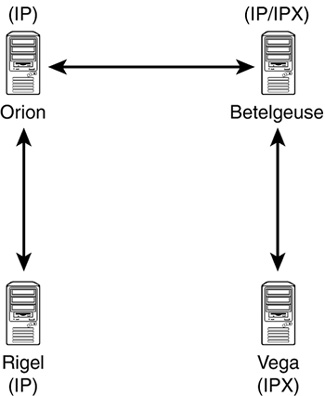
In NetWare 5 Novell introduced the idea of transitive synchronization. Transitive synchronization is a synchronization methodology wherein a server doesn’t have to contact every other server in the replica list. It can enable other servers to ensure that synchronization is complete, as demonstrated in Figure 6.4.
The reduction in traffic in a transitive synchronization environment is very significant, and the completion of the entire synchronization cycle is reduced. Ideally, this would create a scenario in which the vector count would simply equal n–1, so with 27 replicas, only 26 communications vectors would be needed. Table 6.3 shows the difference in vectors between transitive and nontransitive synchronization.
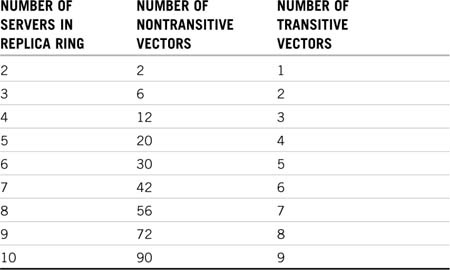
This discussion represents the ideal number of synchronization vectors when using transitive synchronization. As you can see in Table 6.3, the number of communications vectors with transitive synchronization is significantly smaller than the number with nontransitive synchronization, although it is possible that the number of vectors could increase, depending on the network design and availability of services. The actual number of synchronization vectors with transitive synchronization could be larger but will always be smaller than without transitive synchronization.
NOTE
In a way, you can consider transitive synchronization a feature of NDS 7 and higher. Therefore, you do not need to have NetWare servers to take advantage of it because the non-NetWare DS servers will be running eDirectory, which supports transitive synchronization.
Transitive synchronization also addresses mixed transport protocols used on different DS servers. Consider the example presented in Figure 6.4. Without transitive synchronization support, the servers Rigel and Orion will not be able to synchronize with the server Vega because they do not share a common transport protocol. With transitive synchronization, however, there is no problem because the server Betelgeuse acts as a gateway or a mediator.
WARNING
One side effect of replica rings with mixed transport protocols is that the servers Rigel and Orion in this example will attempt to talk directly to Vega (and vice versa). They will report “Unable to communicate with server x” errors. However, this does not indicate a problem with your DS. It’s just that DS has detected a situation that is really not a problem.
To understand how transitive synchronization works, you must first be familiar with transitive vectors. NDS uses a time vector—also called a time array—to keep track of changes to a given partition. This time vector holds timestamps for all the replicas in the replica ring from a given server’s perspective. (For instance, if there are two replicas for this partition, two timestamps will be found in the time vector, as illustrated in Figure 6.5.) Each server holds a copy of its own time vector as well as copies of time vectors from the other servers in the ring. This group of time vectors is collectively known as the transitive vector. The Transitive Vector attribute is multivalued and associated with the partition root object, so NDS/eDirectory can manage the synchronization process and determine what needs to be sent to other replicas. Each replica has its own transitive vector; there is only one transitive vector for each replica, and it is synchronized between all servers within the replica ring.
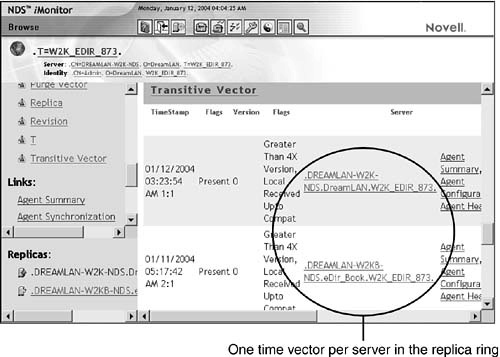
To see the transitive vector values in NDS iMonitor, as shown in Figure 6.5, from Agent Summary, you click the Partition Replica link and then click the Partition link, followed by Attributes. Finally, you click the Transitive Vector link.
NOTE
In NDS 6 and earlier, the single-valued attribute Synchronized Up To is used to determine when the latest changes were made. The value of this attribute is unique for each replica and is not synchronized to the other servers in the replica ring.
When you synchronize the transitive vector values, all the replicas can synchronize without needing to have every replica communicate with every other replica. Each time the replica synchronization process begins its scheduled run, it first checks the entries in the transitive vector to determine which other servers hold replicas that need to be synchronized. The check compares the timestamps of the time vectors of the source server that received the update with those of the destination server. If a timestamp is greater for the source server, replica updates are transferred. The source server updates its own time vector within the transitive vector and sends the updated transitive vector to the target server. At the end of the replica update process, the target server updates its own time vector within the transitive vector and sends that updated transitive vector back to the source server. Now the two servers know they are both up-to-date, and the target server will not try to sync with the source server with the same update.
One of the most significant performance-enhancement features in eDirectory is the introduction of multithreaded replica synchronization, starting with eDirectory 8.6. In previous versions of eDirectory and NDS, all inbound and outbound synchronization was performed using a single thread. Partitions were synchronized in a serial manner—changes in one partition could not be synchronized until the previous partition had been completely processed. However, this is not very efficient for trees where there may be many partitions.
Starting with eDirectory 8.6, outbound synchronization is now multithreaded. Partitions stored on one server can be synchronized out in a parallel manner, allowing replicas to be synchronized in a much more efficient manner.
NOTE
Inbound synchronization is still single threaded. An eDirectory server can receive inbound synchronization for only one partition at a time.
Multithreaded synchronization takes place using one of two synchronization methods (see Figure 6.6):
![]() By partition—This method causes eDirectory to send out one partition to multiple recipient servers at a time.
By partition—This method causes eDirectory to send out one partition to multiple recipient servers at a time.
![]() By server—This method causes eDirectory to send out multiple partitions to multiple unique servers at one time.
By server—This method causes eDirectory to send out multiple partitions to multiple unique servers at one time.
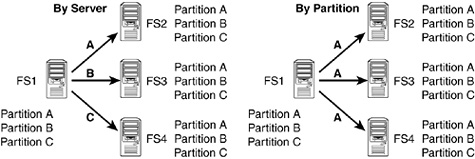
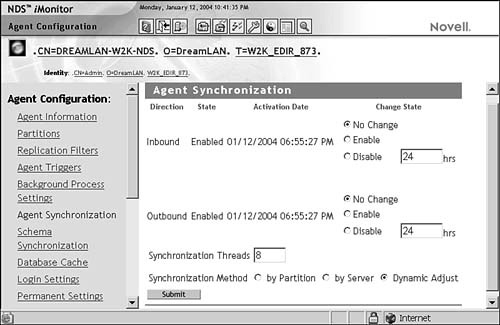
When eDirectory starts up, it analyzes all partitions and corresponding replica rings stored on the server. This analysis procedure results in a list of all servers involved in replica synchronization and all partitions stored on those servers. If the number of partitions stored on the local server is equal to or greater than the number of unique servers minus one (the local server), eDirectory will automatically synchronize using the by-partition method. Otherwise, eDirectory uses the by-server method. By default, the synchronization method is dynamically adjusted (that is, selected by eDirectory upon startup). But you can also manually select a preferred method via NDS iMonitor (see Figure 6.7).
FIGURE 6.7 Use the Agent Synchronization link under Agent Configuration in NDS iMonitor to view and manage multithreaded synchronization.
The number of threads used for synchronization determines how multithreaded synchronization behaves. For example, if only one thread is configured for synchronization, multithreaded synchronization is effectively disabled. By default, eDirectory allows a maximum of eight threads for multithreaded synchronization.
eDirectory automatically determines the number of threads to use in multithreaded synchronization by determining whether the number of partitions is less than or equal to two times the number of unique servers in those partitions’ replica rings. If the number of partitions is less than or equal to two times the number of unique servers in those partitions’ replica rings, eDirectory will set its maximum thread usage to the number of partitions stored on the local server. Otherwise, the number of threads is set to half the number of unique servers in shared replica rings. This allocatable thread count is used only if it does not exceed the configured maximum thread count. If this count is exceeded, the number of allocatable threads will be set to the configured maximum thread count.
Perhaps the most problematic issue you’re likely to encounter with database synchronization is designing correct methods for protecting against data loss or preventing unnecessary duplication of synchronization work due to communication failures. Prior to eDirectory 8.6, any type of communication failure during the replica synchronization process would cause the entire process to be restarted when communication was reestablished. With large partitions containing millions of objects, this could prove to be a very costly restart, especially if slow WAN links are involved.
eDirectory 8.6 addressed this problem by implementing incremental replication. Incremental replication allows for the replica synchronization process to be interrupted and later resume from the point of failure. To understand the how the incremental replication process works, you need to first understand the following related key terms and concepts:
![]() Window vector—The window vector, stored in the
Window vector—The window vector, stored in the SyncWindowVector attribute (of type SYNC_OCTET_STRING) on the partition root object of the receiving server, is the point in time to which the source replica is attempting to move the destination replica. For example, if the latest modification timestamp in the source replica is 2/14/2004 2:35 p.m. and the destination replica has a timestamp of 2/14/2004 1:10 p.m., the window vector in use for the synchronization process would be 2/14/2004 2:35 p.m.
Generally speaking, the window vector is equal to the source replica’s transitive vector, unless the destination replica is more than 30 days behind the source replica. In that situation, the window vector is divided into 30-day intervals.
![]() Window pane—A window pane is a discrete unit of work. In the case of replica synchronization, a window pane represents a complete synchronization cycle. This would be the difference between the current transitive vector of the destination server and the transitive vector of the source server. In other words, the window vector represents the final point in the synchronization cycle, and the window pane represents the entire amount of work—the number of objects and attributes values that need to be sent—necessary to meet that window vector.
Window pane—A window pane is a discrete unit of work. In the case of replica synchronization, a window pane represents a complete synchronization cycle. This would be the difference between the current transitive vector of the destination server and the transitive vector of the source server. In other words, the window vector represents the final point in the synchronization cycle, and the window pane represents the entire amount of work—the number of objects and attributes values that need to be sent—necessary to meet that window vector.
![]() Distributed consistent ordering of objects—To allow incremental replication, the object synchronization process must be able to stop and then pick up again at the point where it was stopped. For fault tolerance and performance, the synchronization process must also be able to be resumed by any other server in the replica ring. This is possible only if all servers in the replica ring are synchronizing objects in the same order as every other server. Because objects can be added to any replica at any time, all servers in the replica ring must use a consistent index of objects, based on some unique value for all objects, within a partition. eDirectory uses the object creation timestamp because all creation timestamps are unique.
Distributed consistent ordering of objects—To allow incremental replication, the object synchronization process must be able to stop and then pick up again at the point where it was stopped. For fault tolerance and performance, the synchronization process must also be able to be resumed by any other server in the replica ring. This is possible only if all servers in the replica ring are synchronizing objects in the same order as every other server. Because objects can be added to any replica at any time, all servers in the replica ring must use a consistent index of objects, based on some unique value for all objects, within a partition. eDirectory uses the object creation timestamp because all creation timestamps are unique.
![]() Synchronization point—The synchronization point is a collection of information that can be used to determine how far the synchronization process has progressed. This collection of information consists of the following types of data:
Synchronization point—The synchronization point is a collection of information that can be used to determine how far the synchronization process has progressed. This collection of information consists of the following types of data:
![]() An object producer—The object producer is one of several sources or background processes that evaluate objects as candidates for the synchronization process. Examples of these producers are the Partition Send All, Change Cache, and Obituary processes.
An object producer—The object producer is one of several sources or background processes that evaluate objects as candidates for the synchronization process. Examples of these producers are the Partition Send All, Change Cache, and Obituary processes.
![]() An ordering of objects—The ordering of objects that have been produced by the object producer is based on the creation timestamps of the objects being produced.
An ordering of objects—The ordering of objects that have been produced by the object producer is based on the creation timestamps of the objects being produced.
![]() A key—The key is the value used to determine the current synchronization location within the ordering of objects. This key is typically the creation timestamp of the objects being synchronized.
A key—The key is the value used to determine the current synchronization location within the ordering of objects. This key is typically the creation timestamp of the objects being synchronized.
The synchronization point is stored as the SyncPanePoint attribute (of type SYN_OCTET_STRING) on the partition root object of the receiving server.
REAL WORLD
Object Producers
Object producers are DS internal processes that are responsible for providing (that is, producing) entries based on different criteria. The following are the producers for the synchronization process and a brief description of the purpose of each:
![]()
ChangeCache—The ChangeCache producer is responsible for synchronizing all entries that exist in the local server’s change cache for the current partition. (Entries are added to the change cache when they are modified in any way on the local server.)
![]()
EntrySendAll—The EntrySendAll producer is used when a Send All for a replica has been performed or a Send All has been performed on an individual entry.
![]()
Obituary—The Obituary producer is responsible for synchronizing all entries in an obituary state.
![]()
PartitionBoundary—The PartitionBoundary producer is responsible for sending information about the current partition’s boundaries.
![]()
PartitionIndex—The PartitionIndex producer is used to walk through any partition on the server and is used by background processes such as the Janitor, Backlinker, and other processes.
![]()
PartitionIndexSync—The PartitionIndexSync producer is used to walk through the partition being synchronized. It also provides keys used in the synchronization process to establish synchronization points.
![]()
PartitionRoot—The partition root object is always synchronized first during all partition synchronization processes. The PartitionRoot producer is responsible for sending this object at the beginning of every synchronization cycle.
Now that you are familiar with the elements of incremental replication, let’s discuss the incremental replication process. The following is an overview of the incremental replication portion of the replica synchronization process:
1. The Replica Synchronization process begins. The transitive vector has been checked, and a replica synchronization process has been started.
2. The replication process checks for the existence of the SyncPanePoint attribute on the target server. If the SyncPanePoint attribute is found, it indicates that the receiving server was in the middle of a replica synchronization process and was interrupted. When a SyncPanePoint attribute is located, the source server reads in the value of the SyncPanePoint attribute and determines the window vector, object producer, and key for the interrupted synchronization. Using that information, the source server resumes the synchronization process that was interrupted.
If no SyncPanePoint attribute is located, the source server calculates and establishes a new window vector for the synchronization process.
NOTE
If the window vector of the interrupted synchronization is newer than the transitive vector of the source server, the source server reestablishes a window vector equal to the source server’s local transitive vector.
3. The replication process sends updates from the source server to the target server. Updates are sent as data packets across the wire. An individual packet can contain one or more object changes that need to be synchronized. To minimize data loss in the event of communication failure, each packet begins with a new SyncPanePoint attribute. The SyncPanePoint data contains the key, which indicates the present position in the synchronization process. This key provides a pointer for the last packet sent from the source server.
4. The receiving server updates its SyncPanePoint attribute for each data packet received. In the event that communication is interrupted, all data received before the last SyncPanePoint attribute will be preserved. At most, two data packets’ worth of information would be lost.
5. The receiving server removes the SyncPanePoint attribute at the end of a successful sync. When the replica update process is completed, the SyncPanePoint attribute is removed from the receiving server’s partition root object. This allows subsequent synchronization cycles to establish new window vectors.
As mentioned previously, incremental replication is available only in eDirectory 8.6 and higher. Safeguards are in place to prevent loss of data where DS servers running pre-eDirectory 8.6 are unable to synchronize replicas with SyncPanePoint attributes. When these servers with the older DS attempt to synchronize with an eDirectory 8.6 or higher server, they encounter error -698 (ERR_REPLICA_IN_SKULK), indicating that the target server is currently in the middle of a replica synchronization process. The purpose of the -698 error is to allow time for another eDirectory 8.6 or higher server to synchronize with the server reporting the -698 error. When another eDirectory server that is capable of incremental replication encounters the SyncPanePoint attribute, the synchronization process will be able to pick up at the point of failure (as indicated by the window vector), and no data will be lost.
TIP
The infrequent occurrence of the -698 error is an example of when an error is not indicative of a real error. However, if its frequency is high, it can indicate a communication issue lurking in the background.
To ensure that an eDirectory server capable of incremental replication is not a requirement for future synchronization (because of the presence of the SyncPanePoint attribute after an aborted sync), the SyncPanePoint attribute is automatically purged after a two-hour timeout. After the timeout period has passed, the SyncPanePoint attribute is purged, and any data received during the incomplete synchronization cycle is lost. At that point, any DS server can begin a new replica synchronization cycle with this server because there is no more SyncPanePoint attribute present to cause a -698 error.
NDS versions prior to NDS 8 do not understand or know how to handle auxiliary classes. Consequently, NDS 8 and higher servers only send auxiliary class and auxiliary attribute information to servers running NDS 8 and above. When synchronizing to servers running previous versions, eDirectory must send the auxiliary class information in a manner that is compatible with the previous releases. Because an auxiliary class adds attributes to an object that previous versions of NDS consider illegal, NDS 8 and eDirectory servers make the following modifications to the objects with auxiliary classes before they are sent to servers with previous versions of NDS:
![]() The
The AuxClass Object Class Backup attribute (of type SYNC_CLASS_NAME) is added to the object, and all the information from the object’s Object Class attribute is stored in the attribute. This attribute is stored only on the pre-NDS 8 servers.
![]() The object’s class is changed to
The object’s class is changed to Unknown.
![]() The
The auxClassCompatibility attribute (of type SYNC_CLASS_NAME) is added to the object on all replicas and is used to maintain timestamps for the object.
Table 6.4 demonstrates how eDirectory modifies an object’s Object Class, AuxClass Object Class Backup, and auxClassCompatibility attributes as it synchronizes to an NDS 7 or older server when an auxiliary class is present for the object.
TABLE 6.4 Auxiliary Class and Attribute Information, as Seen on Servers Running Different DS Versions
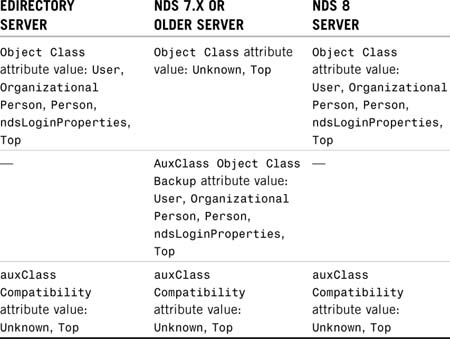
When an NDS 8/eDirectory server receives an Unknown object, it checks whether the object has an auxClassCompatibility attribute. If there is such an attribute, NDS 8/eDirectory replaces the Unknown class with information from the AuxClass Object Class Backup attribute and restores the object to normal. The auxClassCompatibility attribute is maintained on all servers in the replica ring as long as at least one NDS 7.x or older server is in the ring. When all NDS 7.x and older servers are removed from the replica ring, the attribute is removed from the object. This information is often referred to as the “Aux Class Lie.”
NOTE
Because many existing applications that read NDS/eDirectory class definitions do not necessarily understand auxiliary classes, Novell modified the read class definition APIs to provide backward compatibility. All the new routines do is intercept the client responses and substitute the class information located in the Object Class attribute with the information located in the AuxClass Object Class Backup attribute. As a result, if you look at the object in DSBrowse or NDS iMonitor, the object will still show up with an Unknown class, but NetWare Administrator and ConsoleOne will now show up as known objects. You should be able to administer such objects with NetWare Administrator or ConsoleOne as if they were normal objects. Only applications that have been updated to be compatible with NDS 8 and higher can display auxiliary class definitions with an auxiliary object class flag.
You can modify the NDS schema by adding or deleting attribute definitions and object class definitions. Such changes need to be replicated among all the servers within the same tree that contain replicas. This synchronization is done through the Schema Synchronization process. This process is started within 10 seconds following completion of the schema modification operations; the 10-second delay enables several modifications to be synchronized at the same time.
NOTE
Although the Schema Sync process targets only servers hosting replicas, servers without replicas still receive schema information through the Janitor process (which is discussed later in this chapter).
NOTE
Keep in mind that base schema definitions cannot be modified. When a new attribute is added to a base class object definition, it cannot be removed.
The updates to the schema are propagated from one server to another; this is similar to the Replica Synchronization process. However, the Schema Synchronization process does not use a replica ring to determine which servers to send the schema updates to. Schema updates are sent to servers that contain either replicas of a given partition or Child partitions of the given partition.
Because schema modifications must occur on the server that is hosting the Master replica of [Root], the modifications flow from the [Root] partition down to the extreme branches of the tree.
The actual Schema Synchronization process is made up of several different processes:
![]() Schema process—This process, which runs every four hours by default, is the main process. It schedules the execution of the following subprocesses (in the order listed). (DSTrace displays the message “Begin schema sync…” at the start of the sync and either an “All Processed = Yes” or an “All Processed = No” message at the end. If processing is successful, the next Schema process is scheduled to run again after
Schema process—This process, which runs every four hours by default, is the main process. It schedules the execution of the following subprocesses (in the order listed). (DSTrace displays the message “Begin schema sync…” at the start of the sync and either an “All Processed = Yes” or an “All Processed = No” message at the end. If processing is successful, the next Schema process is scheduled to run again after HeartBeatSchemaInterval, which is four hours by default; otherwise, the next Schema process is scheduled to run after SchemaUpdateInterval [60 seconds] plus 1 second.)
![]() Skulk Schema process—This process determines which servers the local server needs to synchronize to (by maintaining a server-centric schema sync list in server memory) and in what order to synchronize to them. It also ensures that the local server is in a state to successfully synchronize the schema. If the process detects that a schema epoch is in progress, DSTrace reports a -654 error (“partition busy”). A -657 error (“schema sync in progress”) will be reported if a schema reset is detected.
Skulk Schema process—This process determines which servers the local server needs to synchronize to (by maintaining a server-centric schema sync list in server memory) and in what order to synchronize to them. It also ensures that the local server is in a state to successfully synchronize the schema. If the process detects that a schema epoch is in progress, DSTrace reports a -654 error (“partition busy”). A -657 error (“schema sync in progress”) will be reported if a schema reset is detected.
![]() Send Schema Updates process—This process is the workhorse in the Schema Synchronization process. It is responsible for sending the schema changes—all deleted classes and deleted attributes—as well as the present attributes and present classes. eDirectory makes several passes through this process to ensure that all these changes are synchronized correctly. (During this phase, DSTrace reports “Sending <present or deleted> <Attributes or classes>”.)
Send Schema Updates process—This process is the workhorse in the Schema Synchronization process. It is responsible for sending the schema changes—all deleted classes and deleted attributes—as well as the present attributes and present classes. eDirectory makes several passes through this process to ensure that all these changes are synchronized correctly. (During this phase, DSTrace reports “Sending <present or deleted> <Attributes or classes>”.)
![]() Schema Purger process—This process is responsible for cleaning up any entry or value records that are no longer needed. (During the cleanup, DSTrace reports “Purger purged <class or attribute>; entries purged <number of values>.”
Schema Purger process—This process is responsible for cleaning up any entry or value records that are no longer needed. (During the cleanup, DSTrace reports “Purger purged <class or attribute>; entries purged <number of values>.”
![]() DSA Start Update Schema process—This process is the process that the receiving server goes through while another server is sending schema to it. When a server receives a request to send schema, it goes through the next two processes. (DSTrace reports “* Start inbound sync from server <senderID> version <protocol number>, epoch <epoch in seconds>:<epoch replica number>.”)
DSA Start Update Schema process—This process is the process that the receiving server goes through while another server is sending schema to it. When a server receives a request to send schema, it goes through the next two processes. (DSTrace reports “* Start inbound sync from server <senderID> version <protocol number>, epoch <epoch in seconds>:<epoch replica number>.”)
TIP
Although the Schema Synchronization process never sends schema to itself, a check is made to ensure that the sender is never the receiver. In the unlikely event that the sender is the receiver, DSTrace displays “Warning - Rejecting DSAStartUpdateSchema Client <serverID>” and reports the error –699 (“fatal”).
![]() DSA Update Schema process—This process details what the receiving server does with each update it receives. This process is looped through over and over, as long as the sending server continues to send updates. (During this phase, DSTrace reports “DSAUpdateSchema: Processing inbound packet one at a time because of…” or “DSAUpdateSchema: Packet with <number of updates> updates,” depending on the information found inside the data packets.)
DSA Update Schema process—This process details what the receiving server does with each update it receives. This process is looped through over and over, as long as the sending server continues to send updates. (During this phase, DSTrace reports “DSAUpdateSchema: Processing inbound packet one at a time because of…” or “DSAUpdateSchema: Packet with <number of updates> updates,” depending on the information found inside the data packets.)
![]() DSA End Update Schema process—This process signals the end of the update. The receiving server goes through the DSA End Update Schema process when it receives a
DSA End Update Schema process—This process signals the end of the update. The receiving server goes through the DSA End Update Schema process when it receives a DSAEndUpdateSchema request from the sending server. (Upon completion of the cycle, DSTrace reports “* End inbound sync from server <serverID>, Version <version>, Epoch <epoch in seconds>:<epoch replica number>.”)
The detailed operation of the Schema Synchronization process is rather involved. The following simple example serves to illustrate how the Schema Synchronization process works from a high-level point of view. Figure 6.8 depicts a small tree with five servers and three partitions.
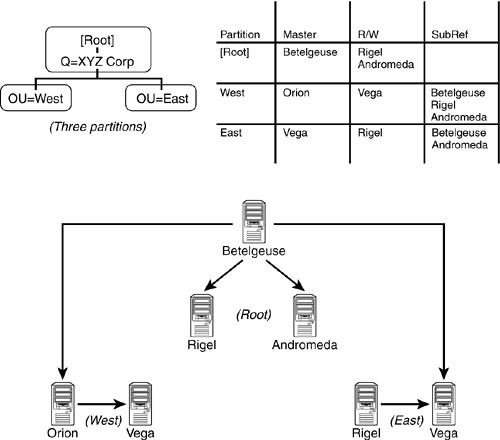
A schema change is made to Betelgeuse because it holds the Master replica of the [Root] partition. After this server has been updated, this server sends the schema changes out to the other servers that hold copies of [Root]: Rigel and Andromeda. After all servers in the [Root] partition have received the updates, DS sends the updates to the other servers in the tree. It does this by looking at the servers that hold copies of [Root] and reading the replica list information to find out what other replicas are out there; then it builds a schema sync list. Each server’s schema sync list may be different, depending on what replicas it hosts.
You can look up a server’s schema sync list by using either DSTrace or NDS iMonitor. It is easiest to use NDS iMonitor, as shown in Figure 6.9; it is found under Service List under the Schema link.
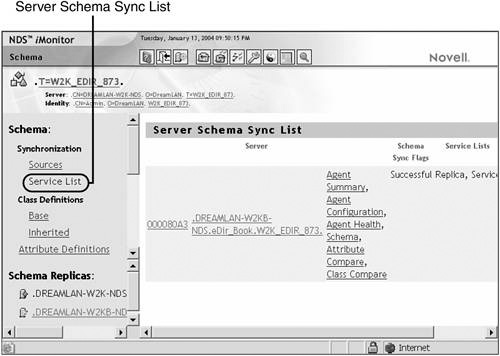
To use DSTrace, you first enable the DSTrace filter with the +SCHEMA flag on NetWare or the +SCMA flag on Unix, and then you use the set dstrace=*ssl DSTrace option. The output looks similar to this:
SchemaSyncList:
--->>> [000080a3] <.DREAMLAN-W2KB-NDS.eDir_Book.W2K_EDIR_873.>
Flags: 0001 Lists: 0005 Expiration: 2004/01/12
![]() 6:11:21
6:11:21
List(s): [0005] Replica Service
Inbound schema synchronization lock status: Released
resetSuccessfulSync = 0 in GetServersInSchemaSyncList
On Windows, you need to enable DSTrace’s Schema Details from the DSTrace Edit menu and then trigger the Schema Sync process from the Trace tab of the DSA window.
By looking at the replica list on Rigel, for example, DS can determine that there are two child partitions—OU=West.O=XYZCorp and OU=East.O=XYZCorp. The replica list on Rigel also indicates what other servers are in the tree. DS determines that the servers Vega and Orion also need to be updated. During this determination, note that Vega and Rigel are listed twice because of the replication scheme in this tree; even though Rigel receives an update in the first round of schema synchronization, after Vega receives the updates to the schema, Rigel is again checked to see whether its schema is current. If the schema is not current, it is updated.
TIP
Schema updates are normally not something to be concerned about unless the change is being made because of an update in the DS module. In cases where Novell has introduced a schema change in a new version of the DS module, you should first update the module on the server that holds the Master replica of [Root]—because that is where schema modification takes place—and then update the rest of your servers after the schema update has completed.
As discussed earlier in this chapter, schema changes are synchronized from the root of the DS tree down to its branches. Because a tree can have NDS 8 servers near the root, with NetWare 6 or 4.2 servers in the middle, and an eDirectory 8.7 server below them, eDirectory must be able to send schema information about auxiliary classes in a manner that is compatible with legacy versions of NDS. It must do so with sufficient clues that an eDirectory server can re-create an auxiliary class from the information. To accomplish this, when synchronizing schema with a server running NDS 7 or older, eDirectory makes the following changes to the three auxiliary class characteristics to make them compatible with previous versions of NDS:
![]() Auxiliary class flag—NDS 8 introduced this object class flag to indicate which classes are auxiliary classes. Because pre-NDS 8 versions do not recognize this flag, eDirectory servers send auxiliary class definitions as standard class definitions with one additional attribute, the
Auxiliary class flag—NDS 8 introduced this object class flag to indicate which classes are auxiliary classes. Because pre-NDS 8 versions do not recognize this flag, eDirectory servers send auxiliary class definitions as standard class definitions with one additional attribute, the Auxiliary Class Flag attribute, which contains the auxiliary class flag information. When an eDirectory server receives a class definition with this attribute, it removes the attribute from the class definition and re-creates an auxiliary class from the class definition.
![]() Superclasses—Prior to NDS 8, NDS required every class to have a superclass. To make auxiliary classes compatible with these rules, NDS 8 and higher servers send
Superclasses—Prior to NDS 8, NDS required every class to have a superclass. To make auxiliary classes compatible with these rules, NDS 8 and higher servers send Top as the superclass of any auxiliary class that has declared no superclass. When an eDirectory server receives a class definition with the Auxiliary Class Flag attribute and with Top as its superclass, the server removes Top as its superclass.
![]()
Object Class Attribute—In versions of NDS prior to NDS 8, the Object Class attribute is a Read-Only attribute. When NDS 8 or higher servers send the definition of this attribute to servers with previous versions of NDS, the source servers include the Read-Only constraint. When eDirectory servers receive the definition for this attribute from a server with previous versions of NDS, the Read-Only constraint is removed from the definition.
The NDS Janitor process is responsible for a number of different tasks, including the following:
![]() Scheduling the Flat Cleaner process.
Scheduling the Flat Cleaner process.
![]() Issuing console messages when synthetic time is issued (on NetWare servers only).
Issuing console messages when synthetic time is issued (on NetWare servers only).
![]() Optimizing the local DS database.
Optimizing the local DS database.
![]() Checking whether the partition root object has been renamed.
Checking whether the partition root object has been renamed.
![]() Updating and verifying the
Updating and verifying the Inherited ACL attributes of partition root objects.
![]() Updating the
Updating the Status attribute in the DS database for the local server.
![]() Ensuring that the local server is registered with another server to receive schema updates if there is no local replica.
Ensuring that the local server is registered with another server to receive schema updates if there is no local replica.
![]() Validating the partition nearest
Validating the partition nearest [Root] on the server and the replica depth of that partition.
The Janitor process has responsibility for some fairly critical tasks. By default, the Janitor process runs every two minutes, although it doesn’t perform every task in its list each time it runs. (For example, it schedules the Flat Cleaner process only once every 60 minutes.)
DS uses synthetic time to manage situations where the current timestamp on an object is later than the current time. The Janitor process checks the timestamps on the objects in the server and when a new timestamp is needed for an object. If an object in the server’s replicas has a timestamp greater than the current server time, the Janitor process notifies the operating system, and a message is generated on NetWare’s system console:
1-02-2004 6:33:58 pm: DS-8.99-12
Synthetic Time is being issued on partition "NW7TEST."
Chapter 2, “eDirectory Basics,” discusses the importance of time synchronization in regard to event timestamping. The timestamp itself is not discussed in detail in Chapter 2. A timestamp consists of three fields: the time and date when the timestamp was issued (more specifically, the number of seconds since midnight January 1, 1970), the replica number, and an event counter. The event counter is incremented every time a timestamp is issued until one second has advanced or 65,535 (64KB minus 1) events have been issued. The following sample timestamp indicates that the server holding Replica 2 issued this timestamp on October 10, 2004, at 04:23:18, and it was for the 34th event within that second:
10/10/2004 04:23:18 2;34
DS uses two types of timestamps to keep track of changes in the database:
![]() Creation timestamp—This timestamp is issued when an object is created. A creation timestamp is used to identify an object; therefore, no two sibling objects (that is, objects in the same context) can have the same creation timestamp.
Creation timestamp—This timestamp is issued when an object is created. A creation timestamp is used to identify an object; therefore, no two sibling objects (that is, objects in the same context) can have the same creation timestamp.
![]() Modification timestamp—This timestamp is issued whenever an attribute is added to, modified, or removed from an object. Every attribute has a modification timestamp that denotes the date and time the attribute was created or last modified (but not when the attribute was removed).
Modification timestamp—This timestamp is issued whenever an attribute is added to, modified, or removed from an object. Every attribute has a modification timestamp that denotes the date and time the attribute was created or last modified (but not when the attribute was removed).
When a timestamp (either a creation or modification timestamp) is issued, the Next Timestamp field (also known as the Partition Timestamp field) in the partition record representing the partition in which this modified object resides is updated. The value placed in the Next Timestamp field is equivalent to the timestamp just issued, but the event counter is incremented by one. This allows DS to identify the minimum value for the next timestamp to be issued.
When a new timestamp is needed, the server obtains the next timestamp based on the partition timestamp of the partition in which the object is being modified. The server also obtains the current time from the operating system. The server then performs one of the following tasks:
![]() If the time obtained from the operating system is higher than the Next Timestamp value (that is, if it is later in time), the server resets the event counter back to 1 and issues a new timestamp, using the time provided by the operating system, its replica number, and the new event counter.
If the time obtained from the operating system is higher than the Next Timestamp value (that is, if it is later in time), the server resets the event counter back to 1 and issues a new timestamp, using the time provided by the operating system, its replica number, and the new event counter.
![]() If the time obtained from the operating system is equal to the Next Timestamp value, the server uses the value from the Next Timestamp field.
If the time obtained from the operating system is equal to the Next Timestamp value, the server uses the value from the Next Timestamp field.
![]() If the time obtained from the operating system is less than the Next Timestamp value (that is, if the Next Timestamp value is in the future compared to the operating system’s time), the server uses the Next Timestamp value and displays on the operating system console that it is using “synthetic time.”
If the time obtained from the operating system is less than the Next Timestamp value (that is, if the Next Timestamp value is in the future compared to the operating system’s time), the server uses the Next Timestamp value and displays on the operating system console that it is using “synthetic time.”
When synthetic time is used, the partition timestamp is frozen, and the only thing that changes is the event count portion of the timestamp. Because every change that occurs requires a unique timestamp, the event counter is incremented from 1 to 65,535 as the server issues timestamps. When the event counter reaches its maximum allowed value, the counter is reset to 1, the next second is used, and the process repeats until the partition timestamp catches up with the current system time.
Synthetic time being issued is not always a critical problem. If a server’s time is set back from within a few hours to within a few days, it is not necessary to correct the problem. This situation is a case where waiting is a better solution than doing something. Using DSRepair to repair timestamps is a serious step to take in that the fix actually destroys replicas on all servers except the server with the Master replica. When all non-Master replicas are destroyed, the replicas are re-created. See Chapter 12, “eDirectory Management Tools,” for information about resolving synthetic time errors.
One of the Janitor process optimization steps is the rehashing of the database information to enable the server to perform lookups more quickly.
If the Janitor process detects that the name of the partition root object has changed, it notifies all servers holding external references of this object of the new name.
Updating the Inherited ACL attribute values starts with the first partition in the partition database. After the Janitor process has located the partition, it validates that the parent object is not an external reference and looks at the ACL to determine whether any of the attribute values have been modified. If they have, it validates whether the attribute is inheritable, and if it is, it recalculates the Inherited ACL attribute values. The Janitor process performs this process for all the partitions on the server.
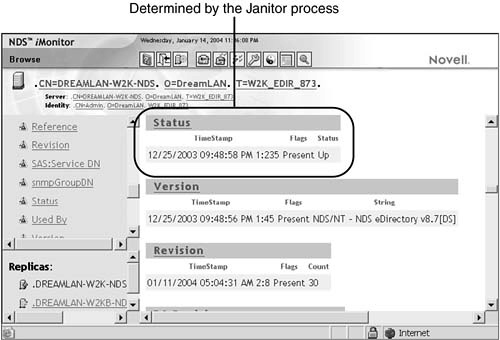
Updating the Status attribute involves validating that the DS attribute Status of the NCP Server object is set to Up. Because the server that performs the validation is up and running, this server always checks for an Up value. If it is set to Down, the Janitor process updates the attribute. Figure 6.10 shows where in NDS iMonitor you can see the result of this operation. To reach this screen, you select Agent Summary, Known Servers; click the server of interest; and select Status.
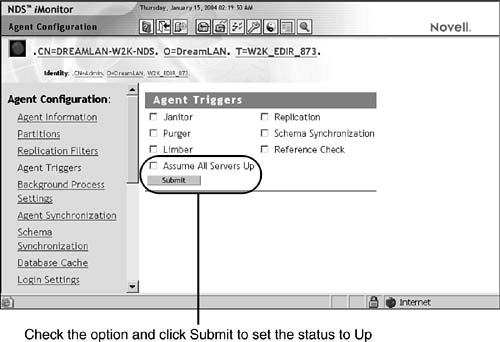
When an NCP Server object’s Status attribute is set to Down, the synchronization processes does not attempt to communicate with that server. Sometimes when a server is brought back online, its Status attribute value of Up might not be noticed by the other servers in the replica ring right way. You can manually force the status to Up by using NDS iMonitor as shown in Figure 6.11 by clicking the Agent Configuration link and then selecting the Agent Triggers link.
The Janitor process’s role in ensuring that the server can receive schema updates if it holds no replicas is particularly important. Even if a server has no local replicas, it still receives information for external references (such as those used to grant rights in the file system). In order to handle this properly, the server needs to know about all the different class definitions in case an extended class object receives rights to the file system. Equally important is the need for the schema partition to be maintained in case a new replica is added to the server later. If the server does not have current information about the schema and a replica is added to the server, many objects will change to Unknown objects in the local database, which can cause problems with object administration if those copies of the objects are read by the various management tools.
Finally, the Janitor process is also responsible for updating the Revision attribute of external references when the attribute value on the referenced object is changed.
The Flat Cleaner process is scheduled by the Janitor process and runs
192every 60 minutes by default. Responsibilities of the Flat Cleaner process include the following:
![]() Purging unused objects and attributes stored in the bindery partition or external reference partition
Purging unused objects and attributes stored in the bindery partition or external reference partition
![]() Purging obituaries that have reached the
Purging obituaries that have reached the Purgeable state
![]() Revalidating the
Revalidating the Status and Version attributes of servers in all partitions of which the server has the Master replica
![]() Verifying that all objects in the user-defined partitions on the server have valid public keys and Certificate Authority (CA) public keys.
Verifying that all objects in the user-defined partitions on the server have valid public keys and Certificate Authority (CA) public keys.
NOTE
Because the Flat Cleaner process performs much of the purging of deleted records, it is also known as the Replica Purger process or simply the Purger process.
As described in Chapter 2, the bindery partition is the partition that is used to store information about the bindery user Supervisor. This partition also stores the SAP information that is received from IPX networks connected to the server. If a service is removed from the network, the SAP table in the server needs to be updated; this is one of the tasks the Flat Cleaner process is responsible for.
Obituaries that have reached the Purgeable stage need to be removed from the database, and the Flat Cleaner takes care of this. Essentially, the Flat Cleaner process removes any object or attribute flagged as Non Present.
The Flat Cleaner process is also responsible for validating the Up state of all servers that hold Master replicas. As discussed earlier in this chapter, the Janitor process is responsible for setting the server Status attribute to Up. The Flat Cleaner process is responsible for setting the Status attribute to Down as necessary if it finds that it cannot communicate with the server.
To understand the process better, let’s consider a simple example where there are two servers, Orion and Rigel. Orion holds the Master copy of [Root], the only partition in the tree. If Rigel is offline when Orion’s Flat Cleaner process runs, Orion sets the Status attribute for Rigel to Down. When Rigel is brought back online, it runs its Janitor process, checks the Status attribute, and sees that it is set to Down. Because the server is no longer down, Rigel changes the Status attribute to Up.
The Flat Cleaner process also performs checks to validate all Public Key and CA Public Key attributes for objects the server holds. If it finds an invalid or missing key, it attempts to create new keys for the object. DS uses the Public Key and CA Public Key attribute values during the authentication process; if these keys are not valid on User objects, the user (or an administrator) has to change his or her password to fix the problem. If, however, these keys are corrupted on an NCP Server object, server-to-server authentication is disrupted, and synchronization does not occur.
The Backlink process, or Backlinker process, as it is called in some Novell documentation, checks on the validity of external references by verifying whether the original entry still exists and whether the reason for its existence is still valid. If the external reference is no longer needed or used after a given time period, the Backlink process removes it.
NOTE
The BackLink attribute consists of two fields: the DN of each remote server holding the external reference and the object ID of each of these servers (known as the remote ID). The Backlink process periodically verifies the DNs and remote IDs to ensure that they are valid.
The Backlink process also helps clean up external references. If the server holding the external reference no longer requires it or if the ExRef partition’s life span has expired after not being used for a certain amount of time (the default is 192 hours [that is, 8 days]), the external reference of the object is deleted when the Backlink process has conformed each of the following conditions seven times:
![]() The object represented by the exref has no file system rights assignments to a volume on the server.
The object represented by the exref has no file system rights assignments to a volume on the server.
![]() The object represented by the exref is not listed on the connection table of the server.
The object represented by the exref is not listed on the connection table of the server.
![]() The object represented by the exref is not required to complete the fully qualified DNs (FQDNs)—that is, FDNs using typeful naming rules—of any subordinate objects.
The object represented by the exref is not required to complete the fully qualified DNs (FQDNs)—that is, FDNs using typeful naming rules—of any subordinate objects.
![]() The object represented by the exref is not used as a local reference by an attribute stored in the attribute database.
The object represented by the exref is not used as a local reference by an attribute stored in the attribute database.
The Backlink process is also responsible for ensuring that every external reference has a copy of the actual object’s GUID attribute. This is necessary for file system rights for NSS volumes in NetWare 6 and higher.
By default, this process runs every 13 hours (that is, 780 minutes). You can modify the default value with via either DSTrace or NDS iMonitor (see Figure 6.12).
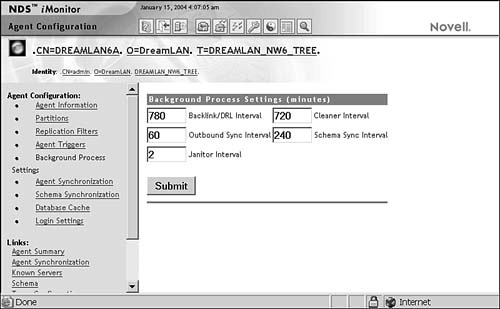
Because the Backlink process works with external references, it is also known as the External Reference Check process.
The last of the automated background processes is the Limber process. Primary responsibilities of the Limber process include the following:
![]() Verifying the network address for the server in all partitions of which the server holds a replica
Verifying the network address for the server in all partitions of which the server holds a replica
![]() Validating that the relative DN (RDN) for the server is correct on the server that holds the Master partition of the replica in which the server exists
Validating that the relative DN (RDN) for the server is correct on the server that holds the Master partition of the replica in which the server exists
![]() Updating and maintaining the
Updating and maintaining the Version attribute for the server in the NDS database
![]() Locating the entry closest to
Locating the entry closest to [Root] by pinging each server in the replica ring list, in order, and selecting the responding server whose entry closest to [Root] is closest to the tree root
![]() Starting the Predicate Statistics collection (see Chapter 16, “Tuning eDirectory,” for more information about Predicate Statistics)
Starting the Predicate Statistics collection (see Chapter 16, “Tuning eDirectory,” for more information about Predicate Statistics)
![]() Verifying that the network address for the server is correct in the server’s DS object.
Verifying that the network address for the server is correct in the server’s DS object.
TIP
These operations perform verifications on the replica list information and server network addresses. If a replica list is inconsistent, forcing the Limber process to run by using NDS iMonitor (refer to Figure 6.11) on the server that appears to have the problem may correct the problem.
If a server name or address changes, the Limber process is responsible for ensuring that the modifications are made to each replica pointer table in the partition ring. If the changes occur on the server that holds the Master replica, the Limber process changes its local address in the replica pointer table. If the changes occur on a server that holds a non-Master replica, the Limber process tells the Master replica about the changes. The Limber process can initiate the Backlink process, which does part of the checking (on exref objects) for the Limber process.
TIP
After changing the server name or its network address (such as the IP address) of a server in a replica ring, you should force the Limber process to run to ensure that all other servers in the replica ring detect the change.
CAUTION
Never change the server name and its network address at the same time. If you do so, eDirectory will lose track of which server this is. You should follow these steps:
1. Change the server name.
2. Restart the server.
3. Force the Limber process to run (for example, by using NDS iMonitor).
4. Verify that the new object name has been synchronized throughout the ring and that the other servers in the replica ring see the new server name.
5. Change the network address.
6. Restart the server.
7. Force the Limber process to run (for example, by using NDS iMonitor).
8. Verify that the new network address has been synchronized throughout the ring and that the other servers in the replica ring see the new network address.
9. If other servers in the replica ring also need their names or network addresses changed, repeat steps 1–8 on each server, one at a time.
As mentioned in Chapter 2, some of the information maintained by the Limber process is stored in part in the local System partition. The following tasks are considered to be secondary functions of the Limber process but are nonetheless important:
![]() Verifying that the directory tree name stored in the server’s System partition is correct
Verifying that the directory tree name stored in the server’s System partition is correct
![]() If the server does not hold a writable replica of the partition its own DS object is in, verifying that the external reference for this object is valid and checking that the
If the server does not hold a writable replica of the partition its own DS object is in, verifying that the external reference for this object is valid and checking that the BackLink attribute is valid on a server that holds a writable copy of the server object
![]() Checking to ensure that the server’s public/private key credentials are correct.
Checking to ensure that the server’s public/private key credentials are correct.
The Limber process is one of the background processes that cannot have its schedule interval changed. If the Limber process’s primary operations complete successfully, the process reschedules itself to run again in three hours. If the primary operations have not completed successfully, the Limber process reschedules itself to run again in five minutes.
Now that we have reviewed the major background processes, the following sections examine the processes you invoke by using the administrative utilities. The first set of such processes is object-related processes. The following sections examine the creation, renaming, deletion, and movement of objects in the NDS tree.
Object creation is a fairly straightforward process. In ConsoleOne, for instance, you select the context where you want the new object to be placed and either click Insert or right-click the container you want to create the object in and then select Create from the menu. ConsoleOne asks you for the object class, and after you select that, you are presented with an appropriate dialog box to enter the mandatory attributes of the object.
From the server’s perspective, object creation is also a simple process. The client API generates the DSA request verb DSV_ADD_ENTRY (decimal value 7) and submits it to the server. Listing 6.4 shows the DSA Add Entry request for User object PKuo.
NOTE
You can find a list of DS verbs and their values, along with explanations of their functions, in Appendix B.
Listing 6.4 A DSA Add Entry Request Shown on a Server
Processing a Client Request
DSA: DSACommonRequest(7) conn:3 for client <JIM>
DSA REQUEST BUFFER:
02 00 00 00 00 00 00 00 FF FF FF FF E3 02 00 12![]() ................
................
0A 00 00 00 50 00 4B 00 75 00 6F 00 00 00 00 00 ![]() ....P.K.u.o.....
....P.K.u.o.....
02 00 00 00 10 00 00 00 53 00 75 00 72 00 6E 00
........S.u.r.n.
61 00 6D 00 65 00 00 00 01 00 00 00 08 00 00 00![]() a.m.e...........
a.m.e...........
4B 00 75 00 6F 00 00 00 1A 00 00 00 4F 00 62 00![]() K.u.o.......O.b.
K.u.o.......O.b.
6A 00 65 00 63 00 74 00 20 00 43 00 6C 00 61 00![]() j.e.c.t...C.l.a.
j.e.c.t...C.l.a.
73 00 73 00 00 00 00 00 01 00 00 00 0A 00 00 00![]() s.s.............
s.s.............
55 00 53 00 45 00 52 00 00 00 U.S.E.R...
The request buffer is filled with the information entered in the Create Object dialog box. In the listings in this section, this information is seen on the server processing the client request by enabling the +DSA and +BUFFERS (+CBUF on Unix) flags in DSTrace.
The information shown in the request buffer is in Unicode format, which is a 2-byte character format. For English-language objects, Unicode fills the first byte with 00. In Listings 6.4 and 6.5, you can see the object name starting at offset 19, followed by the mandatory attribute Surname (offset 39) and its value (offset 63). Finally, you can see the Object class attribute and the value USER. This is the minimum information needed to create a User object and is passed directly to the DSA from ConsoleOne.
If the object already exists, the server’s reply is shown right after the request, as shown in Listing 6.5.
Listing 6.5 A DSA Add Entry Request with Failure
DSA: DSACommonRequest(7) conn:3 for client <JIM>
DSA REQUEST BUFFER:
02 00 00 00 00 00 00 00 FF FF FF FF E3 02 00 12![]() ................
................
0A 00 00 00 50 00 4B 00 75 00 6F 00 00 00 00 00![]() ....P.K.u.o.....
....P.K.u.o.....
02 00 00 00 10 00 00 00 53 00 75 00 72 00 6E 00![]() ........S.u.r.n.
........S.u.r.n.
61 00 6D 00 65 00 00 00 01 00 00 00 08 00 00 00![]() a.m.e...........
a.m.e...........
4B 00 75 00 6F 00 00 00 1A 00 00 00 4F 00 62 00![]() K.u.o.......O.b.
K.u.o.......O.b.
6A 00 65 00 63 00 74 00 20 00 43 00 6C 00 61 00![]() j.e.c.t...C.l.a.
j.e.c.t...C.l.a.
73 00 73 00 00 00 00 00 01 00 00 00 0A 00 00 00![]() s.s.............
s.s.............
55 00 53 00 45 00 52 00 00 00 U.S.E.R...
DSA REPLY BUFFER:
DSA: DSACommonRequest(7): returning ERROR –606
The error code -606 is defined as ERR_ENTRY_ALREADY_EXISTS. This makes sense because in this example, the object does in fact already exist in the specified context.
Object creation can take place on any writable replica. When a create request is completed on the server that the workstation contacts, the object is queued up for the next synchronization cycle and sent out to the other servers in the replica ring. As discussed in the section “The Synchronization Process,” this synchronization cycle is either transitive or nontransitive, depending on the version of NetWare and NDS/eDirectory running on the servers in the replica ring.
Renaming an object is a fairly simple process. The request is actually broken into two parts—a Resolve Name request (DSV_RESOLVE_NAME, decimal value 1), as shown in Listing 6.6, and the actual Rename operation, as shown in Listing 6.7. This example renames the object PKuo as JimH. This operation requires that the client be able to contact a server holding a writable copy of the object being renamed.
Listing 6.6 An Object Resolve Name Request Issued During an
Object Renaming Operation
DSA: DSACommonRequest(1) conn:3 for client <JIM>
DSA REQUEST BUFFER:
00 00 00 00 24 20 00 00 00 00 00 00 30 00 00 00![]() ............0...
............0...
50 00 4B 00 75 00 6F 00 2E 00 4F 00 55 00 3D 00![]() P.K.u.o...O.U...
P.K.u.o...O.U...
45 00 61 00 73 00 74 00 2E 00 4F 00 3D 00 58 00![]() E.a.s.t...O...X.
E.a.s.t...O...X.
59 00 5A 00 43 00 6F 00 72 00 70 00 00 00 00 00![]() Y.Z.C.o.r.p.....
Y.Z.C.o.r.p.....
02 00 00 00 00 00 00 00 08 00 00 00 02 00 00 00![]() ................
................
00 00 00 00 08 00 00 00 ........
DSA REPLY BUFFER:
01 00 00 00 BC 02 00 0E 01 00 00 00 00 00 00 00![]() ................
................
0C 00 00 00 84 12 30 01 00 00 00 00 00 01 04 51![]() ......0........Q
......0........Q
Listing 6.7 An Object Rename Request
DSA: DSACommonRequest(10) conn:3 for client <JIM>
DSA REQUEST BUFFER:
00 00 00 00 BC 02 00 0E 01 00 00 00 0A 00 00 00 ..............
4A 00 69 00 6D 00 48 00 00 00 6F 00 J.i.m.H...o.
DSA REPLY BUFFER:
The reply sent to the Resolve Name request returns the object ID of the object being renamed, starting at offset 4 in reverse-byte order, as shown in bold in Listing 6.6. In this example, the entry being renamed has an entry ID of 0E0002BC. The server responding also includes its network address in the reply buffer. In this example, the (IPX) address is shown starting at offset 20. Unlike the entry ID, the address value is not in reverse-byte order, and it includes the network, the node, and the socket address. In this example, the address is 84123001:000000000001:0451.
When the requested information is returned, the client sends the Rename request (DSV_MODIFY_RDN, decimal value 10) to the server that replied to the Read request. The request buffer for the Rename request does not include the old object name; rather, it uses the object’s ID, retrieved from the Resolve Name request that occurred at the start of the rename operation. This object ID is again put at offset 4, in reverse-byte order. In Listing 6.7, this is 0E0002BC, shown in bold, the same object ID returned by the Resolve Name request. In a rename operation, the object ID in the Rename request always matches the ID read in the initial Resolve Name request. This is how the client knows which object is being renamed.
In a multiserver environment, the rename operation sets in motion a series of events to ensure that the rename operation is synchronized properly. The old object ID has an OLD_RDN obituary issued for it in order to start processing the purge of the old name from the DS database. At the same time, a NEW_RDN obituary is issued for the new object name.
If one of the servers in the replica ring is unavailable, you can see the obituaries that have been issued for the rename operation. By running DSRepair (with the -A command-line parameter), you can view the current obituaries and their states on the server by performing an external reference check. Listing 6.8 shows the information written to the DSREPAIR.LOG file about the two obituaries that have been created by renaming the object PKuo as JimH.
Listing 6.8 A DSRepair Log File, Showing Obituaries Created by a
Rename Operation
/*************************************************************/
Directory Services Repair 10550.61, DS 10550.98
Log file for server ".VEGA.DreamLAN.W2K_EDIR_873." in tree
"W2K_EDIR_873"
External Reference Check
Start: 01/16/2004 10:37:16 PM Local Time
(1) Found obituary for: EID: 0e0002bc,
DN: CN=JimH.OU=East.O=XYZCorp.T=W2K_EDIR_873
-Value CTS : 01/16/2004 10:36:42 PM R = 0001 E = 0003
-Value MTS = 01/16/2004 10:36:42 PM R = 0001 E = 0003,
Type = 0005 NEW_RDN,
-Flags = 0000
-RDN: CN=JimH
(2) Found obituary for: EID: 0e0002bc,
DN: CN=JimH.OU=East.O=XYZCorp.T=W2K_EDIR_873
-Value CTS : 01/16/2004 10:36:42 PM R = 0001 E = 0004
-Value MTS = 01/16/2004 10:36:42 PM R = 0001 E = 0004,
Type = 0006 BACKLINK,
-Flags = 0000
-Backlink: Type = 00000005 NEW_RDN, RemoteID = ffffffff,
ServerID = 000080a3, CN=RIGEL.O=eDir_Book.T=W2K_EDIR_873
Checked 0 external references
Found: 2 total obituaries in this dib,
2 Unprocessed obits, 0 Purgeable obits,
0 OK_To_Purge obits, 0 Notified obits
*** END ***
From the section “Obituaries,” you know that a Backlink obituary was created because the server Rigel contains either a real copy or an exref of the object. The obituaries that are issued do not prevent you from performing other operations on the object. In fact, after an object is renamed, it is possible to create a new object by using the original object’s name.
TIP
Because the OLD_RDN and NEW_RDN obituary types do not hold up other operations, these obituaries can hang around for a very long time and not be detected. Periodically checking the state of obituaries by using DSRepair helps ensure that Flat Cleaner process is properly advancing and purging the obituaries.
Deleting an object from the tree is similar to renaming an object in the tree. As with the rename operation, the delete operation requires that the client be able to communicate with any server that holds a writable copy of the object.
First, a Resolve Name request is sent; it is similar to the one that appears before the rename operation in Listing 6.6. As with the rename object operation, the reply buffer includes both the object ID of the object being deleted and the network address of the server that responded to the request. When this information is returned, the client requests the actual deletion of the object by using DSA verb DSV_REMOVE_ENTRY (decimal value 8). This request is shown in Listing 6.9.
Listing 6.9 A DSA Remove Entry Request
DSA: DSACommonRequest(8) conn:3 for client <JIM>
DSA REQUEST BUFFER:
00 00 00 00 BA 02 00 10 ........
DSA REPLY BUFFER:
You again see the object ID passed into the request starting at offset 4, in reverse-byte order. This request is for object ID 010002BA to be deleted. The object ID requested again corresponds to the object ID returned by the Resolve Name request at offset 4.
Object deletion creates an obituary of class Dead. Again, by using DSRepair with the -A switch and checking external references, you can see the obituaries created by deleting the object. Listing 6.10 shows the log file entries that result from this operation.
Listing 6.10 A DSRepair Log, Showing Obituaries Created by a
Deletion
/*************************************************************/
Directory Services Repair 10550.61, DS 10550.98
Log file for server ".BETELGEUSE.DreamLAN.W2K_EDIR_873."
in tree "W2K_EDIR_873"
External Reference Check
Start: 01/16/2004 11:00:50 PM Local Time
(1) Found obituary for: EID: 010002ba,
DN: CN=JimH.OU=East.O=XYZCorp.T=W2K_EDIR_873
-Value CTS : 01/16/2004 11:00:32 PM R = 0001 E = 0001
-Value MTS = 01/16/2004 11:00:32 PM R = 0001 E = 0001,
Type = 0001 DEAD,
-Flags = 0000
(2) Found obituary for: EID: 010002ba,
DN: CN=JimH.OU=East.O=XYZCorp.T=W2K_EDIR_873
-Value CTS : 01/16/2004 11:00:32 PM R = 0001 E = 0002
-Value MTS = 01/16/2004 11:00:32 PM R = 0001 E = 0002,
Type = 0006 BACKLINK,
-Flags = 0000
-Backlink: Type = 00000001 DEAD, RemoteID = ffffffff,
ServerID = 000080a3,
CN=DREAMLAN-W2KB-NDS.O=eDir_Book.T=W2K_EDIR_873
(3) Found obituary for: EID: 010002ba,
DN: CN=JimH.OU=East.O=XYZCorp.T=W2K_EDIR_873
-Value CTS : 01/16/2004 11:00:32 PM R = 0001 E = 0003
-Value MTS = 01/16/2004 11:00:32 PM R = 0001 E = 0003,
Type = 000c USED_BY,
-Flags = 0002 OK_TO_PURGE
-Used by: Resource type = 00000000, Event type = 00000003,
Resource ID = 00008065, T=W2K_EDIR_873
Checked 0 external references
Found: 3 total obituaries in this dib,
3 Unprocessed obits, 0 Purgeable obits,
1 OK_To_Purge obits, 0 Notified obits
*** END ***
As with a Rename request, a Backlink obituary is generated in addition to the Dead obituary; a Used By obit is also generated. And as with the rename operation, these obituaries do not cause any delay in creating an object with the same name.
The final object-level operation to examine is the move object operation. This operation is more complex than the other object-level operations and differs slightly from them because of the added complexity.
The first difference between moving an object and performing any other object-level operation is that a Move request requires communication with the server that holds the Master replica of the object. If an object is moved across a partition boundary, communication with the servers that hold the Master replicas of both partitions is required. In addition, those servers must be able to communicate with each other in order for an object’s data to be moved from one partition to the other.
For simplicity, let’s examine an object move within a partition (User object PKuo from East.XYZCorp to West.XYZCorp) because this operation does not vary much between a single server operation and a multiserver operation.
In Listing 6.11, you start by reading object information, using DS verb DSV_READ_ENTRY_INFO (decimal value 2), for the source organizational unit (OU) and destination OU. The request made for the objects is by ID, and the reply buffers contain information about the object: the container class and the full DN of the container in question.
Listing 6.11 DSA Read Entry Information Requests for the Source
and Destination Containers in Preparation for an
Object Move
DSA: DSACommonRequest(2) conn:3 for client <JIM>
DSA REQUEST BUFFER:
02 00 00 00 01 00 00 00 1D 28 00 00 E3 02 00 12![]() ................
................
DSA REPLY BUFFER:
1D 28 00 00 04 00 00 00 01 00 00 00 4F E3 8F 36![]() ............O..6
............O..6
28 00 00 00 4F 00 72 00 67 00 61 00 6E 00 69 00![]() ....O.r.g.a.n.i.
....O.r.g.a.n.i.
7A 00 61 00 74 00 69 00 6F 00 6E 00 61 00 6C 00![]() z.a.t.i.o.n.a.l.
z.a.t.i.o.n.a.l.
20 00 55 00 6E 00 69 00 74 00 00 00 1A 00 00 00![]() ..U.n.i.t.......
..U.n.i.t.......
45 00 61 00 73 00 74 00 2E 00 58 00 59 00 5A 00![]() E.a.s.t...X.Y.Z.
E.a.s.t...X.Y.Z.
43 00 6F 00 72 00 70 00 00 00 C.o.r.p...
DSA: DSACommonRequest(2) conn:3 for client <JIM>
DSA REQUEST BUFFER:
02 00 00 00 00 00 00 00 1D 28 02 00 E2 02 00 12![]() ................
................
DSA REPLY BUFFER:
1D 28 02 00 04 00 00 00 01 00 00 00 5B E3 8F 36![]() ...............6
...............6
28 00 00 00 4F 00 72 00 67 00 61 00 6E 00 69 00![]() ....O.r.g.a.n.i.
....O.r.g.a.n.i.
7A 00 61 00 74 00 69 00 6F 00 6E 00 61 00 6C 00![]() z.a.t.i.o.n.a.l.
z.a.t.i.o.n.a.l.
20 00 55 00 6E 00 69 00 74 00 00 00 24 00 00 00![]() ..U.n.i.t.......
..U.n.i.t.......
4F 00 55 00 3D 00 57 00 65 00 73 00 74 00 2E 00 ![]() O.U...W.e.s.t...
O.U...W.e.s.t...
4F 00 3D 00 58 00 59 00 5A 00 43 00 6F 00 72 00![]() O...X.Y.Z.C.o.r.
O...X.Y.Z.C.o.r.
70 00 00 00 28 00 00 00 4F 00 72 00 67 00 61 00![]() p.......O.r.g.a.
p.......O.r.g.a.
6E 00 69 00 7A 00 61 00 74 00 69 00 6F 00 6E 00![]() n.i.z.a.t.i.o.n.
n.i.z.a.t.i.o.n.
61 00 6C 00 20 00 55 00 6E 00 69 00 74 00 00 00![]() a.l...U.n.i.t...
a.l...U.n.i.t...
These requests validate that the source and target containers are known to the client, and they ensure that the client is communicating with the server that holds the Master copy of the object and the server that will hold the Master copy of the object. Next, you see a Read request to obtain information about the actual object being moved. This is shown in Listing 6.12.
Listing 6.12 DSA Read Entry Information for an Object Being
Moved
DSA: DSACommonRequest(2) conn:3 for client <JIM>
DSA REQUEST BUFFER:
02 00 00 00 00 00 00 00 1D 28 02 00 BC 02 00 0E![]() ................
................
DSA REPLY BUFFER:
1D 28 02 00 00 00 00 00 00 00 00 00 6F 5E 90 36![]() ............o..6
............o..6
0A 00 00 00 55 00 73 00 65 00 72 00 00 00 00 00![]() ....U.s.e.r.....
....U.s.e.r.....
34 00 00 00 43 00 4E 00 3D 00 50 00 4B 00 75 00![]() 4...C.N...P.K.u.
4...C.N...P.K.u.
6F 00 2E 00 4F 00 55 00 3D 00 45 00 61 00 73 00![]() o...O.U...E.a.s.
o...O.U...E.a.s.
74 00 2E 00 4F 00 3D 00 58 00 59 00 5A 00 43 00![]() t...O...X.Y.Z.C.
t...O...X.Y.Z.C.
6F 00 72 00 70 00 00 00 0A 00 00 00 55 00 73 00![]() o.r.p.......U.s.
o.r.p.......U.s.
65 00 72 00 00 00 e.r...
The next step in the move process is to issue a start move operation (DS verb DSV_BEGIN_MOVE_ENTRY, decimal value 42). This request, shown in Listing 6.13, involves the name of the object and the server involved in the communications. Starting at offset 16, you can see the object name, and at offset 32, the FQDN of the server.
Listing 6.13 A DSA Start Move Operation
DSA: DSACommonRequest(42) conn:3 for client <JIM>
DSA REQUEST BUFFER:
00 00 00 00 00 00 00 00 E3 02 00 12 0A 00 00 00![]() ................
................
50 00 4B 00 75 00 6F 00 00 00 0C 01 2A 00 00 00![]() P.K.u.o.........
P.K.u.o.........
43 00 4E 00 3D 00 42 00 45 00 54 00 45 00 4C 00![]() C.N...B.E.T.E.L.
C.N...B.E.T.E.L.
47 00 45 00 55 00 53 00 45 00 2E 00 4F 00 55 00![]() G.E.U.S.E...O.U.
G.E.U.S.E...O.U.
3D 00 6F 00 6D 00 65 00 45 00 61 00 73 00 3D 00![]() ..E.a.s.t...O...
..E.a.s.t...O...
58 00 59 00 5A 00 43 00 6F 00 72 00 70 00 00 00![]() X.Y.Z.C.o.r.p...
X.Y.Z.C.o.r.p...
C8 00 ..
DSA REPLY BUFFER:
At this point, the obituaries are issued for the moved object as well as for the object in its new location. Listing 6.14 shows the DSRepair log after an exref check is performed.
Listing 6.14 Obituaries Issued Due to a Move Operation
/*************************************************************/
Directory Services Repair 10550.61, DS 10550.98
Log file for server ".BETELGEUSE.DreamLAN.W2K_EDIR_873."
in tree "W2K_EDIR_873"
External Reference Check
Start: 01/17/2004 03:11:07 AM Local Time
(1) Found obituary for: EID: 0e0002bd,
DN: CN=PKuo.OU=East.O=XYZCorp.T=W2K_EDIR_873
-Value CTS : 01/17/2004 03:10:43 AM R = 0001 E = 0026
-Value MTS = 01/17/2004 03:10:43 AM R = 0001 E = 0026,
Type = 0002 MOVED,
-Flags = 0000
-MoveObit: destID = 0e0002bc,
CN= PKuo.OU=West.O=XYZCorp.T=W2K_EDIR_873
(2) Found obituary for: EID: 0e0002bd,
DN: CN=PKuo.OU=East.O=XYZCorp.T=W2K_EDIR_873
-Value CTS : 01/17/2004 03:10:43 AM R = 0001 E = 0028
-Value MTS = 01/17/2004 03:10:43 AM R = 0001 E = 0028,
Type = 0006 BACKLINK,
-Flags = 0000
-Backlink: Type = 00000002 MOVED, RemoteID = ffffffff,
ServerID = 000080a3, CN=RIGEL.O=eDir_Book.T=W2K_EDIR_873
(3) Found obituary for: EID: 0e0002bd,
DN: CN=PKuo.OU=East.O=XYZCorp.T=W2K_EDIR_873
-Value CTS : 01/17/2004 03:10:43 AM R = 0001 E = 002a
-Value MTS = 01/17/2004 03:10:43 AM R = 0001 E = 002a,
Type = 000c USED_BY,
-Flags = 0002 OK_TO_PURGE
-Used by: Resource type = 00000000, Event type = 00000001,
Resource ID = 00008065, T=W2K_EDIR_873
(4) Found obituary for: EID: 0e0002bc,
DN: CN=PKuo.OU=West.O=XYZCorp.T=W2K_EDIR_873
-Value CTS : 01/17/2004 03:10:43 AM R = 0001 E = 0021
-Value MTS = 01/17/2004 03:10:43 AM R = 0001 E = 0021,
Type = 0003 INHIBIT_MOVE,
-Flags = 0000
Checked 0 external references
Found: 4 total obituaries in this dib,
3 Unprocessed obits, 0 Purgeable obits,
1 OK_To_Purge obits, 0 Notified obits
*** END ***
NOTE
When an object is moved, it is essentially deleted from its original context and re-created in the target context. However, the entry ID is preserved. You accomplish this by first changing the entry ID of the object in the source context (refer to obits 1 and 4 in Listing 6.14) and then assigning the original entry ID to the object in the new context.
Now you see more differences between the move operation and the previously described object operations. The Inhibit Move obituary issued for the new object (Obit 4 in Listing 6.14) blocks further operations (except modify) on the object, including renames, deletions, and moves until the move operation is completed. It is possible to change the attributes of the object, but all other requests receive a -637 error “previous move in progress”). This is one of the most common error messages received while performing administrative tasks. If you understand how the move process operates, you can understand what a -637 error means and know what needs to be done to resolve the situation.
NOTE
Although the target object can only be manipulated in a minimal number of ways because of the Move Inhibit obituary, a new object with the same name can be created in the original location. The Moved obituary type does not prevent object creation.
As with the previous object operations, with this operation, you also have a Backlink obituary created.
When the move is complete, DS requests that the move be finished by issuing DS verb DSV_FINISH_MOVE_ENTRY (decimal value 43). This initiates the purge process for the Move Inhibit and Moved obituaries. Listing 6.15 shows this request.
Listing 6.15 A DSA Finish Move Operation
DSA: DSACommonRequest(43) conn:3 for client <JIM>
DSA REQUEST BUFFER:
00 00 00 00 01 00 00 00 BC 02 00 0E E3 02 00 12![]() ................
................
0A 00 00 00 50 00 4B 00 75 00 6F 00 00 00 6F 00![]() ....P.K.u.o...o.
....P.K.u.o...o.
2A 00 00 00 43 00 4E 00 3D 00 42 00 45 00 54 00![]() ....C.N...B.E.T.
....C.N...B.E.T.
45 00 4C 00 47 00 45 00 55 00 53 00 45 00 2E 00![]() E.L.G.E.U.S.E...
E.L.G.E.U.S.E...
4F 00 55 00 3D 00 6F 00 6D 00 65 00 45 00 61 00![]() O.U...E.a.s.t...
O.U...E.a.s.t...
73 00 3D 00 58 00 59 00 5A 00 43 00 6F 00 72 00![]() O...X.Y.Z.C.o.r.
O...X.Y.Z.C.o.r.
70 00 00 00 65 00 p...e.
The finish move operation completes, and the obituary purge process begins. When the obituaries are purged, you can proceed with other move operations, and you can rename the object or delete it. However, if you try to delete an object that was just moved without waiting for its associated obits to be purged, you will get a response similar to that shown in Listing 6.16.
Listing 6.16 A Delete Request on an Object with a Previous Move
in Progress
DSA: DSACommonRequest(8) conn:16 for client <JIM>
DSA REQUEST BUFFER:
00 00 00 00 BC 02 00 0E ........
DSA REPLY BUFFER:
DSA: DSACommonRequest(8): returning ERROR -637
The error message in the reply buffer is expected in this case: -637 error (“previous move in progress”). This error occurs because the obituaries created for the Move request have not yet purged, even though the finish move operation has executed successfully. You can retry in a short while and succeed. However, if the error is not cleared after some time (say, 10 minutes), you should check server-to-server communications and determine why the obits are not being purged.
Partitioning and replication operations all require communications with the server that holds the Master replica or replicas. The following sections examine the common operations used in manipulating partitions and replicas.
WARNING
Although many of these operations function even if some of the servers in the replica ring are unavailable, it is not at all recommended that they be performed until connectivity can be restored and verified. Even though the impact to users is not noticeable if everything proceeds normally, any partition-related operations (including adding or removing a replica) should be considered to be major changes to the tree.
Prior to initiating a partition or replica operation, it is always a good idea to perform a basic health check to verify communication to all the servers that will be involved in the operation. You can easily do this by using NDS iMonitor. NDS iMonitor has a couple different options that are useful in this situation—the Agent Synchronization option, shown in Figure 6.13, and the partition Continuity option, shown in Figure 6.14.
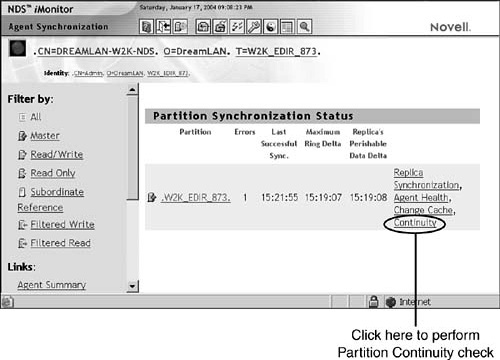
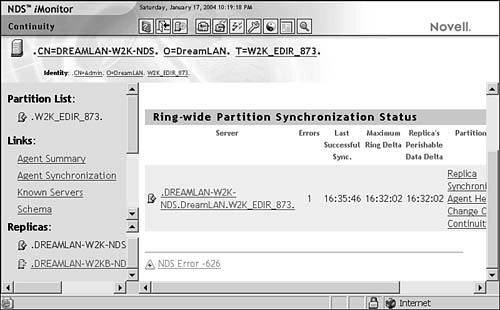
NOTE
You can find detailed NDS/eDirectory health check recommendations in Chapter 13, “eDirectory Health Checks.”
WARNING
Do not confuse the Agent Synchronization link under the Links listing with the Agent Synchronization link found on the Agent Configuration page. The latter is used to change synchronization-related settings.
As you can see in Figure 6.13, the Agent Synchronization screen shows a quick overview of synchronization status. This status is obtained by reading a single server and seeing the status that the server recorded for the last synchronization. If the last synchronization status was All Processed=YES, the synchronization is determined to have been successful and the errors count is zero. If the status was All Processed=NO, the synchronization failed and the errors count shows the number of errors.
NOTE
The following information is shown on the Agent Synchronization status screen:
![]() Partition—The names of the partitions located on this server.
Partition—The names of the partitions located on this server.
![]() Errors—The number of errors encountered during the last synchronization cycle.
Errors—The number of errors encountered during the last synchronization cycle.
![]() Last Successful Sync.—The amount of time since all replicas of the partition were successfully synchronized from this server.
Last Successful Sync.—The amount of time since all replicas of the partition were successfully synchronized from this server.
![]() Maximum Ring Delta—The oldest send delta of any server in the replica ring. This value is the same as the highest send delta in the replica status list.
Maximum Ring Delta—The oldest send delta of any server in the replica ring. This value is the same as the highest send delta in the replica status list.
![]() Replica’s Perishable Data Delta—The amount of data on the partition that has not yet been successfully replicated since the server last synchronized that partition.
Replica’s Perishable Data Delta—The amount of data on the partition that has not yet been successfully replicated since the server last synchronized that partition.
This basic check shows high-level problems in synchronization, but in order to really determine the status, you should check each server in the replica ring. The Partition Continuity screen (refer to Figure 6.14) provides this information. Synchronization errors between one server and another are apparent here. If there is a synchronization problem reported between servers, errors are reported at the end of the page.
After you have verified that the involved replicas are properly synchronized, you can then proceed with a partitioning/replication operation. Before looking at the various operations, though, let’s first review the states in which a replica can be in because they can help you determine what stage you are at during a partitioning or replication operation.
When working with partitions and replicas, you need to be familiar with the various states they can be in. Table 6.5 lists the possible states that a partition or replica can go through and their values (in both hexadecimal and decimal).
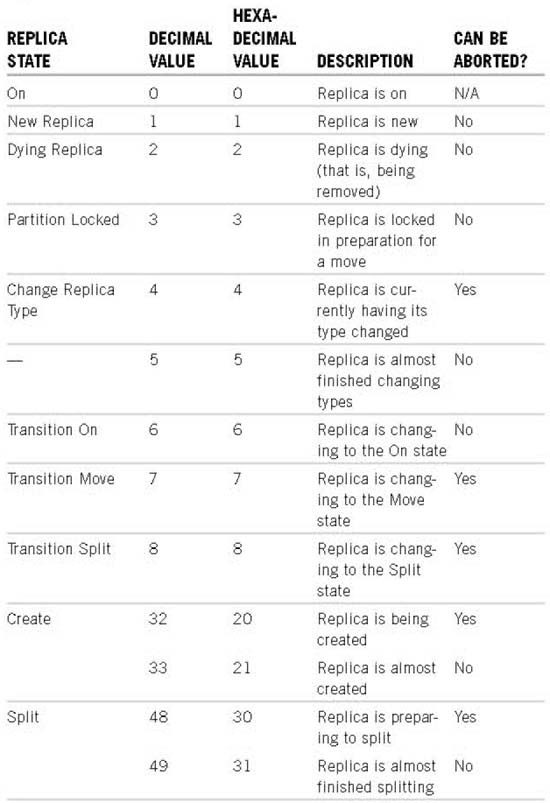
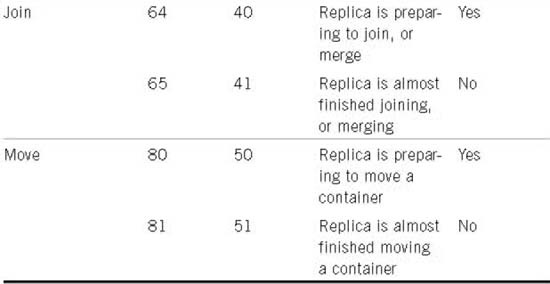
The values that appear in some DSRepair log files and DSTrace screens can provide insight into the current state of operations. A detailed explanation of some of the states follows:
![]() On—Indicates the normal state of a replica.
On—Indicates the normal state of a replica.
![]() New Replica—Indicates that the replica is in the process of forming. This state should last no more than a few minutes.
New Replica—Indicates that the replica is in the process of forming. This state should last no more than a few minutes.
![]() Dying Replica—Indicates that the replica is in the process of being deleted. This replica should disappear completely in a few hours.
Dying Replica—Indicates that the replica is in the process of being deleted. This replica should disappear completely in a few hours.
![]() Transition On—Indicates that the replica is in the process of going on but is currently in transition. This state is typical during a replica installation. The replica is not fully on until the installation is complete.
Transition On—Indicates that the replica is in the process of going on but is currently in transition. This state is typical during a replica installation. The replica is not fully on until the installation is complete.
![]() Transition Move—Indicates that the replica is in the process of going to the Move state but is currently in transition. This state is typical during a Move Partition operation.
Transition Move—Indicates that the replica is in the process of going to the Move state but is currently in transition. This state is typical during a Move Partition operation.
![]() Transition Split—Indicates that the replica is in the process of going to the Split state but is currently in transition. This state is typical during a Split Partition operation.
Transition Split—Indicates that the replica is in the process of going to the Split state but is currently in transition. This state is typical during a Split Partition operation.
TIP
The two important states to watch for are whether the replica is on or successfully deleted. If the replica is stuck in a split, join, or move state, the value itself is not necessarily important, except as an indication that the operation is not yet complete. You should then determine the reason for the operation’s incompletion. It could be due to communication failure between servers.
NetWare 4.1 and higher enable you to abort a partition operation that is in progress. A pending partitioning or replication operation can be aborted through DSRepair, as shown in Figure 6.15.
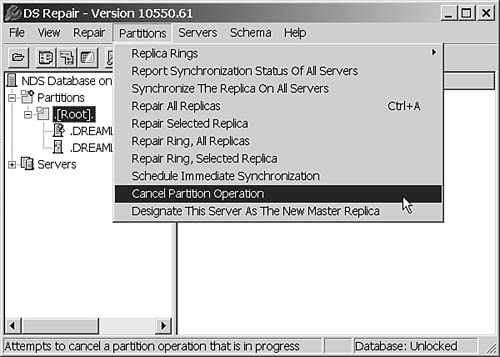
NOTE
Not all partition operations can be canceled successfully (refer to Table 6.5). DSRepair might judge that a given operation couldn’t be canceled due to potential damage to the tree. In such cases, the operation continues as scheduled.
Now that you have a good grounding in the replica states, the following sections examine the various partitioning/replication operations, starting with the Split Partition operation.
The Split Partition operation is the process that is used to create a new (child) partition. When you install the first DS server in a tree, the [Root] partition is created automatically; any other partitions created are split off the [Root] partition.
NOTE
Partition operations are performed using either NDS Manager or ConsoleOne. Unless you have access only to NetWare 4.x servers, ConsoleOne is the preferred utility because it also supports filtered replicas, whereas NDS Manager does not. However, you can download the latest version of ConsoleOne from http://download.novell.com and use it with NetWare 4.
The information reported by the DSTrace screen is fairly minimal. Watching the operation entails enabling the Partition DSTrace flag (+PART in NetWare and Unix). This enables the trace information for all partitioning operations. Listing 6.17 shows the information presented during a Split Partition operation.
Listing 6.17 A Split Partition Operation
SPLITTING -- BEGIN STATE 0
(20:28:39)
*** DSALowLevelSplit <[Root]> and <XYZCorp> ***
Successfully split all partitions in ring.
ADDED 010000B6 and 0C0000BC to partition busy list.
SPLITTING -- END STATE 0
*CNTL: This server is the new master for [0C0000BC]<XYZCorp>
*CNTL: SetNewMaster for [0C0000BC]<XYZCorp> succeeded.
Turning replicas on after changing replica type.
While a Split Partition operation is being performed, further partitioning and replication operations for that partition are suspended. Further operations will result in an error -654 (ERR_PARTITION_BUSY) until the replicas are turned on (that is, become usable). This operation is indicated in the last line of Listing 6.17.
TIP
Although you can perform operations on multiple partitions concurrently, it is best to work on them one at a time, especially if the partitions share common servers.
Notice that lines 7 and 8 in Listing 6.17 (which appear in boldface) indicate that the server the trace was done on became the Master replica for the new partition. This is to be expected because this server holds the Master replica of the parent partition. When you perform a Split Partition operation, the servers that end up with replicas are the same as the ones that hold replicas of the parent partition. After the replicas are turned on, you can further manipulate the replicas by adding, removing, or changing the replica types.
Merging a partition—also referred to as joining a partition—is the reverse of splitting a partition. The Merge Partition operation merges parent and child partitions into a single partition. As Listing 6.18 shows, two operations actually take place during a join—a join up operation and a join down operation. The join up operation is the process of joining of the child partition with the parent; the join down operation is the process of the parent joining with the child partition.
Listing 6.18 DSTrace Messages from a Join Operation
(20:28:08)*** DSAStartJoin <XYZCorp> to <[Root]> ***
JOINING DOWN -- BEGIN STATE 0
JOINING DOWN -- END STATE 0
JOINING UP -- BEGIN STATE 0
JOINING UP -- END STATE 0
JOINING DOWN -- BEGIN STATE 1
PARENT REPORTING CHILD IS STILL IN STATE 1
JOINING UP -- BEGIN STATE 1
JOINING UP -- END STATE 1
JOINING DOWN -- BEGIN STATE 1
JOIN: Reassigning unowned replica changes for [010000B6]
<[Root]> succeeded, total values reassigned 1
(20:28:12)
*** DSALowLevelJoin <[Root]> and <XYZCorp> ***
ADDED 010000B6 to partition busy list.
JOINING DOWN -- END STATE 1
The Merge Partition operation results in a single partition where there were two; however, the replicas for each of the old partitions have to be dealt with in such a way that bindery services on all servers are not disrupted. When you’re merging partitions together, it is very important to determine where the new partition’s replicas are going to be. For example, if you have eight servers involved in the Merge Partition operation, you will end up with eight replicas of the new partition. This might not be desirable, so you will want to examine where these new replicas will be and what services would be affected on each server if you were to remove the replica from this server.
Moving a partition is similar to moving an object—in fact, the operation uses the same code within the DS module to perform the operation. The biggest difference is that the Move Partition operation also generates Create Replica operations, which in turn result in object Synchronization operations. The Move Partition operation is a fairly complex operation—more so than the other operations discussed in this chapter. Before you commence, you must make sure you have no synchronization problems in the partitions involved.
WARNING
A total of three existing partitions can be affected by a move operation: two parent partitions and the partition being moved. It is important that you verify the synchronization status of all three partitions before initiating a Move Partition operation.
There are two rules to remember when moving partitions:
![]() Moving a partition cannot violate containment rules for the partition root object.
Moving a partition cannot violate containment rules for the partition root object.
![]() The partition being moved must not have any child partitions.
The partition being moved must not have any child partitions.
Figure 6.16 shows an example of a violation of the first rule. This Move Partition operation is invalid because containment rules are violated: O=XYZCorp cannot be moved to under O=DIV1 because an organization cannot contain another organization.
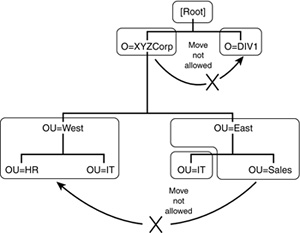
By extension of the second rule, it is not possible to move a partition so that it becomes subordinate to a child partition. As Figure 6.16 shows, it is also not permissible to move the East.XYZCorp partition under the OU=West.O=XYZCorp partition because there exists a child partition, OU=IT.OU=East.O=XYZCorp, under OU=East.O=XYZCorp.
The following sections focus on some things you need to watch out for when moving a partition.
NetWare 5 and higher introduce several objects into the tree at the time of installation, depending on which additional services are installed on the server. In addition, other Novell products (including eDirectory) or third-party products may also create dependencies on a server’s context in the tree. When you’re moving a partition, it is useful to determine which objects will be affected by a server’s move if the server should be in the partition being moved. References to objects within the partition being moved may not be changed. In this section we’ll look at a few NetWare-specific examples.
NetWare 6 installs Secure Authentication Services (SAS), used for security services such as Secure Sockets Layer (SSL) communication, as part of the basic core component. This add-on creates an object in the tree (named SAS Service – servername) and references the server that hosts the service. When a partition containing this service is moved, you need to re-create the object by unloading the SAS.NLM module, loading SASI.NLM (the SAS installation utility), and logging in with sufficient rights to re-create the SAS object in the tree.
TIP
Refer to TID 10063314 for information on how to create the SAS Service object manually on different operating system platforms.
The Novell Distributed Print Services (NDPS) broker service also has dependencies on the server location: A Broker object is created in the tree in the server’s context. When the server object is moved, shut down, and brought back up in the new location, the broker service will not start properly.
WARNING
Of particular significance is NetWare’s license service. If you relocate a partition that contains license information for NetWare 5 servers, you will need to reassign the license files to the servers. This requires reinstalling the license service on the server or servers that have moved as a result of the Move Partition operation. NetWare 6, on the other hand, does not suffer from this problem because its licensing model changed to be user based.
Many other add-on services can be affected by the Move Partition operation. The best thing to do is check all your non-User objects and see which of them reference servers. Moving a server object—and a partition, by extension—is not a trivial operation and has widespread impact in most production environments.
The Move Partition operation consists of two parts: the Move Partition request and the Finish Partition Move request. The Move Partition request is sent by the client to schedule the move. This process performs several verification operations, including the following:
![]() Ensuring that the user has
Ensuring that the user has Create object rights to the destination container to which the partition is being moved.
![]() Verifying that there is not an object in the destination container that has the same name as the partition root object being moved.
Verifying that there is not an object in the destination container that has the same name as the partition root object being moved.
![]() Verifying that the affected replicas are all available to perform partition operations.
Verifying that the affected replicas are all available to perform partition operations.
![]() Ensuring that the Transaction Tracking Service (TTS) is available and enabled on all NetWare servers that are running pre-NDS 8 and are involved in the Move Partition operation. NDS operations are dependent on TTS, and if TTS is not available, NDS cannot function. (eDirectory, on the other hand, does not have this limitation because of the FLAIM database it uses.)
Ensuring that the Transaction Tracking Service (TTS) is available and enabled on all NetWare servers that are running pre-NDS 8 and are involved in the Move Partition operation. NDS operations are dependent on TTS, and if TTS is not available, NDS cannot function. (eDirectory, on the other hand, does not have this limitation because of the FLAIM database it uses.)
When the preceding tasks are completed, the servers handle the Finish Partition Move request. This process has two functions:
![]() Moving the partition root object and all subordinate objects from one context to another valid context
Moving the partition root object and all subordinate objects from one context to another valid context
![]() Notifying the server that holds the Master replica of the partition that the partition has moved
Notifying the server that holds the Master replica of the partition that the partition has moved
This process also performs several verification operations, including verifying that the partition root object being moved and all subordinate objects do not have an Inhibit Move obituary on them. If there is such an obituary within the partition, the process aborts with a -637 error (ERR_PREVIOUS_MOVE_IN_PROGRESS).
A second verification process involves testing to see whether the partition root object to be moved is the [Root] object for the tree. It is not possible to move the [Root] object, and attempting to do so will result in a -641 error (ERR_INVALID_REQUEST).
NOTE
The Finish Partition Move process also tests to see whether you are attempting to move an object that is not a partition root. If you are, you get a -641 error. The standard Novell-supplied administration utilities do not allow such as move, but the check is there to prevent third-party utilities from attempting such an illegal move due to inadequate safeguards.
A further test is done to verify that the servers involved in the move are running at least NDS 4.63; there is no reason you should still be running NDS 4.63 or an older version, but the DS code needs to perform this check as a precaution. Novell made changes to the DS code that are involved in partition moves, and using versions older than NDS 4.63 with versions newer than NDS 4.63 causes a move to fail. Mixing versions in this manner causes a -666 error (ERR_INCOMPATABLE_DS_VERSION) to be reported.
NOTE
The DS engine on the Master replica of the partition being moved generates a list of the servers that need to be informed about the Move Partition operation. This list includes the servers containing real copies of the partition root object as well as all the servers listed in the BackLink attribute for the partition root object (that is, servers holding external references of the partition root object). Each server object is then checked to see whether there is a DS Revision attribute. The value of this attribute is then checked to see whether it meets the minimal version requirement for the operation, which is 463.
If a server in the list happens to be an Unknown object or an external reference object that is not backlinked, there is a good possibility that no DS Revision attribute exists. In that case, the DS Revision value is 0. This value does not meet the minimal version requirement, and the operation fails with a -666 error.
Next, DS checks to verify that the containment rules are not being violated by the move. The DSA finds a server with a copy of [Root] and asks for the class definition for the destination parent object’s class; if the partition root object being moved is in the containment list of the destination, the move is allowed to proceed. Otherwise, a -611 error (ERR_ILLEGAL_CONTAINMENT) is generated, and the process aborts.
Another verification is done to ensure that the partition root object’s DN and the DNs of all subordinate objects do not exceed the maximum length of 256 Unicode characters (512 bytes). If any of the objects affected has a DN that exceeds this length, a -610 error (ERR_ILLEGAL_DS_NAME) is returned.
NOTE
In the check of the objects that are subordinate to the partition root object, the actual returned code may be a -353 error (ERR_DN_TOO_LONG). This error code means the same thing as -610 but is reported by the client library instead of the server.
A further step in the Move Partition process is the submission of a third process to the destination server: an NDS Start Tree Move request. This request actually performs the move operation and is responsible for moving both the partition root object and all the child objects to the new context.
When the move is complete and the partition root object being moved has been locked to prevent other partition operations from occurring, the Replica Synchronization and Backlinker processes are scheduled. When they are successfully scheduled, the partition root object is unlocked.
Moving a partition also causes the creation and deletion of SubRef replicas, which are needed to provide connectivity between partitions, as discussed in Chapter 2. The old SubRef replicas will be deleted from the servers that hold them, and new SubRef replicas will be created as necessary to provide connectivity to the new context.
The Rename Partition operation is very similar to the Rename Object operation, except that the obituaries issued are different—rather than the OLD_RDN and NEW_RDN obituaries being issued, the obituaries issued are Tree_OLD_RDN and Tree_NEW_RDN. Renaming a partition is really a special case of the Object Rename operation because the only object directly affected is the partition root object.
The Rename Partition operation is one operation that can hold up any other type of partition or replication operation. NDS/eDirectory checks for this condition before attempting the Add Replica, Delete Replica, Split Partition, Join Partition, and Change Partition Type operations.
Creating a replica, also known as an Add Replica request, requires communication with each server in the replica ring for the partition being affected. An inability to communicate with a server in the replica ring results in a -625 error (ERR_TRANSPORT_FAILURE) or a -636 error (ERR_UNREACHABLE_SERVER).
NOTE
If a server has a SubRef replica and you want to promote it to be a real replica on the server, the operation you need to use is the Create Replica operation, not the Change Replica Type operation. This is because a SubRef replica is not a real copy of the partition; rather, it contains just enough information for NDS operations such as tree-walking. Therefore, the only way to change its type is to place a copy of the real replica on that server.
WARNING
You should never change a SubRef replica type except in a DS disaster recovery scenario, and you should do that only as a very last resort. Refer to the section “Replica Ring Inconsistency” in Chapter 11, “Examples from the Real World” for more information about this process.
Creating a replica of a partition involves making changes to the local partition database and then performing a synchronization of all objects in the partition to the server receiving the new replica. Problems can occur for two reasons:
![]() Communication cannot be established or maintained with a server in the replica ring.
Communication cannot be established or maintained with a server in the replica ring.
![]() If the server being examined to determine the location of the Master replica does not have a replica attribute, error -602 (
If the server being examined to determine the location of the Master replica does not have a replica attribute, error -602 (ERR_NO_SUCH_VALUE) is returned, and the operation is aborted.
The Delete Replica operation is similar in requirements to the Create Replica operation. The Delete Replica operation requires all servers in the replica ring be reachable. The server holding the Master replica of the partition processes the request.
The verification routines ensure that the replica being removed is a Read/Write or Read-Only replica. If the replica in question is the Master replica, a -656 error (ERR_CRUCIAL_REPLICA) is returned.
NOTE
Some utilities give you the option of making another replica the Master replica before you delete the current one, instead of returning the –656 error and aborting the operation.
A lock is placed on the partition during the operation. Unlike in other operations, this lock is left in place for a number of steps, including an immediate synchronization that is scheduled to ensure that all objects in the replica being moved have been synchronized. This ensures that information in the objects stored in the replica being deleted does not get lost if it is newer than the information in other replicas.
Compared to the other operations we have looked at in this chapter, the Change Replica Type operation is relatively simple. This operation is easiest to perform from the ConsoleOne utility. Figure 6.17 shows the ConsoleOne dialog box, Change Replica Type, that is used during this operation.
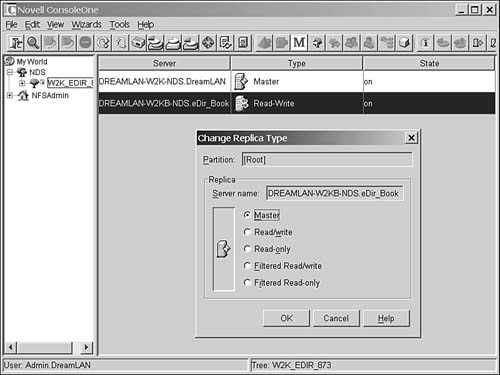
NOTE
As discussed earlier in this chapter, changing a SubRef replica to a Master, Read/Write, or Read-Only replica is treated as a Create Replica operation. You should not confuse it with the “force promotion” process discussed in Chapter 11 that is used for DS disaster recovery. ConsoleOne does not present you with a Change Replica Type option if the selected replica is a SubRef or Master replica.
In Figure 6.17 you can see the replica types available for changing the selected server’s replica type. Because the selected server currently holds a Read/Write replica of the partition, you have a number of options to choose from.
NOTE
Even though you have an option to change the replica type to a Read/Write replica, if you select that option, the OK button is disabled because the replica is already a Read/Write replica.
Changing a Read/Write or Read-Only replica to a Master replica actually causes two changes to be made. First, the Master replica is changed to a Read/Write replica. Second, the Read/Write or Read-Only replica becomes the Master replica; this is done because there cannot be two Master replicas for a given partition—and it is done for you automatically.
NOTE
When running eDirectory 8.5 and higher, you can also change a replica’s type to either Filtered Read/Write or Filtered Read-Only. However, note that before you set up any replication filters, which are server-specific, only the following objects (if they exist within the partition) will be placed in a Filtered replica:
![]() Container objects (and their subordinate container objects), such as organizations and organizational units
Container objects (and their subordinate container objects), such as organizations and organizational units
![]()
NCP Server objects and their SAS objects, but not their other associated objects, such as the SSL objects
![]() The
The Security container and its (leaf and container) subordinate objects
![]() The
The Admin User object if it exists in the partition in question, but not other User objects
These objects allow you to authenticate to the target server as Admin and set up replication filters at a later time.
The Change Replica Type operation generally occurs very quickly because no replicas need to be created or deleted in order to change the replica. The replica ring is updated on all servers that hold replicas (including SubRef replicas), and the server or servers affected have a change made in their partition entry tables to reflect the change in replica type.
This chapter examines NDS/eDirectory’s use of obituaries and the major NDS/eDirectory background processes. The following is a summary of the time intervals at which the various processes run:
|
NDS Background Process |
Default Time Interval |
|
Backlink/DRL |
780 minutes (that is, 13 hours) |
|
External reference life-span |
192 hours (that is, 8 days) |
|
Flat Cleaner |
720 minutes |
|
Heartbeat—data |
60 minutes |
|
Heartbeat—schema |
240 minutes (4 hours) |
|
Janitor |
2 minutes |
|
Limber |
3 hours; 5 minutes if processing was unsuccessful |
|
Server state |
30 minutes |
|
Schema update interval |
60 seconds |
|
Schema synchronization interval |
If processing was successful, schedule to run after next schema heartbeat (which is 4 hours); otherwise, schedule to run after schema update interval plus one second |
|
Synchronization interval for attributes flagged as |
10 seconds |
|
Synchronization interval for attributes flagged as |
30 minutes for NetWare 4; 60 minutes for NetWare 5 and higher and eDirectory servers |
This chapter also examines several object-related and partitioning replication–related operations to show how DS actually performs these operations. Understanding how these processes operate lays a foundation for understanding how to effectively troubleshoot and resolve problems. The next two parts of this book examine how to use this information to troubleshoot and resolve issues with NDS/eDirectory, using the different tools available. The following chapters also examine ways to combine tools using different techniques in order to streamline the troubleshooting-resolution process.