Chapter 11 Examples from the Real World
This chapter brings together the concepts and various utilities that are discussed in previous chapters and applies them to some specific examples. The following topics are examined:
![]() Bindery Services–related issues
Bindery Services–related issues
![]() Security issues
Security issues
![]() Schema problems
Schema problems
![]() Data inconsistencies
Data inconsistencies
![]() Synthetic time
Synthetic time
![]() Server and data recovery
Server and data recovery
Although NDS and eDirectory are backward-compatible with the bindery, you need to be aware of a number of common issues when dealing with bindery-based applications in a DS environment. NetWare bindery information is server-centric; therefore, when you use Bindery Services in a DS environment, the bindery data that you see is also server-centric. From our experience, there are four general areas of concern when using Bindery Services:
You can use the procedures outlined in Table 11.1 to verify whether you have Bindery Services enabled.
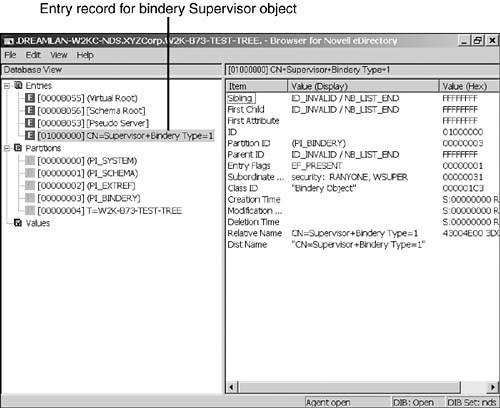
The bindery Supervisor user is an odd creature. It is both a DS object and a non-object. It is a bindery object in that it exists on each and every NetWare 4 and higher server and on non-NetWare eDirectory servers, regardless of whether Bindery Services is enabled on that server or not. Similarly to the [Public] pseudo object, the bindery Supervisor User object doesn’t physically show up when you browse the DS tree using standard management tools such as ConsoleOne or iManager, but it is recognized and acted upon by DS servers. You should be aware of the issues discussed in the following paragraphs.
The bindery Supervisor is created as a pseudo-DS object whose rights are restricted to a specific bindery context and only to that context. Supervisor does not have Admin-like rights in the whole DS tree. It does, however, have full rights over the objects that are in the same bindery context and full file system rights to the servers that provide the bindery emulation service. Within the bindery context, Supervisor can perform all administrative operations, such as changing a user’s password and creating new users, regardless of DS inheritance right filters.
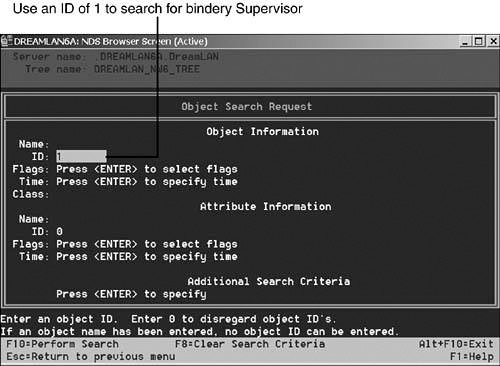
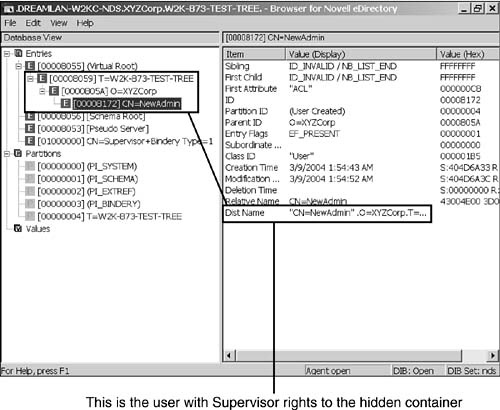
Although you can’t see Supervisor via the traditional management tools—except via bindery-based utilities such as SYSCON.EXE—you can see it using DSBrowse because there is actually an entry record in the Directory Information Base (DIB) for this object. When you use the Windows version of DSBrowse, you need to switch to the DIB view, as shown in Figure 11.1. With DSBROWSE.NLM, you need to use the Object Search option from the main menu and specify an object ID of 1 (see Figure 11.2). Unfortunately, because there is no DSBrowse implementation for Linux/Unix, you cannot readily check this on those platforms.
Depending on how you migrated the user information from a bindery server into NDS/eDirectory, you might have a security backdoor that you’re not readily aware of. Any user who was security equivalent (SE) to Supervisor in the bindery will be made SE to the NCP Server object (and thus will have full rights to all volumes associated with that server object) on the server that was used to import the bindery data. This means that all users who were SE to bindery Supervisor on the old server now have full rights to the new server.
One of the most confusing issues associated with Supervisor is its password. The initial Supervisor password is the same as that of Admin or that of the user used to authenticate the installation utility. When you install the first server into the DS tree, the passwords of Admin and the bindery Supervisor user are set to be the same. Subsequent changes of the Admin password in NDS/eDirectory are not synchronized with the bindery Supervisor password and vice versa.
To change the Supervisor password, you need a bindery utility such as SETPASS.EXE (which is shipped with NetWare 4 and NetWare 5). You can also use SYSCON.EXE, which you can still download from Novell’s knowledge base (see TID #1003215) or use third-party bindery tools such as JRB Utilities, from www.jrbsoftware.com, or BinPass, from ftp://ftp.dreamlan.com/Freeware/binpass.zip. It is important to keep in mind that the Supervisor password is not synchronized between servers; therefore, when you change the Supervisor password, the change applies only to the one server you are logged in to at the moment of change.
WARNING
NDS 8 and eDirectory handle Supervisor differently than do the legacy versions of NDS. Under eDirectory, you are able to log in as Supervisor but are unable to see the user by using any of the bindery-based tools, even with SYSCON. Figure 11.3 shows that although SYSCON reports that one is logged in as Supervisor, the user list does not indicate that Supervisor exists.

This situation leads to a potential security risk if Bindery Services is enabled because you cannot change Supervisor’s password (because the utilities cannot “see” it). Anyone who knows that original password can log in to the server as Supervisor and has full file system access.
This potential security issue is partially addressed in eDirectory 8.7.3, where bindery Supervisor is explicitly prevented from logging in, even though there exists an entry record for it in the DIB, as shown in Figure 11.1.
In NetWare 5 and higher, the screen saver and console-locking function have been removed from MONITOR.NLM and placed into a separate NetWare Loadable Module (NLM), SCRSAVER.NLM. In addition, DS User objects are used to unlock the console. For NetWare 4 servers, however, if you don’t know the password that was used to lock MONITOR.NLM or if the console was locked by pressing Enter twice at the Lock File Server Console option, you need the bindery Supervisor password to unlock MONITOR.NLM. The Admin password does not work unless it happens to be the same as the Supervisor password.
NOTE
There are some alternatives you can try when you encounter this MONITOR.NLM issue for NetWare 4 servers. Two such examples are using SecureConsole from Protocom and using SSLock for NDS from DreamLAN Network Consulting. Both of these products work on NetWare 4 and higher servers. Refer to the “Console Security” section in Chapter 15, “Effectively Setting Up eDirectory Security,” for more information about these products.
Mail directories (created under SYS:MAIL) were an integral part of NetWare prior to version 4; however, they are no longer required for use in the DS environment unless there are users who are still running in bindery emulation mode. These bindery users create the need for mail directories to still exist on NetWare 4 and higher servers.
Each mail directory is tied to its user through the user’s hexadecimal object ID; the name of the directory (located under the SYS:MAIL directory) is the hexadecimal number. There are times, however—especially during a restoration—when the ID of the user object is changed and thus the link to the mail directory is broken. As a result, bindery users lose access to their personal login scripts, and any email applications that make use of these directories fail to function correctly.
TIP
Novell used to have a utility called RENMDR.NLM that was used to restore the link between the users and their mail directories. However, it seems to have been removed from Novell’s support Web site. You may still be able to find a copy on the Internet. Alternatively, you can use Lscripts—from JRB Software (see www.jrbsoftware.com)—to accomplish the same task.
Queues suffer the same issue as user mail directories. The directory corresponding to a bindery queue is named using the queue object’s hexadecimal ID number. Thus, if the object ID of a bindery queue object is changed, the link to its queue directory is broken. In such a case, you need to delete the queue object and re-create it so the proper link can be made. DS queue objects do not fall under this category.
There may be times when you’re unable to switch all your client workstations to use DS-aware client software, such as Novell Client for Windows. Or your workstation platform may be such that you’re unable to switch—for example, if you have old Macintosh workstations that can’t be upgraded to the latest MacOS version in order to use the DS-aware client without great expense. In such a situation, you need to bear in mind the following differences between a Bindery Services connection and a DS connection:
![]() There’s the matter of what NetWare Core Protocol (NCP) API calls the client can use. A bindery connection can’t use any of the DS NCPs. That means you can’t run utilities such as NetWare Administrator or ConsoleOne to perform administration of the tree.
There’s the matter of what NetWare Core Protocol (NCP) API calls the client can use. A bindery connection can’t use any of the DS NCPs. That means you can’t run utilities such as NetWare Administrator or ConsoleOne to perform administration of the tree.
![]() When you log in through Bindery Services, the container and profile login scripts are not read from the tree. The bindery client looks for a
When you log in through Bindery Services, the container and profile login scripts are not read from the tree. The bindery client looks for a NET$LOG.DAT file in the SYS:PUBLIC directory and a login script in the user’s mail directory.
NOTE
The Native File Access Pack (NFAP) enables Macintosh, Windows, and Linux/Unix clients to access storage on NetWare 5.1 and NetWare 6 servers without requiring you to install special client software on each workstation. When communicating with NFAP-enabled NetWare servers, the clients use their own native file protocols—such as Apple File Protocol for Macintosh (AFP), Network File System (NFS) and Common Internet File System (CIFS)—instead of NCP calls, thus eliminating the need for Bindery Services.
Whereas it is an optional product for NetWare 5.1, NFAP is included as part of NetWare 6.0 and higher. For more information, visit www.novell.com/products/nfa/.
Frequently, administrators are not aware that NetWare assigns only one service process to service all bindery requests, regardless of the number of bindery connections to the server or the number of currently allocated service processes. Consequently, you’ll notice that a server which services many bindery clients (workstations and/or printers) will show a higher CPU utilization than ones servicing NDS clients.
As a point of reference, a server servicing 300 bindery connections may show a CPU utilization of 35%, while the same server servicing 300 DS connections (doing the same type of work) may show a CPU utilization of only 10%.
Although there are many different categories of NDS/eDirectory-related security issues, in our experience, the following rank as the top three:
![]() Users getting excessive file system rights
Users getting excessive file system rights
![]() Maximum concurrent login limit reached
Maximum concurrent login limit reached
![]() Hidden or stealth objects in the tree
Hidden or stealth objects in the tree
NetWare implements fairly tight file system security. In order for users to access the files and directories on network volumes, they must have the appropriate file system security access rights. The default NetWare file system security is such that users have no access to any files and directories on NetWare volumes except to their own home directories (whether those were set up) and to SYS:PUBLIC and SYS:LOGIN.
A user can receive file system rights in many different ways, such as from direct trustee assignments, groups belonged to, and even DS containers. Therefore, it is not always easy to determine or troubleshoot a scenario in which a user has full file system rights where he or she is not supposed to. The following are the steps you can take in order:
To track down the cause, at the root of the volume where the user has excessive rights, you type RIGHTS /T to see whether there was an explicit rights assignment granted to the user or to any group or DS container the user is a member of. If so, revoke that assignment and see whether that resolves the problem.
NOTE
RIGHTS.EXE is a 16-bit DOS application that is shipped with all versions of NetWare, including NetWare 6.5. It is located in the SYS:PUBLIC directory.
If no explicit assignment exists, the user has most likely inherited the rights from DS. This means that somewhere in the DS tree, the user, one of the groups the user is a member of, or the container (or one of its parent containers) the User object is in has the Supervisor right to the file server’s Object Trustee (ACL) attribute. This can happen through one or more of the following assignments:
![]() Having Supervisor object rights to the
Having Supervisor object rights to the NCP Server object
![]() Having Supervisor or Write rights to the
Having Supervisor or Write rights to the ACL attribute of the NCP Server object
![]() Having Supervisor or Write rights to All Properties
Having Supervisor or Write rights to All Properties
One way to figure out which of these assignments took place is by using ConsoleOne. To do so, you select Trustees of This Object for the [Root] object and then select Effective Rights to see what the user’s effective rights are. If the user has excessive rights, you can find the object that was granted the excessive rights in the Trustees of This Object list. Then you do the same thing for each container between [Root] and the NCP Server object, including the NCP Server object itself. At some point you should find that the user’s effective right is more than the default (only Browse object rights and Read and Compare All Property rights). It is at this level in the tree that the excessive rights assignment was made.
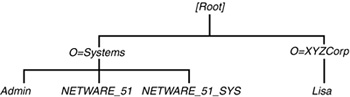
Consider the sample tree shown in Figure 11.4, where Lisa has full rights to the SYS volume, even though she was given an explicit file system trustee assignment of Read and File Scan to the root of SYS. The following steps illustrate how you can use ConsoleOne to track down and fix the problem of Lisa having full rights to the SYS volume:
1. In ConsoleOne right-click [Root] and select Trustees of This Object. (By default, the only trustees that are here should be [Public] and Admin.)
NOTE
NDS 7 and later introduced a Tree Root (T=) class to the schema. The T= object’s name is the same as the name of the tree. As a result, ConsoleOne does not display the [Root] object for NDS 7 and later trees. Instead, it shows the tree name as the top of the tree. However, in the documentation, the term [Root] is still used.
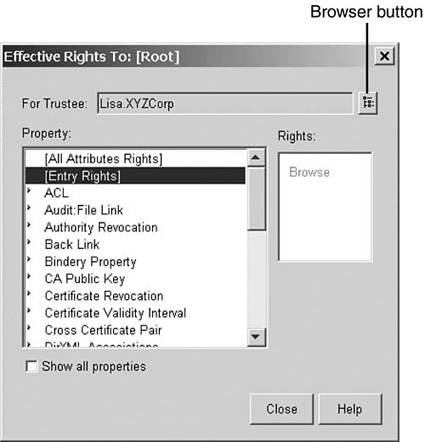
2. Click the Effective Rights button.
3. Click the Browse icon that is to the right of the For Trustee field. Browse the tree and select the User object Lisa (located under O=XYZCorp).
4. Highlight each of [All Attribute Rights], [Entry Rights], and ACL in turn to see what the rights are. Normally a user has only Browse entry rights (see Figure 11.5) and no assigned [All Attribute Rights] and ACL rights.
5. Close the dialog boxes because Lisa didn’t gain her rights here.
6. Repeat steps 1–4 for O=Systems. This time, when you select Effective Rights for Lisa, you see that she has full rights to every attribute listed, including [Entry Rights], as shown in Figure 11.6.

7. Close the Effective Rights dialog box and return to the Properties of Systems dialog.
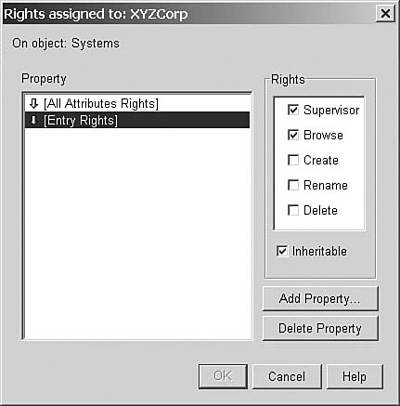
8. Examine each of the trustee assignments (by first highlighting the entry and then clicking Assigned Rights) that are in some way related to the user Lisa (for instance, O=XYZCorp, where the User object is located, and O=Systems, where some of the groups she belongs are). In this case, you find that O=XYZCorp was granted Supervisor rights to [Entry Rights] (see Figure 11.7). This is the source of Lisa’s excessive rights.
9. Uncheck the Supervisor rights assignment from [Entry Rights] and click OK to save the change.
10. Check the effective rights again and verify that Lisa does not have excessive rights to the file system anymore.
11. Have Lisa log in to the network and verify that she no longer has excessive effective rights.
In this example, you can stop at this point because Lisa no longer has full rights to the SYS volume. If you didn’t find anything at O=Systems, however, you would also need to check the other trustee assignments (such as the NCP Server object) in case the User object was made SE to one of those objects.
TIP
When checking objects that have been granted rights, you need to follow the rules for acquiring rights. You should check all containers above the User object, [Root], [Public], all groups the user is a member of, and any objects the user is SE to (which includes any organizational roles).
The following are some questions you can ask to help determine the location within DS where the user’s excessive rights may come from:
![]() Is the user SE to Admin?
Is the user SE to Admin?
![]() Is the user a trustee or a member of a group that is a trustee with Supervisor rights to the Write right to the
Is the user a trustee or a member of a group that is a trustee with Supervisor rights to the Write right to the ACL attribute of the NCP Server object?
![]() Is the user a trustee or a member of a group that is a trustee of a container above the
Is the user a trustee or a member of a group that is a trustee of a container above the NCP Server object with Supervisor rights to the Write right to the ACL attribute of the object?
![]() Is the user a trustee or a member of a group that is a trustee of
Is the user a trustee or a member of a group that is a trustee of [Root] with Supervisor rights to the NCP Server object?
![]() Is the user under a container that is a trustee with Supervisor rights to the
Is the user under a container that is a trustee with Supervisor rights to the [Root] object?
![]() Is
Is [Root] a trustee with Supervisor rights to a container that is over the NCP Server object?
![]() Has
Has [Public] been added as a trustee with Supervisor rights to a container that is over the NCP Server object or to the NCP Server object itself?
One of the most common problems encountered since the initial release of NDS in 1993 is a problem involving maximum concurrent logins. The first instance of this problem you’ll probably hear of involves a user calling you or your help desk and saying that he or she is receiving a message indicating that the maximum concurrent logins have been reached but that he or she is not logged in on any other computer on the network.
When a user logs in to the network, the login process compares the current number of values in the Network Address attribute of the User object to the value of the Login Maximum Simultaneous attribute. If the number of network addresses is less than the maximum logins allowed, the login is allowed to proceed; otherwise, the server returns the error code -217 (ERR_MAXIMUM_LOGINS_EXCEEDED) to the client, which then displays the appropriate error message to the user.
The issue here is that there are circumstances in which old network addresses are never removed from the Network Address property for the user. This most commonly occurs when a workstation the user is logged on to ends its session with the server abnormally. In a NetWare 3.x environment, this is not a problem because the User object has separate authentication credentials for each server. In a NetWare 4 or higher environment, however, the credentials are valid for all servers the client is connected to, and the servers do not communicate with each other a loss of communication with the client. During a normal shutdown, the client logout results in the address being properly cleaned up because the client disconnects from all servers. In an abnormal shutdown, however, none of the servers is told that the disconnect occurred—each uses the watchdog process to clear connections that are terminated abnormally.
You can clean up this type of problem in a few different ways:
![]() Increase the maximum concurrent logins allowed
Increase the maximum concurrent logins allowed
![]() Remove the concurrent login restriction
Remove the concurrent login restriction
![]() Use DSRepair to expire network addresses on the
Use DSRepair to expire network addresses on the User objects that are no longer valid
The first two of these options are easy to implement but may not be desirable for security reasons. If the first two options are not viable for your environment, you will have to use the DSRepair option.
DSRepair automatically purges Network Address attribute values that are older than 60 days (based on the Creation TimeStamp [CTS] value) during an unattended repair or during repair of the local database from the Advanced Options menu. However, you can control the time period in which to purge unused network address values by using the -N switch for DSRepair. To do this on a NetWare server, you load DSRepair as follows:
LOAD DSREPAIR -N<number of days>
After DSRepair is loaded, you execute either an unattended repair or a repair on the local database. During the repair, the value <number of days> is used instead of 60. The main drawback to this solution is that it requires a database repair be run. Running the repair locks the database on the server the repair is being run on. This may not be a desirable side effect (because a locked DIB prevents users from authenticating to that server) for correcting a problem that some administrators consider to be nothing more than a nuisance.
TIP
You can schedule DSRepair to automatically run during off-hours. For example, you can use the CRON.NLM file that is shipped with NetWare and have it execute the following command every night to clear out all network address values at a predetermined time:
LOAD DSREPAIR -N0 -U
The DSRepair option clears out the Network Address attributes for all users who are in the partitions hosted by the server. Novell offers a utility called REMADDR.EXE that can also remove Network Address attribute values for a specific user in IPX environments. Refer to TID #2950374 for details.
TIP
The DSRepair option works only on NetWare because the other implementations do no support the -N option. A more flexible, but workstation-based, option is Deladdr from JRB Software (see www.jrbsoftware.com). It works in both IP and IPX environments.
Chapter 8, “eDirectory Data Recovery Tools,” discusses how you can handle hidden objects. This section describes another possible solution that uses existing tools—DSView on NetWare 4.x servers and DSBrowse on later servers—that you can readily obtain for free without having to call Novell or use a third-party utility.
In a distributed management environment, a network administrator may lock out a branch of a DS tree from administration by other network administrators. This is done by granting one or more users Supervisor object rights to the topmost container of the tree branch and revoking the inheritance of rights from higher in the tree by using inherited rights filters (IRFs). This branch of the DS tree becomes invisible or unmanageable if none of the trustees of the container are available at a later time or have forgotten their passwords.
NOTE
As long as the users know their User object names and the contexts, they can still log in, even if they cannot browse the tree to see the objects.
In such a situation, where there are trustees to the topmost container, you can make use of Bindery Services to change the password of one of the administrators. Here are the steps to accomplish this:
1. Find a user who has explicit rights to the container in question. If you don’t know what containers are invisible or hidden, the Hidden Object Locator NLM (see Chapters 8 and 13, “eDirectory Health Checks”) can assist you in locating them in a NetWare environment; otherwise, you can use DSBrowse as described next. If the users having rights to the containers in question are also unknown, you can use DSBrowse:
1. Run DSBrowse on a server that has a replica of the partition containing the blocked container.
2. Browse the tree until you locate the blocked container object.
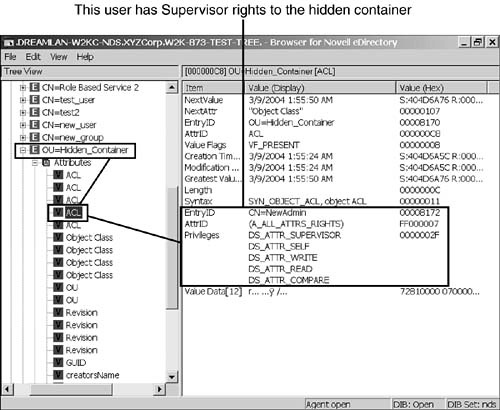
3. Browse through the values of this object’s ACL attribute until you find a User object that has Supervisor object rights. Figure 11.8 shows that a user called NewAdmin has full rights to the hidden container.
4. Although the User object’s context is not shown in the data, you can use its object ID to locate the object in the tree. In this example, the object ID is 0x00008172. With DSBROWSE.NLM, simply enter the value into the ID field (you can leave out any leading zeros) in the Object Search menu and then press F10. With the Windows version, switch DSBrowse into DIB Browser mode, highlight Entries, and right-click. Then select the Go to Record ID option from the context menu and enter the ID value (again, you can leave out any leading zeros). The resulting screen looks similar to what is shown in Figure 11.9. This provides you with the context information of the User object.
NOTE
You cannot use NDS iMonitor or iManager for this step because what these utilities can see in the DIB are based on the rights of the authenticated user.
2. After you locate a user who has Supervisor rights to the blocked container, on a server that holds a writable replica (Master or Read/Write) of the partition, set the server’s bindery context to the location of the user who has rights.
3. Log in to the server from step 2 as Supervisor (in Bindery mode). If that server is running eDirectory 8.7.3 or higher, you need to also include the partition where Admin is in the bindery context and log in as Admin instead.
4. Change the password of the administrator user (NewAdmin in this example) by using SYSCON.
5. Log in with the revived user and either grant other users rights or remove the IRFs from the container so that it can be administered again.
You can apply this same procedure to blocked objects.
Schema problems are not very common in an NDS/eDirectory tree. However, they do pop up once in a while, just to keep things interesting. The most common source of schema issues is schema synchronization problems between servers. The other has to do with trying to merge two DS trees into one. The following sections look at each of these problems.
Before discussing schema issues, let’s first review what a DS schema is and how it may affect the network. The directory schema is the rules that define how the directory tree is constructed. The schema defines specific types of information that dictate the way information is stored in the DS database. The following is some of the information defined by the schema:
![]() Attribute information—Describes what type of additional information an object can or must have associated with it. Attribute types are defined within the schema by specific constraints and specific syntaxes for their values.
Attribute information—Describes what type of additional information an object can or must have associated with it. Attribute types are defined within the schema by specific constraints and specific syntaxes for their values.
![]() Inheritance—Determines which objects inherit the properties and rights of other objects.
Inheritance—Determines which objects inherit the properties and rights of other objects.
![]() Naming—Determines the structure of the NDS tree, thus identifying and showing an object’s reference name within DS.
Naming—Determines the structure of the NDS tree, thus identifying and showing an object’s reference name within DS.
![]() Subordination—Determines the location of objects in the directory tree, thus identifying and showing an object’s location in the directory tree.
Subordination—Determines the location of objects in the directory tree, thus identifying and showing an object’s location in the directory tree.
The foundation for all entries in a DS database is a set of defined object classes referred to as the base schema. Object classes such as NCP Server, User, and Print Server are some of the base object classes defined by the base schema. For a complete list of the base object classes and attribute definitions, see Appendix C, “eDirectory Classes, Objects, and Attributes.”
The DS schema can be modified and expanded to suit the specific needs of an organization. Object class definitions can be added to and modified for the existing base schema. Such additions are called schema extensions.
There are generally two types of problems associated with a schema: those that are DS rights related and those that are timing related (such as needing to wait for schema synchronization to complete between servers). DS rights-related problems are easy to understand and address. In order to extend the DS schema, you must have Supervisor rights to the [Root] object; without Supervisor rights, you are unable to make the changes. The timing-related problem requires some explaining. In large trees where schema extensions can take extended periods of time to be propagated to all servers, the very first installation attempt of an application, such as GroupWise, that requires schema extension may fail a number of times before a successful installation takes place.
As an example, let’s assume that one application creates two custom DS objects during the installation process. During the first installation attempt, the application’s installation routine attempts to create a new DS object by using an extended class. DS reports that this object class and the needed attributes do not exist in the schema, and the setup program adds them to the schema by using the server that is hosting the Master replica of [Root]. The installation then fails because the extension has not yet reached the server on which the object is to be created. Later (possibly 15 minutes or more in very large trees), the administrator attempts to install again. This time the installation finds the first needed object class but not the second one; therefore, the schema is once more extended, but the setup program fails again because the second class extension is not found on the target server. Later, a third installation is successful because all the necessary class extensions are already in the schema.
NOTE
A DS schema is global. Each server stores a replica of the schema in its entirety. The schema data is stored separately from the partitions that contain directory objects. (See Chapter 2, “eDirectory Basics,” for more information about replica types.) You can perform modifications to the schema only through a server that stores the Master replica of [Root]. You need to have Supervisor rights to the [Root] object in order to modify the schema.
If it becomes apparent that DS had not yet propagated the schema extensions to the other servers in the tree, you can help speed up the process. From the console of the server that is holding the Master replica of [Root], you issue the following commands:
SET DSTRACE = ON
SET DSTRACE = +SCHEMA
SET DSTRACE = *SSA
SET DSTRACE = *H
(On Windows servers, the equivalent of using SET DSTRACE=*SSA is clicking the Schema Sync button on the Triggers tab located in the DS.DLM configuration screen.)
TIP
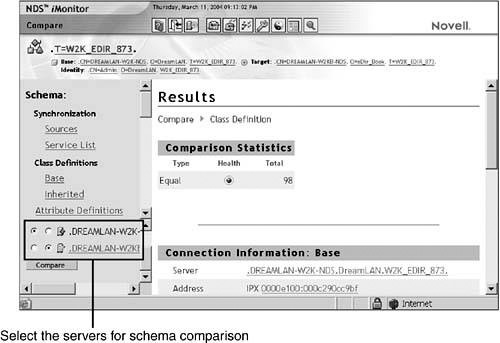
You can use the Schema Compare feature in NDS iMonitor to check whether the schema extension has propagated to the server on which you are installing the application. In NDS iMonitor, you select the Schema link, select to view the base class definitions, and then select the two servers whose schemas you want to compare (see Figure 11.10). Then you repeat the procedure to check the attribute definitions.
Setting DSTrace in this way forces the server to immediately start an outbound schema synchronization process. You need to switch to the DSTrace screen and wait for the message SCHEMA: All Processed = Yes; this may take several minutes, depending on the number of servers in the network and link speeds. If DSTrace says SCHEMA: All Processed = No, there are most likely other issues preventing the synchronization from completing.
If the setup program crashed in the middle of extending the schema, you might need to start over with a clean installation. The only way to verify a clean installation and extension on the DS base schema is to completely remove all extended class objects (related to the application you’re trying to install) and re-extend the schema. You can use the following procedure to accomplish this:
1. Log out of all servers except the one you are installing the application onto.
2. Delete all related extended schema objects by using ConsoleOne and then remove all related file directories from the server volumes.
3. Use Schema Manager to delete all related extended schema class objects. If they do not all delete, verify that you are logged in to only one server.
4. Reinstall the application. During the installation, the application should notice that the schema is not properly extended and reextend the schema.
With the increasing number of applications that leverage NDS/eDirectory for user authentication and storage of global configuration information, it is not uncommon to encounter schema mismatch errors when you’re trying to merge two trees into one. In order to merge two NDS/eDirectory trees, the schema definitions used by both trees must be identical, down to every attribute definition—including any flags (such as Immediate Sync) and value bounds associated with an attribute.
The typical cause of schema mismatch is that different DS-aware applications are installed on the two trees. For instance, one tree might have GroupWise and ZENworks installed but the other tree has only GroupWise. Therefore, the second tree does not have the schema extension for ZENworks, and a tree merge fails as a result of this mismatch. There are two ways you can make the schema on the two trees identical. The first method is to simply extend the schema of the tree that is missing the necessary schema information by installing the required applications. This approach is generally successful in 90% of cases.
However, there are instances in which the software license may prohibit you from installing the second copy on a separate tree, even if you are not going to be running the application at all. There can also be situations in which you are unsure what application made which schema extension or in which there are a large number of applications involved. This is where importing schema information by using DSRepair comes in handy. The following steps outline the procedure for doing this:
1. Ensure that you are running the latest DS and the latest DSRepair modules.
2. Load DSRepair on the server that holds the Master replica of [Root].
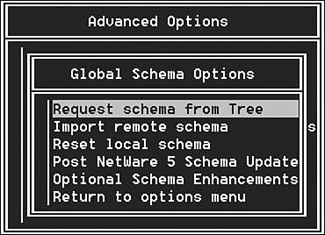
3. Select the Post NetWare 5 Schema Updates operation from the Advanced Options menu and then select Optional Schema Enhancements (see Figure 11.11). Both of these options are located under Global Schema Operations). In Linux/Unix, use ndsrepair -S -Ad; in Windows, select the Schema menu.
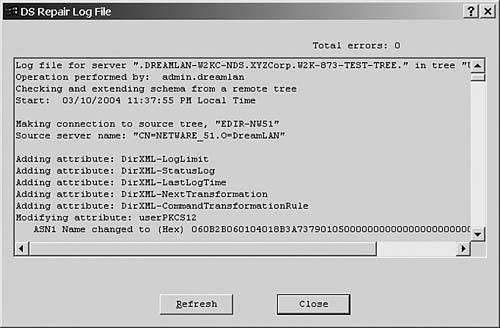
4. Select Import Remote Schema from the menu (in the Linux/Unix platform, the option is called Import Schema from Tree) and select the desired tree to import the schema from. This process imports any schema definitions found in the remote tree that are not defined locally. Figure 11.12 shows a DSRepair log file of the import results.
TIP
To verify that a schema is the same between both trees, you should perform the schema import three times—first from source to target, second from target to source, and finally, from source to target—or until no modifications are being made during the schema imports.
If you encounter “Error: -699 An unrecoverable error has occurred and the operation cannot be completed,” chances are good that the syntax for one or more attribute definitions in the source tree and the target tree are different. For example, the old NetWare Web Server product creates an attribute called photo (to be associated with User objects) and uses SYN_STREAM as the value syntax. However, NetWare 6 and higher change this attribute to SYN_OCTET_STRING. Therefore, when you try to synchronize schemas between a NetWare 5 tree that was extended with the NetWare Web Server product and a NetWare 6.5 tree, you will encounter this -699 error. You can use one of the schema compare methods discussed later in this section to see whether this -699 error is due to the photo, pager, or rbsPageMembership attributes. If it is, you should refer to TID #10066345 for possible solutions. Otherwise, a call to Novell is warranted.
There may be rare cases in which a merge still fails with a schema mismatch error after you synchronize a schema between two trees. This could be a result of some class or attribute definitions in one tree not being the same as those found in the other tree. For instance, in one tree the attribute cellPhone may be defined with the DS_SYNC_IMMEDIATE_ATTR flag, but in the other tree the same attribute may not include this flag. You need to get Novell involved to have one of these definitions changed before you can merge the trees. However, it would be nice to know how many classes and attributes are involved before you open an incident.
If a merge still fails with a schema mismatch error after you synchronize a schema between two trees, you cannot use the Schema Compare feature in NDS iMonitor because it does not work across trees. You could, however, export the schema information to a file by using LDAP:
ldapsearch -h host -D admin_id -w password -b cn=schema![]() -s base objectclass=subschema > filename
-s base objectclass=subschema > filename
and then use a text-compare utility to compare the two files for differences. Alternatively, you could use the two utilities mentioned in Appendix C, ReadClass32.EXE and ReadAttr32.EXE, to export the class and attribute definitions and then compare the output files for differences. However, the easiest method is to use Novell’s Schema Compare utility, Schcmp (see www.novell.com/coolsolutions/tools/1509.html).
To use Schcmp to compare schemas between two trees, you first authenticate to both trees and then use the following command to create a text file that you can later examine by using a text editor:
schcmp server_in_tree1 server_in_tree2 > schema.txt
Although it is not a requirement, it is best if you select the servers holding the Master of [Root] for the schema comparison. The following is an excerpt from Schcmp’s output:
Comparing NETWARE_51 with DREAMLAN6A...
Classes unique to NETWARE_51
3x Computer System Policy
95 Client Config Policy
...
Classes unique to DREAMLAN6A
bhGadget
bhPortal
...
Attributes unique to NETWARE_51
App:Administrator Notes
App:Alt Back Link
...
Attributes unique to DREAMLAN6A
bhArguments
bhClassName
...
Syntaxes unique to NETWARE_51
NONE
Syntaxes unique to DREAMLAN6A
NONE
Definition differences for NETWARE_51
Class Definitions
Country
Optional Attributes
App:Associations
App:Launcher Config
...
Definition differences for DREAMLAN6A
Class Definitions
domain
Super Class
ndsContainerLoginProperties
ndsLoginProperties
...
Missing or lost essential attribute values can lead to data inconsistencies. Sometimes missing or lost values are due to human error (deleting a value or an object when not supposed to), but they can also be a result of system failure (such as time synchronization error or communication issues). The following sections examine the causes and possible solutions to the following situations:
Novell management tools such as ConsoleOne use two different icons to represent unknown objects in DS: a yellow circled question mark and a cube with a black question mark beside it, as illustrated in Figure 11.13.
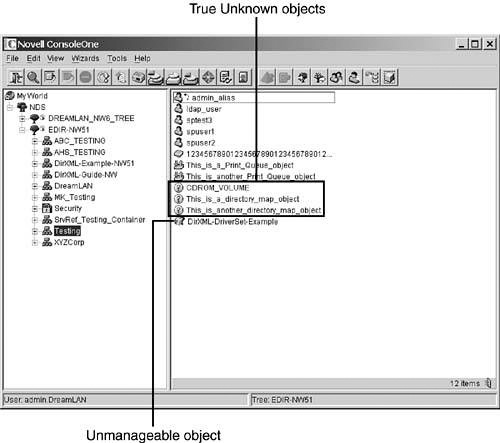
The cause for the white cubed question mark is completely different from that of the yellow circled question mark. The white cubed question mark means that ConsoleOne could not find the correct snap-in to associate the object with the necessary icon. Essentially, it is saying that the object is perfectly legitimate in DS, but the configuration of ConsoleOne is not correct; consequently, the object is “unmanageable.” On the other hand, the yellow circled question mark is usually bad news.
The yellow circled question mark generally means that one or more of the mandatory attributes of the object are missing. When a mandatory attribute is missing from an object, NDS/eDirectory automatically changes the object’s class to Unknown but leaves the name unchanged.
There are two conditions under which the presence of Unknown objects is normal and transitory. The first situation, which is related to timing, happens during replica synchronization. A new replica being added to a server when objects are still being updated from one replica to another can cause Unknown objects. Some objects may start as Unknown objects (when viewed from ConsoleOne, if the timing is right), but when the synchronization process is complete, they are updated with all the information they need and are turned into real objects. Depending on what you are doing, timing can sometimes make Unknown objects go away.
The other situation under which Unknown objects appear is during a DS restore. Because the objects are restored in the order in which they are backed up, some objects (such as a Volume object) may be restored before the objects (such as the NCP Server object) that define their mandatory attributes (Host Server, in the case of Volume objects) are restored. However, when all the objects are restored, the Unknown objects should turn into known objects. For example, if a group is restored but all its members (User objects) do not yet exist in the tree, placeholder (Unknown) objects are created until the User objects are restored. At that time, the placeholder objects become real User objects, and the User and Group objects are fully functional.
If you have not done any of the previously mentioned operations and you have an Unknown object, you can delete it and then re-create if it is replaceable. Before you do that, however, you should be familiar with the following repercussions:
![]() When the
When the Unknown object is a volume, deleting the object causes any user who has a Home Directory attribute pointing to that volume to lose its mapping—that is, the Home Directory attribute value is cleared.
![]() When the
When the Unknown object is a user, deleting the object results in the user losing his or her specific trustee assignments (both file system and DS assignments).
![]() When the
When the Unknown object is a server, deleting the object causes the server to be deleted from the tree, and all DS references to that specific server are lost. This type of Unknown object should not be deleted casually because such deletion can also lead to inconsistent replica rings.
In most cases, however, an Unknown object can be deleted and re-created. Anytime an NCP Server object or something of importance (such as the Admin User object or a Volume object) is turned into an Unknown object, however, you should consider the consequences of your actions before proceeding.
Before you delete an Unknown object and re-create the real object, you need to check whether other replicas have good copies of the Unknown object. If they do, you can rescue this object without having to re-create it. You can easily accomplish this by using a combination of NDS iMonitor and DSBrowse or DSRepair.
You can use NDS iMonitor to browse for the object. You’ll notice that after you select an object and are viewing its entry information, a Replica frame is shown in the bottom-left corner of the window. This frame shows a list of all servers in the replica ring for this object. The server name that is not hyperlinked is the server you are reading the object’s information from. If you want to read the same object from a different server’s perspective, you click the hyperlink for that server. After you have determined that there is a good copy of the object in at least one replica of the replica ring, you can proceed. On the server that has Unknown objects in its DIB, you load DSRepair with the -P switch and perform a repair of the local DS database, leaving all settings at the defaults—but you need to make sure that the Rebuild Operational Schema option is set to YES (in Linux/Unix, you use ndsrepair -R -Ad -P). Following that, you use one of the following procedures to rectify the issue:
![]() Reload DSRepair without any switches. (However,
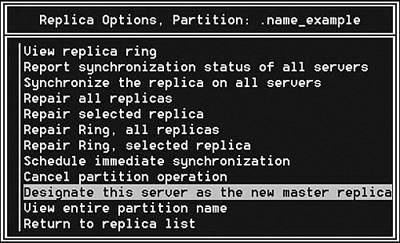
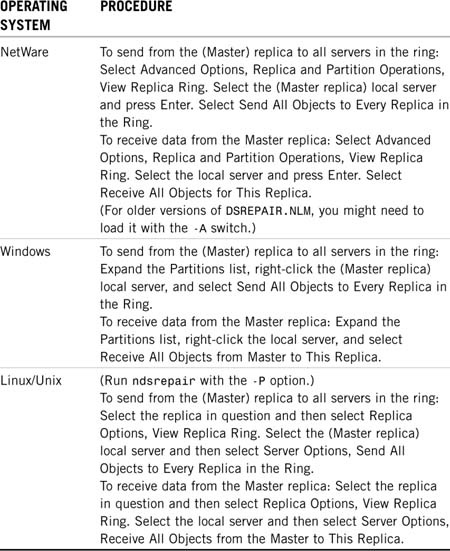
Reload DSRepair without any switches. (However, -A may be required for older versions of DSREPAIR.NLM.) For NetWare, select Advanced Options, Replica and Partition Operations, View Replica Ring. Then select the server that has the good objects and press Enter. Finally, select Send All Objects to Every Replica in the Ring. For Windows, expand the Partitions list, right-click the server that has the good objects, and select Send All Objects to Every Replica in the Ring. For Linux/Unix, start ndsrepair with the -P option, select the replica in question, and then select Replica Options, View Replica Ring. Next, select the server that has the good objects and select Server Options, Send All Objects to Every Replica in the Ring.
![]() Instead of using DSRepair to send all objects in the replica, as outlined in the previous procedure, you can use DSBrowse instead because it has an option to re-send a single selected object. For NetWare, load DSBrowse with
Instead of using DSRepair to send all objects in the replica, as outlined in the previous procedure, you can use DSBrowse instead because it has an option to re-send a single selected object. For NetWare, load DSBrowse with -A to get this option. Load DSBrowse on the server that has a good copy of the object, browse to the object, press F3, and choose Resend Selected Object. This changes the object from Present (Flags=1) to Present New Entry (Flags=801) on the sending server. DSBrowse also timestamps the object with a newer timestamp, which should send updates to the offending servers, provided that the bad object on those servers has its flags value set to 201 (Present Reference). For Windows, launch DSBrowse (-A is not required) on a server that has a good copy of the object, browse to the object, right-click, and select Send Object. This procedure cannot be used on Linux/Unix platforms because DSBrowse is not available; however, you can use NDS iMonitor instead, as described in the next procedure.
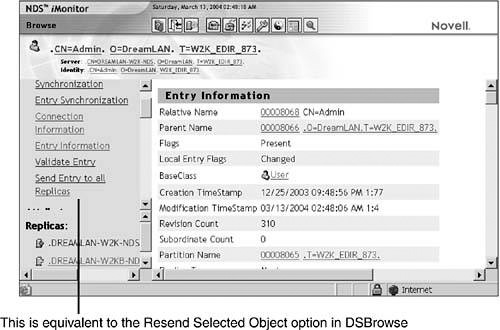
![]() Instead of using DSRepair to send all objects in the replica, as outlined in the first procedure, you can use NDS iMonitor instead because it has an option to send a single selected object. NDS iMonitor is especially suited for Linux/Unix platforms because DSBrowse isn’t available there. Use NDS iMonitor to locate a server that has a good copy of the object and then click the Send Entry to All Replicas link (see Figure 11.14).
Instead of using DSRepair to send all objects in the replica, as outlined in the first procedure, you can use NDS iMonitor instead because it has an option to send a single selected object. NDS iMonitor is especially suited for Linux/Unix platforms because DSBrowse isn’t available there. Use NDS iMonitor to locate a server that has a good copy of the object and then click the Send Entry to All Replicas link (see Figure 11.14).
NOTE
The DSRepair -P procedure marks all Unknown objects in the local DIB as Present Reference (Flags=201). With this flag set, the server is ready to receive the object. In a Reference state, the Unknown objects are overwritten if a valid object is sent to that server, and the server will not synchronize the Unknown object to other servers in the replica ring.
Your choice on which of these procedures to use depends mostly on how many Unknown objects there are in the replica. If there are only one or two Unknown objects, the DSBrowse and NDS iMonitor options are the better choice because they generate only small amounts of traffic. However, if there are a fair number of Unknown objects, DSRepair may be more time-efficient, but at the cost of higher network traffic (depending on the number of objects in the replica).
It has been observed that sometimes Directory Map and Print Server objects spontaneously mutate into Unknown objects for no apparent reason. This can be caused by one of three events:
![]() The server hosting the volume the
The server hosting the volume the Directory Map object was pointing to at the creation time of the Directory Map object has been deleted.
![]() The server hosting the
The server hosting the Print Server object it was pointing to at the creation time of the Print Server object has been deleted.
![]() The
The Volume object the Directory Map object is pointing to has been deleted.
The last situation is easy to understand; however, the first two are not. They are due to a bug in the version of NWAdmin that shipped with NetWare 4 that appears when you’re dealing with Directory Map and Print Server objects. (The same bug is also in the version of NetWare Administrator shipped with NetWare 5 and above and carried over into ConsoleOne.)
When a DM object is created, its Host Server attribute (which is not visible in NWAdmin but which you can determine by looking in the Others tab in ConsoleOne) points to the server that hosts the volume referred to by the Directory Map object. If you change the Directory Map object to point to a volume on a different server, the Host Server attribute is not updated; it remains pointing to the old server. If the old server object referenced in the Host Server attribute gets deleted, DS automatically removes the attribute, and the Directory Map object turns into an Unknown object because it loses its mandatory Host Server attribute. For example, when you create a Directory Map object called TEST_DM and point it to NETWARE65-A_VOL1:HOME, the Host Server attribute points to NETWARE65-A (or whatever your current default server is). If you later change the Directory Map object to point to NETWARE65-B_SYS:DATA, the Host Server attribute of the Directory Map object remains pointing to NETWARE65-A. So if at a later time you remove NETWARE65-A from the network, TEST_DM becomes an Unknown object. A similar problem exists with the Host Device attribute of Print Server objects.
NOTE
In the case of Print Server objects, the Host Device attribute identifies where the Print Server object’s log file is to be kept. When the Print Server object is brought up, a licensed connection is made to the server identified by the Host Device attribute, even if the log file option is not enabled. This can also cause performance issues or prevent the Print Server object from being loaded if the referenced server happens to be across a WAN link or if the (remote) server or the link to it is down.
Although NWAdmin doesn’t show the Host Server and Host Device attributes, you can easily look them up by using ConsoleOne, NDS iMonitor, or NList. The following NList command shows the Host Device settings of all Print Server objects in the current context:
Nlist "print server" show "host device"
The output would look something like this:
Current context: test.xyzcorp
Print Server: PS-test
Host Device: NETWARE5-A.toronto.
-------------------------------------------------------------
One Print Server object was found in this context.
One Print Server object was found.
To address these problems, Novell has available the following (unsupported) solutions:
![]() Novell’s developer support Web site, at developer.novell.com/support/sample.htm, makes available a sample application called Mapobjch that is contained in a file called
Novell’s developer support Web site, at developer.novell.com/support/sample.htm, makes available a sample application called Mapobjch that is contained in a file called D3MAPOBJ.EXE. Mapobjch includes a browser to select what container you want to search and automatically changes the host server to that of the volume object’s, if they are not the same.
![]() An Appware utility called Hstdev enables you to change the host device of a
An Appware utility called Hstdev enables you to change the host device of a Print Server object. You can locate this program by searching for HSTDEV.EXE, using the file finder at Novell’s support Web site.
NOTE
If you are looking for a supported product, you might try HostEditor (see www.dreamlan.com/hostedit.htm). Besides working with Directory Map and Print Server objects, HostEditor also works with Print Queue and Volume objects.
There is one situation in which the presence of Unknown objects is valid. As discussed in Chapter 6, “Understanding Common eDirectory Processes,” in a replica ring that consists of servers running eDirectory and legacy NDS versions, objects containing auxiliary class extensions appear as Unknown objects on pre-NDS 8 servers because those earlier versions of NDS do not know how to handle auxiliary classes. In such a case, you should not be concerned with these Unknown objects and not attempt to delete them unless you have a good reason for so doing.
Generally, when a normal object turns Unknown, the object name is unchanged (only its object class is changed to Unknown). If instead your normal objects have their names changed to names such as 1_2, 2_1, and 13_5 (that is, #_#) when you didn’t name them that way—and they keep coming back after you’ve renamed or deleted them—you have a synchronization problem.
WARNING
You should not casually delete these renamed objects when you first detect them. They could be important objects, such as NCP Server objects, that got renamed. Deleting such objects could lead to dire synchronization errors or data inconsistency consequences if you are not careful.
These objects are called renames. Renames are caused by name collisions during synchronization. A collision occurs when the same object is found with different CTSs. The name collision problem happens mostly in a mixed NetWare 4.0x and NetWare 4.10 environment, which is a rare combination these days. It can also occur with the newer versions of NDS/eDirectory on a LAN/WAN where communication is not stable.
You might also observe multiple renamed objects in the SLP Scope container when you have multiple Service Location Protocol (SLP) directory agents (DAs) servicing the same scope and writing the information into DS. This is because each DA is attempting to write the same service information it detected into DS, but at a slightly different time. To remedy this, you need to ensure that you are running the latest version of the SLP module for your operating system platform because it contains an option to not store SLP service information in DS but to keep it in the DA cache instead.
TIP
When using multiple DAs for the same scope, you should configure only one of the DAs to write service information to DS while keeping the other DAs to use the cache.
The following steps can help you resolve name collision problems:
1. Ensure that the time is in sync on the network and that each server in the replica ring is running the same or the latest compatible version of the DS module. (All the servers in the tree should be running the latest version of DS.) Use the Time Synchronization option from DSRepair’s main menu to check whether time is in sync on the network and the versions of the DS modules.
2. Make sure that all the replicas for the partition in question are in the On state. Also make sure that the partition has a Master replica and that the server holding that replica is accessible by the other servers. You can check them by performing a synchronization status report by using DSRepair, NDS iMonitor, or iManager. You should do this on the server that holds the Master replica of the partition.
3. Compare the replica ring information between the related servers in the ring. Resolve any conflicts or inconsistencies if any are found.
4. Use DSBrowse or NDS iMonitor to examine each replica in the replica ring to determine how many servers have been affected by the rename problem. There should be at least one server that shows the original name of the renamed object.
5. From the server that contains the Master replica of the partition, issue the following DSTrace commands:
set dstrace=on
set dstrace=+sync
set dstrace=*h
(or the equivalent, using NDSCon on Windows servers) and see whether the partition in question is synchronizing successfully.
If DSTrace reports All Processed = Yes, you should first try to rename the objects back to their original names before trying to delete the renamed objects. They should either keep the name change or be removed from the tree without reappearing. If they persist, you need to perform a DS health check to ensure that everything is in order. If nothing obvious shows up and renames keep happening, you should consider opening a call with Novell Support and have them dial in for a look at the underlying problem that is causing the renames to reoccur.
TIP
There is one more option you can try before calling Novell to deal with renamed objects. If at least one server in the replica ring is showing the original object name, you can move the Master replica to a server that shows the correct name. Then, one by one, you can remove the replicas from the other servers in the replica ring and then slowly add the replicas back again, waiting for each replica to be added before you go to the next server.
If the renamed object is an NCP Server object, refer to TID #10013224 for instructions on how to remove the affected server from DS and reinstall it into the tree. The TID was written for NetWare 4.11, but its concept is equally applicable to all versions of NetWare and non-NetWare DS servers.
Although they are not very common, replica ring inconsistencies can reflect serious problems in a DS tree. A replica ring inconsistency is present when two or more servers holding a replica of a partition do not agree on what the replica rings look like.
The most common cause of this problem is a change in the replica ring while a server in the ring is down combined with a timestamp problem where the server that is down has a future timestamp on its replica information. When this occurs, the replica on the server that was down does not change its replica list to reflect the recent change. This can result in a number of odd situations: multiple servers holding the Master replica, inconsistent views for Subordinate Reference (SubRef) replicas, or servers missing from the replica ring.
NOTE
Multiple Master replicas can be a result of the disaster recovery process. If the server holding the Master replica is down for an extended period of time, another server in the replica ring could be designated the Master. When the downed server is brought back online, there would be two Master replicas.
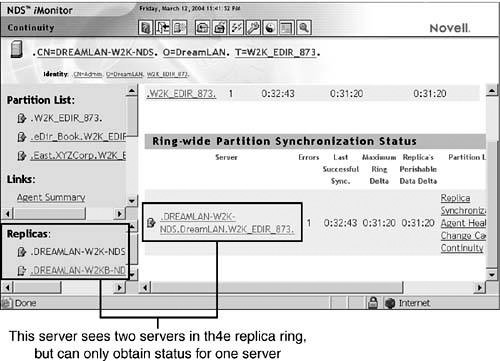
One of the easiest ways to diagnose an inconsistent ring is to use NDS iMonitor to check continuity. You do this by selecting the Agent Synchronization link and then selecting Continuity for each replica hosted on the server. As discussed in Chapter 7, “Diagnostic and Repair Tools,” this method provides a view of the DS partition from each server’s perspective. By querying the continuity information from different servers in the ring, you can quickly determine whether there is an inconsistency in the replica ring. Figure 11.15 shows what this might look like for a two-server replica ring. One server sees two servers in the ring (as shown in the Replicas frame) but obtains status for only one server; there is no -625 or -626 error to indicate that there is a communication problem in contacting the other server; there simply wasn’t any status information to be reported.
FIGURE 11.15 NDS iMonitor, suggesting that the replica ring for the [Root] partition is inconsistent.
NOTE
As discussed in Chapter 9, “Diagnosis and Recovery Techniques,” you should not rely on a single tool to do your diagnosis. After you have narrowed down which servers are having an inconsistent view of the replica ring, you should use DSRepair to obtain a confirmation before formulating a repair plan.
There are a number of ways to resolve an inconsistent replica ring that has inconsistent views. The first and most advisable is to contact Novell Support to examine the replica list information on the servers, using Novell’s diagnostic tools, and repair the database manually. This is the most common resolution we recommend because there are a number of different sets of circumstances that can lead to this sort of situation. If you are comfortable with using DSRepair, however, and are reasonably sure that there are no additional but yet-undetected causes of the inconsistent replica ring problem, you might be able to correct the problem without involving Novell.
WARNING
It is important to realize that an inconsistent replica ring problem is one of the types of problems for which proceeding without Novell’s direct assistance may result in both DS and file system trustee data lost.
To start working with an inconsistent replica ring problem, the first thing to do is determine which server has the inconsistent view. If you have more than two servers in the replica ring, the most consistent view is the one you want to work with. The server with the view that does not match the others is the one you want to correct in most circumstances. If there is more than one server with an inconsistent view, you should start with the one that is most inconsistent.
The best way to correct the problem is to uninstall DS from the server in question and reinstall it. This ensures that the timestamps on the affected server are correct. The procedure for this is as follows:
1. Remove DS from that server by using either INSTALL.NLM for NetWare 4.x, NWCONFIG.NLM for NetWare 5.x and higher, the Add/Remove Programs applet for Windows, or nds-uninstall for Linux/Unix platforms.
NOTE
When running eDirectory 8.7 or higher, with the roll-forward log (RFL) enabled, you need to back up the logs before removing DS. This is because the RFL files are also removed by the uninstallation process.
2. Wait a few minutes. How long you wait depends on the speed of any WAN links involved and the number of replicas the change needs to replicate to.
3. Use NDS iMonitor or DSRepair to confirm that the replica lists on all servers in the ring show that the offending server is gone.
4. If NDS iMonitor still thinks the server is in the replica ring, there may be an additional problem with the server remote ID list. If this happens, use DSRepair on each server that is left to verify the remote ID for each server.
5. If the server still appears in the replica ring, run DSRepair with the -A switch (in Linux/Unix, run ndsrepair -P -Ad) on the server that holds the Master replica to manually remove the server from the replica ring. For NetWare, select Advanced Options, Replica and Partition Operations, View Replica Ring. Then select the server you want to remove and press Enter. Finally, select Remove This Server from the Replica Ring. For Windows, expand the Partitions list and select the server that is to be removed. Then select Partitions, Replica Rings, Remove Server from Ring. For Linux/Unix, run ndsrepair -P -Ad, select the replica in question, and then select Replica Options, View Replica Ring. Select the server that is to be removed and select Server Options, Remove This Server from Replica Ring. (This step is only necessary on the server with the Master because the rest of the servers receive the update from the server with the Master replica, and the list should appear consistently in NDS iMonitor after this change has propagated. However, if the offending server holds the Master, you need to first designate another server to become the Master before performing this step.)
6. When DS has finished synchronizing the changes to the replica ring, reinstall the server that was removed back into the tree and replace the replicas on that server. This also places SubRef replicas on servers where they are required.
NOTE
With eDirectory 8.7 or higher, if the RFL had been enabled previously, don’t forget to reenable the RFL files. Refer to the “Configuring and Maintaining Roll-Forward Logs” section in Chapter 8 for details.
There are many different variations to this problem, so it is important to examine the entire situation carefully before proceeding with a plan of action. Remember: Doing something just for the sake of doing something can make a situation much worse.
It is easiest to fix a replica ring that has more than one Master replica. If there are more than two servers in the replica ring, you should run DSRepair on one of the servers that do not have the Master replica and designate that server to be the Master. The procedures for doing this are outlined in Table 11.2.
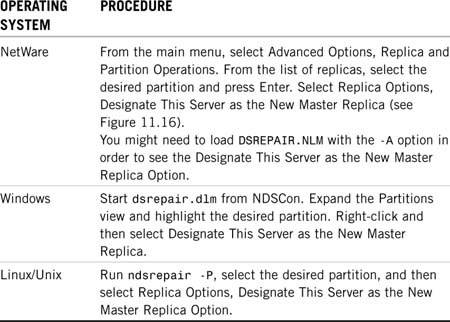
FIGURE 11.16 Using DSRepair to make the current server the Master replica server.
The two servers holding the Master should automatically be demoted to Read/Write replicas. You can then redesignate the original Master server as Master. This procedure must be carried out by using DSRepair and not one of the other management tools, such as ConsoleOne. This is because the other tools will first perform mini-health checks before changing the replica types and will abort when they see that there is more than one Master replica.
Besides inconsistent views of servers in a replica ring, there can also be inconsistency in the number of objects between replicas. This could be due to time-related issues that lead to some servers holding some, but not all, of the objects in the replica rings. Depending on what objects are missing, the problem may go undetected for some time. The issue generally comes to light when users start complaining that they are having intermittent login trouble; they can log in fine when they are attached to one server but not when they are attached to a different server.
WARNING
Before you perform the following procedure, make sure there are no Unknown or renamed objects present. If there are any, refer to the earlier sections in this chapter to resolve them before proceeding.
The following procedure will help ensure that all servers in your replica ring hold the same number of objects. First, you need to use NDS iMonitor or DSBrowse to determine which server has the most accurate replica in the ring. Depending on your finding, you should then exercise one of these options:
![]() If the Master has all the data and only a few servers in the ring have incomplete replicas, use DSRepair to perform a “receive all objects from Master to this replica” operation on the servers that have incomplete replicas.
If the Master has all the data and only a few servers in the ring have incomplete replicas, use DSRepair to perform a “receive all objects from Master to this replica” operation on the servers that have incomplete replicas.
![]() If the Master is the only replica that has the complete replica, use DSRepair to perform a “send all objects to every replica in the ring” operation on the Master server.
If the Master is the only replica that has the complete replica, use DSRepair to perform a “send all objects to every replica in the ring” operation on the Master server.
![]() If none of the replicas have complete information but each replica has some objects that other replicas are lacking, use DSRepair to perform a “send all objects to every replica in the ring” on each server in the ring.
If none of the replicas have complete information but each replica has some objects that other replicas are lacking, use DSRepair to perform a “send all objects to every replica in the ring” on each server in the ring.
Table 11.3 lists the detailed steps for accomplishing these options within each operating system.
WARNING
The Send All Objects to Every Replica in the Ring option does exactly what it says: It sends every single object on that server’s replica to every other server in the replica ring. Each receiving server will either discard the received information because it already has the object, add the object to the receiving server’s DIB because it did not previously have it, or overwrite an Unknown object with a valid object it just received. This process could generate a lot of network traffic, depending on the size of the replica. Therefore, it is advisable that you perform this “send all” operation after-hours and wait for it to complete on each server before starting it on the next server.
As described in Chapter 6, DS makes extensive use of obituary notifications for object management, and obituary flags are eventually cleared out when an object is removed. There are times, however, when an obituary gets stuck so that DS can’t finish the cleanup process. Most obituaries get stuck because a server was not notified that a change to objects has taken place. To see whether you have any stuck obituaries, you should use the latest available version of DSRepair and select Advanced Options, Check External References on the Master replica of each partition. (You need to load DSRepair with the -A command-line switch.) This generates a list of all obituaries on the server. Then you need to review this list, searching for any line with a Flags=0 value. The server listed (that is, the last entry on the Backlink process line) below this value has not been contacted. The following is a sample DSRepair log that shows obituaries:
/*************************************************************/
NetWare 6.00 Directory Services Repair 10515.37, DS 10510.64
Log file for server "NETWARE65-B.Test.DreamLAN" in tree![]() "NETWARE65-TEST"
"NETWARE65-TEST"
External Reference Check
Start: Thursday, March 3, 2004 2:14:25 pm Local Time
Found obituary for: EID: 11000FE8, DN: CN=User3.OU=Test.![]() O=XYZCorp.NETWARE65-TEST
O=XYZCorp.NETWARE65-TEST
-Value CTS : 01/16/2004 10:36:42 PM R = 0001 E = 0003
-Value MTS = 01/16/2004 10:36:42 PM R = 0001 E = 0003,![]() Type = 0001 DEAD,
Type = 0001 DEAD,
-Flags = 0000
-RDN: CN=User3
Found obituary for: EID: 11000FE8, CN=User3.OU=Test.![]() O=XYZCorp.NETWARE65-TEST
O=XYZCorp.NETWARE65-TEST
-Value CTS : 01/16/2004 10:36:42 PM R = 0001 E = 0004
-Value MTS = 01/16/2004 10:36:42 PM R = 0001 E = 0004,![]() Type = 0006 BACKLINK,
Type = 0006 BACKLINK,
-Flags = 0000
-Backlink: Type = 00000005 NEW_RDN, RemoteID = ffffffff,
ServerID = 010000BD, CN=TEST-FS1.OU=Test.O=XYZCorp.![]() NETWARE65-TEST
NETWARE65-TEST
Found obituary for: EID: 11000FE8, CN=User3.OU=Test.![]() O=XYZCorp.NETWARE65-TEST
O=XYZCorp.NETWARE65-TEST
-Value CTS : 01/16/2004 10:36:42 PM R = 0001 E = 0004
-Value MTS = 01/16/2004 10:36:42 PM R = 0001 E = 0004,![]() Type = 0006 BACKLINK,
Type = 0006 BACKLINK,
-Flags = 0000
-Backlink: Type = 00000005 NEW_RDN, RemoteID = ffffffff,
ServerID = 030010C3, CN=TEST-FS2.OU=Test.O=XYZCorp.![]() NETWARE65-TEST
NETWARE65-TEST
Found obituary for: EID: 11000FE8, CN=User3.OU=Test.![]() O=XYZCorp.NETWARE65-TEST
O=XYZCorp.NETWARE65-TEST
-Value CTS : 01/16/2004 10:36:42 PM R = 0001 E = 0004
-Value MTS = 01/16/2004 10:36:42 PM R = 0001 E = 0004,![]() Type = 0006 BACKLINK,
Type = 0006 BACKLINK,
-Flags = 0000
-Backlink: Type = 00000005 NEW_RDN, RemoteID = ffffffff,
ServerID = 03001101, CN=TEST-FS3.OU=Test.O=XYZCorp.![]() NETWARE65-TEST
NETWARE65-TEST
Checked 0 external references
Found: 4 total obituaries in this dib,
4 Unprocessed obits, 0 Purgeable obits,
0 OK_To_Purge obits, 0 Notified obits
*** END ***
The information presented in the this DSRepair log is interpreted as follows:
![]()
EID stands for entry ID. This is a record number in the 0.NDS file (or ENTRY.NDS file in NetWare 4) that specifies the object that has the Obituary attribute assigned.
![]()
CTS and MTS are timestamps. They denote when the Obituary attribute was created and modified, respectively.
![]()
Type indicates both a number and a text description. There are three categories of types: primary, secondary, and tracking. A primary obituary indicates an action on an object. A secondary obituary indicates the servers that must be contacted and informed of the primary obituary action. A tracking obituary is associated with certain primary obituaries. The following are the valid obituary types:
![]() Primary obituaries are
Primary obituaries are 0000 Restored, 0001 Dead, 0002 Moved, 0005 NEW_RDN (New Relative Distinguished Name [RDN]), 0008 Tree_NEW_RDN (Tree New RDN—this does not specify an DS tree name but rather a partition root name), and 0009 Purge All.
![]() Secondary obituaries are
Secondary obituaries are 0006 Backlink (specifies a target server that needs to be contacted regarding an obituary) and 0010 Move Tree (this obituary is similar to the Backlink obituary). There is one move tree obituary for every server that needs to be contacted regarding a Tree_NEW_RDN operation.
![]() Tracking obituaries are
Tracking obituaries are 0003 Inhibit Move, 0004 OLD_RDN (Old RDN), and 0007 Tree_OLD_RDN (Tree Old RDN—this does not specify an DS tree name but rather a partition root name).
![]()
Flags indicate the level or stage to which the obituary is processed. The following are the valid flag values:
![]() 0000 (Issued)—This flag indicates that the obituary has been issued and is ready for processing.
0000 (Issued)—This flag indicates that the obituary has been issued and is ready for processing.
![]() 0001 (Notified)—This flag indicates that the obituary is at the notify stage, which essentially means that the servers identified in the backlink or tree move obituaries have been contacted and notified of the operation or action on an object.
0001 (Notified)—This flag indicates that the obituary is at the notify stage, which essentially means that the servers identified in the backlink or tree move obituaries have been contacted and notified of the operation or action on an object.
![]() 0002 (OK-to-Purge)—This flag indicates that the obituary is being cleaned up on the local database of each server identified in the backlink or tree move obituaries. This cleanup includes resolving all objects that reference the object with the obituary and informing them of the change (for example, deletion or move).
0002 (OK-to-Purge)—This flag indicates that the obituary is being cleaned up on the local database of each server identified in the backlink or tree move obituaries. This cleanup includes resolving all objects that reference the object with the obituary and informing them of the change (for example, deletion or move).
![]() 0004 (Purgeable)—This flag indicates that the obituary is ready to be purged. The purge process essentially recovers the value to the free chain and enables it to be reused.
0004 (Purgeable)—This flag indicates that the obituary is ready to be purged. The purge process essentially recovers the value to the free chain and enables it to be reused.
Using this information, you can readily determine that the DSRepair log reports that User3.Test.XYZCorp has been deleted but the obituary is temporarily stuck because server NETWARE65-B (the server on which this DSRepair was run) is waiting to pass that information to servers TEST-FS1, TEST-FS2, and TEST-FS3.
Armed with the necessary information provided by DSRepair, you can then begin to find the problem with that server. It could be that Transaction Tracking System (TTS) is disabled, the server is down, SAP/RIP filtering may be causing a problem, or the server may not even exist anymore but the server object is still in the tree. By checking these issues, you can resolve almost all obituary problems. With NDS 5.95 and higher, you can use a SET DSTRACE=*ST command, and it will report back information in the DSTrace screen on what servers are having the problems with obituaries.
One of the most commonly reported obituary-related DS error is -637 (0xFFFFFD83), which is a “previous move in progress” error. You may encounter this error when trying to do any kind of partition operation, such as adding or moving a replica or even adding a user (after a container move). In many cases with the newer versions of DS, especially with eDirectory, the -637 error can be resolved without the intervention of Novell Support. In some cases, however, Novell will need to dial in to your network to edit the DS database in order to remove the stuck obituary that’s causing the problem.
For example, if the case is a server not able to communicate with one or more servers referencing the object being moved, you should be able to resolve the error without involving Novell. If a server referencing the object has actually been removed from the tree and the object move has still not completed, however, you may need to contact Novell for additional help.
TIP
For many -637 errors, the cause is due to communication loss to a server holding an external reference (exref) of the object that’s being moved from one container to another. Sometimes the cause is that a server holding a subordinate reference of the replica got taken offline, thus preventing the synchronization cycle from completing.
The actual -637 error is caused by the Type=0003 (Inhibit Move) obituary. This obituary is placed on the object that has been moved and on the container it has been moved to, to prevent another move from taking place on this object until the previous move has completed. In some cases, two other obituary types may be involved as the cause to the -637 error: Type=0002 (Moved) obituary and Type=0006 (Backlink) obituary. The Moved obit is attached to the (original) object that has been moved from this container. The Backlink obit is attached to the object to point to another server holding an exref of the object, which must be notified when the object is modified (for example, deleted, renamed, moved). The Backlink obit can also be caused by an exref, where a server must hold information about an object in a partition that the server does not hold a replica of. DS stores this information in the server’s database as an exref, which is a placeholder that contains information about the object that the server does not hold in a local replica. Exrefs are updated periodically by servers holding replicas of the object via the Backlink process that point to the object on the server holding the exref.
The following three steps can help you resolve most -637 errors without involving outside assistance:
1. Locate the object with the Inhibit Moved obituary because that is the culprit of the error. Go to the server holding the Master replica of the partition reporting the -637 error and use DSRepair (with the -A switch) to perform an exref check. Look for lines similar to this:
Found obituary for ...
EID... RN CN=Objectname.OU=Container.O=Container ...
-Value MTS= ... Type=0003 Inhibit_move
-Flags=0000
This is the object causing a -637 error to be reported. Take note of the object’s full name and context.
2. Locate the corresponding Moved obituary. It is placed on the object that was moved from another container to the one with the Inhibit Move obituary. You need to find where this object was moved from. A server holding a replica of the partition where the object was moved from gives you this information. If you are lucky, the same server holding the Inhibit Move obituary also holds a replica of the partition where the object was moved from. If you are not lucky, you will have to run DSRepair (with the -A switch) on every server in the tree that holds a Master replica of a partition and look for the following error when checking exrefs:
Found obituary for ...
EID ... CN=name.OU=ou_name.O=o_name ...
-Value MTS= ... Type=0002 Moved
-Flags=0000
You are looking for the same CN name as the Inhibit Move obituary, only in a different container (remember that the -637 error is caused by moving objects). A Moved obituary is placed on the object that has been moved until the move is completed. In the same DSREPAIR.LOG file, also look for lines similar to the following:
Found obituary for ...
EID ... CN=name.OU=ou_name.O=o_name ...
-Value MTS= ... Type=0006 Backlink
-Flags=0000
Look for the same object as the Moved obituary object. This object has exrefs, held on other servers in the tree, that must be notified of the move. A Backlink obituary points to the server holding the exref, and Flags=0000 tells you that the server holding the exref has not yet been notified of the move.
TIP
If all Type=0006 Backlink obituaries are at Flags=0000, you should verify that you have a Master replica of each partition in the tree; the Master replica is responsible for forwarding obituary states.
3. Find out the status of the server(s) holding the exref(s). To find out which servers have exrefs to the moved object, use DSBrowse. On the server reporting the Moved and Backlink obituaries, use DSBrowse to locate the object and examine the value(s) of its Obituary attribute. You should see information similar to this:
-Flags = 0000
-Backlink: Type = 00000005 NEW_RDN, RemoteID = ffffffff,
ServerID = ##, CN=Servername
When you find such entries, you have the names of the servers that are holding up the process.
When you have the server names, you need to determine whether the servers are up. Are they communicating properly (that is, no -625 errors)? Do the servers still exist? If the servers are simply down (say, for maintenance), you need to get them back up and running and communicating as soon as possible. If they no longer exist, you need to delete the NCP Server objects from DS by using the Partition view in ConsoleOne, and any exrefs they were holding should clean up after the server objects are deleted. If the servers are up and communicating, you can try the following on each of those servers:
1. Load DSRepair with the -XK3 switch (which kills all exrefs in the local DIB). Select Advanced Options, Repair Local DS Database. Set Check Local References to Yes; set the other options to No.
2. Perform the repair, save the repaired database, and exit DSRepair.
3. At the server console, enable the Backlink trace message and force the Backlink process to run:
SET DSTRACE = +BLINK (+BLNK on Linux/Unix)
SET DSTRACE = *B
SET DSTRACE = *H
4. Toggle to the DSTrace screen and watch for the line BACKLINK: Finished checking backlinks successfully. If the screen scrolls too fast for you to catch the message, enter the following commands:
SET TTF = ON
SET DSTRACE = *R
SET DSTRACE = +BLINK (+BLNK on Linux/Unix)
SET DSTRACE = *B
SET DSTRACE = *H
SET TTF = OFF
Then use EDIT.NLM, VIEW.NLM, or a text editor to examine the resulting SYS:SYSTEMDSTRACE.DBG file. (Use /var/nds/ndstrace.log on Linux/Unix platforms.)
The Backlink obituary should now have purged, which in turn enables the Moved and then the Inhibit Move obituaries to process. You can check the flags of the obituaries by using either DSBrowse or DSRepair, as described previously.
TIP
You should always allow NDS/eDirectory some time for its various background processes to do their jobs. You should wait at least 15 to 45 minutes. It may take a while for an Inhibit Move obituary to purge, depending on how many replicas and objects are in the partition.
If this procedure doesn’t work, there is a trick you can try before having to call Novell. Recall from Chapter 6 that the Master replica initiates most of the obituary processing; the exception to this involves the processing of a Used By obit that is started by the replica that actually modified the object. The trick is to simply move the Master replica around in the replica ring. This forces each replica to process any obituaries in its local database and synchronize the changes to the other servers in the replica ring.
TIP
You may actually consider using the move-Master-around procedure before using the -XK3 option because the move trick is a lot less intrusive.
If your replica ring consists of mixed NDS/eDirectory versions, putting the Master replica on eDirectory helps to reduce the occurrence of Inhibit Move obits. If the replica ring has one or more NetWare 6 servers, putting the Master replica on one of them is also desirable.
On the other hand, if the server referenced by the obits no longer exists in the tree and the server object has been deleted from NDS, you need to call Novell Support for assistance.
NOTE
In some cases, there may be no corresponding moved obituary because the DS obituary process was (somehow) abnormally interrupted. In such situations, you must contact Novell Support for assistance in cleaning up the orphaned Inhibit Move obituaries.
TIP
To prevent orphaned obituaries from occurring, you should perform exrefs for any obituaries that have not completed processing (that is, not at Flags=0004 [Purgeable]) before bringing down a server permanently or performing any other operation that may prevent communication to a server or its replica.
The synthetic time problem is one the Novell Product Support forums see more often than any other problem. Unfortunately, in many cases, the advice given to users does not include the first few steps necessary to determine whether simply waiting is a viable option for the problem to resolve itself. This is a case where waiting is the best alternative.
Synthetic time occurs when the modification timestamp (MTS) on at least one object in the partition is set to a time that is in the future, according to the real-time clock on the server reporting the problem. Because a single object can cause the error, it is important that you find out how far ahead the MTS is and base your solution on that information.
DSRepair can tell you this when you run either an unattended full repair or a local database repair. Objects with future MTSs are reported in the log file as shown here:
ERROR: Illegal timestamps were found in this replica.
You may need to run the advanced option:
’Repair timestamps and declare new epoch’
Value: 4054e3cb, ID: 00008059, DN: T=W2K-873-TEST-TREE
03/14/2010 05:59:23 PM; rep # = 0001; event = 0001
The last line here shows the MTS to be many years in the future.
The way this problem is corrected depends on how far ahead the MTS is. If it is measurable in days, you can simply wait for the time to catch up. Synthetic time ensures that the future MTS and the current real-time converge. This convergence typically takes half the time of the difference between the future timestamp and the current time. So if the MTS is reported to be an hour into the future, it should take about 30 minutes for the problem to resolve itself.
If, however, the time differential is measurable in months or years (as the preceding example shows), we recommend that you repair the timestamps. Table 11.4 outlines the procedure that must be repeated for each replica stored on the server that has one or more objects with a future MTS.
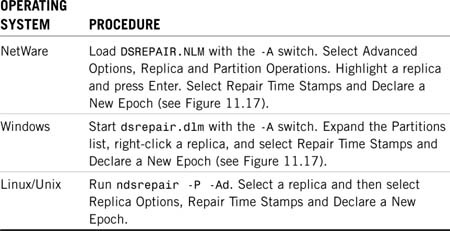
FIGURE 11.17 The Repair Time Stamps and Declare a New Epoch option in DSRepair.
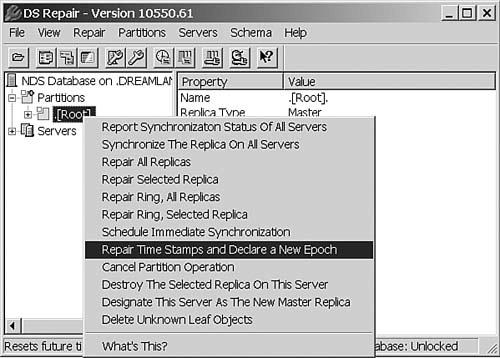
When the Repair Time Stamps and Declare a New Epoch option is selected, you are prompted for a user login and password. The login ID you use here must have Supervisor rights to the portion of the tree where the timestamp repair is taking place.
WARNING
Repairing timestamps is a very traffic-intensive operation because all non-Master replicas of the partition are essentially destroyed and re-created. This can cause loss of services that require bindery contexts for the duration of the repair. Depending on the number of replicas and their sizes, this operation can take hours to complete. You should make sure to schedule time off-hours to perform this operation if it is necessary.
When this operation is initiated, you must wait for it to complete before issuing a second timestamp repair. If the server has multiple replicas with future timestamps, you need to wait for each repair to complete before starting the next one; if you don’t, you might flood other servers on the network with too much traffic and introduce further problems. Because this operation destroys replicas on non-Master replica servers, you need to make sure you minimize the number of changes taking place from one repair to the next. You should run the first repair and verify that it has completed (all replicas should show an On state in DSRepair or NDS iMonitor when the repair is complete) before initiating another—even if the other is in a different part of the tree.
Hardware and human-caused errors are unavoidable. There may be occasions when you need to recover lost DS data, such as group membership information or user Home Directory attribute values. There may be other times when the hard drive hosting NDS/eDirectory fails and you need to recover as fast and as completely as possible. The following sections cover the following scenarios:
![]() Group membership recovery
Group membership recovery
![]()
Home Directory attribute recovery
![]() Recovering from a server crash
Recovering from a server crash
![]() Loss of all replicas except for subrefs in a replica ring
Loss of all replicas except for subrefs in a replica ring
One situation that we have seen occur is that an administrator accidentally deleted group memberships from a large number of users. In this circumstance, the administrator was attempting to add a number of users to a group by using the UImport utility. Unfortunately for the site in question, the administrator used a control file that specified REPLACE VALUE=Y, resulting in the new group membership being added but original group memberships being deleted. Because these group memberships were used to assign rights in the file system and determine which applications are available to each user, this became a big problem very quickly.
Fortunately, the change was made off-hours, so the immediate impact was minimal. Of even more importance was the backup of the DS tree that had been made several weeks earlier. Although it is true that in many cases backups of DS are not of much use, in this case, the backup did contain a large percentage of the users in the tree and the information necessary to rebuild the majority of the users’ group memberships.
The following tools were used for this recovery:
![]() The backup of DS made several weeks earlier
The backup of DS made several weeks earlier
![]() A server not connected to the production network
A server not connected to the production network
![]() NList
NList
![]() UImport
UImport
![]() Two
Two awk scripts
The first step in this recovery was the restoration of the old DS group information. The backup product used was only capable of restoring to a server named the same as the server the backup was taken from. In order to accommodate this limitation, we took a lab server from our isolated network and renamed it. Next, the DS tree was restored to that server. To ensure that the dependencies for group memberships were restored properly, we restored the data twice.
While the DS tree was being restored on the isolated network, two awk scripts were developed. The first script was designed to create a batch file to list the group memberships for each user listed in the original UImport data file. Because the number of users affected was about 100 out of 5,000, it did not make sense to restore group membership information for all users. Instead, a text file with the desired list of users and their contexts was created, using the following format:
.UserID1.Context1
.UserID2.Context1
.UserID3.Context2
The following awk script was used to parse the preceding information into a batch file:
BEGIN { print "del grpinfo.txt" }
{
count = split($0, object, ".")
printf("cx ")
for (x=3; x<= count; x++)
printf(".%s", object[x])
printf("
")
printf("nlist user = " object[2])
printf(" show "group membership" >> grpinfo.txt
")
}
The resulting batch file looks like this:
del grpinfo.txt
cx .Context1
nlist user = UserID1 show "group membership" >> grpinfo.txt
cx .Context1
nlist user = UserID2 show "group membership" >> grpinfo.txt
cx .Context2
nlist user = UserID3 show "group membership" >> grpinfo.txt
When the DS restore finished, the batch file was run to generate a file called GRPINFO.TXT, showing all group memberships for the user objects in question. This GRPINFO.TXT file was in the following format:
Object Class: User
Current context: Context1
User: userID1
Group Membership: Group1.Admin.Groups.Admin...
Group Membership: Group2.XYZCorp
One User object was found in this context
One User object was found.
Object Class: User
Current context: Context1
User: userID2
Group Membership: Group3.Admin.Groups.Admin...
Group Membership: Group4.XYZCorp
One User object was found in this context
One User object was found.
Object Class: User
Current context: context2
User: userID3
Group Membership: Group1.Admin.Groups.Admin...
Group Membership: Group2.XYZCorp
One User object was found in this context
This file was then parsed, using a second awk script, to create the final data file used for the new run of UImport. This data file is in a format that is usable by UImport:
".userID1.context1",".Group1.Admin.Groups.Admin"
".userID1.context1",".Group2.XYZCorp"
".userID2.context1",".Group3.Admin.Groups.Admin"
".userID2.context1",".Group4.XYZCorp"
".userID3.context2",".Group1.Admin.Groups.Admin"
".userID3.context2",".Group2.XYZCorp"
You should note a couple things about the data file created. First, the user ID contains a leading dot. This is done so the script can be run from any context and so the input is valid. The second thing you should notice is that there are multiple entries for a given user ID, but UImport handles these entries just fine.
The challenge is in parsing the trailing dots on the group memberships in GRPINFO.TXT and coming up with a script that works reliably to perform the conversion. The following is the awk script that does this:
/Current context:/ { cx = $3 }
/User:/ {cn = $2}
/Group Membership:/ {
printf("".%s.%s",", cn, cx)
gsub(/ Group Membership: /, "")
grptmp = $0
num = split(cx, tmpcx, ".")
counter = 1
while (substr(grptmp, length(grptmp)) == ".")
{
counter++
sub(/.$/,"",grptmp)
}
printf("".%s", grptmp)
for (y=counter;y<=num;y++)
{
printf(".%s", tmpcx[y])
}
printf(""
")
}
This script counts the number of trailing dots and compares that to the number of parts in the current context. It then removes the leading portions of the current context until it runs out of dots at the end of the group name. Next, it concatenates the group name to the remaining portion of the context, which results in the correct context for the group.
When the new data file is created, we created a control file that uses two fields: one for the user login ID and one for the group membership being processed. Upon watching the run of UImport, we were able to determine which user IDs had been moved or deleted. Even though not all the users were covered in this fix, there were sufficient users fixed to prevent a major outage the following day. In total, out of 100 users, only about 10 had to be modified.
NOTE
This example serves as a reminder that a disaster recovery solution need not be a 100% solution; if you can automate a large portion of the work in a reasonable amount of time, any remnants can be handled by hand or on a case-by-case basis.
REAL WORLD
Programmatically Adding a User to a Group
If instead of using an existing application such as UImport to add users to a group, you are developing your own application, you should be aware of a few things. The action of adding a user to a group involves a total of four major changes in DS:
![]() Add the user’s DN to the group’s
Add the user’s DN to the group’s Member attribute.
![]() Add the user’s DN to the group’s
Add the user’s DN to the group’s Equivalent to Me attribute.
![]() Add the group’s DN to the user’s
Add the group’s DN to the user’s Group Membership attribute.
![]() Add the group’s DN to the user’s
Add the group’s DN to the user’s Security Equals attribute.
The current DS module does not automatically make these four changes happen simultaneously. Therefore, if you are writing a program to accomplish this task, you must make all four of these changes in your program’s code. If you use the NWUsrGrp ActiveX control in the Novell Developer Kit (NDK), it performs the four necessary steps for you when it adds a user to a group or deletes a user from a group. However, if you use the NWDir or NWIDir controls, you need to code the four steps as part of your program logic.
It is a fairly common occurrence that upon fixing certain DS-related issues, the Home Directory attributes of User objects are lost. As discussed earlier in this chapter, in the “Unknown Objects” section, when an object that is referenced by any DS attribute is removed from the tree, that DS attribute’s value is automatically cleared. Because Home Directory is a single-valued attribute, clearing its value means deleting the attribute.
TIP
The procedures discussed here can also be used to update existing Home Directory values when you physically move the folders from one volume or server to another.
The Home Directory attribute uses the SYN_PATH syntax and references a Volume object in its value. If, for any reason, that Volume object is removed from the tree, the Home Directory attribute is cleared. You can repopulate this value fairly easily by using one of the following methods:
![]() Generate a text file that contains the username and home directory information and then use UImport to update the
Generate a text file that contains the username and home directory information and then use UImport to update the User objects. The text file would look something like this:
".userID.context", ".volume_object.context:path"
![]() Generate a text file that contains the username and home directory information and then use Import Convert Export (ICE) to update the
Generate a text file that contains the username and home directory information and then use Import Convert Export (ICE) to update the User objects via LDAP. The LDIF file would look something like this:
version: 1
dn: cn=username,ou=context,o=context
changetype: modify
ndshomedirectory:
cn=vol_object,ou=context,o=context#0#users
![]() The preceding two solutions require you to create a separate record for each user because the path of the home directory is unique for every user. An easy alternative is to use Homes (www.novell.com/coolsolutions/tools/1568.html), with which you can simply select a starting context and set the
The preceding two solutions require you to create a separate record for each user because the path of the home directory is unique for every user. An easy alternative is to use Homes (www.novell.com/coolsolutions/tools/1568.html), with which you can simply select a starting context and set the Home Directory attribute for all users inside a container (see Figure 11.18).
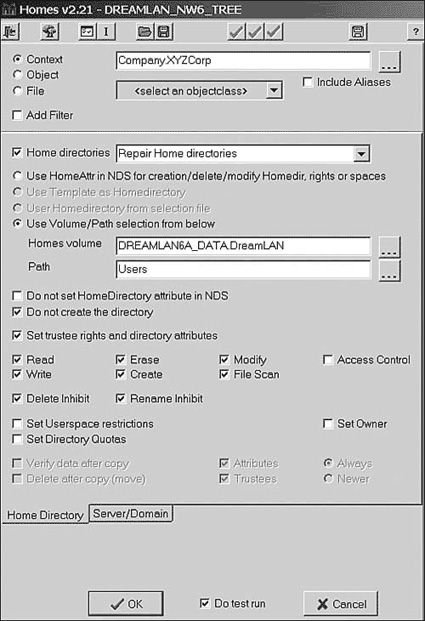
One of the most-asked questions in any network is, “How do I correctly recover from a crashed server?” For those of you who have worked with NetWare 3, you know it’s quite straightforward: Install a new server, restore the bindery from a backup, and restore your file system. In the case of a single-server NDS/eDirectory network, the process is pretty much the same as that with NetWare 3: Install a new server, restore DS from a backup, and then restore your file system. Because of the distributed nature of DS, however, things are a little more interesting when you have a multiserver NDS/eDirectory network.
To successfully recover from a lost server in a multiserver environment, it is essential that you maintain a regular backup of the server-specific information (SSI) files for all the DS servers on your network. (Chapter 8 discusses the situation for eDirectory.) It would also be helpful if you have up-to-date documentation about your DS tree, such as where NCP Server and Volume objects are located. You should also have a record of the partitions and a list of servers where the Master and various other replicas are stored. Finally, you should have the correct license file(s) for the crashed server.
NOTE
The process for recovering from a crashed hard drive where NDS/eDirectory resides (such as the SYS volume on NetWare) is the same as having a dead server because your DS is gone.
The following are the steps you need to take to restore a crashed server or a SYS volume in a multiserver DS environment when you don’t have a current set of SSI data available:
1. Don’t panic!
2. Reconfigure time synchronization configuration in the tree, if necessary.
3. Create a Computer object in the tree to act as a placeholder for server references.
4. Use SrvRef (see ftp://ftp.dreamlan.com/srvref.zip) to replace server references in the tree (see Figure 11.19).
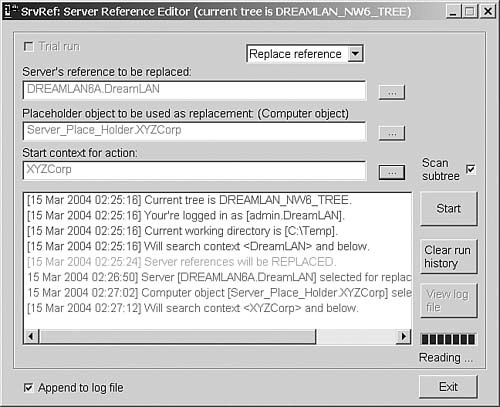
5. Delete from the tree the old NCP Server object for the failed server. Do not delete the associated Volume objects, however. Leave them intact to preserve references that other objects (such as Directory Map objects) may have to these objects as well as any DS trustee assignments made.
6. If the failed server held a Master replica of any partition, go to another server in the replica ring that has either a Read/Write or Read-Only replica and use DSRepair to promote that replica to a Master. Repeat this step for every master replica stored on the failed server. Then clean up the replica rings to remove the downed server from the lists. (See the “Replica Ring Inconsistency” section, earlier in this chapter, for details.)
TIP
After your replica ring cleanup, you should spot-check the DSTrace output on a number of servers to see whether the replica rings are okay and that everything is synchronizing correctly. You do not want to install a server into a tree that’s not fully synchronized.
7. Rebuild the crashed server by using existing documentation. Ensure that the same server name, volume names, IPX/IP addresses, and so on are used. Install the server into a separate temporary tree.
8. If you are just recovering a lost SYS volume, load DSREPAIR.NLM with the -XK6 switch (which deletes all volume trustees) and then perform a Check Volume Objects and Trustees operation. When prompted to make the change on the SYS volume, answer No; for all other volumes, answer Yes. See TID #10013535 for details on this step. (This is Step 22 in TID #10013535.)
9. Remove NDS from the rebuilt server.
10. Reconfigure the time synchronization setting on the rebuilt server, if necessary.
11. Install the rebuilt server back into the production tree, using the same context the original server was installed in.
12. Use SrvRef to restore server references in the tree.
13. Restore data and trustee information to the server. You should be careful when restoring the SYS volume data so that you don’t overwrite any new support pack files with older ones. If you’ve made modifications to your AUTOEXEC.NCF file, you should ensure that the older copy from your backup does not overwrite it.
14. Reestablish replica information by using ConsoleOne. (You might want to wait until after-hours and after the data restoration has completed.)
15. Reinstall licenses, if necessary.
16. Reinstall any server-based applications, such as BorderManager.
17. Reissue any SSL certificates for the recovered server, as necessary.
18. Delete the temporary Computer placeholder object from the tree.
When restoring files to a volume that was nearly full during the backup, you might run into insufficient disk space issues. This is especially true when volume compression is used. Although SMS-compliant backup software can back up and restore a compressed file in its compressed format, that’s not the default in most backup software; therefore, chances are good that you’ll restore previously compressed files in their uncompressed format. And because compression is a background operating system process, files are not compressed until the compression start time is reached. You can, however, flag files as immediate compress, but that’s an extra manual step you have to take. And afterward, you have to remember to undo the flag or else the files will always be compressed again after access, causing unnecessarily high server utilization.
Another volume-related issue that you can get caught with during a restoration is suballocation. Again, because it is a background process, files are not suballocated as they are restored; therefore, if you’re restoring many (small) files, you can run out of disk space before the complete restoration is done.
To work around these two disk space problems, it is best that you try to maintain at least 15% to 20% free disk space on each volume. Even better, you should make certain that the replacement drive capacity is larger.
After the restoration of the file system is complete, you should restart the server yet one more time to ensure that the restoration didn’t overwrite any important system files. Then you should perform a spot-check on some of the restored directories and files to check for correct trustee assignments, file ownerships, and so on. You should also spot-check DS objects to ensure that you don’t have any Unknown or renamed objects.
The steps discussed in the section “Recovering a Crashed SYS Volume or Server” work well when you have replicas on other servers to recover DS information from; however, there is also the (very) unlikely situation where you lose one partition within the tree and, for some reason, no replica of that partition exists. What can you do? First of all, take a deep breath and don’t panic! Depending on the partition location within the tree structure, all may not be lost.
Consider the sample DS tree shown in Figure 11.20. Two of the servers in this tree contain the following replicas:
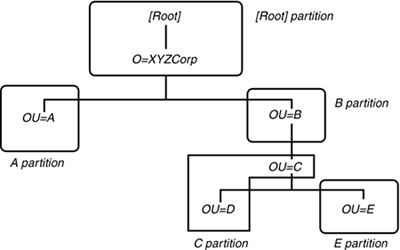
|
Server |
Server |
|
Master of |
|
|
Master of B |
|
|
SubRef of C |
Master of C |
|
Read/Write of E |
Master of E |
NOTE
Because Server FS1 has a copy of B (the parent) but not C (the child), DS automatically placed a SubRef replica of C on server FS1.
If Server FS2 is lost due to hardware failure and no other servers hold a replica of C, you lose the only full replica of the C partition. (SubRef replicas are not full replicas, and they contain only enough information to locate other replicas and track synchronization.) When this happens, you have a hole in the DS tree between OU=B and OU=E. You can’t use any of the procedures discussed earlier in this chapter to recover the C partition because no other full replicas exists.
In this scenario, where a SubRef replica of the lost partition exists, it is possible to rebuild the links to the lost portion of the DS tree and then perhaps restore the objects from a recent backup. The following procedure explains how you may recover from the loss of a single partition in a multipartition tree and have no full replicas of that partition:
WARNING
The following procedure may not work for all cases and, therefore, you should consider acquiring the assistance of Novell Support to rebuild the links to the missing partition in your tree. At the very least, you should test the procedure in a lab environment before ever using it in a production environment.
1. Don’t panic! Don’t attempt any DS recovery or repair procedures.
2. Follow the steps outlined in the section “Replica Ring Inconsistency,” earlier in this chapter, to clean up the replica rings for other partitions that have replicas on this crashed server, and make sure your other partitions are synchronizing without errors.
3. If more than one server has a SubRef replica of the lost partition, choose one to work with. The best choice would be a server that has the least number of replicas on it.
4. On the server chosen in step 3, load DSRepair with the -A command-line switch and promote the SubRef replica to a Master by using the steps outlined earlier in this chapter, in the “Replica Ring Inconsistency” section. This changes the SubRef replica into a real replica; however, because a SubRef replica doesn’t contain any object information, the recovered replica will be empty.
Depending on your replica placement of this lost partition, SubRef replicas of this partition on other servers may be upgraded to Read/Write replicas.
5. Use DSTrace to check that this partition is synchronizing correctly. If it is not, you should consider opening an incident with Novell for further assistance.
6. When the replica ring is synchronizing, use your most recent backup to perform a selective restoration of the DS objects that were in the lost partition. Take note of any objects in other parts of the tree that may have turned into Unknown objects due to loss of their mandatory attributes. You may need to do a selective restoration on those objects or re-create them.
Re-create any bindery objects and DS objects (such as print queues) that depend on object IDs. Reassign DS object trustee assignments, if necessary.
If you don’t have a SubRef replica to work with, you need to first make sure no one attempts any repair operations because they could make a bad situation worse. Then you should open a call with Novell Support for assistance.
In this chapter, you learned how the concepts and various tools that have been discussed in previous chapters can be applied to specific NDS/eDirectory issues. The following topics were examined:
![]() Bindery Services–related issues
Bindery Services–related issues
![]() Security issues
Security issues
![]() Schema problems
Schema problems
![]() Data inconsistencies
Data inconsistencies
![]() Synthetic time
Synthetic time
![]() Server and data recovery
Server and data recovery
In the chapters that follow, you’ll find out how to proactively manage DS to prevent these issues from developing.