
Chapter 17
Features for the Way You Work
In This Chapter
![]() Talking to your Mac
Talking to your Mac
![]() Listening to your Mac
Listening to your Mac
![]() Enhancing productivity by using automation
Enhancing productivity by using automation
![]() Trying out more useful technologies and techniques
Trying out more useful technologies and techniques
![]() Running Microsoft Windows on your Mac (really!)
Running Microsoft Windows on your Mac (really!)
![]() Mirroring your Mac screen to your HDTV screen wirelessly
Mirroring your Mac screen to your HDTV screen wirelessly

This chapter delves into some OS X El Capitan features that might very well improve the ways you interact with your computer. Unlike the more mainstream applications, System Preferences panes, and utilities that I discuss in Part I — Desktop, Finder, Screen Saver, Appearance, Keyboard, Trackpad, Mouse, and such — the items in this chapter are a little more esoteric. In other words, you don’t have to use any of the technologies I’m about to show you. That said, many of these items can make you more productive and can make using your Mac even better. So I’d like to believe that at least some of you will want to use at least some of the cool features I’m about to introduce.
Talking and Listening to Your Mac
Your primary methods for interacting with your Mac are typing and reading text. But there’s another way you can commune with your faithful computer: voice.
Whether you know it or not, your Mac has a lot of speech savvy up its sleeve (er … up its processors?) and can talk to you as well as listen. Believe it or not, it can type the words you speak and obey your spoken commands. And most of you already have a microphone built into your Mac unless your Mac happens to be a Mac Mini or a Mac Pro, which require an external microphone to hear you speak.
In the following sections, you discover how to make your Mac do that and more.
Dictation & Speech System Preferences pane: You talk and your Mac types
Many users don’t realize that dictation is available in Mac OS X and has been for years. In this section, you find out how to harness its power.
First, make sure Dictation is enabled in the Dictation & Speech System Preferences pane’s Dictation tab; if it’s set to Off, click the On button.
 Dictation requires an Internet connection unless you enable the Use Enhanced Dictation check box in the Dictation & Speech System Preferences pane. Otherwise, when you dictate text, what you say is sent to Apple’s servers to convert it to text. If you enable Use Enhanced Dictation, you can use Dictation without an Internet connection after your Mac downloads the necessary files to your Mac. That’s the good news. The bad news is that the necessary files are pretty big — it’s 1.2GB and could take an hour or more to download depending on the speed of your network connection.
 Other information, such as your contacts, may also be sent to Apple over the Internet to help your Mac understand what you’re saying. If that makes you uncomfortable, you probably shouldn’t use the Dictation feature without first selecting the Use Enhanced Dictation check box.
After it’s enabled, with or without the Enhanced option, Dictation couldn’t be easier to use. First, click where you want your words to appear in a document, dialog, web form, or whatever, and then choose Edit ⇒ Start Dictation, or press the Fn key twice in rapid succession.
If your keyboard doesn’t have an Fn key, click the Shortcut pop-up menu in the Dictation & Speech System Preferences pane to change the shortcut to one that works with your keyboard.
When you start Dictation, a little microphone icon appears. The white filling indicates the level (relative loudness) of your voice. Try to keep the white near the middle — not too high and not too low, as shown in Figure 17-1.
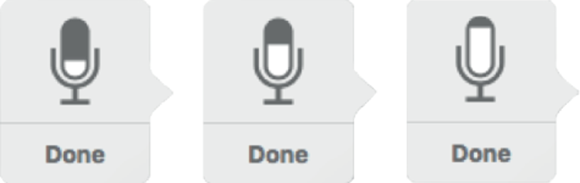
Figure 17-1: Volume levels for dictation (left to right): Too soft, just right, and too loud.
When you see the microphone icon, start speaking. After you dictate a few sentences, click Done and let your Mac catch up. When the words appear, you can start Dictation again. Repeat as necessary.
It might not be a bad idea to save your document after you speak a few sentences or paragraphs; if you don’t, the words you dictated since your last Save will be lost if the app or your Mac crashes.
You can insert punctuation by speaking its name, such as “period” or “comma.” You can also perform simple formatting by saying “new line” or “new paragraph” to add space between lines.
Here are a few more tips to help you get the best results when you dictate:
- Speak in a normal voice at a moderate volume level. Try to keep the white in the microphone icon about half-full (or half-empty if you’re a pessimist).
-
Avoid background noise. If you expect to use dictation in a noisy environment or a room with a lot of ambient echo, you should consider using a headset microphone.
The headset that comes with iPhones and iPod touches is compatible with many Mac models. - Be sure the microphone is not obstructed. Check your Mac’s User Guide for the location of your built-in microphone (if you have one).
- Be sure the input volume of an external microphone is sufficient. If you’re using an external microphone and the white meter doesn’t respond to your voice, select the microphone in the drop-down menu beneath the microphone in the Dictation tab of the Dictation & Speech System Preferences pane.
Commanding your Mac by voice
Speech Recognition enables your Mac to recognize and respond to human speech. The only thing you need to use it is a microphone, which most of you have built right into your Mac (unless it’s a Mac Mini or Mac Pro as noted previously).
Speech Recognition lets you issue verbal commands such as “Get my mail!” to your Mac and have it actually get your email. You can also create AppleScripts and trigger them by voice.
An AppleScript is a series of commands, using the AppleScript language, that tells the computer (and some applications) what to do. You find out a bit more about AppleScript later in this chapter.
In versions of OS X before Yosemite, you had to explicitly turn on Speech Recognition; in El Capitan, if you’ve enabled Dictation, you can use speech commands to instruct your Mac.
To see a list of commands your Mac will understand if you speak them, open the Accessibility System Preferences pane, click Dictation in the list on the left, and then click the Dictation Commands button. A sheet appears, in which you can enable or disable the available dictation commands, as shown in Figure 17-2.
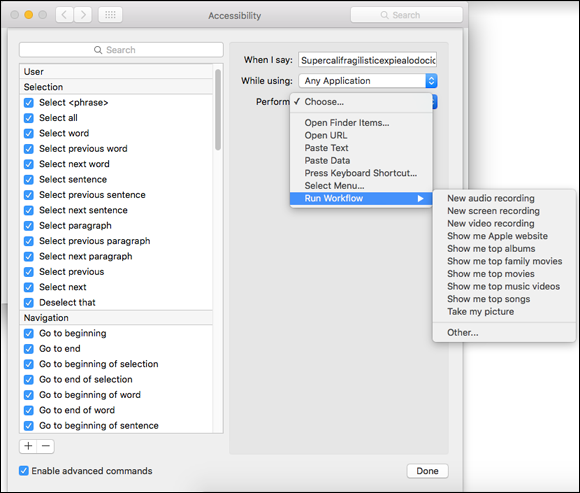
Figure 17-2: The Accessibility System Preferences pane’s Dictation Commands sheet displaying a few of the things your Mac will understand if you say them (properly). Usually.
If you have a laptop or an iMac, you may get better results from just about any third-party microphone or headset with a microphone. The mic built into your Mac works okay, but it’s not great. To select a third-party microphone, first connect the mic to your Mac. Then open the Sound System Preferences pane and select it from the list of sound input devices in the Input tab. Below the list is an input volume control (not available with some third-party mics) and a level meter, as shown in Figure 17-3. Adjust the Input Volume so that most of the dots in the Input Level meter darken (11 of 15 in Figure 17-3).
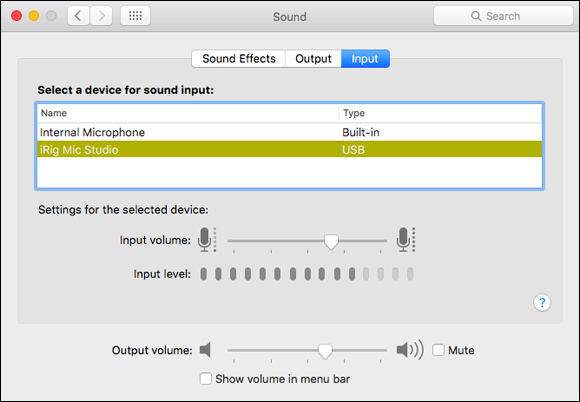
Figure 17-3: This is a good level for Speech Recognition.
Speech Recognition is the same as Dictation; enable Dictation as I show you earlier in this section, and you’re good to go. To give it a try, press Fn twice (or whatever shortcut you set earlier) and speak one of the items from the list of Dictation Commands, such as “Open TextEdit.” If the command is recognized, it will appear in text above the microphone icon, as shown in Figure 17-4.

Figure 17-4: Open TextEdit above the mic icon means your command was recognized.
 This technology is clever and kind of fun, but it can also be somewhat frustrating when it doesn’t recognize what you say, which is far too often, if you ask me. And it requires a decent microphone even though the mic built into most Macs sometimes works okay. The bottom line is that I’ve never been able to get Speech Recognition to work well enough to continue using it beyond a few minutes at best. Still, it’s kind of cool (and it’s a freebie), and I’ve heard more than one user profess love for it. Which is why it’s included here.
Listening to your Mac read for you
The camera pans back. A voice tells you what you’ve just seen. And suddenly it all makes sense. Return with me now to those thrilling days of the off-camera narrator… . Wouldn’t it be nice if your Mac had a narrator to provide a blow-by-blow account of what’s happening on your screen?
Or, your eyes are tired from a long day staring at the monitor, but you still have a lengthy document to read. Wouldn’t it be sweet if you could sit back, close your eyes, and let your Mac read the document to you in a (somewhat) natural voice? The good news is that both are possible with OS X El Capitan: the first scenario with VoiceOver, and the second with Text to Speech.
VoiceOver
El Capitan’s VoiceOver technology is designed primarily for the visually impaired, but you might find it useful even if your vision is 20/20. VoiceOver not only reads what’s on the screen to you but also integrates with your keyboard so you can navigate around the screen until you hear the item you’re looking for. When you’re there, you can use Keyboard Access to select list items, select check boxes and radio buttons, move scroll bars and sliders, resize windows, and so on — all with just a simple key press or two.
To check it out, launch the System Preferences application (from Launchpad, the Applications folder, ![]() menu, or Dock), click the Accessibility icon and then click VoiceOver or press
menu, or Dock), click the Accessibility icon and then click VoiceOver or press ![]() +Fn+F5 on MacBook models and most Apple keyboards (or try
+Fn+F5 on MacBook models and most Apple keyboards (or try ![]() +F5).
+F5).
After VoiceOver is enabled, you can turn it on and off in the Accessibility System Preferences pane or by pressing ![]() +Fn+F5 or
+Fn+F5 or ![]() +F5.
+F5.
While VoiceOver is on, your Mac talks to you about what is on your screen. For example, if you click the Desktop, your Mac might say something along the lines of “Application, Finder; Column View; selected folder, Desktop, contains 8 items.” It’s quite slick. Here’s another example: When you click a menu or item on a menu, you hear its name spoken at once, and when you close a menu, you hear the words “Closing menu.” You even hear the spoken feedback in the Print, Open, and Save (and other) dialogs.
VoiceOver is kind of cool (talking alerts are fun), but having dialogs actually produce spoken text becomes annoying really fast for most folks who aren’t visually impaired. (Those who are visually impaired, however, rave about VoiceOver and say it lets them do things they couldn’t easily do in the past.) In any case, I urge you to check it out. You might like it and find times when you want your Mac to narrate the action on-screen for you.
The VoiceOver Utility
The VoiceOver Utility lets you specify almost every possible option the VoiceOver technology uses. You can adjust its verbosity; specify how it deals with your mouse and keyboard; change its voice, rate, pitch, and/or volume; and more.
You can open the VoiceOver Utility by clicking the Open VoiceOver Utility button in the Accessibility System Preferences pane or in the usual way: by double-clicking its icon (which you find in your Utilities folder).
Of course, you might get the machines-are-taking-over willies when your Mac starts to talk to you or make sounds — but if you give it a try, it could change your mind.
I wish I had the space to explain further, but I don’t. That’s the bad news. The good news is that VoiceOver Help is extensive and clear, and it helps you harness all the power of VoiceOver and the VoiceOver Utility.
Text to Speech
The second way your Mac can speak to you is via Text to Speech, which converts onscreen text to spoken words. If you’ve used Text to Speech in earlier versions of OS X, you’ll find that it’s pretty much unchanged.
Why might you need Text to Speech? Because sometimes hearing is better than reading. For example, I sometimes use Text to Speech to read aloud to me a column or page I’ve written before I submit it. If something doesn’t sound quite right, I give it another polish before sending it off to my editor.
You can configure this feature in the Dictation & Speech System Preferences pane:
- Open System Preferences (from Launchpad, the Applications folder, Dock, or
 menu), click the Dictation & Speech icon, and then click the Text to Speech tab.
 - Choose one of the voices in the System Voice pop-up menu to set the voice your Mac uses when it reads to you.
- Click the Play button to hear a sample of the voice you selected.
- Use the Speaking Rate slider to speed up or slow down the voice.
-
Click the Play button to hear the voice at its new speed.
I really like Alex, who says, “Most people recognize me by my voice.” My second favorite is Fred, who sounds like the Talking Moose and says, “I sure like being inside this fancy computer.”
-
(Optional) Select the Announce When Alerts Are Displayed check box if you want to make your Mac speak the text in alert boxes and dialogs.
You might hear such alerts as “The application Microsoft Word has quit unexpectedly” or “Paper out or not loaded correctly.”
-
(Optional) Click the Set Alert Options button to choose the voice and phrase used to announce your alerts — “Alert,” “Attention,” “Yo, dude,” and the like — when alerting you.
You can also set the delay between the time the alert appears and when it’s spoken to you.
-
(Optional) Select the Speak Selected Text When the Key Is Pressed check box to create a hot key to speak selected text.
The default keyboard shortcut is Option+Esc, but you can assign any key combo you like by clicking the Change Key button.
- (Optional) If you want to have the clock announce the time, click the Open Date & Time Preferences button, and you’re whisked to that System Preferences pane; then click the Clock tab and select the Announce the Time check box.
Now, to use Text to Speech to read text to you, copy the text to the Clipboard, launch any app that supports it (I usually choose TextEdit), paste the text into the empty untitled document, click where you want your Mac to begin reading to you, and then choose Edit ⇒ Speech ⇒ Start Speaking. To make it stop, choose Edit ⇒ Speech ⇒ Stop Speaking.
Another great place Text to Speech is available is in the Safari web browser. It works the same as TextEdit but you don’t have to paste — just select the text you want to hear and choose Edit ⇒ Speech ⇒ Start Speaking.
Automatic Automation
OS X El Capitan offers a pair of technologies — AppleScript and Automator — that makes it easy to automate repetitive actions on your Mac.
AppleScript is “programming for the rest of us.” It can record and play back things that you do (if the application was written to allow the recording, such as the Finder), such as opening an application or clicking a button. You can use it to record a script for tasks that you often perform, and then have your Mac perform those tasks for you later. You can write your own AppleScripts, use those that come with your Mac, or download still others from the web.
Automator is “programming without writing code.” With Automator, you string together prefabricated activities (actions) to automate repetitive or scheduled tasks. How cool is that?
Automation isn’t for everyone. Some users can’t live without it; others could go their whole lives without ever automating anything. So the following sections are designed to help you figure out how much — or how little — you care about AppleScript and Automator.
Script Editor app: Write and edit AppleScripts
Describing AppleScript to a Mac beginner is a bit like three blind men describing an elephant. One man might describe it as the Macintosh’s built-in automation tool. Another might describe it as an interesting but often-overlooked piece of enabling technology. The third might liken it to a cassette recorder, recording and playing back your actions at the keyboard. A fourth (if there were a fourth in the story) would assure you that it looked like computer code written in a high-level language.
They would all be correct. AppleScript, a built-in Mac automation tool, is a little-known (at least until recently) enabling technology that works like a cassette recorder for programs that support AppleScript recording. And scripts do look like computer programs. (Could that be because they are computer programs? Hmm… .)
If you’re the kind of person who likes to automate as many things as possible, you might just love AppleScript because it’s a simple programming language you can use to create programs that give instructions to your Mac and the applications running on your Mac. For example, you can create an AppleScript that launches Mail, checks for new messages, and then quits Mail. The script could even transfer your mail to a folder of your choice. Then there’s Automator, which includes a whole lot of preprogrammed actions that make a task like the one just described even easier.
I call AppleScript a time-and-effort enhancer. If you just spend the time and effort it takes to understand it, using AppleScript can save you oodles of time and effort down the road. Therein lies the rub. This stuff is far from simple; entire books have been written on the subject. So it’s far beyond the purview of OS X El Capitan For Dummies. Still, it’s worth finding out about if you’d like to script repetitive actions for future use. To get you started, here are a few quick tips:
- Script Editor (in the Utilities folder inside the Applications folder) is the application you use to view and edit AppleScripts. Although more information on Script Editor is beyond the scope of this book, it’s a lot of fun. And the cool thing is that you can create many AppleScripts without knowing a thing about programming. Just record a series of actions you want to repeat and use Script Editor to save what you recorded as a script. If you save your script as an application (by choosing Format ⇒ Application in the Save sheet), you can run that script by double-clicking its icon.
- You can put frequently used AppleScripts in the Dock or on your Desktop for easy access.
- Many AppleScripts are designed for use in the toolbar of Finder windows, where you can drag and drop items onto them quickly and easily.
- Scripts can enhance your use of many apps including iTunes, iPhoto, and the Finder, to name a few.
- Apple provides a script menu extra that you can install on your menu bar in the Script Editor’s Preferences window, along with a number of free scripts to automate common tasks (in the Scripts folder in the root-level Library, or choose Open Example Scripts Folder from the Script Editor’s Help menu). Finally, you can download additional example scripts from
www.apple.com/applescript. - If the concept of scripting intrigues you, I suggest that you explore the examples in the Scripts folder (in the root-level Library or choose Open Example Scripts from the Script Editor’s Help menu). Rummage through this folder and when you find a script that looks interesting, double-click it to launch the Script Editor program, where you can examine it more closely.
Automator app: Automate almost anything
Automator does just what you’d expect: It enables you to automate many common tasks on your Mac. If it sounds a little like AppleScript to you (which I discuss in the preceding section), you’re not mistaken; the two have a common goal. But this tool is a lot simpler to use, albeit somewhat less flexible, than AppleScript.
For example, in AppleScript, you can have conditionals (“if this is true, do that; otherwise do something else”), but Automator is purely sequential (“take this, do that, then do the next thing, and then …”).
The big difference is that conditionals allow AppleScripts to take actions involving decision-making and iteration (“while this is true, do these things”); Automator workflows can’t make decisions or iterate.
The upsides to Automator are that you don’t have to know anything about programming, and you don’t have to type any archaic code. Instead, if you understand the process you want to automate, you can just drag and drop Automator’s prefab actions into place and build a workflow (Automator’s name for a series of actions).
 You do need to know one thing about programming (or computers), though: Computers are stupid! You heard me right — even my top-of-the-line MacBook Pro is dumb as a post. Computers do only what you tell them to do even though they can do it faster and more precisely than you can. But all computers run on the GIGO principle (Garbage In, Garbage Out), so if your instructions are flawed, you’re almost certain to get flawed results.
When you launch the Automator application, click the New Document button and the window and sheet shown in Figure 17-5 appear. Choose one of the starting points if you want Automator to assist you in constructing a new workflow; or, choose Workflow to start building a workflow from scratch.
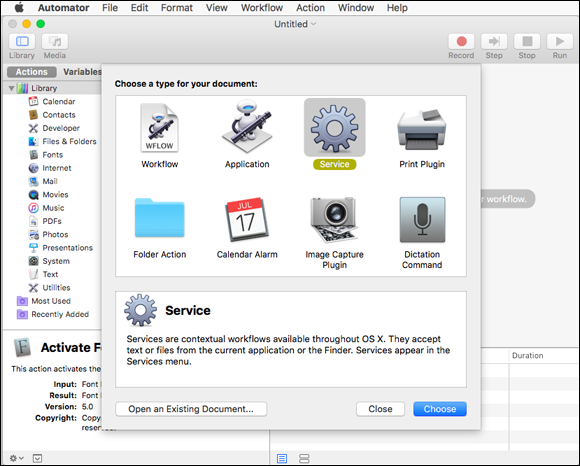
Figure 17-5: Choose Workflow to start a workflow from scratch.
I’m going to choose Service for the sake of this demonstration (you’ll see why in a second). When I select Service and click the Choose button, I see the window shown in Figure 17-6.

Figure 17-6: This converts text that I select to an audio file.
The Library pane on the left contains all the applications Automator knows about that have Actions defined for them. Select an application in the top part of the Library window, and its related actions appear below it. When you select an action, the pane at the bottom of the Library window (Text to Audio File in Figure 17-6) explains what that Action does, what input it expects, and what result it produces. Just drag Actions from the Action list into the window on the right to build your workflow.
This particular Service, which took me less than five minutes of trial and error to perfect, is quite useful. First, I select text from any source — a web page, Microsoft Word document, email message, or whatever. Then I choose Services from the Application menu or right- or Control-click and select my newly created Text to Audio Service from the Services menu. My Automator workflow then converts the selected text into an audio file and saves it to the Desktop. Then, I can have it read to me in iTunes at home or on my iPhone or iPad in the car, on a plane, or just about anywhere. Sweet!
Automator is a very useful addition to OS X; it’s deep, powerful, and expandable, yet relatively easy to use and master. Do yourself a favor, and spend some time experimenting with ways Automator can save you time and keystrokes. You won’t regret it.
For additional information about AppleScript, Automator, Services, and much more, visit www.macosxautomation.com.
A Few More Useful Goodies
Even more neat and useful technologies are built into El Capitan, but I’m running out of space. So here are, at least in my humble opinion, the best of the rest.
App Store app: The place to buy Mac apps
The App Store app is the OS X software version of the iTunes Store for media and iOS apps. Here, you’ll find applications of all types — Business, Entertainment, Graphics, Productivity, Social Networking, and more — at prices that start at zero (free).
Just about everything I tell you in Chapter 13 about the iTunes Store could be said for the App Store. It looks and works the same, and it uses the same credit card you have on file at the iTunes Store.
If you see a little number on the App Store icon in your Dock, it means that a number of your apps have updates available. Launch the App Store app and click the Updates tab to see the apps with updates awaiting them. Even if you don’t see a little number in the App Store’s Dock icon, it wouldn’t hurt to launch the App Store every once in a while to check for updates manually, as the little number sometimes fails to appear in the App Store Dock icon.
Accessibility System Preferences pane: Make your Mac more accessible
If you’ve read the chapter to this point, you got a brief glimpse of the Accessibility System Preferences pane when I discussed commanding your Mac by voice. But this System Preferences pane is mostly designed for users with disabilities or who have difficulty handling the keyboard, mouse, or trackpad.
Select the Show Accessibility Status in Menu Bar check box at the bottom of the window on the left to see the status of all Accessibility Preferences in your menu bar.
The pane has four sections — Vision, Media, Hearing, and Interacting — each of which has one or more subsections.
The Vision section’s Display subsection lets you alter the behavior of the screen display. Select the Use Grayscale check box to desaturate your screen into a grayscale display (so it looks kind of like a black-and-white TV). Enable the Invert Colors option to reverse what you’d see onscreen. For example in the real world you know what the Accessibility System Preferences pane looks like; Figure 17-7 is what it looks like onscreen with Invert Colors enabled.

Figure 17-7: A note with inverted colors.
The Vision section’s Zoom subsection is where you can turn on a terrific feature called hardware zoom, which lets you make things on your screen bigger by zooming in on them. To control it by keyboard, select the Use Keyboard Shortcuts to Zoom check box. Then you can toggle it on and off with the shortcut ![]() +Option+8 and zoom in and out using the shortcuts
+Option+8 and zoom in and out using the shortcuts ![]() +Option+= (equal sign) and
+Option+= (equal sign) and ![]() +Option+– (hyphen), respectively. Finally, the More Options button lets you specify minimum and maximum zoom levels, display a preview rectangle when zoomed out, and toggle image smoothing on or off.
+Option+– (hyphen), respectively. Finally, the More Options button lets you specify minimum and maximum zoom levels, display a preview rectangle when zoomed out, and toggle image smoothing on or off.
Try this feature even if you’re not disabled or challenged in any way; it’s actually a great feature for everyone.
You looked at the Vision section’s VoiceOver subsection earlier in the chapter.
I leave it to you, gentle reader, to explore the remaining sections and subsections of the Accessibility System Preferences pane at your leisure. Until then, you might find the following useful:
- If you want the screen to flash whenever an alert sound occurs, choose Audio.
-
To treat a sequence of modifier keys as a key combination, choose Keyboard and then enable Sticky Keys.
In other words, you don’t have to simultaneously hold down
 while pressing another key. For example, with Sticky Keys enabled, you can do a standard keyboard shortcut by pressing , releasing it, and then pressing the other key. You can select check boxes to tell you (with a beep and/or an onscreen display) what modifier keys have been pressed. As useful as Sticky Keys can be, they’re really awkward in applications like Adobe Photoshop, Adobe Illustrator, and other applications that toggle a tool’s state when you press a modifier key. So if you’re a big Photoshop user, you probably don’t want Sticky Keys enabled.
 - To adjust the delay between a keypress and its activation, choose Keyboard and then enable Slow Keys.
Energy Saver System Preferences Pane: For energy conservation and sleep
All Macs are Energy Star–compliant (and have been for years), allowing you to preset your machine to turn itself off at a specific time or after a specified idle period. To manage your Mac’s energy-saving features, open the Energy Saver System Preferences pane by choosing ![]() ⇒ System Preferences and clicking the Energy Saver icon.
⇒ System Preferences and clicking the Energy Saver icon.
If you have a notebook computer, you have two mostly identical tabs — Battery and Power Adapter — in your Energy Saver System Preferences pane. The Battery tab controls your notebook Mac’s behavior when it’s running on battery power (not plugged in); the Power Adapter tab controls its behavior when it is plugged in.
If you have a desktop Mac, you won’t have tabs, but you do have most of the same controls, including a pair of sliders that control sleep times for your computer and display. To enable Computer or Display sleep, move the appropriate slider to the desired amount of time. You can choose any number between 1 minute and 3 hours or turn off either type of sleep entirely by moving its slider all the way to the right, to Never.
Setting the display to sleep is handy if you want your Mac to keep doing what it’s doing but you don’t need to use the monitor. And if you’re a notebook user, display sleep will save you battery power.
To wake up your Mac from its sleep, merely move your mouse or press any key. Sometimes moving the mouse or a finger on the trackpad won’t wake a sleeping Mac, but a keystroke will. So try both (or all three) before you give up.
Below the Sleep sliders are some check boxes for other useful energy settings, such as the following:
- Put the Hard Disk(s) to Sleep When Possible: Enabling this option forces your hard drive to sleep after a few minutes of inactivity. It’s not a particularly useful feature on a desktop Mac, but if you have a laptop, letting your hard drive sleep when it’s idle will save you some battery power.
- Wake for Wi-Fi Network Access: Enable this option if you want your Mac to wake up automatically for Wi-Fi network access.
If you have a laptop, you’ll have some additional options, including
- Slightly Dim the Display While on Battery Power (Battery tab): The display dims slightly and uses less power when running on the battery.
- Enable Power Nap while on Battery Power (Battery tab): This option allows your Mac to check for new email, calendar, and other iCloud updates while it’s sleeping.
- Enable Power Nap while Plugged into a Power Adapter (Power Adapter tab): This option allows your Mac to back up to Time Machine as well as check for new email, calendar, and other iCloud updates while it’s sleeping.
- Prevent Computer from Sleeping Automatically When the Display is Off (Power Adapter tab): Prevents sleep when the lid is closed and the display is off.
- Show Battery Status in the Menu Bar: This option adds a little battery-status indicator icon and menu.
Finally, to start up, shut down, or put your Mac to sleep at a predetermined time, click the Schedule button and then select the appropriate check box and choose the appropriate options from the pop-up menus.
Bluetooth System Preferences pane: Where Bluetooth lives
Bluetooth is wireless networking for low-bandwidth peripherals, including mice, keyboards, and mobile phones. If your Mac has Bluetooth built in or is equipped with a USB Bluetooth adapter, you can synchronize wirelessly with phones and Palm devices, print wirelessly to Bluetooth printers, and use Bluetooth headsets, mice, and keyboards.
To manage your Mac’s Bluetooth features, open the Bluetooth System Preferences pane by choosing ![]() ⇒ System Preferences and clicking the Bluetooth icon.
⇒ System Preferences and clicking the Bluetooth icon.
Ink System Preferences pane: Visible to pen-input tablet users only
Ink is the OS X built-in handwriting-recognition engine. Sadly, it works only if a third-party drawing tablet with a stylus is connected. Even more sadly, “tablet” in this sense doesn’t include your iPad (at least not so far …).
To write instead of typing, enable Ink in this pane and you’ll be able to handwrite anywhere your Mac accepts typing with the keyboard.
To manage your Mac’s Ink features, open the Ink System Preferences pane by choosing ![]() ⇒ System Preferences and clicking the Ink icon.
⇒ System Preferences and clicking the Ink icon.
The Ink pane is one you see only if you have one of the pen-input drawing tablets that Ink supports connected to your Mac. Most of the supported drawing tablets come from Wacom (www.wacom.com), with prices starting under $100 for a small wireless stylus and drawing tablet.
Automatic Login in the Users & Groups System Preferences pane: Don’t bother with the login screen
Some users don’t care for the fact that OS X El Capitan is a multiuser operating system and dislike having to log in when they start up their Mac. For those users, here’s a way to disable the login screen:
-
Open the Users & Groups System Preferences pane, select yourself in the list of users, and click the Login Options button below the list.
Click the lock and provide your password first, if necessary.
-
Choose the account you want to be logged in to automatically from the Automatic Login pop-up menu.
To disable the logging-in requirement, you have to be an administrator, and you may need to unlock the Users & Groups System Preferences pane.
When you disable logging in, you also affect all the preferences set by anyone else who uses your Mac unless they log out of your account and log into theirs. (Yikes.) So if your Desktop pattern, keyboard settings, and so forth are different from those of someone else who uses your Mac, those preferences won’t be properly reflected unless each of you has a separate, individual login account. Even if you’re not worried about security, consider keeping logging in enabled if any other users have accounts on your machine, or if you don’t want just anyone to be able to turn on your Mac and see your personal stuff.
Note that only one account is allowed to use auto-login. If another user wants to use this Mac, you need to choose ![]() ⇒ Log Out, press
⇒ Log Out, press ![]() +Shift+Q, or have Fast User Switching enabled. And if you’ve disabled automatic login in the Security System Preferences pane, you can’t enable it here.
+Shift+Q, or have Fast User Switching enabled. And if you’ve disabled automatic login in the Security System Preferences pane, you can’t enable it here.
Boot Camp Assistant app: Run Windows on your Mac … really
Boot Camp is El Capitan’s built-in technology that allows you to run Microsoft Windows 10 and (on some Mac models) Windows 7 or 8 on El Capitan-capable Macs. If your Mac meets the following requirements, you can run Windows on your Mac (if you so desire):
- An El Capitan-capable Mac (of course)
- A hard drive that isn’t already partitioned
-
(Optional) A printer (for printing the instructions)
It’s optional ’cause you could just email them to yourself…
- A full install copy of Microsoft Windows 7 or newer (Windows 8 Home Premium, Professional, or Ultimate edition)
You really do need a full retail copy of Windows: one that was purchased in a retail box. If your copy of Windows came with your PC, you probably can’t install it in Boot Camp.
To install Windows on your Mac, here are the basic steps:
-
Launch the Boot Camp Assistant application, which is in your Utilities folder.
This step creates a partition on your hard drive for your Windows installation.
-
Install Windows on the new partition.
From now on, you can hold down Option during startup and choose to start up from either the OS X El Capitan disk partition or the new Windows partition.
If running Windows on your Mac appeals to you, you may want to check out Parallels Desktop or VMware Fusion (around $80 each) or VirtualBox (free). All three programs allow you to run Windows — even older versions like XP and Vista — as well as Linux on your Mac without partitioning your hard drive or restarting every time you want to use Windows. In fact, you can run Mac and Windows programs simultaneously with all three of these products.
One last thing: Apple has a special Boot Camp support page on the web at http://www.apple.com/support/bootcamp/.
AirPlay mirroring
I would be remiss if I didn’t mention the AirPlay Mirroring feature, even though most of you won’t be able to use it without first buying an Apple TV.
With AirPlay Mirroring, you can stream whatever is on your Mac (or iOS device) screen wirelessly to your HDTV with a connected Apple TV.
Apple TV couldn’t be easier to use. If it’s on the same network as your Mac, an option for AirPlay Mirroring will appear in the Displays System Preferences pane. Just enable AirPlay Mirroring, and what is on your Mac screen will appear on your HDTV screen almost instantaneously.
Enable Show Mirroring Options in the Menu Bar When Available in the Displays System Preferences pane, and a handy menu, shown in Figure 17-8, lets you switch AirPlay Mirroring on and off without the bother of first opening the Displays System Preferences pane.
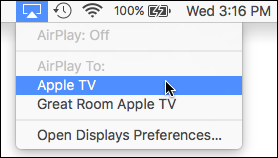
Figure 17-8: The AirPlay menu makes life much easier for AirPlay users like me.
The bad news is that many older Macs — including my wife’s six-year-old MacBook Pro — don’t support mirroring to an Apple TV.
Handoff
 I’d be remiss if I didn’t at least mention the Handoff feature, which lets you start working on a document, an email, or a message on any Apple device and pick up where you left off on another device. Handoff works with Apple apps including Mail, Safari, Maps, Messages, Reminders, Calendar, Contacts, Pages, Numbers, and Keynote as well as a handful of third-party apps.
Handoff is useful only if you own other Apple devices. For details on it and other Continuity features for iDevices, including SMS and Instant Hot Spot, see the book’s cheat sheet at www.dummies.com/cheatsheet/osxelcapitan.