
Chapter 4
Delving Deeper into the Finder and Its Desktop
In This Chapter
![]() Getting to know the Finder
Getting to know the Finder
![]() Using aliases: The greatest things since sliced bread
Using aliases: The greatest things since sliced bread
![]() View(ing) the Finder
View(ing) the Finder
![]() Navigating the Finder
Navigating the Finder
![]() Customizing Finder windows
Customizing Finder windows
![]() Setting Finder preferences
Setting Finder preferences
![]() Getting information on icons
Getting information on icons
On your Mac, the Finder is your starting point — the centerpiece of your Mac experience, if you will — and it’s always available. In Finder windows or the Desktop, you can double-click your way to your favorite application, your documents, or your folders. So in this chapter, I show you how to get the most from the OS X El Capitan Finder and its Desktop.
Introducing the Finder and Its Minions: The Desktop and Icons
The Finder is a special application unlike any other. Its most significant difference from other applications is that it launches automatically when you log in, is always running in the background, and doesn’t include a Quit command. The Desktop is a special part of the Finder unlike any other. Finally, icons and windows are the units of currency used by the Finder and Desktop.
Before I tackle any deep thoughts — such as what the Finder does or what the Desktop is — I start with a quick overview of some of the icons you’re likely to encounter as you get to know the Finder and Desktop.
Introducing the Desktop
The Desktop is the backdrop for the Finder — everything you see behind the Dock and any open windows. The Desktop is always available and is where you can usually find your hard drive icon(s).
This will be a whole lot easier with a picture for reference, so take a gander at Figure 4-1, which is a glorious depiction of a typical OS X El Capitan Finder.
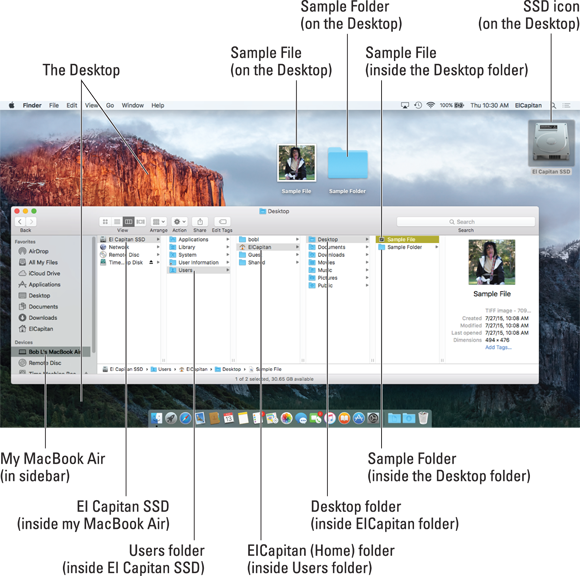
Figure 4-1: A typical Finder and Desktop.
If you’re not familiar with the Finder and its Desktop, here are a few tips that will come in handy as you become familiar with the icons that hang out there:
- Icons on the Desktop behave the same as icons in a window. You move them and copy them just as you would icons in a window. The only difference is that icons on the Desktop aren’t in a window. Because they’re on the Desktop, they’re more convenient to use.
-
The first icon you need to get to know is the icon for your startup disk (a hard disk or SSD; see Figure 4-2). You used to be able to find it on the top-right side of the Desktop, as it is in Figure 4-1. Yours probably has the name Macintosh HD unless you’ve already renamed it. (I renamed my hard drive El Capitan SSD in Figure 4-2; see the section on renaming icons in Chapter 6 if you’d like to rename your own hard drive.) You can see how selected and deselected hard drive icons look in Figure 4-2, too.
El Capitan does not display optical disc and hard drive icons on the Desktop by default. If you don’t see your startup disk’s icon on the Desktop and you’d like to, select the check box for hard drives in Finder Preferences as described in the “Setting Finder preferences” section, later in this chapter.
-
Other disc or hard drive icons appear on the Desktop by default. When you insert a CD or DVD or connect an external hard drive, the disc or drive icon appears on the Desktop just below your startup hard-drive icon (space permitting). If it doesn’t, open Finder Preferences and select its check box.
You can find details about working with discs and drives by visiting
www.dummies.com/extras/osxelcapitan. - You can move an item to the Desktop so you can find it right away. Simply click its icon in any window and then, without releasing the mouse button, drag it out of the window and onto the Desktop. Then release the mouse button. This will move it from wherever it was to the Desktop.
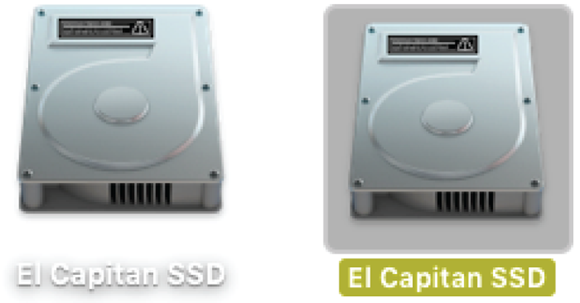
Figure 4-2: Unselected (left) and selected (right) hard-drive icons.
 If you drag an item from an external volume to the Desktop (or any location on your startup disk for that matter), the item is copied, not moved. Put another way, the item is moved if it’s on the same disk or volume, or copied if it’s on any other disk or volume.
 Volume is the generic term for any storage container — a hard disk, solid-state drive, CD, DVD, disk image, or remote disk — that appears in the Sidebar’s Devices section.
 At the bottom of the Finder window in Figure 4-1 are two optional bars. The lower of the two is called the status bar; it tells you how many items are in each window and, if any are selected, how many you’ve selected out of the total, as well as how much space is available on the hard drive containing this window. And just above the status bar is the path bar, which shows the path from the top level of your hard drive to the selected folder (which is Sample File in Figure 4-1). You can show or hide the status bar by choosing View ⇒ Hide/Show Status Bar and show or hide the path bar by choosing View ⇒ Hide/Show Path Bar. Finally, when the toolbar is hidden (see the “Bellying up to the toolbar” section, later in this chapter), the status bar moves to the top of the window (the path bar remains at the bottom of the window no matter what).
Bellying up to the toolbar
In addition to the Sidebar (introduced in Chapter 2) and some good old-fashioned double-clicking, the OS X Finder window offers additional navigation aids on the toolbar — namely, the Back and Forward buttons, as well as the extra-helpful view buttons. You can find other handy features on the Go menu, discussed a little later in this chapter.
In case you didn’t know, the toolbar is the light gray band (see Figure 4-3) at the top of the window, which (among other things) displays the window’s name. On the toolbar you’ll find buttons to navigate quickly and act on selected icons.

Figure 4-3: A Finder window’s default toolbar.
To activate a toolbar button, click it once.
You say you don’t want to see the toolbar at the top of the window? Okay! Just choose View ⇒ Hide Toolbar or use its keyboard shortcut (![]() +Option+T), and it’s gone. (If only life were always so easy!) Want it back? Choose View ⇒ Show Toolbar or use the same keyboard shortcut:
+Option+T), and it’s gone. (If only life were always so easy!) Want it back? Choose View ⇒ Show Toolbar or use the same keyboard shortcut: ![]() +Option+T.
+Option+T.
 Alas, hiding the toolbar also hides the useful Sidebar. If only you could choose to hide them independently… . I find this fact annoying because I use the Sidebar a lot but don’t use the toolbar much. To make matters worse, View ⇒ Hide Sidebar (shortcut:
 ![]() +Option+S) lets you hide the Sidebar without hiding the toolbar. It’s been like this for a long time, and for whatever reason, you still can’t hide the toolbar while keeping the Sidebar visible! Boo. Hiss.
+Option+S) lets you hide the Sidebar without hiding the toolbar. It’s been like this for a long time, and for whatever reason, you still can’t hide the toolbar while keeping the Sidebar visible! Boo. Hiss.
 When you hide the toolbar, opening a folder spawns a new Finder window. The default, which is probably what you’re used to, is for folders to open in place, displaying their contents in the current window.
The toolbar’s default buttons are shown in Figure 4-3.
One last thing: If you customized your toolbar by choosing View ⇒ Customize Toolbar, yours won’t look exactly like Figure 4-3.
Here is the lowdown on the toolbar’s default buttons, from left to right:
-
Forward and Back buttons: Clicking the Forward and Back buttons displays the folders that you’ve viewed in this window in sequential order. If you’ve used a web browser, it’s a lot like that.
Here’s an example of how the Back button works. Say you’re in your Home folder; you click the Favorites button, and a split-second later, you realize that you actually need something in the Home folder. Just a quick click of the Back button and — poof! — you’re back Home. As for the Forward button, well, it moves you in the opposite direction, through folders that you’ve visited in this window. Play around with them both; you’ll find them invaluable. The keyboard shortcuts  +[ for Back and +] for Forward are even more useful (in my opinion) than the buttons.
 -
View buttons: The four view buttons change the way that the window displays its contents.
You have four ways to view a window: Icon, List, Column, and Cover Flow. Some people like columns, some like icons, and others love lists or flows. To each her own. Play with the four Finder views to see which one works best for you. For what it’s worth, I usually prefer Column view with a dash of List view thrown in when I need a folder’s contents sorted by creation date or size. And the Cover Flow view is great for folders with documents because you can see the contents of many document types right in the window, as I explain shortly.
Don’t forget that each view also has a handy keyboard shortcut: +1 for Icon view, +2 for List view, +3 for Column view, and +4 for Cover Flow view. (Views are so useful you’ll find an entire section devoted to them later in this chapter.) -
Arrange: Click this button to see a pop-up menu with options for displaying this window’s contents, as shown in Figure 4-4, which also shows the View menu’s Arrange By submenu. Note that unlike the pop-up version, it displays useful keyboard shortcuts next to most commands. I use them often, and you should, too! (Read more about Arrange By in the later section, “What’s on the (View) menu?”)
In Figure 4-4, I selected Date Last Opened, and my Documents folder reflects that choice.
One last thing: The Arrange By menu works in all four views. -
Action: Click this button to see a pop-up menu of all the context-sensitive actions you can perform on selected icons, as shown in Figure 4-5.
If you see angle brackets (>>) at the right edge of the toolbar, as shown in Figure 4-5, at least one toolbar item is not visible (the Edit Tags button and the Search box in Figure 4-5). Click the angle brackets to select a hidden item. Or expand the window enough to display all the items in the toolbar. -
Share: Click here to share the selected items with others. A pop-up menu lets you choose to share via Mail, Messages, or AirDrop for all files and folders, with Facebook, Twitter, and Flickr also appearing if the selected item is an image (.jpeg, .jpg, .tiff, .tif, .png, and so on).
El Capitan’s extensible architecture lets you add other services (such as Vimeo or LinkedIn) and apps (such as iPhoto and Aperture) to your Share menu. To manage these extensions, choose More from the Share pop-up menu. Alternatively, you can launch the System Preferences application, click the Extensions icon, and then click the Share Menu item on the left side of the window.
- Tags: Click here to assign one or more colored tags to selected items. You’ll find out more about tags and tagging in the “Customizing Finder Windows” section later in this chapter.
- Search: The toolbar’s Search box is a nifty way to search for files or folders. Just type a word (or even just a few letters), and in a few seconds, the window fills with a list of files that match. You can also start a search by choosing File ⇒ Find (shortcut: +F). You find out about Search in Chapter 7.
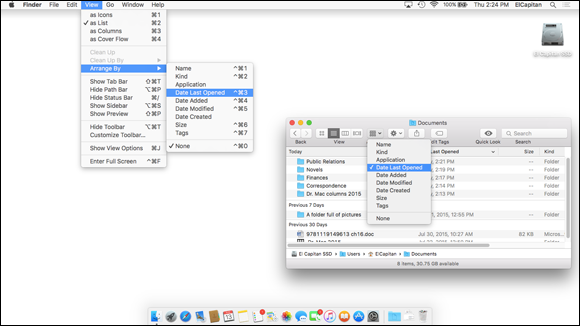
Figure 4-4: The View menu and pop-up menu versions of Arrange By with my Documents folder arranged by Date Last Opened.
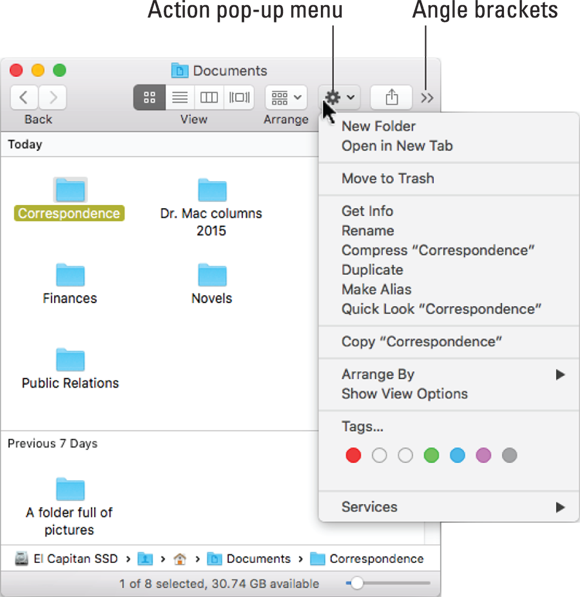
Figure 4-5: Use the Action pop-up menu to perform common actions on selected items.
Figuring out what an icon is
What’s an icon? Glad you asked. Each Finder icon represents an item or a container on your hard drive. Containers — hard disks, USB thumb drives, folders, CDs, DVDs, shared network volumes, and so on — can contain a virtually unlimited number of application files, document files, and folders.
Icons on the Dock and the Sidebar of Finder windows are not the same as the Finder icons I’ll be discussing in this chapter. They’re simply convenient pointers to actual Finder icons. Technically, Dock and Sidebar icons are aliases. (If you don’t yet know what an alias is, you’re going to find out long before the thrilling conclusion of this chapter.)
Anyway, working with icons is easy:
- Single-click to select.
- Double-click to open.
- Click and drag to move.
- Release mouse button to drop.
But enough talk. It’s time to see what these puppies actually look like.
Identifying your Finder icons in the wild
Although icons all work the same, they come in different kinds, shapes, and sizes. When you’ve been around the Macintosh for a while, you develop a sixth sense about icons and can guess what an unfamiliar icon contains just by looking at it.
Here are the major icon types:
-
Application icons are programs — the software you use to accomplish tasks on your Mac. Mail, Safari, and Calendar are applications. So are Microsoft Word and Adobe Photoshop.
Application icons come in a variety of shapes. For example, application icons are often square-ish, diamond-shaped, rectangular, or just oddly shaped. Figure 4-6 displays application icons of various shapes.
-
Document icons are files created by applications. Letters created with TextEdit are documents. This chapter began life as a document created in Microsoft Word. And spreadsheet, PDF, video, image, and song files are all documents.
Document icons are often reminiscent of a piece of paper, as shown in Figure 4-7.
If your document icons are generic, like the six icons on top in Figure 4-7, but you’d prefer icons that reflect their contents, like the six icons on the bottom in Figure 4-7, open View Options or use the +J shortcut, and then select the Show Icon Preview check box (see Chapter 21 for additional details about View Options). -
Folder and Disk icons are the Mac’s organizational containers. You can put icons — and the applications or documents they stand for — in folders or disks. You can put folders in disks or in other folders, but you can’t put a disk inside another disk.
Folders look like, well, manila folders (what a concept) and can contain just about any other icon. You use folders to organize your files and applications on your hard drive. You can have as many folders as you want, so don’t be afraid to create new ones. The thought behind the whole folders thing is pretty obvious: If your hard drive is a filing cabinet, folders are its drawers and folders (duh!). Figure 4-8 shows some typical folder icons.And while disks behave pretty much like folders, their icons often look like disks, as shown in Figure 4-9.
- Alias icons are wonderful — no, make that fabulous — organizational tools. I like aliases so much, in fact, that they get a whole entire section to themselves.

Figure 4-6: Application icons come in many shapes.
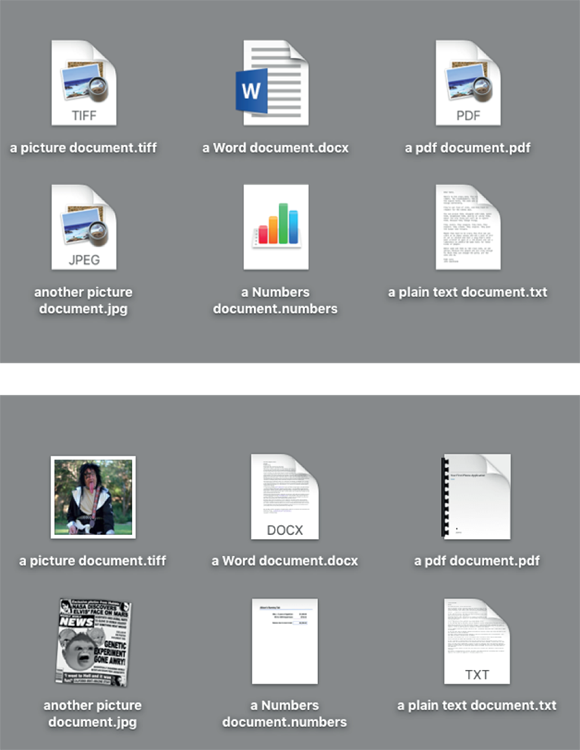
Figure 4-7: Typical document icons.
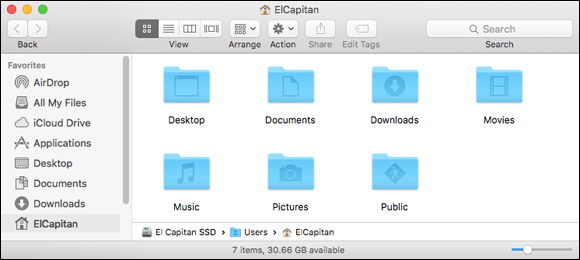
Figure 4-8: The folders in my Home folder are typical folder icons.
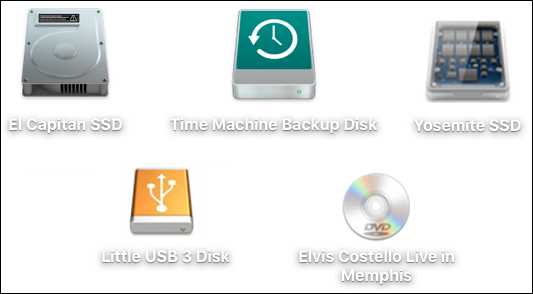
Figure 4-9: Disk icons generally look a lot like, well, disks.
If you’re looking for details about how to organize your icons in folders, move them around, delete them, and so on, hang in there. Chapter 6 is about organizing and managing files and folders.
Aliases Are Awesome!
An alias is a tiny file that automatically opens the file, folder, disk, or network volume that it represents. Although an alias is technically an icon, it’s different from other icons; it actually does nothing but open a different icon when you double-click. Put another way, aliases are organizational tools that let you store an icon in more than one place without creating multiple copies of the file.
An alias is very different from a duplicated file. For example, the iTunes application uses around 340 megabytes (MB) of hard drive space. If I were to duplicate iTunes, I’d have two files on my hard disk, each requiring around 340MB of disk space.
An alias of iTunes, on the other hand, looks just like the original iTunes icon and opens iTunes when you double-click it but uses less than 2MB of hard disk space. So try placing aliases of programs and files you use most often in convenient places such as the Desktop or a folder in your Home folder.
In effect, Microsoft stole the alias feature from Apple. (If you’ve used Windows, you may know aliases as shortcuts.) But what else is new? And for what it’s worth, the Mac’s aliases don’t usually break when you move or rename the original file; Windows shortcuts have been known to do so (although I hear it’s less frequent in Windows 10 than in the last version I touched on purpose, which was Windows XP).
Why else do I think that aliases are so great? Well, they open any file or folder (or application) on any hard drive from anywhere else on any hard drive — which is a very good trick. But there are other reasons why I think aliases are awesome:
-
Convenience: Aliases enable you to make items appear to be in more than one place, which on many occasions is exactly what you want to do. For example, keep an alias of your word-processor program on your Desktop and another in your Documents folder for quick access. Aliases enable you to open your word processor right away without having to navigate into the depths of your Applications folder every time you need it.
While you’re at it, you might want to put an icon for your word processor in both the Dock and the Sidebar to make it even easier to open your word processor without a lot of clicking. - Flexibility and organization: You can create aliases and store them anywhere on your hard drive to represent the same document in several different folders. This is a great help when you need to file a document that can logically be stored in any of several folders. If you write a memo to Fred Smith about the Smythe Marketing Campaign to be executed in the fourth quarter, which folder does the document belong in? Smith? Smythe? Marketing? Memos? 4th Quarter? Correct answer: With aliases, it can go in every folder, if you like. Then you can find the memo wherever you look instead of guessing which folder you filed it in.
- Integrity: Some programs must remain in the same folder as their supporting files and folders. Some programs, for example, won’t function properly unless they’re in the same folder as their dictionaries, thesauruses, data files (for games), templates, and so on. Thus, you can’t put the actual icon for such programs on the Desktop without impairing their functionality. An alias lets you access a program like that from anywhere on your hard drive. (And it’s probably best to leave all your apps in the Applications folder, where they belong.)
I admit I’m somewhat old-school when it comes to organizing my files in the proper folders (see Chapter 6), but El Capitan’s speedy Spotlight search mechanism along with tools like Launchpad and Mission Control (all, not coincidentally, discussed in Chapter 7), as well as the Sidebar’s All My Files item, let you find pretty much any file on your disk in seconds.
Creating aliases
![]() When you create an alias, its icon looks the same as the original icon it represents, but the suffix alias is tacked onto its name, and a tiny arrow called a badge (as shown in the margin) appears in the bottom-left corner of its icon. Figure 4-10 shows an alias and its parent icon — the icon that opens if you double-click the alias.
When you create an alias, its icon looks the same as the original icon it represents, but the suffix alias is tacked onto its name, and a tiny arrow called a badge (as shown in the margin) appears in the bottom-left corner of its icon. Figure 4-10 shows an alias and its parent icon — the icon that opens if you double-click the alias.
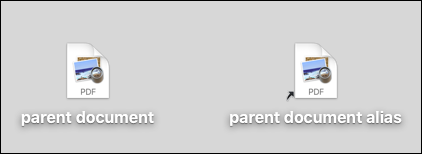
Figure 4-10: An alias (right) and its parent.
To create an alias for an icon, do one of the following:
- Click the parent icon and choose File ⇒ Make Alias.
- Click the parent icon and press +L.
- Click the parent icon and use the Action menu’s Make Alias command (in the Toolbar of all Finder windows).
- Click an icon while holding down the Control key (or right-click it or tap it with two fingers on a trackpad) and then choose the Make Alias command from the contextual menu that appears. (You can explore contextual menus — which are very cool — in Chapter 2.)
- Click any file or folder, press and hold down +Option, and then drag the file or folder while continuing to hold down +Option. Presto! An alias appears where you release the mouse button.
When I first create a file, I save it in its proper folder inside the Documents folder in my Home folder. If it’s a document that I plan to work on for more than a day or two (such as a magazine article or book chapter), I make an alias of the document (or folder) and plop it on my Desktop. After I finish the article or chapter and submit it to an editor, I trash the alias, leaving the original file safe and sound, filed away in its proper folder, and leaving my Desktop clean and uncluttered.
Deleting aliases
This is a short section because deleting an alias is such an easy chore. To delete an alias, simply drag it onto the Trash icon on the Dock. That’s it! You can also Control-click it and choose Move to Trash from the contextual menu that appears (right-click or Control-click or two-finger tap), or select the icon and press ![]() +Delete.
+Delete.
Deleting an alias does not delete the parent item. (If you want to delete the parent item, you have to go hunt it down and kill it yourself.)
Hunting down an alias’s parent
Suppose that you create an alias of a file, and later you want to delete both the alias and its parent file, but you can’t find the parent file. What do you do? Well, you can use the Finder’s Find function to find it (try saying that three times real fast), but here are four faster ways to find the parent icon of an alias:
- Select the alias icon and choose File ⇒ Show Original.
- Select the alias icon and press +R.
- Select the alias icon and use the Action menu’s Show Original command.
- Control-click (or right-click or two-fingered tap on a trackpad) the alias icon and choose Show Original from the contextual menu.
Any of these methods opens the window containing the parent document with its icon preselected for your convenience.
The View(s) from a Window
Views are part of what makes your Mac feel like your Mac. El Capitan offers four views so you can select the best one for any occasion. Some people like one view so much that they rarely (or never) use others. Other people, like me, memorize the keyboard shortcuts to switch views instantly without reaching for the mouse. Try ’em all, and use the one(s) you prefer.
Moving through folders fast in Column view
Column view is a darn handy way to quickly look through a lot of folders at once, and it’s especially useful when those folders are filled with graphics files. The Column view is my favorite way to display windows in the Finder.
![]() To display a window in Column view, shown in Figure 4-11, click the Column view button on the toolbar (as shown in the margin), choose View ⇒ As Columns from the Finder’s menu bar, or press
To display a window in Column view, shown in Figure 4-11, click the Column view button on the toolbar (as shown in the margin), choose View ⇒ As Columns from the Finder’s menu bar, or press ![]() +3.
+3.
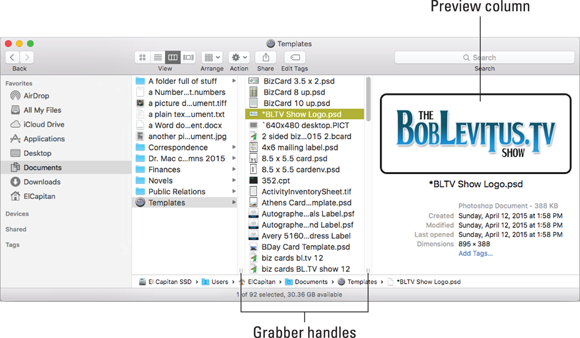
Figure 4-11: A Finder window in Column view.
Here’s how I clicked around in Column view to see the list of folders and files you see in Figure 4-11:
- When I clicked the Documents icon in the Sidebar, its contents appeared in the column to the right.
- When I clicked the Templates folder in this column, its contents appeared in the second column.
-
When I clicked *BLTV Show Logo.psd in the third column, the contents of that file appeared in the fourth column along with information about the file (its size is 511K, it was created on June 9, 2014, and so on).
The fourth column is displaying a Preview, a feature available in all views by choosing View ⇒ Show/Hide Preview.
Here are some helpful tips when you’re poking around Column view:
-
You can have as many columns in a Column view window as your screen can handle. Just drag any edge or corner of the window to enlarge it so new columns have room to open. You can also click the green Zoom (Maximize) button to make the window fill the screen. (Hint: To get out of full-screen mode, press Esc or move your cursor to the top of the screen and click the green Zoom button that appears near the top-left corner.)
If you Option-click the green Zoom button, the window will expand just big enough to display all columns with content in them. -
You can use the little grabber handles at the bottom of every column to resize the column width.
You’ll see the grabber handles shown in Figure 4-11 only if you’ve selected Always Show Scroll Bars in the General System Preferences pane. If you select either of the other options, Automatically or When Scrolling, the grabber handles disappear. The funny thing is, everything works the same either way. So if you don’t see the grabber handles and would like to, open System Preferences, select the General icon, and then select Always Show Scroll Bars. If you don’t see grabber handles, click and drag the thin dividing line between the columns to achieve the same result.To be specific:
- If you drag a handle left or right, the column to its left resizes.
- If you hold down the Option key when you drag, all columns resize at the same time.
- If you double-click one of these little handles, the column to its left expands to the Right Size, which is the width of the widest item in the column.
- Right- or Control-click any grabber handle for a pop-up menu with three options: Right Size This Column, Right Size All Columns Individually, and Right Size All Columns Equally.
-
The preview column displays information about the highlighted item to its left, but only if that item isn’t a folder or disk. Why? Well, if it were a folder or disk, its contents would be in this column.
For many items, the picture you see in the preview column is an enlarged view of the file’s icon. You only see a preview (as shown in Figure 4-11) when the selected item is an image file saved in a format that Quick Look (which you’ll discover in Chapter 7) can interpret (which is to say, most image file formats, including TIFF, JPEG, PNG, GIF, and PDF to name a few, as well as many other file formats, including Microsoft Word and Pages).
If you don’t like having the preview displayed in Column view (but want it to remain in all other views), choose View ⇒ Show View Options and deselect the check box for Show Preview Column. You can do the same for any other view, or turn the preview off in all views by choosing View ⇒ Hide Preview.
Perusing in Icon view
Icon view is a free-form view that allows you to move your icons around within a window to your heart’s content. Refer to Figure 4-6 to see the icons in my Applications folder in Icon view.
![]() To display a window in Icon view, click the Icon view button in the toolbar (shown in the margin), choose View ⇒ As Icons from the Finder’s menu bar, or press
To display a window in Icon view, click the Icon view button in the toolbar (shown in the margin), choose View ⇒ As Icons from the Finder’s menu bar, or press ![]() +1.
+1.
The best part of Icon view, at least in my humble opinion, is the Icon Size slider in the lower-right corner of Icon view windows (or in the top-right corner if the Sidebar and toolbar are hidden).
Listless? Try touring folders in List view
Now I come to my second-favorite view, List view (shown in Figure 4-12). I like it so much because of the little triangles to the left of each folder, known as disclosure triangles, which let you see the contents of a folder without actually opening it. This view also allows you to select items from multiple folders at once and move or copy items between folders in a single window. Finally, it’s the view used to present Spotlight search results.
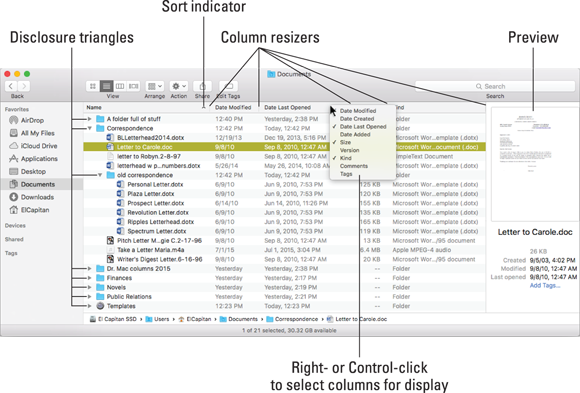
Figure 4-12: A window in List view.
![]() To display a window in List view, click the List view button on the toolbar (shown in the margin), choose View ⇒ As List from the Finder menu bar, or press
To display a window in List view, click the List view button on the toolbar (shown in the margin), choose View ⇒ As List from the Finder menu bar, or press ![]() +2.
+2.
When you’re in List view, the following tips can help you breeze through your folders to find what you’re looking for:
-
To disclose a folder’s contents, click the triangle to its left or, if it’s selected, press the right-arrow key. Figure 4-12 shows the result of either clicking the triangle to the left of the Correspondence folder or selecting (highlighting) the Correspondence folder and pressing the right-arrow key.
I pressed Option+→ in Figure 4-12, so all of the Correspondence folder’s subfolders (the Old Correspondence folder in this case) also expanded. And if the Old Correspondence folder (or any other folder in the Correspondence folder) had subfolders, they too would have been expanded. - Click the column header to sort items in List view. Notice the little triangle at the right edge of the selected column (the Name column in Figure 4-12). That’s the column’s sorting indicator. If the triangle points upward, as it does in Figure 4-12, the items in the corresponding column are sorted in alphabetical order; if you click the header (Name) again, the triangle will flip over to point downward and the items will be listed in the opposite (reverse alphabetical) order. This behavior is true for all columns in List view windows.
-
You can change the order in which columns appear in a window. To do so, press and hold down on a column’s name, and then drag it to the left or right until it’s where you want it. Release the mouse button, and the column moves.
The exception (isn’t there always an exception?) is that the Name column always appears first in List view windows; you can move all other columns about at will. In fact, you can even hide and show columns other than Name if you like using the View Options window.
It’s even easier to hide or show columns by right- or Control-clicking anywhere on any column header (as shown on the right side of Figure 4-12). Column names with check marks are displayed; column names that are unchecked are hidden. You can fine-tune all four views and the Desktop by using the View Options window. Just choose View ⇒ Show View Options or press +J. The options you see apply to the active window or the Desktop. Click the Use as Defaults button to apply these options to all windows in that view (that is, Icon, List, Column, or Cover Flow).  To widen or shrink a column, hover the cursor over the dividing line between that column and drag left or right. When your cursor is over the dividing line in the header, it changes to a double-headed resizer, as shown in the margin.
You gotta go with the flow
If you’re familiar with the Cover Flow feature in iTunes, you’re already familiar with the Finder’s Cover Flow view.
![]() To display a window in Cover Flow view, click the Cover Flow view button on the toolbar (shown in the margin), choose View ⇒ As Cover Flow from the Finder’s menu bar, or press
To display a window in Cover Flow view, click the Cover Flow view button on the toolbar (shown in the margin), choose View ⇒ As Cover Flow from the Finder’s menu bar, or press ![]() +4. Figure 4-13 shows Cover Flow view.
+4. Figure 4-13 shows Cover Flow view.
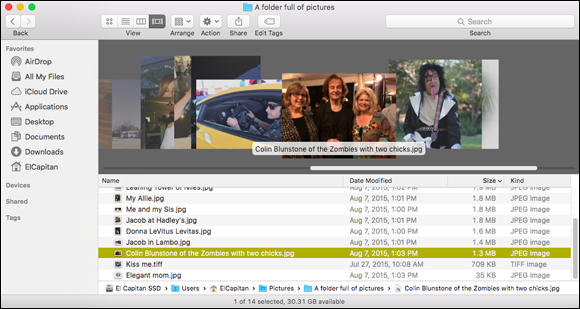
Figure 4-13: A window in Cover Flow mode.
Cover Flow view has two cool features:
- The item selected in the list (Zombies lead singer Colin Blunstone with my wife and her friend Kim in Figure 4-13) appears in a preview in the top part of the window.
- You can flip through the previews by clicking the images to the left or right of the current preview image or by sliding the scroll bar (above the Date Modified, Size, and Kind columns in Figure 4-13) to the left or right.
What’s on the (View) menu?
The Finder View menu offers several commands that might help you peruse your icons more easily:
-
Clean Up: Choose this command to align icons to an invisible grid; you use it to keep your windows and Desktop neat and tidy. (If you like this invisible grid, don’t forget that you can turn it on or off for the Desktop and individual windows by using View Options.) Clean Up is available only in Icon view or when no windows are active. If no windows are active, the command instead cleans up your Desktop. (To deactivate all open windows, just click anywhere on the Desktop or close all open windows.)
If any icons are selected (highlighted) when you pull down the View menu, you see Clean Up Selection rather than Clean Up. If you choose this command, it moves only the icons that are currently selected. -
Clean Up By: This command combines the tidiness of the Clean Up command with the organizational yumminess of the Arrange By command, which I mention earlier in this chapter and discuss in more detail shortly.
This command sorts the icons by your choice of criteria, namely:
- Name (shortcut: +Option+1)
- Kind (shortcut: +Option+2)
- Date Modified (shortcut: +Option+5)
- Date Created (strangely, there’s no shortcut for this command)
- Size (shortcut: +Option+6)
- Tags (shortcut: +Option+7)
Clean Up By is similar to the Arrange By command, but unlike Arrange By, Clean Up By is a one-time affair. After you’ve used it, you can once again move icons around and reorganize them any way you like.
- Name (shortcut:
-
Arrange By: This command rearranges the icons in the active window in your choice from among nine ways, which happen to be the same nine options (10, if you count None) in the Arrange By pop-up menu (shown earlier in Figure 4-4).
Note that when the Desktop is active, this command is named Sort By; open a window in Icon view and it changes back to Arrange By. Seems weird, but it’s true.
Unlike Clean Up By, which is a one-shot command, Arrange By is persistent and will continue to reorganize your icons automatically. In other words, you can’t move icons around manually in an arranged window.
One last thing: The Clean Up and Clean Up By commands are available only for those windows viewed as icons. The Arrange By command is available in all four views and remains in effect if you switch to a different view or close the window. To stop the Finder from arranging icons in a window, choose None from either the View ⇒ Arrange By submenu or the toolbar’s Arrange pop-up menu, or use the keyboard shortcut,
+Control+0.
If you’re like me, you’ve taken great pains to place icons carefully in specific places on your Desktop. If so, the Clean Up By and Arrange By/Sort By commands will mess up your perfectly arranged Desktop icons. And alas, cleaning up your Desktop is still not something OS X lets you undo.
Finder on the Menu
The Finder menu is packed with useful goodies, most of which are available in its menus. In the following sections, I look at those that pertain specifically to using the Finder.
The actual Finder menu
Here are a few of the main items you can find on the Finder menu:
- About Finder: Choose this command to find out which version of the Finder is running on your Mac. This menu item isn’t particularly useful — or at least not for very long. But when a different application is running, the About Finder item becomes About application name and usually gives information about the program’s version number, the developers, and any other tidbits that those developers decide to throw in. Sometimes these tidbits are useful, sometimes they’re interesting, and sometimes they’re both.
- Preferences: Use the choices here to control how the Finder looks and acts. Find out the details in the “Setting Finder preferences” section, later in this chapter.
-
Services: One of the really cool features of OS X applications is the accessibility of Services. If nothing is selected in the Finder, the Services menu is empty, as shown in the top panel of Figure 4-14. When an icon or icons are selected, there are four Services you can choose, as shown in the middle panel of Figure 4-14. Finally, if a word or words are selected, you have five different options, as shown in bottom pane of Figure 4-14.
In other words, the items you see in the Services menu are context-sensitive, so what you see in yours will depend on what you have selected. If you look in the Services menu and don’t find anything interesting, try selecting something else and looking again; you might be pleasantly surprised.
Choose the last item in the menu, Services Preferences, and you can enable dozens of useful Services that aren’t available by default.
-
 Hide Finder (+H): Use this command when you have Finder windows open, and they’re distracting you. Choosing it makes the Finder inactive (another program becomes active) and hides any open Finder windows. To make the Finder visible again, either choose Show All from the application’s self-named menu (the one that bears the name of the active application, such as Finder, TextEdit, System Preferences, and so on) or click the Finder icon, shown in the margin here, on the Dock. The advantage to hiding the Finder — rather than closing or minimizing all your windows to get a clean screen — is that you don’t have to open them all again when you’re ready to get the windows back. Instead, just choose Show All (to see all windows in all apps) or click the Finder button on the Dock to see all Finder windows.
 -
Hide Others (Option+
+H): This command hides all windows associated with all running programs except the active program. It appears in most applications’ self-named menu and is good for hiding distractions so you can focus on one thing: the unhidden application. Another easy way to hide all open applications and windows while activating the Finder is to hold down the and Option keys and click the Finder icon on the Dock. This technique works with whatever application is active, not just the Finder. So if you’re surfing the web and decide you want to see only Safari’s windows on your screen, +Option-click the Safari button on the Dock, and it will happen instantly. -
Show All: Use this command as the antidote to both of the Hide commands. Choose this, and nothing is hidden anymore.
Note that all three of these commands require that at least one application be running in addition to the Finder. Put another way, when the Finder is the only app running, these three commands are grayed out and unavailable.
You can achieve much the same effect as all this hide-and-show jazz with Mission Control, which I discuss in Chapter 7.
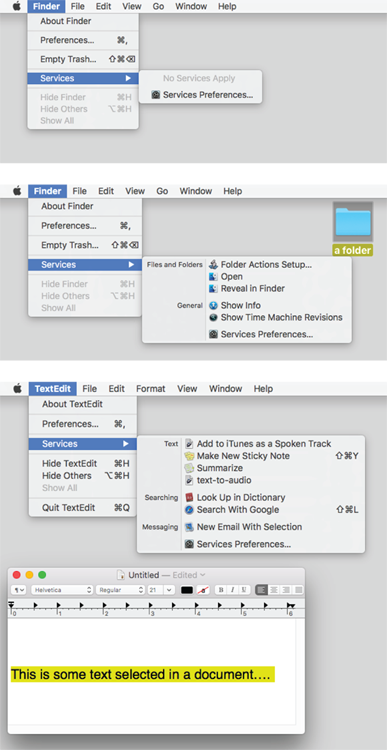
Figure 4-14: Services available with nothing selected (top), an icon selected (middle), and some text selected (bottom).
Finally, if you noticed that the Finder menu’s Empty Trash command isn’t mentioned here, that’s because it gets detailed coverage in Chapter 6.
Like a road map: The current folder’s pop-up menu
In the center of the window’s title bar is the name of the folder that you’re viewing in this window: the highlighted folder. You know that already. What you might not know is that it offers a hidden road map to this folder from the top level. The following steps explain how it works:
-
-click or Control-click the folder’s name in the title bar.
A pop-up menu appears, with the current folder (Desktop in Figure 4-15) at the top.
-
Select any folder in the menu, and it becomes the highlighted folder in the current window. Release the mouse button, and that folder’s contents are displayed.
As shown in Figure 4-15, the contents of the Desktop folder — seven files — are displayed in the window. If I release the mouse button, the contents of the highlighted folder (ElCapitan) will appear, replacing the contents of the Desktop folder.
-
After jumping to a new folder, you can click the Back button.
Hey, you’re right back where you were before you touched that pop-up menu!
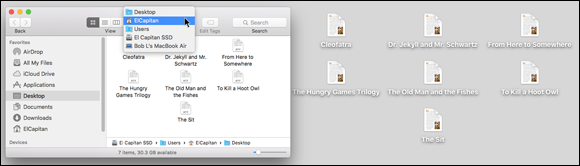
Figure 4-15: Traverse folders from this convenient pop-up menu.
Don’t forget that you can display the path bar near the bottom of the window (it’s showing in Figures 4-12, 4-13, and 4-15) by choosing View ⇒ Show Path Bar. Then you can double-click any folder displayed in the path bar to open it.
Last but not least, this trick doesn’t just work on Finder windows. It also works with the title bar of most document windows (Word, Photoshop, and so on), showing you the path to the folder containing the document you’re working on.
Going places with the Go menu
The Go menu is chock-full of shortcuts. The items on this menu take you to places on your Mac — many of the same places you can go with the Finder window toolbar — and a few other places.
The following list gives you a brief look at the items on the Go menu:
- Back (+[ ): Use this menu option to return to the last Finder window that you had open. It’s equivalent to the Back button on the Finder toolbar, in case you have the toolbar hidden.
- Forward (+] ): This command is the opposite of using the Back command, moving you forward through every folder you open. Remember that if you haven’t gone back, you can’t go forward.
- Enclosing Folder (+↑ ): This command tells the Finder window to display the folder where the currently selected item is located.
-
All My Files (Shift+
+F ): This command shows you all your document files at once. This is a good time to use the Arrange pop-up menu to sort these files into some semblance of order. - Documents (Shift++O): You’ll probably use this command often because the Documents folder is a great place to save documents you create.
- Desktop (Shift++D): Use this command to display the Desktop folder, which contains the same icons as the Desktop you see behind open windows.
- Downloads (Option++L): This opens your Downloads folder, which is where files you download in Safari, save as attachments in Mail, or receive via AirDrop (explained shortly) are saved by default.
- Home (Shift++H ): Use this command to have the Finder window display your Home folder (which is named with your short name).
- Computer (Shift++C ): This command tells the Finder window to display the Computer level, showing your Network and all your disks.
-
AirDrop (Shift+
+R): AirDrop lets you share files wirelessly with anyone around you. No setup or special settings are required. Just click the AirDrop icon in the Finder Sidebar, use this menu item, or use the keyboard shortcut, and your Mac automatically discovers other people nearby who are using AirDrop. Bear in mind that not all Macs capable of running El Capitan support AirDrop. Note: If your Mac is 2009 vintage (or older), AirDrop might not work.AirDrop now works between Macs and late-model iDevices running iOS 8. Which late model devices, you ask? AirDrop in El Capitan supports file sharing with the iPhone 5 and later, fourth-gen and later iPads, all iPad Minis, and fifth-gen and later iPod Touches.
- Network (Shift++K): This command displays whatever is accessible on your network in the Finder window.
 iCloud Drive (Shift++I): This command is new in El Capitan; it opens a window that displays the contents of your iCloud Drive (which you’ll hear more about in Chapter 6).
- Applications (Shift++A): This command displays your Applications folder, the usual storehouse for all the programs that came with your Mac (and the most likely place to find the programs you install).
- Utilities (Shift++U): This command gets you to the Utilities folder inside the Applications folder in one fell swoop. The Utilities folder is the repository of such useful items as Disk Utility (which lets you erase, format, verify, and repair disks) and Disk Copy (which you use to create and mount disk-image files). You find out more about these useful tools in Chapter 20.
- Recent Folders: Use this submenu to quickly go back to a folder that you recently visited. Every time you open a folder, OS X creates an alias to it and stores it in the Recent Folders folder. You can open any of these aliases from the Recent Folders command on the Go menu.
-
Go to Folder (Shift+
+G): This command summons the Go to the Folder dialog, shown in Figure 4-16. Look at your Desktop. Maybe it’s cluttered with lots of windows, or maybe it’s completely empty. Either way, suppose you’re several clicks away from a folder that you want to open. If you know the path from your hard drive to that folder, you can type the path to the folder in the Go to the Folder text box — separating folder names with forward slashes (/) — and then click Go to move (relatively) quickly to the folder you need. The first character you type must also be a forward slash, as shown in Figure 4-16, unless you’re going to a subfolder of the current window (Desktop in Figure 4-16). This particular dialog is a tad clairvoyant in that it tries to guess which folder you mean by the first letter or two that you type. For example, in Figure 4-16, I typed the letter A and paused, and the window guessed that I wanted Applications. Then I pressed the right-arrow key to accept the guess and typed /U, and the window guessed the rest (tilities) and filled it in for me. - Connect to Server (+K): If your Mac is connected to a network or to the Internet, use this command to reach those remote resources.
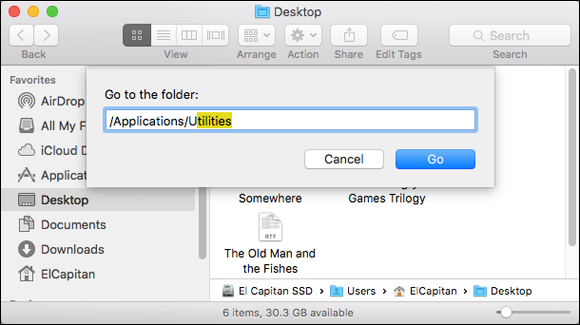
Figure 4-16: Go to a folder by typing its path.
One last thing: If you’re looking for the Library folder inside your Home folder, which used to appear in the Go menu (before OS X 10.7 Lion), it’s now hidden for your protection (as I explain in Chapter 6). To reveal it, hold down the Option key and open the Go menu.
Customizing Finder Windows
The Finder is outrageously handy. It not only gives you convenient access to multiple windows, but also offers ways to tweak what you see until you get what works best for you. So whereas earlier sections in this chapter explain what the Finder is and how it works, the following sections ask, “How would you like it to be?”
Adding folders to the Sidebar
Adding whatever folder you like to the Sidebar is easy. All you need to do is select the item you want to add and choose File ⇒ Add to Sidebar from the menu bar (or press ![]() +Control+T ). You can now reach the item by clicking it in any Finder window’s Sidebar. And you can move files or folders into that folder by dragging them onto the Sidebar icon for the item.
+Control+T ). You can now reach the item by clicking it in any Finder window’s Sidebar. And you can move files or folders into that folder by dragging them onto the Sidebar icon for the item.
You can also add folders (but not files) to the Sidebar by dragging them onto the Sidebar.
Be careful not to drag it onto another folder or it will be moved into that folder instead of being added to the Sidebar. You’ll see a little line above or below existing folders in the Sidebar; that shows you where this folder will appear if you release the mouse button. If a folder in the Sidebar is highlighted and you don’t see the little line, releasing the mouse button will not add the folder to the Sidebar, but will move it into the highlighted folder.
To remove an item from the Sidebar, right- or Control-click the item and choose Remove from Sidebar.
Setting Finder preferences
You can find Finder and Desktop preferences by choosing Finder ⇒ Preferences. In the Finder Preferences window that appears, click the icons in the toolbar to select one of the four Finder preference panes: General, Tags, Sidebar, and Advanced, all of which are shown in Figure 4-17.

Figure 4-17: Set Finder preferences here.
General pane
In the General pane, you find the following options:
- Show These Items on the Desktop check boxes: Select or deselect these check boxes to choose whether icons for hard drives; external disks; CDs, DVDs, and iPods; and connected servers appear on the Desktop. OS X El Capitan deselects all four options by default. If you don’t want disk icons cluttering your beautiful Desktop, deselect (clear) these check boxes as shown in Figure 4-17. When they’re deselected, you can still work with hard drives, CDs, DVDs, and other types of disks. You just have to open a Finder window and select the disk or disc you want in the Sidebar.
- New Finder Windows Show: Here, you can choose whether opening a new Finder window displays All My Files, your Home folder (which is my preference), the Documents or Desktop folders, or any other disk or folder. (All My Files is the default.)
-
Open Folders in Tabs Instead of New Windows check box: Selecting this check box spawns a new tab in the current window when you press
and double-click a folder or disk. Don’t enable it, and +double-clicking a folder or disk icon opens it in a new window.The default behavior is for folders to open in place when you double-click (open) them, which prevents window clutter. If you want a new window or tab instead, press
before you double-click. This forces the folder to open in a new window or tab (depending on whether the box is checked or not). Between this feature and Column view, I rarely need more than two windows onscreen, and I get by most of the time with a single window with multiple tabs.
Tags pane
Prior to OS X 10.9 Mavericks, the Finder featured colored Labels; Mavericks took Labels to a new level, replacing them with the more powerful and versatile Tags.
Labels weren’t particularly useful; you could assign only one label to a file or folder and they weren’t integrated with Opening and Saving files at all. In a nutshell, Tags do everything Labels did and much, much more.
The Tags pane is where you manage your tags, which appear in the Finder’s File menu, the right- or Control-click shortcut menu, the Sidebar, and the toolbar. You can see a file or folder’s tags in Finder windows, Get Info windows and inspectors, and applications’ Open and Save dialogs and sheets, and you can use them as criteria for searches and Smart Folders.
A sheet is nothing more than a dialog that’s attached to a document window’s title bar and can’t be moved. Some apps use sheets, other apps use dialogs, but either way you’ll see the same options.
- To rename a Tag, click its name and type a new one.
- To change a Tag’s color, click the colored circle to the left of its name and choose a different color.
- Check the boxes for Tags you want to appear in the Sidebar and toolbar, as shown in Figure 4-18. (These are the selections made in the Finder Preference pane on the left in Figure 4-18.)
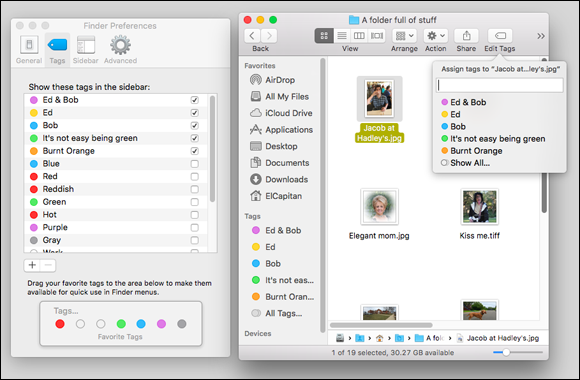
Figure 4-18: Selecting the check boxes for these five Tags displays then in the Sidebar and the toolbar’s Tags button.
To see your unchecked Tags in the Sidebar or toolbar, click All Tags in (Sidebar) or Show All (toolbar).
Now, here’s how to use ’em. To assign Tags to icons, select the icon(s) and then follow these steps:
- Choose File ⇒ Tags and click one or more of the colored dots in the Tags section.
- Right- or Control-click and click one or more of the colored dots in the Tags section of the shortcut menu.
- Click the Tags button on the toolbar and click one or more of the Tags.
Here are a few more handy tricks with Tags:
- To create a custom Tag on the fly: Right- or Control-click an item, choose Tags, type a label for the new tag, and then press Return.
- To untag an item: Right- or Control-click the item, choose Tags, select the tag you want to remove, and then press Delete.
- To remove every instance of a Tag from every file and folder on your disk: Right- or Control-click the Tag in the Tags pane of Finder Preferences, and then choose Delete Tag. Don’t worry. Deleting a Tag won’t delete the items; it just removes that Tag from every item.
Click the Tags in your Sidebar to see every file on all connected hard disks with that tag.
Sidebar pane
The Sidebar pane lets you choose which items are displayed in the Sidebar. Select the check box to display the item; deselect the check box to not display it.
Advanced pane
The Advanced pane is just big enough to offer the following check boxes and a pop-up menu:
- Show All Filename Extensions check box: Tells the Finder to display the little two-, three-, four-, or more character filename suffixes (such as .doc in summary.doc) that make your Mac’s file lists look more like those of a Linux (or Windows) user. The Finder hides those from you by default, but if you want to be able to see them in the Finder when you open or save files, you need to turn on this option.
- Show Warning Before Changing an Extension check box (on by default): Allows you to turn off the nagging dialog that appears if you attempt to change the two-, three-, four-, or more character file extension.
- Show Warning Before Emptying the Trash check box (on by default): Allows you to turn off the nagging dialog telling you how many items are in the Trash and asking whether you really want to delete them.
- When Performing a Search pop-up menu: Lets you choose the default search location when you initiate a search as described earlier in this chapter. Your choices are Search This Mac, Search the Current Folder, and Use the Previous Search Scope.
Digging for Icon Data in the Info Window
Every icon has an Info window that gives you — big surprise! — information about that icon and enables you to choose which other users (if any) you want to have the privilege of using this icon. (I discuss sharing files and privileges in detail in Chapter 12.) The Info window is also where you can lock an icon so that it can’t be renamed or dragged to the Trash.
To see an icon’s Info window, click the icon and choose File ⇒ Get Info (or press ![]() +I ). The Info window for that icon appears. Figure 4-19 shows the Info window for an image (a .tiff file named Kiss me).
+I ). The Info window for that icon appears. Figure 4-19 shows the Info window for an image (a .tiff file named Kiss me).
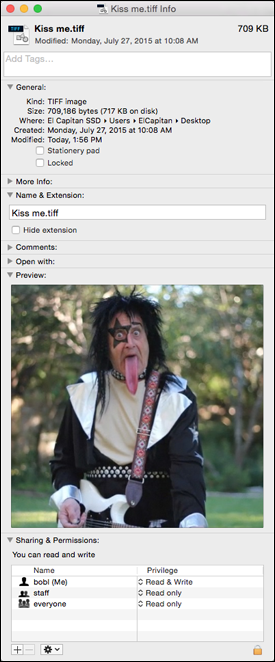
Figure 4-19: A typical Info window for an image (a .tiff file named Kiss me).
Documents, folders, and disks each have slightly different Info windows. In this section, I give you highlights on the type of information and options that you can find.
The gray triangles reveal what information for an icon is available in this particular Info window. The sections that you see for most icons include the following:
- Add Tags: Click in this field to add Tags to this item.
-
General: For information of the general kind, such as
- Kind: What kind of file this is — an application, document, disk, folder, and so on
- Size: How much hard drive space this file uses
- Where: The path to the folder that contains this file
- Created: The date and time this file was created
- Modified: The date and time this file was last modified (that is, saved)
Six other check boxes may or may not appear in the General section of a particular Info window. Here’s the scoop on this quintet of optional options:
- Version: Copyright information and the file’s version number
-
Open in 32-bit Mode (check box): Most late-model Macs can take advantage of El Capitan’s high-performance 64-bit processing mode. Some applications are designed to take advantage of El Capitan’s faster 64-bit processing mode, but sometimes programs that should run in 64-bit mode don’t run properly. If an application doesn’t work properly — it often quits unexpectedly, freezes, or refuses to launch at all — try selecting this check box. It couldn’t hurt.
This option is available only for applications designed to run in both modes; if you don’t see this check box, the program you’re using can run in only one mode. - Shared Folder (check box): Designates the folder as Shared, so other users are allowed to see and use its contents. You find out all about sharing in Chapter 12.
- Stationery Pad (check box): This one appears only in the Info window of document icons. If you select it, the file becomes a template. When you open a Stationery Pad document, a copy of its contents appears in a new Untitled document that you would typically save with a descriptive name.
-
Locked (check box): If this box is checked, you receive a warning if you try to put the item in the Trash: This Item Is Locked. Do You Want to Move It to the Trash Anyway? Your options are Stop and Continue. If you continue, the item goes into the Trash as usual. Then, when you try to empty the Trash, you receive another warning: There Are Some Locked Items in the Trash. Do You Want to Remove All the Items, Including the Locked Ones, or Just the Unlocked Ones? Your choices this time are Cancel, Remove Unlocked Items, and Remove All Items. If you choose to Remove All Items, the locked item(s) is/are deleted. If you choose Remove Unlocked Items, the locked item(s) remain(s) in the Trash, and you receive the There Are Some Locked Items warning again the next time you try to empty it.
To remove the locked item from the Trash, click the Trash icon in the Dock and drag the locked item out of the Trash and into a folder or onto the Desktop.
-
Prevent App Nap (check box): OS X can tell when an app is completely hidden behind other windows. If an app isn’t currently doing something — playing music, downloading files, or checking your email, for example — App Nap conserves valuable battery life on laptops by slowing the app down. As soon as you activate the app again, it shifts back to full speed instantly.
While App Nap can reduce CPU energy use by up to 23 percent, it may interfere with some programs’ operation. If it does, try enabling this check box.
- More Info: When the file was created, modified, and last opened (documents only).
- Name & Extension: Tells the full name, including the (possibly hidden) extension.
-
Comments: Provides a field in which you can type your own comments about this icon for Spotlight to use in its searches.
I talk about searching a little earlier in this chapter and discuss Spotlight searches in greater detail in Chapter 7.
- Preview: When you select a document icon, the menu offers a Preview option that you use to see a glimpse of what’s in that document. You can also see this preview when you select a document icon in Column view; it magically appears in the rightmost column. If you select a QuickTime movie or sound, you can play your selection right there in the preview pane without launching a separate application. And when you select most pictures, you see a preview of the actual picture (Elvis in Figure 4-19).
- Sharing & Permissions: Governs which users have access to this icon and how much access they are allowed. (See Chapter 12 for more about access privileges.)
If you press the Option key before you pull down the Finder’s File menu, the Get Info command changes to Show Inspector (alternatively, press ![]() +Option+I). The Get Info Inspector window looks and acts almost exactly like Get Info windows with two whopping exceptions:
+Option+I). The Get Info Inspector window looks and acts almost exactly like Get Info windows with two whopping exceptions:
- The Inspector displays info only for the currently selected icon. If you click a different icon, the Inspector instantly displays the info for the icon you clicked. That means you can Get Info on lots of icons in a row using the arrow keys or by pressing Tab or Shift+Tab. Try it — it’s cool.
- It displays cumulative info if multiple icons are selected. In other words, if more than one icon is selected, the Inspector displays the total size for all the selected files and/or folders.
And that’s about it for icons, which are among the most fundamental parts of what makes your Mac a Mac (and not a toaster or an Xbox).