Chapter 29
Working with Contacts
IN THIS CHAPTER
Learning about the Contacts window
Customizing the Contacts view
Finding contacts
Adding contacts to the Address Book
Working with distribution lists
Understanding the Contacts form
Using your contacts
Editing Business Cards
Sending contact information by e-mail
Working with multiple address books
Setting Contact options
Outlook’s Contacts feature is much more than a simple address book. It provides you with powerful tools not only to store but also to find and use information about your business and personal contacts.
Understanding Outlook Contacts (People)
Outlook’s Contacts feature is one of its most powerful features. At heart, the Contacts feature is just an address book, but what an address book! Of course, it covers the basics of organizing names, addresses, and phone numbers, but it can do so much more. Many people use Contacts primarily as a way to store people’s e-mail addresses for ease of sending e-mails. This is important, but if that’s all you use Contacts for, you are really missing out. For example, you should know that you can use Outlook Contacts to:
- Create electronic business cards so that you can send your or other people’s contact information by e-mail.
- Store multiple phone numbers, e-mail addresses, and postal addresses for an individual.
- Perform an automated mail merge, creating a mailing to some or all of your contacts.
- Store a photograph as part of a contact’s information.
- Define custom fields to store whatever information you need as part of a contact.
- Communicate via Lync or Skype.
- View a map of the location of a contact’s address.
After you understand all the power of Outlook Contacts, you can use as many or as few of its features as you like.
The Contacts Window
When you click the People choice in the Navigation Bar at the bottom of Outlook and make sure that the Folder Pane is expanded at the left (click the Expand the Folder Pane arrow button at the top if it’s collapsed), the pane displays the available contact lists (Address Books), grouped under My Contacts. If you have more than one address book, they are all displayed here.
By default, Contacts appear in People view, as shown in Figure 29.1. Use the Change View button in the Current View group of the View tab on the Ribbon to select how information will be displayed in the Contacts window. You have five view choices:
- People
- Business Card
- Card
- Phone
- List
FIGURE 29.1 The new default People view is one of several different ways to view contacts.
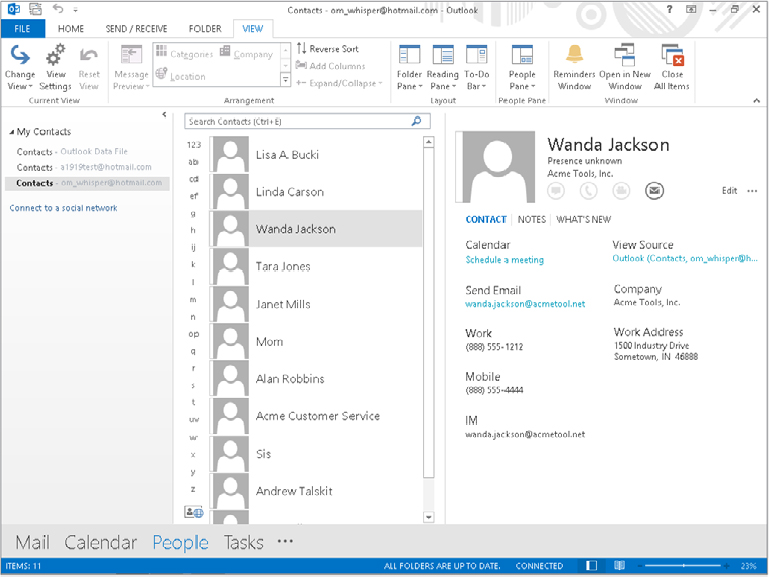
Simply click on the view that you want, and the Contacts window changes immediately.
You can create groups to further organize your contacts or customize the view. The next sections look at these.
Adding a new contact group
By default, an Address Book is not subdivided. As the number of contacts grows, you may find it useful to define groups to organize contacts in a way that makes them easier to find and use.
Note that Contacts groups are different from the folder groups introduced in Chapter 27. A folder group enables you to store a completely separate list of contacts. You create the folder group and drag contacts from the list into the group.
You create a Contact group, in contrast, so that you can easily send a message to the list of recipients defined in the group. You might have Family and Work Team groups, for example. You could then choose the Family group to send an e-mail to all your family members, and use the Work Team group to e-mail messages to your team members at work.
To define a group, follow these steps:
FIGURE 29.2 Adding contacts to a new group
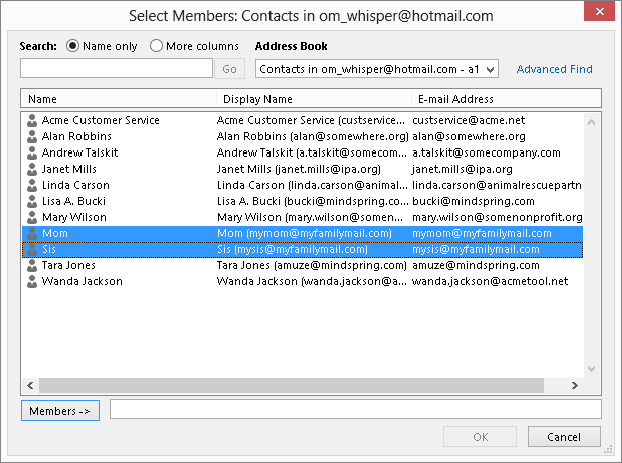
FIGURE 29.3 The list of contacts now includes a group called Family.
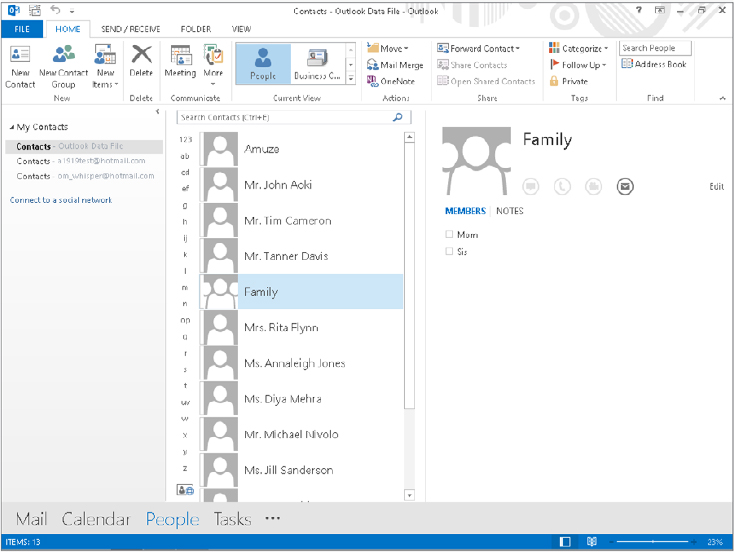
The contacts you add to the group continue to appear in the overall list of contacts, as before.
After you have created one or more additional groups, you can simply double-click on a group to reopen it to change its name or add and remove group members.
Customizing a contacts view
The different views that Outlook provides for contacts can be customized to suit your needs. You cannot, however, create a new view from scratch. To customize a view:
FIGURE 29.4 Customizing a List view
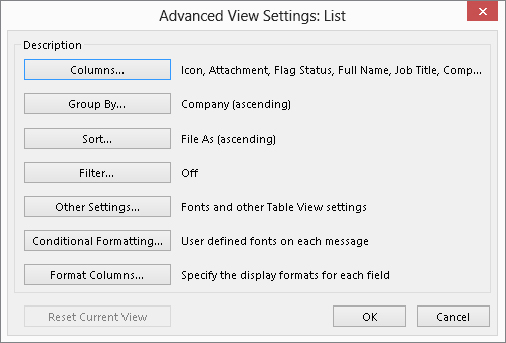
Depending on the view you are customizing, you may have only some of the buttons in the Advanced View Settings dialog box available because certain aspects of a view are not relevant to some views. The aspects of the view that you change with the different buttons are described in Table 29.1.
TABLE 29.1 Components of Customizing a Contacts View
| Button | Action |
| Columns | Specify which fields (items of information) are included in the view. |
| Group By | Define grouping for the displayed contacts based on one or more fields. For example, you can group contacts by company or state. |
| Sort | Define how contacts are sorted. You can sort by last name, for example. |
| Filter | Display only those contacts that meet your defined criteria. |
| Other Settings | Specify fonts, grid lines, and other details of the Contact View layout. |
| Conditional Formatting | Define special formatting for contacts that meet certain conditions, such as for a contact associated with an overdue task or one that has been flagged. |
| Format Columns | Define formatting for columns in the view. |
Finding contacts
As your Contacts list grows, you may find it helpful to search for contacts rather than simply look through the list hoping to find what you are looking for. At the top of the contacts list (the middle pane in People view) is a Search Contacts text box in which you type the text that you are looking for. Outlook automatically filters the contacts to show only those that match what you have entered. An example is shown in Figure 29.5. If no matches occur, a message to that effect is displayed.
FIGURE 29.5 Searching for contacts

After conducting a search, click the X next to the Search box to clear the search and return to displaying all contacts.
The search just described searches all the contact fields for the text you entered. If you want to search in specific fields, you can perform an Advanced Search by clicking in the Search Contacts text box, clicking the Search Tools button in the Options group of the Search Tools ⇒ Search tab that appears, and then clicking Advanced Find. Outlook displays the Advanced Find window, as shown in Figure 29.6.
FIGURE 29.6 Performing an Advanced Search in Contacts
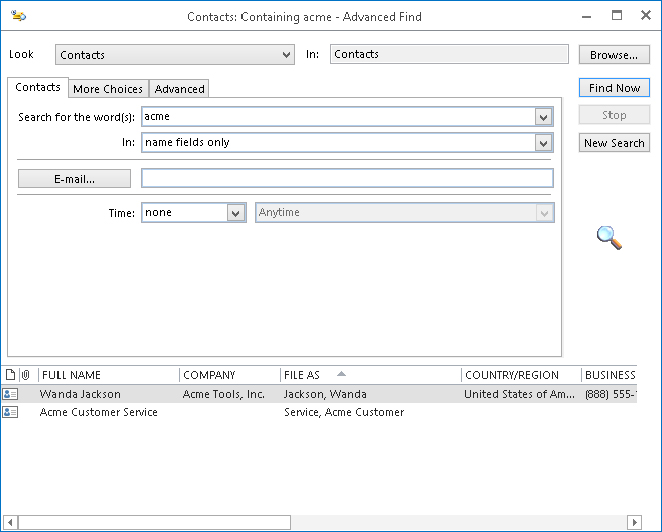
Following are ways to use these tools.
- On the Contacts tab, type the text to search for in the Search for the word(s) text box, and then use the In drop-down list to select the field to search.
- Click the More Choices tab to add additional criteria, such as selecting a category to search by.
- To include more fields in the search, click the Advanced tab and use the Field and Add to List buttons to select the desired fields.
- Click Find Now to perform the search. The search results appear at the bottom of the window. Close the window when you finish with the search.
Click Search Tools ⇒ Search ⇒ Close ⇒ Close Search when you finish working with the search feature.
Adding Contacts
Outlook provides you with several ways to add information to the Contacts list.
Adding a contact manually
To add a new contact to the list currently selected in the Folder Pane in Contacts, click the New Contact button in the New group of the Ribbon.
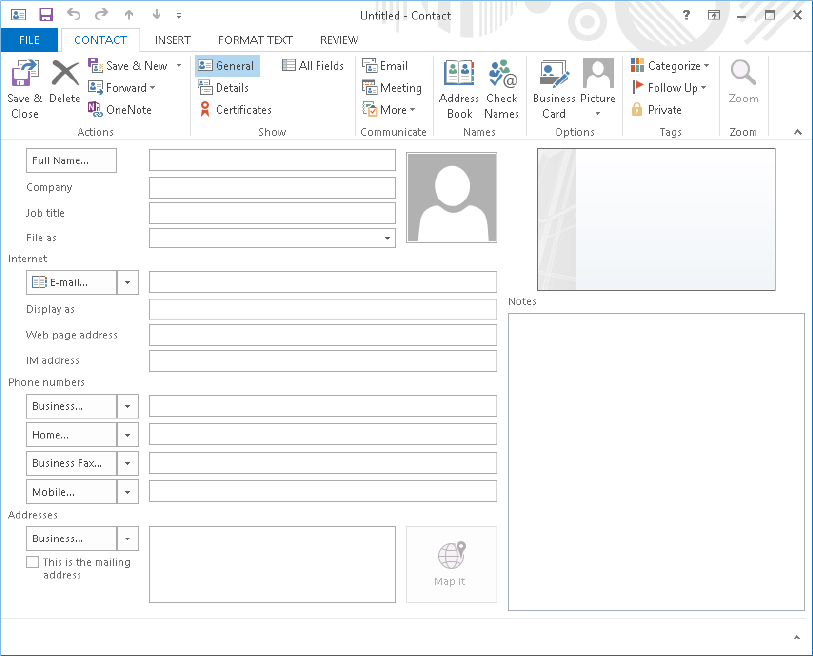
Outlook displays a new, blank contact window, as shown in Figure 29.7. Type in the information — only a name is required, and you can use or not use the other fields as you desire — and then click Save & Close in the Actions group on the Contact tab on the Ribbon. If you want to save this contact and enter another, click Save & New. Most of the fields on the contact form are self-explanatory, but I provide full details about the form later in this chapter.
FIGURE 29.7 A blank Contact window
Adding a contact from a received e-mail
When you have opened a received e-mail (with Mail selected in the Navigation Bar), the From field displays the name or the e-mail address (or both) of the sender in the Reading Pane. It also displays any other recipients — other than you, that is — in the To and Cc fields. You can add the From person or any of the other To or Cc people to your Contacts list by right-clicking on them and choosing Add to Outlook Contacts from the shortcut menu. Outlook opens a new Contact window with the available information filled in. This information includes only the person’s e-mail address and perhaps name. You can add additional information to the Contact form, if desired, and then click Save.
By default, the new contact is saved to your Outlook Data File contacts. You can move the contact to another list by clicking it in the center contacts list, and then clicking Move in the Actions group of the Home tab. Click Other Folder to open the Move Items dialog box that you saw in Chapter 27. Select the contacts folder under another e-mail account, and then click OK to finish moving the contact.
Adding a contact from an Outlook contact
The heading of this section may seem confusing, but it makes more sense when you understand that an Outlook user can send a contact as an attachment to an e-mail message. The technique for doing this is covered later in this chapter, in the section, “Sending contact information by e-mail.”
If you receive a contact in an e-mail message (click Mail on the Navigation Bar to see messages), it appears as an attachment identified by a small Business Card icon and the contact’s name, as shown in Figure 29.8. If you double-click on the attachment, Outlook opens a new Contact window with the contact’s information entered. You can edit the information if needed and then save it to your list of contacts.
FIGURE 29.8 When you receive an Outlook contact attached to an e-mail message, it is identified by a small Business Card icon.
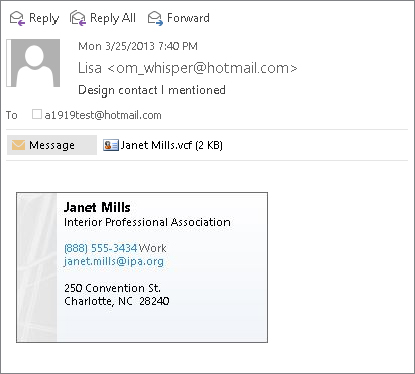
A vCard file is a special file format designed to send contact information. Outlook can read vCard files that you may receive from people using other e-mail software.
Adding contacts from your social network
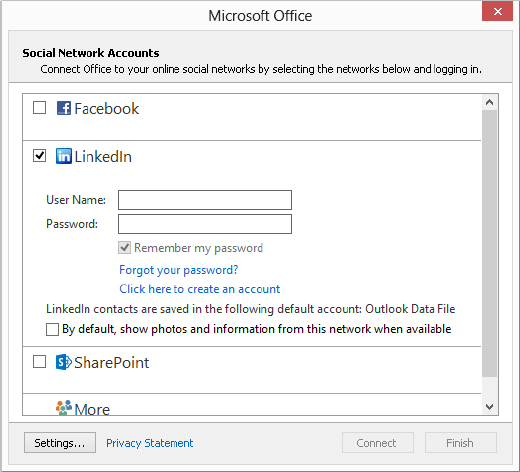
Outlook 2013 can connect directly to your Facebook and LinkedIn accounts so you can add the contacts you’ve made in those services to your Outlook contacts. To start the process, click People in the Navigation Bar, open the Folder Pane if needed, and click Connect to a social network in the pane. In the Connect Office to your social networks window that opens, click Next. In the next window that prompts you for Social Network Accounts information, click the check box beside any network you want to connect with, as shown in Figure 29.9. Enter your sign on information, click Connect, and then click Finish and Close.
FIGURE 29.9 Select a social network, and then enter your sign-on information.
Once you’ve added your social contacts, the Folder Pane includes a folder for the social network, such as LinkedIn, in the My Contacts group. Click the folder to see your social network contacts and work with them as for any other contacts. If some of your social network contacts are also in one of your other Outlook contacts lists, their social network information will show up in the Outlook contact information as well.
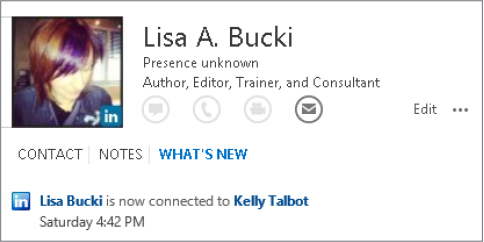
How you see some of the social contact information depends on if you’re working in People view or one of the other views. In People view, if you click a contact in the center contacts list to display the contact in the Reading Pane, you can click What’s New under the contact name in the Reading Pane to see updates for the contact. Figure 29.10 shows an example.
FIGURE 29.10 View social information and updates for a contact.
In the other views, if you double-click a contact, it opens in a full blown Contact window rather than a People Pane. To see the social network updates for the contact, click the up arrow Click to expand the People Pane button in the lower-right corner of the window, then use the tabs that appear at the left side of the pane to see information and social network updates about the contact.
To disconnect from the social network in any view, click the View tab, click People Pane in the People Pane group, and click Account Settings in the menu. Click the X (delete) icon to the far right of the social network you want to disconnect from, click Yes to confirm the deletion, and then click Finish.
Sending an E-mail to a Contact or Group
Part of the point of developing the list of contacts and creating groups is to make it even easier to make sure you’re addressing e-mail to the correct person(s). To create an e-mail message from Contacts:
FIGURE 29.11 A group in the To field of an e-mail message
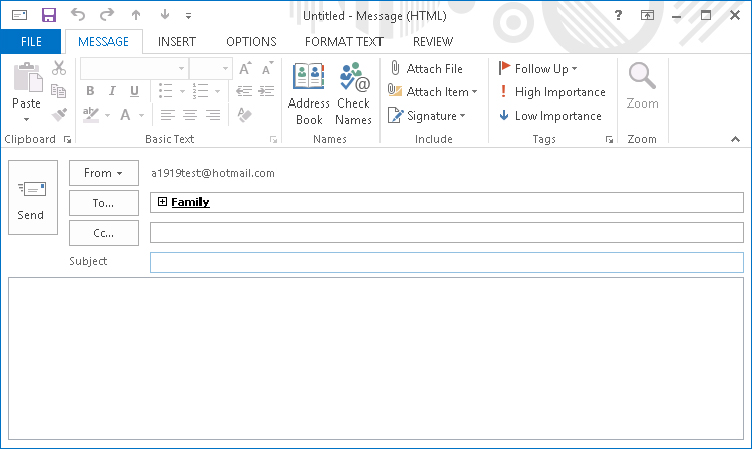
When you address an e-mail message to a group, the group name is displayed in the To or Cc field of the message with an adjacent + sign, as shown in Figure 29.11. If you click this + sign, the list is expanded to display its individual members just as though you had added them individually to the To or Cc field. This feature can be useful if you want to send a message to everyone on the list except one or two people; you can expand the Distribution list and delete those few individuals from the To or Cc field of the message.
More about Contacts
Outlook Contacts function as much more than as the contents of a simple address book. This section covers additional details and capabilities of Outlook Contacts.
The Contact window
The Contact window (refer to Figure 29.7) that appears when you create a contact or that you can reopen at any time by double-clicking on the contact (except in People view) provides places for you to enter many different kinds of information about a contact. The only field that is required is the name; you can use all, some, or none of the other fields, as you like. Some of the elements on the Contacts window may deserve an explanation, as provided in the following sections.
Full Name
You can simply enter a contact’s name in the Full Name field in the usual way, for example, John Q. Public. You can also click the adjacent Full Name button to bring up the Check Full Name dialog box, shown in Figure 29.12. Here you can specify a title such as Dr. or Mrs. and a suffix such as Jr. or Sr.
FIGURE 29.12 The Check Full Name dialog box lets you enter more details for a contact’s name.
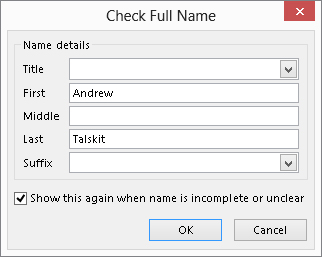
Note the option in this dialog box: Show this again when name is incomplete or unclear. When this option is on (the default), Outlook opens this dialog box automatically when you enter an incomplete name such as Fred in the Full Name field.
The File As field determines how a contact will be filed in the Address Book. The default is last name first (“Public, John Q.”), but you can also choose to file a contact first name first.
Phone Numbers
The Phone Numbers section of the Contacts window provides spaces for four numbers. By default, these are labeled as Business, Home, Business Fax, and Mobile, but you can change which numbers are displayed in a particular Phone Number text box by clicking the adjacent down-arrow and selecting from the list. Some of the choices available are Home Fax, Pager, and Assistant. Outlook can save a phone number for each designation, but only four numbers are displayed on the Contacts window at one time. When you open the list of designations, those for which you have entered a phone number are checked.
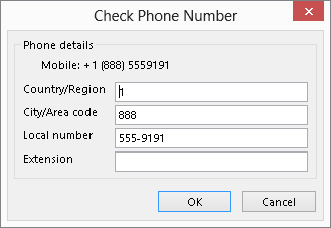
Next to each Phone Number field is a button with the field’s designation on it. If you click on one of these buttons, Outlook opens the Check Phone Number dialog box, shown in Figure 29.13. Here you can enter additional details for the phone number if desired.
FIGURE 29.13 The Check Phone Number dialog box lets you enter more details for a contact’s phone number.
Addresses
The Addresses section of the Contacts window can store up to three addresses designated as Home, Business, and Other. Select the one to display by clicking the down-arrow adjacent to the Address box. Click the adjacent button to open the Check Address dialog box (Figure 29.14), in which you can enter or edit address details. By default, Outlook displays this dialog box automatically if you enter an address that appears to be incomplete or unclear.
FIGURE 29.14 The Check Address dialog box lets you enter more details for a contact’s address.

One of the addresses for a contact can be designated as the mailing address by selecting the corresponding option. Outlook uses this address when you are doing a mail merge using Outlook contact data. Mail merge is discussed later in this chapter.
Picture
You can associate a picture with a contact by clicking the Picture button in the Options group of the Contact tab in the Contacts window and then clicking Add Picture. Outlook displays a dialog box that lets you browse for the picture file. The picture file can be the person’s picture, a company logo, or just a unique image that you want to use to identify the person. When you have associated a picture with a contact, it displays on the picture button and on the contact’s Business Card, as shown in Figure 29.15. (If you are using a Windows phone, you will also see the photo when the contact calls you.) To remove or change the picture, right-click on it and choose from the shortcut menu.
FIGURE 29.15 You can associate a picture with a contact.

E-mail Addresses
Outlook can store as many as three e-mail addresses for a contact, designated as E-mail, E-mail 2, and E-mail 3. You select which one to display on the Contact window using the arrow adjacent to the E-mail button under Internet.
If you create an e-mail message to a contact by clicking the E-mail button on the Contact tab of the Ribbon in a Contact window, Outlook creates a message addressed to all the e-mail addresses for that contact. If you click the To button on an e-mail message, the list of contacts displays each e-mail address separately, and you can choose the one to use.
The Display As field determines how the contact is displayed in a message’s To or Cc field. By default, Outlook displays the contact’s name followed by the e-mail address in parentheses, but you can edit this to display as desired — for example, just the person’s name.
Other contact displays
The default display for an open contact, called General, has been shown in the figures throughout this chapter so far. This is the display that you will probably use most often. Several other displays, or views, are available; you select the display to view from the Show group on the Contact tab of the Ribbon in the Contact message window.
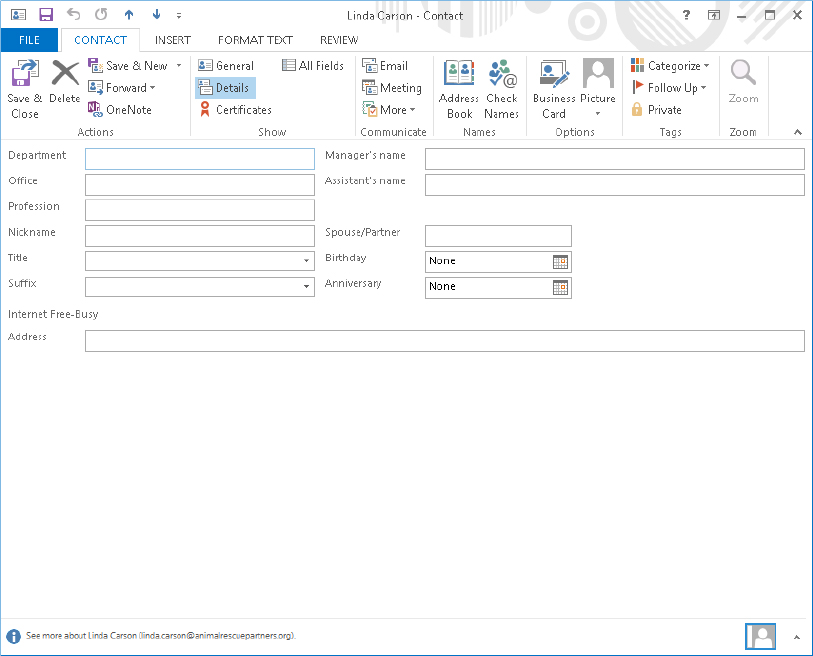
Details view
The Details view gives you access to secondary information about a contact. This view is shown in Figure 29.16. This information includes fields such as Department, Office, Nickname, and Spouse/Partner. You may never use this view, but it’s available if you need it.
FIGURE 29.16 The Details view for a contact
Activities view
When you use the Activities view in the Contact window, it displays all items pertaining to the contact, such as e-mails and tasks.
Certificates view
One of the security features available in Outlook is digital certificates. A contact can send you a certificate, and you can then use this certificate to send encrypted mail to that person. The Certificates display lets you view and work with the certificate(s) that you have for a contact. Digital certificates are covered in Chapter 28.
All Fields view
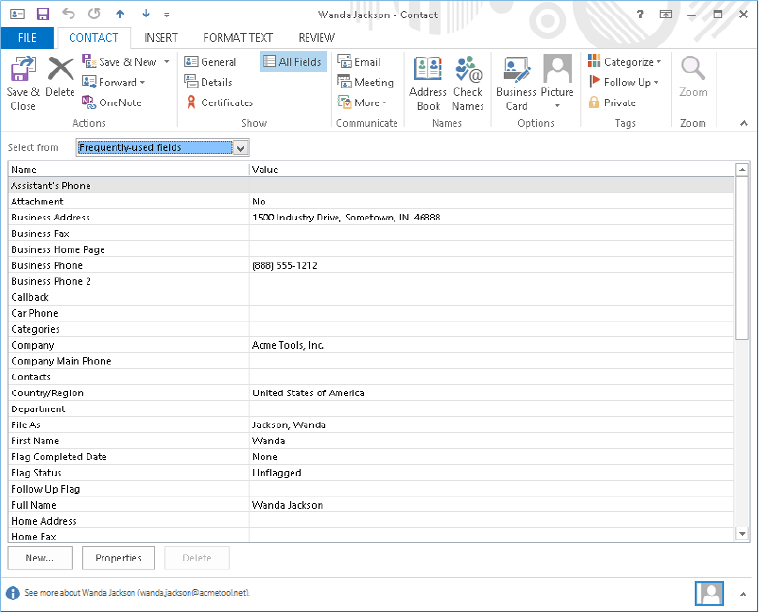
The All Fields view lets you view all or selected subsets of the data associated with a contact. The amount of information — number of fields — that an individual contact can hold is quite impressive and is way too much to display fully in any other contact view. The All Fields display also lets you define your own custom fields for a contact and to change the properties of some fields.
The All Fields display is shown in Figure 29.17. Near the top is the Select From list, in which you choose which fields to display in the window. You can display all fields as well as one of several defined subsets, such as All Contact Fields or All Mail Fields.
FIGURE 29.17 The All Fields view for a contact
Some fields can be edited in this view by clicking in the Value column and making the desired changes. Other fields are generated internally by Outlook and cannot be edited.
You can add a custom field to the contact by clicking the New button at the bottom of the window. Outlook displays the New Column dialog box (Figure 29.18), in which you enter a name for the field (which cannot duplicate an existing field name). You also select the data type for the field. Your choices are Text, Number, Percent, Currency, Yes/No, and Date/Time. For certain data types, you can also select a format from the Format list. When you are finished, click OK, and the custom field will be added to the All Fields display.
FIGURE 29.18 Defining a new field for a contact

You can change the properties of a field by clicking on it in the list and then clicking the Properties button. This is relevant only for user-defined fields; the properties of Outlook’s built-in fields are locked.
Editing the Business Card
Outlook creates a Business Card for each contact based on a default template. As you have seen in previous examples in the chapter, this template includes name, company, title, phone numbers, e-mail and postal addresses, and a photo (assuming that these elements are part of the contact).
To edit the Business Card for a contact, first double-click on the contact in a view other than People view to open its Contact window. Then, click the Business Card button in the Options group of the Contact tab on the Ribbon. Outlook opens the Edit Business Card dialog box, shown in Figure 29.19.
FIGURE 29.19 Editing the Business Card for an individual contact
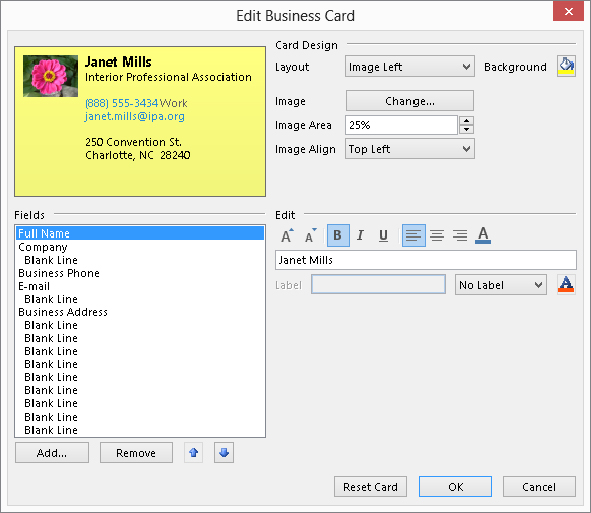
The top-left section of this dialog box previews how the Business Card will look with your edits. The top-right section defines the overall layout of the card:
- Layout: Specifies the image location. You can also omit the image or use it as the card background.
- Background: Lets you select a background color for the card.
- Image: Lets you specify a different image when you click the Change button.
- Image Area: Determines how much of the card is occupied by the image. The maximum is 50 percent.
- Image Align: Determines how the image is positioned within the image area.
The lower-left section of the Edit Business Card dialog box lets you specify the data fields that are included on the card and their order. You can do the following:
- Click Add and then select from the menu to add a field to the card.
- Click Remove to remove the selected field from the card.
- Click the up- or down-arrow to change the position of the selected field.
The lower-right section of this dialog box is for text formatting. When a field is selected in the Fields list, use the tools here to do the following:
- Increase or decrease font size.
- Make font bold, italic, or underlined.
- Align text left, center, or right.
- Change font color.
Oddly enough, you cannot change the font used on a Business Card; you can change only its size.
The Label section lets you add a label to any data field. You can specify the text of the label, its color, and whether it is displayed to the left or right of the item.
Click the Reset Card button to undo any edits you have made and return the card to the default appearance. Click OK to save your changes and close the dialog box.
Sending contact information by e-mail
Sending contact information attached to an e-mail message can be very useful. Doing so lets recipients enter the information in their address books quickly and without errors. If you keep an entry for yourself in your Address Book, you can easily send your own information as well. You saw in Chapter 27 how to send Business Cards from Mail in Outlook. You also can send a contact directly in an open Contact window.
When you have a contact open in a Contacts window, the Actions group of the Contact tab of the Ribbon includes a Forward button. You can use this button to create a new e-mail message and send the open contact in one of three ways by selecting the corresponding command:
- As a Business Card: Outlook creates a new message with the contact inserted in the message body as a Business Card and attached to the message as a vCard file.
- In Internet Format (vCard): Outlook creates a new message with the contact attached to the message as a vCard file.
- As an Outlook Contact: Outlook creates a new message with the contact attached to the message as an Outlook item. This sends the contact information in Outlook’s native format, so the recipient can open it and save it to his or her Contacts.
Contacts, and Lync and Skype
Outlook 2013 now integrates with VoIP (Voice over IP) calling capabilities, which means you can make calls over the Internet rather than a landline or mobile network. Outlook integrates with two separate services that support VoIP calling as well as instant messaging, and video calling: Skype and Lync 2013. For these features to work, you have to have the Skype and Lync 2013 client software installed; Skype is a separate download, while Lync is included with some Office versions, particularly Office 365 subscription versions of Office. To be able to work online with your Skype and Lync contacts via your Outlook contacts, you have to meet three basic conditions:
- The Skype or Lync software must be installed.
- The Outlook contact must also be one of your Skype or Lync contacts (or for Lync, within your organization’s Office 365-allowed federated calling setup).
- The Skype or Lync application must be running, and you must be signed in to your account.
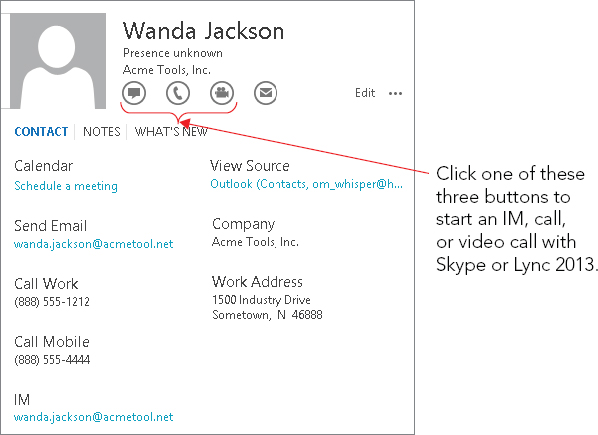
When all of the above are true, the buttons for initiating messaging, calls, and video calls are enabled in the Reading pane as shown in Figure 29.20. Click the button to start the desired activity, and then use the Skype or Lync window that appears to continue.
FIGURE 29.20 Messaging and calling features enabled for a contact
Other contact actions
This section describes some of the other actions you can perform with contacts.
Viewing a map of the contact’s address
If a contact has a valid address entered, you can click the Map It button to the right of the contact’s address in the Contact window to open a web browser and view a map of the specified location. This feature is powered by the Bing Maps feature, which provides other services such as driving directions and business search.
Inviting the contact to a meeting
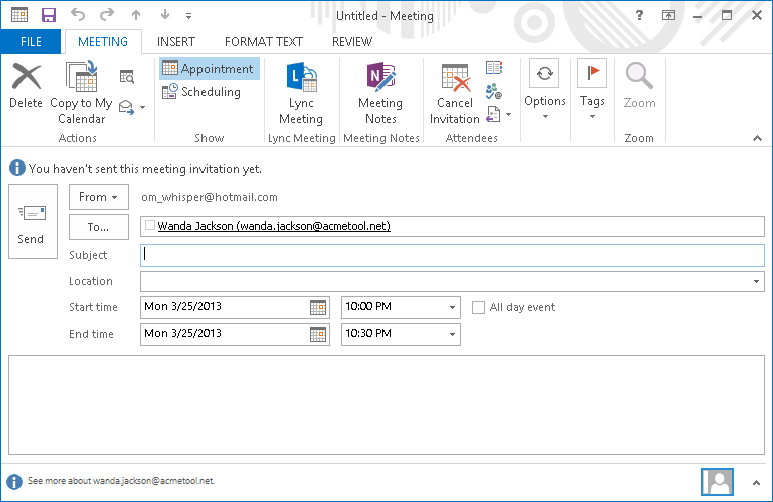
To invite the contact to a meeting, click the Meeting button in the Communicate group of the Contact tab on the Ribbon. Outlook creates a new meeting request addressed to the contact, as shown in Figure 29.21. You can specify the subject and location, enter the date and start and end times, and include a message. You can also add other recipients to the request. You can click Lync Meeting in the Lync Meeting group to set up the meeting via Lync.
FIGURE 29.21 Sending a meeting request to a contact
Assigning a task to a contact
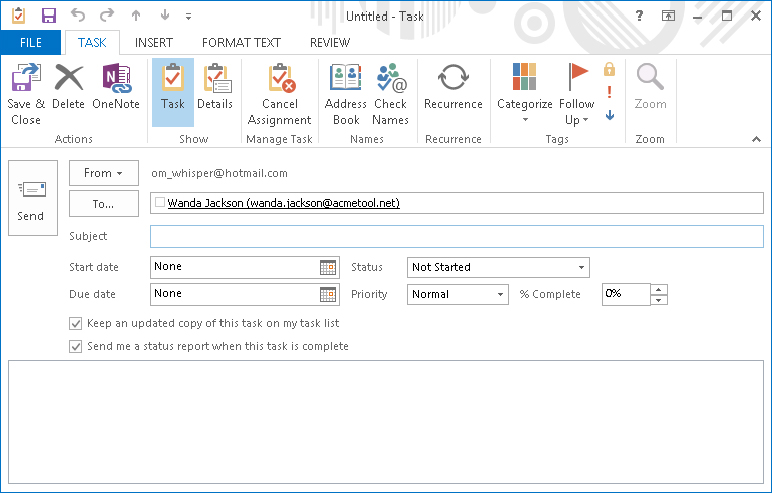
To assign a new task to a contact, click the More button in the Communicate group on the Contact tab in the Contact window, and then click Assign Task. Outlook opens a Task window, as shown in Figure 29.21, in which you can enter details of the task and save it. You learn more about tasks, including assigning an existing task to a contact, in Chapter 30.
Viewing the contact’s web page
If you have entered a web page URL for a contact, clicking the More button in the Communicate group of the Contact tab and then clicking Web Page launches your default web browser and displays the web page.
FIGURE 29.22 Assigning a task to a contact
Performing a Mail Merge from Your Contacts
Mail merge is a technique that lets a form letter be addressed and sent to many different individuals. It can also be used to create mailing labels, envelopes, and catalogs such as a mailing list. Microsoft Office has merge tools built into several of its applications, most notably Word and Outlook.
When would you use Outlook to perform a mail merge? Only when the names and addresses that you want to use are in your Outlook Address Book. In this situation, using Outlook is often the simplest approach. Even so, some factors may mitigate against using Outlook for a merge and instead using the more advanced mail merge tools available in other Office applications. For example, Outlook cannot separate documents by zip code to get reduced mailing rates, and it would not be a good choice for a large merge that will create thousands of documents.
The first step in performing a mail merge is usually to filter your contacts so that only the ones you want included are shown. You can do this by using Outlook’s search capability or by customizing the Contacts view, both of which are covered earlier in this chapter. However, you can skip this step and select the contacts to include later. Then, follow these steps:
FIGURE 29.23 Performing a mail merge with Outlook contacts
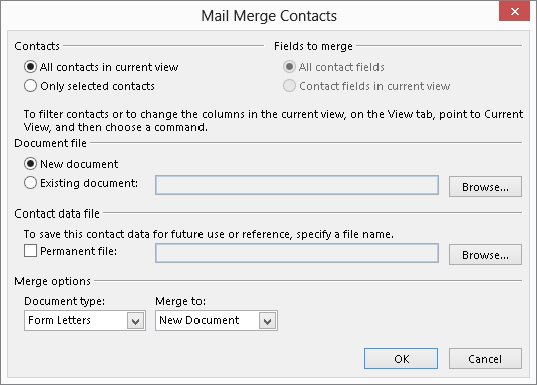
The options in the Mail Merge Contacts dialog box are as follows:
- Contacts. Select All Contacts in Current View to include all displayed contacts in the merge. Select Only Selected Contacts to select contacts to include later.
- Fields to merge: Specifies whether only visible contact fields or all contact fields will be available for the merge. These options may or may not be available depending on the current Contacts view.
- Document file: Specifies whether the merge will use a new or an existing Word document. If you choose the latter option, use the Browse button to locate the document to use.
- Contact data file: You can select this option to save the merge contact data in a separate Word document. Typically, this option is used to create a record of the people who were included in the mailing.
- Document type: You can merge to form letters, mailing labels, envelopes, or a catalog.
- Merge to: Specify whether the merge output goes to a Word document, to the printer, or to e-mail, as follows:
- New Document: Merge creates a Word document that you can edit as needed before creating the final output.
- Printer: The merged document is created and sent directly to the default printer.
- E-mail: The merged documents are created as e-mail messages and placed in your Outbox.
In most situations, the remainder of the merge process is carried out in Word. Please consult your Word documentation for more information.
Setting Contact Options
Outlook has some global options that affect the way contacts work. To view and change these options:
FIGURE 29.24 Setting global options for contacts
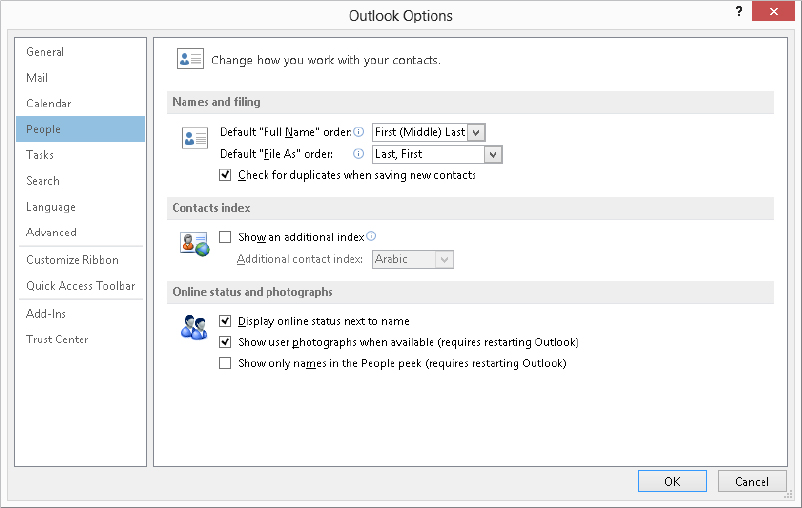
The options that are available for contacts are as follows:
- Default “Full Name” order: Specifies how contacts are sorted when you order them based on full name. You can choose First Middle Last, Last First, or First Last1 Last2.
- Default “File As” Order: Specifies how contacts are sorted when you order them based on the File As field. Your choices are Last First, First Last, Company, Last First (Company), Company (Last, First).
- Check for duplicate when saving new contacts: Outlook warns you if you try to enter a new contact with the same name as an existing contact.
- Show an additional index: Outlook displays a second set of index buttons at the right edge of the Contacts window using the language you select from the list.
Summary
The Outlook Contacts feature is a powerful tool for managing and using information about people. It goes way beyond the basic Address Book to store just about any kind of information about a person you can imagine. What’s more, it makes it easy to find and use that information in various ways. Many people find the Contacts feature to be one of Outlook’s most useful tools. You can now take advantage of Contacts in the following ways:
- Display contacts in the default People view using the Navigation Bar, and change views from there.
- Add and edit contact information, including adding multiple phone numbers and other detailed information.
- Open a contact in the Contact window for additional commands.
- Organize contacts in groups, and e-mail a single contact or group.
- Add contacts from your social networks and view updates from those networks.
- Change a contact’s business card and share contact info by e-mail.
- Use Skype and Lync IM and calling features with contacts.
- Mail merge and more to your contacts.
- Set contact options.