Chapter 28
Processing and Securing E-mail
IN THIS CHAPTER
Understanding junk e-mail filtering
Setting junk e-mail options
Defining blocked and allowed lists
Understanding e-mail rules
Defining a new rule
Looking at some rule examples
Managing e-mail rules
Protecting against viruses
Understanding Outlook’s attachment blocking
Implementing macro security
Using certificates and digital signatures
Encrypting and digitally signing messages
Junk e-mail, often called spam, is a problem for most e-mail users. It can range from a minor annoyance for a home user to a major problem for a large organization, clogging mail servers and reducing the efficiency of employees. Fortunately, Outlook provides you with tools that greatly reduce the spam problem. You also can use message rules to process incoming e-mail, cutting down on the amount of time you spend moving messages around or deleting them. Computer security has unfortunately become a very important topic. With the almost universal use of the Internet and e-mail, it’s easier than ever for various kinds of malicious software such as viruses to spread. Security issues also include message privacy and verification of people’s identities. Because e-mail is the favored means of spreading such malware, Outlook users have to be particularly vigilant. This chapter explains the various tools that Outlook provides to make you more efficient in dealing with spam and managing messages, and to enhance your security.
Understanding Junk E-mail Filtering
Junk e-mail filtering works based on two principles. The first is the content of the message — certain keywords and phrases are considered likely to be spam. The other is the identity of the sender. You can define a safe list — people whose messages are never treated as spam regardless of content. Likewise, you can define a blocked list — people whose messages are always treated as spam regardless of content. In either case, messages that Outlook flags as spam are placed in the Junk E-mail folder rather than the Inbox.
Why doesn’t Outlook just delete spam messages? The fact is that content-based spam filtering is not perfect, and legitimate messages are sometimes caught as spam. Some people like to quickly scan their Junk E-mail folder before permanently deleting the messages just to make sure that a legitimate message has not been caught. However, if you want spam to be deleted automatically, you can tell Outlook to do this. See the next section, “Setting Junk E-mail Options,” for details.
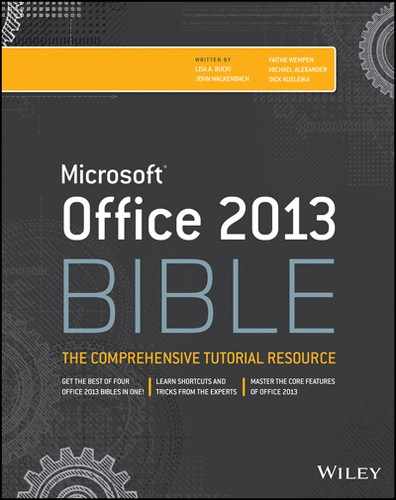
Setting Junk E-mail Options
You set Outlook’s filtering and handling of junk e-mail in the Junk E-mail Options dialog box, as follows:
FIGURE 28.1 Setting options for junk e-mail filtering
The first option in this dialog box determines the level of filtering based on message content. You have four levels to choose from:
- No Automatic Filtering: Messages are not filtered based on their content.
- Low: Only obvious spam is treated as such. Some spam will get through to your Inbox.
- High: More stringent spam rules are applied when message content is scanned. Some legitimate messages may be treated as spam.
- Safe Lists Only: Only messages from senders on your safe lists (explained later in this chapter) are allowed through; all other messages are treated as spam regardless of their content.
The other options in this dialog box are as follows:
- Permanently delete suspected junk e-mail...: Messages that Outlook considers to be spam are deleted rather than moved to the Junk E-mail folder. You may not want to use this option unless you are sure that legitimate messages are not mistakenly being tagged as spam.
- Disable links and other functionality in phishing messages: Phishing messages (see the “Phishing” sidebar) usually contain links to web pages where you are asked for confidential information such as passwords. If this option is selected, Outlook disables these links.
- Warn me about suspicious domain names in e-mail addresses: A spoofed domain name is one that is not what it appears to be. For example, a link might display www.microsoft.com but actually be a link to another domain. If this option is selected, Outlook warns you about possible spoofed domain names in a message.
You may want to check the Junk E-mail folder from time to time to see if it is trapping messages you need. You can select and move those messages back to the Inbox or another folder. To delete all junk e-mail, right-click the folder and click Empty Folder, clicking Yes if a confirmation message appears.
Blocking and Allowing Specific Addresses
A very useful tool in the fight against spam is Outlook’s ability to define lists of e-mail addresses and domains that are always blocked or always allowed through.
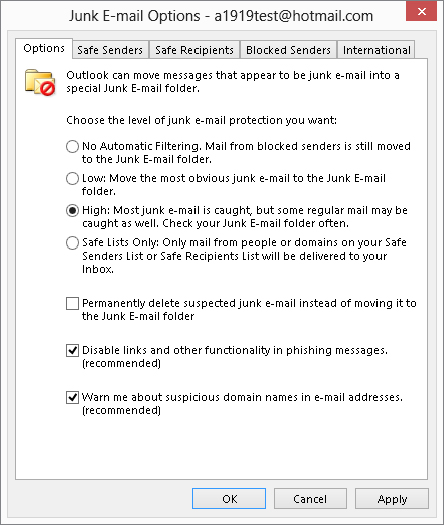
Defining safe senders
A safe sender is a person, or more precisely an e-mail address, whose e-mail messages are always considered to be OK — not spam — regardless of the content. Sometimes a Safe Senders list is called a white list. You can create a Safe Senders list based on your contacts and by entering individual addresses. You can also specify entire domains as safe — for example, all messages from Microsoft.com would be considered to be safe. Here are the steps to follow:
FIGURE 28.2 Defining your Safe Senders list
The other two options in this dialog box are self-explanatory. Having the Also Trust e-mail from my Contacts check box selected saves you the effort of entering these addresses manually.
The Import from File and Export to File tools are useful if you want to transfer a safe list between Outlook and another e-mail program, or pass your safe list to a friend or colleague. The import/export format is a plain-text file with one address per line.
Blocking/allowing individual senders
The shortcut menu is a fast way to add addresses to your safe and blocked lists. All you have to do is right-click on the message in the message list for the Inbox or selected folder, point to Junk in the shortcut menu, and then choose the desired action from the submenu. If you have opened a message, you can use the commands in the Junk list in the Delete group of the Message tab on the Ribbon to perform the same commands:
- Block Sender: Adds the message sender to your Blocked Senders list.
- Never Block Sender: Prevents messages from the sender from being placed in the Junk E-mail folder.
- Never Block Sender’s Domain: Prevents messages from all senders from a particular domain from being placed in the Junk E-mail folder.
- Never Block This Group or Mailing List: Prevents messages addressed to the same group or mailing list used in the message from being placed in the Junk E-mail folder.
- Not Junk: This command is available only if the message is in your Junk E-mail folder. Click to move the message to the Inbox and add the sender to your Safe Senders list.
Defining safe recipients
The Safe Recipients list, located on another tab in the Junk E-mail Options dialog box, is similar to the Safe Senders list, but it marks messages as OK based on their recipients rather than their sender. This is useful when you are on a distribution list or in another situation in which you receive e-mails that are sent to a list of recipients, including you. When an e-mail address is on the Safe Recipients list, any message sent to you and to that address will never be treated as spam, regardless of the message sender and content. The Safe Recipients tab works exactly the same as the Safe Senders tab, described in the previous section.
Defining blocked senders
A blocked sender is an e-mail address or domain whose messages are always treated as spam. The Blocked Senders tab in the Junk E-mail Options dialog box works exactly like the Safe Senders tab as described earlier.
International junk e-mail options
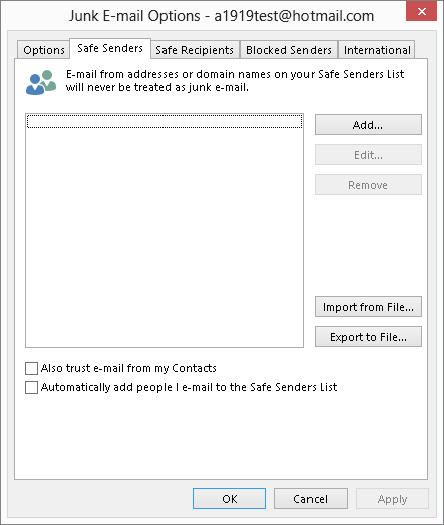
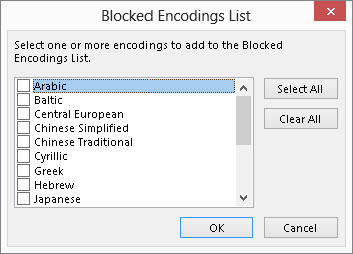
You may receive some e-mails that appear to be gibberish — random, meaningless characters. These messages occur when a sender’s e-mail program uses a different character encoding than the one you are using. For example, a person in China likely uses Chinese encoding to create a message in Chinese characters. If your e-mail reader is set to use, say, English encoding, the message displays as gibberish. Outlook lets you block messages that use specified character encodings. It also lets you block e-mails from certain countries based on the top-level domain of the sender’s address. Here are the steps to follow:
FIGURE 28.3 Specifying top-level domains to block
FIGURE 28.4 Specifying character encodings to block
Understanding E-mail Rule Basics
Outlook lets you automate the handling of e-mail messages with rules. A rule can perform actions such as moving messages from a specific person to a designated folder or deleting messages with certain words in the subject. Rules can also display alerts, play sounds, and move InfoPath forms and RSS feed items. Rules can help you save time and stay organized.
Outlook e-mail rules are all similar in that they specify a condition and an action. A rule can be defined to apply to e-mail messages when they arrive, which is most common, and to messages as you send them. The Rules Wizard, through which you create rules, provides a set of partially defined rules for commonly needed actions — all you need to do is fill in the details. This wizard also provides the capability to define a rule completely from scratch, a feature you’ll use if one of the existing rule templates does not meet your needs.
Creating a New Rule
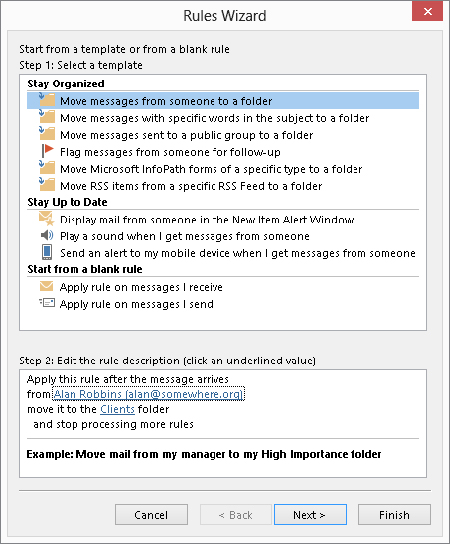
To create a new e-mail rule, click the Rules button in the Move group of the Home tab in the Outlook window, and then click Manage Rules & Alerts. Outlook displays the Rules and Alerts dialog box, in which you should select the E-mail Rules tab. If you have any rules already defined, they are listed here. You can work with existing rules as described later in this chapter. To create a new rule, click the New Rule button to display the Rules Wizard, as shown in Figure 28.5.
FIGURE 28.5 The first step in defining a new rule

You can see that this dialog box has two parts, Step 1: Select a template at the top, and Step 2: Edit the rule description at the bottom. The following sections look at these in turn.
Selecting a rule template
The first step, selecting a template, of this dialog box is divided into three subsections, each containing two or more templates:
- Stay Organized: Templates that move, delete, or flag messages or other items
- Stay Up to Date: Templates for alerting you when messages arrive
- Start from a blank rule: Templates that are empty and let you define a rule from scratch
The remainder of this section deals with the first two of these categories. Starting from a blank rule is covered separately later in this chapter.
When you click on an item in the Select a Template section, the Step 2: Edit the rule description section displays the rule definition along with an example. Editing the definition is covered next.
Editing a rule description
A rule definition contains underlined elements that represent the parts of the rule that you can edit. Figure 28.5, for example, shows a definition with two editable elements: people or public group and specified. When you click such an underlined element, Outlook opens a dialog box in which you can specify the details. In this example:
- Click people or public group to open a dialog box in which you can select the people, distribution lists, or both from your Address Book. The rule will be applied to messages from the selected people.
- Click specified to select a folder to which matching messages will be moved.
After you have made selections for the editable rule items, the rule displays the selected information. An example is shown in Figure 28.6, in which the rule is defined to move messages from “Alan Robbins” to the “Clients” folder. Note that these elements of the rule are still underlined and can be clicked on to make changes as needed.
FIGURE 28.6 A completed rule definition displays the details that you have specified.
Finishing the rule
At this point, the rule is ready to use. You can click Finish in the Rules Wizard dialog box to save the rule. In some cases, you may want to fine-tune the rule; if so, click the Next button. Fine-tuning a rule is essentially the same as creating a rule from a blank template, which is covered in the next section.
Creating a rule from a blank template
If the rule templates that Outlook provides do not suit your needs, you can create a rule from a blank template. In the first step of the Rules Wizard, shown earlier in Figure 28.5, you must select one of the following from the Start from a blank rule section:
- Apply rule on messages I receive: Creates a rule that works with messages you receive.
- Apply rule on messages I send: Creates a rule that works with messages you send.
After making your selection, click the Next button. Outlook displays the next Rules Wizard step as shown in Figure 28.7. You use this dialog box to specify the conditions for the rule. You can have more than one condition for a rule. When you do, all conditions must be met for a message to be processed. The steps to follow are:
FIGURE 28.7 Selecting conditions for a rule
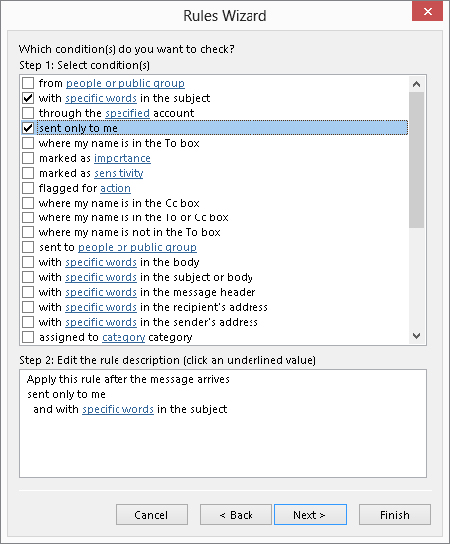
FIGURE 28.8 Selecting an action for a rule

FIGURE 28.9 Specifying exceptions for a rule
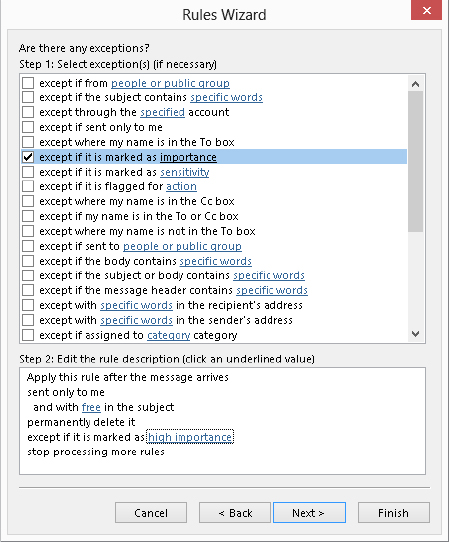
FIGURE 28.10 The final step of the Rules Wizard
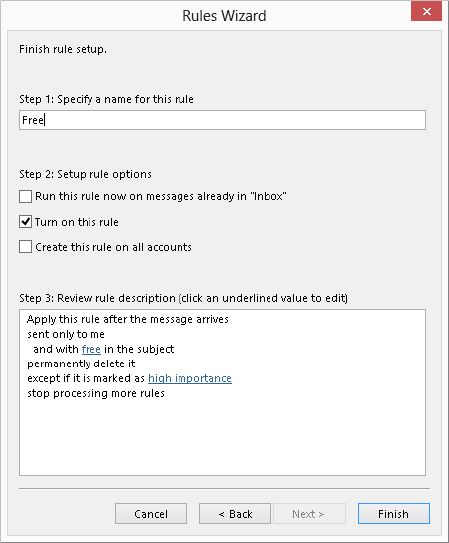
- Run this rule now on messages already in “Inbox”: Apply the rule to messages already in the Inbox folder for your account.
- Turn on this rule: Enable the rule for newly received or sent messages.
- Create this rule on all accounts: Apply the rule for all your e-mail accounts (relevant only if you have multiple accounts).
Some Rule Examples
Outlook e-mail rules are admittedly rather complex. It may help you to understand them if you follow the steps required to define a few different kinds of rules.
Rule example 1
This first rule example shows you how to define a rule that moves all messages from a certain domain to a specified folder. It would be useful if, for example, you are doing some contracting work for a company and are interacting with several people there. This rule moves all e-mail that you receive from anyone at that company into one folder, helping you to stay organized.
The first step is to create the folder:
Now that you have created the folder, you can proceed to defining the rule:
FIGURE 28.11 Specifying an address to be part of a new e-mail rule

After you create a rule, you will see it listed in the Rules and Alerts dialog box. It is assigned a default name based on the information in the rule. You can, if desired, change the rule name as explained later in this chapter in the section on managing rules.
Rule example 2
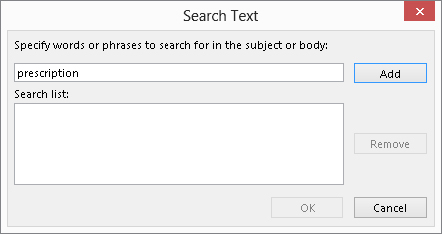
This rule example shows you how you can use a rule to help guard against spam. Let’s say that you receive many junk e-mails offering to sell you prescription medication online. However, the subject of the message is often disguised, so you want to define a rule that looks for the word prescription in both the subject and the body of the message, and if the word is found, Outlook deletes the message.
But there’s a wrinkle — you do in fact get some meds from a legitimate online drug store, and you do not want e-mails from that store to be caught — so the rule will have to include an exception. Here are the steps for creating this rule:
FIGURE 28.12 Use this dialog box to specify words that will be searched for in a message.
Rule example 3
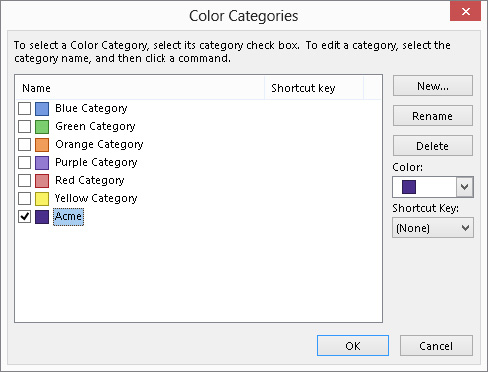
Our final rule example shows you how to process messages that you send. Suppose that your major client is Acme Corporation and you have created an Outlook category specifically for items that are related to Acme. You want all messages you send to Acme to be placed in this category automatically. Here’s how:
FIGURE 28.13 Selecting a category to assign sent messages to
Managing Rules
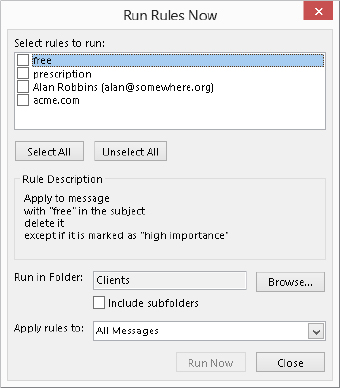
When you select Rules ⇒ Manage Rules & Alerts from the Move group of the Home tab, the E-mail Rules tab in the Rules and Alerts dialog box lists all the rules that are defined (Figure 28.14). If you have more than one rule, they are applied in top-down order. The actions you can take in this dialog box are the following:
FIGURE 28.14 You manage your e-mail rules in the Rules and Alerts dialog box.
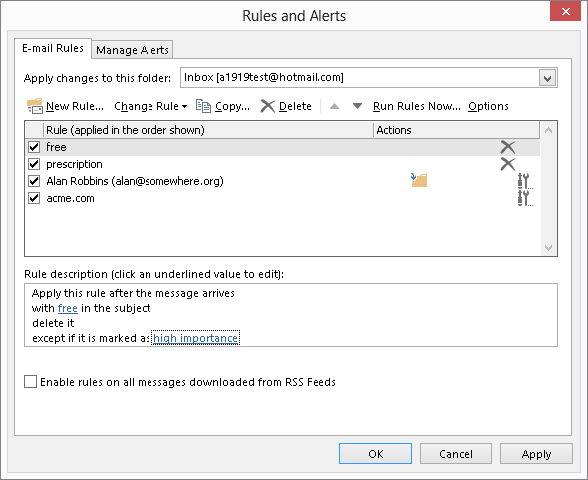
- To edit a rule, click on it and then click the Change Rule button. Then select Edit Rule Settings or Rename Rule from the menu.
- To change a rule’s position in the list, click on it and then click the up- or down-arrow button.
- To copy a rule, click on it and then click the Copy button. Outlook will make a copy of the rule, which you can then rename and modify as desired.
- To delete a rule, click on it and then click the Delete button.
- To run rules, click the Run Rules Now button. Then, in the dialog box that is displayed, select the rules to run and the folder(s) and messages to apply the rules to (Figure 28.15), and click Run Now.
FIGURE 28.15 Running rules manually
- To deactivate a rule, click the adjacent check box to remove the checkmark.
- To import or export your rules from or to other versions of Outlook, or for use by a friend or colleague, click the Options button.
Protecting against Viruses
Everyone has heard about viruses, malicious software elements that infect and harm computer systems. Technically, a virus is a piece of software that not only infects a computer system but also spreads to other systems usually by means of a host file, similarly to biological viruses that cause colds and other human illnesses. The term is often used more broadly to include other kinds of malware — a generic term for harmful software — that do not fit the strict definition of a virus, such as worms and Trojan horses.
Viruses range from the merely annoying to the truly disastrous, but they all have one thing in common — you do not want them on your system! Because viruses often spread by means of e-mail, Outlook provides you with some defenses against them.
It’s important to understand that Outlook itself does not have any anti-virus capabilities. An anti-virus program is specialized to detect and remove viruses and will have a way to automatically download the latest virus definitions so that it can stay up-to-date. Symantec, Zone Alarm, and McAfee are three of the better-known publishers of anti-virus software. Microsoft also offers a free anti-virus program called Microsoft Security Essentials, and there are other decent freeware and shareware antivirus programs available. Most systems have anti-virus software installed, and part of protecting yourself against viruses that come with e-mail is to make sure that your anti-virus program is configured properly. Specifically, you should set the anti-virus program’s options so that it always scans incoming e-mail and attachments for viruses before they get to Outlook. It’s also advisable to set the program to scan outgoing e-mail and attachments in order to prevent you from inadvertently spreading a virus that you have been infected with through other means (such as a floppy disk).
On-demand e-mail scan
If you have an Outlook-compatible anti-virus program installed, you may find that it has added a command or option for working with the anti-virus program. The details of how the virus scan works and how you set options depend on the specific anti-virus program that you have installed. Please refer to that program’s documentation for more information. However, the possible commands fall into two categories:
- Scan for Viruses: Opens your anti-virus program and performs an immediate virus scan of e-mail items according to the program options. Use this command when you are not sure that the anti-virus program’s automatic scanning is enough.
- E-mail Scan Properties: Opens your anti-virus program’s Options dialog box, in which you can specify the details of how the program scans e-mail items for viruses.
People worry about getting viruses via e-mail, so it can be a good idea to reassure them that messages from you are safe. You could include a brief note at the bottom of every e-mail that you send that states, “This e-mail message and any attachments have been scanned for viruses by XXX” (where XXX is the name of the anti-virus program in use).
Dealing with Attachments
One of the most common ways for viruses to spread is by means of e-mail attachments. However, all attachments are not equal in their ability to spread a virus. Certain file types are potentially very dangerous, such as executable programs, batch files, and installation files. Others, such as image and music files, are generally safe.
Automatically blocked attachments
Because of the potential danger posed by some file types, Outlook blocks certain kinds of attachments that are sent to you; you receive the message with a notification that an unsafe attachment has been blocked. This blocking is built into Outlook and cannot be turned off or changed. Some of the more common blocked file types are listed in Table 28.1. You can search Outlook Help for blocked file types to see the whole list, which includes many file types you may not be familiar with.
Outlook also catches these file types on the way out — that is, if you try to send them as an attachment. They aren’t necessarily blocked, but Outlook reminds you that the recipient may not be able to receive them (and definitely won’t if he or she uses Outlook) and asks you if you want to proceed.
TABLE 28.1 File Types Blocked by Outlook by Default
| Extension | File Type |
| ASP | Active Server Page |
| BAS | BASIC source code |
| BAT | Batch processing |
| CER | Internet Security Certificate file |
| CHM | Compiled HTML help |
| CMD | DOS CP/M command file, or a command file for Windows NT |
| COM | Command |
| EXE | Executable file |
| GADGET | Windows Vista gadget |
| HLP | Windows Help file |
| JSE | JScript encoded script file |
| MSC | Microsoft Management Console Snap-in control file (Microsoft) |
| MSI | Windows Installer File (Microsoft) |
| MSP | Windows Installer Update |
| OPS | Office Profile settings file |
| PIF | Windows Program Information file (Microsoft) |
| PST | Exchange Address Book file, Outlook Personal Folder File (Microsoft) |
| TMP | Temporary file/folder |
| URL | Internet location |
| VB | VBScript file or any Visual Basic source |
| VBE | VBScript encoded script file |
| VBS | VBScript script file, Visual Basic for Applications script |
| WS | Windows script file |
| WSC | Windows script component |
| WSF | Windows script file |
| WSH | Windows Script Host settings file |
Other attachment types
Some other file types are not on the blocked list even though they have the potential to carry viruses. These file types are not blocked because they are very commonly sent as attachments. They include Microsoft Word documents (.docx), Excel workbooks (.xlsx), and PowerPoint files (.pptx). When you receive this kind of file as an attachment, it’s important for you to be aware of the potential for harm. Even if you have anti-virus software, you cannot be sure that it will catch every virus, particularly because new ones are created regularly.
The general rule is to not open any such file unless you trust the source. It is also wise to have macro security set to a safe level, as described elsewhere in this chapter.
Sending blocked file types
Many people have perfectly legitimate reasons for sending blocked file types as attachments. You have two ways to get around Outlook’s restrictions to do this:
Macro Security
A macro is a sequence of program commands that have been recorded and saved and can be executed with a single command. Outlook has its own macro capabilities. More germane to the topic of security, however, are the macros in programs such as Microsoft Word and Excel. Such macros are part of the document file and as such are included when the file is sent as an e-mail attachment. (However, you can identify files that contain macros because the file name extension changes, from .docx to .docm for a Word document, for example.) A malicious macro can be set to execute automatically when the file is opened and can potentially wreak havoc on your system and data files. Such viruses are called macro viruses.
Anti-virus programs catch most macro viruses, and the precaution of not opening attachments from unknown sources is another layer of protection. The final layer of protection against macro viruses is the macro security level in your programs.
Macro security applies to all Office programs, and it is set in the Trust Center. The Trust Center is an Office component, not specifically part of Outlook or any other program. On Outlook, you access the Trust Center by clicking File, then clicking Options to open the Outlook Options dialog box. Then, in the list on the left, click Trust Center. Finally, click the Trust Center Settings button, and click Macro Settings in the list at the left to display the macro security settings shown in Figure 28.16.
FIGURE 28.16 Setting macro security in the Trust Center
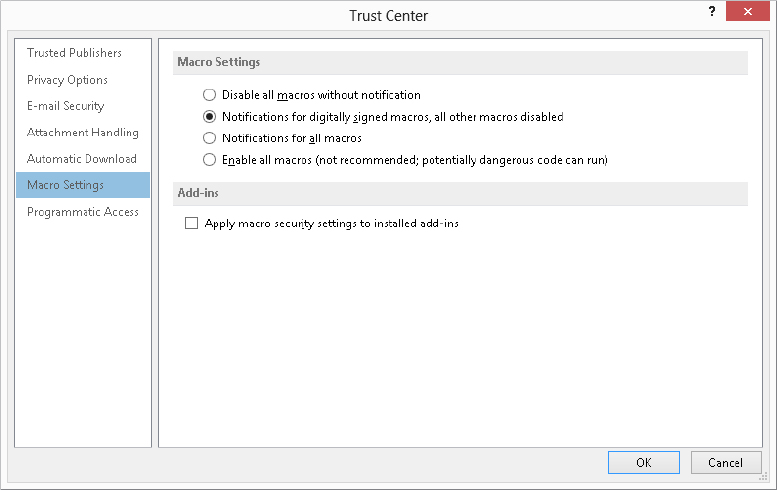
You can see that the options mention “signed macros.” Digital signing is a way that the person who creates a macro can “sign” it so that the recipient can be assured that it comes from a trusted source. You’ll learn more about digital signatures later in this chapter. You can choose from four levels of macro security, described here from the strictest to the least strict:
- Disable all macros without notification: No macros, whether signed or not, are ever run.
- Notifications for digitally signed macros, all other macros disabled: For a signed macro, the program displays a notification message and asks you whether it should be run. Unsigned macros are never run. This is the default macro security level.
- Notifications for all macros: The program displays a notification message for any macro, signed or unsigned, and asks you whether it should be run.
- Enable all macros: All macros are run without a notification message. For reasons that are probably obvious, this level is not recommended.
The default level of macro security for all Office programs is recommended. You can always set a lower level temporarily if you want to run some unsigned macros from a trusted source.
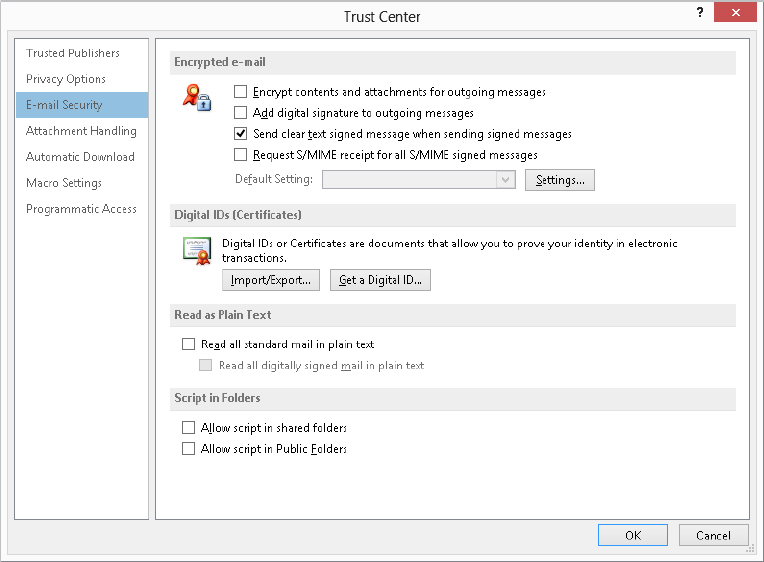
Using Certificates and Digital Signatures
A certificate, also known as a digital ID, provides a higher level of security with Outlook. You can use a certificate to send encrypted e-mails so that only the intended recipient can view the contents. You can also use them to sign messages to prevent tampering and prove your identity. Finally, you can use a digital ID in lieu of a user name and password to access certain restricted websites, although this use is not relevant to Outlook.
Digital IDs are based on the technique of a public/private key pair. These are two long numbers that are related to each other. You can use either key of the pair to encrypt data, and only people who have the other key of the pair are able to un-encrypt the data. When you have a digital signature, you keep your private key secret and make your public key freely available. Here’s how it works:
- To send an encrypted message to people, you use their public key to encrypt it. Only they can decrypt the message because no one else has their private key.
- To prove your identity, encrypt some data using your private key. When recipients of a message decrypt the data using your public key, if the data is intact they will know that you must have encrypted it because nobody else has your private key.
Digital certificates have expiration dates, typically one year after they are issued.
Obtaining a digital ID
If you are using Outlook at work, your employer may provide a digital ID to you that you’ll import as described in the next section. Otherwise, you can get your own. Digital IDs are provided by independent companies for a small fee. A digital ID is linked to a specific e-mail address and cannot be used with other addresses.
To get your own digital ID:
FIGURE 28.17 Using the Trust Center to get a digital ID
After you complete the ordering process, the issuing company will send you an e-mail containing instructions for installing the digital ID.
Importing/exporting digital IDs
Digital IDs can be provided to you in a file as well as obtained over the web, as described in the previous section. Your employer may provide you with an ID in a file; you can also export an existing ID to a file for backup purposes or to install it on multiple computers, such as both a personal and a work computer. These files are password protected for security reasons.
To import a digital ID:
FIGURE 28.18 The Import/Export Digital ID dialog box
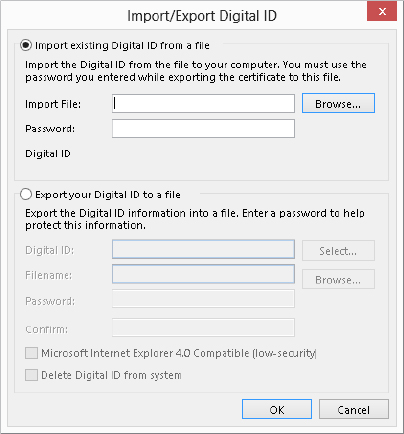
Exporting a digital ID uses the same dialog box as shown in Figure 28.18, except you must select the Export your Digital ID to a file option. Then, follow these steps:
Receiving digitally signed messages
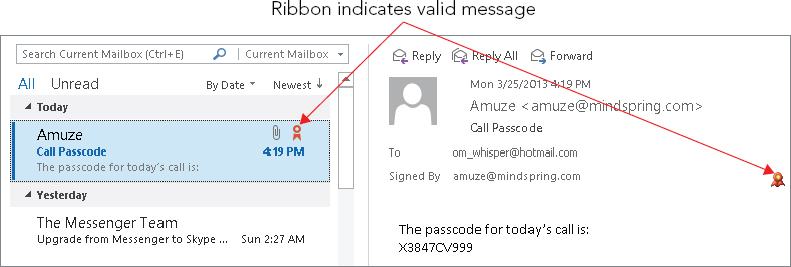
When you receive a digitally signed message, the only difference is that the message says “Signed By XXXX” (where XXXX is the sender’s e-mail address) in the header, just below the subject line. You can use such a message to add the sender’s public key to your Contacts list, as explained in the next section.
Just because a message is signed does not mean that the signature is legitimate. On the same line that “Signed By XXXX” is displayed, Outlook displays a red ribbon icon, as shown in Figure 28.19, to indicate that the signature is valid. If the signature is not valid, the message “There are problems with the signature” is displayed, and you can click a button to view the details. A digital signature could be invalid because it has expired, the issuing authority has revoked it, or the server that verifies the certificate is invalid.
FIGURE 28.19 The red ribbon icon indicates that the digital signature in a message is valid.
Obtaining other people’s public keys
To send an encrypted message to people, you must have their public key. You can get this from a signed message that an intended recipient sent you. That recipient’s certificate will be added to his or her entry in Contacts, and it will be available for you to use to send encrypted e-mail. Follow these steps to send an encrypted e-mail message:
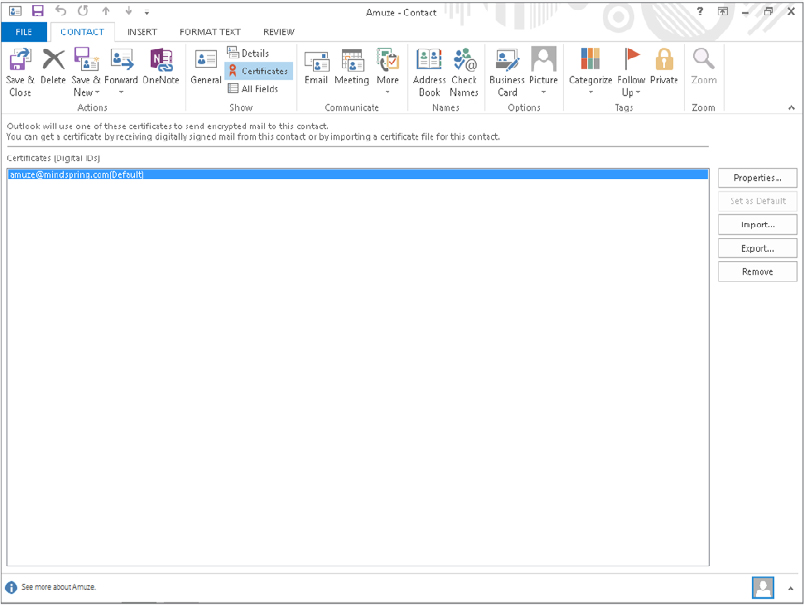
You can view a contact’s certificates by choose Home ⇒ Find ⇒ Address book, choosing the list where you stored the contract from the Address Book drop-down list, and then double-clicking the contact. In the contact window, choose Contact ⇒ Show ⇒ Certificates (maximize the window to see the Show group). Outlook displays a list of the contact’s certificates, if there are any, as shown in Figure 28.20. You can take the following actions by clicking the buttons at the right side of this window:
- Properties: View the certificate details, including the name of the issuing company and its expiration date.
- Set as Default: If the contact has more than one certificate, this command sets the one that will be used as the default for encrypting messages to the contact.
- Import: This option lets you import a person’s certificate from a file. Certificate files have the .p7c or .cer extension.
- Export: This option lets you export the certificate to a file. Doing so can be useful when you want to transfer a contact’s certificate to another computer.
- Remove: This option deletes the certificate from the contact information.
FIGURE 28.20 Viewing a contact’s digital certificates
Encrypting and digitally signing messages
It’s important to understand that encrypting a message and signing a message are two different things, as follows:
- Encrypting: Encrypting uses the recipient’s public key to encrypt the message and attachments so that only the recipient can read them.
- Signing: Signing uses your digital ID to mark a message so that recipients can verify that it really came from you.
A message can be signed, encrypted, or both.
Encrypting messages
You can send an encrypted message to anyone for whom you have the public key — in other words, you have that recipient’s certificate as part of his or her contact information. You can encrypt single messages or specify that all messages be encrypted (when possible).
To encrypt a single message:
FIGURE 28.21 The Security Properties dialog box
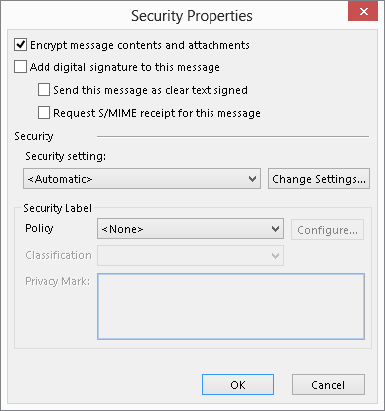
Of course, messages can be encrypted only when they are going to one or more recipients for whom you have a certificate. If you request encryption for a message going to people for whom you do not have a certificate, Outlook displays a message and gives you the option of sending the message without encryption.
You can also tell Outlook to encrypt all outgoing messages and attachments. Of course, this capability affects only messages that you send to people whose public key you have. To tell Outlook to encrypt all outgoing messages and attachments, follow these steps:
Digitally signing messages
As with encryption, you can apply digital signatures to individual outgoing messages or to all of them.
To add a digital signature to an individual message:
To add a digital signature to all outgoing messages:
HTML Message Dangers
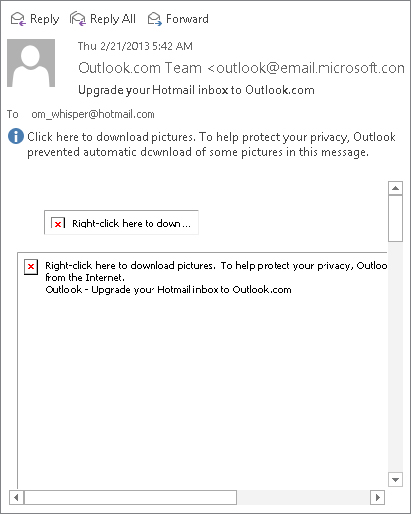
Because HTML messages can contain script and ActiveX controls, they are a potential source of virus attacks. Outlook blocks links (depending on system settings) and a lot of functionality automatically, and may move a message to the Junk E-mail folder, as well. As shown in Figure 28.22, Outlook displays a notification in the message header when there is blocked content. The notification tells you how to restore the content. For example, you may be instructed to click the notification to download and view blocked pictures.
FIGURE 28.22 Many features in HTML messages are automatically disabled.
To guard against HTML viruses that make it past your anti-virus software, you can tell Outlook to display HTML messages as plain text. Because scripts and ActiveX controls are not activated until the HTML is displayed, this prevents them from doing harm.
To guard against malicious HTML messages:
Summary
Spam, or junk e-mail, is a serious problem for most e-mail users. Outlook provides you with some powerful tools to detect and filter spam. By understanding these tools and using them efficiently, you can greatly reduce the negative impact that spam has on your productivity. You should now know how to protect your system by:
- Understanding how Outlook handles junk messages.
- Blocking and allowing senders and domains.
- Creating e-mail rules to organize messages and automatically deleted unwanted junk.
- Adding virus protection if you need it.
- Getting and using digital certificates.