
Chapter 19
Ten Tips for Using Office 2013
Microsoft Office is famous for burying tons of useful features that most people never know about, so this chapter is about exposing some of Office 2013’s features so you can take advantage of them and make Office 2013 more convenient (and safer) for you to use.
Saving Office 2013 Files
Most people dump their documents inside a folder in the Documents folder. Store too many documents in this folder, however, and you’ll find it’s nearly impossible to find anything. To make retrieving files easier, it’s a good idea to store different data in its own folders, such as storing tax-related information in a special Tax Returns folder or invoices in a special 2014 Invoices folder.
Left to its own devices, of course, Office 2013 will cheerfully save all your files in the Documents folder, so you’ll need to tell Office 2013 where you want it to save files.
In addition to defining a default folder to store files, you can also define a default file format for your Office 2013 programs. This can be especially useful if you need to share files with others, such as people still stuck using an older version of Microsoft Office (97/2000/XP/2003).
Finally, to protect your data (as much as possible) from inevitable computer crashes and hard drive failures, Office 2013 programs include a special AutoRecover feature, which saves a temporary copy of your file at fixed intervals, such as every ten minutes. That way, if the power goes out, you lose only those changes you made in the last ten minutes and not all your changes.
 Access doesn’t offer an AutoRecover feature because it automatically saves any changes to your data anyway.
To customize the location, format, and AutoRecover feature of an Office 2013 program, follow these steps:
1. Load the Office 2013 program you want to customize (such as Word or PowerPoint).
2. Click the File tab.
3. Click Options.
An Options dialog box appears.
4. Click Save in the left pane.
The Options dialog box displays various Save options, as shown in Figure 19-1.
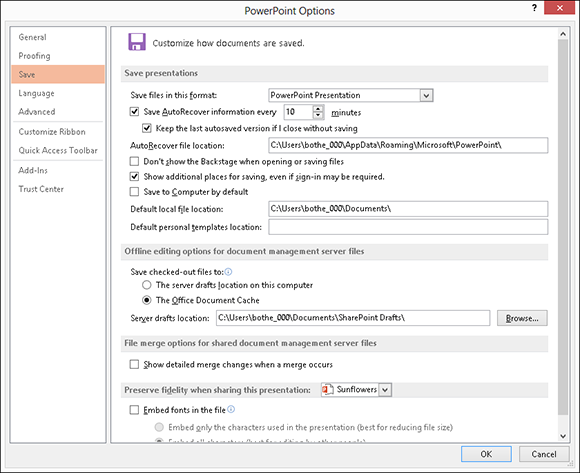
Figure 19-1: The Options dialog box lets you define default settings to save a file.
5. (Optional) Click in the Save Files in This Format list box and choose a file format, such as the 97–2003 format to save files that are compatible with previous versions of Office.
6. (Optional) Click in the Default File Location text box and type the drive and folder that you want to define as your default folder.
7. (Optional) Select the Save AutoRecover Information Every check box, click in the Minutes text box, and type a value or click the up/down arrows to define a value, such as 7 minutes.
8. Click OK.
Password-Protecting Your Files
To prevent prying eyes from peeking at your Word, Excel, or PowerPoint files, you can password-protect them. That way, if someone wants to open, view, or edit your files, she must use your password. If someone doesn’t know your password, she won’t be able to view — let alone edit — your files.
 You (or anyone) can buy programs off the Internet that can crack an Office 2013 password-protected file. For real security, don’t rely on Office 2013’s password-protection feature.
To password-protect a file, follow these steps:
1. Load Word, Excel, or PowerPoint.
2. Click the File tab.
3. Choose Save As.
The Save As window appears.
4. Click the Browse button.
The Save As dialog box appears.
5. Click the Tools button.
A pull-down menu appears, as shown in Figure 19-2.
6. Choose General Options.
The General Options dialog box appears.
7. (Optional) Click in the Password to Open text box and type a password.
Another dialog box appears and asks you to confirm the password by typing it again.
8. Type the password again and then click OK.
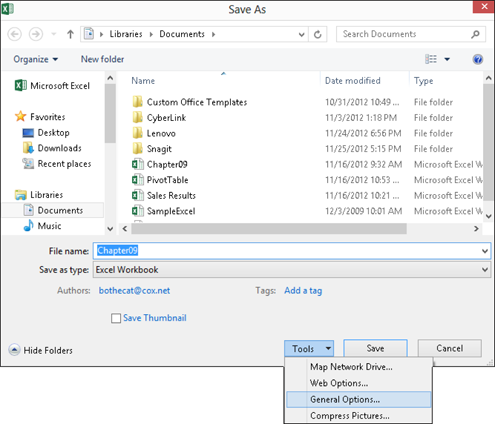
Figure 19-2: The Tools button appears in the bottom-right corner of the Save As dialog box.
9. (Optional) Click in the Password to Modify text box and type a password.
This password can be different from the password you typed in Step 6. Another dialog box appears and asks you to confirm the password by typing it again.
10. Type the password again and then click OK.
11. Click Save.
You can create a password or remove passwords altogether by repeating the preceding steps and retyping a new password or deleting the password completely.
Guarding against Macro Viruses
Macro viruses are malicious programs designed to attach themselves to Word, Excel, and PowerPoint files. When an unsuspecting victim opens an infected file, the virus can spread and do something nasty, such as deleting your files or the entire contents of your hard drive.
To stop these pests from wrecking your files, get an antivirus program, avoid downloading or accepting any files from unknown people, and turn on Office 2013’s built-in macro-protection feature, which can disable macros or restrict what macro viruses and worms can do even if they infect your computer.
To turn on macro protection, follow these steps:
1. Load Word or PowerPoint.
2. Click the File tab.
3. Click Options.
The Options dialog box appears.
4. Click Trust Center.
The Trust Center options appear in the right pane.
5. Click the Trust Center Settings button.
The Trust Center dialog box appears with the Macro Settings options displayed, as shown in Figure 19-3.
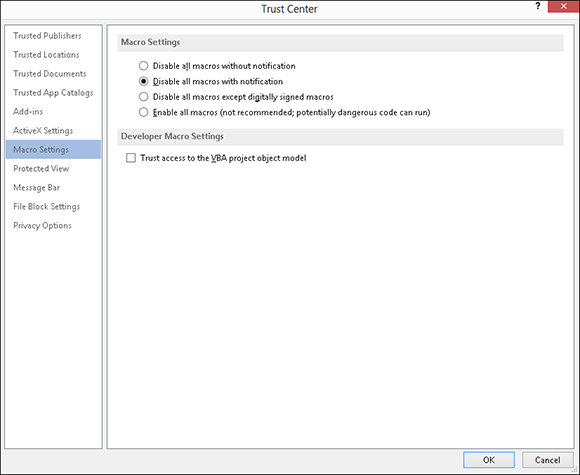
Figure 19-3: The Trust Center dialog box.
6. Select one of the following radio buttons:
• Disable All Macros without Notification: The safest but most restrictive setting, this prevents any macros (valid or viruses) from running when you open the file.
• Disable All Macros with Notification: This is the default setting; it displays a dialog box that lets you turn on macros if you trust that the file isn’t infected.
• Disable All Macros except Digitally Signed Macros: Blocks all macros except for the ones “authenticated” (previously defined as “trusted”) by the user.
• Enable All Macros: This setting runs all macros, which is the most dangerous setting.
7. Click OK until you return to the Save As dialog box.
8. Click Save.
Customize the Ribbon
Some people love the Ribbon interface of Office 2013, while others only tolerate it. No matter what your feelings toward the Ribbon interface may be, you can customize which icons appear on it so it only displays those features you need (and use) most often.
To customize the Ribbon interface, follow these steps:
1. Load an Office 2013 program, such as Word or Excel.
2. Click the File tab.
3. Click Options.
The Options dialog box appears.
4. Click Customize Ribbon in the left pane.
The Options dialog box displays two columns. The left column displays all additional commands you can place on the Ribbon, while the right column lists all currently displayed tabs and commands, as shown in Figure 19-4.
5. (Optional) Clear a check box in the right column to hide an entire tab from view.
Hiding tabs can be handy when you never use a particular group of commands and you want to simplify the Ribbon interface.
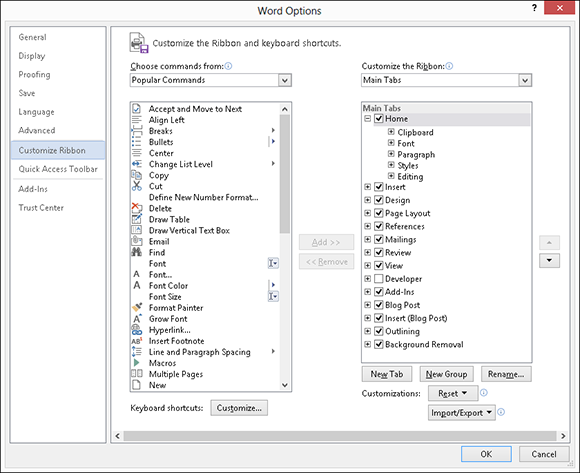
Figure 19-4: You can customize which tabs and commands appear on the Ribbon.
6. (Optional) Click the New Tab button to create a new tab. Then you can click a command in the left column and click the Add button to place commands on a new tab of your own design.
7. (Optional) Click the Reset button.
The Reset button lets you restore the default settings of a single tab or the entire Ribbon. Use this feature to make your copy of Office 2013 look like everyone else’s.
8. Click OK.
Customizing the Ribbon can make your copy of Office 2013 work exactly the way you want. However, if other people need to use your copy of Office 2013 (or if you need to use someone else’s copy of Office 2013), you may find that using different Ribbon interfaces can get confusing.
Save to SkyDrive
If you need to access, edit, or create files on a computer, smartphone, or tablet, you may find it easier to save your important files to SkyDrive, which is Microsoft’s cloud storage service. By signing up for a SkyDrive account, you can get 7GB of free storage and pay if you need more.
The basic idea behind SkyDrive (and cloud storage in general) is that you store a single file on your SkyDrive. Now — no matter where you are in the world or which device you have with you — you can access that file as long as you have an Internet connection. By editing a file stored in a single location, you can avoid the hassles of copying a file to store on multiple devices and then worrying about which file has your latest changes.
 You can download the SkyDrive app from
 www.windows.microsoft.com/en-US/skydrive/download.
To open a file stored on SkyDrive, follow these steps:
1. Load an Office 2013 program, such as Word or Excel.
2. Click the File tab.
3. Click Open.
The Open window appears.
4. Click Add a Place.
5. Click SkyDrive.
At this point, you’ll have to type in your SkyDrive username and password to access your file.
To save a file to SkyDrive, follow these steps:
1. Load an Office 2013 program, such as Word or Excel.
2. Click the File tab.
3. Click Save As.
The Save As window appears.
4. Click Add a Place.
5. Click SkyDrive.
At this point, you’ll have to type in your SkyDrive username and password to save your file to your SkyDrive account.
When in Doubt, Right-Click the Mouse
As a shortcut to giving commands to Office 2013, remember this simple guideline: First select, and then right-click.
So if you want to change text or a picture, first select it to tell Office 2013 what you want to modify. Then right-click the mouse to display a pop-up menu of the commands. These pop-up menus display a list of only relevant commands for the item you just selected.
Freezing Row and Column Headings in Excel
One problem with creating large spreadsheets in Excel is that your identifying row and column headings may scroll out of sight if you scroll down or to the right of your worksheet.
To prevent this from happening, you can “freeze” a row or column that contains identifying labels. That way, when you scroll through your worksheet, your frozen row or column always remains visible.
To freeze a row or column in an Excel worksheet, follow these steps:
1. Click the View tab.
2. Click the Freeze Panes icon in the Window group.
3. Click one of the following:
• Freeze Panes: Divides a worksheet into multiple panes
• Freeze Top Row: Always displays the top row, no matter how far down you scroll
• Freeze First Column: Always displays the first column, no matter how far to the right you scroll
To unfreeze a row or column, repeat Steps 1 through 3 but click Unfreeze Panes in Step 2.
Displaying Slides Out of Order in PowerPoint
When you display a PowerPoint presentation, your slides typically appear in the order that you arranged them, starting with the first slide. If you want to display your slides in a different order in the middle of a presentation, follow these steps:
1. Load your presentation in PowerPoint and press F5.
The first slide of your presentation appears.
2. Type the number of the slide you want to view and press Enter.
If you want to jump to the fifth slide in your presentation, type 5 and press Enter. If you jump to the fifth slide, clicking the mouse or pressing the spacebar next displays the sixth slide, and then the seventh, and so on.
Print a list of your slide titles and slide numbers on a sheet of paper so that you know which slide number to type to view a particular slide.
Reduce Spam in Outlook
If you have an e-mail account, you will get spam, that unwanted e-mail that clogs millions of Inboxes every day with obnoxious offers for mortgage refinancing, low-cost prescription drugs, or celebrity pornography. Unless you actually enjoy deleting these messages manually, you can use Outlook to filter your e-mail for you.
Setting up Outlook’s junk e-mail filter
Outlook can move suspected spam to a special junk e-mail folder automatically. Because Outlook looks for keywords in spam, be aware that it will never be 100-percent effective in identifying spam, but it can identify the more blatant spam and save you the time and effort of deleting the messages yourself.
To define Outlook’s spam filter, follow these steps:
1. Click the Home tab.
2. Click the Junk icon.
A menu appears, as shown in Figure 19-5.
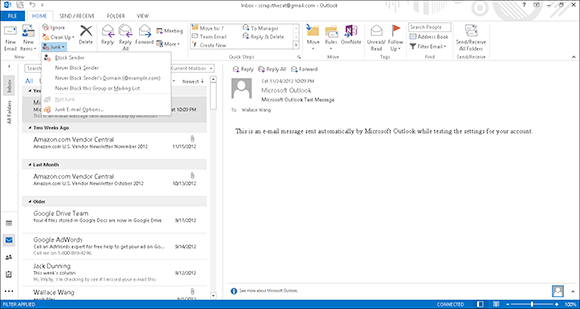
Figure 19-5: The Junk menu.
3. Click Junk E-mail Options.
The Junk E-mail Options dialog box appears, as shown in Figure 19-6.
4. Select one of the following radio buttons:
• No Automatic Filtering: Turns off the Outlook spam filter.
• Low: Identifies and moves most obvious spam to the Junk E-mail folder.
• High: Identifies and moves nearly all spam into the Junk E-mail folder along with some regular e-mail messages, too, so check the Junk E-mail folder periodically to look for valid messages.
• Safe Lists Only: Identifies and moves e-mail messages into the Junk E-mail folder, except for those messages sent from addresses listed in your Safe Senders List or Safe Recipients List.
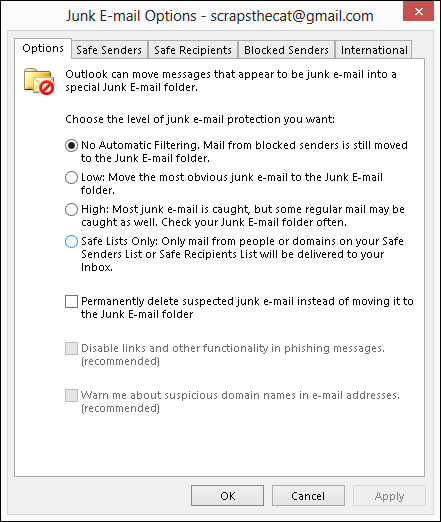
Figure 19-6: The Junk E-mail Options dialog box lets you define how aggressively you want Outlook’s spam filter to work.
5. Click OK.
The Options dialog box appears again.
6. Click OK.
Creating a Safe Senders list
A Safe Senders list lets you define all the e-mail addresses you want to accept messages from, and Outlook routes all e-mail from other e-mail addresses directly to your Junk E-mail folder.
The advantage of a Safe Senders list is that it guarantees you will never receive spam. On the downside, though, it also guarantees that if someone tries to contact you whose e-mail address doesn’t appear on your Safe Senders list, you will never get that valid message, either.
To create a Safe Senders list, follow Steps 1 through 4 in the preceding section, “Setting up Outlook’s junk e-mail filter,” to display the Junk E-mail Options dialog box. Then follow these steps:
1. In the Junk E-mail Options dialog box (refer to Figure 19-6), click the Safe Senders tab.
The Safe Senders tab of the Junk E-mail Options dialog box appears.
2. (Optional) Select (or clear) the Also Trust E-mail from My Contacts check box.
Selecting this check box tells Outlook that if you store someone’s e-mail address in your Contacts list, you will also accept e-mail from that person, too.
3. (Optional) Select (or clear) the Automatically Add People I E-mail to the Safe Senders List check box.
This tells Outlook that if you send e-mail to someone, you’ll accept his or her messages in return.
4. (Optional) Click the Add button.
The Add Address or Domain dialog box appears.
5. Type a complete e-mail address. (Or type a domain name — for example, if you trust everyone from Microsoft.com to send you valid e-mail, type @microsoft.com in this dialog box.)
6. Click OK.
7. Repeat Steps 4 through 6 for each additional e-mail address or domain you want to add.
8. Click OK until all the dialog boxes disappear.
If you click the Safe Recipients tab, you can repeat these steps to define another list of e-mail addresses that you’ll accept as valid.
Creating a Blocked Senders list
If a particular e-mail address persists in sending you spam, you can choose to selectively block that single e-mail address or domain. To create a Blocked Senders list, follow Steps 1 through 4 in the earlier section, “Setting up Outlook’s junk e-mail filter,” to display the Junk E-mail Options dialog box. Then follow these steps.
1. In the Junk E-mail Options dialog box (refer to Figure 19-6), click the Blocked Senders tab.
The Blocked Senders tab of the Junk E-mail Options dialog box appears.
2. Click the Add button.
The Add Address or Domain dialog box appears.
3. Type an e-mail address or domain name and then click OK.
The Options dialog box appears again.
4. Click OK until all the dialog boxes disappear.
Using Office Web and Windows RT
Office 2013 gobbles up a huge chunk of hard-drive space and bombards you with waves of features that you’ll probably never need (or use) in a million years. In case you want to use Microsoft Office but find it too complicated, try the free Office Web (http://office.microsoft.com/en-us/web-apps/) version instead.
Office Web provides simplified versions of Word, Excel, and PowerPoint that you use over the Internet. As long as you have an Internet connection, a browser, and a free Windows Live ID, you can use Office Web to create, edit, and share files with others.
Perhaps the greatest advantage of Office Web is that multiple people can collaborate on a single document from anywhere in the world. Instead of swapping files back and forth (and risk losing track which file may be the latest one), Office Web lets you store a single copy of your document online for everyone to access.
Of course, the biggest drawback of Office Web is that you need an Internet connection to use it. However, as Internet access becomes cheaper and more accessible, this disadvantage shouldn’t be a problem for most people.
Even better, anyone with a browser can use Office Web, including Windows, Mac OS X, and Linux users. Office Web is basically Microsoft’s answer to Google Docs, so if the idea of using a word processor, spreadsheet, or presentation program over the Internet appeals to you, then give Office Web a try.
In case you don’t like the idea of accessing Office 2013 through the Internet, grab a tablet running Windows RT, which comes with a bundled version of Office 2013. By using Office 2013 on your Windows RT tablet, you can take your programs and files with you and save them in either of these ways:
![]() Save your files to a USB flash drive so you can transfer them to your computer at a later time.
Save your files to a USB flash drive so you can transfer them to your computer at a later time.
![]() Save your files to SkyDrive.
Save your files to SkyDrive.
By using the version of Office 2013 that comes bundled with Windows RT, you can still be productive with your favorite Microsoft Office programs without lugging around a heavy and bulky laptop computer running the full version of Windows 8.