
Chapter 1
Introducing Microsoft Office 2013
In This Chapter
![]() Starting an Office 2013 program
Starting an Office 2013 program
![]() Learning the Ribbon
Learning the Ribbon
![]() Customizing an Office 2013 program
Customizing an Office 2013 program
![]() Exiting from Office 2013
Exiting from Office 2013
Microsoft Office 2013 consists of five core programs: Word, Excel, PowerPoint, Access, and Outlook, where each program specializes in manipulating different data. Word manipulates text; Excel manipulates numbers; PowerPoint manipulates text and pictures to create a slide show; Access manipulates organized, repetitive data such as inventories; and Outlook manipulates personal information such as e-mail addresses and phone numbers.
Although each Office 2013 program stores and manipulates different types of data, they all work in similar ways. First, you have to enter data into an Office 2013 program by typing on the keyboard or loading data from an existing file. Second, you have to tell Office 2013 how to manipulate your data, such as underlining, sorting, arranging it on the screen, or deleting it. Third, you have to save your data as a file.
To help you understand this three-step process of entering, manipulating, and saving data, all Office 2013 programs offer similar commands so you can quickly jump from Word to PowerPoint to Excel without having to learn entirely new commands for each program. Even better, Office 2013 organizes commands in tabs to make finding the command you need faster and easier than ever before.
 If you’re already familiar with computers and previous editions of Microsoft Office, you may want to browse through this chapter just to get acquainted with the appearance and organization of Office 2013. If you’ve never used a computer before or just don’t feel comfortable using Microsoft Office, read this chapter first.
Starting an Office 2013 Program
Microsoft Office 2013 runs on both Windows 7 and Windows 8.
To start Office 2013 on Windows 7, you can go through the Start menu. To start Office 2013 on Windows 8, you must click the Office 2013 tile that represents the program you want to run.
To load Office 2013 in Windows 7, follow these steps:
1. Click the Start button on the Windows taskbar.
A pop-up menu appears.
2. Choose All Programs.
Another pop-up menu appears.
3. Choose Microsoft Office.
A list of programs appears on the Start menu.
4. Choose the Office 2013 program you want to use, such as Microsoft Word 2013 or Microsoft PowerPoint 2013.
Your chosen program appears on the screen. At this point, you can open an existing file.
To load Office 2013 in Windows 8, follow these steps:
1. Open the Windows 8 tiles by either pressing the Windows key on your keyboard or moving the mouse pointer to the bottom-left corner of the screen and clicking when the Start preview window appears.
The Windows 8 tile interface appears.
2. Scroll sideways until you see the Office 2013 tiles that represent the program you want to start as shown in Figure 1-1.
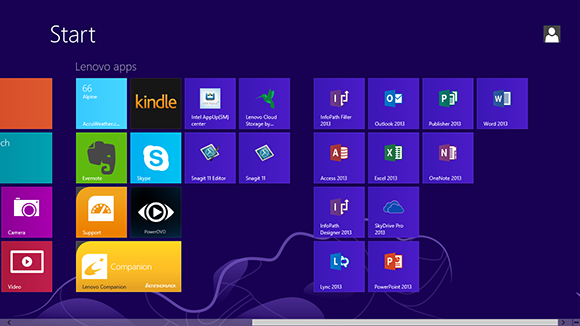
Figure 1-1: The tile interface of Windows 8 displays the Office 2013 programs as individual tiles.
3. Click the tile that represents the Office 2013 program you want to run, such as Microsoft Word 2013 or Microsoft PowerPoint 2013.
Your chosen program appears on the screen. At this point, you can open an existing file.
Introducing the Microsoft Office Ribbon
In older Windows programs, such as Microsoft Office 2003, the program displayed pull-down menus at the top of the screen. To find a command, you had to click a pull-down menu and then search for a command buried in the menu. Since this can get tedious and confusing, later versions of Microsoft Office introduced a Ribbon interface.
The basic idea behind this Ribbon interface is to store commonly used commands under separate tabs. Clicking each tab displays icons that represent related commands. Now you can see groups of related commands at a glance.
Although every Office 2013 program displays different tabs, the three most common tabs are the File tab, the Home tab, and the Insert tab.
The File tab lets you open, save, and print your files. In addition, the File tab also lets you exit out of the program and customize an Office 2013 program as shown in Figure 1-2.
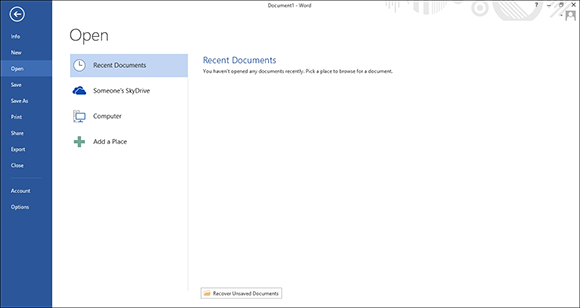
Figure 1-2: The types of commands available through the File tab.
The Home tab displays icons that represent the most common commands for that particular Office 2013 program, such as formatting commands (as shown in Figure 1-3).
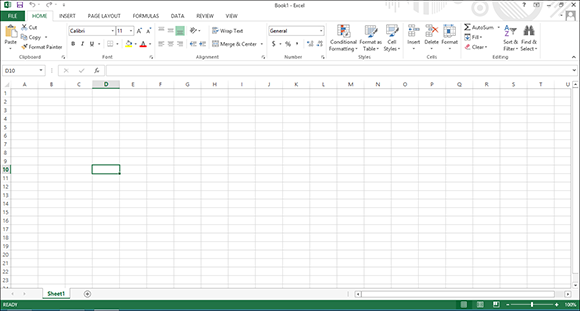
Figure 1-3: The Home tab displays common formatting commands.
The Insert tab displays icons that represent common commands for adding items to a file such as pictures and tables, as shown in Figure 1-4.
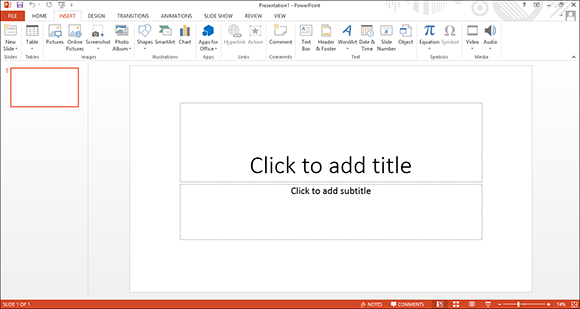
Figure 1-4: The Insert tab displays common commands for adding items to a file.
In addition to the File, Home, and Insert tabs, every Office 2013 program also includes tabs that contain commands specific to that particular program. For example, Excel contains a Formulas tab that contains commands for creating a formula in a spreadsheet while PowerPoint contains a Transitions tab for adding transitions to your presentation slideshows.
The File tab
The various commands available on the File tab include
![]() Info: Protects your file from changes, inspects a file for compatibility issues with older programs, and manages different versions of your file. The Info command also lets you view the details of your file such as the file’s size and the date you created it, as shown in Figure 1-5.
Info: Protects your file from changes, inspects a file for compatibility issues with older programs, and manages different versions of your file. The Info command also lets you view the details of your file such as the file’s size and the date you created it, as shown in Figure 1-5.
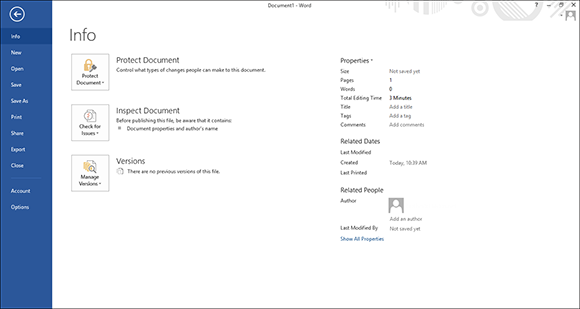
Figure 1-5: The Info command on the File tab lets you protect or inspect a file.
![]() New: Creates a new file.
New: Creates a new file.
![]() Open: Loads an existing file.
Open: Loads an existing file.
![]() Save: Saves your file. If you haven’t named your file yet, the Save command is equivalent to the Save As command.
Save: Saves your file. If you haven’t named your file yet, the Save command is equivalent to the Save As command.
![]() Save As: Save the current file under a new name and/or in a different location such as a different folder or computer.
Save As: Save the current file under a new name and/or in a different location such as a different folder or computer.
![]() Print: Prints the current file.
Print: Prints the current file.
![]() Share: Sends a file as an e-mail attachment or posts it online.
Share: Sends a file as an e-mail attachment or posts it online.
![]() Export: Saves the current file in a different file format.
Export: Saves the current file in a different file format.
![]() Close: Closes an open file but keeps the Office 2013 program running.
Close: Closes an open file but keeps the Office 2013 program running.
![]() Account: Displays information about your SkyDrive account.
Account: Displays information about your SkyDrive account.
 SkyDrive is Microsoft’s cloud computing service that lets you store files online so you can access them from other types of devices such as a smart phone, a tablet, or another computer.
![]() Options: Displays various options for customizing the way each Office 2013 program behaves.
Options: Displays various options for customizing the way each Office 2013 program behaves.
![]() Exit: Closes any open files and exits the Office 2013 program.
Exit: Closes any open files and exits the Office 2013 program.
In Word, a file is called a document. In Excel, a file is called a workbook. In PowerPoint, a file is called a presentation. In Access, a file is called a database.
Creating a new file
Each time you create a new file, you have the option of choosing different types of templates that are already formatted and designed for specific purposes, such as a calendar, newsletter, sales report, or corporate slide-show presentation, as shown in Figure 1-6.
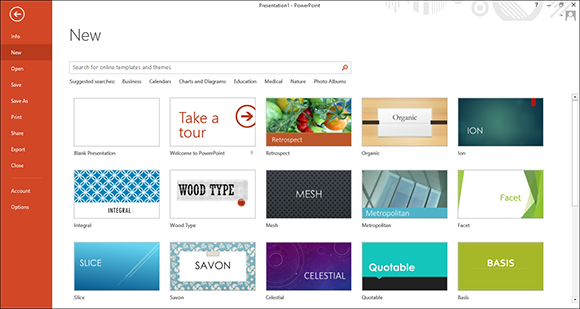
Figure 1-6: The New command displays a variety of files you can create.
To create a new file, follow these steps:
1. Click the File tab.
2. Click New.
A list of templates appears (see Figure 1-6).
3. Double-click the template you want to use.
Office 2013 creates a new file based on your chosen template. For some templates, you may need access to the Internet to download the templates from Microsoft’s website.
Opening an existing file
When you load an Office 2013 program, you may want to edit a file that you created and modified earlier. To open an existing file, you need to tell Office 2013 the location and name of the file you want to open.
The four options for finding an existing file include
![]() Recent Documents/Workbooks/Presentations: Displays a list of files you recently opened.
Recent Documents/Workbooks/Presentations: Displays a list of files you recently opened.
![]() Someone’s SkyDrive: Displays a list of files stored on another person’s SkyDrive account. (You may need to get permission from that other person to access certain files.)
Someone’s SkyDrive: Displays a list of files stored on another person’s SkyDrive account. (You may need to get permission from that other person to access certain files.)
![]() Computer: Lets you browse through the folders stored on your computer to find a file.
Computer: Lets you browse through the folders stored on your computer to find a file.
![]() Add a place: Lets you define a new location for storing files in the cloud such as your SkyDrive account.
Add a place: Lets you define a new location for storing files in the cloud such as your SkyDrive account.
To open a file, follow these steps:
1. Click the File tab.
2. Click Open.
An Open pane appears, as shown in Figure 1-7.
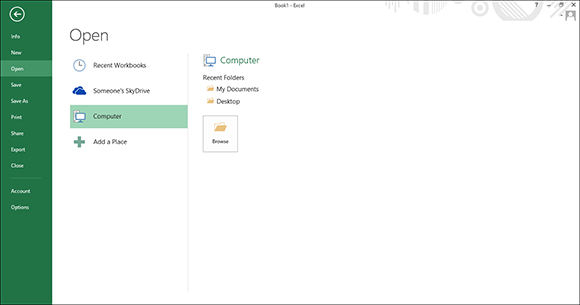
Figure 1-7: The Open pane lets you change drives and folders to find the file you want to use.
3. Choose an option such as Recent Documents or Computer.
You may need to click the Browse button to access different folders.
4. Click the file you want to open.
Your chosen file appears.
If you deleted or moved a file, Office 2013 may still list that filename under the Recent category even if that file no longer exists or has been moved.
Saving files
Saving a file stores all your data on a hard drive or other storage device (such as a USB flash drive). You can also save your files to a SkyDrive account so you can access that file anywhere you have Internet access. The first time you save a file, you need to specify three items:
![]() The location in which to store your file
The location in which to store your file
![]() The name of your file
The name of your file
![]() The format in which to save your file
The format in which to save your file
The location can be any folder on your hard drive or in your SkyDrive account. It’s a good idea to store similar files in a folder with a descriptive name, such as Tax Evasion Information for 2015 or Extortion Letters to Grandma. If you save your files to your computer, Office 2013 stores all your files in the Documents folder unless you specify otherwise.
You can give a file any name you want, but it’s also a good idea to give your file a descriptive name, such as Latest Resume to Escape My Dead-End Job or Global Trade Presentation for World Domination Meeting on October 29, 2014.
The format of your file defines how Office 2013 stores your data. The default file format is simply called Word Document, Excel Workbook, PowerPoint Presentation, or Access Database. Anyone using Office 2013, 2010, or Office 2007 can open these files.
For a quick way to save a file, click the Save icon that appears above the File tab or press Ctrl+S.
Saving a file in other file formats
If you need to share files with people using older versions of Microsoft Office or other word processors, spreadsheets, or database programs, you need to save your files in a different file format. To share files with people using older versions of Microsoft Office, you need to save your files in a format known as 97-2003, such as Word 97-2003 Document or PowerPoint 97-2003 Presentation.
This special 97-2003 file format saves Office 2013 files so that previous versions of Microsoft Office 97/2000/XP/2003 can open and edit your files.
 When you save files in the 97-2003 format, Microsoft Office 2013 saves your files with a three-letter file extension, like
 .doc or .xls. When you save files in the Office 2013 format, Microsoft Office 2013 saves your files with a four- or five-letter file extension, such as .docx or .pptx, as shown in Table 1-1.
Table 1-1 File Extension Names Used by Different Versions of Microsoft Office
|
Program |
Microsoft Office 2013 File Extension |
Microsoft Office 97-2003 File Extension |
|
Microsoft Word |
|
|
|
Microsoft Excel |
|
|
|
Microsoft PowerPoint |
|
|
|
Microsoft Access |
|
|
To save your Office 2013 files in the 97-2003 format, follow these steps:
1. Click the File tab.
2. Click Export.
The middle pane displays different options.
3. Click Change File Type.
A list of different formats appears, as shown in Figure 1-8.
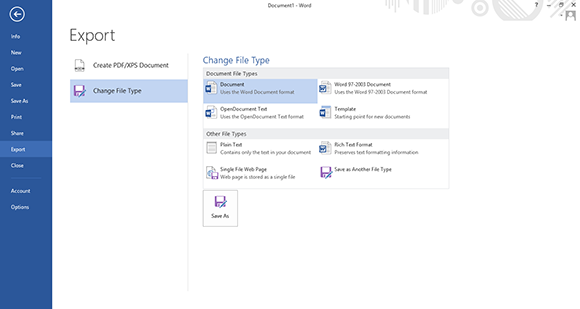
Figure 1-8: The Export pane lets you choose a file format.
4. Click the 97-2003 format option, such as Word 97-2003 Document or Excel 97-2003 Workbook.
5. Click the Save As button near the bottom of the screen.
The Save As dialog box appears.
If you want to share your file with different types of programs, you may need to choose a different file format, such as Rich Text Format or Text.
6. (Optional) Click in the File Name text box and type a descriptive name for your file.
7. Click Save.
Closing a file
When you’re done editing a file, you need to close it. Closing a file simply removes the file from your screen but keeps your Office 2013 program running so you can edit or open another file. If you haven’t saved your file, closing a file will prompt you to save your changes.
To close a file, follow these steps:
1. Click the File tab.
2. Click Close.
If you haven’t saved your file, a dialog box appears asking whether you want to save your changes.
For a faster way to choose the Close command, press Ctrl+F4.
3. Click Save to save your changes, Don’t Save to discard any changes, or Cancel to keep your file open.
If you click either Save or Don’t Save, Office 2013 closes your file.
Using the Ribbon
The Ribbon interface displays tabs that contain groups of related commands. For example, the Page Layout tab displays only those commands related to designing a page, and the Insert tab displays only those commands related to inserting items into a file, such as a page break or a picture.
Using the Ribbon is a two-step process. First, you must click the tab that contains the command you want. Second, you click the actual command.
Tabs act exactly like traditional pull-down menus. Whereas a pull-down menu simply displays a list of commands, tabs display a list of icons that represent different commands.
Deciphering Ribbon icons
Each Ribbon tab displays commands as buttons or icons, organized into groups. There are four types of icons displayed on the Ribbon:
![]() One-click icons: These icons do something with a single click.
One-click icons: These icons do something with a single click.
![]() Menu icons: These icons display a pull-down menu of options you can choose.
Menu icons: These icons display a pull-down menu of options you can choose.
![]() Split-menu icons: These icons consist of two halves. The left or top half lets you choose a command like a one-click icon, and the right or bottom half displays a downward-pointing arrow, which displays additional options.
Split-menu icons: These icons consist of two halves. The left or top half lets you choose a command like a one-click icon, and the right or bottom half displays a downward-pointing arrow, which displays additional options.
![]() Combo boxes: These display a text box where you can type a value in or click a downward-pointing arrow to choose from a menu of options.
Combo boxes: These display a text box where you can type a value in or click a downward-pointing arrow to choose from a menu of options.
Using one-click icons
If you’re in too much of a hurry to double-click, Office 2013 offers you two types of one-click icons (as shown in Figure 1-9).
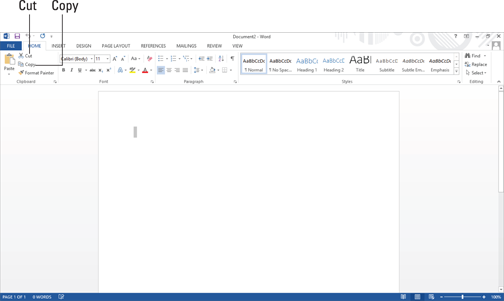
Figure 1-9: The two types of one-click icons.
The most common one-click icons are the Cut and Copy commands, which appear on the Home tab of every Office 2013 program.
Using menu icons
A one-click icon represents a single command. However, there isn’t enough room on the Ribbon to display every possible command as a single icon. As a result, menu icons display a pull-down menu that stores multiple options within a single icon, as shown in Figure 1-10.
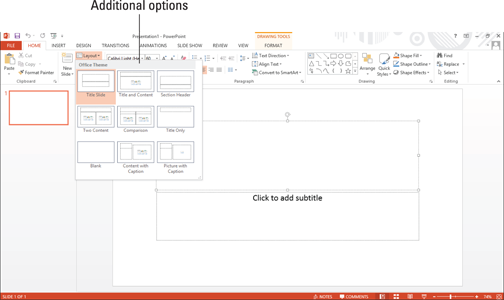
Figure 1-10: A menu icon displays additional options you can choose.
Selecting an option in the pull-down menu immediately manipulates your selected data.
Using split-menu icons
Split-menu icons give you two choices:
![]() If you click the top or left half of a split-menu icon, you choose a default value. For example, the left half of the Font Color icon lets you choose the currently displayed color.
If you click the top or left half of a split-menu icon, you choose a default value. For example, the left half of the Font Color icon lets you choose the currently displayed color.
![]() If you click the bottom or right half of a split-menu icon, a pull-down menu appears, letting you choose a new default option, as shown in Figure 1-11.
If you click the bottom or right half of a split-menu icon, a pull-down menu appears, letting you choose a new default option, as shown in Figure 1-11.
The Paste and Font Color icons, found on the Home tab of Word, Excel, and PowerPoint, are typical split-menu icons.
You can identify split-menu icons because only half of the icon appears highlighted when you move the mouse pointer over that half.
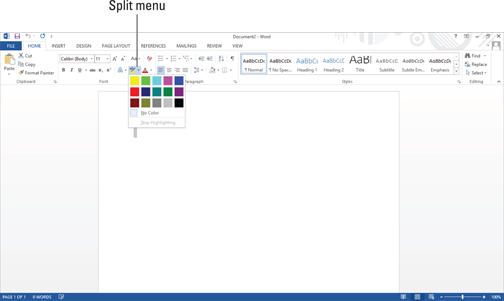
Figure 1-11: A split-menu icon gives you a choice between either a menu or the currently displayed option.
Using combo boxes
A combo box gives you two ways to choose an option:
![]() Type directly into the combo box.
Type directly into the combo box.
![]() Click the downward-pointing arrow to display a list of options, as shown in Figure 1-12.
Click the downward-pointing arrow to display a list of options, as shown in Figure 1-12.

Figure 1-12: A combo box lets you choose a menu or type data in yourself.
The Font and Font Size combo boxes, found on the Home tab of Word, Excel and PowerPoint, are typical combo boxes:
![]() If you click the left side of the Font Size combo box, you can type your own value in for a font size.
If you click the left side of the Font Size combo box, you can type your own value in for a font size.
![]() If you click the downward-pointing arrow on the right side of the Font Size combo box, you can choose a value from a pull-down menu.
If you click the downward-pointing arrow on the right side of the Font Size combo box, you can choose a value from a pull-down menu.
Identifying Ribbon icons
While some icons include descriptive text (such as Format Painter or Paste), most icons simply look like cryptic symbols from an alien language. To get additional help deciphering icons on the Ribbon, just point the mouse pointer over an icon, and a short explanation appears, called a ScreenTip, as shown in Figure 1-13.
ScreenTips provide the following information:
![]() The official name of the command (which is Format Painter in Figure 1-13)
The official name of the command (which is Format Painter in Figure 1-13)
![]() The equivalent keystroke shortcut you can use to run the command (which is Ctrl+Shift+C in the figure)
The equivalent keystroke shortcut you can use to run the command (which is Ctrl+Shift+C in the figure)
![]() A short explanation of what the command does
A short explanation of what the command does
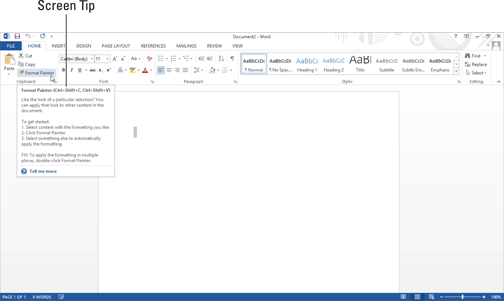
Figure 1-13: A ScreenTip explaining the Format Painter icon.
To view the ScreenTip for any icon on the Ribbon, move the mouse pointer over that icon and wait a few seconds for the ScreenTip to appear.
Shortcut keystrokes let you choose a command from the keyboard without the hassle of clicking a tab and then clicking the icon buried inside that tab. Most shortcut keystrokes consist of two or three keys, such as Ctrl+P or Ctrl+Shift+C.
Displaying dialog boxes
On each tab, the Ribbon displays related commands in a group. For example, the Home tab groups the Cut, Copy, and Paste commands within the Clipboard group and the text alignment and line-spacing commands within the Paragraph group.
Although you can choose the most commonly used commands directly from the Ribbon, Word often contains dozens of additional commands that don’t appear on the Ribbon. To access these more obscure commands, you need to open a dialog box.
In the bottom-right corner of a group of icons on the Ribbon, you’ll see the Show Dialog Box icon, which looks like an arrow pointing diagonally downward, as shown in Figure 1-14.
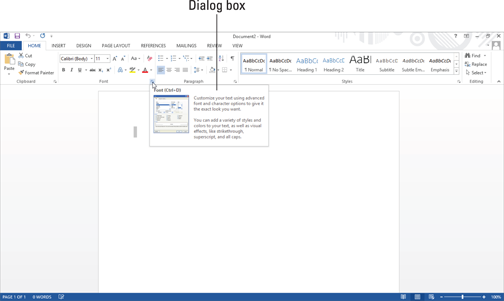
Figure 1-14: The Show Dialog Box icon appears in many groups on the Ribbon.
Not every group of icons on the Ribbon displays the Show Dialog Box icon.
To open a dialog box that contains additional options, follow these steps:
1. Click a tab on the Ribbon, such as the Home or Page Layout tab.
2. Click the Show Dialog Box icon in the bottom-right corner of a group such as the Font or Paragraph group found on the Home tab.
Office 2013 displays a dialog box, as shown in Figure 1-15.

Figure 1-15: Clicking the Show Dialog Box icon displays a dialog box.
3. Choose any options in the dialog box, and then click OK or Cancel when you’re done.
Minimizing the Ribbon
Some people like the Ribbon displaying various icons at all times, but others find that it makes the screen appear too cluttered. In case you want to tuck the Ribbon out of sight (or display a Ribbon that is already tucked out of sight) so icons only appear when you click a tab, choose one of the following methods:
![]() Double-click the current tab.
Double-click the current tab.
![]() Press Ctrl+F1.
Press Ctrl+F1.
![]() Click the Full Screen Mode icon that appears on the far right next to the Help (Question Mark) icon.
Click the Full Screen Mode icon that appears on the far right next to the Help (Question Mark) icon.
When you choose either of the first two methods, the Ribbon displays its tabs but hides any icons that normally appear underneath. When you click the Full Screen Mode icon, a menu appears (as shown in Figure 1-16) and gives you three options:
![]() Auto-hide Ribbon: Completely hides the Ribbon including tabs and icons.
Auto-hide Ribbon: Completely hides the Ribbon including tabs and icons.
![]() Show Tabs: Displays the Ribbon tabs but hides the icons on each tab.
Show Tabs: Displays the Ribbon tabs but hides the icons on each tab.
![]() Show Tabs and Commands: Displays the Ribbon tabs and icons on each tab.
Show Tabs and Commands: Displays the Ribbon tabs and icons on each tab.
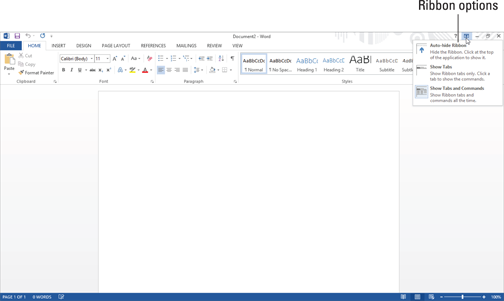
Figure 1-16: The Full Screen Mode menu lets you choose how to display the Ribbon tabs.
Using the Quick Access Toolbar
The Quick Access toolbar appears in the upper-left corner of the screen, directly above the File and Home tabs. The Quick Access toolbar displays icons that represent commonly used commands such as Save and Undo, as shown in Figure 1-17.

Figure 1-17: The Quick Access toolbar provides one-click access to the most commonly used commands.
Using the Quick Access icons
If you click the Save icon in the Quick Access toolbar, Office 2013 saves your current file. If you’re saving a new file, a dialog box pops up, asking you to choose a name for your file.
The Undo icon is unique in that it offers two ways to use it. First, you can click the Undo icon to undo the last action you chose. Second, you can click the downward-pointing arrow that appears to the right of the Undo icon to display a list of one or more of your previous actions, as shown in Figure 1-18.

Figure 1-18: The Undo icon displays a list of actions you can undo.
The most recent action you chose appears at the top of this list, the second most recent action appears second, and so on. To undo multiple commands, follow these steps:
1. Click the downward-pointing arrow that appears to the right of the Undo icon in the Quick Access toolbar.
2. Move the mouse pointer to highlight one or more actions you want to undo.
3. Click the left mouse button.
Office 2013 undoes all the multiple actions you selected.
Adding icons
The Quick Access toolbar is designed to put your most commonly used commands (such as the Save and Undo commands) where you can find them quickly. To add other icons to the Quick Access toolbar, follow these steps:
1. Click the Customize Quick Access Toolbar arrow.
A pull-down menu appears, as shown in Figure 1-19.
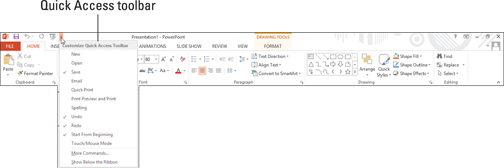
Figure 1-19: The Customize Quick Access Toolbar menu.
2. Click a command that you want to add to the Quick Access toolbar such as Open or Quick Print.
A check mark appears next to each command that currently appears on the Quick Access toolbar. If you want to add more commands that aren’t displayed on the Quick Access toolbar menu, continue with the rest of Steps 3 through 7.
3. Click More Commands.
An Options window appears, as shown in Figure 1-20. The panel on the right shows all the current icons on the Quick Access toolbar. The panel on the left shows all the other icons you can add.
4. Click in the Choose commands from list box and choose a title, such as Home Tab or Insert Tab.
The left panel displays a list of icons and commands.
5. Click an icon and then click the Add button.
6. (Optional) Repeat Steps 4 and 5 for each icon you want to add to the Quick Access toolbar.
7. Click OK.
Your chosen icon (or icons) now appears on the Quick Access toolbar.
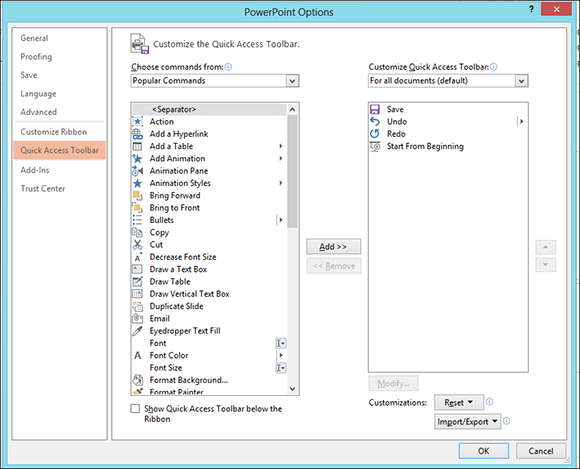
Figure 1-20: The Options window lets you select the icons you want to add to the Quick Access toolbar.
Removing icons
You can remove icons from the Quick Access toolbar at any time. To remove an icon, follow these steps:
1. Right-click an icon on the Quick Access toolbar.
A pull-down menu appears.
2. Click Remove from Quick Access Toolbar.
Office 2013 removes your selected icon from the Quick Access toolbar.
Moving the Quick Access toolbar
The Quick Access toolbar can appear in one of two places:
![]() Above the Ribbon (its default location)
Above the Ribbon (its default location)
![]() Below the Ribbon
Below the Ribbon
To move the Quick Access toolbar, follow these steps:
1. Click the Customize Quick Access Toolbar arrow.
A pull-down menu appears.
2. Choose Show Below/Above the Ribbon.
If the Quick Access toolbar currently appears over the Ribbon, you’ll see the Show Below the Ribbon command.
If the Quick Access toolbar appears under the Ribbon, you’ll see the Show Above the Ribbon command.
Customizing an Office 2013 Program
If you don’t like the default settings of your favorite Office 2013 program, you can modify them. Some common ways to modify an Office 2013 program include
![]() Changing the file format and location to save files
Changing the file format and location to save files
![]() Customizing the icons that appear on the Ribbon
Customizing the icons that appear on the Ribbon
Changing the file format and default location
Every Office 2013 program is designed to share files easily with anyone who uses Office 2013, 2010, or 2007. However, if you need to share files with people who use earlier versions of Office or other programs altogether, you may need to save your files in a different format.
To choose a default file format that each Office 2013 program will use every time you choose the Save command, follow these steps:
1. Load an Office 2013 program.
2. Click the File tab.
3. Click the Options button in the left pane.
An Options dialog box appears.
4. Click Save.
The Options dialog box displays multiple options for defining a default file format and file location, as shown in Figure 1-21.

Figure 1-21: The Options dialog box lets you choose a default file format and location.
5. Choose a different file format and location.
6. Click OK when you’re done choosing different options.
Customizing the Ribbon icons
If you don’t use certain Ribbon icons, you can remove them and replace them with icons that represent the commands you do use most often. To customize the Ribbon icons, follow these steps:
1. Load an Office 2013 program.
2. Click the File tab.
3. Click the Options button in the left pane.
An Options dialog box appears.
4. Click Customize Ribbon.
The Options dialog box displays multiple options for you to customize, as shown in Figure 1-22.
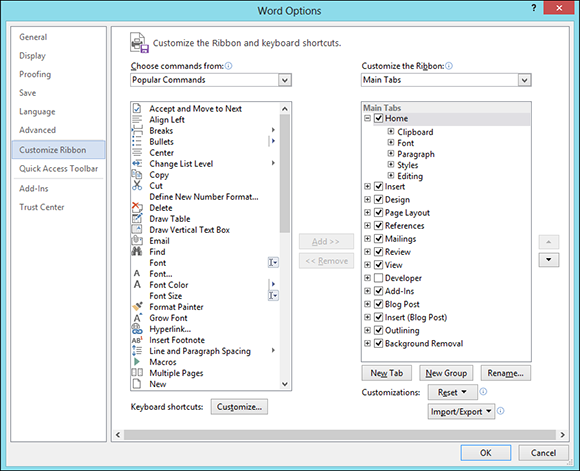
Figure 1-22: The Options dialog box lets you change the icons that appear on the Ribbon.
5. Click different icons and click the Add or Remove buttons.
6. Click OK when you’re done choosing different options.
Exiting Office 2013
No matter how much you may love using Office 2013, eventually there will come a time when you need to exit an Office 2013 program and do something else with your life. To exit from any Office 2013 program, choose one of the following:
![]() Click the Close box in the upper-right corner of the Office 2013 window.
Click the Close box in the upper-right corner of the Office 2013 window.
![]() Click the program icon in the upper-left corner and when a menu appears, click Close.
Click the program icon in the upper-left corner and when a menu appears, click Close.
![]() Press Alt+F4.
Press Alt+F4.
If you try to close an Office 2013 program before saving your file, a dialog box pops up to give you a chance to save your file. If you don’t save your file before exiting, you’ll lose any changes you made to that file.