CHAPTER 3
Designing a Coherent Course
An online course can meet minimum technical standards for course design, yet fail to measure up in a “cognitive walk-through.”
—R. E. Youger and T. C. Ahern
 ONLINE COURSE DESIGN STANDARDS
Probably the best way to prepare to teach an online course is to take a couple of online courses yourself and experience them from the student’s perspective. But whether or not you have, the most important guideline to follow is to ensure tight coherence, or alignment, among all your course components. For example, you should be able to take any assessment item, whether an assignment or a test item, and match it up to a course outcome. If you can do this, you can improve learning as much as fourfold (Cohen, 1987; Squires, 2009). We also have some not-so-surprising evidence that online students choose what content to study based on what they think will make a difference in their performance on assignments and assessments, and they will simply ignore the rest (Murray, Pérez, Geist, & Hedrick, 2012).
Aligning all parts of your course will help your students achieve your intended learning outcomes and make a positive impression (Delaney, Johnson, Johnson, & Treslan, 2010; Fink, 2013; Lee, 2014; Moore, Downing, & York, 2009; Peterson & Cruz, 2004; Reisetter & Boris, 2009; Sun & Chen, 2016; Wiggins & McTighe, 2011). These research findings anchor the online course standards we review here. You can make more of your courses than what the standards mandated by educational institutions and accrediting agencies require, but these standards furnish a set of quality checkpoints. Some are the same as for face-to-face classes, and others apply to your use of technology and your digital rather than physical presence in your online classes. Some campuses have their own sets of standards, some outsource quality review to a separate organization, and some have no published standards at all.
Following are lists of the standards from a sampling of colleges and universities and accreditation agencies. We then lay out the common checkpoints for quality.
Examples of Colleges and Universities That Set Quality Standards
- Quality Matters rubric, copyrighted by MarylandOnline, to which many colleges and universities subscribe by paying a fee (Quality Matters Higher Education Program, n.d.; Roehrs, Wang, & Kendrick, 2013)
- California State University campuses (Quality Online Learning and Teaching, n.d.; QOLT program background, n.d.)
- Illinois Online Network (Quality Online Course Initiative, n.d.)
- Grand Rapids Community College (GRCC Distance Learning Standards, 2015)
- Purdue University Fort Wayne (formerly Indiana University–Purdue University Fort Wayne) (IPFW Online Course Design Standards, 2016)
- Pennsylvania State University, which ranks as a top online bachelor’s degree program (US News & World Report, 2016; Web Learning @ Penn State, n.d.)
Examples of Accreditation Agencies That Set Quality Standards
- Accrediting Council for Independent Colleges and Schools (2016)
- Council of Regional Accrediting Commissions (2011)
- Commission on Colleges–Southern Association of Colleges and Schools (2000, 2011, 2014)
- Distance Education Accrediting Commission (2016)
- Southern Regional Education Board (2006)
- Keil & Brown, (2014)—review of six US regional accrediting commissions and two national accrediting organizations
We also present an integrated summary of the basic expectations for online course quality in exhibit 3.1.
PHASES OF COURSE DESIGN
Procedural templates for instructional design typically display a linear process: you start at one step, complete it, then start the next, complete it, and move on, one step at a time (Dick, Carey, & Carey, 2015). This is a proven methodology (Salifu, 2015). But in practice, some phases occur cyclically or simultaneously (Smith & Ragan, 2005). You may return to a certain phase as you discover what course components work well or need improvement. Nonetheless, this simple model, as shown in figure 3.1, provides a well-established grounding in essential phases of course design.

Figure 3.1 Phases of Course Design
Analysis begins after determining significant learning (see chapter 2). It proceeds with ensuring that outcomes, activities, and assessments lead to the vision of significant learning. Start with a wide-angle view of the vision and then zoom in to other parts of instruction with a general-to-detailed and simple-to-complex organization of all course lessons (Reigeluth, 1999, 2007). Should the sequence of the lessons be chronological, hierarchical, processual, procedural, spiral, or something else? At each stage of analysis, decide how one part of a course fits with the wide-angle view, and design every part so that students’ final grades reflect their achievement of one or another learning outcome. The order of topics also affects how students learn (Ritter, Nerb, Lehtinen, & O’Shea, 2007), a topic we address in chapter 4.
STRUCTURING YOUR COURSE
Students see and value your effort in course design, choice of content, and relevance of assignments (Morrison & Anglin, 2009). Explicit organization and clearly labeled segments reduce student anxiety, help students better understand the learning process, and facilitate their time management (Briggs, 1977; Fink, 2007; Lee, Dickerson, & Winslow, 2012; Martin, 2011; Reisetter & Boris, 2009; Savenye, Olina, & Niemczyk, 2001). Indeed, clarity of structure is a hallmark of outstanding online course design (Dooley, Lindner, & Dooley, 2005; Dyckman & Davis, 2008; Helms et al., 2011; Lee et al., 2012; Reisetter & Boris, 2009; Simonson & Schlosser, 2009; Simonson, Smaldino, & Zvacek, 2015; Smith, 2014; Welch, Orso, Doolittle, & Areepattamannil, 2015).
Course Design Structure
Students benefit from a clear content focus and well-crafted titles for each week, module, or lesson (Reisetter & Boris, 2009). For example, Week 1: Chapter 1 conveys nothing about content. In contrast, Week 1: The Medical vs. Psychosocial Model indicates that students will compare two models in a given week and time frame. Some instructors prefer module or lesson rather than week to make it easier to adapt to changes in schedules, such as a fifteen-week semester format and a six-week summer session format for the same course. Use of a calendar tool or listing of weekly dates along with topic titles helps students plan their time, such as Module 1: The Medical vs. Psychosocial Model [August 6–12]. Beyond titles and time frames, displaying relationships among weeks also helps, even when labeling course sections as modules. Methods for figuring out the best way to structure a course include these:
- Making outlines
- Developing a concept map
- Making notes on colored sticky papers or index cards that you can easily rearrange
- Making a graphic of the course structure (see figure 3.2 for an example)
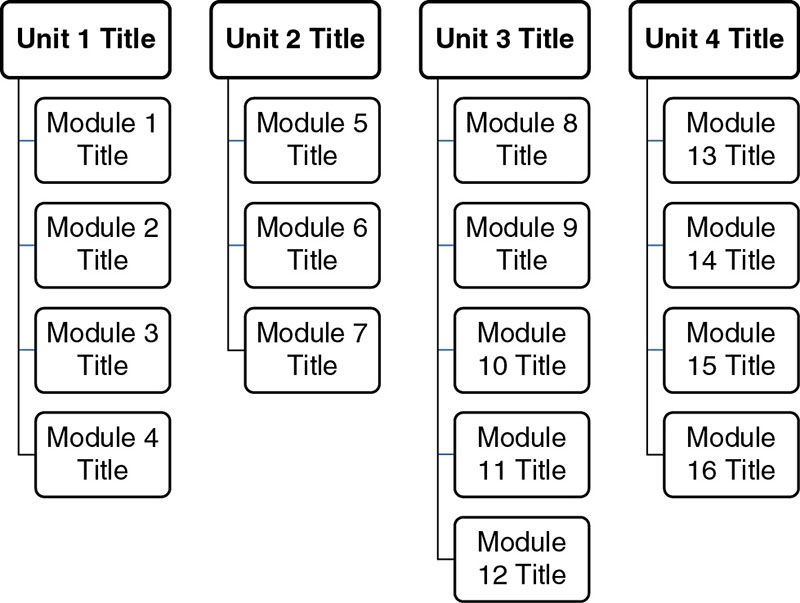
Figure 3.2 Example of Unit Structure for Course Weeks
A simple flowchart also supports the structure of course design, as displayed in figure 3.3. This flowchart starts with a course overview followed by weekly previews and summaries to build bridges between chunks of content (Smith, 2014). These connections not only show the course structure but also allow students to see the progression of the topic they are studying. Include the following sections:
- An overview to introduce the whole course (a few sentences giving the bird’s-eye, wide-angle view)
- A preview for each unit and week (one or two paragraphs or a short bulleted list of the week’s focus)
- A summary of how a completed week or module relates to the upcoming one
- A summary for the end of a unit and its connections to the upcoming unit
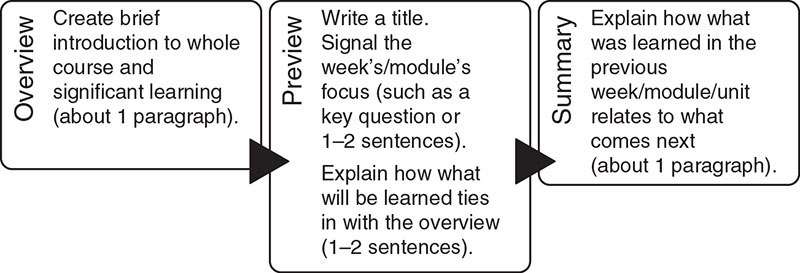
Figure 3.3 Connections across Weeks of Study
The Graphic Syllabus
The most elaborate and informative graphic for showing relationships among topics is the graphic syllabus. Not to be confused with the standard text syllabus, it is a content-focused flowchart, graphic organizer, or diagram of the sequencing and organization of the major course topics through the term. Figure 3.4 shows an example.
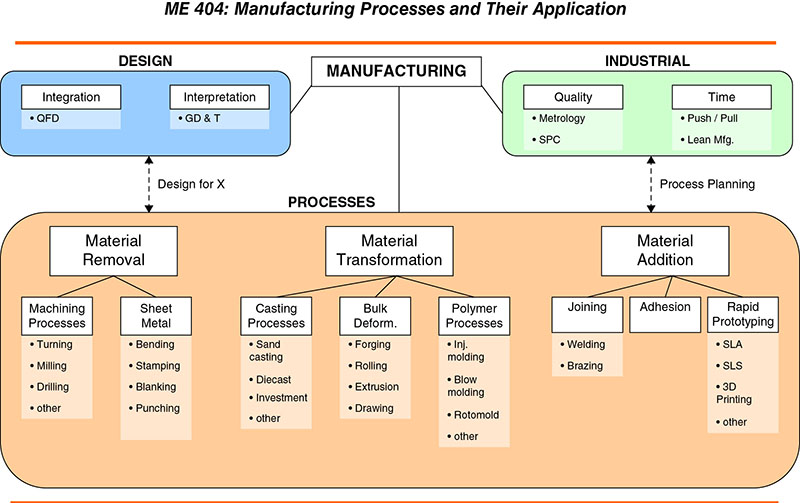
Figure 3.4 Graphic Syllabus of a Manufacturing Course
Source: Courtesy of Laine Mears, Mechanical Engineering, Clemson University.
Along with clarifying the complex connections among topics, a graphic syllabus provides the big picture of your course content—the structure of the knowledge as an integrated whole and a cohesive system of interpreting phenomena—giving students a deeper understanding of the course material than they would otherwise have (Medina, 2008; Vekiri, 2002). Because it is a relational graphic, it influences how students organize learning content (Clark & Mayer, 2011). The knowledge structure enables them to better process, comprehend, and retain the material (Marzano, 2003). That structure is what prior knowledge is all about. New material is integrated not into an aggregate of facts and terms but into a preexisting organization of learned knowledge (Ausubel, 1968; Baume & Baume, 2008; Bransford, Brown, & Cocking, 1999; Carlile & Jordan, 2005; Hanson, 2006; Svinicki, 2004; Wieman, 2007; Zull, 2002, 2011). Acquiring the discipline’s mental structure of knowledge advances a learner from novice toward expert (Alexander, 1996; Bransford et al., 1999; Chi, Glaser, & Rees, 1982; Royer, Cisero, & Carlo, 1993).
A graphic syllabus has other learning benefits as well. It reveals why you organized the course content the way you did. After all, you put substantial time and mental effort into your topical organization, but students, who have no background in the field and no command of the vocabulary, cannot possibly follow your sophisticated logic. Figure 3.4 shows the conceptual relationships using spatial arrangements and arrows. It also cues the associated textual information, which means that simply recalling the shape of the visual can help a student remember the words within it. A final learning boost of the graphic syllabus and graphics in general is their ability to communicate better than text across cultural, language, and ability barriers (Tversky, 1995, 2001). They can increase the accessibility of the materials and help us meet the learning needs of a diverse student population.
A graphic syllabus may notate the calendar schedule of the topics, the major activities and assignments, and the tests. But however much information it contains, it cannot include everything that a regular text syllabus should, so it is meant to be a supplement, not a replacement for it. Nilson (2002, 2007) provides many more examples and much more information about the use of the graphic syllabus.
In designing any graphic or part of your course, avoid cognitive overload (see chapter 4). The exact size of a chunk or segment of learning depends on the kinds of practice, the degree of difficulty, and the amount of content delivered at one time (Hung, Randolph-Seng, Monsicha, & Crooks, 2008; Reisetter & Boris, 2009). Course chunks that are too large inhibit learning. Segmented chunks reduce complexity, prevent students from feeling overwhelmed, and make the content easier to grasp, even if the amount of information remains the same (Clark & Mayer, 2011). Then organize the chunks into a logical sequence of meaningful interrelated sections.
COURSE TEMPLATES AND MAPS: AIDS TO COURSE DESIGN
Although the LMS comes with default course menus, they may not make good instructional sense. Several campuses use online course templates to create a more logical organization and set of names or labels for course areas and course menus. In addition to these kinds of templates, course maps help you plan all the essential course components before building them directly into the LMS.
Course Templates
You or your institution may be able to customize your course site within the LMS. For example, at Purdue University Fort Wayne, the Center for the Enhancement of Learning and Teaching provides several customizable templates for online courses that Goodson (2014) designed in consultation with faculty and technology specialists. Course menu items are grouped into three categories for students and one with tips and resources for instructors hidden from the student view. The sample template in exhibit 3.2 shows the menu items for each category.
- Content
- Communication Tools
- Support Resources
- Instructor Areas
The course home page provides placeholders with directions for adding these items to the home page:
- A course banner (a decorative enclosure with the name and number of a course)
- Welcome
- Start Here (including an online readiness self-assessment survey)
- Online Office
- What You Will Study in This Course
The home page also has a link to the weekly folders, which contain all the materials students need to study and the activities and assignments to complete each week. This type of organization makes sense to students (Smith, 2014). Each placeholder contains suggestions for what to include and how an instructor can make edits. Images of students and icons signal the location of folders, items, assignments, quizzes, and discussions. Weekly folders contain placeholders for:
- An introduction
- Learning outcomes
- A study guide
- Activities for the week in a checklist format
The first weekly folder also holds common start-up activities to give students practice with the technology, like a low-stakes practice quiz about the university’s mascot, color brand, and meaning of the university acronym (1 point for each correct answer). Notes within this folder encourage faculty to give the quiz before the graded syllabus quiz or start-here quiz. The quiz settings allow students multiple attempts to earn all 3 points, and directions encourage them to give at least one wrong answer on one of the attempts so that they can see how the automated feedback works for both correct and incorrect answers. Such practice items familiarize students easily and quickly with the course technology with scarcely any risk.
Common customizations to the template include the addition of a “student café” or “lounge area” for students to use for social discussions and the elimination of the My Group category when the course does not use small groups. Some instructors add a link to the department website or specialized content such as tutorials. In some cases, assignments appear not only in the weekly folders but also in an assignments area linked on the course menu.
Other universities, like Fresno State, furnish course templates and menus from which to choose (e.g., Fresno State University, n.d.). If you lack access to such templates, you can create your own unless your institution prohibits it. Even within fixed menu labels, the course can be consistently and clearly organized to include the same types of course items.
Course Maps
A course map makes it easier to fit your course design into whatever electronic spaces are available to you at your institution. It helps you sequence your course topics, learning activities, and materials. Just select a map template and customize it to make sense for your course (Distance@FSU; Purdue University Course Development Plan; Simonson et al., 2015; UCONN eCampus, n.d.). Topics considered later in this chapter and in chapter 6 will help you develop your map further. The Pennsylvania State University College of Earth and Mineral Sciences (2016) uses a questionnaire to help faculty design new online courses:
- What are the learning outcomes of your course? See the next section on learning outcomes.
- What is the general description of your course? The flow of the course, your approach to teaching, segments of lessons and topics, content to draw on in building the course, and plan for assessment
- How do you envision the course being delivered? Kinds of student experiences, activities previously used in face-to-face classes to carry over to the online course, any real or simulated lab requirements, concepts that require demonstration, kinds of student interactions, technologies, time required for each lesson
- What general resources will your students need for the course? Required and supplementary materials such as textbooks, articles, workbooks, media, online materials or websites, and preferred citation-style format (e.g., APA, MLA, Chicago)
Answers round out the information in a worksheet for:
- Lesson and title
- Learning outcomes
- Level of outcomes
- Accompanying assessments (such as quiz, exam, blog post, lab report)
- Grade category (participation, quizzes, exams)
- Lesson topics
- Multimedia needs
- Textbook chapter and/or external reading/links
Other institutions offer similar course maps, some with additional categories or areas for content, module concept labels, deliverables, or technology strategies.
Let’s examine a course map worksheet in some depth. The actual layout appears on a horizontal long sheet with multiple columns. Denise Jordan at Purdue University Fort Wayne includes a section for student deliverables in her online community health nursing course (D. Jordan, sample course map, 2016). She prepared the course map in Microsoft Word so that she could easily review and make edits before placing the content into her online course site:
Part 1: At the top of each weekly map: title and summary of learning focus: “In this module, settings for community health nursing are addressed; key functions of public health nursing, funding, and governmental structure are included in the discussion. Specialty areas such as schools, correctional facilities, home health, and hospice are examined.”
Part 2: List of deliverables to expect from students and point values
- Writing Assignment: Home Health Settings, 10 points
- Discussion Board: Nutritional Assessment in Schools, 3 points
- Writing Assignment: Dealing with Clients in Correctional Settings, 4 points
- Web Assignment: Explore DHHS Website and Select Priority Health Issue, 3 points
Part 3: Six columns:
- Competencies: Course-level learning outcomes, accreditation standards, and university expectations for graduation at the baccalaureate level
- Learning Outcomes: For each weekly module (such as “Explain the focus of the nursing process and how community health nurses use it to provide care in their communities”)
- Resources: Introductory videos, websites, and topic videos organized to match different learning outcomes (such as the Quality and Safety Education for Nurses website, Video: Just the Job, at http://www.youtube.com /watch?v=VwfkIoEPfHk; Video: Working in Corrections at http://www.youtube.com/watch?v=p1f0SVEH_k)
- Activities: Reading, analysis, critical thinking, discussion, and writing activities (such as Discussion Board: Nutritional Assessment of School Age Children)
- Assessments: Chapter quizzes, assessment of writing activities, and unit exams
- Rubrics: Column to check if a rubric is required to guide grading
Part 4: Detailed deliverables–for example:
Writing Activity:
Settings—Correctional Facility and Hospice
Write no less than 150 and no more than 500 words for this assignment:
As a correctional nurse, you will deal with people from a variety of backgrounds, social classes, and past crimes. Answer these questions:
- How can your values and attitudes toward criminal activity impact your treatment of the inmates?
- Does social class, race, age, or gender make any difference in how you feel about them?
- Consider the Levels of Prevention, Pyramid Health Issue: Sexually Transmitted Diseases in Correctional Facilities on page 1010 in the textbook. What are your thoughts as you consider how to apply these interventions in the local juvenile detention center?
- Reflect on the video, Dying in Prison (http://www.youtube.com/watch?v=W8rd18hKaiY). How does the prison experience depict the essential characteristics of hospice nursing practice? (Jordan, 2016)
Listing the video URLs in her map allowed Jordan to easily embed them into their titles later when she began building the actual course site. This system worked very well in planning a complex course with multiple higher-level outcomes in which some students worked entirely online and others in a hybrid environment where students attended some class sessions on campus and completed learning activities online for other days.
WRITING AND SEQUENCING LEARNING OUTCOMES
Aligning your learning outcomes with a vision of significant learning deserves your utmost attention (see chapter 2). The outcomes state what students should be able to do or perform to demonstrate learning, such as, “The student will be able to classify given rocks as igneous or metamorphic,” or, “The student will be able to identify the parts of a computer system.” As identified in the basic standards for online course design, outcomes should be:
- Measurable
- Student-centered
- Listed in the syllabus and other places at the course level, for each unit or module, and at the lesson level
- Connected to program competencies, degree goals, general education outcomes, and professional accreditation standards
Measurable outcomes center on action verbs (e.g., define, classify, construct, compute, design, assess) rather than nebulous verbs reflecting internal states that cannot be observed (e.g., know, learn, understand, realize, and appreciate). They should also specify conditions under which the student’s performance will be assessed. For example, will the student differentiate among and classify igneous, metamorphic, and sedimentary rocks in writing or orally, and will the rocks be actual samples, or drawn, or photographed? Will the student identify parts of a computer system on a diagram or in an actual computer? Two sets of examples contrast vague versus explicit learning outcomes.
- Example Set 1 (Clair & Baker, 2000, cited in Heywood, 2005, p. 21):
- Vague: “At the end of this course in Engineering Graphics, the student will know how to use a computer-aided-design (CAD) software package.”
- Explicit: “At the end of this course in Engineering Graphics, the student will be able to draw a multi-view representation of a solid object using a computer aided-design software package.”
- Example Set 2 (Dick et al., 2015, p. 130):
- Vague: “The student will be able to lead group discussions aimed at solving problems.”
- Explicit: “During simulated problem-solving meetings attended by master’s students in the leadership department and held in the department’s conference rooms, the student will successfully lead group discussions aimed at solving given problems.”
We tend to display our learning outcomes to students in a list, but this fails to represent the relationships they have to each other. In fact, outcomes later in a course build on earlier outcomes, making a course a true learning process. A flowchart of the learning process through which you plan to lead students is called an outcomes map. Instructional designers start with this same type of map in developing the instructional task analysis for any course. It is the most important part of the design process (Dick et al., 2015; Jonassen, Tessmer, & Hannum, 1999; Smith & Ragan, 2005).
The outcomes map illustrates your course design to students, making their learning process evident in visual form. It starts with your early foundational outcomes (those critical during the first part of the course), progresses through your mediating outcomes, and finally arrives at your ultimate (end-of-course) outcomes. It visually represents the sequence, flow, and cumulative progression of the skills and abilities that students should be able to demonstrate at various times during the course. It shows students how achieving one or more outcomes should enable them to achieve subsequent ones, and it orients them to your course more effectively than a linear list does (Nilson, 2007). You can provide your students with your outcomes map as part of the orientation to your course, whether it is fully online or in a classroom course with technology support. Figure 3.5 shows an example.

Figure 3.5 Outcomes Map of an E-Commerce and Tourism Marketing Course
Source: Courtesy of Irem Arsal, Parks, Recreation and Tourism Management, Clemson University.
Learning outcomes represent our top-priority content and abilities for our students to master (Anderson, 2002; Fink, 2013; Youger & Ahern, 2015). Don Slater in the College of Science at Technology at Georgia Southern University started with the major topics for his Site Construction course. Then for each topic, he created a list of tasks students should be able to accomplish by the end of the course, such as, “Use a hand level, Jacob staff, and folding rule to conduct a vertical survey” (Goodson, Slater, & Zubovic, 2015). Making his topic and task lists visible revealed some gaps and overlaps in what he was teaching and testing. This is precisely the kind of revelation that other faculty who do an instructional analysis experience. You can also start with an inventory of all previous assessment items used for a course, sequence them before mapping them to levels of learning, and then make adjustments to fill in the gaps.
For certain subject areas, professional standards mandate the outcomes that also should go into an outcomes map, as in the following examples:
Engineering: Students should be able to design and conduct engineering experiments as well as analyze and interpret data (Criteria for Accrediting Engineering Programs, 2017–2018).
Nursing: Students should be able to pass a licensure exam and achieve successful employment (Accreditation Commission for Education in Nursing, 2013).
Psychology: Students at the doctorate level should be able to follow communication protocols for challenging interactions, challenges to professional values, and ways to resolve them (American Psychological Association, 2011, n.d.; Fouad et al., 2009).
In fact, professional standards and requirements can shape the whole design of an online course, as in the next examples:
Psychopathology: In professional practice, Veronika Ospina-Kammerer’s students must be able to use the Diagnostic and Statistical Manual of Mental Disorders (DSM) and make decisions in spite of some controversies about its content. She designed her course to require students to use the DSM, analyze controversies between the medical and the psychosocial model, and write research-based analyses of its strengths, weaknesses, and usefulness in professional practice (L. Goodson, personal communication including course design review, 2003–2004, 2016).
Fashion design: InSook Ahn took stock of the professional competencies needed in the worldwide fashion design industry rather than limiting the course to personal style for one’s stereotyped body type. Her course outcomes included the ability to find and implement inspirations for design, explain the cultural diversity of design, and create elements of design (Goodson & Ahn, 2014).
Organizational leadership: Anna Gibson considered the responsibilities and actions of different types of team leaders and followers in actual organizations. She then designed her course to enable her students to practice expected leadership styles, spearhead organizational change, work within group dynamics, and make sound decisions about the ethical, personal, and organizational issues that students are likely to encounter in leadership and follower roles (L. Goodson, personal communication including course design review, 2016–2017).
DEVELOPING VALID ASSESSMENTS
Instructional designers and teaching and learning scholars alike agree on this added leading-edge strategy: design your assessments at the start, before developing the instructional materials, to bring into sharp focus your analysis for your course design (Briggs, 1977; Dick et al., 2015; Fink, 2013; Gagné, Wager, Golas, & Keller, 2005; Simonson et al., 2015; Smith & Ragan, 2005; Wiggins & McTighe, 2011). In the basic online course design standards, the following requirements apply:
- Derive assessments directly from the learning outcomes.
- Administer short assessments of different types periodically throughout the course to enable students to assess their progress.
- Explain to students how completing assignments and assessments will help them achieve the learning outcomes.
All course design standards call for multiple forms of assessment, and students prefer their learning to be assessed a variety of ways (Battalio, 2009). As the following example shows, adding frequent short assessments also improves student learning (Sharpe & Oliver, 2007, p. 43):
There was a problem in the course [introductory chemistry] with a 73 percent overall pass. . . . The students had complained about the time lag for feedback on the eight practical reports and the inconsistency in quality of feedback and grading. . . .
The course was redesigned to include both high and low stakes [assessments]. . . . The low stakes assessments were made available for a week, students were allowed unlimited attempts and their best mark was recorded. High stakes assessments were unseen and conducted under examination invigilation conditions in computer labs.
The pass rate improved to 93 per cent and student feedback and analysis of logs identified the low stakes assessments as being critical. Students completed each of the five low stakes assessments on average three or four times and received instant feedback that provided clues to the answer, but not the actual answer.
Student feedback was extremely positive and students identified the multiple attempts with feedback as highly motivating and helpful.
Assessments should measure the student performance they claim to measure. If you want to determine how well your students can do X, Y, and Z, then assess them doing X, Y, and Z. Hirumi (2009, p. 48) had this to say: “If an objective states that students will be able to list key concepts, assessments should ask students to list key concepts. If an objective states that learners will be able to analyze a case, the assessment should ask learners to analyze a case.”
Many different forms of assessment appear in resources like these:
- Bloom’s taxonomy (Bloom, 1956) for the cognitive domain, which contains excellent examples for different types of learning
- Classroom assessment techniques (Angelo & Cross, 1993)
- MIT’s Teaching and Learning Lab (MIT Teaching and Learning Laboratory, n.d.)
- Teaching at Its Best (Nilson, 2016)
- Teach the Earth (Science Education Resource Center, Carleton College, n.d.)
- Handbooks of strategies and examples for developing and validating test items (e.g., Haladyna & Rodriguez, 2013; Lane et al., 2016)
Beyond well-designed assessments, what about the possibility that students will plagiarize or cheat? Actually, despite such fears, online students self-report no more academic dishonesty than do classroom students (Beck, 2014; Weimer, 2015), and students themselves perceive opportunities for cheating in online courses as no greater than those in most classroom courses (Chiesl, 2009). But in an online course, strategic assessment design matters no less than in a campus classroom. To begin, cheating is less likely under the following conditions (All, 2011; Chiesl, 2009; Simonson et al., 2015):
- Assessments align with learning outcomes.
- The class and campus create a climate of academic integrity.
- Students receive frequent short assessments.
- Grades are based on achievement rather than a curve.
We suggest additional ways to minimize academic dishonesty in the following sections. But first, we consider the different kinds of assessment you might want to use and offer recommendations for designing them.
Objective Tests and Quizzes
Test banks that accompany textbooks specialize in objective items—true/false, matching, multiple-choice, and multiple-answer/true-false—that assess students’ recall of facts, terms, definitions, processes, causes, effects, results, and similar pieces of information available in the course materials. Short-answer items are also classified as objective, but you must read and grade each one, which undermines the efficiency advantage of objective items. A cleanly written objective item avoids two tricky pitfalls: diverting a knowledgeable student away from the correct response and cluing a poorly prepared student toward the correct response (Suskie, 2009). Faulty phraseology or construction can do either.
Multiple-Answer/True-False Items
Multiple-answer/true-false items have a stem and a list of responses, as do multiple-choice items. However, students do not select just one right response; they decide whether each option is true or false in relation to the stem. This type of item has the following format (Bellchambers, Davies, Ford, & Walton, 2015).
With regards to thermoregulation, which of the following are correct?
- Rectal temperature is an accurate way to assess core temperature.
- Heat stroke can be life-threatening.
- Genetic factors predispose to heat stroke.
- Heat stroke is rare in elderly patients, as they are more susceptible to hypothermia.
- The hypothalamus is not involved in temperature regulation in patients with heat stroke.
This type of item is flexible enough to accommodate any number of correct answers and represents the statistically strongest and most efficient type of objective question. Each option—and there may as many as eight or ten—presents a decision point and, in essence, a separate item. So with just ten stems, you can easily generate forty to eighty items, and the more items a test has, the more reliable it is (Ebel, 1978; Frisby & Sweeney, 1982.) Furthermore, multiple true-false choices remove the process-of-elimination strategy.
Short-Answer/Recall Items
Recall items in frequent quizzes make excellent compliance checks of reading, viewing, and listening, and recall has its place in learning, but not as the end of college-level or professional education. You should set, teach, and assess learning outcomes to include higher-level thinking, such as interpretation, nonroutine problem solving, application, analysis, inference, generalization, synthesis, conclusion drawing, and evaluation. Contrary to popular myth, you can assess these cognitive skills with most objective items. You can, for example, have students rewrite a false statement to make it true or have them explain why they chose a certain multiple-choice option. But like short-answer items, only you, not the computer, can grade them.
Clicker Databases
In the sciences, mathematics, and a few other disciplines, you can find many concept-oriented multiple-choice items in clicker question databases on the web, such as these:
- Carl Wieman Science Education Initiative at the University of British Columbia: http://www.cwsei.ubc.ca/resources/clickers.htm#questions
- Agile Learning: Derek Bruff’s Blog on Teaching and Technology: http://derekbruff.org/?page_id=2
- Vanderbilt University Center for Teaching: Classroom Response System (“Clickers”) Bibliography: https://cft.vanderbilt.edu/docs/classroom-response-system-clickers-bibliography/#education
- Clickers in Statistics Courses at Oklahoma University: http://www.ou.edu/statsclickers/clicker Questions.htm
You might also search the web using “clicker questions” + “teaching” and look for your discipline.
Even if you do not plan to use clickers, you can use these types of items in creating self-assessments, practice quizzes, and, in some cases, prompts for online discussions.
Stimulus-Based Items
You can also compose your own higher-level-thinking multiple-choice and multiple-answer/true-false items around a realistic stimulus—a table, graph, diagram, flowchart, drawing, photo, map, schematic, equation, data set, description of an experiment, report, statement, quotation, passage, poem, situation, or short case—that students must interpret or analyze accurately and intelligently to answer the items correctly. These have been called “interpretive exercises” (Suskie, 2009), but “stimulus-based items” is the more descriptive term we use here. Usually you can create a series of items around one stimulus. Multiple-choice items built around a stimulus frequently appear in professionally written standardized tests, such as the Scholastic Assessment Test, the Graduate Record Examination, and the California Critical Thinking Skills Test (CCTST), as well as licensing exams, such as the National Council of Licensure Examinations for registered and practical nurses.
Be creative in choosing stimuli, and use different kinds. Just make sure to give your students prior practice in interpreting and analyzing the types of stimuli you put on the test and in performing the thinking skills each item requires. Try to minimize interlocking items—that is, items that responding to correctly require having responded correctly to previous items in the series. While you have to find the stimuli yourself, you will see them all around you when you start looking for them.
Distracters
To develop plausible distracters (wrong answers), you can juggle the elements (or variables) in the correct responses. For example, if you have students interpret a table from which they should conclude that more industrialized nations have lower birthrates and infant mortality rates than less industrialized nations, the elements are a nation’s degree of industrialization, birthrate, and infant mortality rate. You can mix these variables together in an assortment of ways. You can also introduce other variables that students often confuse with the elements—for instance, population density and population growth, which some students mistakenly equate with birthrate. In addition, make all responses grammatically parallel and about the same length, and order them alphabetically, numerically, or chronologically to reduce the possibility of cluing students or falling into a pattern (Suskie, 2009).
Reducing Cheating
Whether you select your objective items from a test bank or compose your own, you can give more robust tests and minimize the cheating opportunities if you develop a pool of different but equivalent items for each learning outcome (Helms et al., 2011). Your LMS should have a tool to create a test by sampling items or question sets randomly from the item pools so that each student will have comparable but different assessments. An instructional designer may be able to create sets of equivalent items using LMS tools so students see different variations of each item but in the same order.
On your own, you can use LMS settings to make a test available for a limited period of time, such as forty-eight hours, and set a time limit just long enough for knowledgeable students to complete the test. You might also select “show one question at a time” and “no backtracking,” as well as “allow multiple attempts,” and students would get a new test for each attempt (Chiesl, 2009). Let students know the scope, types of assessments, and limits in advance.
Perhaps you can convince students that cheating is not in their best interests. This was the strategy that chemistry professor Paul Edwards followed in writing the cover page for his online diagnostic test (P. Edwards, personal communication, August 14, 2015):
In order to offer this Diagnostic Test online, we are relying on your maturity and personal integrity to complete the test yourself without help from other people or resources. More specifically, the Chemistry Department expects you to comply with XXX University’s Code of Conduct, particularly Section II titled Statement of Academic Integrity.
It is also important for you to understand that if you do get outside help, you could find yourself enrolled in a course for which you are NOT prepared. A low grade in a four-credit course such as General Chemistry or Principles of Chemistry 1 can jeopardize not only your academic standing but also your financial aid early in your academic career!
Edwards also added an item at the end of his test stating that by submitting the test, the student was verifying that the work was his or her own and agreed to be bound by the university’s code of conduct.
Just about every LMS has a tool for monitoring student activity. In this case, Edwards chose to monitor coincident log-ins and students’ responses for patterns suggesting cheating. On the rare occasions when he or his colleagues detected cheating, they followed the institutional procedures in place for proctored testing. But in his view and experience, students are no more likely to cheat on online tests than classroom tests. The key lies in the character of the student. If the student is already inclined to cheat, the student will do so in any context, and the converse also holds true for honesty.
Papers, Graphics, and Projects
While these take longer to grade than an objective test, student-constructed work like essays, papers, graphics, and projects may be the only way to assess student performance on certain outcomes, such as the ability to conduct research, organize a project, set up a business, make ethical decisions, and communicate in writing. Avoid stock paper topics and analyses of textbook cases because students may be able to purchase them on the web. Many capable entrepreneurs operate online paper mills available equally to classroom and online students (Ko & Rossen, 2010; Simonson et al., 2015).
To avoid stock assignments, customize your assessments to what your outcomes specify and what you teach, and devise topics and deliverables that require originality, creativity, personalization, and relevance. For instance, you can have students create a product relevant to their current or future job: a website, a piece of equipment, an oral or video presentation, a treatment plan, a business plan or strategy, or marketing materials. Or ask them to select a problem they are facing in their workplace or personal life and conduct research to identify possible solutions. Or have them analyze a challenging new case that describes a situation they are likely to face someday. Alternatively, you can ask for a graphic of important course material, such as a flowchart, a schematic diagram, a decision map, a concept map, or a mind map. You may even be able to give students a choice of presentation media. No technology solves the problems caused by poor assignments (Council of Writing Program Administrators, 2003; McCord, 2008).
Students need resources and guidance in the process of developing their papers and projects. Make your plagiarism and citation policies clear, and give students resources and exemplars of citation practices—either your own or those available elsewhere. For example, the Purdue Online Writing Lab (OWL, 2017) supplies students with guides and exemplars on writing, research, and citation practices. You can further discourage cheating by breaking down and chunking major assignments into manageable pieces that have spaced due dates and providing feedback for improvements. This strategy discourages students from procrastinating as well as cheating. A good first chunk might require annotations of research articles before asking for any other writing.
Grading with a rubric can save you and teaching assistants some time, as well as improve your students’ work (Howell, 2011; Jönsson & Svingby, 2007). Students have a right to see your rubric in advance so they will know the criteria on which they should focus. Make sure to explain how your rubric aligns with the outcomes. Your LMS may have a built-in rubric tool that allows you to give comments as well as score student assignments. Suskie (2009) identifies and gives examples of these types of rubrics: checklists, rating scales, holistic rating scales, and descriptive rubrics. You can find many examples at these websites:
- Association of American Colleges and Universities VALUE Rubrics: https://www.aacu.org/value /rubrics
- Carnegie Mellon University, Whys & Hows of Assessment: http://www.cmu.edu/teaching/assessment /howto/assesslearning/rubrics.html
- Carnegie Mellon University Eberly Center, Examples by College: http://www.cmu.edu/teaching /assessment/examples/programlevel-bycollege/index.html
In addition to designing meaningful assignments that align with course outcomes, make sure you know the limits of plagiarism detection tools. After all, manufacturers explicitly caution that the instructor, not the tool itself, is responsible for plagiarism detection. Such tools have limited databases, and you need to know whether they include the ones your students are able to use. Turnitin and SafeAssign, for example, do not check work against all subscription databases, online encyclopedias, textbooks not posted online, or purchased papers (Kaner & Fiedler, 2008). Some faculty use such detection tools just for teaching students about what counts as originality. You simply need to make informed choices about how to use them (Goodson, 2007). If in doubt about a tool’s value or use, check with your librarian or instructional designer or others who have knowledge and experience with it. You may find that a web search of selected phrases serves just as well for suspiciously constructed student prose (Ko & Rossen, 2011; McKeever, 2004; MIT Comparative Media Studies: Writing, n.d.).
Self-Assessments and Reflections
Assignments and activities that require self-assessment and reflection enhance the performance of online students (US Department of Education, 2010), usually without generating a heavy grading workload. Students can assess their learning using online readiness surveys, knowledge surveys, flash cards, and practice quizzes. You can place reflection prompts in discussion forums, blogs, chats, or short paper assignments—for example:
- “What did you find to be the ‘muddiest point’ in the week’s lesson?” (Angelo & Cross, 1993).
- “What are you doing to learn the material?” (Fink, 2013).
- “What are your personal goals for this course?” followed at the end of the term by, “What have you learned in this course?” (Weimer, 2012).
In a portfolio, students can reflect on their improvements, strengths, and weaknesses. In an “exam wrapper” (questions to prompt error analysis about study and test-taking strategies), they can assess how effectively they prepared for the exam, what else they could have done, what kinds of mistakes they made, and how they will better prepare for the next exam (Ambrose et al., 2010; Barkley, 2009; Lovett, 2013). If your prompts ask students to analyze or react to their peers’ work (they should not ask students to evaluate the way we do), peer feedback also encourages self-assessment (Nilson, 2003). The student author cannot help but assess her communication skills, especially if her peer reviewers misunderstood her intended message.
Group Work
The same recommendations for individual work apply to group projects, but group assignments should present a greater degree of challenge than an individual assignment. Students have to need each other to come to defensible conclusions or develop and assess alternative solutions. They have to generate synergy within their group. If an assignment is too easy and straightforward, they will simply divide up the work and collaborate only to piece their sections together at the last minute.
Another way to encourage mutual need among group members is to assign roles among them. The roles should make sense in the context of your course and group assignment. Examples include discussion leader, prompter (or kickstarter), time manager, encourager, project coordinator, skeptic, summarizer, and reporter. These roles can rotate from week to week or assignment to assignment. Or you can set up a jigsaw, in which each member becomes an expert on a topic and teaches it to the group. Then the group reaches a decision, judgment, or recommendation. Amador and Mederer (2013) explain how to adapt such jigsaw groups and problem-based learning to an online course.
At the end of all group work, the group must generate and report some kind of conclusion as a result of their research, reflections, or analyses. Group project tools may include entries for class wikipedias, file exchanges, website-building software, and collaboration tools like Google Hangouts, Skype, discussion forums, e-mail, wikis, and chat. If your LMS does not allow you to set up private spaces for each group, you can make group spaces by creating separate wikis, chat, and discussion forums or threads for each group.
Grade group assignments with a rubric, but first decide how to determine individual grades from the group product grade. Teamwork will be more successful when you include individual accountability, such as a research paper submitted to both instructor and group members, or you might add an individual assignment in which students reflect on the process of completing their designated portion of the group work (Huang, 2014). Here are some options for grading:
- Give all the members of the group the same grade based on their collective product.
- Assign group members primary responsibility for different parts of the project—for example, one member develops the bibliography, another conducts the research, and another does the write-up—and grade them on their parts.
- Base a significant portion of the individual grade on peer performance evaluations, and break the project into stages to help ensure that students write honest evaluations after each stage. Then you can weigh the group grade for each individual by the quantity and quality of his or her contribution.
This last strategy merits elaboration. The peer portion of the final grade should reflect the amount and importance of group work in the course—at least 5 to 20 percent but no more than 30 percent. At the end of the term or group work unit, have members assign each of their teammates a letter grade, rating, or points for their contributions or estimate the percentage of the work they contributed. If you use percentages or points, you may want to prohibit students from giving equal percentages or points across their group members. Of course, students must have criteria on which to grade their peers on being a good group member, such as attendance, preparation, promptness, leadership, quality of contributions, quantity of contributions, and social skills.
You can have students brainstorm criteria in an online discussion, or have the groups develop their own to incorporate into a group contract, or you can provide them yourself. If you choose the last option, you should include the following five criteria because students value these behaviors the most in their teammates (Crutchfield & Klamon, 2014):
- Contributing to the group’s work
- Communicating effectively
- Striving for a high-quality product
- Doing one’s share of the work
- Making every effort to solve group problems and resolve conflicts
Performances
Many online courses have field experiences, labs, and specific performance components. Assessments of performances such as music, dance, acting, athletics, and clinical procedures generally require a rubric. For example, a vocal performance rubric may include criteria such as these: musicianship; intonation/tone; rhythm, dynamics, phrasing, and diction; and stage presence, each with ratings from “excellent” to “not satisfactory” (University of North Georgia, Department of Music, n.d.). In nursing, a medication administration rubric may focus on accurate preparation, the selection of correct supplies, the site or route selection, and administration technique, each with ratings from “proficient” to “nonperformance” (Rcampus, n.d.). Whatever type of performance you are assessing, prepare the rubric well ahead of time in alignment with your learning outcomes, and give it to students along with the assignment directions to clarify your expectations.
Proctored Assessments
If your department or program requires proctored assessments, provide students with directions on the procedures, location, any costs, and any advance arrangements needed. Sometimes proctored assessments occur off-site or in other countries, and your program may provide preceptors or monitors in various locations. Any such provisions require coordination with your institution’s protocols.
MAPPING LEARNING ACTIVITIES TO OUTCOMES
All the learning activities in your course should be organized around your course outcomes so that you have no inconsistences in what you teach, how you teach, and what you assess. Follow the same line of reasoning for learning activities as you do for assessments: if you want students to learn to do X, Y, and Z, plan activities that give them practice in doing X, Y, and Z, starting with the simple and progressing through higher complexity. Recall the online course design standard to make sure that course materials are:
- Relevant
- Accurate
- Comprehensive
- Free of extraneous content
- Organized in a logical sequence of meaningful chunks
Learning activities must require action, so use activity verbs such as read, study, reflect, listen, view, watch, write, discuss, do, describe, explain, analyze, or evaluate. Calling their approach R2D2, Bonk and Zhang (2008) use read, reflect, display, and do as major organizing categories and suggest over one hundred online learning activities. Watkins (2005) offers seventy-five more online activities. Many of the assessments count as learning activities for your students (such as flash cards, quizzes with feedback, and peer reviews). These and other learning activities are in fact your teaching methods. Remember to include estimates of the time required to complete them.
Classroom faculty have several sources to turn to for guidance in deciding their learning activities (e.g., Ambrose et al., 2010; Davis & Arend, 2013; Fink, 2013; Nilson, 2016), and you can integrate most of these activities into online courses in digital, audio, or video formats (Hirumi, 2009; Jacobs, 2014; McLaren, 2009; Simonson et al., 2015; Vai & Sosulski, 2016; Watkins, 2005; Zayapragassarazan & Kumar, 2012). Examples include:
- Short lectures
- Student self-assessments
- Written reflections
- Quizzes
- Games
- Debates
- Discussions
- Demonstrations
- Short writing-to-learn exercises
- Analyses and critiques of artistic or intellectual work
- Presentations by guest speakers and expert panels
- Case studies and their analysis
- Role plays and their debriefings
- Online simulations and their debriefings
- Jigsaw, team-based learning, and most other forms of group work
- Surveys (for fun, reflection, or self-assessment)
- Field trips (real and simulated)
- Problem-based learning (including outside research)
- Student peer feedback and review
- Service-learning/community engagement
- Individual and group projects and presentations
In classes enrolling a substantial number of adults, you also can draw out students’ own experiences and knowledge in discussion forums, chats, blogs, and group work, and they will be glad to share it.
When deciding on learning activities, consider giving students practice not only in performing your learning outcomes but also in doing whatever your discipline does. If your field requires interpreting data, your activities should include practice in identifying types of data, implementing methods of analysis, and interpreting sample data sets. If it involves analysis of texts or documents, so should your learning activities. If it entails mathematical problem solving, provide students with process (step-by-step) worksheets, worked examples, and partially worked examples to reduce their cognitive load and scaffold their learning (Kirschner, Sweller, & Clark, 2006). Recall the online course design standard to use best practices in the discipline and online instructional design.
Your choice of activities should also tie into your decisions about significant learning. The following examples describe learning activities that can foster significant learning (Fink, 2013, pp. 175–176):
- Nursing—cultural issues in childbearing: Students view films and read books to explore the ethical and cultural issues of childbearing for women and their families as well as for the nurses themselves.
- Different perspectives on the environment: Students keep journals on their personal experiences with nature while reading varied and often conflicting views on the relationship between people and their environments.
- Art history—myth, religion, and art: Students work on weekly problems that explore the relationships between spiritual beliefs and artistic works, drawing on material from different world cultures and historical periods.
Do consider the time required for your activities so that you anchor your plans in your course’s class time expectations, such as contact time of three hours per week for a three-credit course (Vai & Sosulski, 2016). Giving students choices of activities and assignments can increase their learning and motivation.
CHOOSING ONLINE COURSE CONTENT
Online courses require different means of content delivery from classroom courses. Handouts need to be posted in electronic form. Movies may not be legal to show online (see the “Online Copyright Guidelines” section). And long lectures and presentations will fail because students stop viewing and listening after about six minutes. This phenomenon parallels McKeachie’s earlier classroom findings about inattention after five to ten minutes (McKeachie & Hofer, 2002). In online classes, such student inattention becomes explicitly visible through electronic monitoring of activities and questions from students about what has already been covered in a long presentation.
Consider your own technology skills when choosing how to present content. Recall the online course design standard for knowing how to use the tools you expect the students to use. If you are just getting started in online teaching, use technology and media you are already comfortable with, and consult with your technology support team or instructional designer on how to make these fit well in your LMS. The quality of your students’ learning experience relies less on using a lot of media and more on the coherence of your course, your instructional design strategies, the clarity of your course structure, the organization of your modules and lessons, your choice of meaningful titles and labels, and the ease with which students can locate course areas and materials (Moore et al., 2009; Reisetter & Boris, 2009; Sadik & Reisman, 2009). The media matter only to the extent that they can support and engage learning (Clark & Mayer, 2007, 2011; Daniel, 2011).
In making your initial choices about content, consider the following questions (Zheng & Smaldino, 2011, p. 112):
- What content must be included, and what can be left out?
- What is the best way to sequence and organize the materials?
- What are the best media to present the material?
With online course sites, whether teaching fully online or hybrid, you have many resources and ways for delivering course content:
- Traditional textbooks. Generally an author or publisher holds the copyright, students purchase the textbook, and instructors build learning activities around the textbook. (Instructors and instructional designers can contact the publisher for a free preview copy.)
- Content-rich supplemental online publisher resources to accompany textbooks, such as Pearson’s Mastering Astronomy site (Pearson, 2016), for which students pay an access fee. You must password-protect access to any digital content sold with a textbook.
- E-textbooks, such as Wiley-Blackwell’s Environment and Society, which comes with companion websites of instructor and student resources (Robbins, Hintz, & Moore, 2014). Some faculty build their own e-textbooks to customize and align the content to their outcomes (Coussement, Johnson, & Goodson, 2016).
- Web-based multimedia and open-educational resources. You can find an untold number of online resources—scholarly articles, images, podcasts, videos (TED Talks, YouTube), animations, simulations, and more—for both content presentation and learning activities (see chapter 6).
- Personally recorded podcasts or videos. Be sure to divide up your video and audio lectures into five- to seven-minute segments. Recordings are not difficult to produce yourself and may be well worth it for your students’ learning (see chapter 4 for guidelines).
- Original content files added directly to the LMS. Figure 3.6 shows how an item with attached files might look at a course site.
Figure 3.6 Example of an Activity with an Attached File
ONLINE COPYRIGHT GUIDELINES
Because you have many resources from which to draw when building an online course, you need to pay attention to copyright. How much attention depends on what material you use and how you use it. You probably already know that copyright law protects all creative work: literary (fiction and nonfiction), musical (including lyrics), dramatic (including accompanying music), choreographic, sculptural, pictorial, graphic, architectural, audio, and audiovisual (including motion pictures). Copyright law does not protect facts, ideas, discoveries, inventions, words, phrases, symbols, designs that identify a source of goods, and some US government publications (you must check on each one). However, we still have to cite the sources of our facts, other people’s ideas, and certain key phrases.
You can use some material more freely than others and need to take care to avoid copyright infringement. Let’s start with some basic legal definitions of free use, fair use, and public domain before looking at the restrictions on certain kinds of materials.
Free use means no license or written permission from the copyright holder is required to copy, distribute, or electronically disseminate the work. Whether a given case qualifies depends on three rather gray criteria: (1) your use is fair use, (2) the material you wish to use is factual or an idea, and (3) the work you wish to use is in the public domain.
In general, fair use allows limited use of materials for purposes of teaching, scholarship, research, criticism, comment, parody, and news reporting. Legal determinations of fair use are made on a case-by-case basis. The amount and significance of material used from the protected work also figure into the determination. A tiny amount should not raise concerns unless it is of substantial importance—such as the heart of the copied work, a trademarked logo, or content that would harm an author’s or copyright holder’s sales market.
Public domain is a clearer legal concept but is sometimes redefined. A work published in the United States is now in the public domain if (1) it was published on or before 1923, (2) ninety-five years have elapsed since its publication date if it was published between 1923 and 1977, or (3) seventy years have elapsed since the author’s death if it was published after 1977. However, if a work was published between 1923 and 1963 and the copyright owner did not renew the copyright after the twenty-eight-year term that once applied, the work has come into public domain. Corporate works published after 1977 enter the public domain ninety-five years after publication.
Restrictions on Online Course Materials
Here is what you can freely use in an online course:
- Your own original work if it is not published or otherwise owned by another agency
- Materials that explicitly give you permission for their use, such as those made available under Creative Commons Licenses
- Materials for which your institution has purchased a license to allow use in courses (which may include media)
- Materials in the public domain
- Links to websites with appropriate citation
With respect to websites, you can link to but may not copy the content at a website without permission. These linked sites may include media resources, such as iTunesU, YouTube Education, TED Talks, and many more listed in chapter 6.
Certain restrictions apply to the use of other kinds of materials. As the rules stand now under the Technology Education and Harmonization Act (TEACH Act) of 2002, you may, without prior permission, download online images for your teaching if you do so in a way that does not allow students to copy them. You may do the same for sound and video files but subject to length limitations: videos to three minutes or 10 percent, whichever is shorter, and music to 10 percent of the composition, up to a maximum of thirty seconds. The same length limits apply if you or your students take excerpts from a lawfully purchased or rented DVD or CD.
The TEACH Act allows you to post materials online if you also displayed them when teaching the same course in a classroom. Thus, you would be prohibited from posting the chapter of a book online because that is not something you would have displayed.
You may be fortunate enough to find that your library or department already has a license for use of the materials you would like to make available to your online students, such as ArtStor and collections of videos for your discipline. Otherwise, be mindful of staying within the limits of the law. In addition, the TEACH Act requires you to add a legal notice in your syllabus that online materials “may” be copyright protected. Some university lawyers contend that fair use protection makes permissions unnecessary (Foster, 2008), but libraries tend to err on the conservative side and routinely request permission for use.
Obtaining Permission or a License
The copyright holder of any material is entitled to set limits on who may use the materials, how long anyone may use them, and in what ways. You will have to seek permission whenever you or a student wants to exceed the length limits described or post or repost any of the files online, or if you are unable to prevent students from copying the materials. To stream an entire commercially produced motion picture or musical in your LMS requires a very costly license and support from your information services technology specialists. Such media can take up too much digital space in your course if they are not correctly copied and streamed for viewing.
When going to the copyright source to request permission, supply your name and role, the name of the course, the semesters in which you would like to use the material, the estimated enrollment, and the LMS, and explain that the course is password-protected. Your library staff or instructional designer may have a standard form to use and guidance to share. If you request permission on your own, you might start by contacting the Copyright Clearance Center (http://www.copyright.com/get-permissions/). It offers an electronic service that usually obtains your permission within a few days. If you request a license, write the copyright holder supplying the same information about yourself and your course as noted. A license always entails fees, but they may be negotiable.
Requests do not always result in permissions and licenses, and online use is legally more restrictive than classroom use. For example, in a social work course, an instructor had shown in her classroom an out-of-print documentary video of the mental health treatment of a young child. Her use was legal in her classroom because she had purchased the video, but it was denied in her online course.
When in doubt, check the latest laws with your campus copyright advisory office, the appropriate librarian, or your institution’s general counsel. For more details on copyright protections, restrictions, and exemptions, see exhibit 3.3.
For more help, look for copyright charts, tools, and checklists. You might start with the Stanford University Libraries Copyright & Fair Use Charts and Tools (http://fairuse.stanford.edu/charts-and-tools/). In addition, if you search for “checklist for compliance with the TEACH Act” or “TEACH Act checklist,” you will find checklists provided at several universities, perhaps even your own. You can do a similar search for “fair use checklist” or “checklist for fair use.”
THE SYLLABUS: WHAT TO INCLUDE
Your syllabus gives students their first impression of both your course and you as their instructor, so it merits careful development. When you design it well, it becomes a central part of your online course orientation. Within it, you can make the overall course design and structure clear to students as required in online course design standards. Here is an annotated list of what your students really want to know: policies, assignments, and grading methods (Doolittle & Siudzinski, 2010). These items can also help you detail your course map. Of course, follow the topical requirements, organization, and template that your institution requires.
- Basic course information: the course number and title; any required or recommended prerequisites for enrollment, including the instructor’s permission; credit hours; the days, hours, and way to access any synchronous meetings; directions on how to access the course LMS site and locate the LMS folder of online course materials (e.g., exercises, assignments, exams); and contact information for help with technology and software issues. State the time zone you are using since some online students may be in a different one.
- Information about yourself: your full name and title; the way you wish to be addressed; your e-mail address; and your home page URL (if you have one). If you will use Google Hangouts, Skype, FaceTime, or other telecommunication software for office hours, provide your address. (Conversation may be a more efficient way to help the students understand the material than any kind of text-based electronic exchange.) If you decide to give students your home or cell phone number, you may wish to limit calls to certain days and reasonable hours. Also specify the days and hours that you will be answering their e-mail so that they do not expect you to be on e-mail 24/7. You also may wish to add a department e-mail address or phone number.
- Similar information about others supporting the course, such as a teaching assistant or librarian.
- A briefly annotated list of required materials such as readings, podcasts, and videos: books (including edition and price); online materials (with their URL or LMS folder locations); reasons for using these materials; and copyright limits. Work ahead of time with your bookstore for course materials.
- Any other materials required for the course, including cost estimates and where to find them. (Don’t forget eBay and Amazon.com.) For example, some science labs require students to buy sets of lab equipment. Art and photography classes usually expect students to furnish their own equipment, supplies, and expendable materials. If special types of calculators, computers, or software are called for, these too deserve mention. If the materials will not be used immediately, specify when they will be needed in the course.
- Supplemental materials—students want these even if they do not use them (Reisetter & Boris, 2009).
- A course description, which may be as brief as a few lines describing the content or the full catalogue description. However, you might want to elaborate on the organization or flow of the course and your rationale for it. You may even want to mention topics the course will not cover if previous students have held mistaken expectations.
- Your student learning outcomes for the course. These should include not only your ultimate outcomes but also your major mediating and foundational ones. Better yet, draw an outcomes map for your students to show them the learning process you plan for them. Review it to see that your course targets all six of Fink’s (2013) dimensions of significant learning (Palmer, Bach, & Streifer, 2014; see chapter 2) and has solid assessable learning outcomes. You do not want students to interpret your outcomes as binding promises to them because students have to apply themselves to achieve these outcomes. Therefore, consider adding this caveat or similar disclaimer:
(1) Students may vary in their competency levels on these outcomes, and (2) they can expect to achieve these outcomes only if they honor all course policies, complete all assigned work in good faith and on time, prepare adequately for quizzes and exams, and meet all other course expectations of them as students.
- A list of graded course requirements and breakdown of your grading scale, such as the number and point values of homework assignments, student peer feedback, discussion boards, chats, quizzes, tests, papers, graphics, and projects. If you expect students to participate in discussion boards, tell them so. State if their lowest-scoring work can be thrown out. Explain the grading system you will use (which we hope is criterion referenced), along with percentage breakdowns (e.g., 91–100 = A, 81–90 = B, and so on). Describe the types of homework assignments and quizzes and tests, including the types of items or essays. Also explain why you are assessing the way you are and how your assessments map onto the learning outcomes (Palmer et al., 2014).
- How major assignments will be evaluated: with an atomistic key of many separate elements, a holistic rubric, or a multicriterion rubric. You might briefly identify the rubric criteria. Also explain your policies regarding revisions and extra credit. To prevent frivolous grade protests, state in the syllabus that you will deal with a protest by regrading a student’s entire work because if you made a mistake in one place, perhaps you made one in another. Or require that students submit grading complaints in writing, tying their justification to specific locations in the readings, podcasts, videos, or your discussion board comments (dated) within forty-eight hours.
- Your policies on missed or late exams and assignments. Your LMS has electronic monitoring tools for viewing when students enter and participate in a course. Students may have good reasons for getting a late start in the class or missing a discussion due date, an assignment deadline, or a test, and you should indicate that you will ask for documentation. Identify what assignments or quizzes can have multiple attempts. State whether students can drop one of their grades during the term or can substitute their grade on one assignment or test for another they missed. If you assess penalties for late work, describe them precisely to prevent any later disputes. Check the academic regulations in your institution’s course catalogue so your penalties do not exceed what is allowed.
- A statement of your and your institution’s policies on academic integrity, as well as how they apply in your course. Your institution’s policies are boilerplate statements that all but beginning students have seen and heard before, so they might very well belong in an appendix. Yours, however, deserve a more prominent place. This is an opportunity to build a strong explanation for what you mean by academic integrity. Otherwise your students may assume that you are naive or will look the other way. This statement should include the procedures you will follow in prosecuting violations and the sanctions a student may suffer. Consult your institution’s course catalogue, student handbook, or faculty handbook for details, and find out what your department or program may expect, require, and support. As noted earlier, if you plan to use a plagiarism detection tool, verify what databases it covers and tell students how it will be used.
- A statement of your institution’s policies on Americans with Disabilities Act accommodations, which is probably a boilerplate statement required by your institution. For some students, you may need to arrange accommodations, such as longer time to take an exam. To design your course materials, you will need the required accommodations to meet some basic format requirements for accessibility, and these are in chapter 7. You should be able to get help from your institution’s disability services staff, information technologists, and instructional designers.
- Policies on academic discourse, including an explanation of what kinds of behaviors you expect. Include “netiquette” (network etiquette) to set expectations for online discussions. Specify what constitutes violations (e.g., rude or harassing statements in online discussions) and penalties (such as deletion of offending messages or disciplinary actions). While such policies may seem controlling, some students are unfamiliar with the netiquette of online discussion and may not realize what comes across as flaming to others. Your policies can provide guidance and create a safe and respectful learning environment, especially if your content addresses sensitive issues. Phrase conduct codes in positive terms so that students know what you expect them to do, not just what you want them not to do.
- Relevant institutional support services for online students, along with contact information, for help with technology such as course software, doing electronic library research, submitting computer assignments, writing papers or reports, and learning study skills. To better prepare students for online learning, you might give them an online readiness survey that includes adaptive learning feedback, such as Georgia OnMyLine “Online Education Readiness Assessment” (http://goml.readi.info/). You also can use its content to add to your own tips for student success.
- A week-by-week course schedule with as much of the following information as possible: topics to be covered and the required readings, podcasts, videos, quizzes, exams, and individual and group assignments, along with their due dates.
-
A concluding legal caveat or disclaimer. Things may happen during the term to throw off your course schedule: widespread loss of electrical power, your own health issues, severe weather, or your students’ lack of preparation for the material you planned for them. Usually disruptions slow down the course and force you to diverge from your syllabus. Students may think they are not getting their money’s worth if you fail to get through the syllabus by the end of the term. In our litigious society, they may even file a grievance or threaten to sue. However, the courts have not recognized the syllabus as a legally binding contract on an instructor because the students’ registration for the course constitutes voluntary acceptance of the terms of the course, and the instructor maintains creative control over the content and methods of instruction (Kauffman, 2014; Reed, 2013). Still, it is wise to add this caveat or disclaimer regarding changes to the course at the end of the syllabus. This way you make your right to use your own discretion explicit. While this disclaimer mentions policies, it is best to avoid changing those unless they work in the students’ favor. Your statement might be as simple as the following one: “The above schedule, policies, procedures, and assignments in this course are subject to change in the event of extenuating circumstances, by mutual agreement, and/or to ensure better student learning.” Or it may be more comprehensive, such as the following one from Purdue University Fort Wayne (IPFW Syllabus Template, n.d.):
This syllabus, with its course schedule, is based on the most recent information about the course content and schedule planned for this course. Its content is subject to revision as needed to adapt to new knowledge or unanticipated events. Updates will remain focused on achieving the course outcomes. Students will be notified of changes and are responsible for attending to such changes or modifications posted on the Blackboard Learn site for this course.
These additional syllabus items may not be essential but they have merit:
- Curricular requirements that your course satisfies, such as general education; various majors or programs; writing-, speaking-, or ethics-across-the-curriculum; and any other graduation or certification requirements of the program or institution.
- Additional background information about yourself, such as the universities from which you received your degrees, other institutions where you have taught or conducted research, and your areas of research or special interest. After all, you will probably be asking your students for some personal and academic information. In addition, most students are keenly interested in you as a professional and a person and appreciate knowing something about you.
- Your teaching philosophy. So many faculty write such a statement for job applications and reviews that you might want to make yours or an abbreviated version of it available. It can express your commitment to education, your hopes and objectives for your students, your knowledge of how people learn, the rapport with students you aim to develop, and your preferred teaching and assessment methods. With it, you can set a fruitful, congenial tone for the term.
- Other available study or assignment aids. Students like to know if you plan to provide future study guides, review sheets, practice problems, or practice test questions.
- Your view of the mutual rights and obligations between instructors and students (Habanek, 2005; Slattery & Carlson, 2005)—what you expect from students and what you will provide in turn. This sets up a friendly contract. You might include some motivating or inspiring statements and invite students to become co-learners with you (Slattery & Carlson, 2005). For instance, you explicitly create an encouraging, respectful online learning space by expressing your high expectations of students, your confidence in their ability to meet them, your view of them as competent and serious learners, and the relevance of the course materials to their professional and personal lives (Palmer et al., 2014). These statements can have powerful motivating effects, as chapter 5 documents.
Unlike a paper syllabus, an online syllabus can be dynamic, growing, and “living,” as Wilson (2008, p. 1), who invented the living syllabus, noted. In the first paragraph on his website for his History of Life course, he informs his students that he will be adding links, images, alternative perspectives on controversial issues, and other information on a weekly basis as the term proceeds, and he requires them to check the site at least once a week. This syllabus organizes course work into weekly folders, each with dates and content on Recommended Reading, Special Events, and Assignments. This weekly organization and consistent structure allow students to see at a glance the big picture of what will be covered in each week Designed as a weblog, the living syllabus is integrated with the College of Wooster course publishing platform, which also includes a home page, course notes, and preparation questions to support the course work contained in the syllabus. Wilson (2008) has two content-rich text sections (350–900 words) for each week’s topic—web resources and discipline-related news items—each studded with links to more information on concepts, proper names, and other subjects he mentions. The History of Life course and syllabus show the structure and organization for multiple weeks (http://historyoflife.voices.wooster.edu/course-syllabus/).
ORGANIZING YOUR FILES FOR YOURSELF AND YOUR STUDENTS
You are more likely to build a well-organized course site when you create a good file organization system on your computer. Your organization should mirror what you anticipate your course site to look like. Your goal in designing your file organization is to facilitate navigation and avoid wasting your and your students’ time looking for documents, images, and the like. For your students, organize your materials into the home page, weekly folders, and other areas you plan for your course. For yourself, follow these procedures:
- Make a separate folder in your computer system for your course where you can place all your files.
- Create subfolders within this folder with labels designating each segment of the course, such as Home Page, Module 1 [title], Module 2 [title], and so on (or Week 1 [title], Week 2 [title], and so on). Within these subfolders, include your previews and summaries for each week, as well as the content materials you want to use.
- Add another subfolder for communications in which you place the messages you anticipate sending out to students during the course. You might include templates of the kind of feedback you anticipate giving to students after their first academic discussion and major assignments.
- Name files in an organized, technology-friendly way, such as mod01-introduction, mod01-video-list, mod01-reflection-questions, mod01-summary. Materials for the second module would be mod02-introduction, mod02-video-list, mod02-reflection, mod02-summary, and so on.
- Place all images in a separate images folder and save the image files in a similar way, such as mod01-reflection-image.png. Keep track of image sources in a separate file and code them to the image file names so that you can easily cite your sources when building in your course site.
- Do the same for your audio and video files.
Here are other resources on file organization:
- How to Organize and Manage Your E-Learning Course Files, Rapid E-Learning Blog: http://blogs.articulate.com/rapid-elearning/how-to-organize-manage-your-e-learning-course-files/
- How to Keep Course Files Organized, Teaching in Higher Ed: http://teachinginhighered.com /productivity/keep-course-files-organized/
- Best Practices for File Naming, Stanford University Libraries: https://library.stanford.edu/research /data-management-services/data-best-practices/best-practices-file-naming
Because reading online is not the same as reading in print, these tips may help your writing:
- Writer’s Web, University of Richmond’s Writing Center: http://writing2.richmond.edu/writing /wweb/blogging.html
- Writing for the Web, Hunter College: http://www.hunter.cuny.edu/communications/style-guide /writing-for-the-web
- Writing for the Web by David Walbert, University of North Carolina: http://www.learnnc.org/lp /editions/webwriting/705
How you enter content into your course site depends on what LMS you use. There are many LMSs, but you only need to be familiar with the one you are using unless you are part of a process to compare them. For the commercial ones, institutions pay a license fee—examples include Angel, Blackboard, Canvas, and Desire2Learn. Many choose an open source and free platform such as CourseWorks, Moodle, and Sakai. All LMSs require information technology for administration and support (Drouin, 2011), so you most likely will have on-campus help to learn how to use your institution’s choice. Each LMS has a slightly different presentation style, and the one you use may not look like the following examples, but their organization and style may give you some ideas about what you can do in your own course (these examples are not an endorsement of any specific LMSs):
- Drama of Diversity E01 at University of Colorado (https://ucdenver.instructure.com/courses/11412)
- Core Composition II E01 at University of Colorado (https://ucdenver.instructure.com/courses/11411)
- General Psychology Psyc 101 ECP at Bowie State University (video, 6:35; https://www.youtube.com /watch?v=t9YqYAG1cWI)
- U.S. History 2 at Seattle Central Community College (https://learn.canvas.net/courses/13)
- Introduction to Telecommunications at Grand Valley State University (video, 9:23: https://www.youtube.com/watch?v=iZkIjPsdoYY)
- Small Business Management Course at Embry-Riddle Aeronautical University (video, 7:30; https://www.youtube.com/watch?v=nFlVv5wiVSw&list=PLontYaReEU1voZsmm5gDVNT6imGKnLWTp&index=11)
You can search for other sample courses on the web with key words “subject” and the name of your LMS.
REFERENCES
- Accreditation Commission for Education in Nursing. (2013). Accreditation manual: Baccalaureate. Retrieved from http://www.acenursing.org/accreditation-manual/
- Accrediting Council for Independent Colleges and Schools. (2016). Accreditation criteria: Policies, procedures, and standards. Retrieved from http://www.acics.org/WorkArea/DownloadAsset.aspx?id=5071
- Alexander, P. (1996). The past, the present, and the future of knowledge research: A reexamination of the role of knowledge in learning and instruction. Educational Psychologist, 31(2), 89–92.
- All, A. C. (2011). A behind the scenes look at the faculty role in the online learning environment. In T. A. Middleton Brosche & M. Feavell (Eds.), Successful online learning: Managing the online learning environment efficiently and effectively (pp. 159–167). Sudbury, MA: Jones and Bartlett.
- Amador, J. A., & Mederer, H. (2013, March). Migrating successful student engagement strategies online: Opportunities and challenges using jigsaw groups and problem-based learning. MERLOT Journal of Online Learning and Teaching, 9(1). Retrieved from http://jolt.merlot.org/vol9no1/amador_0313.htm
- Ambrose, S. A., Bridges, M. W., DiPietro, M., Lovett, M. C., Norman, M. K., & Mayer, R. E. (2010). How learning works: Seven research-based principles for smart teaching. San Francisco, CA: Jossey-Bass.
- American Psychological Association. (2011, June). Revised competency benchmarks for professional psychology. Retrieved from http://www.apa.org/ed/graduate/competency.aspx
- American Psychological Association. (n.d.). Section C: IRs related to the guidelines and principles. Retrieved from http://www.apa.org/ed/accreditation/about/policies/index.aspx
- Anderson, L. W. (2002). Curricular alignment: A re-examination. Theory into Practice, 41(4), 255–260.
- Angelo, T., & Cross, P. (1993). Classroom assessment techniques: A handbook for college teachers. San Francisco, CA: Jossey-Bass.
- Association of American Colleges and Universities VALUE Rubrics. [website]. Retrieved from http://www.aacu.org/value-rubrics
- Ausubel, D. (1968). Educational psychology: A cognitive view. New York, NY: Holt.
- Barkley, E. F. (2009). Student engagement techniques: A handbook for college faculty. San Francisco, CA: Jossey-Bass.
- Battalio, J. (2009). Interaction online: A reevaluation. In A. Orellana, T. L. Hudgins, & M. Simonson (Eds.), The perfect online course: Best practices for designing and teaching (pp. 443−462). Charlotte, NC: Information Age Publishing.
- Baume, D., & Baume, C. (2008). Powerful ideas in teaching and learning. Wheatley, UK: Oxford Brookes University.
- Beck, V. (2014). Testing a model to predict online cheating—Much ado about nothing. Active Learning in Higher Education, 15(1), 65–75.
- Bellchambers, E., Davies, K., Ford, A., & Walton, B. (2015). Multiple true false questions for the final FFICM. Cambridge, UK: Cambridge University Press.
- Bloom, B. S. (Ed.). (1956). Taxonomy of educational objectives, handbook 1 cognitive domain. Longman, NY: Longman.
- Bonk, C. J., & Zhang, K. (2008). Empowering online learning: 100 +activities for reading, reflecting, displaying, and doing. San Francisco, CA: Jossey-Bass.
- Bransford, J. D., Brown, A. L., & Cocking, R. R. (1999). How people learn: Brain, mind, experience, and school. Washington, DC: National Academy Press.
- Briggs, L. M. (1977). Instructional design: Principles and applications. Englewood Cliffs, NJ: Educational Technology Publications.
- Carlile, O., & Jordan, A. (2005). It works in practice but will it work in theory? The theoretical underpinnings of pedagogy. In G. O’Neill, S. Moore, & R. McMullan (Eds.), Emerging issues in the practice of university teaching (pp. 11–25). Dublin, Ireland: All Ireland Society for Higher Education.
- Chi, M.T.H., Glaser, R., & Rees, E. (1982). Expertise in problem solving. In R. Steinberg (Ed.), Advances in the psychology of human intelligence (pp. 7–76). Mahwah, NJ: Erlbaum.
- Chickering, A. W., & Gamson, Z. F. (1987, March). Seven principles for good practice in undergraduate education. AAHE Bulletin, 39(7), 3–7. Retrieved from https://www.aahea.org/articles/sevenprinciples1987.htm
- Chiesl, N. (2009). Pragmatic methods to reduce dishonesty in web-based courses. In A. Orellana, T. L. Hudgins, & M. Simonson (Eds.), The perfect online course: Best practices for designing and teaching (pp. 327−339). Charlotte, NC: Information Age Publishing.
- Clark, R. C., & Mayer, R. E. (2011). E-learning and the science of instruction: Proven guidelines for consumers and designers of multimedia learning (3rd ed.). San Francisco, CA: Pfeiffer.
- Cohen, S. A. (1987). Instructional alignment: Searching for a magic bullet. Educational Researcher, 16(8), 16−20.
- Commission on Colleges–Southern Association of Colleges and Schools. (2000). Best practices for electronically offered degree and certificate programs. Retrieved from http://www.sacscoc.org/pdf/commadap.pdf
- Commission on Colleges–Southern Association of Colleges and Schools. (2011). Guidelines for addressing distance and correspondence education: A guide for evaluators charged with reviewing distance and correspondence education. Retrieved from http://www.sacscoc.org/pdf/081705/Guidelines%20for%20Addressing%20Distance%20and%20Correspondence%20Education.pdf
- Commission on Colleges–Southern Association of Colleges and Schools. (2014). Distance and correspondence education: Policy statement. Retrieved from http://www.sacscoc.org/pdf/DistanceCorrespondenceEducation.pdf
- Council of Regional Accrediting Commissions. (2011). Interregional guidelines for the evaluation of distance education. Retrieved from http://nc-sara.org/files/docs/C-RAC%20Guidelines.pdf
- Council of Writing Program Administrators. (2003, January). Defining and avoiding plagiarism: The WPA statement of best practices. Retrieved from http://wpacouncil.org/positions/WPAplagiarism.pdf
- Coussement, M. A., Johnson, S., & Goodson, L. A. (2016). Developing an e-textbook for the consumer and family sciences classroom: Challenges and rewards. Journal of Consumer and Family Sciences, 108(2), 64–72.
- Criteria for Accrediting Engineering Programs. (2017−2018). Retrieved from http://www.abet.org/accreditation /accreditation-criteria/criteria-for-accrediting-engineering-programs-2017--2018/
- Crutchfield, T. N., & Klamon, K. (2014). Assessing the dimension and outcomes of an effective teammate. Journal of Education for Business, 89(6), 285–291.
- Daniel, D. B. (2011). Practical PowerPoint: Promising principles for developing individual practice. In D. S. Dunn, J. H. Wilson, J. Freeman, & J. Stowell (Eds.), Best practices for technology-enhanced teaching and learning: Connecting to psychology and the social sciences (pp. 87–104). New York, NY: Oxford University Press. Retrieved from http://www.ebrary.com
- Davis, J. R., & Arend, B. D. (2013). Facilitating seven ways of learning: A resource for more purposeful, effective, and enjoyable college teaching. Sterling, VA: Stylus.
- Delaney, J. G., Johnson, A. N., Johnson, T. D., & Treslan, D. L. (2010). Students’ perceptions of effective teaching in higher education. St. Johns, Newfoundland, Canada: Distance Education and Learning Technologies. Retrieved from http://www.uwex.edu/disted/conference/resource_library/handouts/28251_10h.pdf
- Dick, W., Carey, L., & Carey, J. O. (2015). The systematic design of instruction (8th ed.). Upper Saddle River, NJ: Pearson Merrill.
- Distance@FSU. (n.d.). Introduction: Designing for online learning. Retrieved from https://distance.fsu.edu/instructors /designing-online-learning
- Distance Education Accrediting Commission. (2016). DEAC accreditation handbook. Retrieved from http://www.deac.org/Seeking-Accreditation/The-DEAC-Accrediting-Handbook.aspx
- Dooley, K. E., Lindner, J. R., & Dooley, L. M. (2005). Advanced methods in distance education: Applications and practices for educators, administrators and learners. Hershey, PA: Information Science Publishing.
- Doolittle, P. E., & Siudzinski, R. A. (2010). Recommended syllabus components: What do higher education faculty include in their syllabi? Journal on Excellence in College Teaching, 21(3), 29–61.
- Drouin, M. (2011). The what? how? and which? of course-management systems. In J. H. Wilson, D. S. Dunn, J. R. Stowell, & J. Freeman (Eds.), Best practices for technology-enhanced teaching and learning (pp. 155–170). Don Mills, Ontario, Canada: Oxford University Press.
- Dyckman, C. A., & Davis, C. K. (2008). Online education forum: Part two. Teaching online versus teaching conventionally. Journal of Information Systems Education, 19(2), 157−164.
- Rcampus. (n.d.). E-MAR medication performance tool. Retrieved from http://www.rcampus.com/rubricshowc.cfm?code=AX63XCW&sp=true&
- Ebel, R. L. (1978). The effectiveness of multiple true-false test items. Educational and Psychological Measurement, 38(1), 37–44.
- Fink, L. D. (2007). The power of course design to increase student engagement and learning. Peer Review, 9(1), 13−17. Retrieved from https://www.aacu.org/publications-research/periodicals/power-course-design-increase-student -engagement-and-learning
- Fink, L. D. (2013). Creating significant learning experiences: An integrated approach to designing college courses (2nd ed.). San Francisco, CA: Jossey-Bass.
- Foster, A. (2008, January 17). Despite skeptics, publishers tout new “fair use” agreements with universities. Chronicle of Higher Education. Retrieved from http://chronicle.com/daily/2008/01/1279n.htm
- Fouad, N. A., Grus, C. L., Hatcher, R. L., Kaslow, N. J., Hutchings, P. S., Madson, M. B., . . . Crossman, R. E. (2009). Competency benchmarks: A developmental model for understanding and measuring competence in professional psychology. Training and Education in Professional Psychology, 3(4, Suppl.), S5−S6. doi:10.1037/a0015832
- Fresno State University. (n.d.). Blackboard 9.1 Faculty resources for online teaching and learning. Retrieved from http://www.fresnostate.edu/academics/blackboard/fac-staff/bb91-faculty-resources.html#welcome
- Frisby, D. A., & Sweeney, D. C. (1982). The relative merits of multiple true-false achievement tests. Journal of Educational Measurement, 19(1), 29–35.
- Gagné , R. M., Wager, W. W., Golas, K. C., & Keller, J. M. (2005). Principles of instructional design (5th ed.). Belmont, CA: Wadsworth/Thomson Learning.
- Goodson, L. (2007). Student plagiarism: How to maintain academic integrity. Essays on teaching excellence: Toward the best in the academy, 18(2). Retrieved from http://podnetwork.org/content/uploads/V18-N2-Goodson.pdf
- Goodson, L. A. (2014, November). Re-fillable faculty templates for online course design. Session led at the 2014 International Convention of the Association for Educational Communications and Technology, Jacksonville, FL.
- Goodson, L. A., & Ahn, I. S. (2014). Consulting and designing in the fast lane. In A. P. Mizell & A. A. Piña (Eds.), Real-life distance learning: Case studies in research and practice (pp. 197–220). Charlotte, NC: Information Age Publishing.
- Goodson, L. A., Slater, D., & Zubovic, Y. (2015). Adding confidence to knowledge. Journal of the Scholarship of Teaching and Learning, 15(1), 20–37.
- GRCC distance learning standards. (2015). Retrieved from http://www.grcc.edu/sites/default/files/attachments /GRCCDLStandards.pdf
- Habanek, D. V. (2005). An examination of the integrity of the syllabus. College Teaching, 53(2), 62–64.
- Haladyna, T. M., & Rodriguez, M. C. (2013). Developing and validating test items. New York, NY: Routledge.
- Hanson, D. (2006). Instructor’s guide to process-oriented guided-inquiry learning. Stony Brook, NY: Stony Brook University Press.
- Helms, J. L., Marek, P., Randall, C. K., Rogers, D. T., Taglialatela, L. A., & Williamson, A. L. (2011). Developing an online curriculum in psychology: Practical advice from a departmental initiative. In J. H. Wilson, D. S. Dunn, J. R. Stowell, & J. Freeman (Eds.), Best practices for technology-enhanced teaching and learning (pp. 53–71). Don Mills, Ontario, Canada: Oxford University Press.
- Heywood, J. (2005). Engineering education: Research and development in curriculum and instruction. Hoboken, NJ: Institute of Electrical and Electronics Engineers.
- Hirumi, A. (2009). In search of quality: An analysis of e-learning guidelines and specifications. In A. Orellana, T. L. Hudgins, & M. Simonson (Eds.), The perfect online course: Best practices for designing and teaching (pp. 39–67). Charlotte, NC: Information Age Publishing.
- Howell, R. J. (2011). Exploring the impact of grading rubrics on academic performance: Findings from a quasi-experimental, pre-post evaluation. Journal on Excellence in College Teaching, 22(2), 31–49.
- Huang, L-S. (2014, September 29). Students riding on coattails during group work? Five simple ideas to try. Faculty Focus. Retrieved from http://www.facultyfocus.com/articles/effective-teaching-strategies/students-riding-coattails -group-work-five-simple-ideas-try/
- Hung, J., Randolph-Seng, B., Monsicha, K., & Crooks, S. M. (2008, Winter). Computer-based instruction and cognitive load. Academic Exchange Quarterly, 12(4), 207–212.
- IPFW Center for the Enhancement of Learning and Teaching. Online Teaching. [website]. Retrieved from http://ipfw.edu/offices/celt/online-teaching/index.html
- IPFW Online Course Design Standards. (2016). IPFW Online Course Design Standards and peer review process. Retrieved from http://www.ipfw.edu/dotAsset/d405f15e-760b-46bb-b7a6-b2c9eb5fbbb8.pdf
- IPFW Syllabus Template. (n.d.). Retrieved from http://www.ipfw.edu/offices/celt/rtfs-docs-and-docxs /2015to2016SyllabusTemplate-March2016.docx
- Jacobs, P. (2014, October). Engaging students in online courses. Research in Higher Education Journal, 26. (ERIC EJ1055325)
- Jonassen, D. H., Tessmer, M., & Hannum, W. H. (1999). Task analysis methods for instructional design. London, UK: Erlbaum.
- Jönsson, A., & Svingby, G. (2007). The use of scoring rubrics: Reliability, validity and educational consequences. Retrieved from https://www.pdx.edu/education/sites/www.pdx.edu.education/files/Scoring_Rubrics_(Reliability,Validity, Consequences).pdf
- Kaner, C., & Fiedler, R. L. (2008). A cautionary note on checking software engineering papers for plagiarism. IEEE Transactions on Education, 51(2). doi:10.1109/TE.2007.909351
- Kauffman, K. D. (2014, March). Is your syllabus a contract? A comparison of the SoTL literature and “The Law.” Paper presented at the SoTL Commons Conference, Statesboro, GA. Retrieved from http://digitalcommons.georgiasouthern.edu/cgi/viewcontent.cgi?article=1017&context=sotlcommons
- Keil, S., & Brown, A. (2014). Distance education policy standards: A review of current regional and national accrediting organizations in the United States. Online Journal of Distance Learning Administration, 17(3). Retrieved from http://www.westga.edu/~distance/ojdla/fall173/keil_brown173.html
- Kirschner, P. A., Sweller, J., & Clark, R. E. (2006). Why minimal guidance during instruction does not work: An analysis of the failure of constructivist, discovery, problem-based, experiential, and inquiry-based teaching. Educational Psychologist, 41(2), 75–86.
- Ko, S., & Rossen, S. (2010). Teaching online: A practical guide. New York, NY: Routledge.
- Lane, S., Raymond, M. R., & Haladyna, T. M. (Eds.). (2016). Handbook of test development (2nd ed.). New York, NY: Routledge.
- Lee, C-Y., Dickerson, J., & Winslow, J. (2012). An analysis of organizational approaches to online course structures. Online Journal of Distance Learning Administration, 15(1). Retrieved from http://www.westga.edu/~distance/ojdla /spring151/lee_dickerson_winslow.html
- Lee, J. (2014, February). An exploratory study of effective online learning: Assessing satisfaction levels of graduate students of mathematics education associated with human and design factors of an online course. International Review of Research in Open and Distributed Learning, 15(1). Retrieved from http://www.irrodl.org/index.php/irrodl/article /view/1638/2769
- Lovett, M. C. (2013). Make exams worth more than the grade: Using exam wrappers to promote metacognition. In M. Kaplan, N. Silver, D. LaVague-Manty, & D. Meizlish (Eds.), Using reflection and metacognition to improve student learning: Across the disciplines, across the academy (pp. 18–52). Sterling, VA: Stylus.
- Martin, F. (2011). Instructional design and the importance of instructional alignment. Community College Journal of Research and Practice, 35, 955–972. doi:10.1080/1066892080246683fjord
- Marzano, R. J. (2003). What works in schools: Translating research into action. Alexandria, VA: Association for Supervision and Curriculum Development.
- McCord, A. (2008). Improving online assignments to deter plagiarism. TCC Proceedings. Retrieved from https://laulima.hawaii.edu/access/content/group/fb8c10fd-5445--420b-0034-bad118df6196/TeachingResources /DeterPlagiarismMcCord2008.pdf
- McKeachie, W. J., & Hofer, B. K. (2002). McKeachie’s teaching tips: Strategies, research, and theory for college and university teachers. Boston, MA: Houghton Mifflin.
- McKeever, L. (2004). Online plagiarism detection services. Plagiarism: Prevention, practices and policies. Newcastle upon Tyne. Retrieved from http://www.tandfonline.com/doi/abs/10.1080/02602930500262460
- McLaren, A. C. (2009). Designing effective e-learning. What works: Student perceptions of effective elements in online learning. In A. Orellana, T. L. Hudgins, & M. Simonson (Eds.), The perfect online course: Best practices for designing and teaching (pp. 229−245). Charlotte, NC: Information Age Publishing.
- Medina, J. (2008). Brain rules. Seattle, WA: Pear Press.
- MIT Comparative Media Studies: Writing. (n.d.). Resources for teachers: How to detect plagiarism. Retrieved from http://cmsw.mit.edu/writing-and-communication-center/resources/teachers/detect-plagiarism/
- MIT Teaching and Learning Laboratory. (n.d.). How we can help you. Retrieved from http://tll.mit.edu/help/types -assessment-and-evaluation
- Moore, J. L., Downing, R. E., & York, D. L. (2009). Organizing instructional content for web-based courses: Does a single model exist? In A. Orellana, T. L. Hudgins, & M. Simonson (Eds.), The perfect online course: Best practices for designing and teaching (pp. 341−358). Charlotte, NC: Information Age Publishing.
- Murray, M., Pérez, J., Geist, D., & Hedrick, A. (2012). Student interaction with online course content: Build it and they might come. Journal of Information Technology Education: Research, 11, 125–140.
- Nilson, L. B. (2002). The graphic syllabus: Shedding visual light on course organization. In D. Lieberman & C. Wehlburg (Eds.), To improve the academy: Vol. 20. Resources for faculty, instructional, and organizational development (pp. 238–259). Bolton, MA: Anker.
- Nilson, L. B. (2003). Improving student peer feedback. College Teaching, 51(1), 34–38.
- Nilson, L. B. (2007). The graphic syllabus and the outcomes map: Communicating your course. San Francisco, CA: Jossey-Bass.
- Nilson, L. B. (2016). Teaching at its best: A research-based resource for college instructors (4th ed.). San Francisco, CA: Jossey-Bass.
- OWL Purdue Online Writing Lab. (2017). [website]. Retrieved from https://owl.english.purdue.edu/owl/
- Palmer, M. S., Bach, D. J., & Streifer, A. C. (2014). Measuring the promise: A learning-focused syllabus rubric. To Improve the Academy, 33(1), 14–36.
- Pearson. (2016). Mastering astronomy. Retrieved from http://www.pearsonmylabandmastering.com/masteringastronomy/
- Pennsylvania State University College of Earth and Mineral Sciences. (2016). Planning documents and templates. Retrieved from http://facdev.e-education.psu.edu/plan/templates
- Purdue University. (n.d.). Purdue University Online Course Development Plan. Retrieved from https://www.distance.purdue.edu/pdf/PUOCDPTemplate.pdf
- QOLT program background. (n.d.). [website]. Retrieved from http://courseredesign.csuprojects.org/wp /qualityassurance/qolt/
- Quality Matters Higher Education Program. (n.d.). [website]. Retrieved from https://www.qualitymatters.org /professional-development/workshops/higher-ed-appqmr
- Quality Online Course Initiative: Complete rubric. (n.d.). Retrieved from http://www.ion.uillinois.edu/initiatives/qoci /docs/QOCIRubric.rtf
- Quality Online Learning and Teaching (QOLT) instrument. Retrieved from https://drive.google.com/file /d/0BxN4M6qCVbDPOEl0d1dKWmFXOEk/view
- Reed, D. (2013). Is the syllabus a contract? Retrieved from http://www.uri.edu/facsen/Curricular_Materials /Course_Proposals_2013--14/CAC_nov-25/Is_a_Syllabus_a_Contract.pdf
- Reigeluth, C. M. (1999). The elaboration theory: Guidance for scope and sequence decisions. In C. M. Reigeluth (Ed.), Instructional design theories and models: Vol. 2. Mahwah, NJ: Erlbaum.
- Reigeluth, C. M. (2007). Order, first step to mastery: An introduction to sequencing in instructional design. In F. E. Ritter, J. Nerb, E. Lehtinen, & T. O’Shea (Eds.), In order to learn: How the sequence of topics influences learning (pp. 19−40). New York, NY: Oxford University Press.
- Reisetter, M., & Boris, G. (2009). What works: Student perceptions of effective elements in online learning. In A. Orellana, T. L. Hudgins, & M. Simonson (Eds.), The perfect online course: Best practices for designing and teaching (pp. 157−179). Charlotte, NC: Information Age Publishing.
- Ritter, F. E., Nerb, J., Lehtinen, E., & O’Shea, T. (Eds.). (2007). In order to learn: How the sequence of topics influences learning. New York, NY: Oxford University Press.
- Robbins, P., Hintz, J., & Moore, S. A. (2014). Environment and society: A critical introduction (2nd ed.). Chichester, West Sussex, UK: Wiley.
- Roehrs, C., Wang, L., & Kendrick, D. (2013, March). Preparing faculty to use the Quality Matters model for course improvement. Journal of Online Learning and Teaching, 9(1). Retrieved from http://jolt.merlot.org/vol9no1 /roehrs_0313.htm
- Royer, J., Cisero, C., & Carlo, M. S. (1993). Techniques and procedures for assessing cognitive skills. Review of Educational Research, 63(2), 201−243.
- Sadik, A., & Reisman, S. (2009). Design and implementation of a web-based learning environment. In A. Orellana, T. L. Hudgins, & M. Simonson (Eds.), The perfect online course: Best practices for designing and teaching (pp. 179−200). Charlotte, NC: Information Age Publishing.
- Salifu, S. (2015). Using instructional design goals to appropriately classify instructional design models. In J. Keengwe & J. J. Agamba (Eds.), Models for improving and optimizing online and blended learning in higher education (pp.189−203). Hershey, PA: IGI Global.
- Savenye, W. C., Olina, Z., & Niemczyk, M. (2001). So you are going to be an online writing instructor: Issues in designing, developing, and delivering an online course. Computers and Compositions, 18, 371−385.
- Science Education Resource Center, Carleton College. (n.d.). Understanding what our geoscience students are learning: Observing and assessing: Assessment tools. Retrieved from http://serc.carleton.edu/NAGTWorkshops/assess/types.html
- Sharpe, R., & Oliver, M. (2007). Designing courses for e-learning. In G. Conole & M. Oliver (Eds.), Contemporary perspectives in e-learning research: Themes, methods and impact on practice (pp. 41–51). London, UK: Routledge.
- Simonson, M., & Schlosser, C. (2009). We need a plan: An instructional design approach for distance education courses. In A. Orellana, T. L. Hudgins, & M. Simonson (Eds.), The perfect online course: Best practices for designing and teaching (pp. 3−21). Charlotte, NC: Information Age Publishing.
- Simonson, M., Smaldino, S., & Zvacek, S. (2015). Teaching and learning at a distance: Foundations of distance education (6th ed.). Charlotte, NC: Information Age Publishing.
- Slattery, J. M., & Carlson, J. F. (2005). Preparing an effective syllabus: Current best practices. College Teaching, 53(4), 159–164.
- Smith, P. L., & Ragan, T. L. (2005). Instructional design (3rd ed.). San Francisco, CA: Jossey-Bass.
- Smith, R. (2014). Conquering the content: A step-by-step guide to web-based course development (2nd ed.). San Francisco, CA: Jossey-Bass.
- Southern Regional Education Board. (2006, November). Standards for quality online courses. Retrieved from http://publications.sreb.org/2006/06T05_Standards_quality_online_courses.pdf
- Squires, D. A. (2009). Curriculum alignment: Research-based strategies for increasing student achievement. Thousand Oaks, CA: Corwin Press.
- Sun, A., & Chen, X. (2016). Online education and its effective practice: A research review. Journal of Information Technology Education: Research, 15, 157–190.
- Suskie, L. (2009). Assessing student learning: A common sense guide (2nd ed.). San Francisco, CA: Jossey-Bass.
- Svinicki, M. (2004). Learning and motivation in the postsecondary classroom. San Francisco, CA: Jossey-Bass.
- TED: Ideas worth spreading. 2200+ talks to spur your curiosity. (n.d.). Retrieved from https://www.ted.com/talks
- Tversky, B. (1995). Cognitive origins of conventions. In F. T. Marchese (Ed.), Understanding images (pp. 29–53). New York, NY: Springer-Verlag.
- Tversky, B. (2001). Spatial schemas in depictions. In M. Gattis (Ed.), Spatial schemas and abstract thought (pp. 79–111). Cambridge, MA: MIT Press.
- UCONN eCampus. (n.d.). Step one: Plan and design your course. Retrieved from http://ecampus.uconn.edu/course _development/step1.html
- University of North Georgia, Department of Music. (n.d.). Performance assessment rubric (vocal). Retrieved from http://ung.edu/music/_uploads/files/Recital%20Assessment%20RubricVOCALRecitalAssessmentRubric%20-%20Table.pdf
- US Department of Education. (2010). Evaluation of evidence-based practices in online learning: A meta-analysis and review of online learning studies. Washington, DC: Author. Retrieved from http://www2.ed.gov/rschstat/eval/tech/evidence -based-practices/finalreport.pdf
- US News & World Report. (2016). Best online programs. Retrieved from http://www.usnews.com/education/online -education
- Vai, M., & Sosulski, K. (2016). Essentials of online course design: A standards-based guide (2nd ed.). New York, NY: Routledge.
- Vekiri, I. (2002). What is the value of graphical displays in learning? Educational Psychology Review, 14(3), 261–312.
- Watkins, R. (2005). 75 e-learning activities: Making online learning interactive. San Francisco, CA: Pfeiffer.
- Web Learning @ Penn State: Penn State quality assurance e-learning standards. (n.d.). Retrieved from https://weblearning.psu.edu/resources/penn-state-online-resources/qualityassurance/
- Weimer, M. (2012, February 1). Student self-assessment: A sample assignment. Faculty Focus. Retrieved from http://www.facultyfocus.com/articles/teaching-professor-blog/student-self-assessment-a-sample-assignment/
- Welch, A. G., Orso, D., Doolittle, J., & Areepattamannil, S. (2015). Matching student expectations with instructor’s dispositions: Insight into quality of online teaching. Journal of Effective Teaching, 15(2), 5–19. Retrieved from http://www.uncw.edu/cte/et/articles/Vol15_2/Welch.html
- Wieman, C. E. (2007). Why not try a scientific approach to science education? Change, 39(5), 9–15.
- Wiggins, G., & McTighe, J. (2011). The understanding by design guide to creating high-quality units. Alexandria, VA: ASCD.
- Wilson, M. A. (2008). Syllabus for History of Life (Geology 100), Department of Geology, The College of Wooster. Retrieved from http://www.wooster.edu/geology/HOL.html
- Youger, R. E., & Ahern, T. C. (2015). Is a quality course a worthy course? Designing for value and worth in online courses. Online Journal of Distance Learning Administration, 18(1). Retrieved from http://www.westga.edu/~distance /ojdla/spring181/youger_ahern181.html
- Zayapragassarazan, Z., & Kumar, S. (2012). Active learning. NTTC Bulletin, 19(1), 3−5.
- Zheng, J., & Smaldino, S. (2009). Key instructional design elements for distance education. In A. Orellana, T. L. Hudgins, & M. Simonson (Eds.), The perfect online course: Best practices for designing and teaching (pp. 107−126). Charlotte, NC: Information Age Publishing.
- Zull, J. E. (2002). The art of changing the brain: Enriching the practice of teaching by exploring the biology of learning. Sterling, VA: Stylus.
- Zull, J. E. (2011). From brain to mind: Using neuroscience to guide change in education. Sterling, VA: Stylus.