
Chapter 5. Working with messages
In this chapter:
- Using routing
- Implementing validation
- Transforming messages
As an open source ESB developer, you are dealing with messages in all kinds of different ways. For messages that arrive at the ESB, you’ll have to determine where that message needs to be forwarded. And you must transform the message format to meet the requirements of the target service provider. In this chapter, we look at the various ways in which you can work with messages.
Because an ESB is a piece of middleware between service consumers and service providers, an essential part of creating an integration solution involves the determination of the target service provider(s). The logic related to this core functionality of an ESB is often referred to as message routing. We look at the theory of message routing and how it can be implemented in open source ESBs in section 5.1. With these examples, you’ll be able to introduce complex routing functionality to both Mule and ServiceMix.
When messages flow through an ESB and are guided to the target service provider(s), we need to be sure that the message content meets its specification. When transforming and routing messages, we have to rely on the message specification to be able to execute the transformation and routing. When a message specification enforces the presence of a version attribute, we can develop routing rules that use this version attribute. It is a common practice to validate incoming messages against their message specification before logic like transformation and routing is performed. In section 5.2, we explore message validation and show how it can be implemented. We show Mule and ServiceMix examples that use XML Schema validation.
We already mentioned transformation a few times in this chapter introduction. Transforming the format of messages is common in integration solutions. In section 5.3, we look at message transformation in detail. With XSLT as the open standard for XML message transformation, we’ll see how it can be used in a Mule and ServiceMix message flow.
By the end of this chapter, you’ll have enough experience and knowledge of routing, message validation, and transformation that you’ll be able to implement a large percentage of the real-life message flows for your projects.
5.1. Routing messages
Creating an integration solution always involves some kind of logic to determine the ultimate destination for an incoming message. Therefore, routing is an essential functionality that an ESB provides. As you can read in Hohpe and Woolf’s Enterprise Integration Patterns, a distinction exists between different types of message routers. In this section, we look at examples of message routing that are common when implementing integration solutions. We begin with the most trivial case of a message router: the fixed router.
5.1.1. Fixed router
In some cases, the source application must simply be decoupled from the target application. When we don’t use a message router between these applications, they are coupled via the message channel. The source application puts a message on a queue and the target application reads the message from this message channel. With a fixed message router, the source application places a message on a message channel; then the message is picked up by the fixed router and passed on to another message channel.
By decoupling the source from the target application, we can easily add functionality such as message transformation and a transport protocol conversion. Therefore, the addition of a message router can also be beneficiary for future integration needs. The downside of the fixed router is that the router configuration is only applicable to a specific source and target location. For the integration solutions that need a lot of routing, this message router is not the best choice. Figure 5.1 shows an example of a fixed router.
Figure 5.1. An example of a fixed router that moves the message from a messaging infrastructure to a web service

The example displayed in figure 5.1 shows an integration solution that uses a fixed router to send a JMS message to a web service. An adapter is used to read the JMS message from the queue, and then the fixed router sends the message to the web service. Before the web service is called, the JMS message is transformed to the message format defined in the WSDL file of the web service. A web service adapter eventually performs the web service invocation.
We’ve chosen to implement this example in Mule, because it has a clear definition of a fixed router. First, we have to define a service configuration with an inbound endpoint that listens for JMS messages on a specific queue and calls a web service via an outbound router. Let’s look at a short example of a fixed router as it can be implemented with Mule (listing 5.1).
Listing 5.1. Service configuration of a fixed router implemented in Mule
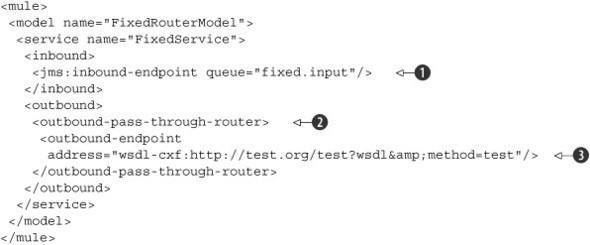
The Mule configuration doesn’t consist of any new elements. In the examples shown in this book so far, we’ve used a fixed
router a few times. The inbound endpoint implements the adapter logic to get messages from the messaging infrastructure
![]() .
.
The outbound router configures a web service destination using the Apache CXF web service adapter provided by Mule
![]() . But where is the fixed router component configured within this listing? Well, it’s defined by using Mule’s outbound passthrough
router
. But where is the fixed router component configured within this listing? Well, it’s defined by using Mule’s outbound passthrough
router
![]() . This specific Mule message router forwards an incoming message to the defined endpoint, which is what a fixed router is
supposed to do.
. This specific Mule message router forwards an incoming message to the defined endpoint, which is what a fixed router is
supposed to do.
The fixed router is a trivial but common message router. Now let’s look at another common, but less trivial, message router: the content-based router.
5.1.2. Content-based router
Another way to determine the ultimate destination for an incoming message is by looking at the content of that message. The content-based router interprets the incoming message against particular element values and forwards this message to the matching target endpoint. There are two main types of content-based routers, which differ as to where the ultimate destination is determined. The first type is the content-based router with domain logic, and the second is the router without domain logic.
For the first type of content-based router, the ultimate destination is determined in the ESB. The source application sends a message to the ESB, which consumes the message. The message is picked up by the content-based router, which reads message values based on predefined routing rules. For an insurance request, here’s a sample routing rule: if the insurance type is car, the message is forwarded to the car insurance application. The content-based router will extract the insurance type from the incoming insurance request and fire the routing rule against the extracted value. The logic for determining the ultimate destination is therefore performed within the content-based router. The router needs to be configured with domain logic to determine the destination of an incoming message.
The other type of content-based router is ignorant of any domain logic. The source application itself determines the ultimate destination for the message that’s waiting to be sent. The domain logic needed to execute this logic is then only required within the source applications. The message is enriched with a message header that contains the target destination and is then passed on to the ESB. The content-based router extracts the message header and sends the message to the destination as defined in this header value. The message header value typically isn’t an endpoint definition that can be used directly to forward a message. In most cases, the message header contains some text value configured in the content-based router to represent a specific endpoint definition.
The content-based router with domain logic is the most common implementation. We’ll look at an example with ServiceMix and Mule using this router. We’ll show the other type of content-based router with an example using Apache Synapse.
Content-based routing with domain logic in servicemix-eip
Let’s implement the insurance request example that we discussed earlier with ServiceMix. To provide a better description of the insurance request example, figure 5.2 shows a schematic overview.
Figure 5.2. An example of the use of a content-based router with a car insurance request. The insurance request is routed to the car insurance application based on the insurance type element value.
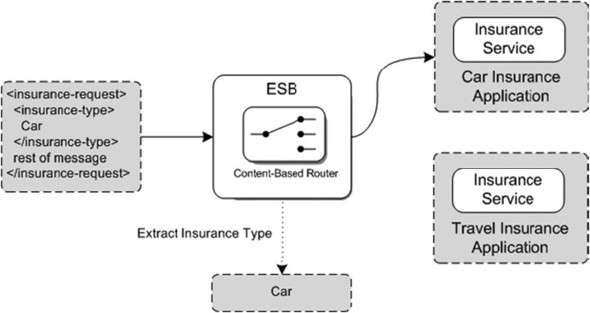
Figure 5.2 shows a simplified insurance request message that’s sent to the ESB. The message contains an insurance-type element, which we can use to determine the destination service. In this simple example, we have two possible target applications: the car insurance application and the travel insurance application. The message in figure 5.2 is routed to the car insurance application because insurance-type equals Car.
To implement this example in ServiceMix, we have two main options. We can use the servicemix-eip or the servicemix-camel service engine. The servicemix-eip service engine is an implementation of a number of Enterprise Integration patterns from the Hohpe and Woolf book. Apache Camel is a subproject of the Apache ActiveMQ project, which provides a rich set of components that implement the same Enterprise Integration patterns. Future implementations of ServiceMix, starting at version 4.0, will be based on Apache Camel, so this service engine is our preference. We show listings for both service engines, though.
Let’s first focus on the configuration with the servicemix-eip service engine. We’ve already used this service engine in chapter 4 to configure pipelines that transform an in-only to an in-out message exchange. Listing 5.2 shows the configuration of the content-based routing shown in figure 5.2.
Listing 5.2. Content-based router configuration with servicemix-eip

When we want to define a content-based router for the servicemix-eip service engine, we have to create an xbean.xml file. The configuration for the router in this xbean.xml file uses the content-based-router element defined in the servicemix-eip service engine
![]() . In this element, two common attributes, service and endpoint, have to be configured.
. In this element, two common attributes, service and endpoint, have to be configured.
We can configure the logic in the content-based router by specifying routing rules. The insurance request message example
consists of an insurance-type element that’s important for the routing rule that we have to define. To implement the routing rule, we define a predicate
that uses an XPath expression to check whether the insurance type is Car
![]() . If necessary, it’s also possible to define multiple predicate definitions as part of one routing rule. Besides the predicate
definition, the routing rule must consist of a target definition, which configures the service destination if the routing
rule evaluates to true
. If necessary, it’s also possible to define multiple predicate definitions as part of one routing rule. Besides the predicate
definition, the routing rule must consist of a target definition, which configures the service destination if the routing
rule evaluates to true
![]() . Here we’ve defined a target service carAppIn, which represents the service location for the car insurance application.
. Here we’ve defined a target service carAppIn, which represents the service location for the car insurance application.
For the insurance example, there are only two different insurance types that we need to address. Therefore, we can define
a default routing rule that sends the incoming insurance request to the travel insurance application if the insurance type
is not equal to Car. We can do this by leaving out the predicate definition in a new routing rule
![]() . This default routing rule only consists of a target service configuration—travelAppIn for our example.
. This default routing rule only consists of a target service configuration—travelAppIn for our example.
The last part of listing 5.2 defines a namespace context that can be used in the XPath expression we just discussed. Because the insurance-request message uses the namespace http://insurance.com, the XPath expression requires a namespace context definition. In the servicemix-eip service engine configuration, we can define a namespace-context element that consists of a number of namespaces
![]() . For our example, we only need one namespace that has a prefix value of ins and a namespace URI of http://insurance.com. The prefix can then be used within the XPath expression, as we’ve done here
. For our example, we only need one namespace that has a prefix value of ins and a namespace URI of http://insurance.com. The prefix can then be used within the XPath expression, as we’ve done here
![]() .
.
If you want to do a quick test with this content-based router configuration, you can use the service assembly implementation in the resources/chapter5/eip directory. Once you’ve started ServiceMix with the start target in the ch5-examples.xml Ant build file, you can deploy this insurance routing example with the deploy-insurance-eip target in the same build file. The example uses a file poller to trigger the content-based router and a file sender to simulate the car and insurance applications. With the Swing test client, you can trigger the routing example and check whether the content-based routing functionality is working.
Content-based routing with domain logic in servicemix-camel
In addition to the servicemix-eip service engine, which can be used for content-based routing, ServiceMix also provides the servicemix-camel service engine. We already saw a quick example of using Apache Camel within ServiceMix in chapter 2. The main difference between these two service engines is that servicemix-eip was developed as part of ServiceMix and offers a small set of routers, and servicemix-camel provides integration with Apache Camel, which is a separate project that offers a large set of routers.
Apache Camel is a subproject of the top-level Apache project ActiveMQ. Apache Camel provides an implementation of the Enterprise Integration patterns from the Hohpe and Woolf book with a Java-based Domain-Specific Language (DSL). Routing rules can be implemented with POJOs as well as an XML configuration. In addition to the Enterprise Integration pattern functionality, Apache Camel offers support for a lot of transports, such as HTTP, JMS, File, virtual machine queues, ActiveMQ, JDBC, JBI, and others. With this functionality, Apache Camel offers an ESB-like framework, but it’s called a routing and mediation engine. Apache Camel can be easily integrated with other projects such as Apache ActiveMQ, Apache CXF, and of course Apache ServiceMix.
We can configure routing rules with a Java implementation as well as an XML configuration. We show both options in this section.
To provide an easier comparison between the servicemix-eip and the servicemix-camel configurations, let’s start with an XML configuration. Just like the servicemix-eip service engine, we begin with a configuration file, named camel-context.xml, which is used to configure the routing rules (listing 5.3).
Listing 5.3. Content-based router XML configuration with servicemix-camel

The first difference compared with the servicemix-eip implementation in listing 5.2 is the number of lines. With Apache Camel, routing rules can be defined with just a few lines of code. To instantiate the
Camel context for the routing rules definition, the camelContext element is the starting point
![]() .
.
Within the Camel context, the trigger or originating service for the routing rules is configured with the from element
![]() . To keep the listing compact, we’ve defined the namespace for the JBI service as #NS#, but in the book’s source code this is replaced with http://esbinaction.com/insurance. In the URI definition of the from element, you can see how the integration between ServiceMix and Camel is implemented. The URI starts with jbi:service:, which tells the Camel runtime to look for a JBI service in the JBI runtime. Notice that you have to specify the full service
name, including the namespace.
. To keep the listing compact, we’ve defined the namespace for the JBI service as #NS#, but in the book’s source code this is replaced with http://esbinaction.com/insurance. In the URI definition of the from element, you can see how the integration between ServiceMix and Camel is implemented. The URI starts with jbi:service:, which tells the Camel runtime to look for a JBI service in the JBI runtime. Notice that you have to specify the full service
name, including the namespace.
With a choice definition, a content-based routing configuration can be implemented in Camel. A choice consists of a number of when statements and one optional otherwise statement. Recall that in the insurance request example, insurance-type must be evaluated to be equal to Car. In Camel we can do this with an XPath expression, just as we did in the servicemix-eip configuration
![]() . Camel, however, offers a richer set of options, such as JavaScript and Groovy scripts, to implement a routing rule. We can’t
use a namespace in the XPath expression, because namespace support for routing rules is supported within Camel starting from
version 1.3, and ServiceMix is still on 1.2. In Camel 1.3, we can just define the namespace as part of the XML configuration
with a common xmlns definition. In addition to the XPath expression, the target service definition is defined in the when statement.
. Camel, however, offers a richer set of options, such as JavaScript and Groovy scripts, to implement a routing rule. We can’t
use a namespace in the XPath expression, because namespace support for routing rules is supported within Camel starting from
version 1.3, and ServiceMix is still on 1.2. In Camel 1.3, we can just define the namespace as part of the XML configuration
with a common xmlns definition. In addition to the XPath expression, the target service definition is defined in the when statement.
The default target service, if insurance-type does not equal Car, can be easily configured with the otherwise element
![]() . The URI definition is similar to the from element configuration we just discussed. The #NS# tag should also be replaced with the http://esbinaction.com/insurance namespace.
. The URI definition is similar to the from element configuration we just discussed. The #NS# tag should also be replaced with the http://esbinaction.com/insurance namespace.
You can test the example with the service assembly in the directory resources/chapter5/camel of the book’s source code. To be able to run the Camel example, you’ll have to implement a number of other service units. Of course, you need a way to trigger the routing functionality and to simulate the car and travel endpoints. In the example implementation, we used a file poller to trigger the Camel router, and two file senders to simulate the communication with the travel and insurance applications. Due to a problem with the message format in the exchange between ServiceMix and Camel, we also have to implement a bean service unit.
At the time of this writing, ServiceMix uses Camel 1.2 to implement the Camel service engine. Although ServiceMix and Camel are nicely integrated and both frameworks provide support for message exchanges, some inconveniences exist. For example, the file poller of ServiceMix parses the message as a StreamSource. A StreamSource can be accessed only once, and when the file message is sent to Camel, an IOException occurs, because the stream was already closed.
To prevent this IOException from occurring, we implemented a bean service unit, which transforms the StreamSource message type to a StringSource instance. And because the bean service unit needs an in-out message exchange to implement this functionality, we also need to use a pipeline component to convert the in-only exchange of the file poller to an in-out exchange. Although this sounds like complex functionality, you can look in the source code of chapter 5 to see that it’s actually quite simple.
When you’ve started the ServiceMix container, you can deploy the Camel routing example with the deploy-insurance-camel target in the ch5-examples.xml Ant build file. Then you can use the Swing client to trigger the Camel routing example.
The Camel configuration can also be implemented with the Java DSL. This means that we implement a Java class that extends the RouteBuilder class, which consists of similar logic as the XML alternative that we have just discussed. Listing 5.4 shows the implementation of the insurance request content-based router with the Insurance-Router class.
Listing 5.4. Content-based router Java DSL configuration with servicemix-camel

The InsuranceRouter is more compact than the XML configuration alternative in listing 5.3. To keep the routing logic clean, the class implementation starts with the definition of the incoming and outgoing services
![]() . The configure method is called on initialization of the RouteBuilder, and is therefore the place to implement the routing logic. The service definition of the content-based router is defined
by the from method and uses the SERVICE_IN attribute value for the configuration
. The configure method is called on initialization of the RouteBuilder, and is therefore the place to implement the routing logic. The service definition of the content-based router is defined
by the from method and uses the SERVICE_IN attribute value for the configuration
![]() . The from method returns a RouteType instance, which can be used to implement the routing logic.
. The from method returns a RouteType instance, which can be used to implement the routing logic.
In the Camel XML configuration example, we had to use an extra bean service unit to trigger the router due to usage of the StreamSource class by the file poller. In the Java DSL implementation a solution is available to transform the StreamSource instance to a DOMSource with the convertBodyTo method. The convertBodyTo method returns the same RouteType instance that the from method did. Only the incoming message type is transformed to a DOM structure.
The routing logic can be implemented with the choice method that is available on the RouteType class. With the choice method, we get a ChoiceType instance that can be used to implement content-based routing logic. We can now add a when predicate, which consists of an XPath expression
![]() . The xpath method is a static method of the XPathBuilder class that can be used for XPath expressions. Notice that we’ve used a static import for the xpath method in this code example, which is a Java 5 feature. To support namespaces in the XPath expression, a namespace method
is available in the XPathBuilder. The when method returns the same ChoiceType instance, so we can add a to method to register the target service for a Car insurance message.
. The xpath method is a static method of the XPathBuilder class that can be used for XPath expressions. Notice that we’ve used a static import for the xpath method in this code example, which is a Java 5 feature. To support namespaces in the XPath expression, a namespace method
is available in the XPathBuilder. The when method returns the same ChoiceType instance, so we can add a to method to register the target service for a Car insurance message.
The to method also returns the ChoiceType instance, which can be used to add an otherwise statement. The otherwise method again returns the ChoiceType instance, and we can add the target service for messages for which the XPath expression evaluates to false
![]() .
.
This example shows that the Camel Java DSL is a nice alternative to the more verbose XML configuration. Maybe you have to get used to the concatenation of methods, but it provides a great way to specify routing rules in Java code. To run this example, we need a bit of XML configuration in addition to the Java code. This XML configuration is used by Camel to initialize the context with the right Java classes:
<camelContext id="camel"
      xmlns="http://activemq.apache.org/camel/schema/spring">
  <package>esb.chapter5.camel.router</package>
</camelContext>
As you can see, the XML configuration needed is quite minimal; only the Java packages for the Camel router classes have to be configured. In this case, we have only one router, so we have to include the package for the InsuranceRouter. Also notice that because we use the convertBodyTo(DOMSource.class) method in listing 5.4, we don’t have to implement the additional service units that we saw in the Camel XML example.
To test the example, you can deploy the service assembly with the deploy-insurance-camelDSL target of the ch5-examples.xml Ant build file. Be sure that ServiceMix has been started before you execute this deploy target. Again, you can test the example using the Swing test client.
Content-based routing with domain logic in Mule
To be able to compare the content-based routing functionality of ServiceMix and Mule, we implement the insurance routing example with Mule (listing 5.5).
Listing 5.5. Mule content-based router implementation

Listing 5.5 uses a file inbound and outbound endpoint with a content-based router, the filtering-router, defined on the outbound router. Filtering routers consist of an outbound endpoint and a filter implementation. If the filter evaluates to true, the message is sent to the outbound endpoint configured for the corresponding filtering router. To implement the filter, Mule offers several filter types, including a payload type, a regular expression, a wildcard, and an XPath filter. Because the insurance request message uses an XML format, the XPath filter is best suited to implement the content-based routing logic for this example.
The XPath filter is implemented with the Apache Commons JXPath library. The JXPath filter is part of the Mule XML module,
and the XPath expression can be configured with the pattern attribute
![]()
![]() . The XPath expressions for this example evaluate if the insurance-type element in the XML message equals Car or Travel. Because the insurance-type element has a namespace of http://insurance.com, we also have to configure the namespace and the namespace prefix as part of the JXPath filter definition. When the XPath
filter evaluates to true, the message is sent to the Car or Travel file outbound endpoint, with the current date and time as part of the filename.
. The XPath expressions for this example evaluate if the insurance-type element in the XML message equals Car or Travel. Because the insurance-type element has a namespace of http://insurance.com, we also have to configure the namespace and the namespace prefix as part of the JXPath filter definition. When the XPath
filter evaluates to true, the message is sent to the Car or Travel file outbound endpoint, with the current date and time as part of the filename.
The ordering of the filtering routers can be important, because only the first filtering router that evaluates to true will
be executed by default. If you want all of the filtering routers that evaluate to true to be executed, then configure a matchAll attribute value of true on the outbound element. We also have configured a catchall router, which handles the message
![]() when both filters evaluate to false.
when both filters evaluate to false.
Because the JXPath filter expects the payload type to be an XML document, an XML string, or a Java object, we need to transform
the input stream payload of the incoming message to a string or document. Therefore, we’ve defined a Mule transformer for
this purpose
![]() .
.
To run the example, execute the routing-mule target in the ch5-examples.xml Ant build file in the resources/chapter5 directory. When Mule has started, use the example files in the resources/chapter5/routing directory as input for the insuranceInbox directory in the Mule distribution. Of course, you can also use the Swing test client to trigger this routing example.
Content-based routing without domain logic in Apache Synapse
So far, we’ve discussed routers that use domain logic to determine the target endpoint. Next, we look at content-based routers that don’t include domain logic. We show an example with Apache Synapse, an open source ESB that is part of Apache’s web services project.
Apache Synapse is based on the well-known Apache Axis2 web service container framework. With the wide variety of complex standards and specifications in the web service world today, such as WSDL, SOAP, XSD, WS-Addressing, WS-ReliableMessaging, and WS-Security, there is a need to simplify the usage for developers. Apache Synapse provides an abstraction layer that supports a lot of the web services standards but keeps it simple for developers to implement solutions, based on these standards. Figure 5.3 shows an overview of the Apache Synapse framework.
Figure 5.3. The Apache Synapse architecture, showing the different layers and Axis2 foundation

We focus on the Synapse processing model shown in figure 5.3. The functionality that Apache Synapse provides is implemented with so-called mediators. A mediator is a component that performs a specific kind of functionality on a message, such as message validation, XSLT transformation, logging, and message header processing. Another important component in the Synapse processing model is the endpoint, which represents an address for incoming and outgoing messages. By using mediators and endpoints, we can build mediation logic to send an incoming message to the right target endpoint, as we’d like to do with content-based routing.
In the previous section, we used the insurance-type element in the XML message to define routing rules. That was a simple example, but you can imagine that if routing rules become complex, the amount of domain-specific logic will increase. An alternative solution is to add some extra logic when creating the insurance request message in the originating application. This is typically the place where the domain logic about insurance requests is implemented, so why not add a small piece of extra logic to it?
A common way to implement this kind of functionality is by adding a header element to the message that defines the target destination with a keyword. The keyword is then matched in the ESB to the actual target endpoint address. This means that we still have the advantage of decoupling the originating application from the target application, but we don’t have to implement domain-specific logic in the ESB. There is a web service standard that standardizes the header elements for a SOAP message: WS-Addressing.
The Web Services Addressing, or WS-Addressing, 1.0 standard specifies how address-related information, like the destination address, the reply endpoint, and the fault endpoint, can be specified. After a long process of standardization, the W3C standardization organization declared the WS-Addressing 1.0 specification to be a W3C recommendation (which means it is a standard). WS-Addressing uses SOAP header elements to define the address information, so intermediaries like ESBs don’t have to look at the whole message. The SOAP headers defined in the WS-Addressing specification are quite similar to the JMS headers of the JMS specification. For example, both specifications have a message identifier and correlation identifier header that can be used to uniquely identify and correlate messages. A number of other web services specifications, including WS-ReliableMessaging, use WS-Addressing headers as a foundation.
We could use the WS-Addressing standard for the insurance request example, without having to use domain-specific logic inside the ESB. A WS-Addressing header element well suited for our purpose is the Action header. This element specifies the action related to the message, such as which service method needs to be called. We could use the Action header to specify the destination of the insurance request in our application. Figure 5.4 shows an overview of how WS-Addressing can be used as a foundation for our content-based routing implementation.
Figure 5.4. Example of content-based routing without domain logic using the WS-Addressing Action header element. The WS-Addressing Action header value defines a keyword that can be used to select the target endpoint for the insurance request message.

The insurance request message is wrapped in a SOAP envelope that includes a WS-Addressing Action header, as described in figure 5.4. The keyword Travel-Insurance maps to the endpoint address of the travel insurance application, so the content-based router in the ESB can send the insurance request to the proper target application.
With the incoming insurance request message structure defined, we can look at the routing implementation within Apache Synapse. The routing implementation is defined with the Synapse Configuration Language, an XML-based configuration language that specifies the necessary mediators. Listing 5.6 shows the XML configuration that implements the example in figure 5.4.
Listing 5.6. The content-based routing example implemented with Apache Synapse

A Synapse configuration starts with a definitions element. The endpoint addresses of the car and travel insurance applications can be registered quite simply with a name and
address URI
![]() . The endpoint name is the identifier that can be used within the Synapse configuration.
. The endpoint name is the identifier that can be used within the Synapse configuration.
The actual routing logic is implemented with a switch mediator
![]() . This mediator requires a source attribute that consists of an XPath expression that selects a message element. In this case,
the get-property expression is used, which is a Synapse-specific expression to retrieve a SOAP message header. Because we want to select the
WS-Addressing Action header, the literal ‘action’ is used. In addition to the switch mediator, a case element is used to complete the routing rule. The regular expression in the case element specifies the value for the message element that is selected in the switch mediator. So in this example, we check to see whether the WS-Addressing Action header value starts with Car. If this routing evaluates to true, the incoming message is routed on to the car insurance application
. This mediator requires a source attribute that consists of an XPath expression that selects a message element. In this case,
the get-property expression is used, which is a Synapse-specific expression to retrieve a SOAP message header. Because we want to select the
WS-Addressing Action header, the literal ‘action’ is used. In addition to the switch mediator, a case element is used to complete the routing rule. The regular expression in the case element specifies the value for the message element that is selected in the switch mediator. So in this example, we check to see whether the WS-Addressing Action header value starts with Car. If this routing evaluates to true, the incoming message is routed on to the car insurance application
![]() . We can simply reference the endpoint that we defined at the top of the configuration
. We can simply reference the endpoint that we defined at the top of the configuration
![]() .
.
We know that if the message should not be sent to the car insurance application, it’s targeted for the travel insurance application.
The switch mediator provides the default element for this purpose
![]() . We can simply reference the TravelEndpoint, which points to the endpoint address of the travel insurance application.
. We can simply reference the TravelEndpoint, which points to the endpoint address of the travel insurance application.
You’ve seen that implementing routing rules within an ESB like Mule and Service-Mix is quite easy. You only have to specify XPath routing rules or Camel DSL logic to route the message to its destination. Doing this manually would mean a lot of extra coding. The provided routing functionality in Mule and ServiceMix can be an important reason to choose an open source ESB implementation if you have an integration issue, instead of developing your own custom routing logic.
In the next section, we look at another important capability of the open source ESB: message validation. To ensure that the incoming and outgoing messages are structured as agreed on by the involved application owners, message validation is critical. We discuss the details about this important step in a message flow with some interesting examples.
5.2. Validating messages
The Society for Worldwide Interbank Financial Telecommunication (SWIFT) standard is a widely adopted message standard for exchanging messages reliably and securely between banks and other financial institutions. When sending a message to the SWIFT network, the sending financial institution is responsible for the validity of that message. When a financial institution sends invalid messages to the SWIFT network, this results in penalties. Therefore, the messages are validated before they are sent out. This not only includes validation on the message format, but also the validity of the content of the message against all kinds of complex rules.
The validation of messages is not only important when sending messages between organizations, or financial institutions as in the SWIFT example. Within any organization message validation is important, because sending invalid messages between internal applications can result in storing invalid information about clients or a failure of processing messages in the receiving applications. Repairing this damage can be costly.
Message validation can be categorized into two types of validation functionality: validation of message format and validation of message content. Validating the format of a message is simpler than checking the message content against complex rules. An open standard is available to validate XML messages with the XML Schema Definition (XSD) specification. This type of validation is well supported within ESB products, and we’ll look at how it can be implemented with Mule, ServiceMix, and Apache Synapse. For the validation of message content, custom solutions exist for specific message standards (like SWIFT for the financial market and Health Level 7 [HL7] for healthcare). There are JBI components available as part of the open source OpenESB and Chain-Builder that provide support for HL7. In this section we focus on validating the message format, because message content validation is a topic on its own.
Let’s consider a small example about message validation before we look at the implementation details. Assume that we have an incoming message from a messaging provider. The message is picked up by the ESB and will be routed to a web service, just as in figure 5.1. Before the message is transformed to the message format of the web service, we must be sure that the incoming message is formatted as expected. Therefore, the incoming message is validated against an agreed-on XSD. Figure 5.5 shows these steps.
Figure 5.5. The incoming message from the messaging layer is validated against an XSD. When the message is invalid, it will be forwarded to an invalid message queue. When the message validation succeeds, the basic flow is processed.
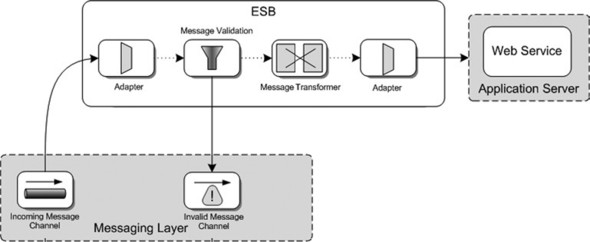
Figure 5.5 shows how messages that don’t pass the validation step are sent to the invalid message channel. This is a common way to deal with invalid messages. The invalid message channel is used as a storage mechanism so ESB administrators can be alerted when invalid messages arrive at the ESB. Now let’s see how this kind of message validation can be implemented with Mule.
5.2.1. Validating messages with Mule
As message validation is a common step in the implementation of message flow for a specific integration solution, you’d expect that Mule would provide a standard message validation component. This is not the case, but when you look a bit further at the functionality provided by the inbound and outbound routers available in Mule, you’ll see that the FilteringXmlMessageSplitter message router has an option for validation. In this section, we copy the validation functionality implemented in this router in our ValidationRouter class (see listing 5.8).
Configuring message validation for Mule
For the implementation of a message validation example in Mule, we need a simple inbound and outbound endpoint definition. Because JMS messaging is a common transport type for Mule, let’s define a JMS input queue, validation.in, and a JMS output queue, validation.out. With this choice made, we can configure most of the necessary Mule elements (see listing 5.7).
Listing 5.7. Mule validation configuration

The Mule configuration is shown without the namespace definitions for convenience reasons. Because we are using the ActiveMQ
message broker as the hosting environment for the JMS queues, the configuration starts with the JMS connector definition
![]() .
.
There is one service defined called ValidationService, which configures the inbound and outbound router. The message validation functionality is implemented with a custom inbound
router, named ValidationRouter
![]() . This router consumes the incoming JMS message and performs an XSD validation against this message. The implementation of
this router will be discussed in listing 5.8. The XSD file order-Schema.xsd, which is used for the validation step, is injected with a Spring property into the validation
router. When the XSD validation returns no errors the message is forwarded to the outbound router
. This router consumes the incoming JMS message and performs an XSD validation against this message. The implementation of
this router will be discussed in listing 5.8. The XSD file order-Schema.xsd, which is used for the validation step, is injected with a Spring property into the validation
router. When the XSD validation returns no errors the message is forwarded to the outbound router
![]() .
.
But what happens when the message validation step returns errors? An inbound router in Mule has to implement a method named
isMatch, which specifies whether the message can be consumed by this inbound router. If the message validation step fails, this method
should return false to prevent the incoming message from being forwarded to the endpoint defined in the outbound router. To
be able to route a message to another endpoint when no inbound routers accept the incoming message, Mule provides a catchall
strategy
![]() . In this example, the incoming message that doesn’t pass the validation step is routed to the validation.error JMS queue.
. In this example, the incoming message that doesn’t pass the validation step is routed to the validation.error JMS queue.
Developing a Mule validation component
We still have to implement the actual validation logic in the custom inbound router used in the Mule configuration. This inbound router will be based on the Forwarding-Consumer inbound router provided by Mule, because we want to forward the incoming message directly to the outbound router when the validation step returns no errors. The inbound router will also use the same validation functionality as the Filtering-XmlMessageSplitter router, which is provided by Mule. So we are copying validation functionality here from an existing Mule router. Listing 5.8 shows the implementation of the isMatch method in the ValidationRouter.
Listing 5.8. Custom inbound router with XSD validation
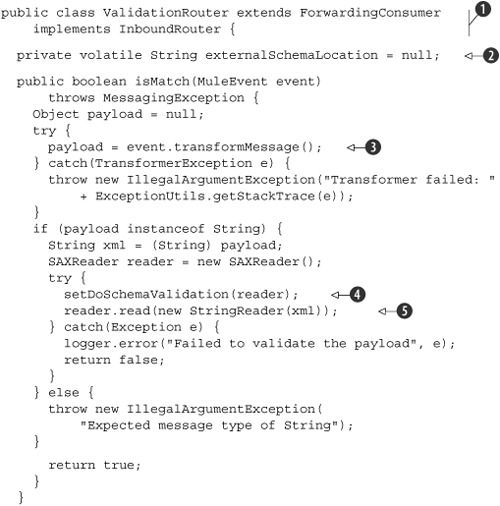
The ValidationRouter uses the functionality provided by the ForwardingConsumer message router by extending this class
![]() . This means that the process method, which forwards the message from the inbound router directly to the outbound router, is already implemented.
. This means that the process method, which forwards the message from the inbound router directly to the outbound router, is already implemented.
The XML Schema used to validate the incoming message is injected with Spring into the externalSchemaLocation attribute
![]() . The injection is done by calling the setter method for this attribute. We don’t show the setter method in listing 5.8 to reduce the amount of Java code.
. The injection is done by calling the setter method for this attribute. We don’t show the setter method in listing 5.8 to reduce the amount of Java code.
Before the process method (implemented in the ForwardingConsumer class) is called, the isMatch method is called by the Mule container. Because we only want messages without any validation errors to be forwarded to the
outbound router, we have to implement the validation logic in this method. To be able to perform the message validation, we
must first retrieve the incoming message from the MuleEvent instance. Notice that we use the transformMessage method in this example
![]() , and not the more obvious getMessage method. When we use the getMessage method, we get a JMS message. JMS messages can be transformed to the payload type with the default transformer of the JMS
endpoint, but we have to use the transformMessage method to execute this transformation step.
, and not the more obvious getMessage method. When we use the getMessage method, we get a JMS message. JMS messages can be transformed to the payload type with the default transformer of the JMS
endpoint, but we have to use the transformMessage method to execute this transformation step.
In this example we expect the JMS message payload to be of type String. A simple SAXReader is used to perform the parsing of the String to an XML structure. The set-DoSchemaValidation method sets the necessary properties on the SAXReader instance to enable validation when parsing the message
![]() . The location of the XML Schema file is also defined on the SAXReader instance in this method. The implementation of this method is left out of the listing, because it’s a trivial step for Java
developers. For the full Java code overview of the ValidationRouter class, you can look at the book’s source code.
. The location of the XML Schema file is also defined on the SAXReader instance in this method. The implementation of this method is left out of the listing, because it’s a trivial step for Java
developers. For the full Java code overview of the ValidationRouter class, you can look at the book’s source code.
Now that all the necessary parameters are set, we can parse the string with the read method of the SAXReader
![]() . When an exception is thrown while parsing the string, a boolean value of false is returned to trigger the catchall strategy. If the validation step returns no errors, a boolean value of tr165ue is returned and the process method is executed to forward the message to the outbound router.
. When an exception is thrown while parsing the string, a boolean value of false is returned to trigger the catchall strategy. If the validation step returns no errors, a boolean value of tr165ue is returned and the process method is executed to forward the message to the outbound router.
Before we can start the example implementation in Mule, we first have to start the ActiveMQ broker. In the resources/chapter5 directory of the source code, you’ll find the ch5-examples Ant build file, which you can use to build and deploy this validation example to Mule with the validation-mule target. This target also starts Mule with the validation Mule configuration. With the Swing test client, we can now send a message that passes the validation test and a message that will return a validation error.
Although Mule has no default message validation component available, we’ve built our own inbound validation router with code that’s already implemented in the FilteringXmlMessageSplitter and we used the ForwardingConsumer as our base class. This isn’t a difficult task, as you’ve seen in this section. This simple validation component could be enriched with additional functionality, such as storing the validation error messages in the message that’s returned. Let’s see how we can implement validation functionality in ServiceMix.
5.2.2. Validating messages with ServiceMix
ServiceMix provides a number of components that are JBI compliant and one deprecated component, the lightweight container, which isn’t JBI compliant. The lightweight container provides some additional functionality, including validation, which cannot be found in the JBI-compliant components (a validation service engine will be provided in ServiceMix 3.3). When no JBI-compliant component is available that provides the desired functionality, the ServiceMix project’s recommended approach is to develop a Java bean with, for example, the servicemix-bean JBI component. But for this section we’ve chosen to use the validation functionality provided by the lightweight container, to also provide some insight into the lightweight container implementation.
Configuring message validation for ServiceMix
Now let’s look at how we can use the validation functionality of the lightweight container with JMS input and output queues. We have to define JMS endpoints within the servicemix-JMS binding component, and we have to configure a servicemixlwcontainer service engine for the validation functionality. This isn’t enough to implement the validation example, though. With the validation component, validation errors are sent back to the endpoint where the incoming message arrived—in this example, the validation.in JMS queue. We want the message that doesn’t pass the validation step to be forwarded to the validation.error JMS queue. To take advantage of this functionality, we have to include a custom bean service engine implementation. Figure 5.6 shows an overview of the ServiceMix components for this example.
Figure 5.6. The JBI components needed to implement a validation example with JMS input and output queues. The ErrorHandlerComponent is a custom-developed bean component that forwards the response message to the proper JMS endpoint.

The JMS message consumed from the validation.in queue is forwarded to the ErrorHandlerComponent, as shown in figure 5.6. This custom bean component is responsible for the message exchange with the validation component configured in the lightweight container. When the validation component returns validation errors to the ErrorHandlerComponent, the message is forwarded to the validation.error queue; if there are no errors, the message is sent to the validation.output queue.
We’ve already configured a couple of JMS endpoints in earlier examples, so we’ll focus on the implementation of the ErrorHandlerComponent and the configuration of the validation component. Let’s start with the validation component configuration shown in listing 5.9.
Listing 5.9. servicemix.xml of the validation component in the lightweight container

In listing 5.9, the configuration for the lightweight validation component is implemented with the servicemix.xml file. For lightweight
components, a different kind of configuration is used, based on the embedded ServiceMix configuration style. With the configuration
of activation specifications, lightweight components can be defined with a service and endpoint name
![]() . The service name can be used to call the validation component from the ErrorHandlerComponent (which we discuss in listing 5.10).
. The service name can be used to call the validation component from the ErrorHandlerComponent (which we discuss in listing 5.10).
The validation component, org.apache.servicemix.components.validation. ValidateComponent, is configured with the bean element
![]() , just as you saw in the servicemix-bean JBI component configuration. The location and name of the XSD file that will be used
to validate the incoming message is injected with the schema-Resource property
, just as you saw in the servicemix-bean JBI component configuration. The location and name of the XSD file that will be used
to validate the incoming message is injected with the schema-Resource property
![]() .
.
When the validation component encounters validation errors, the default error handler just sends a fault message to the calling
component. To format the fault message with an XML structure that lists all encountered validation errors, we inject another
error handler
![]() . This error handler is provided with the org.apache.servicemix.components.validation.MessageAggregatingErrorHandlerFactory class
. This error handler is provided with the org.apache.servicemix.components.validation.MessageAggregatingErrorHandlerFactory class
![]() . With the rootPath attribute, the root element for the validation errors can be configured, and the namespace property is used to specify the namespace for the fault message. It’s possible to include the full stack trace of the validation
error, but in this example we only want to include the validation error message.
. With the rootPath attribute, the root element for the validation errors can be configured, and the namespace property is used to specify the namespace for the fault message. It’s possible to include the full stack trace of the validation
error, but in this example we only want to include the validation error message.
Developing a ServiceMix validation error handler
Now we’ve configured the lightweight validation component and defined the JMS endpoints, we should be able to implement the custom bean. The bean implementation has to include an in-out message exchange with the validation component and forward the response or error message to the proper JMS queue. Listing 5.10 shows the implementation of the ErrorHandlerComponent.
Listing 5.10. Java implementation of the ErrorHandlerComponent

The message exchange received in the ErrorHandlerComponent is the in-only exchange from the JMS consumer endpoint for the validation.in queue. Because the validate component exchange needs to be an in-out exchange, we have to instantiate a client
![]() . A ServiceMix client can be used to start a new message exchange in your own bean implementation.
. A ServiceMix client can be used to start a new message exchange in your own bean implementation.
To configure the ServiceMix client with the target service details, we have to create a destination
![]() . The full service name used here is configured in listing 5.9. Notice that the namespace of the service definition must be included in the destination. The destination instance can then
be used to create the message exchange. Because we want the response of the validation component to be sent back to this bean
component, we use an in-out MEP.
. The full service name used here is configured in listing 5.9. Notice that the namespace of the service definition must be included in the destination. The destination instance can then
be used to create the message exchange. Because we want the response of the validation component to be sent back to this bean
component, we use an in-out MEP.
The input message for the validation component should be the received JMS message payload. So we just have to copy the incoming
message content to the message exchange
![]() . With the in message filled, the validation component can be invoked with the sendSync method on the ServiceMix client. The done method can be invoked right after the send method to finish the message exchange within the ServiceMix container. When we don’t invoke the done method, the output or fault message is not yet filled and the message exchange is still running.
. With the in message filled, the validation component can be invoked with the sendSync method on the ServiceMix client. The done method can be invoked right after the send method to finish the message exchange within the ServiceMix container. When we don’t invoke the done method, the output or fault message is not yet filled and the message exchange is still running.
The response message of the validation component can be a copy of the incoming message or a fault message that contains the
validation errors. Therefore, the getOut-Message and the getFault methods are both used. If the output message is filled with content, we know that there are no validation errors. In that
case, we can forward the message to the validation.out message queue
![]() . If the output message is empty, we can be sure that validation errors exist and the fault message content is forwarded to
the validation.error queue
. If the output message is empty, we can be sure that validation errors exist and the fault message content is forwarded to
the validation.error queue
![]() .
.
The logic needed to send the message to the JMS queues is quite similar to the message exchange we just discussed to communicate
with the validation component. The main difference is that the MEP is in-only
![]() . The content of the response or fault message is copied to the input message of the in-only exchange, and the ServiceMix
client sends the message to the proper JMS queue.
. The content of the response or fault message is copied to the input message of the in-only exchange, and the ServiceMix
client sends the message to the proper JMS queue.
To test the ServiceMix validation example, you can use the service assembly provided in the resources/chapter5/validation directory. First, you have to start the ServiceMix container with the ch5-examples build file, and then the deploy-validation target has to be executed to deploy the validation service assembly. The esb.chapter5.validation.test.ValidationJMSTest JUnit test case or the Swing test client can be used to put messages on the validation.in queue to test the validation example with and without validation errors.
We’ve implemented two validation examples with Mule and ServiceMix. In both cases, we had to use a bit of custom logic to implement the example to work according to our demands. In the next section, we look at another approach to message validation with Apache Synapse.
5.2.3. An alternative way to perform message validation using Synapse
Because Mule and ServiceMix don’t provide a validation component out of the box that works without additional logic, we look at how message validation is supported within another open source ESB: Apache Synapse. We chose Apache Synapse because it provides good support for message validation based on an XML Schema definition. You’ve seen a Synapse configuration with content-based routing and endpoint functionality in section 5.1.2. We also talked about WS-Addressing and the Action header element in particular. For the message validation example, we use an endpoint definition and another WS-Addressing header, named FaultTo.
Because Apache Synapse is a web service mediation framework, we show the same order validation example as used for Mule and ServiceMix with web service endpoints instead of JMS queues. Apache Synapse does, however, also support JMS transport functionality.
With Synapse we can also use WS-Addressing header elements for our message validation example. When an incoming message fails the XSD validation step, we’ve used a JMS error queue in the previous examples. With the WS-Addressing FaultTo header element, clients that send SOAP messages to the ESB have a way to configure an endpoint address where faults should be sent. Now let’s look at the Synapse configuration with message validation support (listing 5.11).
Listing 5.11. Message validation example with Apache Synapse

Besides the message validation functionality, we’ve used a registry in listing 5.11
![]() . Synapse provides an easy-to-configure URL-based registry, which can be used to store XML Schemas and other definitions.
In this example, the registry URL points to a local directory with the cache timeout set to 15,000 milliseconds.
. Synapse provides an easy-to-configure URL-based registry, which can be used to store XML Schemas and other definitions.
In this example, the registry URL points to a local directory with the cache timeout set to 15,000 milliseconds.
The message validation functionality is configured with the validation element. The location of the XSD file is configured with the schema element
![]() . The key attribute value points to the XSD file location in the registry. The root element of the XML structure that must be validated
is specified with the source attribute with namespace declaration.
. The key attribute value points to the XSD file location in the registry. The root element of the XML structure that must be validated
is specified with the source attribute with namespace declaration.
When the XML parser encounters any validation errors, the on-fail element is executed. Synapse provides a simple mediator to construct a fault message, the makefault element
![]() . The makefault mediator creates a SOAP message with a SOAP fault element. The code and reason element values in the fault message can be easily configured with the same elements in Synapse.
. The makefault mediator creates a SOAP message with a SOAP fault element. The code and reason element values in the fault message can be easily configured with the same elements in Synapse.
Because the validation step is defined as part of the incoming message sequence, we have to instruct Synapse that the fault
message should be sent back as a response. Therefore, the property RESPONSE is set to true. We also have to specify the endpoint address to which the fault response message should be sent. Here we
can use the FaultTo WS-Addressing header element value that we expect the client application to set. With the header mediator and an expression
that retrieves the FaultTo value, we can set the response destination address
![]() . This is all we have to do to implement message validation within Apache Synapse.
. This is all we have to do to implement message validation within Apache Synapse.
You’ve seen three approaches to message validation in this section. In all three open source ESBs, we can implement message validation pretty easily. Mule doesn’t provide a standard validation component, but with the aggregation of two provided routers we’re able to implement an inbound validation router. ServiceMix does provide a validation component as part of the lightweight container, but this component has limited error-handling functionality. With the addition of a custom bean component, we can implement the order validation example, though. With Apache Synapse, implementing message validation was the easiest, because of its support for fault handling and WS-Addressing.
Before a message can be sent to a service or application, we must be sure that the message conforms to the expected target message format. In many message flows, we need to transform the message to this message format, as you’ll see next.
5.3. Transforming messages
As you’ve learned, message transformation cannot be neglected. Using an ESB means that different applications and services have to be integrated and information has to be shared. Because application and service development is usually not done with the same business object model in mind, developing integration solutions means that messages have to be transformed from one application model to another. In this section, we see how message transformation can be implemented with Mule and ServiceMix.
With message routing we saw that XPath is an important open standard for implementing routing rules and that XML Schema is an often used open standard for implementing message validation. To include a message transformation step in your integration solution, the XSLT open standard is a common choice. The assumption is that the messages exchanged via the ESB are in XML format. With ServiceMix you’re forced to XML, although you can build transformers to, for example, change a text-based message to an XML format. But the message format inside ServiceMix is, according to the JBI specification, XML. For Mule there is no need to use XML messages inside the bus. We already saw in previous chapters that you can also exchange POJOs over the Mule bus, but the industry is more and more standardizing on XML for exchanging messages because it’s technology and platform independent. So for the topic of message transformation, we’ll assume that the message format is XML.
Although the concept of message transformation may already be quite familiar to you, let’s look at a quick example of a message flow that involves a transformation step. Let’s assume that a message is arriving from a JMS queue and that this message needs to be sent to a web service that has a WSDL with a different message format (see figure 5.7).
Figure 5.7. A message flow that transforms an incoming JMS message to the message format as defined in the WSDL of an external web service

The message transformer shown in figure 5.7 will consume the JMS message and transform the format with an XSLT style sheet to the web service format. Now let’s look at how to implement such an example with Mule.
5.3.1. Implementing message transformation in Mule
Because transformation is such an essential piece of functionality within an ESB, Mule provides all kinds of out-of-the-box transformers. In order for Mule users to deal with building message flows that involve various transport protocols, Mule also uses the concept of transformation on a transport level. To make this easier to comprehend, let’s focus on Mule’s JMS transport.
Every developer who has coded a JMS consumer and/or producer knows that you have to deal with the javax.jms.Message interface and one of its subclasses: TextMessage, BytesMessage, MapMessage, StreamMessage, or ObjectMessage. These classes are used as message container objects. For XML and simple text-based messages, the TextMessage class is often used. So when you have a String representation of an XML message, you have to create a TextMessage and set the string as the message content before the message can be put on a JMS queue.
To facilitate using JMS transport within Mule, two transformers are available that handle this functionality for you. The ObjectToJMSMessage transformer accepts a Java object, creates the correct JMS message class, and sets the Java object as the message content. The JMSMessageToObject transformer does the exact opposite: it takes the payload out of a JMS message and returns the corresponding Java object type. Table 5.1 shows how the Java objects are mapped to JMS messages.
Table 5.1. Mapping of Java objects to JMS message types
|
Message payload type |
JMS message type |
|---|---|
| java.lang.String | javax.jms.TextMessage |
| byte[] | javax.jms.BytesMessage |
| java.util.Map | javax.jms.MapMessage |
| java.io.InputStream | javax.jms.StreamMessage |
| java.lang.Object | javax.jms.ObjectMessage |
Because mapping the other way around is not the same, table 5.2 shows the mapping of JMS messages to Java objects.
Table 5.2. Mapping of JMS messages to Java objects
|
JMS message type |
Java object |
|---|---|
| javax.jms.TextMessage | java.lang.String |
| javax.jms.ObjectMessage | java.lang.Object |
| javax.jms.BytesMessage | Byte[] (Note that the transformer will check whether the payload is compressed and automatically uncompress the message.) |
| javax.jms.MapMessage | java.util.Map |
| javax.jms.StreamMessage | java.util.Vector of objects from the stream message |
The JMS transport support of Mule doesn’t stop with availability of these two transformers. By default, these transformers are executed automatically. So when an inbound router is configured with a JMS transport URI, by default when an incoming TextMessage is consumed, the payload is extracted and passed on as a String object. For an outbound router with a JMS queue, a String object is automatically transformed to a TextMessage. Figure 5.8 shows a message flow that consumes messages from a JMS queue and then forwards this message to another JMS queue.
Figure 5.8. A message flow example showing the usage of default transformers within Mule. In this example, the default JMS transformers are shown that transform the JMS message type to a Java object, and vice versa.

The example in figure 5.8 provides an overview of the default JMS transformers for both an incoming JMS message and an outgoing JMS message. Before the component is called, the payload is first extracted and a Java object of the payload is created. The component is then called with this Java object. When the component returns a Java object, the outbound router is called. The JMS transport connector then transforms the Java object to a JMS message again and the message is forwarded to the JMS queue. Note that this is the default behavior of the JMS transformers, but it can be overridden in every Mule configuration by implementing a transformer-ref attribute on an inbound or outbound endpoint. When a router contains this attribute, the listed transformers are executed instead of the default transformers that we’ve described.
The default transformers are provided by Mule to make it easier for Mule users to deal with various transport types. This isn’t the type of transformer that we want to discuss in relation to message transformation, however. With message transformation, the message format is actually changed, and this isn’t what happens with the transport transformers. Why discuss the previous JMS example, then? Well, the transformer architecture in Mule is based on this type of transformer, including the message transformation support. The XsltTransformer class that we use in the next example must also be configured in the transformer element, and therefore the default transformers are overridden. So you should know the concept of default transformers before using the XsltTransformer. Now let’s take a look at an example of message transformation in Mule.
Configuring the weather service invocation in Mule
We implement a message flow that listens for console user input, then calls a weather service and gives the response to the user via the console. The website WebserviceX.NET (http://www.webservicex.net) provides a number of free web services that are great to use for examples. One of these web services is a weather service that takes a city and country as input and responds with a number of weather parameters for that city. This means that we ask a user to enter a city and country in the console, then call the web service; then we send the response back to the console. But because we’re only interested in the temperature and humidity, we first transform the web service response to a message format with these weather parameters before sending the message to the console.
To make it easy to comprehend the Mule configuration, we begin by retrieving the city and country via the console and calling the weather web service first. This part of the Mule configuration is shown in listing 5.12.
Listing 5.12. Mule configuration that calls the weather web service

Let’s start with the inbound router that asks for user input via the stdio connector
![]() . The user is asked to provide a city and country, using a comma as delimiter. This means that we receive a String when the user provides this information. The web service transport provider that we use later in the Mule configuration can
accept multiple input parameters for a web service, but they have to be provided as a List. This means that we have to transform the string message to a primitive list with two entries: a city and a country.
. The user is asked to provide a city and country, using a comma as delimiter. This means that we receive a String when the user provides this information. The web service transport provider that we use later in the Mule configuration can
accept multiple input parameters for a web service, but they have to be provided as a List. This means that we have to transform the string message to a primitive list with two entries: a city and a country.
We’ve used a Groovy script to transform the string message to a List
![]() . We could’ve implemented a small Java method with the same logic. The Groovy script tokenizer.groovy consists of the following:
. We could’ve implemented a small Java method with the same logic. The Groovy script tokenizer.groovy consists of the following:
return src.toString().tokenize(",")
With this Groovy script, the incoming user input is transformed to a Java List object. Because we need a primitive array to call the weather web service, we then have to transform the List object to a primitive string array. We’ve implemented a simple Mule transformer CollectionToArray that handles this conversion:
public class CollectionToArray extends AbstractTransformer {
  protected Object doTransform(Object src, String encoding)
      throws TransformerException {
    if (src instanceof Collection) {
      Collection collection = (Collection) src;
      return collection.toArray();
    } else {
      throw new TransformerException(this, new
          javax.xml.transform.TransformerException(
              "Only Collection payload is supported."));
    }
  }
}
We’ve configured the script and primitive array transformers on the inbound endpoint with the transformer elements. Because the stdio URI doesn’t have any default transformers, we only have to configure these two transformers.
With the user input converted to a primitive string array, we can invoke the weather web service as an outbound endpoint
![]() . Because we want to transform the response of the web service, we use a chaining router to forward the web service response
to another Mule service. With a chaining router, the response of the first outbound endpoint is forwarded to the next configured
outbound endpoint. We use a wsdl-cxf transport URI to invoke the weather web service. The web service URI needs to point to the WSDL of the web service. For the
weather web service, this is the http://www.webservicex.net/globalweather.asmx?WSDL URI. We also have to provide the web service operation to invoke: GetWeather. With this configuration, Mule will invoke the GetWeather operation on the weather web service with the city and country parameters as input. The Apache CXF transport accepts the string array as input and puts the first occurrence of the array
in the first element of the input message for the web service—in this case, the city value. Of course, the second occurrence in the string array is used as the second element: the country value.
. Because we want to transform the response of the web service, we use a chaining router to forward the web service response
to another Mule service. With a chaining router, the response of the first outbound endpoint is forwarded to the next configured
outbound endpoint. We use a wsdl-cxf transport URI to invoke the weather web service. The web service URI needs to point to the WSDL of the web service. For the
weather web service, this is the http://www.webservicex.net/globalweather.asmx?WSDL URI. We also have to provide the web service operation to invoke: GetWeather. With this configuration, Mule will invoke the GetWeather operation on the weather web service with the city and country parameters as input. The Apache CXF transport accepts the string array as input and puts the first occurrence of the array
in the first element of the input message for the web service—in this case, the city value. Of course, the second occurrence in the string array is used as the second element: the country value.
The weather web service will then respond with the weather information, which includes a large number of weather-related elements.
Because we’re only interested in the temperature and humidity values, we’ve configured a message transformation step as a
separate Mule service. The transformation service listens to the endpoint address of the second outbound router that’s configured
in the chaining router
![]() .
.
Configuring message transformation in Mule
The next part of the Mule configuration performs the message transformation step on the weather response message (see listing 5.13).
Listing 5.13. The message transformation service in the Mule configuration
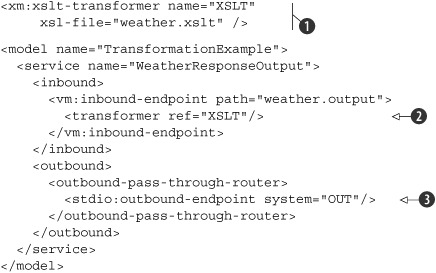
Notice that normally we would’ve configured the XSLT transformation as part of the chaining router in listing 5.12. Then we wouldn’t need an extra VM queue because the XSLT transformer would be part of the console response outbound endpoint. We chose to divide the functionality into two services to make it easier to show here. Also notice that we use the same model name here because the WeatherResponseOutput service is part of the Mule configuration shown in listing 5.12.
The first part of the Mule configuration defines an XSLT transformer with the weather.xslt style sheet
![]() . This transformer converts an XML message with the XSLT style sheet to another message format. The style sheet consists of
these transformation elements:
. This transformer converts an XML message with the XSLT style sheet to another message format. The style sheet consists of
these transformation elements:
<xsl:stylesheet version="1.0"
      xmlns:xsl="http://www.w3.org/1999/XSL/Transform">
  <xsl:template match="/CurrentWeather">
    <weather-news>
      <temperature>
        <xsl:value-of select="Temperature"/>
      </temperature>
      <humidity>
        <xsl:value-of select="RelativeHumidity"/>
      </humidity>
    </weather-news>
  </xsl:template>
</xsl:stylesheet>
The web service response has a root element with the name of CurrentWeather. We want to send two child elements back to the user: Temperature and RelativeHumidity. This style sheet extracts these two elements from the web service response message and converts the response message to a simple weather news message.
The XSLT transformer is configured on the inbound endpoint with the transformer-ref attribute
![]() . The transformed message is then sent back to the console with the outbound endpoint
. The transformed message is then sent back to the console with the outbound endpoint
![]() .
.
This means we’ve implemented the full weather integration solution. We should now be able to test this Mule example with the source code provided at the book’s website. You can find the example in the resources/chapter5/transformation directory. Executing the transformation-mule target in the ch5-examples Ant build file builds and deploys the distribution to the Mule container. With the transformation script, Mule will start along with the example. The console should ask you to provide input for the city and country (in the format Amsterdam, Netherlands). You should receive a response with the temperature and humidity values for the city and country you entered.
We have seen how message transformation works in Mule with multiple transformer types. Now let’s look at the message transformation functionality in ServiceMix.
5.3.2. Implementing message transformation in ServiceMix
We use the same weather service that has a city and country as input parameters and responds with weather information about this city. Because we’ve already discussed this example for Mule, let’s jump straight to the ServiceMix configuration overview in figure 5.9.
Figure 5.9. The service units that will be implemented in the ServiceMix weather example. We use a JMS message to invoke the weather web service. The web service response will be transformed with the Saxon component, and the transformed message will be forwarded to a JMS output queue.
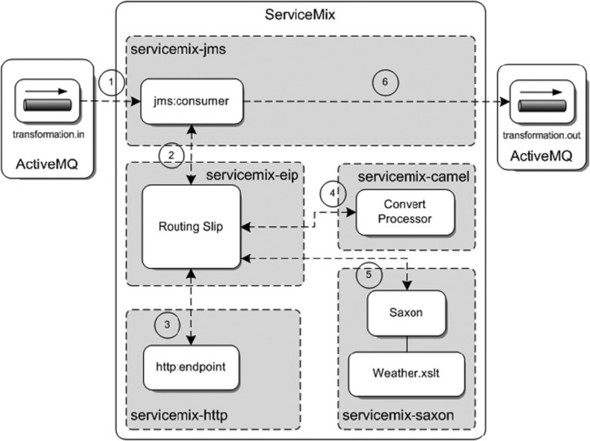
The numbers shown in figure 5.9 reflect the runtime message flow of the weather service. The incoming JMS message is used to invoke the weather web service via the HTTP JBI component. A routing slip is used to configure a number of services that must be processed in a static ordering. The routing slip first invokes the weather web service via the HTTP binding component. Next, the web service response is handled by a Camel processor implementation and then transformed with an XSLT style sheet. (We discuss the Camel component later in this section.) Finally, the transformed message is sent to the outgoing JMS queue with the JMS consumer.
Using a JMS consumer to send the response message to the transformation.out queue may seem a bit strange—and it is, actually. In previous examples where we used a JMS consumer, we only took advantage of the message consumption functionality. Listing 5.14 shows how we can use a JMS consumer with an in-out message exchange pattern and a reply queue configuration.
Listing 5.14. Configuration of a JMS consumer with a reply destination

The JMS consumer sends the incoming message to the routing slip implemented in the EIP service engine
![]() . One of the requirements of a routing slip is that the incoming message exchange must use an in-out message exchange pattern.
By default, the JMS consumer uses an in-only message exchange pattern, so we have to override the setting in the default marshaler
. One of the requirements of a routing slip is that the incoming message exchange must use an in-out message exchange pattern.
By default, the JMS consumer uses an in-only message exchange pattern, so we have to override the setting in the default marshaler
![]() . We have to define a Spring bean with the Default-ConsumerMarshaler and then override the mep attribute with the in-out URI definition. Now we’ve configured the JMS consumer to implement the in-out message exchange
pattern, we can configure a reply destination. When the routing slip has processed the three services (as shown in figure 5.9), the response message is sent to the JMS consumer because we use an in-out message exchange pattern. We can easily configure
the reply queue with the replyDestinationName attribute
. We have to define a Spring bean with the Default-ConsumerMarshaler and then override the mep attribute with the in-out URI definition. Now we’ve configured the JMS consumer to implement the in-out message exchange
pattern, we can configure a reply destination. When the routing slip has processed the three services (as shown in figure 5.9), the response message is sent to the JMS consumer because we use an in-out message exchange pattern. We can easily configure
the reply queue with the replyDestinationName attribute
![]() .
.
Since we haven’t yet implemented a routing slip, let’s quickly look at the configuration of the EIP service unit:
<eip:static-routing-slip service="esb:routingSlip" endpoint="endpoint">
  <eip:targets>
    <eip:exchange-target service="wws:GlobalWeather" />
    <eip:exchange-target service="esb:convertDSLRouter" />
    <eip:exchange-target service="esb:transformWeather" />
  </eip:targets>
</eip:static-routing-slip>
The configuration of the routing slip shows the ordering of the invocation of the different services. First, the weather web service is invoked via the HTTP service unit, and in the other services the web service response is transformed so that the response message only includes temperature and humidity values. Let’s take a look at the HTTP endpoint configuration in listing 5.15.
Listing 5.15. Weather web service invocation configuration for ServiceMix

This web service configuration for the invocation of the weather web service is quite compact for the most part, but there
are some caveats. The first thing to notice is that the namespace of the target web service must be included in the service
unit configuration
![]() . We need this namespace declaration for the service name definition. The name of the service as defined in the WSDL of the
weather web service must be equal to the service name of the HTTP endpoint
. We need this namespace declaration for the service name definition. The name of the service as defined in the WSDL of the
weather web service must be equal to the service name of the HTTP endpoint
![]() . This is something that you might overlook when defining an HTTP endpoint for the first time.
. This is something that you might overlook when defining an HTTP endpoint for the first time.
Notice that we use a role of provider
![]() in this listing to invoke a web service. You may have expected a value of consumer, but that would mean ServiceMix would have to provide a web service that can be invoked from clients outside ServiceMix.
in this listing to invoke a web service. You may have expected a value of consumer, but that would mean ServiceMix would have to provide a web service that can be invoked from clients outside ServiceMix.
The WSDL file (which is very important to the HTTP endpoint configuration) can be configured with the wsdlResource attribute, but this attribute is not required. When the WSDL file is included in the service unit distribution, we can reference it by using the classpath: prefix. Because we want to use SOAP messages for the web service request and response, we have to define a soap attribute with a value of true. We also have to define the SOAP version to be used for the web service call because the default version is 1.2. The weather service only supports SOAP 1.1, so we have to provide a soapVersion attribute with a value of 1.1. The last attribute that we have to configure is the SOAP action. Because the weather web service needs a SOAP action specified in the request, we must define a soapAction attribute with the SOAP action for the GetWeather operation.
Another part that needs explaining is the need for a Camel component for this example. The response message of the HTTP weather service unit is marshaled into a result element, as shown here:
<soap:Envelope>
<soap:Body>
<GetWeatherResponse>
<?xml version="1.0" encoding="utf-16"?>
<CurrentWeather>
Rest of message
</CurrentWeather>
<GetWeatherResponse>
</soap:Body>
</soap:Envelope>
Because the weather response message we’re interested in is marshaled into the GetWeatherResponse message, the Saxon service engine is not able to transform this XML message. Therefore, we must first retrieve the actual response message, which has a root element of CurrentWeather. This is exactly why we introduced a Camel component in the example implementation. Let’s look at the implementation of the Camel converter component in listing 5.16.
Listing 5.16. Implementation of the Camel converter component
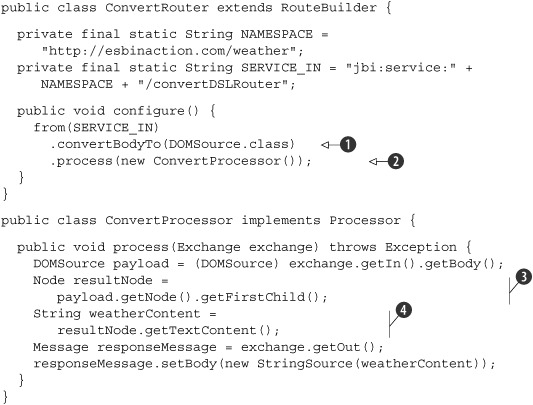
The Camel converter component is triggered after the weather web service has returned a response. The response message is
parsed with a SAX parser by the HTTP service engine, and because we want to process the XML message in a tree structure, the
XML message is first converted to a DOM structure
![]() . After the message is converted to a DOM structure, the message is processed with the ConvertProcessor
. After the message is converted to a DOM structure, the message is processed with the ConvertProcessor
![]() .
.
The ConvertProcessor implements the process method of the Processor interface to process the message exchange. The weather response message is available as the first child, GetWeatherResponse, of the root element
![]() . Then the content of the GetWeatherResponse element
. Then the content of the GetWeatherResponse element
![]() is set as the body of the response message of the message exchange. This message is then sent on to the Saxon service unit
by the routing slip.
is set as the body of the response message of the message exchange. This message is then sent on to the Saxon service unit
by the routing slip.
The configuration of the message transformation is implemented in the Saxon service unit. This is also a small piece of XML configuration:
<beans xmlns:saxon="http://servicemix.apache.org/saxon/1.0"
    xmlns:esb="http://esbinaction.com/weather">

  <saxon:xslt service="esb:transformWeather"
              endpoint="transformWeatherEndpoint"
              resource="classpath:Weather.xslt" />
</beans>
You already saw an XSLT implementation in the message flow example in chapter 4, so this configuration may look familiar to you. Configuring an XSLT transformation step is quite easy in ServiceMix because we only have to provide an XSLT style sheet. This style sheet should be included in the service unit distribution and can then be referenced via the classpath. The style sheet is the same as the one we discussed in listing 5.13.
For a full insight into the example implementation, check out the resource/chapter5/transformation directory in the ServiceMix source code. Once you’ve deployed the service assembly to the ServiceMix container with the deploy-transformation target in the ch5-examples Ant build file, you can use the TransformationJMSTest in the chapter 5 test source folder to test the example. Of course, you can also use the Swing test client. You should receive a JMS response with the temperature and humidity values of the city and country you entered in the JMS input message.
5.4. Summary
In this chapter, we examined the ESB core capabilities of message routing, validation, and transformation. You learned how important open standards are for the configuration and implementation of these capabilities. Message routing is defined with routing rules that send messages to the proper target service. For content-based routing, the routing rules are defined with XPath expressions that include element values of the incoming message. When an XPath expression evaluates to true, the message will be sent to the target endpoint configured for that routing rule. Both Mule and ServiceMix provide solid support for message routing. We also saw that Apache Synapse provides routing capabilities with the WS-Addressing open standard.
Another capability, message validation, is also based on an open standard: XML Schema. Because Java provides out-of-the-box functionality that supports the parsing of XML messages with XML Schema validation enabled, implementing message validation in an ESB that uses Java is not so difficult. However, in section 5.2 you saw that there is no default message validation component in Mule. Yet, as you learned, implementing an XML Schema validation component is not hard. ServiceMix provides a message validation component, but this component doesn’t provide the error-handling functionality that we needed for our example. With a bean component we easily implemented the necessary functionality. With the Synapse example, we showed how you can use the Synapse validation component to implement XML Schema–based validation.
The last section explored the implementation of message transformation with Mule and ServiceMix. We also used an open standard for this core capability: XSLT. Both ESBs provide support for XSLT style sheets with default components. We also discussed a different perspective on transformation with the Mule ESB. The Mule architecture defines transformers to make it easy to deal with messages from different transport protocols. We showed an example of these transport related transformers with the JMS transport. Support for message transformation (such as the XSLT transformer) is implemented in the same way as these transport transformers.
Next, we’ll look at the connectivity functionality provided by Mule and ServiceMix. We used quite a few connectivity options in this and the previous four chapters, but both ESBs provide many more options. In the next chapter, we’ll illustrate the various connectivity options for Mule and ServiceMix.