
Chapter 6. Connectivity options
In this chapter:
- Connectivity options with Mule and ServiceMix
- Open ESB JDBC component in ServiceMix
- PEtALS Mail component in ServiceMix
When dealing with integration projects, you are bound to encounter many different types of technologies and standards. You have to be able to use older integration methods, such as file-based integration and FTP, as well as more modern integration mechanisms, such as web services and JMS. In this chapter, we show you how to use Mule and ServiceMix to connect to various transports and technologies and how Mule and ServiceMix can help you solve connectivity problems.
We describe the most common connectivity options and include examples using both Mule and ServiceMix. We don’t discuss complex integration challenges, but we focus on how to implement connectivity functionality in open source ESBs. In part 3 of this book we delve into the more complex integration challenges, using the connectivity functionality you’ll learn in this chapter. Here are the options you’ll learn about:
- File connectivity— Files aren’t really a technology, but file-based integration is a common way to communicate between applications. We look
at the specific features Mule and ServiceMix offer related to file connectivity support.
File-based integration
In the early days of application integration, most integration solutions used simple files. One application stored a file in a specific directory in, say, a batch interval and another application picked up the file and processed it. There was no common standard to deal with this style of integration, so every integration solution required specific knowledge to implement the solution. File-based integration is still used a lot, especially when you’re communicating with mainframes, old proprietary software, and the older UNIX systems.
- Java Message Service (JMS)— JMS is a standard way to connect applications based on the messaging paradigm. You learned about JMS in chapter 3, where we discussed ActiveMQ and JMS, so we don’t go into greater detail here. We show various ways to connect and use JMS with the ActiveMQ message broker.
- Java Database Connectivity (JDBC)— In many integration scenarios, you need to either store or retrieve information from a database. For instance, storing logging
information or retrieving data for message enhancement requires database connectivity. JDBC is the standard Java technology
used to connect and query against relational databases. Since we don’t want to install a complete MySQL, PostgreSQL, or other
database server, we included HSQLDB in the book’s source code. HSQLDB is a relational database management system written in
Java, which requires no additional installation.
Shared databases
Before people started integrating applications using messaging and web services, data was often shared between applications using databases. One application would serve as the “master” of a certain part of data, and other applications could then connect to the database and just read that data.
The biggest issue with a shared database approach is that it’s hard to define a database schema. Normally you’d create a schema made specifically for an application. With a shared database, you’ll have to keep in mind that parts of the database schema are reused by other applications.
- Mail integration— A mail-based integration approach is an easy and asynchronous way to integrate applications—if performance and speed aren’t an issue. Using POP3 and SMTP allows for easy communication between applications. Besides that, this approach offers an easy way to communicate with end users or the support staff about certain events. For instance, when an error occurs the support staff can be automatically notified by sending an email with a detailed error message as well as any additional information.
- File Transfer Protocol (FTP)— FTP is one of the older internet protocols, but is still used to communicate with legacy systems. We show you how the open source ESBs can log on to an FTP server to retrieve and store files there, and what advanced options Mule and ServiceMix support. We use the AnomicFTPD server to implement the examples. This open source FTP server requires no complex user management; you can start it and use it without having to create extensive configurations.
- Enterprise JavaBeans (EJBs)— EJBs are part of the JEE specification and provide functionality to create highly scalable and transactional service implementations. Many applications make use of EJBs, so it would be nice to be able to call these EJBs from Mule and ServiceMix. We show you how to connect to an EJB container and invoke the EJB methods with Mule and ServiceMix.
There is one important technology missing here: web service connectivity. For example, SOAP is increasingly used as a message standard to solve integration problems. Since integration with web services and SOAP is such a broad topic, we decided to dedicate an entire chapter to that subject (chapter 7).
Just a quick note before we start looking at the various options Mule and ServiceMix offer. You can play around with all the examples shown in this chapter—just navigate to either the Mule or the ServiceMix workspace and then go to the resources/chapter6 directory of the book’s source code. Here you’ll find an Ant build file, ch6-build.xml, that has targets for all the examples in this chapter.
6.1. File connectivity
Let’s start with a simple connectivity option: the file connection. You’ve seen the file connection used in examples in previous chapters, so you already know the basics of this type of connection. Take a look at figure 6.1, which provides an overview of the example that we implement in this section.
Figure 6.1. Our example uses the ESB to read a file from a directory and write it to a different directory.
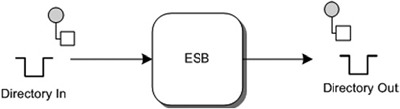
In the example shown in figure 6.1, we read a file from the In directory and write it to the Out directory. Let’s begin with Mule.
6.1.1. Mule File transport
When we want to implement integration logic in Mule, we have to define a Mule service as part of a Mule configuration. This Mule service reads files from the In directory and then writes them to the Out directory. The Mule configuration in listing 6.1 illustrates a number of features of the Mule File transport.
Listing 6.1. Mule File transport using a file filter and output pattern

In listing 6.1, we listen for new files in the chapter6/1a-file/in directory
![]() . We don’t process all the files that are put in this directory—just the ones that match the *.txt configuration of the file
filter, which we define with the filename wildcard filter
. We don’t process all the files that are put in this directory—just the ones that match the *.txt configuration of the file
filter, which we define with the filename wildcard filter
![]() . We also tell the endpoint to poll the chapter6/1a-file/in directory every 3 seconds, and once the file that matches the
*.txt filter is consumed, it should be deleted
. We also tell the endpoint to poll the chapter6/1a-file/in directory every 3 seconds, and once the file that matches the
*.txt filter is consumed, it should be deleted
![]() .
.
The outbound endpoint
![]() is specified in the same manner. The only property we define here is the filename to be used for the output file
is specified in the same manner. The only property we define here is the filename to be used for the output file
![]() . When Mule writes the file to the chapter6/1a-file/out directory specified in the outbound endpoint, it replaces the placeholders
with real values, such as the date value. You can run this example with the chapter6-file-example-1a target in the ch6-build.xml Ant build file located in the resources/chapter6 directory of the book’s source code.
. When Mule writes the file to the chapter6/1a-file/out directory specified in the outbound endpoint, it replaces the placeholders
with real values, such as the date value. You can run this example with the chapter6-file-example-1a target in the ch6-build.xml Ant build file located in the resources/chapter6 directory of the book’s source code.
There are a couple of properties of the Mule File transport we have yet to show you. Listing 6.2 is an example with more advanced properties.
Listing 6.2. Mule File transport using a backup directory
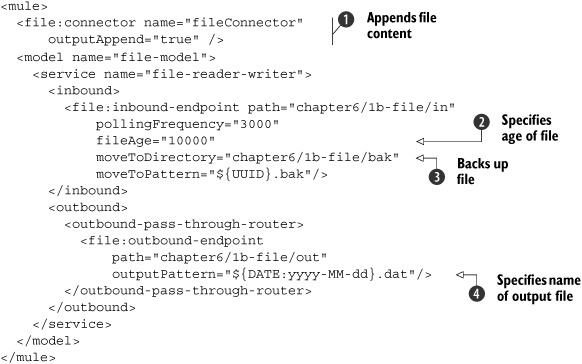
In listing 6.2, you can see a number of additional features that Mule’s file connector provides. As you can see, we now specify a fileAge attribute
![]() , which defines how old a file must be in relation to the current date and time before we start processing it. We also add
a moveToDirectory
, which defines how old a file must be in relation to the current date and time before we start processing it. We also add
a moveToDirectory
![]() and a moveToPattern property. We can use these properties to tell Mule to make a copy of our file and save it to a specific directory (with the
moveToDirectory attribute) and with a specific name (with the moveToPattern attribute) before the actual processing starts. The use of a move-ToDirectory attribute is very helpful, since it prevents the incoming messages from getting lost.
and a moveToPattern property. We can use these properties to tell Mule to make a copy of our file and save it to a specific directory (with the
moveToDirectory attribute) and with a specific name (with the moveToPattern attribute) before the actual processing starts. The use of a move-ToDirectory attribute is very helpful, since it prevents the incoming messages from getting lost.
Another option in listing 6.2 is the outputAppend attribute for the file connector definition
![]() . Normally when Mule writes an output file and the file already exists, that file is overwritten. By specifying the outputAppend attribute on a file connector, we ensure output files won’t be overwritten because the new file is appended to the end of
the existing file. The name of the output file is specified with the outputPattern attribute
. Normally when Mule writes an output file and the file already exists, that file is overwritten. By specifying the outputAppend attribute on a file connector, we ensure output files won’t be overwritten because the new file is appended to the end of
the existing file. The name of the output file is specified with the outputPattern attribute
![]() ; in this example, it’s the current date with a .dat file extension. You can run this example with the chapter6-file-example-1b target in the ch6-build.xml Ant build file located in the resources/chapter6 directory of the book’s source code.
; in this example, it’s the current date with a .dat file extension. You can run this example with the chapter6-file-example-1b target in the ch6-build.xml Ant build file located in the resources/chapter6 directory of the book’s source code.
You’ve seen how easy it is to work with files and file systems in Mule. Now let’s see how you can use ServiceMix to access a file system.
6.1.2. ServiceMix file transport
As we explained in chapter 5, you can configure the ServiceMix JBI components by creating service units and service assemblies using xbean.xml configuration files. These service assemblies are deployed to the ServiceMix container, and then the various service units are each deployed to a specific binding component or service engine.
Let’s start with a basic example that shows some of the features the servicemixfile binding component provides. We split the listings into a sender part, which writes files to a directory (listing 6.3), and a poller part, which reads files from a directory (listing 6.4).
Listing 6.3. servicemix-file binding component using a filename marshaler

As you can see in listing 6.3, part of a file sender implementation in ServiceMix is the definition of the file output directory
![]() . And as with any JBI component, we also need to uniquely identify the file sender with a service and an endpoint name
. And as with any JBI component, we also need to uniquely identify the file sender with a service and an endpoint name
![]() so that it can be registered in the JBI container. The other file properties listed here are optional. The tempFile properties
so that it can be registered in the JBI container. The other file properties listed here are optional. The tempFile properties
![]() and
and
![]() define the filename of the temporary file ServiceMix uses while writing the contents to the output directory.
define the filename of the temporary file ServiceMix uses while writing the contents to the output directory.
Another part of the file sender is the configuration of the file marshaler
![]() , which defines how the file output is written. In this example we only specify the filename of the output message, using
the fileName element. The marshaler uses an XPath expression to create an output filename based on the original filename, prefixed with
“from-source-.”
, which defines how the file output is written. In this example we only specify the filename of the output message, using
the fileName element. The marshaler uses an XPath expression to create an output filename based on the original filename, prefixed with
“from-source-.”
If you want to use the fileSender service to write a message to the file system, you just need to send an in-only message exchange to this service endpoint
![]() . The file poller in listing 6.4 demonstrates how you can do just that.
. The file poller in listing 6.4 demonstrates how you can do just that.
Listing 6.4. ServiceMix file poller that implements a custom file filter
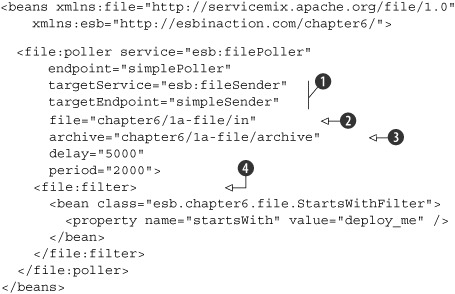
In listing 6.4, we start the file poller configuration with a service name and an endpoint name definition, as you’d expect in a JBI service
configuration. The two file attributes
![]() , targetService and targetEndpoint, define which JBI service (the file sender from listing 6.3) will be called when a new file is found in the polled directory
, targetService and targetEndpoint, define which JBI service (the file sender from listing 6.3) will be called when a new file is found in the polled directory
![]() .
.
The file poller also allows you to define an archive
![]() attribute. This archive will contain copies of all the files that the poller processes. That way, you can be sure that files
are never lost, should something unforeseen happen during later processing. You can also define how the directory is polled.
The delay attribute tells ServiceMix to wait 5 seconds before polling begins, and the period property sets the polling frequency for the input directory.
attribute. This archive will contain copies of all the files that the poller processes. That way, you can be sure that files
are never lost, should something unforeseen happen during later processing. You can also define how the directory is polled.
The delay attribute tells ServiceMix to wait 5 seconds before polling begins, and the period property sets the polling frequency for the input directory.
The last item shown in this configuration is a simple custom filter that only reads files whose names start with “deploy_me”
![]() . As you can see, we used a standard Spring bean to define this filter. Since this is a custom bean implementation, let’s
just look at the code for this component in listing 6.5.
. As you can see, we used a standard Spring bean to define this filter. Since this is a custom bean implementation, let’s
just look at the code for this component in listing 6.5.
Listing 6.5. Filter implementation that checks the beginning of a filename

The filter implementation in listing 6.5 is applied to each file found in the polled directory. As you can see, the filter implements the standard FileFilter interface
![]() , which is part of the Java IO package of the JDK. If the filename equals the value of the injected class attribute startsWith, the file is accepted by this file filter
, which is part of the Java IO package of the JDK. If the filename equals the value of the injected class attribute startsWith, the file is accepted by this file filter
![]() .
.
To get the ServiceMix container started, you’ll first have to run the default Ant target start of the ch6-build.xml build file in the resources/chapter6 directory of the book’s source code. Then you can deploy the service assembly with the deploy-1a-file-example target in the same Ant build file. A test XML file is provided in the resources/chapter6/1a-file directory, which you can copy to the chapter6/1a-file/in directory in the ServiceMix installation directory.
So far you’ve learned how to write a file to a directory and how to read files from a directory. This doesn’t mean, though, that you can process all the different types of files you might need in an integration project. Using the previous setup, for example, we can only process files that are valid XML. The reason is that the JBI specification defines the use of XML as the normalized message format. Luckily, we have a solution to consume non-XML file messages in the form of attachments.
When we discussed JBI in chapter 2, we mentioned that the payload of a JBI message should always be XML. So how can you send binary files? Well, a JBI message contains a bit more than just the message payload. It contains a set of message properties where you can set some metadata for the message, and it can also include attachments. These attachments can store pretty much everything and therefore can be used to transfer binary data.
However, take care when using these attachments, since not all the binding components and service engines in ServiceMix can deal with them. When you want to use attachments, be sure that the JBI service(s) know how to process them. Listing 6.6 shows how to configure the servicemix-file binding component to process non-XML files.
Listing 6.6. File sender configuration showing how to send binary files

This time, we add a different file marshaler
![]() and
and
![]() . The binary marshaler of the file poller
. The binary marshaler of the file poller
![]() won’t set the content of the polled file in the JBI message body, but it will add the file content as an attachment so it
can be processed in ServiceMix and still conform to the JBI standards.
won’t set the content of the polled file in the JBI message body, but it will add the file content as an attachment so it
can be processed in ServiceMix and still conform to the JBI standards.
Of course, we also need to set the binary marshaler for the file sender so that the attachment can be written to the file system. Keep in mind, though, that not all the available service engines and binding components can deal with attachments. The JBI specification doesn’t specify how attachments should be addressed.
To run this example, make sure that the ServiceMix container is started (the start Ant target of the ch6-build.xml build file can be used to start ServiceMix). Then you can deploy the binary file service assembly with the deploy-1b-file-binary-example Ant target available in the same Ant build file. We provide a graphics file, front.jpg, in the resources/chapter6/1b-file directory, which you can use to copy to the directory that’s polled by ServiceMix.
As you’ll recall, file-based integration is a common way to integrate two applications. An advantage of file-based integration is that it’s asynchronous: the applications you’re integrating don’t have to wait for each other, or even be available at all times.
However, a more modern method of asynchronous integration is message-based integration. With message-based integration, there is also no direct communication between two applications, as the messages are sent to a message broker asynchronously. Java uses JMS as the standard API to access and communicate with message brokers. In the next section, we show how we can use JMS in Mule and ServiceMix.
6.2. Connecting to JMS
To demonstrate JMS’s functionality, we present two different examples for Mule and ServiceMix. One example shows how to use the JMS queuing functionality, and the other shows how to use JMS topics. Let’s first look at the queuing example (shown in figure 6.2).
Figure 6.2. This JMS example shows how to use the ESB to consume a message from a JMS queue and produce the message for another JMS queue.

In the example in figure 6.2, the ESB consumes a message from a JMS queue. The ESB can then use integration logic to transform and route the message, but in this example we simply forward the message to another JMS queue.
The other example implementation using JMS topics is shown in figure 6.3.
Figure 6.3. This JMS example shows how to use the ESB to consume a message from a JMS queue and send the message to a JMS topic. Then the ESB implements three topic subscribers that each forwards the message to a JMS queue.

For the topic example shown in figure 6.3, we start with consuming a message from a JMS queue. The ESB then forwards the consumed JMS message to a JMS topic. You may remember from the previous chapter that a topic follows the Publish/Subscribe principle. So in other words, all the topic subscribers of a JMS topic receive the message. So when we run this example and put a JMS message in the input queue, it should eventually result in three copies of the message being sent to a different JMS queue. Now let’s examine our first example, which uses Mule.
6.2.1. Connecting Mule to JMS
This example forwards a message consumed from a JMS queue to another JMS queue, as shown in figure 6.2. When you want to run this example, just go to the resources/chapter6 folder in the Mule workspace. The ch6-build.xml Ant file available in that folder provides you with an Ant target named chapter6-jms-example-2a to run this example.
Now let’s look at the Mule service we need to define to implement this simple JMS queue example. Listing 6.7 shows the Mule configuration that forwards a message to another JMS queue.
Listing 6.7. A Mule service that consumes and produces a JMS message

In listing 6.7, we define a JMS inbound endpoint, which tells Mule from which queue the message should be consumed. Before you can run this example, make sure that you have started ActiveMQ, for example, with the ext:start-activeMQ Ant target in the ch6-build.xml. Then you can use the Swing test client to send a test message to the in.queue and to receive that message on the out.queue.
Now let’s see how to implement a Mule example with topics. In this example, Mule consumes a message from a JMS queue and sends this message to a topic. Then Mule will define three different topic subscribers, and each will send the message to a different JMS queue. To implement this example in Mule, we need to define four Mule services. The first service will define functionality similar to that of the JMS queue example in listing 6.7. The service will just consume a message from a JMS queue and send it to another JMS endpoint. But instead of sending the message to a queue, we send the message to a topic (listing 6.8).
Listing 6.8. A Mule service that sends the incoming message to a JMS topic

In listing 6.8, we show some additional configuration attributes for Mule’s ActiveMQ connector. For example, we can specify the acknowledgment mode for the JMS consumer. The default value is AUTO_ACKNOWLEDGE, which means that so-called “exactly once delivery” is guaranteed by the JMS provider. If exactly once delivery isn’t needed, we can also specify a value of DUPS_OK_ACKNOWLEDGE as we did in this example. By allowing duplicate messages, the JMS provider guarantees “at least once” delivery of the message.
We can also specify a maxRedelivery attribute, which configures the number of redeliveries in case of an error during the message processing for the ActiveMQ connector. Chapter 8, where we talk about error handling and transactions, provides more details about this topic.
We also changed the queue attribute on the JMS endpoint to a topic attribute, to instruct the Mule container to send the message to a JMS topic. Let’s also look at one of the Mule services that subscribes to this topic (listing 6.9).
Listing 6.9. A Mule service that subscribes to a JMS topic
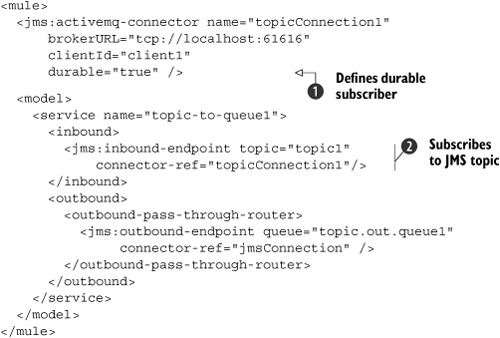
In listing 6.9, we define another attribute for the ActiveMQ connector, the durable attribute
![]() . This attribute is only applicable to topic subscriber endpoints, such as the one in this example
. This attribute is only applicable to topic subscriber endpoints, such as the one in this example
![]() . A durable topic subscriber can receive messages published to the topic even if the topic subscriber wasn’t active at that
moment. The JMS provider will hold the message until the topic subscriber becomes active again. Notice that we need to specify
a unique clientId for every durable topic subscriber.
. A durable topic subscriber can receive messages published to the topic even if the topic subscriber wasn’t active at that
moment. The JMS provider will hold the message until the topic subscriber becomes active again. Notice that we need to specify
a unique clientId for every durable topic subscriber.
Because this ActiveMQ connector configuration is only valid for the topic subscriber (the inbound endpoint definition in this example), we need two ActiveMQ connector configurations. The topic subscriber uses the connector-ref attribute to point to the durable subscriber connector configuration, and the JMS outbound endpoint points to the jmsConnection connector configuration (listing 6.8).
We don’t show the other two Mule topic subscriber services since they are the same, except for the name of the service and the name of the outbound JMS queue. If you run this example with the chapter6-jms-example-2b Ant target, you’ll see that if you put a JMS message onto the topic.in.queue JMS queue with the Swing test client, this will result in three messages on different JMS queues. Mule’s JMS transport has more options than we have shown thus far in the code listings. All these properties, together with the properties for the other connectors, can be found in appendix D.
Implementing the same JMS examples in ServiceMix is quite similar to the Mule examples, as you’ll see in the next section.
6.2.2. Connecting ServiceMix to JMS
With ServiceMix we have the concept of a message sender (or a provider in JBI terms) and a message reader (also called consumer in the JBI specification). The message sender provides the functionality, as a proxy, for other components to send a message to the configured JMS destination. The message reader consumes a message from its configured JMS destination and passes it on to another JBI service endpoint.
If you want to run the examples of this section yourself, go to the resource/chapter6 directory in the ServiceMix workspace. You have to start ServiceMix from the ch6-build.xml Ant build file. When ServiceMix is running, use the JMS deploy targets to try out the examples.
For this example, we read an XML message from a JMS queue and forward this message to another JMS queue. The required JBI services and components appear in figure 6.4.
Figure 6.4. An example showing the ServiceMix JMS functionality for consuming messages from a JMS queue and producing messages for a JMS queue

Now let’s look at the configuration of the JMS services shown in figure 6.4 (listing 6.10).
Listing 6.10. ServiceMix JMS configuration for a queue-based scenario

Notice in listing 6.10 that the target service and target endpoint definitions of the JMS consumer point to the service and endpoint definition of the JMS provider. That’s it—we’ve implemented the JMS queue example in ServiceMix by creating two JBI services: a JMS consumer and a JMS provider.
To test the example, first start the ServiceMix container with the start Ant target of the ch6-build.xml build file. Then deploy the JMS queue service assembly with the deploy-2a-jms-queue-example Ant target of the same Ant build file. Then you can use the Swing test client to send and receive messages with the JMS functionality of this example.
The previous example only showed how to use JMS queues in ServiceMix. In the next example, we show how to configure JMS topics in ServiceMix. We start with the definition of the JMS provider that writes to a topic (listing 6.11).
Listing 6.11. ServiceMix configuration showing how to write to a topic
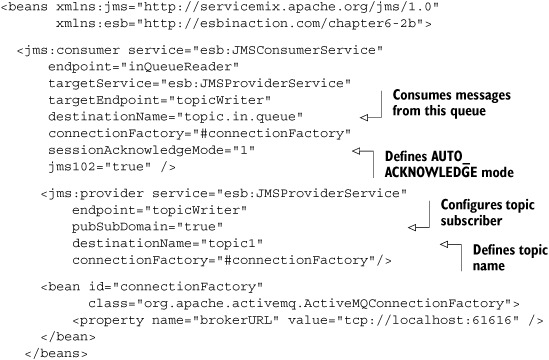
Note the use of the pubSubDomain attribute, which specifies that the JMS provider writes to a topic. The name of the topic is still configured with the destinationName attribute.
We also configured some additional attributes for the JMS consumer. For example, we configured the acknowledgment mode for the JMS consumer with the session-AcknowledgeMode attribute. The default value is the AUTO_ACKNOWLEDGE mode, which has a value of 1, as we also configured in this example. But you can also configure the consumer to use the DUPS_OK_ACKNOWLEDGE mode (value of 3), which is an “at least once” delivery mode.
Listing 6.12 shows the configuration of the topic subscriber and one of the three JMS provider definitions.
Listing 6.12. ServiceMix configuration showing how to read from a topic

The JMS consumer is configured to be a topic subscriber with the same pubSubDomain attribute
![]() that we saw for the JMS provider in listing 6.11.
that we saw for the JMS provider in listing 6.11.
When this topic subscriber receives a message, it’s forwarded to the JMS provider (also shown in listing 6.12). We configured a higher-priority value for the outgoing message using the priority attribute
![]() . Note that a JMS provider isn’t obliged to deal with higher-priority values in JMS messages.
. Note that a JMS provider isn’t obliged to deal with higher-priority values in JMS messages.
We mentioned earlier that this example would include three JMS topic subscribers. But all three consumers have the same configuration as the JMS consumer defined here, except for the endpoint property value. Therefore, we show only one JMS consumer and provider definition here.
If you run this example with the ch6-build.xml Ant build file and the deploy-2b-jms-topic-example target, all three JMS queues will receive the message that was consumed by the topic subscriber in listing 6.11. Of course, you’ll first have to send a message to the topic.in.queue (for example, with the Swing test client) to trigger the example.
And that’s it. Just by adding the pubSubDomain property, we’re now able to work with topics in ServiceMix.
So far we’ve explored file-based integration and message-based integration. In the next section, you’ll learn how to connect to databases directly from an open source ESB, without having to write any JDBC code.
6.3. Connecting to a database using JDBC
Next, we show you how to use the open source ESBs to read from and write to a relational database. We introduce two types of examples, one that queries data from the database and another that manipulates data in the database. We use the HSQL database to implement the examples, because it requires no installation and yet still provides full relational capabilities. Before we delve deeper into these examples, let’s take a quick look at the database table we use to query and store data:
Table name: person
id:         long primary key
name:       varchar[255]
processed:  boolean
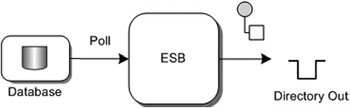
The rows in the person table are identified by the id field. They contain a name column as well as a processed column (to indicate that the person has been processed). In the first example, shown in figure 6.5, we read the rows of the person table and send them to a file endpoint, where they’ll be stored on the file system.
Figure 6.5. Use the ESBs to read a record from the database and write the contents as a file to a directory.
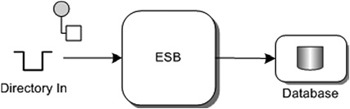
The second example, shown in figure 6.6, is the reverse functionality of the first. This time we read a file from the file system, process the contents from the file, and store the file contents as a new record in the database.
Figure 6.6. Use the ESBs to read a file from the file system and store its contents in the database.
Before we begin, we have to fill the HSQL database with some initial data. To do so, just run the chapter6-jdbc-setup-database Ant target from the ch6-build.xml Ant build file located in the resources/chapter6 directory. Note that you first have to start the HSQL database with the ext:start-hsqldb Ant target in the same Ant build file. Also note that this step is necessary for both the Mule as well as the ServiceMix examples.
6.3.1. Connecting Mule to JDBC
In this section, we implement the examples shown in figures 6.5 and 6.6 with Mule. For the first example we need to configure a JDBC connection to tell Mule how to connect to the HSQL database and which queries should be executed (listing 6.13).
Listing 6.13. Mule JDBC configuration for querying and updating a database table

In listing 6.13, we define a common JDBC data source
![]() , which is used to connect to the HSQL database. We also define the JDBC queries that will be executed in order to read and
update the person table in the HSQL database. The first query
, which is used to connect to the HSQL database. We also define the JDBC queries that will be executed in order to read and
update the person table in the HSQL database. The first query
![]() is used to get the data from the database; every row that is read is processed as a separate message. So if this query returns
five rows, five different messages are sent to the Mule container.
is used to get the data from the database; every row that is read is processed as a separate message. So if this query returns
five rows, five different messages are sent to the Mule container.
The get.ack query
![]() is used to update the person table. Mule invokes the get.ack query automatically after the get query is executed. Mule tries to find a query with the same name as the get query, but now with ack appended. If Mule finds such a JDBC query definition, that JDBC query will be automatically executed. This functionality
is useful for updating an indicator column, such as the processed column in this example.
is used to update the person table. Mule invokes the get.ack query automatically after the get query is executed. Mule tries to find a query with the same name as the get query, but now with ack appended. If Mule finds such a JDBC query definition, that JDBC query will be automatically executed. This functionality
is useful for updating an indicator column, such as the processed column in this example.
The get query in listing 6.13 will first read all the rows that haven’t been processed yet, as defined in the where clause: processed=false. For each row in the result message, the get.ack query is executed. One thing to notice about the get.ack query is the ${jxpath:id} placeholder. This expression uses JXPath to query the returned object from the database. So in this case, the id, retrieved from the returned rows of the get query, is used to specify which table row to update.
Now let’s configure a Mule endpoint that uses this JDBC connector definition (listing 6.14).
Listing 6.14. Mule service showing how to query a database table
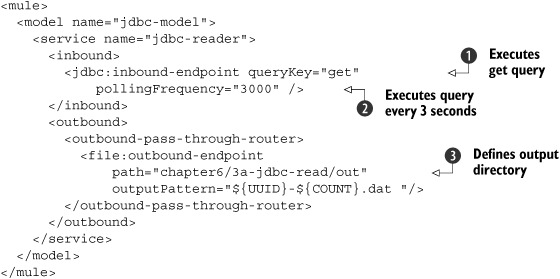
In listing 6.14, the JDBC inbound endpoint references the get query we specified in listing 6.13
![]() . This query is executed every 3 seconds
. This query is executed every 3 seconds
![]() by the Mule container. Every row retrieved with the get query is then sent to a file endpoint
by the Mule container. Every row retrieved with the get query is then sent to a file endpoint
![]() , which stores the message in the file system. Note, though that the generated files contain serialized Java objects holding
the result of the database query. You can run this example with the Ant target chapter6-jdbc-read-3a in the ch6-build.xml file.
, which stores the message in the file system. Note, though that the generated files contain serialized Java objects holding
the result of the database query. You can run this example with the Ant target chapter6-jdbc-read-3a in the ch6-build.xml file.
In the second example, we show how to use Mule to write data to an HSQL database. Let’s start with configuring the JDBC connector definition (listing 6.15).
Listing 6.15. Mule JDBC connector definition to insert data into a database

This configuration is quite similar to the JDBC connector definition in listing 6.13, except for the write query definition
![]() . In the write query you see a placeholder: ${payload}. This value will be replaced with the payload of the message. You can also use other placeholders that are retrieved from
the payload. For instance, if your message is a simple JavaBean that has a name property, you can reference that property by using the ${name} placeholder.
. In the write query you see a placeholder: ${payload}. This value will be replaced with the payload of the message. You can also use other placeholders that are retrieved from
the payload. For instance, if your message is a simple JavaBean that has a name property, you can reference that property by using the ${name} placeholder.
Next we have to configure the Mule service that uses this JDBC connector definition. Remember that we want to read from the file system and write that message to the database. Listing 6.16 shows the implementation of this Mule service.
Listing 6.16. Mule service showing how to write to a database

In listing 6.16, we configure a simple file reader that reads files from the chapter6/3b-jdbc-write/in directory. We also add a transformer,
which is needed since the default format for the Mule file transport is a byte array. By using the file-to-string transformer
![]() , we ensure that the file contents are transformed to a String object.
, we ensure that the file contents are transformed to a String object.
The outbound endpoint uses the write query we specified in listing 6.15 and replaces the ${payload} placeholder with the content of the file
![]() .
.
To run this example, execute the chapter6-jdbc-write-3b Ant target in the ch6-build.xml Ant build file. You can then test this example by dropping a text file with only a person
name as content into the chapter6/3b-jdbc-write/in directory
![]() . This file is read by Mule, transformed to a String, and passed on to the outbound endpoint, which uses the contents of this file to create and then execute the insert query. We configured the table with a unique primary key that will be generated, so the result is a new record inserted into
the HSQL database, based on the contents of the input file.
. This file is read by Mule, transformed to a String, and passed on to the outbound endpoint, which uses the contents of this file to create and then execute the insert query. We configured the table with a unique primary key that will be generated, so the result is a new record inserted into
the HSQL database, based on the contents of the input file.
We’ve now shown that you don’t need to configure too much to get these examples running. You can now easily combine these two examples. If you run the JDBC write example first and then the JDBC read example, you can see that files dropped in the input directory of the JDBC write example will eventually be processed by the JDBC connector and stored in the output queue of the JDBC read example.
Now that you’ve seen them work successfully in Mule, let’s implement the same examples in ServiceMix.
6.3.2. Connecting ServiceMix to JDBC
ServiceMix doesn’t provide a binding component to connect to a database using JDBC. There are, however, other JBI-compliant ESBs available that do provide this functionality. For the implementation of the JDBC connectivity, we use the JDBC binding component provided by the Open JBI components project (https://open-jbi-components.dev.java.net). This project was started as a subproject of the Open ESB project (http://open-ESB.dev.java.net), which is the Sun open source implementation of the JBI standard (see chapter 1).
One of the goals of the JBI specification was to allow components from one ESB to run on another ESB. So in theory you could take any of the components from PEtALS or Open ESB, deploy them to ServiceMix, and instantly use the functionality provided by these components. However, in practice you’re bound to run into issues. These issues usually are caused by different library versions on the classpath. For instance, the JDBC component in this section uses a patched version of the wsdl4j library. So when you initially deploy this binding component in ServiceMix, you’ll get all kinds of strange errors. By replacing the wsdl4j supplied by ServiceMix with the version provided by the component, we easily solved this problem.
In the ServiceMix examples so far, you’ve seen how to configure binding components and service engines in the ServiceMix-specific way using xbean.xml configuration files. The JDBC binding component provided by Open ESB, however, requires your service units and the configuration to be in a different format.
Therefore, this section is a bit longer than other sections in this chapter, but it provides insight into deploying other JBI components to ServiceMix. We need to implement the following steps to get the JDBC functionality to work in ServiceMix:
- Register a data source in JNDI— The JDBC component uses JNDI to retrieve its database connection, so we need to register a data source in JNDI for this.
- Create a database mapping— The component also needs to know how its database columns are mapped to XML. In this step we configure this mapping.
- Configure the operations in a WSDL file— The insert and polling operations are configured in a WSDL file. In this step we show you how to configure these operations.
- Create a jbi.xml file— The jbi.xml file will tell ServiceMix how the operations can be accessed. In this step we show you how, for each operation, the jbi.xml file must be defined.
- Define file pollers and senders— This is just a simple step where we connect the JDBC component to a file sender and a file poller so that we can test this component.
Let’s start with the first step: defining the data source in JNDI.
Register a data source in JNDI
The JDBC binding component requires the JDBC data source to be defined in a JNDI provider. So before we can start configuring the JDBC component, we need to set up a data source in ServiceMix. Luckily for us, ServiceMix provides its own JNDI implementation, based on Spring. In the ServiceMix installation directory you’ll find a conf directory containing a file named jndi.xml. In this file, add the code fragment in listing 6.17 as a child element of the <util:map id="jndiEntries"> tag.
Listing 6.17. Adding a JDBC datasource to the JNDI registry
<entry key="java:comp/env/jdbc/defaultDS">
  <bean class="org.hsqldb.jdbc.jdbcDataSource">
    <property name="database"
        value="jdbc:hsqldb:hsql://localhost/xdb" />
    <property name="user" value="sa" />
    <property name="password" value=""/>
  </bean>
</entry>
Here, we register the data source for our database in the JNDI provider of ServiceMix. To be able to query the HSQL database we use in this example, we need to make the hsqldb.jar file available in the lib directory of the ServiceMix installation. This is already done by the Ant build script for the environment setup, which we showed in chapter 3. You can then start the database from the ch6-build.xml Ant build file with the ext:start-hsqldb target and create the database. Do this by running the chapter6-jdbc-setup-database target from the same Ant build file.
Create a database mapping
To illustrate how to configure this JDBC binding component, we create an example where the input of a file will be stored in a database and another example where database information is sent to the file system. The configuration for these examples consists of three files: a database mapping file, a WSDL, and a jbi.xml file. We begin with the database mapping file (listing 6.18).
Listing 6.18. Database mapping that maps the columns to an XML Schema
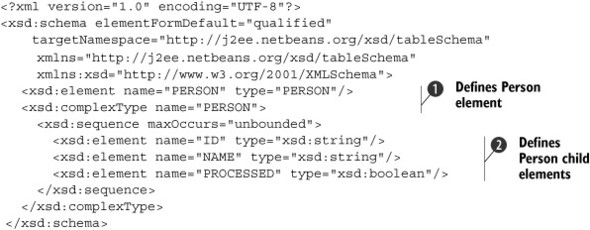
The person and child elements
![]() ,
,
![]() we defined in listing 6.18 have the same names as the columns of the person table we defined at the beginning of this section. The data types of the columns are mapped to an XML Schema type equivalent.
This schema will be used in the WSDL file to define the input format for the service implementation. So with the database
mapping file, we ensure that the fields of the message sent to our service contain the correct information and have the correct
format. To learn more about this database mapping, check out the Open ESB website (http://open-ESB.dev.java.net).
we defined in listing 6.18 have the same names as the columns of the person table we defined at the beginning of this section. The data types of the columns are mapped to an XML Schema type equivalent.
This schema will be used in the WSDL file to define the input format for the service implementation. So with the database
mapping file, we ensure that the fields of the message sent to our service contain the correct information and have the correct
format. To learn more about this database mapping, check out the Open ESB website (http://open-ESB.dev.java.net).
Configure the operations in the WSDL file
Now that we’ve defined the XML definition for the data source and the person table mapping, let’s look at the WSDL that defines how and which queries are executed. Before we examine the code of this WSDL itself, let’s look at the different elements of the WSDL file for database functionality (figure 6.7).
Figure 6.7. The elements of a WSDL file used to configure the JDBC binding component

As you can see in figure 6.7, the WSDL file has five parts. In the first part, we import the file from listing 6.18. This database-mapping file defines how the input XML should look when we want to store data using this JDBC component in the database. The second part defines the operation arguments and the operations’ results. In the next part of the WSDL, the interface, also called the portType, of the service is defined. Here we configure the names of the operations as well as the messages they take as parameters and return values.
Now that we’ve defined the service interface, which is also called the abstract part of the WSDL, we’ll define the service implementation, or binding, of the interfaces we defined in the portType section. In this example, we create a binding to SQL, but usually you see bindings to SOAP over HTTP here. In the last part of the WSDL, we have to configure the service section. In this example, we define which data source will be used to execute the queries in the service section, but a more common usage of the service part of a WSDL is the definition of the web service location.
Let’s look at the full implementation of the WSDL file for the JDBC component. Because the WSDL file is quite large, we split this up into five sections, as shown in figure 6.7. Listing 6.19 shows the first section of the WSDL file, where we import the XML Schema definition in listing 6.18.
Listing 6.19. WSDL configuration for JDBC component: import section
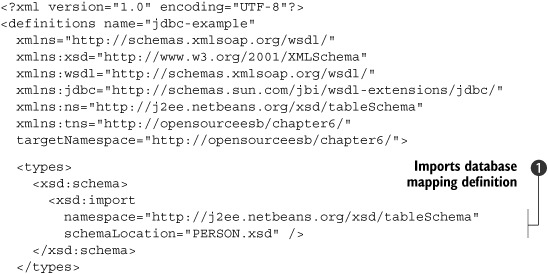
We import the previously defined database mapping with the XML Schema import element
![]() . The person element defined in the PERSON.xsd file is used in listing 6.20 to define the WSDL messages.
. The person element defined in the PERSON.xsd file is used in listing 6.20 to define the WSDL messages.
Listing 6.20. WSDL configuration for JDBC component: message section

The WSDL message section specifies the input and output messages for the operation part of the WSDL definition. The messages defined in this listing
![]() ,
,
![]() are used in listing 6.21 to define the operations for the JDBC service.
are used in listing 6.21 to define the operations for the JDBC service.
Listing 6.21. WSDL configuration for JDBC component: portType section
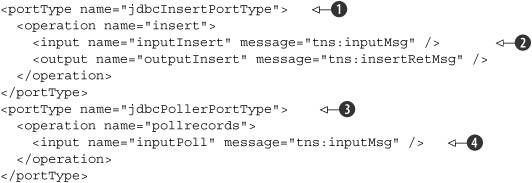
We defined two interfaces, each with one operation. In the poller operation definition
![]() , you might expect an output element instead of the input element inputPoll
, you might expect an output element instead of the input element inputPoll
![]() , because when you poll a database you get a result. That’s true, but keep in mind that the poller is a service that sends
messages to the normalized message router. It reads data from a database and sends that data to a JBI service running in ServiceMix.
The operation shown here specifies how the receiving service looks. So a receiving service must be able to handle the operation
specified here.
, because when you poll a database you get a result. That’s true, but keep in mind that the poller is a service that sends
messages to the normalized message router. It reads data from a database and sends that data to a JBI service running in ServiceMix.
The operation shown here specifies how the receiving service looks. So a receiving service must be able to handle the operation
specified here.
For the insert operation
![]() , it’s the exact opposite. The insert operation can be directly invoked by other JBI services within ServiceMix. It receives
an input message, inputInsert
, it’s the exact opposite. The insert operation can be directly invoked by other JBI services within ServiceMix. It receives
an input message, inputInsert
![]() , and sends a response back. This difference between a service provider (the insert operation) and a service consumer (the
poll operation) is also the reason we created two different portTypes.
, and sends a response back. This difference between a service provider (the insert operation) and a service consumer (the
poll operation) is also the reason we created two different portTypes.
Let’s look at how the WSDL operations are bound to the JDBC implementation (listing 6.22).
As you’ve seen so far, ServiceMix hides a lot of the inner details of JBI. JBI components from other JBI containers, however, don’t necessarily do that, as you can see from this JDBC configuration and later in this chapter in the mail configuration. When you’re working with components from other ESBs, and specifically when working with binding components, it’s a good idea to have a clear understanding of service providers and service consumers. A binding component basically provides a service to other JBI services by serving as a proxy to a specific technology.
For our JDBC example, for instance, the JDBC binding component provides a service to the other JBI services that can insert a record in the database. Besides providing a service, a binding component can also allow a non-JBI component to call JBI services. In this case, the binding component serves more as a façade. If we look at this from the context of our JDBC example, we have a database, the non-JBI component, which wants to send a message to a specific JBI service. So every time a new record is found, a JBI service will be consumed.
Listing 6.22. WSDL configuration for JDBC component: binding section
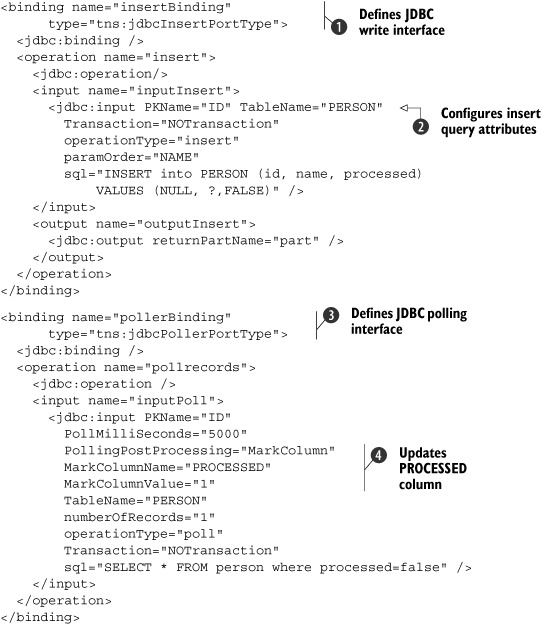
The binding section starts with the definition of the insert binding
![]() . When this binding is invoked by the ServiceMix container, the SQL insert query
. When this binding is invoked by the ServiceMix container, the SQL insert query
![]() is executed. As you can see, this query is a common JDBC PreparedStatement. The ? in this statement will be replaced by the supplied parameters, based on the paramOrder attribute. In other words, the NAME element of the input message will be used as an input parameter for the prepared statement.
is executed. As you can see, this query is a common JDBC PreparedStatement. The ? in this statement will be replaced by the supplied parameters, based on the paramOrder attribute. In other words, the NAME element of the input message will be used as an input parameter for the prepared statement.
The second binding that’s defined is the poller operation
![]() . The poller operation will poll the database at an interval specified with the PollMilliSeconds attribute to determine if new records are inserted. If there are any new records, they will be processed and sent to a JBI
service, which implements the tns:jdbcPollerPort-Type interface.
. The poller operation will poll the database at an interval specified with the PollMilliSeconds attribute to determine if new records are inserted. If there are any new records, they will be processed and sent to a JBI
service, which implements the tns:jdbcPollerPort-Type interface.
In this example, we defined a poller operation, which executes the query specified with the sql attribute every 5 seconds. We also specified what to do after we’ve processed a row. We configured a MarkColumn postprocessing operation
![]() . This means that when we’ve read a row from the person table, we can update a specific column to a certain value. In this case, we set the PROCESSED column to a value of 1. This sets the PROCESSED column to true so it won’t be processed the next time. The polling query defined with the sql attribute is simple; it just reads all the unprocessed rows.
. This means that when we’ve read a row from the person table, we can update a specific column to a certain value. In this case, we set the PROCESSED column to a value of 1. This sets the PROCESSED column to true so it won’t be processed the next time. The polling query defined with the sql attribute is simple; it just reads all the unprocessed rows.
Listing 6.23 defines the final part of the WSDL file.
Listing 6.23. WSDL configuration for JDBC component: service section

The service section of the WSDL file relates the two bindings of listing 6.22 with the JDBC JNDI configuration we implemented in listing 6.17. In this example, both port definitions
![]() ,
,
![]() work on the same data source. What’s also important in listing 6.23 is the port name. If we want to reference the services defined here from other JBI services, we should use this port name
as the endpoint name, since multiple ports can be defined on a service.
work on the same data source. What’s also important in listing 6.23 is the port name. If we want to reference the services defined here from other JBI services, we should use this port name
as the endpoint name, since multiple ports can be defined on a service.
Create a jbi.xml file
We’re ready to start with the last piece of the JDBC configuration: the jbi.xml file. This file maps the service definitions from the WSDL file to JBI services, which are available in the JBI container. Listing 6.24 shows the configuration of the jbi.xml file for our JDBC example.
Listing 6.24. JBI services configuration for the services described in the WSDL
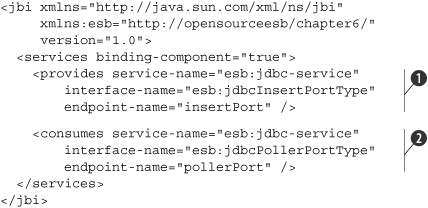
In listing 6.24, you can see that the portType and the port name that we defined in listing 6.23 are referenced here. We defined one provides element and one consumes element. The provides element
![]() defines a service that can be used by other JBI services. In this example, it points to the service and port we defined in
the WSDL for the insert operation. So if a JBI service wants to add a record to the person table in the HSQL database, this can be done by sending a message to the service endpoint specified with the provides element.
defines a service that can be used by other JBI services. In this example, it points to the service and port we defined in
the WSDL for the insert operation. So if a JBI service wants to add a record to the person table in the HSQL database, this can be done by sending a message to the service endpoint specified with the provides element.
The other element is the consumes element
![]() . As the name implies, this polling service can’t be used from other JBI services; this is a service that consumes another
service. This means that the poller will invoke the JBI service specified here. So every 5 seconds, assuming new database
rows are present, this JDBC component will send a message to the JBI service endpoint specified here (which is a file sender
JBI service we explain in the next section).
. As the name implies, this polling service can’t be used from other JBI services; this is a service that consumes another
service. This means that the poller will invoke the JBI service specified here. So every 5 seconds, assuming new database
rows are present, this JDBC component will send a message to the JBI service endpoint specified here (which is a file sender
JBI service we explain in the next section).
Define file pollers and senders
Now that we’ve completed the JDBC configuration, let’s summarize the whole example again. We’ll begin with the first part, where we read from the file system and write to the database. To implement this functionality, we have to configure a JBI service that reads files from a directory and invokes the JDBC insert service we configured in listing 6.24. The file poller and file sender are shown in listing 6.25.
Listing 6.25. File poller and sender configuration for the JDBC example
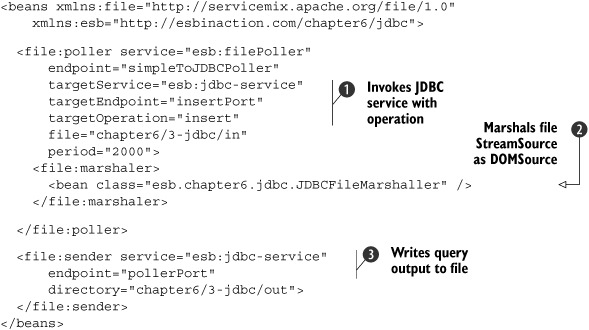
As you can see in listing 6.25, we reference the JDBC insert service
![]() provided by the JDBC binding component. The JDBC binding component also expects a method name to be specified, so we provide
this with the targetOperation attribute. When a file is dropped in the chapter6/3-jdbc/in directory, the insert method, as specified in the WSDL file we
discussed earlier, is invoked and the content of the input file is used as the argument.
provided by the JDBC binding component. The JDBC binding component also expects a method name to be specified, so we provide
this with the targetOperation attribute. When a file is dropped in the chapter6/3-jdbc/in directory, the insert method, as specified in the WSDL file we
discussed earlier, is invoked and the content of the input file is used as the argument.
We had to define an additional marshaler element
![]() in the file binding component configuration to get the example to work. By default, ServiceMix uses a Stream-Source instance as a container for the file message content that is consumed by the file poller. A StreamSource can only be processed once, and the Open ESB JDBC component processes the message payload more than once. Therefore, we created
a custom marshaller, the JDBCFileMarshaler which transforms the StreamSource to a DOMSource, which can be processed more than once.
in the file binding component configuration to get the example to work. By default, ServiceMix uses a Stream-Source instance as a container for the file message content that is consumed by the file poller. A StreamSource can only be processed once, and the Open ESB JDBC component processes the message payload more than once. Therefore, we created
a custom marshaller, the JDBCFileMarshaler which transforms the StreamSource to a DOMSource, which can be processed more than once.
Notice that for the file sender definition, the service and endpoint name
![]() match the ones we specified in the jbi.xml file in listing 6.23. When the JDBC poller finds a new record to process, the resulting message is passed on to this file sender service, which
writes the polled message to the file system.
match the ones we specified in the jbi.xml file in listing 6.23. When the JDBC poller finds a new record to process, the resulting message is passed on to this file sender service, which
writes the polled message to the file system.
To summarize, in order to work with the JDBC binding component provided by the Open JBI Components project, you first need to configure a database-mapping file that matches the JBI message to the database table. Then you need to create a WSDL file where you define the operations and how they map to JDBC queries. And finally, you tie everything together with the jbi.xml file and the file xbean.xml definitions.
Now let’s deploy and test the example in your local environment. To get this example to run we have to walk through some additional steps. Make sure that the ServiceMix container isn’t running and execute the following steps:
1. Copy the preparedResources/wsdl4j-sun.jar to the lib folder in your ServiceMix distribution.
2. Remove the wsdl4j-1.6.1.jar from the lib folder in the ServiceMix distribution.
3. Start ServiceMix with the start target in the ch6-build.xml Ant build file.
4. Copy the file boxResources/jdbcbc.jar to the ServiceMix hotdeploy directory to install the Open ESB JDBC component in ServiceMix.
5. Start the HSQL database with the ext:start-hsqldb target in the ch6-build.xml Ant build file.
6. Execute the chapter6-jdbc-setup-database target in the ch6-build.xml Ant build file to insert some test persons into the database.
7. Deploy the JDBC service assembly with the deploy-3-jdbc-example target in the ch6-build.xml Ant build file.
After executing these steps, you’ll see messages arriving in the chapter6/3-jdbc/out directory in your ServiceMix installation directory. These messages include the persons we inserted with the database script in step 6. The person.xml file in the resources/chapter6/3-jdbc/jdbc/resources directory can be copied to the chapter6/3-jdbc/in directory to trigger the JDBC example to write a record to the person table.
This JDBC ServiceMix section has been a long one. Normally when you work with components from the Open ESB environment, you’ll use the NetBeans IDE. NetBeans provides easy code completion and great visual wizards for these JBI components so configuration will be easier. This has been the most complex type of configuration for this chapter, and one of the most difficult ones in this book. Rest assured that the next sections will be much easier. Now let’s see how to connect to mail servers to read and send mail.
6.4. Connecting to mail servers
Mail is a common way to integrate applications and to inform users and application maintainers of certain events. In this section we explain how to integrate Mule and ServiceMix with a mail server. We show how to use the SMTP and POP3 protocols from these two open source ESBs to communicate with a mail server. For the mail server we use Apache James, an open source mail server that supports all mail-related protocols. You could also use your own mail server for the examples in this section, but beware that mail which is read will be deleted by using the configuration shown here.
We once again focus on the connectivity functionality and only show you a couple of basic examples. The first one, as shown in figure 6.8, demonstrates how to send an email message to a mail server from Mule and ServiceMix.
Figure 6.8. We read a file from the file system with the ESB and forward the message to a mail server using SMTP connectivity.

The other example we implement with Mule and ServiceMix shows how to receive email messages from a mail server, as shown in figure 6.9.
Figure 6.9. We receive an email from a mail server using the ESB with POP3 connectivity and send the email message to the file system.
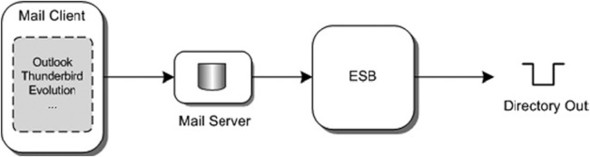
To implement examples as shown in figures 6.8 and 6.9, we use file connectivity to trigger or process the result of the Mail connectivity, because this is easy to test.
The figures also show the use of a mail client; you can use your favorite mail client to work with these examples. Let’s first look at configuring SMTP connectivity in Mule.
6.4.1. Connecting Mule to POP3 and SMTP
Our first task is to set up Mule so that we can send an email to a specific address from a Mule configuration. As we mentioned earlier, we read a file from the file system and send the file contents as the body of an email to a configured email address. The Mule configuration shown in listing 6.26 defines this SMTP connectivity.
Listing 6.26. Mule services configuration that sends mail using SMTP

We only need to tell Mule how to connect to the SMTP server
![]() as part of an SMTP outbound endpoint definition
as part of an SMTP outbound endpoint definition
![]() . In this case we connect to a local mail server (Apache James) using mule for the username and password.
. In this case we connect to a local mail server (Apache James) using mule for the username and password.
Before you can start Mule with this configuration, start Apache James with the ext:start-james Ant target in the ch6-build.xml file. Now we need to add two email accounts to the Apache James server with these steps:
1. Open a telnet session with the following command: telnet localhost 4555.
2. In the James telnet session, log in with the username root and the password root.
3. Add a user mule by entering adduser mule mule.
4. Add a user authors by entering adduser authors authors.
5. Now exit using the quit command.
You can then run this example with the chapter6-mail-smtp-4a Ant target in the same Ant build file. To trigger the SMTP service definition in listing 6.26, you need to drop a file (such as the provided mail.txt file) into the chapter6/4a-mail-smtp/in directory
![]() . Mule will send the file contents to the configured endpoint, with the file contents as the body of the email message. You
can then use any mail client (for example, Mozilla Thunderbird) to receive the message, as shown in figure 6.10. Notice that you’ll first have to configure the mule and authors email accounts in the mail client. You can use localhost as the POP and SMTP server and mule@localhost and authors @localhost as email addresses.
. Mule will send the file contents to the configured endpoint, with the file contents as the body of the email message. You
can then use any mail client (for example, Mozilla Thunderbird) to receive the message, as shown in figure 6.10. Notice that you’ll first have to configure the mule and authors email accounts in the mail client. You can use localhost as the POP and SMTP server and mule@localhost and authors @localhost as email addresses.
Figure 6.10. We can receive an email message with the Mule configuration we implemented.

You know how to configure Mule to send emails, so now let’s look at the next task: receiving email messages. To work with this example, we use a mail client to send a message, and then use the Mule POP3 transport to read the message from the mail server. We start again by looking at the Mule configuration (listing 6.27).
Listing 6.27. Mule service configuration that receives emails using POP3

Listing 6.27 looks similar to the Mule configuration in listing 6.26, where we showed you how to send email messages. We configured where the POP3 server is located and which username and password
should be used to make the connection
![]() . We also specified some additional properties on the pop3:connector. In this case, we tell Mule to not delete messages it has received
. We also specified some additional properties on the pop3:connector. In this case, we tell Mule to not delete messages it has received
![]() , and to check every 5 seconds for new email messages
, and to check every 5 seconds for new email messages
![]() .
.
To test this code, use a simple mail client—just send a message to mule@localhost and you’ll see that Mule will pick it up and process it. Make sure that you sent a plain text email message, as HTML-formatted messages can’t be consumed by Mule’s POP3 connector.
In addition to POP3 and SMTP, Mule supports the secure variants, POP3S and SMTPS, as well as IMAP. You use these secure transports in the same way, but you have to supply some additional security properties (such as certificates).
6.4.2. Connecting ServiceMix to POP3 and SMTP
To implement Mail connectivity with ServiceMix, we need a binding component to receive email messages using POP3 and a binding component that’s able to send email messages using SMTP. A Mail binding component is available for ServiceMix, but only for version 3.3 and greater. We use a Mail JBI component provided by another JBI implementation.
In the JDBC example, we demonstrated how to use a JBI component from the Open ESB project. In this example, we use a JBI component provided by the PEtALS project (see chapter 1). When you created the environment in chapter 3 we provided this binding component, so no extra installations or downloads are needed.
The PEtALS components don’t work out of the box in the ServiceMix container. We mentioned earlier that usually this is caused by incompatible JAR files or other library and classloading issues. In this case, however, the problems are simply caused by a bug in ServiceMix. If you look at the jbi.xml file from the JDBC example, you can see that we specify consumes and provides elements. These two elements are described in the JBI specification but don’t allow service-specific configuration. ServiceMix uses Apache XBean for this configuration, and the Open ESB project configures services using a WSDL file. However, PEtALS uses the standard extension mechanism, which is described in the JBI specification. This allows additional configuration elements to be present in the jbi.xml file. In ServiceMix, however, only the first of these extension elements is processed. We provide you with a patched version to solve this issue.
We want to read a file from the file system and use ServiceMix to send an email message using the file contents to a certain email address. The first thing we’ve done is configure a simple file poller. This configuration is shown in listing 6.28.
Listing 6.28. File poller configuration that sends the message to the mail service
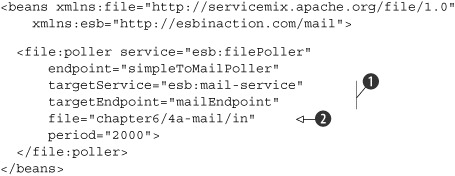
In the file poller implementation, we just read a file from the file system
![]() and send the received file to the mail service endpoint
and send the received file to the mail service endpoint
![]() . Now let’s focus on the mail service implementation.
. Now let’s focus on the mail service implementation.
We explained in previous sections that configuring service units in ServiceMix is done in the form of xbean.xml files. When you’re working with PEtALS, you don’t configure the service unit in an xbean.xml file—you use a jbi.xml file instead. Listing 6.29 shows the configuration of a PEtALS service unit that sends a message to an email address.
Listing 6.29. Configuration for sending emails using the PEtALS Mail binding component
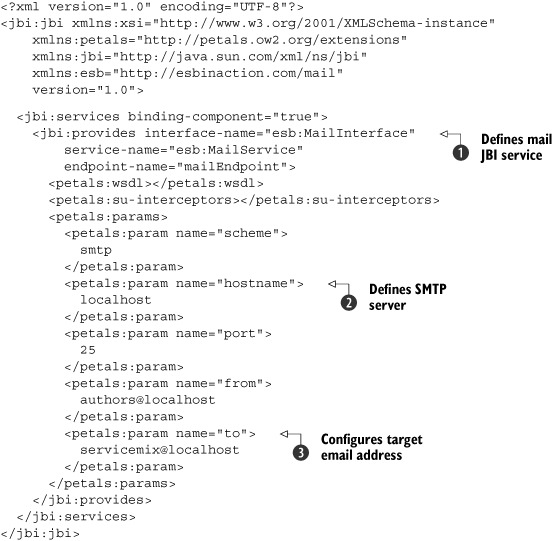
Adding the PEtALS Mail binding component for Mail support to ServiceMix is easy—all you have to do is configure the location
of the mail server
![]() . Notice that we didn’t set the subject. This is a limitation of the PEtALS Mail component: the subject of the email message
sent is always set to the name of the service. So in this example where an email message is sent, the subject will be mail-service. Work is currently being done on this component to make the subject name configurable.
. Notice that we didn’t set the subject. This is a limitation of the PEtALS Mail component: the subject of the email message
sent is always set to the name of the service. So in this example where an email message is sent, the subject will be mail-service. Work is currently being done on this component to make the subject name configurable.
One more thing to notice about this configuration is the provides element
![]() . In chapter 2 we talk about consumers and providers. This example implements a provider, which can be accessed from other JBI services
by sending a JBI message to this service endpoint.
. In chapter 2 we talk about consumers and providers. This example implements a provider, which can be accessed from other JBI services
by sending a JBI message to this service endpoint.
To run this example, you first need to add an additional email account in Apache James and install the PEtALS Mail JBI component in ServiceMix. Execute these steps before you run the mail example:
1. Start Apache James with the ext:start-james target in the ch6-build.xml Ant build file.
2. Connect to Apache James with telnet in a command colsole: telnet local-host 4555.
3. Log into Apache James with the username root and the password root.
4. Add the user servicemix with the following command: adduser servicemix servicemix.
5. Exit the telnet session with the quit command.
6. Run the Ant target gn:patchSMCore in the ch6-build.xml Ant build file, which fixes a JBI deployment descriptor bug in ServiceMix.
7. Start the ServiceMix container with the start target in the ch6-build.xml Ant build file.
8. Copy the PEtALS JDBC component boxResources/petals-bc-mail-3.0-beta1.zip to the hotdeploy folder of the ServiceMix distribution; the JDBC component will be installed.
9. Run the Ant target deploy-4a-mail-sender-example in the ch6-build.xml Ant build file to deploy the mail sender service assembly.
Now you can drop a file (such as the provided test-mail.xml) into the chapter6/4a-mail/in directory specified in listing 6.27. ServiceMix will pick up this message and send it to the PEtALS Mail component. This component in turn will send an email
message to the configured email address, servicemix@localhost
![]() .
.
To receive email messages, you need to configure another jbi.xml file for the same PEtALS Mail binding component, only this time you’ll consume a service endpoint provided by the ServiceMix file binding component. Let’s first look at the service endpoint, which is provided by the servicemix-file component in the following code snippet:
  <file:sender service="esb:mailFileWriter"
    endpoint="mailFileWriterEndpoint"
    directory="chapter6/4b-mail/out">
</file:sender>
This file binding component configuration provides a JBI service with the name esb:mailFileWriter and has an endpoint with the name mailFileWriterEndpoint. We use this service endpoint in our PEtALS Mail configuration (see listing 6.30).
Listing 6.30. PEtALS configuration for the Mail component to receive emails

The main difference compared to listing 6.29 is that here we specify a scheme of POP3 instead of SMTP. This will tell the PEtALS Mail component to start polling for mail
messages. Whenever a message is received, it will be sent to the service endpoint configured in the consumes element
![]() . In this example we specify the service and endpoint names for the File sender JBI service. So whenever a message is received,
it will be passed on to the File sender JBI service, which writes it to the file system.
. In this example we specify the service and endpoint names for the File sender JBI service. So whenever a message is received,
it will be passed on to the File sender JBI service, which writes it to the file system.
To deploy the mail receiver service assembly to the ServiceMix container, you can execute the deploy-4b-mail-receiver-example target provided in the ch6-build.xml Ant build file. Then you can send an email message with XML elements (for example, <hello>world</hello>) to the email address servicemix@localhost with the mail client of your choice. In the chapter6/mail-4b/out directory in the ServiceMix distribution, you should see files appearing with the content of the email message you sent. Notice that the files keep coming as the email message is not deleted on the email server.
Besides PEtALS, Open ESB also provides a Mail component. The Open ESB Mail component offers a lot of configuration options and has many features, but is somewhat harder to use since it requires the WSDL-based configuration we saw in the JDBC example in section 6.3. If you just want an easy way to connect to mail servers, the PEtALS component is probably the best solution; if you need more advanced features and don’t mind the WSDL-based configuration, the Open ESB component would be a better choice. Of course, when ServiceMix version 3.3 is released, a Mail binding component will be available out of the box.
Now that we’ve seen how to connect to SMTP and POP3, let’s look at another connectivity option that is still used often in enterprises: FTP.
6.5. FTP connectivity
FTP is one of the older transport protocols. It started back in 1971 and evolved in 1985 into the version that’s currently used. Especially when communicating with mainframe systems or old UNIX environments, FTP is still used often. Just as with mail connectivity, FTP has its security-enhanced variants: SFTP and FTPS. Those variants aren’t widely used, so we just focus on the basic FTP connectivity in this section.
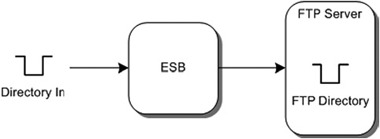
We again show you a simple example, where we read a file from a directory and store it on an FTP server, as shown in figure 6.11.
Figure 6.11. We read a file from a local directory and send the file to an FTP server.
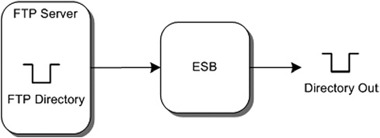
And just as we did with the other connectivity examples, we also show the way back, where we read from an FTP server and write the contents to a local file (figure 6.12).
Figure 6.12. We read a file from a directory on a FTP server and write its contents to a file in a local directory.
As you’ll see in the Mule and ServiceMix examples, the FTP connectivity looks a lot like the file connectivity. We begin by showing how Mule implements these examples.
6.5.1. FTP and Mule
Using FTP connectivity with Mule is pretty much the same as using basic file connectivity. We start with the example where we read a file from the file system and write its contents to a FTP server (listing 6.31).
Listing 6.31. Mule configuration that sends file messages to an FTP server
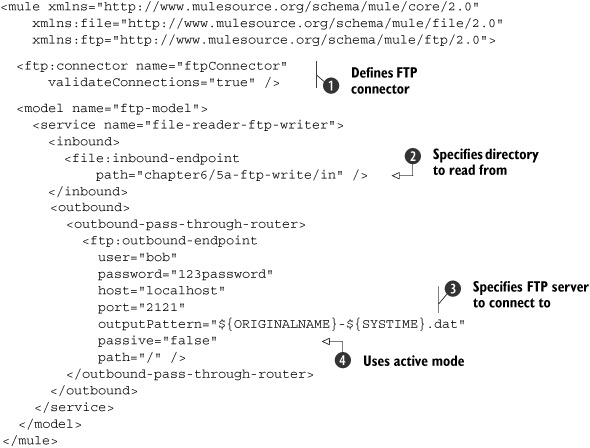
In listing 6.31 we poll for new files from a file system directory
![]() . The FTP outbound endpoint tells Mule that we want to connect to the FTP server that is running locally on port 2121
. The FTP outbound endpoint tells Mule that we want to connect to the FTP server that is running locally on port 2121
![]() . It also tells Mule that we use bob as the username and 123password as the password to connect to the FTP server.
. It also tells Mule that we use bob as the username and 123password as the password to connect to the FTP server.
We also define some advanced properties on this endpoint. We define an output pattern that’s used for the filename when we
store a file on the FTP server. We also specify that we want Mule to check whether the connection is still valid before we
attempt to upload a file
![]() . So if the connection is lost, Mule will reconnect to the server and try again. Finally, we instruct Mule to use an active
mode
. So if the connection is lost, Mule will reconnect to the server and try again. Finally, we instruct Mule to use an active
mode
![]() for file transfer instead of the passive mode.
for file transfer instead of the passive mode.
Reading files from the FTP server is as simple as storing files on an FTP server. The only thing we need to do is switch the inbound and the outbound endpoints from our previous example (see listing 6.32).
Listing 6.32. Mule configuration that reads data from a FTP server
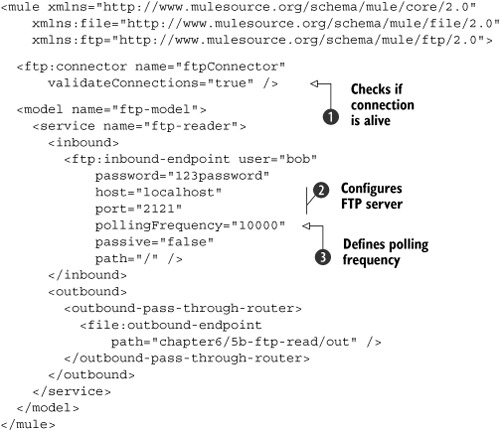
As you can see, we use the same configuration parameters
![]() for the inbound endpoint that we used for the outbound endpoint in listing 6.31. The only difference is the definition of a pollingFrequency attribute
for the inbound endpoint that we used for the outbound endpoint in listing 6.31. The only difference is the definition of a pollingFrequency attribute
![]() to indicate how often we’ll check for files. When the FTP server is polled for new files, we first validate the FTP connection
to indicate how often we’ll check for files. When the FTP server is polled for new files, we first validate the FTP connection
![]() .
.
When you want to run the FTP read and write examples, you’ll first have to configure the AnomicFTPD server. First you need to configure the group authorization in the tools/AnomicFTPD_v0.93_build20080215/ftpd.groups file. Use the configuration as shown here. Notice that you need a different configuration for UNIX/Linux and Windows systems:
Unix/Linux
usergroup=rw-,00:01,/osesbinaction/ftproot/
guestgroup=r--,00:01,/pub
admingroup=rwx,00:01,/
Windows
dosusergroup=rw-,00:01,C:\osesbinaction\ftproot\
dosguestgroup=r--,00:01,C:\pub
dosadmingroup=rwx,00:01,C:\
This code specifies the directory path for the usergroup (UNIX/Linux) and dosuser-group (Windows) FTP groups, which we use in this example. Of course, you can use another directory path if you like. Next you need to define the users for the Anomic-FTPD server in the tools/AnomicFTPD _v0.93_build20080215/ftpd.accounts file. Use the configuration shown here to define these users:
UNIX/Linux
bob=usergroup,123password
anonymous=guestgroup,*
admin=admingroup,789password
Windows
bob=dosusergroup,123password
anonymous=dosguestgroup,*
admin=dosadmingroup,789password
Now you’re ready to start the FTP server with the ext:start-AnomicFTPD Ant target in the ch6-build.xml Ant build file. You can use the chapter6-ftp-write-5a and chapter6-ftp-read-5b Ant targets in the same Ant build file to start Mule with the FTP read example (listing 6.31) and the FTP write example (listing 6.32). Next, let’s move on to the implementation of the FTP connectivity in ServiceMix.
6.5.2. FTP and ServiceMix
Using FTP from ServiceMix is just as simple as using FTP from Mule. ServiceMix provides an FTP binding component that’s able to read files from and write files to an FTP server. This BC uses the same concept as ServiceMix File BC. For the examples we explained in figures 6.12 and 6.13, we’re going to create an FTP poller and sender. Let’s first look at the FTP poller configuration (listing 6.33).
Listing 6.33. FTP binding component for ServiceMix with poller functionality

We don’t have to configure much to read files from an FTP server. We need to configure an uri
![]() , which specifies where the FTP server is running and how to connect to this server. In this example, the server is running
on localhost and on port 2121. This uri also specifies the credentials used to connect to this server.
, which specifies where the FTP server is running and how to connect to this server. In this example, the server is running
on localhost and on port 2121. This uri also specifies the credentials used to connect to this server.
Besides the connection uri, we also specify the deleteFile property
![]() . With this property we instruct ServiceMix that when a file is processed from the FTP server, this file should be deleted.
To complete the example where we pick up a file from the FTP server and write it to the file system, we also need to configure
a file sender, shown in this code snippet:
. With this property we instruct ServiceMix that when a file is processed from the FTP server, this file should be deleted.
To complete the example where we pick up a file from the FTP server and write it to the file system, we also need to configure
a file sender, shown in this code snippet:
<file:sender service="esb:fileSender"
    endpoint="simpleFromFtpSender"
    directory="chapter6/5-ftp/out" />
In the next example, we read a file from the file system and write that file to the FTP server. Again, we start by looking at the FTP configuration (listing 6.34).
Listing 6.34. FTP sender configuration for ServiceMix
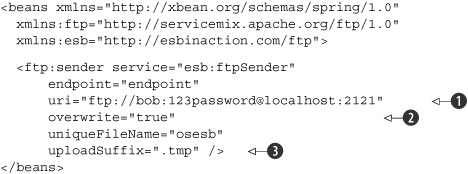
This FTP sender will send the messages it receives to the specified FTP uri
![]() , which in this example is the same as our FTP poller shown in listing 6.33. Besides the uri attribute, we also specify an overwrite attribute here
, which in this example is the same as our FTP poller shown in listing 6.33. Besides the uri attribute, we also specify an overwrite attribute here
![]() . With this attribute we specify that if a file already exists at the FTP server and a file with the same name is uploaded,
the file on the FTP server should be overwritten.
. With this attribute we specify that if a file already exists at the FTP server and a file with the same name is uploaded,
the file on the FTP server should be overwritten.
ServiceMix can’t always determine the name of the file to use when uploading. If a file is first read from the file system before being sent to the FTP server, the FTP component uses the original filename. If the message originates from a JMS queue, the original filename isn’t known. In that case, ServiceMix will use the uniqueFileName property to create a new filename: the uniqueFilename attribute value with a sequence number appended.
The final property shown here is the uploadSuffix
![]() . This suffix is appended to the filename during upload, and once the file is completely uploaded, the uploaded file is renamed
to the correct filename. This is done to prevent any processing of this file by other applications that are monitoring the
upload site.
. This suffix is appended to the filename during upload, and once the file is completely uploaded, the uploaded file is renamed
to the correct filename. This is done to prevent any processing of this file by other applications that are monitoring the
upload site.
Of course, we need to define a file poller service to drive the FTP sender service. The definition of this service is shown in this code snippet:
<file:poller service="esb:filePoller"
    endpoint="simpleToFtpPoller"
    targetService="esb:ftpSender"
    file="chapter6/5-ftp/in"
    period="2000" />
To execute the FTP example, you should first start the FTP server with the ext:start-AnomicFTPD target of the ch6-build.xml Ant build file. Then you can start the ServiceMix container with the start target in the same Ant build file. Finally, you need to deploy the FTP service assembly with the deploy-5-ftp-example Ant target. There is a test file available, test-ftp.xml, which you can use to trigger the FTP example in the chapter6/5-ftp/in directory in the ServiceMix installation directory.
Mule and ServiceMix both make it easy to connect to FTP servers, and both have some advanced features (such as uploadSuffix, which you can use to indicate that the file being uploaded is not yet completely uploaded).
Let’s now look at an old Java-based connectivity option: EJB 3.
6.6. Connecting to EJB 3
Enterprise JavaBeans (EJBs) are the standard JEE components to expose business functionality in a scalable, transactional, and distributed manner. Many enterprise applications use EJBs, and being able to connect to EJBs is an important feature for an ESB from a Java perspective. There are two different ways to implement EJB connectivity:
- Using RMI
- Adding a web service layer to the EJB and invoking the web service
In this section, we focus on the first option. We show how you can implement the example shown in figure 6.13.
Figure 6.13. We read a file from the file system and use the message to invoke a method on a remote EJB.
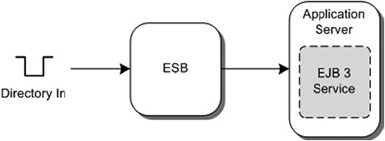
In the example in figure 6.13, we use Mule and ServiceMix to connect to an EJB and use the content of the file as parameters for the EJB call. Before we dive into the Mule and ServiceMix configuration, let’s create and deploy a sample EJB service that we use in this section.
We create a stateless session bean that can be used to search for individuals based on certain search criteria. Let’s start by looking at the interface, shown in listing 6.35, of this session bean.
Listing 6.35. PersonService interface that defines the method of our EJB

The EJB 3 service interface implementation is straightforward: it consists of a single method, which takes a query as its
input and returns a list of Persons
![]() . The SearchQuery and the Person objects are both simple beans. These beans are shown in listing 6.36.
. The SearchQuery and the Person objects are both simple beans. These beans are shown in listing 6.36.
Listing 6.36. Person and SearchQuery objects used by the PersonService
public class Person implements Serializable {
  private String firstName;
  private String lastName;

  public Person(String firstName, String lastName) {
    this.firstName = firstName;
    this.lastName = lastName;
  }

  // ommitted getters and setters
}

public class SearchQuery implements Serializable {
  private String firstName;
  private String lastName;

public SearchQuery(String firstName, String lastName) {
  this.firstName = firstName;
  this.lastName = lastName;
}
  // omitted getters and setters
}
As you can see, these bean implementations are just basic POJOs. Let’s move forward to the implementation of the EJB (listing 6.37).
Listing 6.37. EJB3 implementation of the PersonService interface
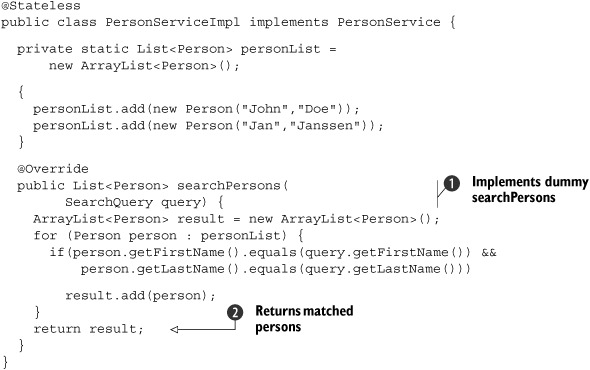
Listing 6.37 is a dummy implementation, since we’ve implemented a static list of Persons. This, however, works great for testing. To start the OpenEJB container, use the Ant task ext:start-openejb in the ch6-build.xml file of the Mule or ServiceMix workspace. You can now use the Ant task chapter6-ejb-deploy-ejb in the same Ant build file to deploy this example to the OpenEJB EJB container. When you’ve done this, an EJB service bean becomes available that can be reached by using the JNDI settings shown in table 6.1.
Table 6.1. Connection settings used to connect to the PersonService EJB
|
Property |
Value |
|---|---|
| jndiInitialFactory | org.openejb.client.RemoteInitialContextFactory |
| jndiProviderUrl | ejbd://localhost:4201 |
| jndiName | PersonServiceImplRemote |
Now let’s see how to use Mule to implement the EJB connectivity in a Mule configuration file.
6.6.1. Using EJB 3 from Mule
Connecting to EJBs from a Mule configuration is just like using any of the other transports: you just need to configure an endpoint. To show the EJB connectivity in Mule, we implement the example shown in figure 6.13. We read a file from the file system that contains the arguments for the searchPersons method. Then we transform this file into a SearchQuery object and use that object to invoke the EJB method. The result from the EJB method will be stored on the file system.
The Mule configuration to implement this EJB connectivity appears in listing 6.38.
Listing 6.38. Mule configuration showing how to connect Mule to an EJB server
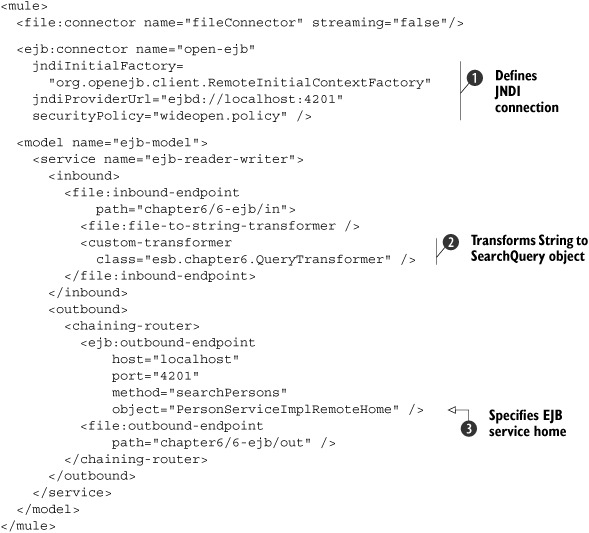
We just walk you through the interesting attributes of this Mule configuration step by step. The first thing we do is configure
JNDI-related EJB properties on the EJB connector
![]() ; these properties will be used by all the EJB endpoints. The jndiInitialFactory property is used to connect to the JNDI server, and the securityPolicy defines the security policy we use. These are just basic EJB properties. The defintion of the EJB JNDI name is specified
with the object attribute
; these properties will be used by all the EJB endpoints. The jndiInitialFactory property is used to connect to the JNDI server, and the securityPolicy defines the security policy we use. These are just basic EJB properties. The defintion of the EJB JNDI name is specified
with the object attribute
![]() in the outbound-endpoint element. This JNDI name is used to retrieve the home interface from the EJB container, so the searchPersons method can be invoked on the PersonServiceImpl EJB service.
in the outbound-endpoint element. This JNDI name is used to retrieve the home interface from the EJB container, so the searchPersons method can be invoked on the PersonServiceImpl EJB service.
The first endpoint we configured is a file inbound endpoint. This is a simple file endpoint that reads a file from the chapter6/6-ejb/in
directory. When the file is read, it’s transformed using a file-to-string transformer and a custom transformer
![]() , which transforms the input string to a SearchQuery object. Let’s look a bit closer at this custom transformer in listing 6.39.
, which transforms the input string to a SearchQuery object. Let’s look a bit closer at this custom transformer in listing 6.39.
Listing 6.39. Transformer that transforms a string to a SearchQuery object

In listing 6.39 we specify the expected input type, a String
![]() , and the expected output type, a SearchQuery
, and the expected output type, a SearchQuery
![]() , for this transformer. Mule will check whether the transformer is called with the correct source object and will also check
whether the result from the transformer is of the type we specified. Adding these checks isn’t necessary but will make our
transformers more robust and will allow us to catch any problems immediately. The doTransform method performs the actual transformation by simply splitting the incoming String object and creating a new SearchQuery based on the resulting string array
, for this transformer. Mule will check whether the transformer is called with the correct source object and will also check
whether the result from the transformer is of the type we specified. Adding these checks isn’t necessary but will make our
transformers more robust and will allow us to catch any problems immediately. The doTransform method performs the actual transformation by simply splitting the incoming String object and creating a new SearchQuery based on the resulting string array
![]() . This SearchQuery is returned from this transformer and passed back to Mule.
. This SearchQuery is returned from this transformer and passed back to Mule.
If you return to listing 6.38, you can see that we use a chaining router. This chaining router calls the EJB and File endpoint sequentially and uses the output, if any, from each endpoint as input for the next. So in this case, the result of the EJB call is used as input for the next file endpoint, which writes the EJB result to a file.
As you can see, calling EJBs in Mule isn’t that different from using Mule to connect to mail, file, or JMS servers. All we need to do is create an endpoint that shows us how to connect to the EJB. Let’s look a bit closer at the properties defined on the EJB outbound endpoint in table 6.2.
Table 6.2. The EJB outbound endpoint properties
|
Description |
|
|---|---|
| host | The location where the JNDI registry is running |
| port | The port the JNDI registry is running on |
| method | The method to invoke on the remote EJB |
| object | The name under which the EJB is registered |
Note that the default EJB connector in Mule doesn’t support EJB 3, but only EJB 2.1. So the Mule EJB connector will expect an EJB home interface to be available. Luckily, we can easily make our EJB 3 implementation of the person service (listing 6.36) EJB 2.1–compliant by adding a @RemoteHome annotation, which references a PersonServiceEJBHome interface. We also need to implement an EJB object interface class with PersonServiceEJB-Object. Now our person service is EJB 2.1–compliant and we can invoke the EJB with the Mule EJB connector.
Make sure the OpenEJB container is started (ext:start-openejb) and the EJB is deployed (chapter6-ejb-deploy-ejb). When you run this example with the chapter6-ejb Ant target and drop the test file, query-person.txt, into the chapter6/6-ejb/in directory, you’ll see that this method is invoked and that the Persons found are stored in the directory specified by the last endpoint. Now let’s move on to the last section of this chapter, where we implement the same example in ServiceMix.
6.6.2. EJB 3 and ServiceMix
ServiceMix doesn’t provide a standard EJB binding component or service engine. Various JBI-based EJB binding components are available that we can use instead. However, in this section we show how you can use Spring with the ServiceMix JSR181 binding component to provide EJB 3 connectivity.
With this component, it’s very easy to expose POJOs as services. To use this functionality to connect to EJBs, we use Spring’s JndiObjectFactoryBean. With this component we can expose a remote EJB 3 bean and access it as a normal POJO, so with this Spring bean we can use the JSR181 component to expose remote EJBs. You might remember the servicemix-bean component from chapter 3, which could also be used to expose POJOs to ServiceMix. The main difference is that with the servicemix-bean component, we need to implement a couple of lifecycle methods and be able to handle the JBI-specific way services are called. When we use the JSR181 binding component, we can just expose a POJO and don’t have to worry about the underlying JBI specifics.
Listing 6.40 shows how you need to configure Spring and this component so that you can access remote EJBS.
Listing 6.40. ServiceMix configuration that exposes EJBs as services to the NMR
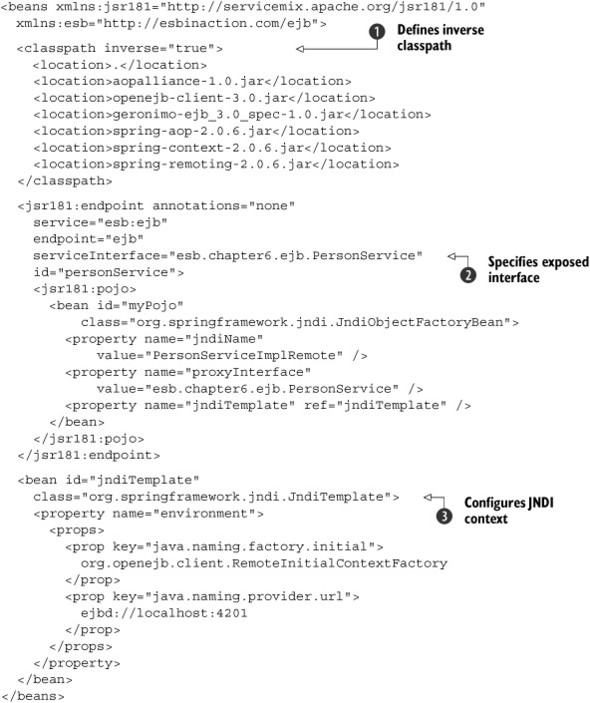
In listing 6.40 we configure a JSR181 service you can use to invoke a method on the PersonServiceImpl remote EJB. We do this by creating a Spring proxy to the remote EJB. We use Spring’s JNDI template
![]() to define how to connect to the remote EJB.
to define how to connect to the remote EJB.
With the JSR181 configuration in the listing, all the methods from the exposed interface PersonService
![]() are automatically available on the ESB. So if you want to call the searchPersons method on the remote EJB, you can just send a message to this endpoint. We don’t have to worry about the XML message exchange
inside the ServiceMix container and the use of Java objects in the PersonServiceImpl EJB; the ServiceMix JSR181 component uses XFire to marshal and unmarshal the messages from XML to Java and back again.
are automatically available on the ESB. So if you want to call the searchPersons method on the remote EJB, you can just send a message to this endpoint. We don’t have to worry about the XML message exchange
inside the ServiceMix container and the use of Java objects in the PersonServiceImpl EJB; the ServiceMix JSR181 component uses XFire to marshal and unmarshal the messages from XML to Java and back again.
Notice that we use an inverse classpath
![]() in listing 6.40. An inverse classpath can be used to achieve a parent-last kind of classloading. So the libraries specified in this ServiceMix
configuration will be loaded first, before the libraries of the ServiceMix container.
in listing 6.40. An inverse classpath can be used to achieve a parent-last kind of classloading. So the libraries specified in this ServiceMix
configuration will be loaded first, before the libraries of the ServiceMix container.
So let’s quickly look back at the scenario we want to implement. We want to read a file from the file system, invoke a call on the EJB, and send the result on to the file system. Let’s first configure the file endpoints (listing 6.41).
Listing 6.41. A file sender and file poller configuration for the EJB example

The sender can write a message to the file system. The poller polls the file system every 2 seconds and uses the result to
send a message to the pipeline service endpoint
![]() . As you can see here, we don’t directly invoke the EJB service, but we invoke a service called pipeline. We do this because we want to route the result of the EJB call to the file sender endpoint so it can be written to the file
system. Listing 6.42 shows the configuration of this pipeline.
. As you can see here, we don’t directly invoke the EJB service, but we invoke a service called pipeline. We do this because we want to route the result of the EJB call to the file sender endpoint so it can be written to the file
system. Listing 6.42 shows the configuration of this pipeline.
Listing 6.42. Pipeline configuration to connect the file endpoints to the EJB service
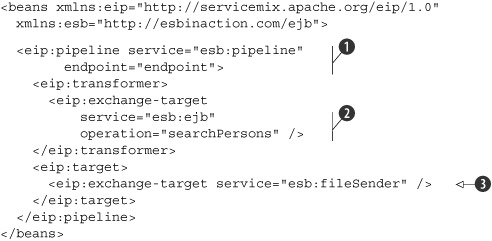
With the configuration in listing 6.42, once this pipeline service
![]() is invoked, a call is made to the specified exchange target
is invoked, a call is made to the specified exchange target
![]() , which in this case is the call to the EJB. The result of this call is then passed on to the file sender component
, which in this case is the call to the EJB. The result of this call is then passed on to the file sender component
![]() , which stores the EJB result on the file system.
, which stores the EJB result on the file system.
You might wonder why we chose this odd construction. The reason is that we need to convert between different message exchange patterns. The file reader we specify reads a file from a directory and invokes a target service using the in-only pattern. The PersonServiceImpl EJB sends a response and thus only expects in-out exchanges. Using a pipeline, we can change the message exchange from an in-only pattern to an in-out pattern to invoke the EJB service and back to an in-only pattern to write the output to a file.
To execute the EJB example, you’ll first have to start the OpenEJB container with the ext:start-openejb target in the ch6-build.xml Ant build file. Then you have to undeploy the EJB example of Mule with the chapter6-ejb-undeploy-ejb Ant target and deploy the ServiceMix EJB example (without the EJB 2.1 compliancy) with the chapter6-ejb-deploy-ejb Ant target. Finally, you start the ServiceMix container with the start Ant target and deploy the EJB service assembly with the deploy-6-ejb-example Ant target. With the PERSON.xml test file, you can trigger the EJB example by copying this file to the chapter6/6-ejb/in path in the ServiceMix installation directory.
6.7. Summary
In this chapter you learned how to use Mule and ServiceMix to connect to various technologies. You saw that the configuration of some of these technologies is straightforward, but some are a bit more complex and require an understanding not only of Mule and ServiceMix but also of how the underlying technology works.
Using ESBs such as Mule and ServiceMix facilitates working with all kinds of technologies and standards. Connecting to existing business logic using EJBs or JMS is as easy as adding a couple of lines of configuration.
The technologies in this chapter are just a selection of what’s available. In appendices D and E, we list the available connectors and binding components, so if you want to use a technology not explained here, check out those appendices.
We covered a lot of ground in this chapter, and even though we skipped some technologies, you should now be able to work with other Mule transports and JBI components.
In the next chapter, we look at another popular integration technology. We show how you can use web services and two of the most important standards, WS-Security and WS-Addressing.