
Chapter 7. Web services support
Working with SOAP and web services is rather complex; for instance, you usually have to run a servlet engine in which you deploy your web services. In this chapter you’ll learn how easy it is to use Mule and ServiceMix to connect to and host web services. We first show you how to connect to existing web services and how to create your own web services. Then we explain how to use two of the most important web services specifications in Mule and ServiceMix: WS-Security and WS-Addressing.
When creating web services you have three approaches:
- In the top-down approach, you write the WSDL file first and use it as the foundation for the Java service. This is usually the best approach since your WSDL file doesn’t depend on the Java interface definition and you have total freedom in the way you create the messages and thus define the XML that is sent over the wire. This is especially useful when you want to interact with .NET web services. This option does, however, require some extra effort to get the web service implemented and running.
- In the bottom-up approach, you create a Java service and generate a WSDL file from that service. This approach is usually the quickest one and works pretty well if the web service consumers are also Java applications. But there is a risk that the generated web service won’t interoperate correctly with .NET, although with the most modern web services frameworks, interoperability with .NET works well if you follow certain guidelines.
- In the meet-in-the-middle approach, you use an already existing Java model to create the foundation for the messages being sent in a WSDL file. You can then tailor the WSDL file to your liking.
In this chapter, we demonstrate the top-down and the bottom-up approaches; the meet-in-the-middle approach can easily be distilled from these two approaches.
The web service that we create is a simple service where we implement three operations that can be used to look up information about a company:
- Get company— Provides detailed information based on the name of a certain company. So when you look for information on MuleSource or IONA, you’ll get the location of that company and the members of its board of directors.
- Find companies— Lets you search for companies based on street name and city name. This operation returns either an empty list (if no companies are found) or a list of companies.
- Update company info— Allows you to change an existing company’s information by providing the name and new information.
We implement this web service using the bottom-up and the top-down approaches we’ve talked about. First let’s look at implementing the web service using a top-down approach.
7.1. Top-down approach web service
For the top-down approach, we need to create a WSDL file that describes the type of messages that can be sent to, and received from, the web service and the operations this web service provides. A WSDL file is usually a large XML file, so we just look at the various parts that make up the WSDL file (figure 7.1). You’ve already seen the definition of a WSDL file in chapter 6 (when we discussed the JDBC connectivity of ServiceMix), but in this section we look at the parts of a WSDL file without the JDBC logic.
Figure 7.1. An overview of a WSDL version 1.1 file, showing the various parts that together define a web service description
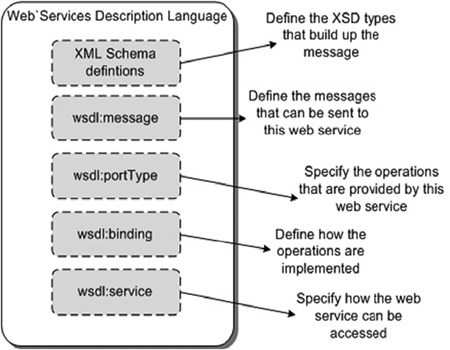
As you can see in figure 7.1, a WSDL version 1.1 file contains, among other things, XML Schema elements and type definitions.
In this book, when we talk about WSDL, we’re referring to the 1.1 version. A WSDL 2.0 specification is also available that is becoming popular. We don’t go into the WSDL 2.0 details here but instead focus on the most visible differences between WSDL 1.1 and WSDL 2.0. The first thing you’ll notice when you compare a WSDL 2.0 file to the WSDL 1.1 version is that the message constructs have been removed. In WSDL 2.0 they’re instead defined using the standard XML Schema model in the types element. Another change is that some of the elements have been renamed. The portType element from WSDL 1.1 has been renamed to interface in WSDL 2.0, and the port element has been replaced with the interface element. As you may recall from chapter 2, the naming conventions of JBI match those of WSDL 2.0. The reason is that the JBI specification leans heavily on the WSDL 2.0 model.
These elements and type definitions describe the format of the XML messages used to communicate with the web service. Listing 7.1 shows the XML Schema definitions for the company web service we described in the introduction of this chapter.
Listing 7.1. XML Schema definition part of the WSDL file
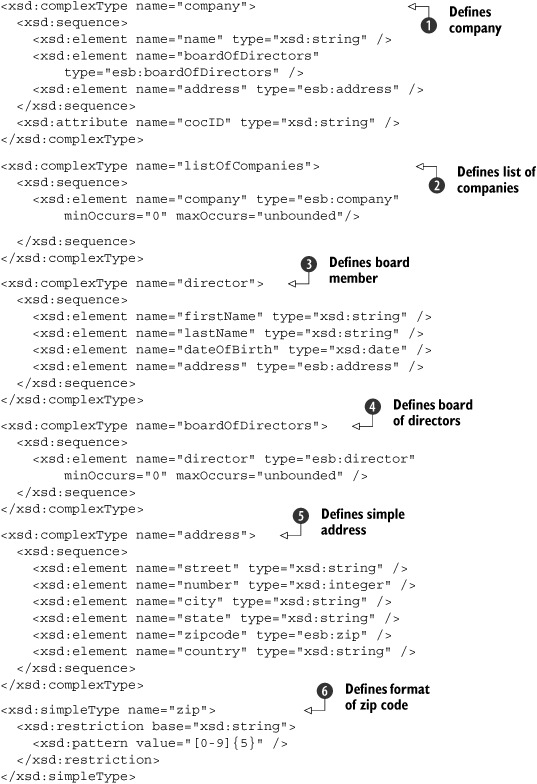
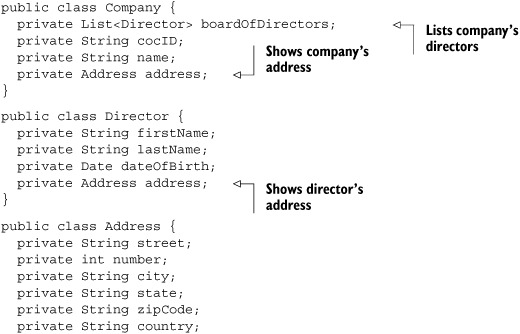
In listing 7.1, we define some XML Schema types that represent the objects we need for our company web service implementation: a company object
![]() , which has a cocID; a name; an address; and a number of boardmembers. The director
, which has a cocID; a name; an address; and a number of boardmembers. The director
![]() , the boardmembers
, the boardmembers
![]() , the address
, the address
![]() , and its zipcode
, and its zipcode
![]() types are also defined in this listing. Since we have an operation that returns a list of companies, we also define a complex
type for this result value
types are also defined in this listing. Since we have an operation that returns a list of companies, we also define a complex
type for this result value
![]() . These type definitions will define the format of the XML messages used to communicate with this web service.
. These type definitions will define the format of the XML messages used to communicate with this web service.
When writing web services, it’s a good thing to keep interoperability in mind. To ensure interoperability, you can use the document/literal wrapped approach.
With the document/literal wrapped approach, the parameters of the web service operation are wrapped in an XML element, which indicates the method to be called. So, for instance, when we invoke a findCompanies operation, the XML message that we send is
<findCompanies>
    <city>companyName</city>
    <streetName>companyName</streetName>
</findCompanies>
Document/literal wrapped is a SOAP style made popular by Microsoft and is now the de facto web service standard. With document/literal wrapped, we wrap the XML elements we want to send in a single element. So the input message for the web service will always contain a single XML element. This root element usually has the same name as the operation we want to invoke and isn’t allowed to have any attributes. The name of this root element can then be used by the various web service frameworks to determine which method to invoke in the web service implementation. So in our example, our root elements will be called findCompanies, getCompany, and changeCompany, and the methods in our service implementation will have to have the same names.
The reason document/literal wrapped has become so popular is that we can now easily correlate the name of the method to invoke from the SOAP message. If we only used document/literal, we’d just send XML messages, without a wrapper, so we wouldn’t be able to correlate the message directly from the XML received.
Document/literal wrapped does have some issues. The first is that you can’t have overloaded methods, since the method name is used as a wrapper. The second problem is that since WS-Addressing is getting more popular, the use of the wrapped element to indicate the method to invoke is getting a bit obsolete. As we’ll see in the last part of this chapter, we can do the same thing with WS-Addressing by specifying the wsa:action element, which is sent in the header of the SOAP message.
To be able to use this message definition for our company web service, we need to create the XML elements that represent this style. We don’t explain all the element types, but focus on the request and response definition, shown in listing 7.2, for the findCompanies operation.
Listing 7.2. Wrapped element used for the findCompanies operation

In listing 7.2 we created a wrapper element, which contains all the parameters for the input message
![]() of the findCompanies operation, and we also created a wrapper element for the response message
of the findCompanies operation, and we also created a wrapper element for the response message
![]() . Now that we’ve defined the format of the input and response XML messages, let’s define the messages and the operations (listing 7.3).
. Now that we’ve defined the format of the input and response XML messages, let’s define the messages and the operations (listing 7.3).
Listing 7.3. WSDL message and operations definition
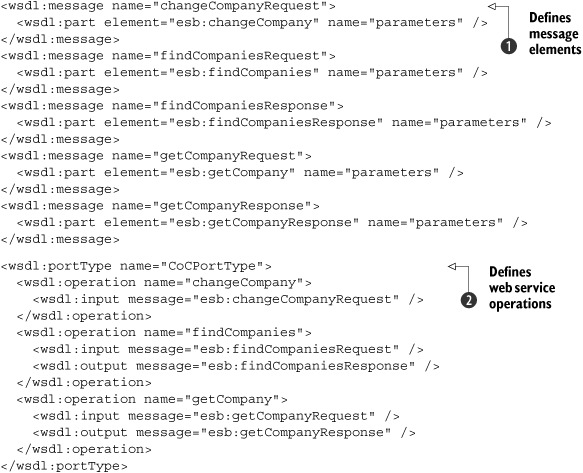
In listing 7.3, we defined five messages
![]() , which serve as input or output messages for the WSDL operations
, which serve as input or output messages for the WSDL operations
![]() . Since we’re implementing a document/literal wrapped web service, the messages just point to the XML elements defined in
listing 7.1. The portType shown here
. Since we’re implementing a document/literal wrapped web service, the messages just point to the XML elements defined in
listing 7.1. The portType shown here
![]() specifies the operations this web service will provide. Note that at this point we haven’t yet indicated how the operations
are implemented or bound to a specific technology; this portType is the equivalent of a Java interface, where we just define the operations.
specifies the operations this web service will provide. Note that at this point we haven’t yet indicated how the operations
are implemented or bound to a specific technology; this portType is the equivalent of a Java interface, where we just define the operations.
The final part of the WSDL is binding this portType to an actual implementation technology, where we define how this web service can be invoked. We use SOAP over HTTP and a document/literal style web service, as shown in listing 7.4.
Listing 7.4. WSDL part showing the binding implementation of the port type
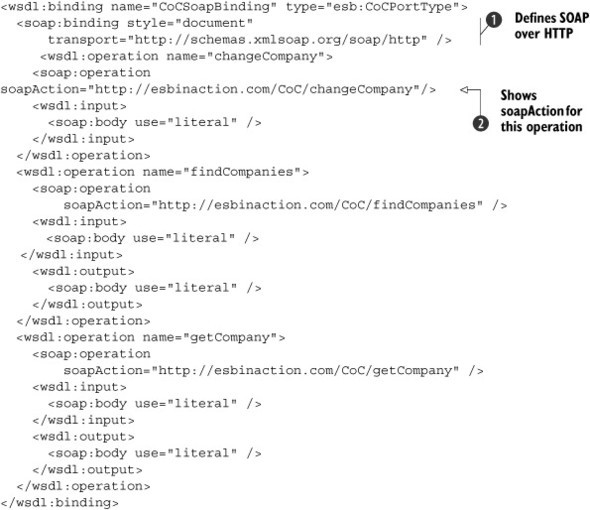
An interesting aspect to notice in listing 7.4 is the soapAction attribute
![]() . Earlier we mentioned that the name of the message can be used to determine which method needs to be invoked on the actual
implementation. There’s another common way to determine the method to invoke: the soapAction. Most modern web service frameworks allow you to specify which soapAction maps to which method in your web service implementation.
. Earlier we mentioned that the name of the message can be used to determine which method needs to be invoked on the actual
implementation. There’s another common way to determine the method to invoke: the soapAction. Most modern web service frameworks allow you to specify which soapAction maps to which method in your web service implementation.
Also notice that we’ve specified that this company web service is bound to SOAP over HTTP
![]() . In the JDBC connectivity example in chapter 6, you saw other options for implementing a WSDL definition. Another common binding is SOAP over JMS, which uses a reliable
transport for a web service invocation.
. In the JDBC connectivity example in chapter 6, you saw other options for implementing a WSDL definition. Another common binding is SOAP over JMS, which uses a reliable
transport for a web service invocation.
Finally, we must define the web service location related to a binding definition (listing 7.5).
Listing 7.5. WSDL part showing the service location related to a binding definition

So that’s it. We’ve shown you the format of the XML messages and the operations definition, and explained how to bind them to use SOAP over HTTP. Now that we’ve created the web services definition, let’s create a Java implementation that contains the business logic for the company web service.
7.1.1. Java implementation of the web service
For the Java implementation of the company web service, let’s create an interface definition, as shown in the next code snippet, which contains the methods that match the names and the arguments in our WSDL definition:
public interface ChamberOfCommerceService {

   List<Company> findCompanies(String city, String streetName);
   Company getCompany(String companyName);
   void changeCompany(String companyName, Company companyInfo);
}
Back in listing 7.2, you can see that the findCompanies method shown here can be directly related to the WSDL definition. Note that we use a Company object in all three web service methods. A schematic overview of the Java objects related to the Company object is shown in figure 7.2.
Figure 7.2. The data model used in the Company web service implementation. The Company object is used in the operations of the web service.

Figure 7.2 shows that both a company as well as a director have a relationship with an address. Listing 7.6 provides a more detailed description of these objects.
Listing 7.6. Domain objects by the company web service Java implementation
Now we that have implemented the Java interface definition and the domain objects needed as method parameters, we can implement the Java code for the company web service. The Java implementation of the ChamberOfCommerceService interface is shown in listing 7.7.
Listing 7.7. Implementation of the CompanyService interface
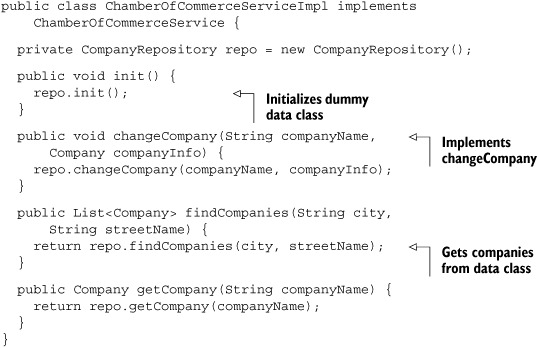
As you can see, we defined a CompanyRepository class, which we use as a dummy data class. We don’t show the implementation of this class, as it’s just a simple class that stores a couple of companies in a map, which we use to retrieve the correct companies based on the operation parameters.
Now that you’ve seen the Java implementation and specified the WSDL, we show you how to use Mule and ServiceMix to host this company web service, based on the WSDL definition and the Java implementation.
7.1.2. Implementing a top-down web service using Mule
Mule has support for multiple frameworks that allow you to implement web services. It supports Apache Axis, Glue, and Apache CXF. Axis and Glue are mainly there for backward compatibility—for instance, when you need to connect to web services that support older standards such as Dime. Apache CXF is a modern, mature framework that implements the JAX-WS specification that’s part of JEE 5. For the examples in this chapter, we use CXF, but the principles shown here also apply to Apache Axis and Glue.
To get this top-down approach (WSDL-first) working in Mule, we need to execute the following steps:
1. Generate server stub—This will create some Java files that map the incoming SOAP request to a Java operation. We do this to avoid having to write the conversion between the incoming XML and a Java operation ourselves. The result of this step is a basic Java class or a stub, which will already contain all the web service operations. We then just have to connect this class to our own implementation shown in listing 7.7.
2. Implement the server stub—In the implementation we map from the generated classes to our own JavaBeans and implementation. We need to do this since the classes generated in the first step won’t be exactly the same as the ones we’ve created in section 7.1.1.
3. Configure Mule to publish the WSDL as a web service—The final step is publishing the WSDL and its generated implementation as a web service. When we do this, Mule will create a listener on a specific port, which web service clients can connect to, to invoke the web service we’ve just created.
We start with the first two items on this list and look at how we can generate and implement the server stubs.
Generating and implementing the server stub for Mule
We added a simple Ant target to the ch7-build.xml Ant build file of this chapter, which you can use to generate the server stubs. You do this by executing the cxf-generate-server-stubs task, which calls the Apache CXF WSDLToJava class to generate the Java code that maps the operations and types defined in the WSDL file to Java objects. When you run this Ant target, it will execute the following command:
<java classname="org.apache.cxf.tools.wsdlto.WSDLToJava"
          fork="true">
  <arg value="-server" />
  <arg value="-impl" />
  <arg value="-d" />
  <arg value="${workspace.home}/mule/src-generated" />
  <arg value="${chapter.home}/provide-wsdl-top-down/CoC.wsdl" />
  <classpath>
    <path refid="cxf.path" />
  </classpath>
</java>
We don’t look at all the generated classes, since they are just basic JavaBeans, which use JAXB to map the incoming XML message to Java and back again. However, we look at the stub implementation since we need to connect the methods generated in that stub to our own Java implementation in listing 7.7. We don’t show you the complete stub implementation but focus only on the parts that need to be changed (listing 7.8).
Listing 7.8. The generated stub with code to connect to our own implementation
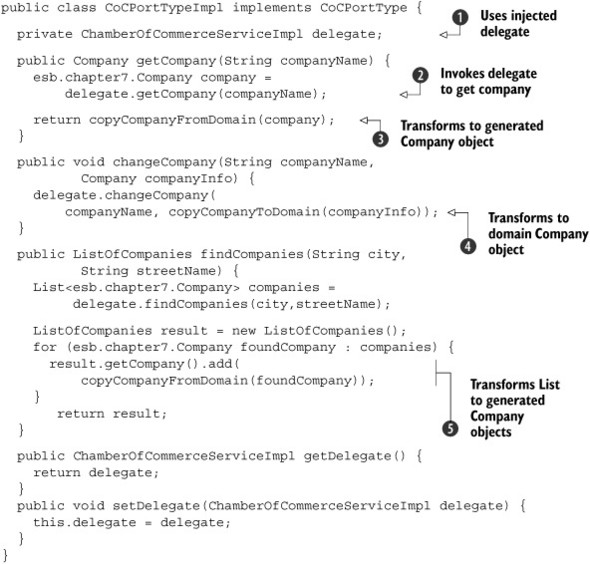
The methods generated in this stub all delegate
![]() to the implementation
to the implementation
![]() we showed in listing 7.7. This way, we can easily regenerate the stubs or change the web service interface without having to touch our implementation.
And in the same manner, our implementation can change without having to define a new WSDL every time our implementation changes.
we showed in listing 7.7. This way, we can easily regenerate the stubs or change the web service interface without having to touch our implementation.
And in the same manner, our implementation can change without having to define a new WSDL every time our implementation changes.
In listing 7.8 you can also see a couple of copyXXX methods
![]() ,
,
![]() ,
,
![]() . The implementation of those methods isn’t shown, but the only thing these methods do is copy the generated domain objects
to our own domain objects defined in listing 7.6 and back again.
. The implementation of those methods isn’t shown, but the only thing these methods do is copy the generated domain objects
to our own domain objects defined in listing 7.6 and back again.
Well, that’s it for generating and implementing the web service stub. The final task is to configure Mule to publish the company web service we just created.
Configure Mule
All we need to do now is configure Mule so that we can access the web service using SOAP over HTTP. Figure 7.3 shows the example, which we implement using Mule.
Figure 7.3. An overview of Mule hosting our generated web service that delegates to the Java implementation
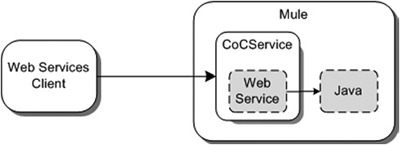
Figure 7.3 shows that we want to use Mule to host a web service, which uses our Java implementation in listing 7.7. A web services client can then use the web service provided by Mule by just connecting to the port where Mule hosts this web service. To implement this web services functionality, we need to create a Mule configuration (listing 7.9).
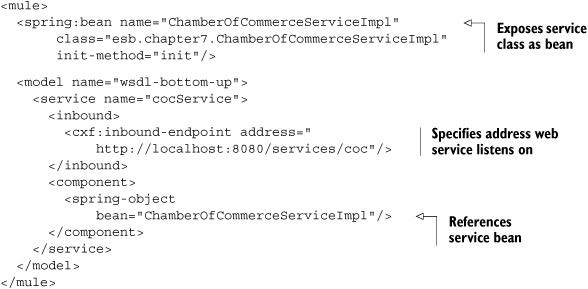
Listing 7.9. Mule configuration that shows how Mule can host a top-down web service
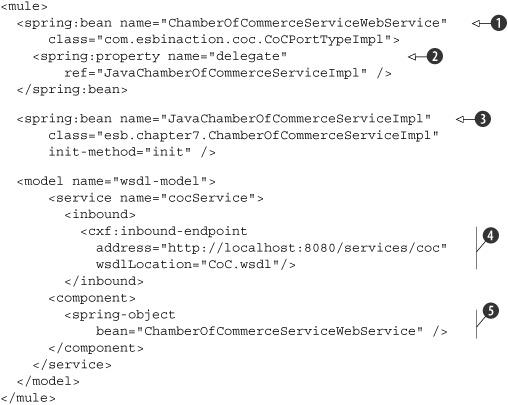
We first specify two Spring beans. The first bean is the generated web service stub implementation, ChamberOfCommerceServiceWebService
![]() , which we configured to delegate to the Java implementation from listing 7.7
, which we configured to delegate to the Java implementation from listing 7.7
![]() . The second Spring bean, Java-ChamberOfCommerceServiceImpl
. The second Spring bean, Java-ChamberOfCommerceServiceImpl
![]() , is our own Java implementation in listing 7.7.
, is our own Java implementation in listing 7.7.
You can also see that we created an cxf:inbound-endpoint
![]() . This endpoint defines at which address the web service is hosted; in this example we also referenced the location of the
WSDL file. Note that even though we specified the WSDL file here, this isn’t really necessary. The stub that’s generated by
CXF contains a number of JAX-WS annotations. One of these annotations already specifies the WSDL file to use. Configuring
it here, however, makes it clearer which WSDL is used. So if an external client looks up this address and appends ?wsdl, the WSDL file we created at the beginning of this chapter is returned.
. This endpoint defines at which address the web service is hosted; in this example we also referenced the location of the
WSDL file. Note that even though we specified the WSDL file here, this isn’t really necessary. The stub that’s generated by
CXF contains a number of JAX-WS annotations. One of these annotations already specifies the WSDL file to use. Configuring
it here, however, makes it clearer which WSDL is used. So if an external client looks up this address and appends ?wsdl, the WSDL file we created at the beginning of this chapter is returned.
If a call is made to http://localhost:8080/services/coc, the message will be automatically marshaled to Java and a call on the generated stub is made
![]() . The stub delegates the message on to the real implementation, which executes the query and returns the result. This result
is finally returned to the requesting client. If you run this example from the supplied Ant build file with the chapter7-top-down-provide Ant target, you can use the Swing test client or, for example, SoapUI, to connect to this service and execute web service
calls.
. The stub delegates the message on to the real implementation, which executes the query and returns the result. This result
is finally returned to the requesting client. If you run this example from the supplied Ant build file with the chapter7-top-down-provide Ant target, you can use the Swing test client or, for example, SoapUI, to connect to this service and execute web service
calls.
Our example uses a binding library to automatically marshal Java to XML and back again. The CXF default binding implementation, and the one used here, is JAXB. We don’t have to do anything for this since all the mapping is implemented when we generated our server stubs. Another popular approach to web services, which is especially promoted by the development team of Axis2, is message-based web services. With these kinds of web services, you don’t create a binding to Java, but you just have a class that receives the XML payload of your SOAP message. You’re then free to do with this what you want. CXF also provides support for this kind of web service.
As you’ve seen in this section, it’s easy to provide a web service using Mule once you’ve got a WSDL file and a Java implementation. You only have to configure a CXF endpoint that points to the generated web service stub and Mule takes care of the rest. Since we’re working top-down here, there’s always some work required to connect the generated stub to your own implementation and also to convert the generated domain model to your own domain model.
Now that you know how to implement a web service in Mule, let’s implement a simple top-down web service in ServiceMix.
7.1.3. Implementing a top-down web service using ServiceMix
ServiceMix also has support for multiple web services frameworks. It supports both XFire and CXF. Since CXF is the continuation of XFire and XFire itself isn’t actively developed anymore, we show you how CXF can be used from ServiceMix. To implement web service functionality in ServiceMix, we need to repeat much the same steps we used for Mule:
1. Generate server stub—For ServiceMix we also need to have a server stub, which we can alter to delegate to our own implementation. So we need to generate a server stub, just like we did in our Mule example.
2. Implement the server stub—We map from the generated classes to our own Java-Beans and implementation. We can use exactly the same code that you saw in the previous section.
3. Configure ServiceMix to publish the WSDL as a web service—The final step is configuring a binding component to listen on an HTTP endpoint. We also need a service engine that contains our implementation. We configure this endpoint to work as follows: whenever a message is received on the binding component, the message will be forwarded to the JBI service endpoint defined in the service engine.
We start with the generation of the server stub, as we also did in the previous section on Mule.
Generating and implementing the server stub for ServiceMix
In the resources/chapter7 directory of the ServiceMix workspace is an Ant file, ch7-build.xml, which can be used to run all the examples in this chapter. This Ant file also contains a target called cxf-generate-server-stubs. When you run this target, it generates classes for all the types defined in the WSDL file introduced earlier in this chapter and a stub implementation, just as we’ve seen in the Mule example.
The implementation of the server stub looks exactly the same as in listing 7.8, so we don’t go into more details here. Now that we have the same stub as the one in the Mule example, let’s look at configuring ServiceMix to work with this web service stub.
Configure ServiceMix to host a web service
With ServiceMix, it isn’t possible to create a web service, which invokes a Java object as we did in the Mule example. This is related to the JBI specification. As we explained in earlier chapters, there’s a distinction between binding components and service engines in JBI. The binding components handle the external communication, and the service engines consume and provide internal services. To get web services to work in ServiceMix, we need to do two things. We first need to configure a binding component so that the web service can be called from outside the JBI container, and secondly, we need to configure a service engine to provide the real implementation. Let’s look at figure 7.4, which explains this in a bit more detail.
Figure 7.4. ServiceMix configuration for top-down web services showing how the CXF binding component calls the CXF service engine
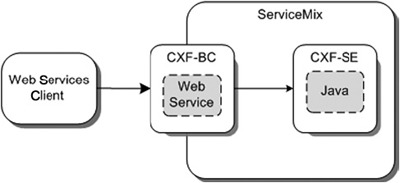
Whenever a message is received by the CXF binding component, we configure ServiceMix to forward the request directly to the Java implementation in the CXF service engine. The implementation will execute the call and return the optional result back again to the binding component, which returns it to the client. We begin by looking at the configuration of the CXF binding component (listing 7.10).
Listing 7.10. CXF binding component configuration that publishes a web service
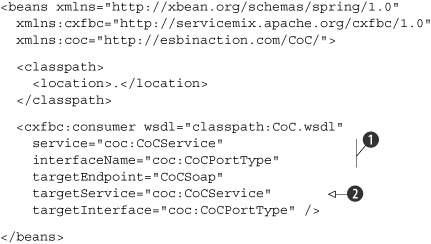
We defined a CXF JBI service, which can be deployed to the servicemix-cxf-bc binding component. This JBI service uses the information in the WSDL file to create a listener to which SOAP messages can
be sent. The service and interface names
![]() should match the names used in the WSDL file. This information will be used by CXF to determine which service to expose. If
you look back at the WSDL definition for the company web service, you’ll see we defined the service element in the WSDL file,
as shown here:
should match the names used in the WSDL file. This information will be used by CXF to determine which service to expose. If
you look back at the WSDL definition for the company web service, you’ll see we defined the service element in the WSDL file,
as shown here:
<wsdl:service name="CoCService">
  <wsdl:port binding="coc:CoCSoapBinding" name="CoCSoap">
    <soap:address location="http://localhost:8080/services/coc" />
  </wsdl:port>
</wsdl:service>
The elements used to determine where to expose the service are the name of the service, and the type of the binding. This coc:CoCSoapBinding is also defined in the WSDL file, and is of type coc:CoCPortType. Using this information, CXF exposes the service on the address http://localhost:8080/services/coc.
We also configured targetEndpoint, targetService, and targetInterface
![]() . This is the JBI service the message is sent to when a message is received on the web service. Notice that we didn’t specify
where this service is listening. The CXF service unit looks into the WSDL file and, based on information from the WSDL, exposes
a web service.
. This is the JBI service the message is sent to when a message is received on the web service. Notice that we didn’t specify
where this service is listening. The CXF service unit looks into the WSDL file and, based on information from the WSDL, exposes
a web service.
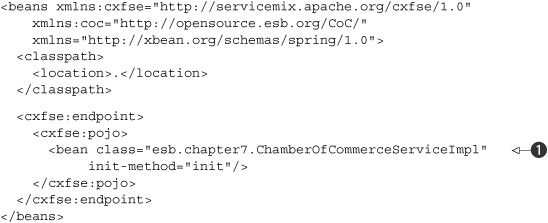
Let’s now look at the real implementation of the service. This is defined in another xbean.xml file, shown in listing 7.11, which is deployed to the servicemix-cxf-se service engine. Remember that this is the service the message will be sent to once it’s received by the previously configured binding component.
Listing 7.11. CXF service engine configuration, which calls a POJO class
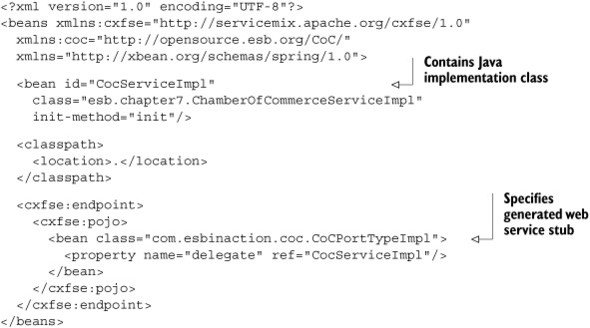
We use the generated stub as the implementation of the CXF service engine endpoint. As you saw in listing 7.8, this implementation delegates all the calls to the Java implementation class we’ve written ourselves. And that’s all you have to do.
You might wonder why we haven’t specified an endpoint or service name here. This isn’t necessary in this case since this service engine uses information from the generated web services stub to determine the service name and the endpoint name. It does this by reading the JAX-WS annotations, which were also generated by CXF. We haven’t shown those yet, so let’s quickly look at the JAX-WS annotations for the generated CoCPortTypeImpl Java class in listing 7.12.
Listing 7.12. JAX-WS annotations for the generated web services stub
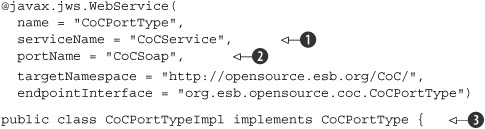
These annotations are used by the CXF service engine to determine how to register this service. The serviceName
![]() and portName
and portName
![]() together define the JBI service endpoint name this JBI service is registered with in the JBI container. The name is used to indicate which interface is provided by this service. You can also see that this class implements the Java interface
together define the JBI service endpoint name this JBI service is registered with in the JBI container. The name is used to indicate which interface is provided by this service. You can also see that this class implements the Java interface
![]() generated by CXF.
generated by CXF.
JSR-181 is a specification started back in 2002 that specifies a set of annotations Java developers can use to easily create web services. When developing web services, you often have to write a whole set of artifacts: a WSDL describing the interface, a binding definition to marshal to and from XML, and maybe even some implementation-specific deployment descriptors. With JSR-181, a set of eight annotations have been defined that make it a lot easier for Java developers to write web services from a bottom-up approach.
Using this JSR-181, you can just annotate a POJO with the javax.jws.Webservice annotation, configure a web service framework (such as XFire, CXF, or any JEE 5–compliant application server), and the web service is created. This specification also gives you more fine-tuned control for mapping operations and messages using any of the other available annotations. Generally, not much fine tuning is needed, though, since the defaults chosen by JSR-181 fit most requirements.
When you deploy these two service units to ServiceMix, a web service will be started on the address specified in the WSDL file. This web service will be accessible by clients outside ServiceMix. This configuration will also start an internal service endpoint, which calls to the stub implementation. If you run this example from the supplied Ant build file, ch7-build.xml, with the deploy-wsdl-top-down Ant target, you can use the Swing test client or SoapUI to call this web service.
Next, let’s discuss the bottom-up approach. We show you how to start from a Java class and expose it as a web service using Mule and ServiceMix.
7.2. Bottom-up approach
Another common approach to using web services is starting with a Java implementation, and generating a WSDL from the code. With modern web services frameworks such as CXF and Axis2, the WSDL files generated are of good quality, and this approach will get your web services up and running quickly. So if you already have numerous Java-based services, using a bottom-up approach you can quickly expose them as web services. In the upcoming sections, we show you how to use the bottom-up approach to provide web services in Mule and ServiceMix.
7.2.1. Bottom-up approach using Mule
We use the same service implementation from section 7.1.1. We want to expose as a web service the interface we implemented there. Let’s quickly look at how this interface looks:
public interface ChamberOfCommerceService {

  List<Company> findCompanies(String city, String streeName);
  Company getCompany(String companyName);
  void changeCompany(String companyName, Company companyInfo);
}
Exposing this web service in Mule couldn’t be easier. We use the CXF endpoint, shown in listing 7.13, to implement this functionality in a Mule configuration.
Listing 7.13. Mule configuration for providing a bottom-up web service
If you compare listing 7.13 with the top-down approach, the only differences are that we didn’t specify a WSDL file and that we point directly to our bean implementation. That’s all you have to do: CXF will inspect the implementation, and based on the available methods, it will expose a web service on the specified address. Let’s look at implementing the same example in ServiceMix.
7.2.2. Bottom-up approach using ServiceMix
For the bottom-up approach with ServiceMix, we start with the same implementation as in the previous Mule section. We create an endpoint in the CXF service engine (listing 7.14).
Listing 7.14. ServiceMix configuration for providing a bottom-up web service
We only need to define the name of the class we want to expose as a web service
![]() and the CXF service engine will take care of the rest. In the previous section, we explained what JSR-181 does; this CXF service
engine also uses JSR-181 to expose the methods from the implementation as a web service. We could customize the behavior of
this implementation class with additional JSR-181 annotations. For this example, however, we only use the @Webservice annotation, which we defined on the implementation class:
and the CXF service engine will take care of the rest. In the previous section, we explained what JSR-181 does; this CXF service
engine also uses JSR-181 to expose the methods from the implementation as a web service. We could customize the behavior of
this implementation class with additional JSR-181 annotations. For this example, however, we only use the @Webservice annotation, which we defined on the implementation class:
@WebService(targetNamespace = "http://opensource.esb.org/CoC/" )
public class ChamberOfCommerceServiceImpl
    implements ChamberOfCommerceService {
If we could access internal ServiceMix endpoints from outside the container, we’d be finished at this point. But as we explained in previous chapters, to access internal JBI services, we need to configure a binding component that can serve as a façade to internal endpoints. So for this example we configure a CXF binding component that simply forwards the received message to this internal implementation (listing 7.15).
Listing 7.15. ServiceMix configuration for providing a web service externally
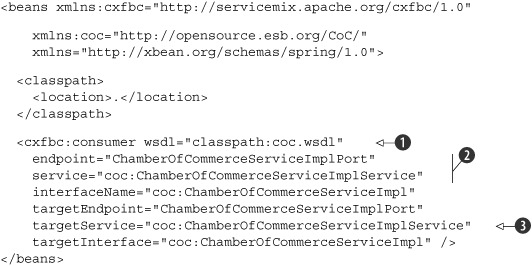
In listing 7.15 we define a web service that can be accessed from external clients. The first thing you see here is that we reference a WSDL
file
![]() . We don’t write this WSDL file ourselves but generate it using the tools provided by CXF. For this we once again provide
a simple target in the Ant build file for this chapter. When you run this target, cxf-generate-bottom-up, CXF will inspect the Java class we wish to expose, and based on the class, CXF will generate a WSDL file. In addition to
the WSDL file, CXF will generate a set of JAXB classes that are used to go from XML to Java and back again.
. We don’t write this WSDL file ourselves but generate it using the tools provided by CXF. For this we once again provide
a simple target in the Ant build file for this chapter. When you run this target, cxf-generate-bottom-up, CXF will inspect the Java class we wish to expose, and based on the class, CXF will generate a WSDL file. In addition to
the WSDL file, CXF will generate a set of JAXB classes that are used to go from XML to Java and back again.
The next thing we need to do is define the service and the endpoint for which we’re going to provide a web service. This information can be found in the generated WSDL file, just as we did for the top-down web service earlier:
<wsdl:service name="ChamberOfCommerceServiceImplService">
  <wsdl:port name="ChamberOfCommerceServiceImplPort"
      binding="tns:ChamberOfCommerceServiceImplServiceSoapBinding">
    <soap:address location="http://localhost:9090/hello"/>
  </wsdl:port>
</wsdl:service>
The names that are generated for the WSDL are also used in the ServiceMix configuration to define which service and port combination
we’d like to expose. This is done in the endpoint and service attributes
![]() in listing 7.15. If you look at the previous code fragment, you can also see a soap:address element. This element is used by ServiceMix to determine on which address it should expose the web service. You can see the
default generated address in this fragment. If you want to expose the service on a different address, you can just change
the value of the location attribute to the address you want to expose the web service on.
in listing 7.15. If you look at the previous code fragment, you can also see a soap:address element. This element is used by ServiceMix to determine on which address it should expose the web service. You can see the
default generated address in this fragment. If you want to expose the service on a different address, you can just change
the value of the location attribute to the address you want to expose the web service on.
The final task is telling ServiceMix which internal service to invoke when a message is received on this binding component.
We do this by specifying the targetEndpoint and targetService attributes
![]() ; as you can see in listing 7.15, these elements are the same as shown in the generated WSDL file.
; as you can see in listing 7.15, these elements are the same as shown in the generated WSDL file.
That’s all you have to configure. If you now run this example with the deploy-wsdl-bottom-up Ant target, the CXF binding component will start listening on http://localhost:9090/hello, or the address you specified in the generated WSDL file, and any call made to that HTTP endpoint will be forwarded to the
internal running service inside the CXF service engine (listing 7.14). This service engine will then call to the POJO to execute the business logic. As you can see in this listing, the external
exposed endpoint and service have the same name as the internal ones. As you’ll recall from chapter 2, a service endpoint uniquely identifies a service within the JBI container, and therefore this might seem strange. The reason
this can still work is that a difference exists between external service endpoints and internal endpoints. The first service
endpoint in listing 7.15 defines an external endpoint
![]() and calls an internal endpoint
and calls an internal endpoint
![]() . Because ServiceMix knows when to call an internal endpoint and when to call an external one, these two endpoints with the
same name can exist in the same JBI context.
. Because ServiceMix knows when to call an internal endpoint and when to call an external one, these two endpoints with the
same name can exist in the same JBI context.
So far you’ve seen how you can take advantage of the bottom-up and top-down approaches to use Mule and ServiceMix to provide web services that other parties can call. Let’s now look at how we can use Mule and ServiceMix to consume web services. We begin by looking at Mule.
7.3. Consuming web services
Calling existing web services using Mule and ServiceMix is not that hard. They both provide various implementations that you can use to access these web services. The web service that we access in this example is the web service we created in section 7.2. So if you want to know which operations are available, check out the WSDL defined at the beginning of this chapter.
7.3.1. Consuming web services with Mule
You’ve seen how to host a web service in Mule using CXF—now let’s look at consuming a web service using the same web services framework. The Mule configuration for consuming a web service is shown in listing 7.16.
Listing 7.16. Consuming web services using the CXF transport in Mule
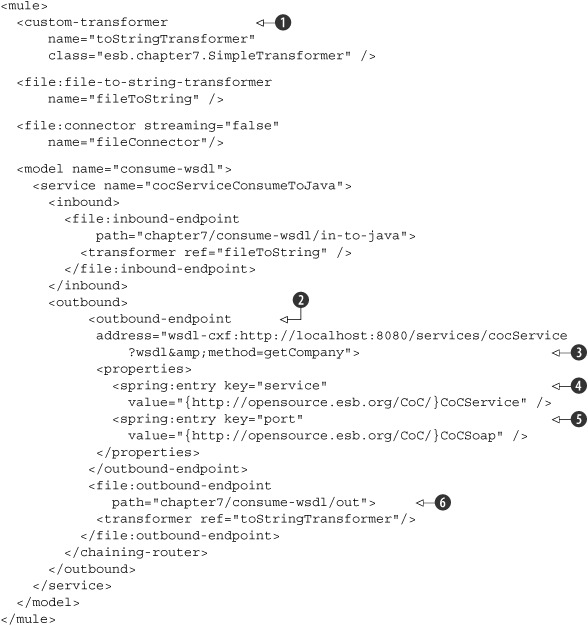
The Mule configuration for consuming a remote web service based on a WSDL is quite large, so let’s start at the top. First,
we include a number of transformer definitions
![]() . The first transformer is used to create a readable string from a JavaBean and is used in the file:outbound-endpoint
. The first transformer is used to create a readable string from a JavaBean and is used in the file:outbound-endpoint
![]() .
.
The outbound configuration shows a chaining router, which calls two endpoints. The first endpoint is the web service
![]() call. For this call we use Mule’s wsdl-cxf
call. For this call we use Mule’s wsdl-cxf
![]() endpoint. With this endpoint we can directly call an operation on a web service without having to generate any client code.
endpoint. With this endpoint we can directly call an operation on a web service without having to generate any client code.
In our example we use the wsdl-cxf endpoint to directly call into a WSDL. Mule also provides an alternative way of calling web services. You can call remote web services using the cxf:outbound endpoint. The main difference between these two approaches is that when you use the cxf:outbound endpoint, you first have to generate the client classes from the WSDL file using the WSDL2Java tool provided by CXF. This generated client class is then used by the cxf:outbound endpoint to call the web service.
Notice that we also specifiy a service
![]() and a port
and a port
![]() attribute. Mule uses these values to determine which service and port from the WSDL file it should make the call to (since
a WSDL file can contain multiple services and ports). Once the call is made, the result is sent to the next configured file
endpoint
attribute. Mule uses these values to determine which service and port from the WSDL file it should make the call to (since
a WSDL file can contain multiple services and ports). Once the call is made, the result is sent to the next configured file
endpoint
![]() , which writes the result from the web service to the file system.
, which writes the result from the web service to the file system.
To test this web service consumer, we also need a service provider. In listing 7.1 we showed you how you can use Mule to provide web services. If you run the chapter-7-top-down Ant task, you get a web service that you can use to test this example. Once you’ve started the web service, run the chapter-7-consume-ws target and drop the test file in the chapter7/consume-wsdl/in-to-java directory.
Before we discuss the WS-Security and WS-Addressing standards, we show you how to consume web services in ServiceMix.
7.3.2. Consuming web services using ServiceMix
When we want to consume web services in ServiceMix, we have to use a binding component since we’re communicating with a service outside the ESB. For this we use the CXF binding component from section 7.1.3, where we used the consumer element of the binding component. In other words, we made a web service available to external clients over HTTP and consumed an internal service.
In this example, we want to provide a service to an internal service and consume an external web service, so we have to configure a cxfbc:provider. Listing 7.17 shows the CXF binding component for this example.
Listing 7.17. Calling web services using the CXF binding component in ServiceMix
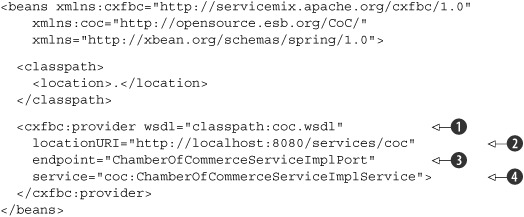
In listing 7.17 we specify a WSDL location
![]() for this CXF provider. This might seem strange, since we aren’t offering a web service ourselves but are calling an external
one. The reason is that all services and endpoints are self-describing in JBI. So with this WSDL specification, we provide
the description of this service so that internal services know how to access this service. To specify where the service is
running, we specify the locationURI
for this CXF provider. This might seem strange, since we aren’t offering a web service ourselves but are calling an external
one. The reason is that all services and endpoints are self-describing in JBI. So with this WSDL specification, we provide
the description of this service so that internal services know how to access this service. To specify where the service is
running, we specify the locationURI
![]() .
.
The attributes
![]() and
and
![]() identify the web service. It’s good practice (and also enforced by CXF) to use the same names specified by the web service
that we’re calling, since this provider serves as a proxy between internal services and an external web service and as such
provides exactly the same functionality. When you now send a message in the correct XML format to this service, the web service
will be called.
identify the web service. It’s good practice (and also enforced by CXF) to use the same names specified by the web service
that we’re calling, since this provider serves as a proxy between internal services and an external web service and as such
provides exactly the same functionality. When you now send a message in the correct XML format to this service, the web service
will be called.
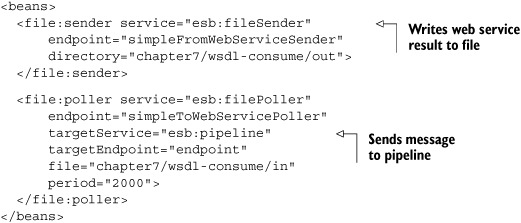
Let’s look at two other service units, which we use to read a file from the file system and use the file content to invoke the web service, and finally write the result of the web service call to a different directory. Let’s begin with the servicemix-file binding component (listing 7.18).
Listing 7.18. File configuration for reading from and writing files to the file system
Listing 7.18 configures a simple file poller that reads all incoming files from a directory and a file sender that writes files to a different directory. To connect the file sender and poller to the web service, we use a pipeline from the servicemix-eip component (listing 7.19).
Listing 7.19. EIP configuration that invokes the CXF service definition
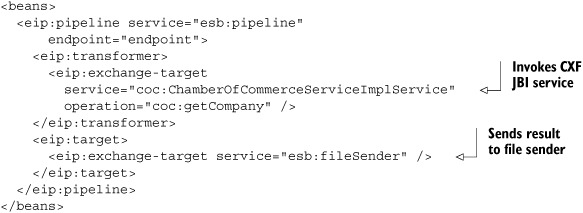
This pipeline definition in listing 7.19 is called from the file poller (listing 7.18) and makes a call to the service endpoint where the CXF web service provider is running. When the result from the web service comes back, it’s sent to the file sender component, which is registered on esb:fileSender.
We need this eip:pipeline because we have to deal with two different MEPs. When a file poller reads a file and sends the content to a service, this is done using the in-only MEP. The web service, however, expects an in-out MEP, since it can return results. We use the eip:pipeline to bridge the in-only MEP to an in-out MEP.
If you want to run this example, go to the resources/chapter7 directory of the ServiceMix workspace and execute the deploy-wsdl-consume Ant target from the ch7-build.xml Ant build file. Just as for the Mule example we once again need a web service to call. We can use the ServiceMix bottom-up or top-down example, but let’s use the Mule service. That way, you can see how easy it is to use web services as one way of integrating these two ESBs. Start up the chapter-7-top-down Ant task from the Mule workspace, and you get a web service that you can use to test this example. A test file is provided in the directory of this example.
So far you’ve seen how to provide and consume web services using Mule and ServiceMix. In the last part of this chapter, we look at two important web services standards: WS-Addressing and WS-Security. You’ll learn how Mule and ServiceMix support these standards.
7.4. Web service standards
Our examples so far have demonstrated how to use web services together with Mule and ServiceMix. Web services, however, are much more complex than just sending plain XML messages wrapped in a SOAP envelope. Currently there are over one hundred web services specifications, and each governs a specific area. For instance, transactions are covered by the WS-Transactions specification, message encryption is covered by the WS-Security specification, and so on.
We don’t have the space in this book to cover all these specifications, so we just focus on two important ones: WS-Security and WS-Addressing.
7.4.1. WS-Security
WS-Security is a standard that describes how to apply security to your SOAP messages. When we talk about security in this context, we’re referring to these following four concepts:
- Confidentiality— The information we send to a certain party is only accessible by those authorized to have access. When someone sends a message to our web service, and we want to guarantee confidentiality, we have to encrypt the message.
- Authenticity— We want to verify that when someone sends us a message we’re 100 percent certain that the sending party is who it claims to be. If we receive a message and let the sending party sign the message, we can use the signature to identify the sending party and be sure the message isn’t being sent by someone else.
- Integrity— If someone sends us a message, the message is routed through firewalls, over the internet, and through some routers before it finally arrives at its destination. During transit, the message could have been changed. We want to guarantee that the message hasn’t changed during transit. We can sign part of the data, and validate that data on the receiver end to determine whether the message has been tampered with.
- Nonreputability— When we receive and process messages—for instance, orders—the sending party shouldn’t be able to deny it sent the message. This is easily accomplished by just storing the raw content of a message that’s signed.
So how can we apply all of these requirements on a SOAP message that’s sent to our service? The answer is by encrypting and signing the data, and the WS-Security specification tells us how to do it.
WS-Security specifies more than just encryption and signing; it also specifies, for instance, how you can use SAML, timestamps, and so forth together for authentication. However, we don’t delve into those details in this section; we show how to use WS-Security to add encryption and signatures to SOAP message.
7.4.2. Using WS-Security with Mule
Mule supports WS-Security through the web service libraries it supports. So let’s look at securing your web service and calling secured web services by using Mule’s CXF support.
WS-Security and Mule for outgoing messages
Let’s first look at how to apply WS-Security to outgoing messages. We don’t show you the complete configuration in listing 7.20—just what you need to change in listing 7.16 to make the call secure.
Listing 7.20. Using Mule together with WS-Security for calling a secured web service
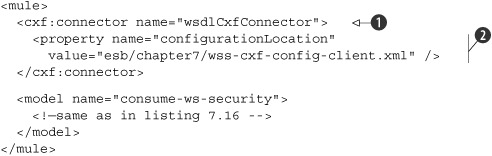
The only configuration we add in listing 7.20 is a cxf:connector
![]() . This CXF connector specifies how invocations to external web services using the CXF endpoint are made. The important part
is the configurationLocation property
. This CXF connector specifies how invocations to external web services using the CXF endpoint are made. The important part
is the configurationLocation property
![]() . This property points to an external CXF configuration file, where we indicate how CXF should deal with WS-Security (listing 7.21).
. This property points to an external CXF configuration file, where we indicate how CXF should deal with WS-Security (listing 7.21).
Listing 7.21. CXF configuration for securing outgoing web service calls
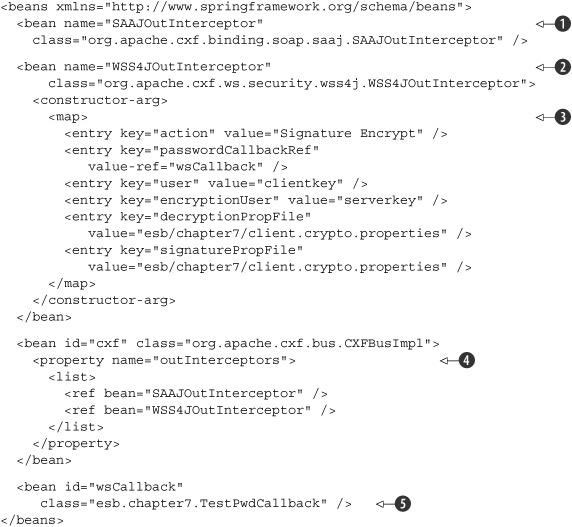
To get WS-Security to be applied to all our outgoing messages, we add a WS-Security specific interceptor
![]() . As you can see, we add two interceptors. This is necessary because the SAAJOutInterceptor
. As you can see, we add two interceptors. This is necessary because the SAAJOutInterceptor
![]() prepares the content of the message so that the WSS4JOutInterceptor
prepares the content of the message so that the WSS4JOutInterceptor
![]() can work with it. Before looking at the details of the WS-Security configuration
can work with it. Before looking at the details of the WS-Security configuration
![]() , let’s quickly examine the other parts.
, let’s quickly examine the other parts.
As you can see, we add the configured interceptors to the CXFBusImpl
![]() . By doing this, we ensure that all the outgoing web service calls use WS-Security. We also specify a password callback
. By doing this, we ensure that all the outgoing web service calls use WS-Security. We also specify a password callback
![]() , which is used when private keys need to be retrieved from the keystore. The most interesting part of this configuration,
however, is
, which is used when private keys need to be retrieved from the keystore. The most interesting part of this configuration,
however, is
![]() . This element contains WS-Security for Java (WSS4J)-specific properties (see table 7.1).
. This element contains WS-Security for Java (WSS4J)-specific properties (see table 7.1).
Table 7.1. An overview of WSS4J security properties
|
Name |
Description |
|---|---|
| signaturePropFile | Defines the crypto properties for WSS4J. This file is used when signing a message or when checking a signature. |
| decryptionPropFile | Defines another set of crypto properties for WSS4J. Just as the signaturePropFile was used for the signing part, this file is used for encryption and decryption of the SOAP messages. In our case, this points to the same file. |
| action | Specifies what to do with the message. In this case, we specified Signature and Encrypt. As the name implies, this signs and encrypts the SOAP body. |
| user | Refers to the alias stored in the keystore, which is used for signing. |
| passwordCallbackClass | Returns the password for the specified user. This password is then used to get the correct key out of the keystore. This property is needed here since we want to retrieve the private key from the keystore. |
| encryptionUser | Indicates the name of the key used for encryption. No password is required, since this is just a public key. |
Let’s look at the properties described in table 7.1 in greater detail. We begin by looking at the client.crypto.properties file (listing 7.21). This file configures how we access the keystore where the certificates are stored:
org.apache.ws.security.crypto.provider =
    org.apache.ws.security.components.crypto.Merlin
org.apache.ws.security.crypto.merlin.keystore.type = jks
org.apache.ws.security.crypto.merlin.keystore.password = storePass
org.apache.ws.security.crypto.merlin.file =
    esb/chapter7/clientStore.jks
This file configures how WSS4J accesses the keystore. The first property you see here points to a WSS4J-specific implementation, which handles the encrypting and signing of the data. The other properties define where WSS4J can find the keystore and how the keystore is accessed. In this case, we have a Java KeyStore (JKS) store (the default format in Java) that’s located in the classpath at esb/chapter7/clientStore.jks and that has a password of storePass.
Whenever WSS4J needs to access the keystore, it will use this information. As shown in table 7.1, the user property and the encryptionUser property must match a key’s alias, which is stored in the keystore configured by the client.crypto.properties file. The keystore from the crypto.properties file also relates to the passwordCallback class; to access a private key, identified by the user property (which is used for signing), we require a password supplied by this passwordClass.
An action defines what needs to be done with the XML message. In this case, we want to add a signature to the message and encrypt the message, so we define that as the actions to execute: Signature and Encrypt.
When signing a message, we use a private key from the keystore to create a signature of the XML that we’ll send. This signature can be validated by the server to check whether the message has been tampered with during transport, and whether the sender is who it claims to be. If the message is changed during transport, the signature check will fail, and if a different private key is used, which means someone is pretending to be someone else, the signature check will also fail, since we won’t have that sender’s public key inour keystore. Figure 7.5 summarizes the signing and encryption of messages.
Figure 7.5. Example showing signing and encryption of a message
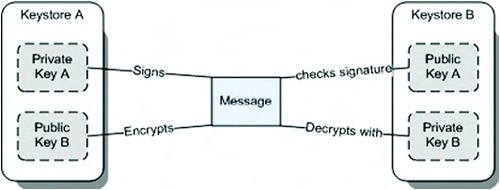
As shown in figure 7.5, for the encryption part the public key of the server is used, and the server decrypts the message using its own private key. This way, no one can read the message while it’s in transit and only the intended recipient can decrypt the message.
Well, that was WS-Security for outgoing messages and an introduction to how WSS4J is configured. We’ll see these same configuration elements in the sections that follow.
WS-Security and Mule for incoming messages
So far you’ve seen how to secure the outgoing messages. When we want to do this on incoming messages, we use a similar configuration, since we need the same information. We just show the changed code in regard to listing 7.13’s Mule configuration (listing 7.22).
Listing 7.22. Using Mule and WS-Security to provide security to incoming messages
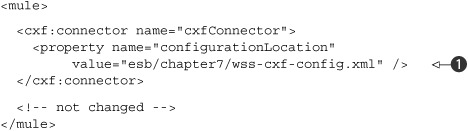
What you see in listing 7.22 is much the same as the outgoing configuration in listing 7.21. We point to an external file, which holds the WS-Security configuration
![]() . Listing 7.23 shows the CXF configuration that is referenced here.
. Listing 7.23 shows the CXF configuration that is referenced here.
Listing 7.23. CXF configuration for securing incoming web service calls
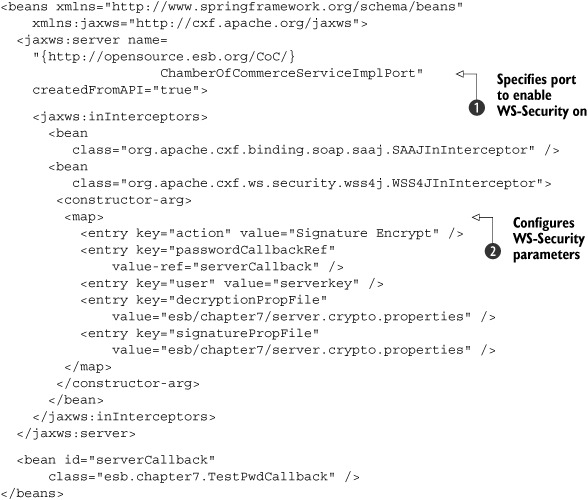
In listing 7.23, we specify WSS4J settings
![]() that define how to decrypt and validate a signature. The biggest difference here is that we don’t apply these settings on
all the CXF-provided web services, but only on the one with the specified fully qualified port name
that define how to decrypt and validate a signature. The biggest difference here is that we don’t apply these settings on
all the CXF-provided web services, but only on the one with the specified fully qualified port name
![]() . You can easily find out this name when you look at the WSDL file for the service you’re providing.
. You can easily find out this name when you look at the WSDL file for the service you’re providing.
The Mule support for WS-Security goes further than what we explain here, since WSS4J, which Mule use for WS-Security, has many more options. What we’ve seen so far however, are the most common WS-Security features. Let’s look at the configuration of the same features in ServiceMix.
7.4.3. Using WS-Security with ServiceMix
To use WS-Security with ServiceMix, you use pretty much the same configuration you’d use with Mule—which isn’t that strange since they both use CXF and WSS4J. Because we already created the initial example for ServiceMix with CXF, we don’t have to change much of the configuration. We only have to extend the previous examples with some WSS4J-specific properties.
WS-Security and ServiceMix for outgoing messages
Listing 7.24 shows how we configure ServiceMix to consume messages based on a WSDL file.
Listing 7.24. Consuming web services using the CXF binding component
<beans xmlns:cxfbc="http://servicemix.apache.org/cxfbc/1.0"
  xmlns:coc="http://opensource.esb.org/CoC/"
  xmlns="http://xbean.org/schemas/spring/1.0">

  <classpath>
    <location>.</location>
  </classpath>

  <cxfbc:provider wsdl="classpath:coc.wsdl"
    locationURI="http://localhost:8080/services/coc"
    endpoint="ChamberOfCommerceServiceImplPort"
    service="coc:ChamberOfCommerceServiceImplService">
  </cxfbc:provider>

</beans>
To add WS-Security support to the CXF provider, we need to add a number of CXF interceptors, as shown in listing 7.25.
Listing 7.25. Consuming a web service that’s secured using WS-Security
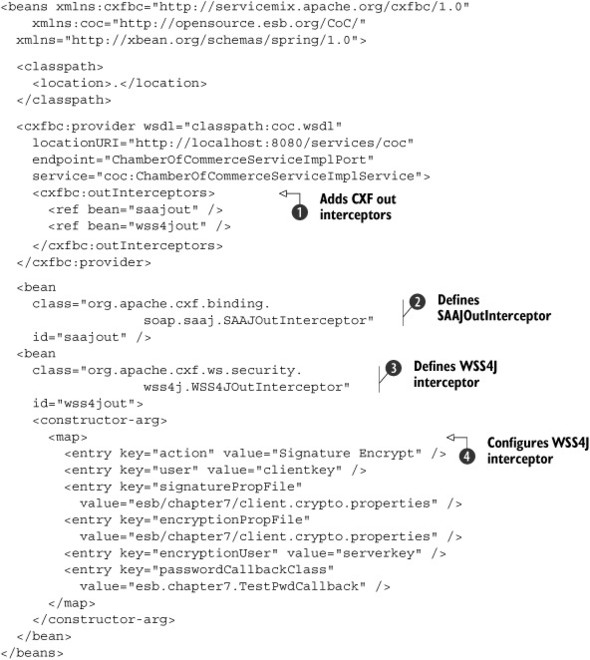
In listing 7.25, we add two interceptors
![]() . The first one, SAAJOutInterceptor
. The first one, SAAJOutInterceptor
![]() , makes a DOM object from an XML message. This is needed for the WSS4JOut-Interceptor
, makes a DOM object from an XML message. This is needed for the WSS4JOut-Interceptor
![]() , which handles the signing and encryption of the message. We also configure the actions
, which handles the signing and encryption of the message. We also configure the actions
![]() that need to be applied—signing and encryption in this case—and we specify the property file that defines how the keystore
is accessed.
that need to be applied—signing and encryption in this case—and we specify the property file that defines how the keystore
is accessed.
We use the same password callback class as we did for the Mule example. This passwordCallback returns the password needed to access the private key in the keystore, which is used for signing the message. When you now run this example, the message that’s sent will be signed with the private key (which has an alias named clientkey) and will be encrypted using the public key (which is stored as serverkey in the keystore).
WS-Security and ServiceMix for incoming messages
To enable WS-Security on the web services we offer, we use a similar configuration. This time, however, we define incoming interceptors, and we can remove the encryption alias. The CXF binding component configuration for this example is shown in listing 7.26.
Listing 7.26. Providing a web service that’s secured using WS-Security

We define two interceptors
![]() in listing 7.26. SAAJInInterceptor
in listing 7.26. SAAJInInterceptor
![]() will transform the incoming message to a DOM message so that it can be processed by WSS4J-InInterceptor. WSS4JInInterceptor
will transform the incoming message to a DOM message so that it can be processed by WSS4J-InInterceptor. WSS4JInInterceptor
![]() applies the specified WS-Security actions
applies the specified WS-Security actions
![]() on the incoming message.
on the incoming message.
In this example, we specify the action as Signature Encrypt. This means that we first decrypt the message, using the private key with the alias serverkey, and then check the signature. We don’t need to specify the key to check the signature with, since its serial identification is included in the XML message and is used to get the correct key from the keystore.
As you can see, using WS-Security on your messages from ServiceMix isn’t difficult. The most difficult part is understanding all the private and public keys and the various configuration options.
In the last section of this chapter, we explore the WS-Addressing specification. This standard is becoming increasingly popular and provides great functionality.
7.4.4. WS-Addressing
WS-Addressing is a popular specification that can be used to specify addressing information using headers inside the SOAP message. One of the reasons this specification was created was because with web services, part of the addressing is normally done outside the message. For instance, when we send a SOAP message, the address where we sent the message is specified outside the message. This is an HTTP address or an SMTP address.
When we’re doing direct point-to-point communication this isn’t such big an issue, but when we have a number of intermediaries between the client and the server, this process can become a problem. The WS-Addressing specification identifies a number of SOAP headers that are used to address a message. In this section, we show you how Mule and ServiceMix handle the following headers:
- wsa:To— Specifies the destination where the message should be sent. For instance, when we have a central entry point for all our web services, we can route the message based on this header.
- wsa:ReplyTo— Allows the sending party to specify an URL where the response of the message will be sent to.
- wsa:messageID— Uniquely identifies the message.
- wsa:relatesTo— Used to indicate that this message is related to another message. When we use replyTo we can add this field to the response message and set the content to point to the messageID of the request. That way, the recipient can easily correlate the request to the response.
- wsa:Action— Defines the action that needs to be executed by the recipient. This could, for instance, be mapped to a certain operation on a web service.
Let’s start by looking at Mule’s support for WS-Addressing.
7.4.5. Using WS-Addressing in Mule
Mule supports WS-Addressing through its Apache CXF connector. If you want to use WS-Addressing in Mule, you have to create a CXF endpoint and specify a CXF configuration file that defines how you want to use WS-Addressing. Listing 7.27 shows how to configure an incoming web service endpoint that can process ws:addressing headers.
Listing 7.27. WS-Addressing–enabled inbound endpoint for Mule using CXF
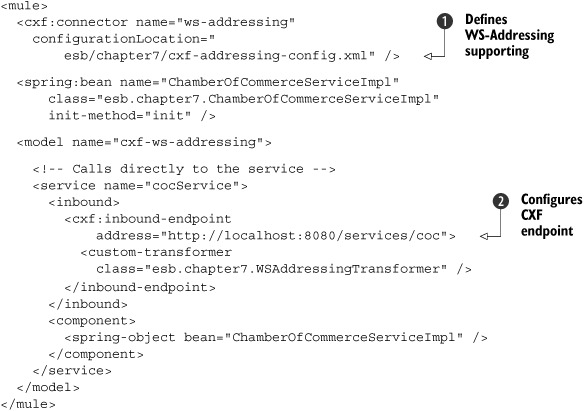
In listing 7.27, we use a CXF-based HTTP inbound endpoint
![]() , which uses the CXF connector
, which uses the CXF connector
![]() . On this CXF connector, we override the default CXF configuration and specify our own: cxf-addressing-config.xml. The rest of this configuration is just the same as in the Mule bottom-up example. So when we make a call to the address
specified with the inbound endpoint
. On this CXF connector, we override the default CXF configuration and specify our own: cxf-addressing-config.xml. The rest of this configuration is just the same as in the Mule bottom-up example. So when we make a call to the address
specified with the inbound endpoint
![]() , the call is routed to the specified component class. Let’s look at the cxf-addressing-config.xml file, which specifies that we want to use WS-Addressing:
, the call is routed to the specified component class. Let’s look at the cxf-addressing-config.xml file, which specifies that we want to use WS-Addressing:
<beans>
  <jaxws:server name="{http://opensource.esb.org/CoC/}
         ChamberOfCommerceServiceImplPort" createdFromAPI="false">
    <jaxws:features>
       <wsa:addressing usingAddressingAdvisory="true" />
    </jaxws:features>
  </jaxws:server>
</beans>
In this code fragment, the WS-Addressing specific configuration for CXF is defined. With the CXF configuration, we can add features to a web service—in this case, the feature wsa:addressing. This feature is applied only to the web service that matches the specified name. For more detailed information on how to use WS-Addressing, check the CXF website (http://cxf.apache.org), which provides extensive demos on how to configure and use this feature. Before showing how you can use WS-Addressing in ServiceMix, let’s quickly look at accessing the WS-Addressing headers from Mule.
Mule doesn’t provide a standard transformer or filter for these headers, but creating one is easy, so that’s what we do (listing 7.28).
Listing 7.28. Mule transformer that accesses the WS-Addressing headers
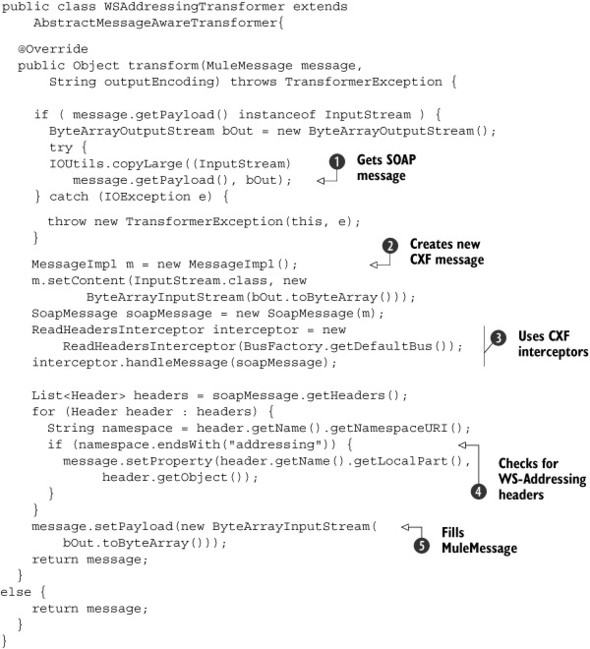
Listing 7.28 first uses CXF
![]() to parse the input message
to parse the input message
![]() to a SOAP message. This SOAP message is again parsed by CXF to get to the headers of the SOAP message
to a SOAP message. This SOAP message is again parsed by CXF to get to the headers of the SOAP message
![]() .
.
Then we implement a bit of logic to check for WS-Addressing headers
![]() . If any WS-Addressing headers are found, they’re stored in the properties of the Mule message. Finally, we set a new stream
in the Mule message
. If any WS-Addressing headers are found, they’re stored in the properties of the Mule message. Finally, we set a new stream
in the Mule message
![]() so that further processing isn’t interrupted. We can now configure this transformer on a web service–based endpoint. After
this transformer is applied, we can access the WS-Addressing properties from everywhere, using them for content-based routing,
for example.
so that further processing isn’t interrupted. We can now configure this transformer on a web service–based endpoint. After
this transformer is applied, we can access the WS-Addressing properties from everywhere, using them for content-based routing,
for example.
Let’s move on to the WS-Addressing functionality provided by ServiceMix.
7.4.6. Using WS-Addressing in ServiceMix
ServiceMix supports the WS-Addressing standard with its CXF binding component. This component automatically parses the WS-Addressing action and WS-Addressing To headers, and you can use them automatically for routing the incoming message to a service endpoint. So by specifying a specific wsa:to and wsa:action header in the incoming message, the service consumer can easily call different services provided by the JBI container:
- wsa:Action— Can be used to specify the target interface and the target operation
- wsa:To— Can be used to specify which service name and endpoint name to forward the message to
Both these headers use a custom format to determine either which interface/operation to send the message to, or to determine which service endpoint to invoke. Let’s start by looking at the format used by the wsa:Action header:
[target namespace][delimiter][interface][delimiter][operation]
These elements are explained in detail in table 7.2.
Table 7.2. The wsa:Action header used in ServiceMix
|
Name |
Description |
|---|---|
| Target namespace | The namespace of the interface that we want to call |
| Delimiter | Either : (if the namespace is a URN) or /otherwise |
| Interface | The name of the interface we want to call |
| Operation | The name of the operation on the interface we want to invoke |
Here’s an example:
<wsa:Action>http://osesb.org/CoCService/GetCompany</wsa:Action>
If we specify this action, the CXF BC will forward the message to a service endpoint that implements the CoCService interface and has a namespace equal to http://osesb.org. On this JBI service, the GetCompany operation will be invoked.
For the wsa:To header, the same construct is used, but now we specify the service and the endpoint name instead of the interface and the operation name:
[target namespace][delimiter][service][delimiter][endpoint]
Table 7.3 explains the background of these elements in more detail.
Table 7.3. The wsa:To header used in ServiceMix
|
Name |
Description |
|---|---|
| Target namespace | The namespace of the service that we want to call |
| Delimiter | Either : (if the namespace is a URN) or /otherwise |
| Service | The name of the service we want to call |
| Endpoint | The name of the endpoint on the service that we’ll invoke |
Here’s a simple example:
<wsa:To>urn:osesb:cocservice:simpleEndpoint</wsa:To>
The message will be automatically routed to a service with the name cocservice, which uses the namespace urn:osesb. On this service, the message will be sent to the simpleEndpoint endpoint.
Working with WS-Addressing in ServiceMix is easy. You don’t have to configure anything, and you can use the WS-Addressing headers directly. For ServiceMix you can also use more advanced WS-Addressing features, but that topic is beyond the scope of this book. If you’re interested in using these features, visit the CXF website.
7.5. Summary
This chapter described how to work with web services using Mule and ServiceMix. The top-down example illustrated how you can easily take a WSDL file and create a web service implementation from that WSDL using Mule and ServiceMix.
Even when you don’t get the WSDL file from an external party, using a top-down approach is smart, especially when you’re offering services to .NET consumers. Be sure to start with a good WSDL design to allow for easy integration.
Suppose you need to expose some functionality for other applications in your organization. The bottom-up approach is a quick way to get everything up and running. Just use Mule or ServiceMix to expose a Java interface and you’re done—but make sure the quality of the generated WSDL is sufficient.
Just providing web services isn’t always enough. In a large organization, a number of different web services are available, such as web services that handle authentication or allow you to retrieve customer information. For these services, you’re usually provided with a WSDL file. You use this file to call the specific operation on the service. As you’ve seen in this chapter, this is easy to do using either Mule or ServiceMix.
In the last part of this chapter, we looked at two WS-* specifications. We started with WS-Security, which allows you to apply certain security aspects to your messages. Encrypting and signing your messages is a good thing, especially when you’re calling or providing services that use the internet for communication.
Finally, we showed you how to work with WS-Addressing. The biggest advantage of this specification is that it allows you to specify all the routing information inside the message, independent of the transport used. With WS-Addressing it’s easy to implement web service proxies and expose certain operations based on the wsa:Action that was specified.
In this chapter we mainly talked about communicating with the outside world. In the next chapter, we’ll dive into some more internal features of the ESB, such as error handling, transaction support, and security. These are features needed to run an ESB in an enterprise environment.