Configuring the Management Station
You will recall that configuring a collection station does nothing by itself. Indeed, during a large NNM deployment it is prudent to preconfigure all collection stations so they are ready when the management station is brought online. The actual management station to collection station relationship is initiated at the management station. There may be more than one management station in cases where high availability is required.
Begin the management station configuration process by turning off autodiscovery in the polling menu.
The management station must be configured to include all device community strings, icons, oid_to_type, and other such customized files consistent with those on all the collection stations.
A collection station must be present in the management station’s object database before the collection-to-management relationship can be established. Manually add them to the management station ovw map if you like, but listing the collection stations in a seedfile may be preferable to you. Remember the first time you define a seedfile in $OV_LRF/netmon.lrf you must register the change using $OV_BIN/ ovaddobj $OV_LRF/netmon.lrf and stop and start netmon. If you edit only the seedfile, you need only stop and restart netmon.
Note that, by default, netmon will attempt to add the NNM system name to the trap destination list for each SNMP agent it communicates with. This means each collection station will have a trap destination entry in the snmpd.conf file. If this causes problems at your installation, you can prevent this behavior by including the -N flag in the netmon.lrf file. Note that starting with the NNM 6.0 release, netmon will use the SNMP set community name configured through xnmsnmpconf when adding and removing trap destination entries (rather than the mechanism used in previous releases which bypassed normal SNMP authentication measures).
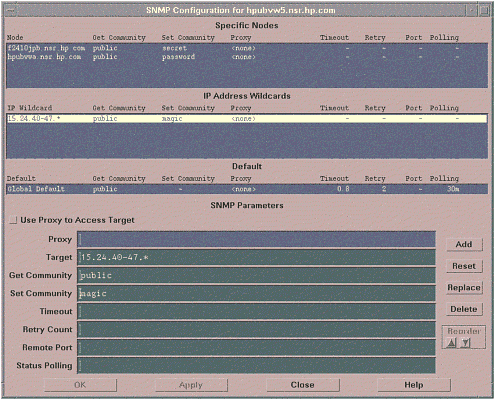
The management station must be configured with the set-community-names for the collection stations, as seen in Figure 6-2.
Figure 6-2. Defining collection station community strings.
Enter the community strings manually. Since they are often identical for each collection station, a few minutes of work is all it takes to configure even a few dozen.
Check that all the collection stations are known to the management station by typing this command:
$OV_BIN/ovtopodump -Lr | more
Known collection stations are given at the beginning of the list. This version of ovtopodump is very useful because it gives a concise one-line entry per device, including the MAC address.
It’s time for the magic. Establish the collection station relationship at the management station by opening a shell window and typing:
$OV_BIN/xnmtopoconf -manage collection_station_name
Repeat this command for every collection station. You can monitor the progress of the devices import process by opening the configuration alarm category and watching imported nodes scroll by in the list. However, be aware that the event correlation system (ECS) may correlate these events so they don’t scroll by.
To check the relationship status to a collection station, type:
$OV_BIN/xnmtopoconf -print collection_station_name
After perhaps an hour, all collection stations will have been interrogated and the management station will assemble a composite database of network devices. Some devices known to the management station may be imported from two or more collection stations because of the overlapping patches of their management domains. A primary collection station is designated for such a device. It is possible to set a preferred collection station and to change the overlap using xnmtopoconf.