
When I first started evaluating Coherence, one of my biggest concerns was how easy it would be to set up and use, especially in a development environment. The whole idea of having to set up a cluster scared me quite a bit, as any other solution I had encountered up to that point that had the word "cluster" in it was extremely difficult and time consuming to configure.
My fear was completely unfounded—getting the Coherence cluster up and running is as easy as starting Tomcat. You can start multiple Coherence nodes on a single physical machine, and they will seamlessly form a cluster. Actually, it is easier than starting Tomcat.
In this chapter, you will learn how to install Coherence on your machine and how to configure your development environment to make working with Coherence as easy as possible. We will then cover the basics of the Coherence API as we develop a small utility that will allow us to import data into Coherence from CSV files. Finally, we will talk about testing, which due to the distributed nature of Coherence applications, can be a bit trickier than usual.
But first things first…
In order to install Coherence you need to download the latest release from the Oracle Technology Network (OTN) website. The easiest way to do so is by following the link from the main Coherence page on OTN. At the time of this writing, this page was located at http://www.oracle.com/technology/products/coherence/index.html, but that might change. If it does, you can find its new location by searching for 'Oracle Coherence' using your favorite search engine.
In order to download Coherence for evaluation, you will need to have an Oracle Technology Network (OTN) account. If you don't have one, registration is easy and completely free.
Once you are logged in, you will be able to access the Coherence download page, where you will find the download links for all available Coherence releases: one for Java, one for .NET, and one for each of the supported C++ platforms.
You can download any of the Coherence releases you are interested in while you are there, but for the remainder of this chapter and a large part of this book you will only need the first one. The latter two (.NET and C++) are client libraries that allow .NET and C++ applications to access the Coherence data grid, and will be covered towards the end of the book.
Coherence ships as a single ZIP archive. Once you unpack it you should see the README.txt file containing the full product name and version number, and a single directory named coherence. Copy the contents of the coherence directory to a location of your choice on your hard drive. The common location on Windows is c:coherence and on Unix/Linux /opt/coherence, but you are free to put it wherever you want.
The last thing you need to do is to configure the environment variable COHERENCE_HOME to point to the top-level Coherence directory created in the previous step, and you are done.
Note
Coherence is a Java application, so you also need to ensure that you have the Java SDK 1.4.2 or later installed and that JAVA_HOME environment variable is properly set to point to the Java SDK installation directory.
If you are using a JVM other than Sun's, you might need to edit the scripts used in the following section. For example, not all JVMs support the -server option that is used while starting the Coherence nodes, so you might need to remove it.
The first thing you should do after installing Coherence is become familiar with the structure of the Coherence installation directory.
There are four subdirectories within the Coherence home directory:
bin:This contains a number of useful batch files for Windows and shell scripts for Unix/Linux that can be used to start Coherence nodes or to perform various network testsdoc:This contains the Coherence API documentation, as well as links to online copies of Release Notes, User Guide, and Frequently Asked Questions documentsexamples:This contains several basic examples of Coherence functionalitylib:This contains JAR files that implement Coherence functionality
In order to get the Coherence cluster up and running, you need to start one or more Coherence nodes. The Coherence nodes can run on a single physical machine, or on many physical machines that are on the same network. The latter will definitely be the case for a production deployment, but for development purposes you will likely want to limit the cluster to a single desktop or laptop.
The easiest way to start a Coherence node is to run cache-server.cmd batch file on Windows or cache-server.sh shell script on Unix. The end result in either case should be similar to the following screenshot:
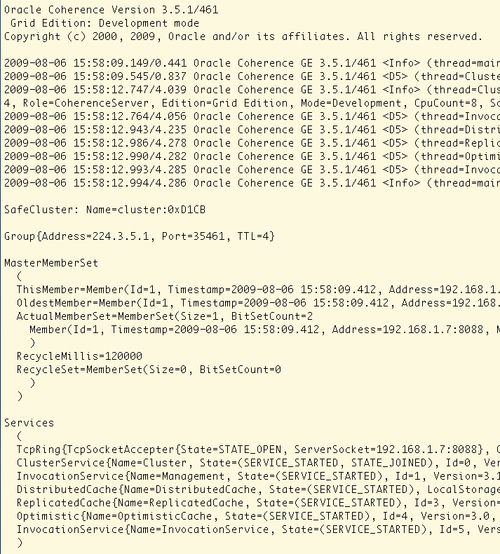
There is quite a bit of information on this screen, and over time you will become familiar with each section. For now, notice two things:
At the very top of the screen, you can see the information about the Coherence version that you are using, as well as the specific edition and the mode that the node is running in. Notice that by default you are using the most powerful, Grid Edition, in development mode.
The
MasterMemberSetsection towards the bottom lists all members of the cluster and provides some useful information about the current and the oldest member of the cluster.
Now that we have a single Coherence node running, let's start another one by running the cache-server script in a different terminal window.
For the most part, the output should be very similar to the previous screen, but if everything has gone according to the plan, the MasterMemberSet section should reflect the fact that the second node has joined the cluster:
MasterMemberSet
(
ThisMember=Member(Id=2, ...)
OldestMember=Member(Id=1, ...)
RecycleMillis=120000
RecycleSet=MemberSet(Size=0, BitSetCount=0)
)
You should also see several log messages on the first node's console, letting you know that another node has joined the cluster and that some of the distributed cache partitions were transferred to it.
If you can see these log messages on the first node, as well as two members within the ActualMemberSet on the second node, congratulations—you have a working Coherence cluster.
In some cases, a Coherence node will not be able to start or to join the cluster. In general, the reason for this could be all kinds of networking-related issues, but in practice a few issues are responsible for the vast majority of problems.
By far the most common issue is that multicast is disabled on the machine. By default, Coherence uses multicast for its cluster join protocol, and it will not be able to form the cluster unless it is enabled. You can easily check if multicast is enabled and working properly by running the multicast-test shell script within the bin directory.
If you are unable to start the cluster on a single machine, you can execute the following command from your Coherence home directory:
This will limit time-to-live of multicast packets to the local machine and allow you to test multicast in isolation. If everything is working properly, you should see a result similar to the following:
Starting test on ip=Aleks-Mac-Pro.home/192.168.1.7, group=/237.0.0.1:9000, ttl=0
Configuring multicast socket...
Starting listener...
Fri Aug 07 13:44:44 EDT 2009: Sent packet 1.
Fri Aug 07 13:44:44 EDT 2009: Received test packet 1 from self
Fri Aug 07 13:44:46 EDT 2009: Sent packet 2.
Fri Aug 07 13:44:46 EDT 2009: Received test packet 2 from self
Fri Aug 07 13:44:48 EDT 2009: Sent packet 3.
Fri Aug 07 13:44:48 EDT 2009: Received test packet 3 from self
If the output is different from the above, it is likely that multicast is not working properly or is disabled on your machine.
This is frequently the result of a firewall or VPN software running, so the first troubleshooting step would be to disable such software and retry. If you determine that was indeed the cause of the problem you have two options. The first, and obvious one, is to turn the offending software off while using Coherence.
However, for various reasons that might not be an acceptable solution, in which case you will need to change the default Coherence behavior, and tell it to use the Well-Known Addresses (WKA) feature instead of multicast for the cluster join protocol.
Doing so on a development machine is very simple—all you need to do is add the following argument to the JAVA_OPTS variable within the cache-server shell script:
-Dtangosol.coherence.wka=localhost
With that in place, you should be able to start Coherence nodes even if multicast is disabled.
Note
Localhost and loopback address
On some systems, localhost maps to a loopback address, 127.0.0.1.
If that's the case, you will have to specify the actual IP address or host name for the tangosol.coherence.wka configuration parameter. The host name should be preferred, as the IP address can change as you move from network to network, or if your machine leases an IP address from a DHCP server.
As a side note, you can tell whether the WKA or multicast is being used for the cluster join protocol by looking at the section above the MasterMemberSet section when the Coherence node starts.
If multicast is used, you will see something similar to the following:
Group{Address=224.3.5.1, Port=35461, TTL=4}
The actual multicast group address and port depend on the Coherence version being used. As a matter of fact, you can even tell the exact version and the build number from the preceding information. In this particular case, I am using Coherence 3.5.1 release, build 461.
This is done in order to prevent accidental joins of cluster members into an existing cluster. For example, you wouldn't want a node in the development environment using newer version of Coherence that you are evaluating to join the existing production cluster, which could easily happen if the multicast group address remained the same.
On the other hand, if you are using WKA, you should see output similar to the following instead:
WellKnownAddressList(Size=1,
WKA{Address=192.168.1.7, Port=8088}
)
Using the WKA feature completely disables multicast in a Coherence cluster, and is recommended for most production deployments, primarily due to the fact that many production environments prohibit multicast traffic altogether, and that some network switches do not route multicast traffic properly.
That said, configuring WKA for production clusters is out of the scope of this book, and you should refer to Coherence product manuals for details.
Another issue that sometimes comes up is that one of the ports that Coherence attempts to bind to is already in use and you see a bind exception when attempting to start the node.
By default, Coherence starts the first node on port 8088, and increments port number by one for each subsequent node on the same machine. If for some reason that doesn't work for you, you need to identify a range of available ports for as many nodes as you are planning to start (both UDP and TCP ports with the same numbers must be available), and tell Coherence which port to use for the first node by specifying the tangosol.coherence.localport system property. For example, if you want Coherence to use port 9100 for the first node, you will need to add the following argument to the JAVA_OPTS variable in the cache-server shell script:
Now that you have the Coherence data grid up and running, the next step is to put some data into the grid and check if we can retrieve it. After all, a data grid without any data is not a very useful thing.
You will shortly learn how to use the Coherence APIs to store and retrieve your application data from the grid, but for now let's keep things simple and use the Coherence command-line utility to perform basic grid operations.
Coherence ships with a command-line utility that allows you to manipulate caches within a data grid. Keep your grid nodes running and launch Coherence console by executing the coherence.sh/cmd script within the bin directory.
For the most part the resulting screen looks exactly the same as the screens for the previously started Coherence nodes. As a matter of fact, the Coherence console is a Coherence node, and you can see that it has joined the cluster as the third member.
The only significant difference is the prompt at the bottom of the screen:
Map (?):
This is where you can enter various commands to create caches, put values into them and get values from them, and perform many other operations. I will show you how to perform some of those tasks in this section, but keep in mind that the full description of the Coherence console functionality is out of the scope of this book. If you would like to learn more, feel free to consult the Coherence manuals for more details.
Note
Warning: Use at your own risk
The Coherence console is a development tool and should not be used in production. Many things can go wrong, and you can easily loose data not only in the Coherence cache, but in the underlying data store as well if you are not careful.
Now that you can't say you haven't been warned, let's see what we can do with it ☺.
The first thing you need to do in order to store some data in the grid is to create a named cache. This can be easily accomplished from the console prompt, using the cache command:
Map (?): cache countries
This will create a cache with the name countries. You can later use that name to obtain a reference to the cache programmatically.
You will notice that the prompt changed to:
Map (countries):
This tells us that the currently active cache is the one we just created. What this means is that all the commands we execute next will be executed against that cache.
Now that we have an active cache, let's put some data into it. This is also very simple—all we need to do is to execute the put command as many times as we want:
Map (countries): put USA "United States"
Map (countries): put GBR "United Kingdom"
Map (countries): put RUS Russia
Map (countries): put CHN China
Map (countries): put JPN Japan
Map (countries): put DEU Germany
Map (countries): put FRA France
Map (countries): put ITA Italy
Map (countries): put SRB Serbia
As you can see, the put command takes two arguments—key and value. If either of the two arguments contains a space, it has to be enclosed in quotes in order to be parsed properly.
You will also notice that each put command returns null (which was intentionally omitted earlier to reduce clutter). Actually, each cache put returns the old cache value for the specified key. In this case, we started with an empty cache, which is why null was returned for each command. If you modify an existing value, you will see that the original value is returned:
Map (countries): put USA "United States of America"
United States
We can now use the list command to see a list of all cache entries:
Map (countries): list
JPN = Japan
SRB = Serbia
CHN = China
GBR = United Kingdom
ITA = Italy
FRA = France
USA = United States of America
DEU = Germany
RUS = Russia
Notice that the Coherence cache behaves exactly like the standard HashMap and provides no order guarantees for cache items. This is typically not an issue, but it is good to know.
If you only want to find out how many items are in the cache, you can use the size command:
Map (countries): size
9
Now, that we have some data in the cache, we can retrieve a single item from it, using the get command:
Map (countries): get SRB
Serbia
Or we can delete an item using the remove command:
Map (countries): remove SRB
Serbia
Similar to a put command, remove returns the value that was just deleted from the cache.
You can verify that the item was indeed removed by issuing a list or size command again:
Map (countries): list
JPN = Japan
CHN = China
GBR = United Kingdom
ITA = Italy
FRA = France
USA = United States of America
DEU = Germany
RUS = Russia
Map (countries): size
8
Now, as much fun as all of this is, it won't take you long to realize that the Coherence console has some limitations. For one, the fact that you can only use primitive types, such as numbers and strings, for cache keys and values, will put fairly severe constraints on what you can accomplish.
In the next section, we will see how you can work with Coherence caches programmatically, and how you can store instances of your custom classes within the data grid. However, before we do that, let me show you why Coherence can have such a positive impact on your application's availability and reliability.
Switch to one of the Coherence nodes you started at the beginning of this chapter and stop it by pressing Ctrl+C. Now go back to the console window and issue a list command. You will notice that all the data is still there. To prove that I'm not playing any Jedi mind tricks on you, start a brand new Coherence node and after it comes up and joins the cluster, kill the other cache server node that you started earlier. Once again, list all the items in the cache from the console and you will see that no data was lost even though both of the original storage nodes have disappeared. Basically, as long as there are enough storage nodes in the grid to hold all the data, the data will be safe.
We will explore in detail why this is the case in the next chapter, but for now let's see how we can configure the development environment in order to do something slightly more useful.
Before we can write our first Coherence application, we need to configure the development environment. This involves several steps, such as adding the necessary JAR files to the classpath, configuring the IDE to start Coherence nodes, and specifying configuration parameters that will ensure that each developer has a private Coherence cluster for development and testing.
Most of the examples in this section are specific to IntelliJ IDEA, which is the IDE that I am most familiar with. However, adapting them to Eclipse or any other IDE should be trivial—the principles are the same, even if the mechanics are slightly different.
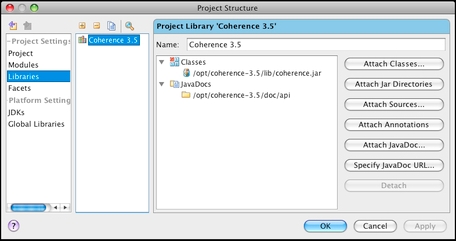
In a day and age when every library seems to come with so many dependencies that we need build tools like Maven and Ivy to help us put everything together, you might be surprised to find out that Coherence has no external dependencies. For the most part, all you need is a reference to a single JAR file, coherence.jar, which can be found in the COHERENCE_HOME/lib directory.
You should also configure the API documentation by pointing your IDE to the COHERENCE_HOME/doc/api directory. This will allow you to access documentation for Coherence classes within your IDE.
For example, a fully configured project-level library referencing Coherence should look similar to the following in IntelliJ IDEA:
This configuration will be sufficient for the vast majority of examples in this book. That said, even though Coherence does not require any dependencies, it does provide a number of integrations with both Oracle and third-party libraries out of the box.
For example, Coherence provides a distributed implementation of CommonJ Work Manager specification. In order to use it you need to include both commonj.jar and coherence-work.jar into the classpath.
Similarly, if you want to use Hibernate, Oracle TopLink, or JPA integration for persistence, you will need to include coherence-hibernate.jar, coherence-toplink.jar, or coherence-jpa.jar respectively, as well as any JAR files required by the persistence provider of your choice.
Another thing you will likely want to configure in your IDE is the IntelliSense for Coherence configuration files.
Coherence uses a set of XML-based files for configuration. We will cover these files in more detail a bit later, but at the moment it should suffice to say that all of them have a corresponding DTD file within the coherence.jar file.
Most IDEs can take the advantage of that fact and provide assistance when editing XML documents, based on information in a DTD file. However, more likely than not, you will need to tell your IDE where to find the DTD files.
With IDEA, you need to create external resource definitions that point to the files within the coherence.jar file:
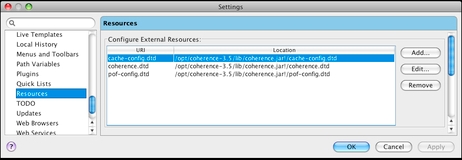
With other IDEs the process might be somewhat different, and you might need to extract these three DTD files from coherence.jar and place them in a location that will be accessible to everyone on the team.
So far we have used the cache-server shell script to start Coherence nodes, but that is not the most convenient way to do so during development.
For one, you will likely start and restart your development cluster many times a day, and switching between your IDE and a number of terminal windows all the time is not the most productive way to work.
Second, you will need to add your application's classes and any third-party libraries they depend on to the classpath of each Coherence node. While you could copy and edit the cache-server shell script to include necessary classes and JAR files into the classpath (and you will need to do so before deploying to production), this tends to be quite cumbersome during development.
Fortunately, as I mentioned earlier, Coherence is a regular Java application, which makes it quite simple to start within the IDE. If you look at the cache-server shell script, you will see that it really doesn't do much—it sets heap size and classpath, and launches com.tangosol.net.DefaultCacheServer using server JVM.
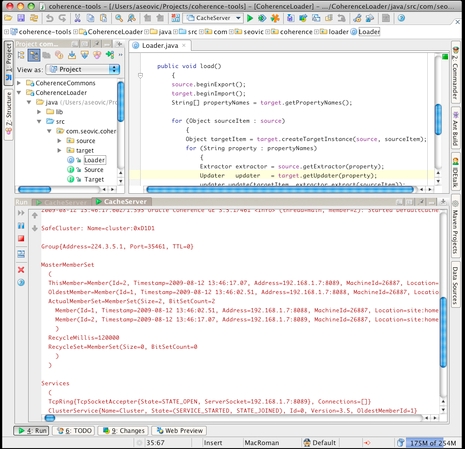
Doing the same within any IDE should be trivial. The following screenshot shows a sample configuration in IntelliJ IDEA:
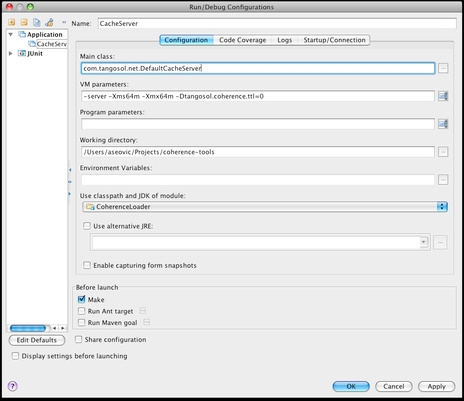
As you can see, I have configured the cache server to use server JVM and 64 MB of heap. This is significantly lower than the 512 MB allocated by the cache-server script, but it should be more than enough for development, as you will likely not use the complete data set. In any case, you can adjust heap size to fit your needs.
Now that we have DefaultCacheServer configured, we can launch as many nodes as we need within the IDE by simply clicking on a toolbar button. The following screenshot shows two Coherence nodes running within IntelliJ IDEA:
One thing you will definitely want to do while working with Coherence is to ensure that each developer uses a private cluster on their own machine. The very fact that Coherence clusters so seamlessly can lead to some head scratching during development if this is not done.
Just recently a colleague of mine and I were working on two independent tasks, but we both had a few Coherence nodes running on our laptops. The initial implementation of the code he was working on had a trivial bug that loaded objects of a wrong type into one of the caches. He quickly fixed the bug, restarted the nodes on his machine, and was surprised to find out that the invalid objects were still in the cache, although now in addition to the objects of the correct type.
Fortunately, I was sitting right next to him and it didn't take us long to figure out what was going on and fix the problem. Basically, even though he restarted the nodes on his machine before rerunning the tests, the cluster as a whole, and the data within it survived because there were other nodes running on my laptop.
Even though the impact in this case was minimal, the situation might have been different if I was sitting in another office, so it is extremely important to create developer "sandboxes" when working with Coherence. It is also the reason why you need to pay close attention to the information within the MasterMemberSet section when starting Coherence nodes, and to investigate if the result does not match your expectations.
If you were wondering what that tangosol.coherence.ttl system property I specified when configuring DefaultCacheServer within the IDE meant, it is one of the ways to limit cluster reach. By setting it to zero, you can effectively limit multicast packets to a single machine and ensure that your cluster remains private.
If you are using Well-Known Addresses instead of multicast, you can achieve the same goal by setting the tangosol.coherence.wka system property to localhost.
That said, using system properties is only one way to configure Coherence, and in this case probably not the best. The issue is that you need to remember to specify the property in every run configuration you create, and to make sure that each developer does the same for configurations that are not shared. This creates a lot of opportunities for human error, and chances are that sooner or latter someone will forget to specify the necessary system property.
The good news is that you can achieve the same goal using configuration files, which can be committed into the source control repository and shared by the whole team. In addition, settings specified within the configuration files will apply automatically to all run/debug configurations that you create in your IDE.
Coherence uses several configuration files, some of which will be covered in later chapters. In this section, we will cover one of the core configuration files, the operational descriptor.
The operational descriptor is used to configure Coherence runtime parameters such as clustering, communication, services, logging, security, license information, and so on.
Coherence ships with a default operational descriptor, tangosol-coherence.xml, packaged within coherence.jar. If you look more carefully at the console printout of a Coherence node, you will see that the very first line printed is similar to the following:
2009-08-12 13:46:01.983/0.259 Oracle Coherence 3.5.1/461 <Info> (thread=main, member=n/a): Loaded operational configuration from resource "jar:file:/opt/coherence-3.5/lib/coherence.jar!/tangosol-coherence.xml"
While you are encouraged to review this file to see what the default configuration looks like, you will typically not modify it directly. Instead, you will use one or more override files to modify only those elements of the operational descriptor that need to be changed for your environment.
All you need to do is create an override file and place it in the Coherence node's classpath before coherence.jar.
There are several override files that you can use:
If you want to change the settings globally, regardless of the mode Coherence is running in, you can create a file called
tangosol-coherence-override.xmland use it to override any of the elements from a default deployment descriptor. The structure of the files is exactly the same, with the exception that all elements in the override file are optional.If you want your changes to apply only to the development environment, you can create an override file called
tangosol-coherence-override-dev.xml. Any settings specified in this file will apply only when the Coherence is running in a development mode, which is the default.If you want your changes to apply only to the production environment, you can create a file called
tangosol-coherence-override-prod.xml. In order to have settings from this file applied on your production servers, you should set the system propertytangosol.coherence.modetoprodin the script that is used to start Coherence nodes.
You can also create all of these files, and they will be applied in order, from most specific to the default one. For example, if you define both tangosol-coherence-override-dev.xml and tangosol-coherence-override.xml, settings from the former will be used to override default settings, and settings from the latter will override both the default settings and the settings specified in the tangosol-coherence-override-dev.xml.
I will cover some of the most important operational parameters in the following sections but thorough coverage of all parameters is not in the scope of this book. If you would like to learn more, you should consult the Coherence product manuals, as well as coherence.dtd and tangosol-coherence.xml files within coherence.jar for detailed information on various configuration elements.
By default, Coherence prints out log statements to stderr using its own logging subsystem. More likely than not, this is not the desired behavior—you will probably want to use the same logging framework for Coherence that you use for the rest of the application. Fortunately, Coherence supports both the JDK logging framework and Log4J.
In order to configure Coherence to use Log4J, you need to create an operational override file and define a logging-config section with a destination element set to log4j:
<coherence>
<logging-config>
<destination>log4j</destination>
</logging-config>
</coherence>
You will likely want to use the same logging framework both in development and production, so you should place the code above into tangosol-coherence-override.xml file, and make sure that the file is in the classpath.
You will also need to configure Log4J by creating a log4j.properties file similar to the following, and placing it in the classpath as well:
log4j.logger.Coherence=DEBUG, CONSOLE, FILE
log4j.appender.CONSOLE=org.apache.log4j.ConsoleAppender
log4j.appender.CONSOLE.threshold=INFO
log4j.appender.CONSOLE.layout=org.apache.log4j.PatternLayout
log4j.appender.CONSOLE.layout.ConversionPattern=%m%n
log4j.appender.FILE=org.apache.log4j.RollingFileAppender
log4j.appender.FILE.File=logs/coherence.log
log4j.appender.FILE.MaxFileSize=10MB
log4j.appender.FILE.layout=org.apache.log4j.PatternLayout
log4j.appender.FILE.layout.ConversionPattern=%m%n
Obviously, you can set logging thresholds as you like, but my personal preference is to log errors, warnings, and informational messages to the console, and to write all messages into the log file. This allows me to immediately see on the console if anything is out of the ordinary, and to dig into the log file for details.
Writing log messages from all the nodes into a single log file also has tremendous benefits, as it allows you to see the events across the cluster in one place. This is very helpful when debugging Coherence applications.
In any case, while the exact logger configuration is up to you, there are two important things to notice in the previous sample:
You need to configure a logger named Coherence, as that's the name that the internal logging subsystem looks for when delegating to Log4J.
Also, because Coherence already formats log messages internally to include all necessary information, you should simply print out the message using the
%m%nlayout pattern in Log4J.
Of course, you could modify the standard Coherence message pattern and use Log4J for formatting, but using the default one will make the process much easier if you need to submit the log file to Coherence support team.
Now that you know how to use operational descriptors to configure Coherence, let's see how we can use configuration elements to ensure that each developer's cluster is private.
First off, because we want clusters to be private only in the development environment, you will need to create a tangosol-coherence-override-dev.xml file, and ensure that it is in the classpath at runtime. The next step will depend on whether you are using multicast or WKA for cluster join protocol.
In the former case, you will need to use the following configuration:
<coherence xml-override="/tangosol-coherence-override.xml">
<cluster-config>
<multicast-listener>
<join-timeout-milliseconds>1000</join-timeout-milliseconds>
</multicast-listener>
</cluster-config>
</coherence>
While you only need to specify the time-to-live element to ensure that cluster is private, it is recommended that you specify join-timeout-milliseconds as well, and to set it to a relatively small value (one to three seconds should be more than enough for a private cluster). This will override the default production setting of thirty seconds and ensure that your cluster nodes start quickly.
If you are using WKA, configuration will be slightly different:
<coherence xml-override="/tangosol-coherence-override.xml">
<cluster-config>
<unicast-listener>
</unicast-listener>
<multicast-listener>
<join-timeout-milliseconds>1000</join-timeout-milliseconds>
</multicast-listener>
</cluster-config>
</coherence>
Notice that we still had to specify the join-timeout-milliseconds parameter. Even though multicast is not used, this setting still controls how long the member will wait for evidence of an existing cluster before starting a new cluster and electing itself as a senior member, so you need to specify it in order to avoid a 30-second delay when starting the first member.
Finally, you should notice xml-override attribute within the root configuration element and its value—this is what ensures that the tangosol-coherence-override.xml file we created in the previous section is loaded and used to override the settings in this file and the base operational descriptor, so make sure that you include it if you want the logging configuration we defined earlier to be used.
Now that we have both the development environment and Coherence configured properly, we are ready to write some code.
One of the great things about Coherence is that it has a very simple and intuitive API that hides most of the complexity that is happening behind the scenes to distribute your objects. If you know how to use a standard Map interface in Java, you already know how to perform basic tasks with Coherence.
In this section, we will first cover the basics by looking at some of the foundational interfaces and classes in Coherence. We will then proceed to do something more interesting by implementing a simple tool that allows us to load data into Coherence from CSV files, which will become very useful during testing.
As I have briefly mentioned earlier, Coherence revolves around the concept of named caches. Each named cache can be configured differently, and it will typically be used to store objects of a particular type. For example, if you need to store employees, trade orders, portfolio positions, or shopping carts in the grid, each of those types will likely map to a separate named cache.
The first thing you need to do in your code when working with Coherence is to obtain a reference to a named cache you want to work with. In order to do this, you need to use the CacheFactory class, which exposes the getCache method as one of its public members. For example, if you wanted to get a reference to the countries cache that we created and used in the console example, you would do the following:
NamedCache countries = CacheFactory.getCache("countries");
Once you have a reference to a named cache, you can use it to put data into that cache or to retrieve data from it. Doing so is as simple as doing gets and puts on a standard Java Map:
countries.put("SRB", "Serbia");
String countryName = (String) countries.get("SRB");
As a matter of fact, NamedCache is an interface that extends Java's Map interface, so you will be immediately familiar not only with get and put methods, but also with other methods from the Map interface, such as clear, remove, putAll, size, and so on.
The nicest thing about the Coherence API is that it works in exactly the same way, regardless of the cache topology you use. We will cover different cache topologies in much more detail in the next chapter, but for now let's just say that you can configure Coherence to replicate or partition your data across the grid. The difference between the two is that in the former case all of your data exists on each node in the grid, while in the latter only 1/n of the data exists on each individual node, where n is the number of nodes in the grid.
Regardless of how your data is stored physically within the grid, the NamedCache interface provides a standard API that allows you to access it. This makes it very simple to change cache topology during development if you realize that a different topology would be a better fit, without having to modify a single line in your code.
In addition to the Map interface, NamedCache extends a number of lower-level Coherence interfaces. The following table provides a quick overview of these interfaces and the functionality they provide:
|
Interface Name |
Description |
|---|---|
|
|
Provides a way to specify expiration for a map entry |
|
|
Adds the ability to register listeners for various cache events |
|
|
Allows you to execute queries against the cache |
|
|
Enables execution of processing agents within the grid |
|
|
Adds support for distributed concurrency control |
We will discuss these interfaces in more detail throughout the book, but for now let's stick with the basics and implement our first complete example using the Coherence API.
In this section we will implement a complete example that achieves programmatically what we have done earlier using Coherence console—we'll put a few countries in the cache, list cache contents, remove items, and so on.
To make things more interesting, instead of using country names as cache values, we will use proper objects this time. That means that we need a class to represent a country, so let's start there:
public class Country implements Serializable, Comparable {
private String code;
private String name;
private String capital;
private String currencySymbol;
private String currencyName;
public Country() {
}
public Country(String code, String name, String capital,
String currencySymbol, String currencyName) {
this.code = code;
this.name = name;
this.capital = capital;
this.currencySymbol = currencySymbol;
this.currencyName = currencyName;
}
public String getCode() {
return code;
}
public void setCode(String code) {
this.code = code;
}
public String getName() {
return name;
}
public void setName(String name) {
this.name = name;
}
public String getCapital() {
return capital;
}
public void setCapital(String capital) {
this.capital = capital;
}
public String getCurrencySymbol() {
return currencySymbol;
}
public void setCurrencySymbol(String currencySymbol) {
this.currencySymbol = currencySymbol;
}
public String getCurrencyName() {
return currencyName;
}
public void setCurrencyName(String currencyName) {
this.currencyName = currencyName;
}
public String toString() {
return "Country(" +
"Code = " + code + ", " +
"Name = " + name + ", " +
"Capital = " + capital + ", " +
"CurrencySymbol = " + currencySymbol + ", " +
"CurrencyName = " + currencyName + ")";
}
public int compareTo(Object o) {
Country other = (Country) o;
return name.compareTo(other.name);
}
}
There are several things to note about the Country class, which also apply to other classes that you want to store in Coherence:
Because the objects needs to be moved across the network, classes that are stored within the data grid need to be serializable. In this case we have opted for the simplest solution and made the class implement the
java.io.Serializableinterface. This is not optimal, both from performance and memory utilization perspective, and Coherence provides several more suitable approaches to serialization that we'll discuss in Chapter 4,We have implemented the
toStringmethod that prints out an object's state in a friendly format. While this is not a Coherence requirement, implementingtoStringproperly for both keys and values that you put into the cache will help a lot when debugging, so you should get into a habit of implementing it for your own classes.Finally, we have also implemented the
Comparableinterface. This is also not a requirement, but it will come in handy in a moment to allow us to print out a list of countries sorted by name.
Now that we have the class that represents the values we want to cache, it is time to write an example that uses it:
import com.tangosol.net.NamedCache;
import com.tangosol.net.CacheFactory;
import ch02.Country;
import java.util.Set;
import java.util.Map;
public class CoherenceHelloWorld {
public static void main(String[] args) {
NamedCache countries = CacheFactory.getCache("countries");
// first, we need to put some countries into the cache
countries.put("USA", new Country("USA", "United States",
"Washington", "USD", "Dollar"));
countries.put("GBR", new Country("GBR", "United Kingdom",
"London", "GBP", "Pound"));
countries.put("RUS", new Country("RUS", "Russia", "Moscow",
"RUB", "Ruble"));
countries.put("CHN", new Country("CHN", "China", "Beijing",
"CNY", "Yuan"));
countries.put("JPN", new Country("JPN", "Japan", "Tokyo",
"JPY", "Yen"));
countries.put("DEU", new Country("DEU", "Germany", "Berlin",
"EUR", "Euro"));
countries.put("FRA", new Country("FRA", "France", "Paris",
"EUR", "Euro"));
countries.put("ITA", new Country("ITA", "Italy", "Rome",
"EUR", "Euro"));
countries.put("SRB", new Country("SRB", "Serbia", "Belgrade",
"RSD", "Dinar"));
assert countries.containsKey("JPN")
: "Japan is not in the cache";
// get and print a single country
System.out.println("get(SRB) = " + countries.get("SRB"));
// remove Italy from the cache
int size = countries.size();
System.out.println("remove(ITA) = " + countries.remove("ITA"));
assert countries.size() == size - 1
: "Italy was not removed";
// list all cache entries
Set<Map.Entry> entries = countries.entrySet(null, null);
for (Map.Entry entry : entries) {
System.out.println(entry.getKey() + " = " + entry.getValue());
}
}
}
Let's go through this code section by section.
At the very top, you can see import statements for NamedCache and CacheFactory, which are the only Coherence classes we need for this simple example. We have also imported our Country class, as well as Java's standard Map and Set interfaces.
The first thing we need to do within the main method is to obtain a reference to the countries cache using the CacheFactory.getCache method. Once we have the cache reference, we can add some countries to it using the same old Map.put method you are familiar with.
We then proceed to get a single object from the cache using the Map.get method, and to remove one using Map.remove. Notice that the NamedCache implementation fully complies with the Map.remove contract and returns the removed object.
Finally, we list all the countries by iterating over the set returned by the entrySet method. Notice that Coherence cache entries implement the standard Map.Entry interface.
Overall, if it wasn't for a few minor differences, it would be impossible to tell whether the preceding code uses Coherence or any of the standard Map implementations. The first telltale sign is the call to the CacheFactory.getCache at the very beginning, and the second one is the call to entrySet method with two null arguments. We have already discussed the former, but where did the latter come from?
The answer is that Coherence QueryMap interface extends Java Map by adding methods that allow you to filter and sort the entry set. The first argument in our example is an instance of Coherence Filter interface, which will be discussed in more detail in Chapter 5, Querying the Data Grid. In this case, we want all the entries, so we simply pass null as a filter.
The second argument, however, is more interesting in this particular example. It represents the java.util.Comparator that should be used to sort the results. If the values stored in the cache implement the Comparable interface, you can pass null instead of the actual Comparator instance as this argument, in which case the results will be sorted using their natural ordering (as defined by Comparable.compareTo implementation).
That means that when you run the previous example, you should see the following output:
get(SRB) = Country(Code = SRB, Name = Serbia, Capital = Belgrade, CurrencySymbol = RSD, CurrencyName = Dinar)
remove(ITA) = Country(Code = ITA, Name = Italy, Capital = Rome, CurrencySymbol = EUR, CurrencyName = Euro)
CHN = Country(Code = CHN, Name = China, Capital = Beijing, CurrencySymbol = CNY, CurrencyName = Yuan)
FRA = Country(Code = FRA, Name = France, Capital = Paris, CurrencySymbol = EUR, CurrencyName = Euro)
DEU = Country(Code = DEU, Name = Germany, Capital = Berlin, CurrencySymbol = EUR, CurrencyName = Euro)
JPN = Country(Code = JPN, Name = Japan, Capital = Tokyo, CurrencySymbol = JPY, CurrencyName = Yen)
RUS = Country(Code = RUS, Name = Russia, Capital = Moscow, CurrencySymbol = RUB, CurrencyName = Ruble)
SRB = Country(Code = SRB, Name = Serbia, Capital = Belgrade, CurrencySymbol = RSD, CurrencyName = Dinar)
GBR = Country(Code = GBR, Name = United Kingdom, Capital = London, CurrencySymbol = GBP, CurrencyName = Pound)
USA = Country(Code = USA, Name = United States, Capital = Washington, CurrencySymbol = USD, CurrencyName = Dollar)
As you can see, the countries in the list are sorted by name, as defined by our Country.compareTo implementation. Feel free to experiment by passing a custom Comparator as the second argument to the entrySet method, or by removing both arguments, and see how that affects result ordering.
If you are feeling really adventurous and can't wait for a few more chapters to learn about Coherence queries, take a sneak peek by changing the line that returns the entry set to:
Set<Map.Entry> entries = countries.entrySet(
new LikeFilter("getName", "United%"), null);
As a final note, you might have also noticed that I used Java assertions in the previous example to check that the reality matches my expectations (well, more to demonstrate a few other methods in the API, but that's beyond the point). Make sure that you specify the -ea JVM argument when running the example if you want the assertions to be enabled, or use the run-helloworld target in the included Ant build file, which configures everything properly for you.
That concludes the implementation of our first Coherence application. One thing you might notice is that the CoherenceHelloWorld application will run just fine even if you don't have any Coherence nodes started, and you might be wondering how that is possible.
The truth is that there is one Coherence node—the CoherenceHelloWorld application. As soon as the CacheFactory.getCache method gets invoked, Coherence services will start within the application's JVM and it will either join the existing cluster or create a new one, if there are no other nodes on the network. If you don't believe me, look at the log messages printed by the application and you will see that this is indeed the case.
Now that you know the basics, let's move on and build something slightly more exciting, and much more useful.
The need to load the data into the Coherence cache from an external data source is ever-present. Many Coherence applications warm up the caches by pre-loading data from a relational database or other external data sources.
In this section, we will focus on a somewhat simpler scenario and write a utility that allows us to load objects into the cache from a comma-separated (CSV) file. This type of utility is very useful during development and testing, as it allows us to easily load test data into Coherence.
If we forget for a moment about the technologies we are using and think about moving data from one data store to another at a higher level of abstraction, the solution is quite simple, as the following pseudo-code demonstrates:
for each item in source
add item to target
end
That's really all there is to it—we need to be able to iterate over the source data store, retrieve items from it, and import them into the target data store.
One thing we need to decide is how the individual items are going to be represented. While in a general case an item can be any object, in order to simplify things a bit for this particular example we will use a Java Map to represent an item. This map will contain property values for an item, keyed by property name.
Based on the given information, we can define the interfaces for source and target:
public interface Source extends Iterable<Map<String, ?>> {
void beginExport();
void endExport();
}
The Target interface is just as simple:
public interface Target {
void beginImport();
void endImport();
void importItem(Map<String, ?> item);
}
One thing you will notice in the previous interfaces is that there are matching pairs of begin/end methods. These are lifecycle methods that are used to initialize source and target and to perform any necessary cleanup.
Now that we have Source and Target interfaces defined, we can use them in the implementation of our Loader class:
public class Loader {
private Source source;
private Target target;
public Loader(Source source, Target target) {
this.source = source;
this.target = target;
}
public void load() {
source.beginExport();
target.beginImport();
for (Map<String, ?> sourceItem : source) {
target.importItem(sourceItem);
}
source.endExport();
target.endImport();
}
}
As you can see, the actual Java implementation is almost as simple as the pseudo-code on the previous page, which is a good thing.
However, that does imply that all the complexity and the actual heavy lifting are pushed down into our Source and Target implementations, so let's look at those.
On the surface, implementing a class that reads a text file line by line, splits each line into fields and creates a property map based on the header row and corresponding field values couldn't be any simpler. However, as with any other problem, there are subtle nuances that complicate the task.
For example, even though comma is used to separate the fields in each row, it could also appear within the content of individual fields, in which case the field as a whole needs to be enclosed in quotation marks.
This complicates the parsing quite a bit, as we cannot simply use String.split to convert a single row from a file into an array of individual fields. While writing a parser by hand wouldn't be too difficult, writing code that someone else has already written is not one of my favorite pastimes.
Super CSV (http://supercsv.sourceforge.net), written by Kasper B. Graversen, is an open source library licensed under the Apache 2.0 license that does everything we need and much more, and I strongly suggest that you take a look at it before writing any custom code that reads or writes CSV files.
Among other things, Super CSV provides the CsvMapReader class, which does exactly what we need—it returns a map of header names to field values for each line read from the CSV file. That makes the implementation of CsvSource quite simple:
public class CsvSource implements Source {
private ICsvMapReader reader;
private String[] header;
public CsvSource(String name) {
this(new InputStreamReader(
CsvSource.class.getClassLoader().getResourceAsStream(name)));
}
public CsvSource(Reader reader) {
this.reader =
new CsvMapReader(reader, CsvPreference.STANDARD_PREFERENCE);
}
public void beginExport() {
try {
this.header = reader.getCSVHeader(false);
}
catch (IOException e) {
throw new RuntimeException(e);
}
}
public void endExport() {
try {
reader.close();
}
catch (IOException e) {
throw new RuntimeException(e);
}
}
public Iterator<Map<String, ?>> iterator() {
return new CsvIterator();
}
}
As you can see CsvSource accepts a java.io.Reader instance as a constructor argument and wraps it with a CsvMapReader. There is also a convenience constructor that will create a CsvSource instance for any CSV file in a classpath, which is the most likely scenario for testing.
We use the beginExport lifecycle method to read the header row and initialize the header field, which will later be used by the CsvMapReader when reading individual data rows from the file and converting them to a map. In a similar fashion, we use the endExport method to close the reader properly and free the resources associated with it.
Finally, we implement the Iterable interface by returning an instance of the inner CsvIterator class from the iterator method. The CsvIterator inner class implements the necessary iteration logic for our source:
private class CsvIterator implements Iterator<Map<String, ?>> {
private Map<String, String> item;
public boolean hasNext() {
try {
item = reader.read(header);
}
catch (IOException e) {
throw new RuntimeException(e);
}
return item != null;
}
public Map<String, ?> next() {
return item;
}
public void remove() {
throw new UnsupportedOperationException(
"CsvIterator does not support remove operation");
}
}
Thanks to the CsvMapReader, the implementation is quite simple. We read the next line from the file whenever the hasNext method is called, and store the result in the item field. The next method simply returns the item read by the previous call to hasNext.
That completes the implementation of CsvSource, and allows us to shift our focus back to Coherence.
The last thing we need to do to complete the example is to create a Target interface implementation that will import items read from the CSV file into Coherence.
One of the things we will need to do is to convert the generic item representation from a Map into an instance of a class that represents the value we want to put into the cache. The naïve approach is to use Java reflection to create an instance of a class and set property values, but just as with the CSV parsing, the devil is in the details.
The property values read from the CSV files are all strings, but the properties of the target object might not be. That means that we need to perform type conversion as appropriate when setting property values on a target object.
Fortunately, we don't need to reinvent the wheel to do this. If you are familiar with the Spring Framework, you already know that property values, specified as strings within the XML configuration file, are automatically converted to appropriate type before they are injected into your objects. What you might not know is that this feature is easily accessible outside of Spring as well, in the form of the BeanWrapper interface and BeanWrapperImpl class.
Another problem we need to solve is key generation—when we put objects into a Coherence cache, we need to specify both the key and the value. The simplest option, and the one we will use for this example, is to extract the key from the target object itself. This will often be all we need, as most entities already have a field representing their identity, which is the ideal candidate for a cache key. In the case of our Country class, we will use the value of the code property as a cache key.
Finally, while we could insert every item into the cache using individual put calls, this is not the most efficient way to perform bulk loading of the data. As I mentioned in Chapter 1, Achieving Performance, Scalability, and Availability Objectives, each call to the put method is potentially a network call, and as such introduces some latency. A significantly better approach from a performance perspective is to batch multiple items and insert them into the cache all at once by calling the putAll method.
So, with the design considerations out of the way, let's look at the implementation of the CoherenceTarget class:
public class CoherenceTarget implements Target {
public static final int DEFAULT_BATCH_SIZE = 1000;
private NamedCache cache;
private Class itemClass;
private String idProperty;
private Map batch;
private int batchSize = DEFAULT_BATCH_SIZE;
public CoherenceTarget(String cacheName, Class itemClass,
String idProperty) {
this.cache = CacheFactory.getCache(cacheName);
this.itemClass = itemClass;
this.idProperty = idProperty;
}
public void setBatchSize(int batchSize) {
this.batchSize = batchSize;
}
public void beginImport() {
batch = new HashMap();
}
public void importItem(Map<String, ?> sourceItem) {
BeanWrapper targetItem = new BeanWrapperImpl(itemClass);
for (Map.Entry<String, ?> property : sourceItem.entrySet()) {
targetItem.setPropertyValue(property.getKey(), property.getValue());
}
Object id = targetItem.getPropertyValue(idProperty);
batch.put(id, targetItem.getWrappedInstance());
if (batch.size() % batchSize == 0) {
cache.putAll(batch);
CoherenceTarget classimplementingbatch.clear();
}
}
public void endImport() {
if (!batch.isEmpty()) {
cache.putAll(batch);
}
}
}
The constructor accepts three arguments: the name of the cache to import objects into, the class of cache items, and the name of the property of that class that should be used as a cache key. We initialize batch size to 1000 items by default, but the value can be easily overridden by calling the setBatchSize method.
The beginImport lifecycle method initializes the map representing a batch of items that need to be inserted, while the endImport method ensures that the last, potentially incomplete, batch is also inserted into the cache.
The real meat is in the importItem method, which creates a Spring BeanWrapper instance for the specified item class and sets its properties based on the entries in the sourceItem map. Once the target item is fully initialized, we use BeanWrapper again to extract the cache key from it and add the item to the batch.
Finally, whenever the batch size reaches the specified limit, we insert all items from the batch into the cache and clear the batch.
With this last piece in place, we are ready to test the loader.
Note
Cache loader on steroids
The implementation of the cache loader presented in this chapter is a simplified version of the loader my colleague, Ivan Cikić, and I have implemented as part of the Coherence Tools project, which is available at http://code.google.com/p/coherence-tools/.
The full version has many additional features and removes some limitations of the implementation in this chapter. For example, it provides flexible mapping and transformation features, as well as multiple key generation strategies.
It also contains both Source and Target implementations for CSV files, XML files, and Coherence, allowing you to import data from the existing CSV and XML files into Coherence, and to export contents of a Coherence cache into one of these formats.
In any case, if you like the idea behind the Cache Loader but need more capabilities than presented in this chapter, check out the latest Coherence Tools release.
In order to test the loader, we will use a countries.csv file containing a list of most countries in the world (I'd say all, but being from Serbia I know firsthand that a list of countries in the world is anything but static ☺).
The file header matches exactly the property names in the Country class defined earlier, which is the requirement imposed by our loader implementation:
code,name,capital,currencySymbol,currencyName
AFG,Afghanistan,Kabul,AFN,Afghani
ALB,Albania,Tirana,ALL,Lek
DZA,Algeria,Algiers,DZD,Dinar
AND,Andorra,Andorra la Vella,EUR,Euro
AGO,Angola,Luanda,AOA,Kwanza
With the test data in place, let's write a JUnit test that will load all of the countries defined in the countries.csv file into the Coherence cache:
public class LoaderTests {
public static final NamedCache countries = CacheFactory.getCache("countries");
@Before
public void clearCache() {
countries.clear();
}
@Test
public void testCsvToCoherenceLoader() {
Source source = new CsvSource("countries.csv");
CoherenceTarget target =
new CoherenceTarget("countries", Country.class, "code");
target.setBatchSize(50);
Loader loader = new Loader(source, target);
loader.load();
assertEquals(193, countries.size());
Country srb = (Country) countries.get("SRB");
assertEquals("Serbia", srb.getName());
assertEquals("Belgrade", srb.getCapital());
assertEquals("RSD", srb.getCurrencySymbol());
assertEquals("Dinar", srb.getCurrencyName());
}
}
As you can see, using the cache loader is quite simple—we initialize the source and target, create a Loader instance for them, and invoke the load method. We then assert that all the data from the test CSV file has been loaded, and that the properties of a single object retrieved from the cache are set correctly.
However, the real purpose of the previous test is neither to teach you how to use the loader (you could've easily figured that out yourself) nor to prove that the code in the preceding sections works (of course it does ☺). It is to lead us into the very interesting subject that follows.
From the application's perspective, Coherence is a data store. That means that you will need to use it while testing the data access code.
If you have ever had to test data access code that uses a relational database as a data store, you know that the whole process can be quite cumbersome. You need to set up test data, perform the test, and then clean up after each test, in order to ensure that the side effects of one test do not influence the outcome of another.
Tools such as DbUnit (http://www.dbunit.org) or Spring's transactional testing support can make the process somewhat easier, but unfortunately, nothing of that nature exists for Coherence.
The good news is that no such tools are necessary when working with Coherence. Setting up test data can be as simple as creating a bunch of CSV files and using the loader we implemented in the previous section to import them into the cache. Clearing data from the cache between the tests is even simpler—just call the clear method on the cache you are testing. In most cases, testing Coherence-related code will be very similar to the LoaderTests test case from the previous section and much simpler than testing database-related code.
However, Coherence is not only a data store, but a distributed processing engine as well, and that is where things can get interesting. When you execute a query or an aggregator, it executes across all the nodes in the cluster. When you execute an entry processor, it might execute on one or several, possibly even all nodes in parallel, depending on how it was invoked.
For the most part, you can test the code that executes within the cluster the same way you test more conventional data access code, by having each test case start a one-node cluster. This makes debugging quite simple, as it ensures that all the code, from test, to Coherence, to your custom processing code executing within Coherence runs in the same process.
However, you should bear in mind that by doing so you are not testing your code in the same environment it will eventually run in. All kinds of things change internally when you move from a one-node cluster to two-node cluster. For example, Coherence will not create backups in a single-node scenario, but it will as soon as the second node is added to the cluster.
In some cases you might have to test and debug your code in a true distributed environment, because it depends on things that are only true if you move beyond a single node.
Debugging in a distributed environment can get quite tricky. First of all, you will need to enable remote debugging on a cache server node by adding the following JVM arguments to DefaultCacheServer run configuration:
-Xdebug
-Xrunjdwp:transport=dt_socket,server=y,suspend=n,address=5005
Second, you will need to ensure that all the data is stored on a cache server node where remote debugging is enabled. That will ensure that the code you need to debug within the cluster, such as the entry processor mentioned earlier, is guaranteed to execute on that node.
Even though you will only be able to start one DefaultCacheServer now (because of the remote debug port it is bound to), as soon as your test invokes any CacheFactory method it will join the cluster as a second node. By default, the data is balanced automatically across all the nodes in the cluster, which will make it impossible to ensure that your processor executes where you want.
Fortunately, Coherence provides a feature that allows you to control which nodes are used to store cached data and which aren't. This feature is normally used to disable cache storage on application servers while allowing them to be full-blown members of the cluster in all other respects, but it can also be used to ensure that no data is cached on the test runner node when using remote debugging.
In order to activate it, you need to add the following JVM argument to your test runner configuration:
-Dtangosol.coherence.distributed.localstorage=false
Once everything is configured properly, you should be able to set a breakpoint, start the cache server, attach the debugger to it, and run the test. When the breakpoint is hit, the debugger will allow you to step through the code and inspect the variables in a remote process as you normally would, as shown in the following screenshot:
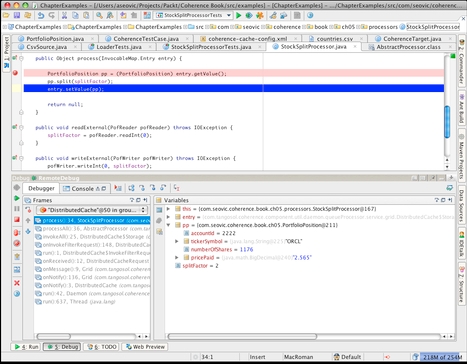
The bottom line is that even though debugging a distributed system poses some new challenges, you can overcome them using a combination of features found in Java, modern IDEs, and Coherence.
Also keep in mind that you won't have to do this very often—more likely than not you will be able to test and debug most of your code using a simple, single-node-in-a-single-process approach. However, it is good to know how to do it in a distributed environment as well, because sooner or later you will need to do it.
In this chapter, you have learned how to install Coherence and how to start one or more grid nodes. You experimented with the Coherence Console, and learned that it is a development and debugging tool that should never be used in production (just in case you forgot the earlier warning).
We also discussed how to configure the development environment while working with Coherence to make you most productive, and to ensure that each developer has their own, private cluster for development and testing.
We then discussed Coherence operational configuration, and you learned how to configure Coherence to use Log4J for logging and how to set up private developer clusters using the operational descriptor.
A large part of the chapter was devoted to the Coherence API. You learned how to perform basic cache operations programmatically, and along the way created a useful utility that allows you to import data from CSV files into Coherence.
Finally, I briefly talked about the testing and debugging of Coherence applications and provided some guidelines and suggestions on how to use remote debugging with Coherence.
In the next chapter, you will learn about the different ways to configure Coherence caches and how to choose the most appropriate cache topology based on your data and data access patterns.