
PL/SQL is tightly integrated with the Oracle database via the SQL language. From within PL/SQL, you can execute any Data Manipulation Language (DML) statements—specifically INSERTs, UPDATEs, DELETEs, and, of course, queries.
Tip
You cannot, however, execute Data Definition Language (DDL) statements in PL/SQL unless you run them as dynamic SQL. This topic is covered in Chapter 16.
You can also join multiple SQL statements together logically as a transaction, so that they are either saved (“committed” in SQL parlance) together, or rejected in their entirety (“rolled back”). This chapter examines the SQL statements available inside PL/SQL to establish and manage transactions .
To appreciate the importance of transactions in Oracle, it helps to consider the “ACID” principle: a transaction has Atomicity, Consistency, Isolation, and Durability. These concepts are defined as follows:
- Atomicity
A transaction’s changes to a state are atomic: either they all happen or none happens.
- Consistency
A transaction is a correct transformation of state. The actions taken as a group do not violate any integrity constraints associated with that state.
- Isolation
Many transactions may be executing concurrently, but from any given transaction’s point of view, other transactions appear to have executed before or after its own execution.
- Durability
Once a transaction completes successfully, the changes to the state are made permanent and survive any subsequent failures.
A transaction can either be saved by performing a COMMIT or erased by requesting a ROLLBACK. In either case, the affected locks on resources are released (a ROLLBACK TO might release only some locks). The session can then start a new transaction. The default behavior in a PL/SQL program is that there is one transaction per session, and all changes that you make are a part of that transaction. By using a feature called autonomous transactions , however, you can create nested transactions within the main, session-level transaction. This feature was added to PL/SQL in Oracle8i Database and is covered near the end of this chapter in the section “Autonomous Transactions.”
From within any PL/SQL block of code you can execute DML statements (INSERTs, UPDATEs, and DELETEs) against any and all data structures to which you have access.
Tip
Access to these data structures is determined at the time of compilation when you’re using the definer rights model. If you instead use the invoker rights model with the AUTHID CURRENT_USER compile option, access privileges are determined at runtime. See Chapter 23 for more details.
It is outside the scope of this book to provide complete reference information about the features of DML statements in the Oracle SQL language. Instead, we provide a quick overview of the basic syntax, and then explore special features relating to DML inside PL/SQL, including:
Examples of each DML statement
Cursor attributes for DML statements
Special PL/SQL features for DML statements, such as the RETURNING clause
For detailed information, I encourage you to peruse Oracle documentation or a SQL-specific text.
There are three DML statements available in the SQL language:
- INSERT
Inserts one or more new rows into a table
- UPDATE
Updates the values of one or more columns in an existing row in a table
- DELETE
Removes one or more rows from a table
Here is the syntax of the two basic types of INSERT statements :
Let’s look at some examples of INSERT statements executed within a PL/SQL block. First, I insert a new row into the book table. Notice that I do not need to specify the names of the columns if I provide a value for each column.
    BEGIN
       INSERT INTO book
            VALUES ('1-56592-335-9',
               'Oracle PL/SQL Programming',
               'Reference for PL/SQL developers,' ||
               'including examples and best practice ' ||
               'recommendations.',
               'Feuerstein,Steven, with Bill Pribyl',
               TO_DATE ('01-SEP-1997','DD-MON-YYYY'),
               987);
    END;
I can also list the names of the columns and provide the values as variables, instead of literal values:
    DECLARE
       l_isbn book.isbn%TYPE := '1-56592-335-9';
       ... other declarations of local variables
    BEGIN
       INSERT INTO books (
            isbn, title, summary, author,
            date_published, page_count)
          VALUES (
             l_isbn, l_title, l_summary, l_author,
l_date_published, l_page_count);Now let’s take a look at the UPDATE statement. You can update one or more columns in one or more rows using UPDATE. Here is the basic syntax:
UPDATEtableSETcol1 = val1[,col2 = val2, ... colN = valN] [WHEREwhere clause];
The WHERE clause is optional; if you do not supply one, all rows in the table are updated. Here are some examples of UPDATEs:
Uppercase all the titles of books in the books table:
UPDATE books SET title = UPPER (title);
Run a utility procedure that removes the time component from the publication date of books written by specified authors (the argument in the procedure) and uppercases the titles of those books. As you can see, you can run an UPDATE statement standalone or within a PL/SQL block.
    CREATE OR REPLACE PROCEDURE remove_time (
       author_in IN VARCHAR2)
    IS
    BEGIN
       UPDATE books
          SET title = UPPER (title),
              date_published =
                 TRUNC (date_published)
        WHERE author LIKE author_in;
    END;
Finally, let’s look at the DELETE statement. You can use DELETE to remove one, some, or all the rows in a table. Here is the basic syntax:
DELETE FROMtable[WHEREwhere-clause];
The WHERE clause is optional in a DELETE statement. If you do not supply one, all rows in the table are deleted. Here are some examples of DELETEs:
Delete all the books from the books table:
DELETE FROM books;
Delete all the books from the books table that were published prior to a certain date and return the number of rows deleted:
    CREATE OR REPLACE PROCEDURE remove_books (
       date_in             IN       DATE,
       removal_count_out   OUT      PLS_INTEGER)
    IS
    BEGIN
       DELETE FROM books WHERE date_published < date_in;
       removal_count_out := SQL%ROWCOUNT;
    END;
Of course, all these DML statements can become qualitatively more complex as you deal with real-world entities. You can, for example, update multiple columns with the contents of a subquery. As of Oracle9i Database, you can replace a table name with a table function that returns a result set upon which the DML statement acts.
As I mentioned, this chapter is limited to exploring the intersection point of DML and PL/SQL. It will answer such questions as: How can you take full advantage of DML from within the PL/SQL language? And how do you manage transactions that are created implicitly when you execute DML statements?
First, let’s take a look at the cursor attributes that Oracle provides for the implicit cursors behind your DML statements.
Oracle allows you to access information about the most recently executed implicit cursor by referencing one of the following special implicit cursor attributes:
Implicit cursor attributes return information about the execution of the most recent INSERT, UPDATE, DELETE, or SELECT INTO statement. Cursor attributes for SELECT INTOs are covered in Chapter 15. In this section, we’ll discuss how to take advantage of the SQL% attributes for DML statements.
First of all, remember that the values of implicit cursor attributes always refer to the most recently executed SQL statement, regardless of the block in which the implicit cursor is executed. And before Oracle opens the first SQL cursor in the session, all the implicit cursor attributes yield NULL. (The exception is %ISOPEN, which returns FALSE.)
Table 14-1 summarizes the significance of the values returned by these attributes for implicit cursors.
Table 14-1. Implicit SQL cursor attributes for DML statements
Name | Description |
|---|---|
SQL%FOUND | Returns TRUE if one or more rows were modified (created, changed, removed) successfully |
SQL%NOTFOUND | Returns TRUE if no rows were modified by the DML statement |
SQL%ROWCOUNT | Returns number of rows modified by the DML statement |
SQL%ISOPEN | Always returns FALSE for implicit cursors because Oracle opens and closes implicit cursors automatically |
Now let’s see how we can use cursor attributes with implicit cursors.
Use SQL%FOUND to determine if your DML statement affected any rows. For example, from time to time an author will change his name and want a new name used for all of his books. So I create a small procedure to update the name and then report back via a Boolean variable whether any rows were modified:
    CREATE OR REPLACE PROCEDURE change_author_name (
       old_name_in        IN       books.author%TYPE,
       new_name_in        IN       books.author%TYPE,
       changes_made_out   OUT      BOOLEAN)
    IS
    BEGIN
       UPDATE books
          SET author = new_name_in
        WHERE author = old_name_in;

       changes_made_out := SQL%FOUND;
    END;
Use SQL%ROWCOUNT when you need to know exactly how many rows were affected by your DML statement. Here is a reworking of the above name-change procedure that returns a bit more information:
    CREATE OR REPLACE PROCEDURE change_author_name (
       old_name_in        IN       books.author%TYPE,
       new_name_in        IN       books.author%TYPE,
       rename_count_out   OUT      PLS_INTEGER)
    IS
    BEGIN
       UPDATE books
          SET author = new_name_in
        WHERE author = old_name_in;

       rename_count_out := SQL%ROWCOUNT;
    END;
Suppose that I perform an UPDATE or DELETE, and then need to get information about the results of that statement for future processing. Rather than perform a distinct query following the DML statement, I can add a RETURNING clause to an INSERT, UPDATE, or DELETE and retrieve that information directly into variables in my program. With the RETURNING clause, you can reduce network round trips, consume less server CPU time, and minimize the number of cursors opened and managed in the application.
Here are some examples that demonstrate the capabilities of this feature.
The following very simple block shows how I use the RETURNING clause to retrieve a value (the new salary) that was computed within the UPDATE statement:
    DECLARE
       myname  employee.last_name%TYPE;
       mysal   employee.salary%TYPE;
    BEGIN
       FOR rec IN (SELECT * FROM employee)
       LOOP
          UPDATE    employee
                SET salary = new_compensation (rec)
              WHERE employee_id = rec.employee_id
          RETURNING salary, last_name INTO mysal, myname;

          DBMS_OUTPUT.PUT_LINE ('New salary for ' ||
             myname || ' = ' || mysal;
       END LOOP;
    END;
Suppose that I perform an UPDATE that modifies more than one row. In this case, I can return information not just into a single variable, but into a collection using the BULK COLLECT syntax. This technique is shown below in a FORALL statement:
    DECLARE
       names name_varray;
       new_salaries number_varray;
    BEGIN
       populate_names_array (names);

       FORALL indx IN names.FIRST .. names.LAST
          UPDATE compensation
             SET salary = new_compensation (names(indx))
           WHERE name = names (indx)
           RETURNING salary BULK COLLECT INTO new_salaries;
       ...
    END;
When an exception occurs in a PL/SQL block, Oracle does not roll back any of the changes made by DML statements in that block. It is up to you, the manager of the application’s logical transaction, to decide what kind of behavior should occur.
Consider the following procedure:
    CREATE OR REPLACE PROCEDURE empty_library (
       pre_empty_count OUT PLS_INTEGER)
    IS
    BEGIN
       -- The tabCount function returns the number
       -- of rows in the specified table, using
       -- Native Dynamic SQL. SeeChapter 16 for details.
       pre_empty_count := tabcount ('books'),

       DELETE FROM books;
       RAISE NO_DATA_FOUND;
    END;
Notice that I set the value of the OUT parameter before I raise the exception. Now let’s run an anonymous block that calls this procedure, and examine the after-effects:
    DECLARE
       table_count   NUMBER := -1;
    BEGIN
       INSERT INTO books VALUES (...);
       empty_library (table_count);
    EXCEPTION
       WHEN OTHERS
       THEN
          DBMS_OUTPUT.put_line (tabcount ('books'));
          DBMS_OUTPUT.put_line (table_count);
    END;
The output is:
    0
    -1
Notice that my rows remain deleted from the books table even though an exception was raised; Oracle did not perform an automatic rollback. My table_count variable, however, retains its original value.
So it is up to you to perform rollbacks—or rather, to decide if you want to perform a rollback—in programs that perform DML. Here are some things to keep in mind in this regard:
If your block is an autonomous transaction (described later in this chapter), then you must perform a rollback or commit (usually a rollback) when an exception is raised.
You can use savepoints to control the scope of a rollback. In other words, you can roll back to a particular savepoint and thereby preserve a portion of the changes made in your session. Savepoints are also explored later in this chapter.
If an exception propagates past the outermost block (i.e., it goes “unhandled”), then in most host execution environments for PL/SQL like SQL*Plus, an unqualified rollback is automatically executed, reversing any outstanding changes.
New to Oracle9i Database Release 2, you can now use records in INSERT and UPDATE statements. Here is an example:
    CREATE OR REPLACE PROCEDURE set_book_info (book_in IN books%ROWTYPE)
    IS
    BEGIN
       INSERT INTO books VALUES book_in;
    EXCEPTION
       WHEN DUP_VAL_ON_INDEX
       THEN
          UPDATE books SET ROW = book_in
           WHERE isbn = book_in.isbn;
    END;
This enhancement offers some compelling advantages over working with individual variables or fields within a record:
- Very concise code
You can “stay above the fray” and work completely at the record level. There is no need to declare individual variables or decompose a record into its fields when passing that data to the DML statement.
- More robust code
By working with %ROWTYPE records and not explicitly manipulating fields in those records, your code is less likely to break as changes are made to the tables and views upon which the records are based.
In the later section, “Restrictions on record-based inserts and updates,” you will find a list of restrictions on using records in DML statements. First, let’s take a look at how you can take advantage of record-based DML for the two supported statements, INSERT and UPDATE.
You can INSERT using a record with both single-row inserts and bulk inserts (via the FORALL statement). You can also use records that are based on %ROWTYPE declarations against the table to which the insert is made, or on an explicit record TYPE that is compatible with the structure of the table.
Here are some examples.
Insert a row into the books table with a %ROWTYPE record:
    DECLARE
       my_book books%ROWTYPE;
    BEGIN
       my_book.isbn := '1-56592-335-9';
       my_book.title := 'ORACLE PL/SQL PROGRAMMING';
       my_book.summary := 'General user guide and reference';
       my_book.author := 'FEUERSTEIN, STEVEN AND BILL PRIBYL';
       my_book.page_count := 1000;

       INSERT INTO books VALUES my_book;
    END;
Notice that you do not include parentheses around the record specifier. If you use this format:
INSERT INTO books VALUES (my_book); -- With parentheses, INVALID!
then you will get an ORA-00947: not enough values exception.
You can also use a record based on a programmer-defined record TYPE to perform the INSERT, but that record type must be 100% compatible with the table %ROWTYPE definition. You may not, in other words, INSERT using a record that covers only a subset of the table’s columns.
Perform record-based inserts with the FORALL statement. You can also work with collections of records and insert all those records directly into a table within the FORALL statement.
With Oracle9i Database Release 2, you can also perform updates of an entire row with a record. The following example inserts a row into the books table with a %ROWTYPE record. Notice that I use a new keyword, ROW, to indicate that I am updating the entire row with a record:
    DECLARE
       my_book books%ROWTYPE;
    BEGIN
       my_book.isbn := '1-56592-335-9';
       my_book.title := 'ORACLE PL/SQL PROGRAMMING';
       my_book.summary := 'General user guide and reference';
       my_book.author := 'FEUERSTEIN, STEVEN AND BILL PRIBYL';
       my_book.page_count := 980; -- new page count for 3rd edition

       UPDATE books
          SET ROW = my_book
         WHERE isbn = my_book.isbn;
    END;
There are some restrictions on record-based updates:
You must update an entire row with the ROW syntax. You cannot update a subset of columns (although this may be supported in future releases).
You cannot perform an update using a subquery.
DML statements can include a RETURNING clause that returns column values (and expressions based on those values) from the affected row(s). You can return into a record, or even a collection of records:
    DECLARE
       my_book_new_info books%ROWTYPE;
       my_book_return_info books%ROWTYPE;
    BEGIN
       my_book.isbn := '1-56592-335-9';
       my_book.title := 'ORACLE PL/SQL PROGRAMMING';
       my_book.summary := 'General user guide and reference';
       my_book.author := 'FEUERSTEIN, STEVEN AND BILL PRIBYL';
       my_book.page_count := 980; -- new page count for 3rd edition

       UPDATE books
          SET ROW = my_book_new_info
         WHERE isbn = my_book.isbn
         RETURNING isbn, title, summary, author, page_count
              INTO my_book_return_info;
    END;
Notice that I must list each of my individual columns in the
RETURNING clause. Oracle does not yet support the * syntax.
As you begin to explore these new capabilities and put them to use, keep in mind the following:
You can use a record variable only (a) on the right side of the SET clause in UPDATEs, (b) in the VALUES clause of an INSERT, or (c) in the INTO subclause of a RETURNING clause.
You must (and can only) use the ROW keyword on the left side of a SET clause. In this case, you may not have any other SET clauses (i.e., you cannot SET a row and then SET an individual column).
If you INSERT with a record, you cannot pass individual values for columns.
You cannot INSERT or UPDATE with a record that contains a nested record or with a function that returns a nested record.
You cannot use records in DML statements that are executed dynamically (EXECUTE IMMEDIATE). This requires Oracle to support the binding of a PL/SQL record type into a SQL statement, and only SQL types can be bound in this way.
Oracle introduced a significant enhancement to PL/SQL’s DML capabilities for Oracle8i Database and above with the FORALL statement. FORALL tells the PL/SQL runtime engine to bulk bind into the SQL statement all of the elements of one or more collections before sending anything to the SQL engine. Why would this be useful? We all know that PL/SQL is tightly integrated with the underlying SQL engine in the Oracle database. PL/SQL is the database programming language of choice for Oracle—even though you can now use Java inside the database as well.
But this tight integration does not necessarily mean that no overhead is associated with running SQL from a PL/SQL program. When the PL/SQL runtime engine processes a block of code, it executes the procedural statements within its own engine but passes the SQL statements on to the SQL engine. The SQL layer executes the SQL statements and then returns information to the PL/SQL engine, if necessary.
This transfer of control (shown in Figure 14-1) between the PL/SQL and SQL engines is called a context switch. Each time a switch occurs, there is additional overhead. There are a number of scenarios in which many switches occur and performance degrades. In Oracle8i Database and above, Oracle offers two enhancements to PL/SQL that allow you to bulk together multiple context switches into a single switch, thereby improving the performance of your applications. These enhancements are FORALL, which is explored in this chapter, and BULK COLLECT, which is explained in Chapter 15.

When the statement is bulk bound and passed to SQL, the SQL engine executes the statement once for each index number in the range. In other words, the same SQL statements are executed, but they are all run in the same round trip to the SQL layer, minimizing the context switches. This is shown in Figure 14-2.

Although the FORALL statement contains an iteration scheme (i.e., it iterates through all the rows of a collection), it is not a FOR loop. Consequently, it has neither a LOOP nor an END LOOP statement. Its syntax is as follows:
FORALLindex_rowIN [lower_bound ... upper_bound| INDICES OFindexing_collection| VALUES OFindexing_collection] [ SAVE EXCEPTIONS ]sql_statement;
where:
- index_row
Is the specified collection through which the FORALL will iterate
- lower_bound
Is the starting index number (row or collection element) for the operation
- upper_bound
Is the ending index number (row or collection element) for the operation
- sql_statement
Is the SQL statement to be performed on each collection element
- indexing_collection
Is the PL/SQL collection used to select the indices in the bind array referenced in the sql_statement; the INDICES OF and VALUES_OF alternatives are available starting in Oracle Database 10g Release 1
- SAVE EXCEPTIONS
Is an optional clause that tells FORALL to process all rows, saving any exceptions that occur
You must follow these rules when using FORALL:
The body of the FORALL statement must be a single DML statement—an INSERT, UPDATE, or DELETE.
The DML statement must reference collection elements, indexed by the index_row variable in the FORALL statement. The scope of the index_row variable is the FORALL statement only; you may not reference it outside of that statement. Note, though, that the upper and lower bounds of these collections do not have to span the entire contents of the collection(s).
Do not declare a variable for index_row. It is declared implicitly as PLS_INTEGER by the PL/SQL engine.
The lower and upper bounds must specify a valid range of consecutive index numbers for the collection(s) referenced in the SQL statement. Sparsely filled collections will raise the following error:
ORA-22160: element at index [3] does not exist
See the diffcount.sql file on the book’s web site for an example of this scenario.
Note that Oracle Database 10g offers the INDICES OF and VALUES OF syntax to support sparse collections (in which rows are not filled sequentially).
Fields within collections of records may not be referenced within the DML statement. Instead, you can only reference the row in the collection as a whole, whether the fields are collections of scalars or collections of more complex objects. For example, the code below
    DECLARE
       TYPE employee_aat IS TABLE OF employee%ROWTYPE
          INDEX BY PLS_INTEGER;
       l_employees   employee_aat;
    BEGIN
       FORALL l_index IN l_employees.FIRST .. l_employees.LAST
          INSERT INTO employee (employee_id, last_name)
            VALUES (l_employees (l_index).employee_id
                  , l_employees (l_index).last_name
            );
    END;
will cause the following compilation error:
    PLS-00436: implementation restriction: cannot reference fields
    of BULK In-BIND table of records
The collection subscript referenced in the DML statement cannot be an expression. For example, the following script:
    DECLARE
       names name_varray := name_varray ();
    BEGIN
       FORALL indx IN names.FIRST .. names.LAST
          DELETE FROM emp WHERE ename = names(indx+10);
    END;
will cause the following error:
PLS-00430: FORALL iteration variable INDX is not allowed in this context
Before we look at the details of FORALL, let’s examine the scenarios in which excessive context switches are likely to cause problems. These scenarios may occur when you are processing multiple rows of information stored (or to be deposited) in a collection (a VARRAY, nested table, or associative array).
Suppose, for example, that I need to write a procedure to update the page count of specified books in my books table. Inputs to my program are two collections, one that contains the ISBN numbers of the books to be updated and another that holds the page counts for those books. Here’s the solution I would have written prior to Oracle8i Database (taking advantage of two previously defined variable array types, name_varray and number_varray):
CREATE OR REPLACE PROCEDURE order_books (
isbn_in IN name_varray,
new_count_in IN number_varray)
IS
BEGIN
FOR indx IN isbn_in.FIRST .. isbn_in.LAST
LOOP
UPDATE books
SET page_count = new_count_in (indx)
WHERE isbn = isbn_in (indx);
END LOOP;
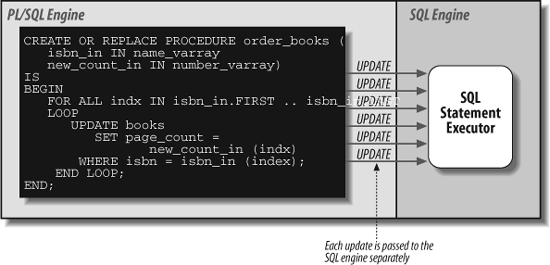
END;If I needed to insert 100 rows, then I would be performing at least 100 context switches, because each update is processed in a separate trip to the SQL engine. Figure 14-3 illustrates this excessive (but previously unavoidable) switching.
You can also run into lots of switching when you fetch multiple rows of information from a cursor into a collection. Here is an example of the kind of code that cries out for the bulk collection feature:
    DECLARE
       CURSOR major_polluters IS
          SELECT name, mileage
            FROM cars_and_trucks
           WHERE vehicle_type IN ('SUV', 'PICKUP'),
       names name_varray := name_varray();
       mileages number_varray := number_varray();
    BEGIN
       FOR bad_car IN major_polluters
       LOOP
          names.EXTEND;
          names (major_polluters%ROWCOUNT) := bad_car.name;
          mileages.EXTEND;
          mileages (major_polluters%ROWCOUNT) := bad_car.mileage;
       END LOOP;

       ... now work with data in the arrays ...
    END;
If you find yourself writing code like either of these examples , you will be much better off switching to one of the bulk operations explored in the following sections. In particular, you should keep an eye out for these cues in your code:
A recurring SQL statement inside a PL/SQL loop. (It doesn’t have to be a FOR loop, but that is the most likely candidate.)
Some parameter that can be made a bind variable. You need to be able to load those values into a collection to have it processed by FORALL.
Here are some examples of the use of the FORALL statement:
Let’s rewrite the order_books procedure to use FORALL:
    CREATE OR REPLACE PROCEDURE order_books (
       isbn_in IN name_varray,
       new_count_in IN number_varray)
    IS
    BEGIN
       FORALL indx IN isbn_in.FIRST .. isbn_in.LAST
          UPDATE books
             SET page_count = new_count_in (indx)
           WHERE isbn = isbn_in (indx);
    END;
Notice that the only changes in this example are to change FOR to FORALL, and to remove the LOOP and END LOOP keywords. This use of FORALL accesses and passes to SQL each of the rows defined in the two collections. Figure 14-2 shows the change in behavior that results.
The next example shows how the DML statement can reference more than one collection. In this case, I have three collections: denial, patient_name, and illnesses. Only the first two are subscripted, and so individual elements of the collection are passed to each INSERT. The third column in health_coverage is a collection listing preconditions. Because the PL/SQL engine bulk binds only subscripted collections, the illnesses collection is placed in that column for each row inserted:
    FORALL indx IN denial.FIRST .. denial.LAST
       INSERT INTO health_coverage
          VALUES (denial(indx), patient_name(indx), illnesses);
Use the RETURNING clause in a FORALL statement to retrieve information about each separate DELETE statement. Notice that the RETURNING clause in FORALL must use BULK COLLECT INTO (the corresponding “bulk” operation for queries):
    CREATE OR REPLACE FUNCTION remove_emps_by_dept (deptlist dlist_t)
       RETURN enolist_t
    IS
       enolist enolist_t;
    BEGIN
       FORALL aDept IN deptlist.FIRST..deptlist.LAST
          DELETE FROM emp WHERE deptno IN deptlist(aDept)
             RETURNING empno BULK COLLECT INTO enolist;
       RETURN enolist;
    END;
Use the indices defined in one collection to determine which rows in the binding array (the collection referenced inside the SQL statement) will be used in the dynamic INSERT.
    FORALL indx IN INDICES OF l_top_employees
       EXECUTE IMMEDIATE
          'INSERT INTO ' || l_table || ' VALUES (:emp_pky, :new_salary)
          USING l_new_salaries(indx).employee_id,
                l_new_salaries(indx).salary;
You can use cursor attributes after you execute a FORALL statement to get information about the DML operation run within FORALL. Oracle also offers an additional attribute, %BULK_ROWCOUNT, to give you more granular information about the results of the bulk DML statement.
Table 14-2 describes the significance of the values returned by these attributes for FORALL.
Table 14-2. Implicit SQL cursor attributes for DML statements
Name | Description |
|---|---|
SQL%FOUND | Returns TRUE if the last execution of the SQL statement modified one or more rows. |
SQL%NOTFOUND | Returns TRUE if the last execution of the SQL statement modified one or more rows. |
SQL%ROWCOUNT | Returns the total number of rows processed by all executions of the SQL statement, not just the last statement. |
SQL%ISOPEN | Always returns FALSE and should not be used. |
SQL%BULK_ROWCOUNT | Returns a collection that tells you the number of rows processed by each corresponding SQL statement executed via FORALL. Note: when %BULK_ROWCOUNT(i) is zero, %FOUND and %NOTFOUND are FALSE and TRUE, respectively. |
Let’s now explore the %BULK_ROWCOUNT composite attribute. This attribute, designed specifically for use with FORALL, has the semantics of (acts like) an associative array or collection. Oracle deposits in the Nth element in this collection the number of rows processed by the Nth execution of the FORALL’s INSERT, UPDATE, or DELETE. If no rows were affected, the Nth row will contain a zero value.
Here is an example of using %BULK_ROWCOUNT (and the overall %ROWCOUNT attribute as well):
    DECLARE
       TYPE isbn_list IS TABLE OF VARCHAR2(13);

       my_books  isbn_list
       := isbn_list (
             '1-56592-375-8',
             '0-596-00121-5',
             '1-56592-849-0',
             '1-56592-335-9',
             '1-56592-674-9',
             '1-56592-675-7',
             '0-596-00180-0',
             '1-56592-457-6'
          );
    BEGIN
       FORALL book_index IN
              my_books.FIRST..my_books.LAST
          UPDATE books
             SET page_count
           WHERE isbn = my_books (book_index);

       -- Did I update the total number of books I expected?
       IF SQL%ROWCOUNT != 8
       THEN
          DBMS_OUTPUT.PUT_LINE (
             'We are missing a book!'),
       END IF;

       -- Did the 4th UPDATE statement affect any rows?
       IF SQL%BULK_ROWCOUNT(4) = 0
       THEN
          DBMS_OUTPUT.PUT_LINE (
             'What happened to Oracle PL/SQL Programming?'),;
       END IF;
    END;
Here are some tips on how this attribute works:
The FORALL statement and %BULK_ROWCOUNT use the same subscripts or row numbers in the collections. For example, if the collection passed to FORALL has data in rows 10 through 200, then the %BULK_ROWCOUNT pseudo-collection will also have rows 10 through 200 defined and populated. Any other rows will be undefined.
When the INSERT affects only a single row (when you specify a VALUES list, for example), a row’s value in %BULK_ROWCOUNT will be equal to 1. For INSERT...SELECT statements, however, %BULK_ROWCOUNT can be greater than 1.
The value in a row of the %BULK_ROWCOUNT pseudo-array for deletes and inserts may be any natural number (0 or positive); these statements can modify more than one row, depending on their WHERE clauses.
The FORALL statement allows you to pass multiple SQL statements all together (in bulk) to the SQL engine. This means that as far as context switching is concerned, you have one SQL “block,” but these blocks are still treated as individual DML operations.
What happens when one of those DML statements fails? Here is the default behavior:
The FORALL statement stops executing. It isn’t possible to request that the FORALL skip over the offending statement and continue on to the next row in the collection.
The DML statement being executed is rolled back to an implicit savepoint marked by the PL/SQL engine before execution of the statement.
Any previous DML operations in that FORALL statement that already executed without error are not rolled back.
Oracle9i Database introduced a new clause, SAVE EXCEPTIONS, which can be used inside a FORALL statement. By including this clause, you instruct Oracle to continue processing even when an error has occurred. Oracle will then “save the exception” (or multiple exceptions, if more than one error occurs). When the DML statement completes, it will then raise the ORA-24381 exception. In the exception section, you can then access a pseudo-collection called SQL%BULK_EXCEPTIONS to obtain error information.
Here is an example, followed by an explanation of what is going on:
    /* File on web: bulkexc.sql */
1    CREATE OR REPLACE PROCEDURE bulk_exceptions (
2       whr_in IN VARCHAR2 := NULL)
3    IS
4       TYPE namelist_t IS TABLE OF VARCHAR2 (100);
5       enames_with_errors namelist_t := -- Max of 10 characters in emp.
6          namelist_t ('LITTLE', 'BIGBIGGERBIGGEST', 'SMITHIE', ''),
7       bulk_errors EXCEPTION;
8       PRAGMA EXCEPTION_INIT ( bulk_errors, -24381 );
9    BEGIN
10       FORALL indx IN
11             enames_with_errors.FIRST ..
12             enames_with_errors.LAST
13          SAVE EXCEPTIONS
14          EXECUTE IMMEDIATE
15             'UPDATE emp SET ename = :newname'
16             USING enames_with_errors(indx);
17    EXCEPTION
18       WHEN bulk_errors
19       THEN
20          FOR indx IN 1 .. SQL%BULK_EXCEPTIONS.COUNT
21          LOOP
22             DBMS_OUTPUT.PUT_LINE (
23                'Error ' || indx || ' occurred during ' ||
24                'iteration ' || SQL%BULK_EXCEPTIONS(indx).ERROR_INDEX ||
25                ' updating name to ' ||
26                     enames_with_errors (
27                      SQL%BULK_EXCEPTIONS(indx).ERROR_INDEX));
28             DBMS_OUTPUT.PUT_LINE (
29                'Oracle error is ' ||
30                SQLERRM (-1 * SQL%BULK_EXCEPTIONS(indx).ERROR_CODE));
31          END LOOP;
32    END;
When I run this code (with SERVEROUTPUT turned on), I see these results:
    SQL>EXEC bulk_exceptions

    Error 1 occurred during iteration 2 updating name to BIGBIGGERBIGGEST
    Oracle error is ORA-01401: inserted value too large for column

    Error 2 occurred during iteration 4 updating name to
    Oracle error is ORA-01407: cannot update () to NULL
In other words, Oracle encountered two exceptions as it processed the DML for the names collection. It did not stop with the first exception, but continued on, cataloging a third.
The following table describes the error-handling functionality in this code:
Prior to Oracle Database 10g, the collection that is referenced inside the FORALL statement (the “binding array”) had to be densely or consecutively filled. If there were any gaps between the low and high values specified in the range of the FORALL header, Oracle would raise an error as shown below:
1    DECLARE
2       TYPE employee_aat IS TABLE OF employee.employee_id%TYPE
3          INDEX BY PLS_INTEGER;
4       l_employees   employee_aat;
5    BEGIN
6       l_employees (1) := 100;
7       l_employees (100) := 1000;
8       FORALL l_index IN l_employees.FIRST .. l_employees.LAST
9          UPDATE employee SET salary = 10000
10           WHERE employee_id = l_employees (l_index);
11    END;
12    /
The error message looked like this:
    DECLARE
    *
    ERROR at line 1:
    ORA-22160: element at index [2] does not exist
Furthermore, there was no way for you to skip over rows in the binding array that you didn’t want processed by the FORALL statement. These restrictions often led to the writing of additional code to compress collections to fit the limitations of FORALL. To help PL/SQL developers avoid this nuisance coding, PL/SQL now offers the INDICES OF and VALUES OF clauses, both of which allow you to specify the portion of the binding array to be processed by FORALL.
First, let’s review the difference between these two clauses, and then we will explore examples to demonstrate their usefulness.
- INDICES OF
Use this clause when you have a collection (let’s call it the indexing array) whose defined rows specify which rows in the binding array (referenced inside the FORALL’s DML statement) you would like to be processed. In other words, if the element at position N (a.k.a. the row number) is not defined in the indexing array, you want the FORALL statement to ignore the element at position N in the binding array.
- VALUES OF
Use this clause when you have a collection of integers (again, the indexing array) whose content (the value of the element at a specified position) identifies the position in the binding array that you want to be processed by the FORALL statement.
I would like to update the salaries of some employees to 10,000. Currently, no one has such a salary:
    SQL>SELECT employee_id FROM employee WHERE salary = 10000;
    no rows selected
I then write the following program.
    /* File on web: 10g_indices_of.sql */
1    DECLARE
2       TYPE employee_aat IS TABLE OF employee.employee_id%TYPE
3          INDEX BY PLS_INTEGER;
4
5       l_employees           employee_aat;
6
7       TYPE boolean_aat IS TABLE OF BOOLEAN
8          INDEX BY PLS_INTEGER;
9
10       l_employee_indices   boolean_aat;
11    BEGIN
12       l_employees (1) := 7839;
13       l_employees (100) := 7654;
14       l_employees (500) := 7950;
15       --
16       l_employee_indices (1) := TRUE;
17       l_employee_indices (500) := TRUE;
18       --
19       FORALL l_index IN INDICES OF l_employee_indices
20          UPDATE employee
21             SET salary = 10000
22           WHERE employee_id = l_employees (l_index);
23    END;
24    /
The following table describes the logic of the program:
Line(s) | Description |
|---|---|
2-5 | Defines a collection of employee ID numbers. |
7-10 | Defines a collection of Boolean values. |
12-14 | Populates (sparsely) three rows (1, 100, and 500) in the collection of employee IDs. |
16-17 | Defines only two rows in the collection, 1 and 500. |
19-22 | In the FORALL statement, rather than specify a range of values from FIRST to LAST, I simply specify INDICES OF l_employee_indices. |
After executing this code, I query the table to see that, in fact, only two rows of the table were updated; the employee with ID 7654 was skipped because the Boolean indices collection had no element defined at position 100.
    SQL>SELECT employee_id FROM employee  WHERE salary = 10000;

    EMPLOYEE_ID
    -----------
           7839
           7950
What’s the problem? With INDICES OF (line 19), the contents of the indexing array are ignored. All that matters are the positions or row numbers that are defined in the collection.
Again, I would like to update the salaries of some employees to 10,000, this time using the VALUES OF clause. Currently, no one has such a salary:
    SQL>SELECT employee_id FROM employee WHERE salary = 10000;
    no rows selected
I then write the following program:
    /* File on web: 10g_values_of.sql */
1    DECLARE
2       TYPE employee_aat IS TABLE OF employee.employee_id%TYPE
3          INDEX BY PLS_INTEGER;
4
5       l_employees           employee_aat;
6
7       TYPE indices_aat IS TABLE OF PLS_INTEGER
8          INDEX BY PLS_INTEGER;
9
10       l_employee_indices   indices_aat;
11    BEGIN
12       l_employees (-77) := 7820;
13       l_employees (13067) := 7799;
14       l_employees (99999999) := 7369;
15       --
16       l_employee_indices (100) := -77;
17       l_employee_indices (200) := 99999999;
18       --
19       FORALL l_index IN VALUES OF l_employee_indices
20          UPDATE employee
21             SET salary = 10000
22           WHERE employee_id = l_employees (l_index);
23    END;
24    /
The following table describes the logic of the program:
Line(s) | Description |
|---|---|
2-6 | Defines a collection of employee ID numbers. |
7-10 | Defines a collection of integers. |
12-14 | Populates (sparsely) three rows (-77, 13067, and 99999999) in the collection of employee IDs. |
16-17 | I want to set up the indexing array to identify which of those rows to use in my update. Because I am using VALUES OF, the row numbers that I use are unimportant. Instead, what matters is the value found in each of the rows in the indexing array. Again, I want to skip over that “middle” row of 13067, so here I define just two rows in the l_employee_indices array and assign them values -77 and 9999999, respectively. |
19-22 | Rather than specify a range of values from FIRST to LAST, I simply specify VALUES OF l_employee_indices. Notice that I populate rows 100 and 200 in the indices collection. VALUES OF does not require a densely filled indexing collection. |
After executing this code, I query the table to see that in fact only two rows of the table were updated; the employee with ID 7799 was skipped because the Boolean indices collection had no element defined at position 13067.
    SQL>SELECT employee_id FROM employee WHERE salary = 10000;

    EMPLOYEE_ID
    -----------
           7369
7820The Oracle RDBMS provides a very robust transaction model, as you might expect from a relational database. Your application code determines what constitutes a transaction, which is the logical unit of work that must be either saved with a COMMIT statement or rolled back with a ROLLBACK statement. A transaction begins implicitly with the first SQL statement issued since the last COMMIT or ROLLBACK (or with the start of a session), or continues after a ROLLBACK TO SAVEPOINT.
PL/SQL provides the following statements for transaction management :
- COMMIT
Saves all outstanding changes since the last COMMIT or ROLLBACK, and releases all locks.
- ROLLBACK
Erases all outstanding changes since the last COMMIT or ROLLBACK, and releases all locks.
- ROLLBACK TO SAVEPOINT
Erases all changes made since the specified savepoint was established, and releases locks that were established within that range of the code.
- SAVEPOINT
Establishes a savepoint, which then allows you to perform partial ROLLBACKs.
- SET TRANSACTION
Allows you to begin a read-only or read-write session, establish an isolation level, or assign the current transaction to a specified rollback segment.
- LOCK TABLE
Allows you to lock an entire database table in the specified mode. This overrides the default row-level locking usually applied to a table.
These statements are explained in more detail in the following sections.
When you COMMIT, you make permanent any changes made by your session to the database in the current transaction. Once you COMMIT, your changes will be visible to other Oracle sessions or users. The syntax for the COMMIT statement is:
COMMIT [WORK] [COMMENTtext];The WORK keyword is optional and can be used to improve readability.
The COMMENT keyword specifies a comment that is then associated with the current transaction. The text must be a quoted literal and can be no more than 50 characters in length. The COMMENT text is usually employed with distributed transactions, and can be handy for examining and resolving in-doubt transactions within a two-phase commit framework. It is stored in the data dictionary along with the transaction ID.
Note that COMMIT releases any row and table locks issued in your session, such as with a SELECT FOR UPDATE statement. It also erases any savepoints issued since the last COMMIT or ROLLBACK .
Once you COMMIT your changes, you cannot roll them back with a ROLLBACK statement.
The following statements are all valid uses of COMMIT:
    COMMIT;
    COMMIT WORK;
COMMIT COMMENT 'maintaining account balance'.When you perform a ROLLBACK, you undo some or all changes made by your session to the database in the current transaction. Why would you want to erase changes? From an ad hoc SQL standpoint, the ROLLBACK gives you a way to erase mistakes you might have made, as in:
DELETE FROM orders;
“No, no! I meant to delete only the orders before May 2005!” No problem—just issue ROLLBACK. From an application coding standpoint, ROLLBACK is important because it allows you to clean up or restart from a clean state when a problem occurs.
The syntax for the ROLLBACK statement is:
    ROLLBACK [WORK] [TO [SAVEPOINT
] savepoint_name];
There are two basic ways to use ROLLBACK: without parameters or with the TO clause to indicate a savepoint at which the ROLLBACK should stop. The parameterless ROLLBACK undoes all outstanding changes in your transaction.
The ROLLBACK TO version allows you to undo all changes and release all acquired locks that were issued since the savepoint identified by savepoint_name. (See the next section on the SAVEPOINT statement for more information on how to mark a savepoint in your application.)
The savepoint_name is an undeclared Oracle identifier. It cannot be a literal (enclosed in quotes) or variable name.
All of the following uses of ROLLBACK are valid:
    ROLLBACK;
    ROLLBACK WORK;
    ROLLBACK TO begin_cleanup;
When you roll back to a specific savepoint, all savepoints issued after the specified savepoint_name are erased, but the savepoint to which you roll back is not. This means that you can restart your transaction from that point and, if necessary, roll back to that same savepoint if another error occurs.
Immediately before you execute an INSERT, UPDATE, or DELETE, PL/SQL implicitly generates a savepoint. If your DML statement then fails, a rollback is automatically performed to that implicit savepoint. In this way, only the last DML statement is undone.
SAVEPOINT gives a name to, and marks a point in, the processing of your transaction. This marker allows you to ROLLBACK TO that point, erasing any changes and releasing any locks issued after that savepoint, but preserving any changes and locks that occurred before you marked the savepoint.
The syntax for the SAVEPOINT statement is:
SAVEPOINTsavepoint_name;where savepoint_name is an undeclared identifier. This means that it must conform to the rules for an Oracle identifier (up to 30 characters in length, starting with a letter, containing letters, numbers, and #, $, or _), but that you do not need to (and are not able to) declare that identifier.
Savepoints are not scoped to PL/SQL blocks. If you reuse a savepoint name within the current transaction, that savepoint is “moved” from its original position to the current point in the transaction, regardless of the procedure, function, or anonymous block in which the SAVEPOINT statements are executed. As a corollary, if you issue a savepoint inside a recursive program, a new savepoint is executed at each level of recursion, but you can only roll back to the most recently marked savepoint.
The SET TRANSACTION statement allows you to begin a read-only or read-write session, establish an isolation level, or assign the current transaction to a specified rollback segment. This statement must be the first SQL statement processed in a transaction, and it can appear only once. This statement comes in the following four flavors.
- SET TRANSACTION READ ONLY;
This version defines the current transaction as read-only. In a read-only transaction, all subsequent queries see only those changes that were committed before the transaction began (providing a read-consistent view across tables and queries). This statement is useful when you are executing long-running, multiple query reports, and you want to make sure that the data used in the report is consistent.
- SET TRANSACTION READ WRITE;
This version defines the current transaction as read-write.
- SET TRANSACTION ISOLATION LEVEL SERIALIZABLE | READ COMMITTED;
This version defines how transactions that modify the database should be handled. You can specify a serializable or read-committed isolation level. When you specify SERIALIZABLE, a data manipulation statement (UPDATE, INSERT, DELETE) that attempts to modify a table already modified in an uncommitted transaction will fail. To execute this command, you must set the database initialization parameter COMPATIBLE to 7.3.0 or higher.
If you specify READ COMMITTED, a DML statement that requires row-level locks held by another transaction will wait until those row locks are released.
- SET TRANSACTION USE ROLLBACK SEGMENT rollback_segname;
This version assigns the current transaction to the specified rollback segment and establishes the transaction as read-write. This statement cannot be used with SET TRANSACTION READ ONLY.
This statement allows you to lock an entire database table with the specified lock mode. By doing this, you can share or deny access to that table while you perform operations against it. The syntax for this statement is:
LOCK TABLEtable_reference_listINlock_modeMODE [NOWAIT];
where table_reference_list is a list of one or more table references (identifying either a local table/view or a remote entity through a database link), and lock_mode is the mode of the lock, which can be one of the following:
| ROW SHARE |
| ROW EXCLUSIVE |
| SHARE UPDATE |
| SHARE |
| SHARE ROW EXCLUSIVE |
| EXCLUSIVE |
If you specify the NOWAIT keyword , Oracle will not wait for the lock if the table has already been locked by another user. If you leave out the NOWAIT keyword, Oracle waits until the table is available (and there is no set limit on how long Oracle will wait). Locking a table never stops other users from querying or reading the table.
The following LOCK TABLE statements show valid variations:
    LOCK TABLE emp IN ROW EXCLUSIVE MODE;
    LOCK TABLE emp, dept IN SHARE MODE NOWAIT;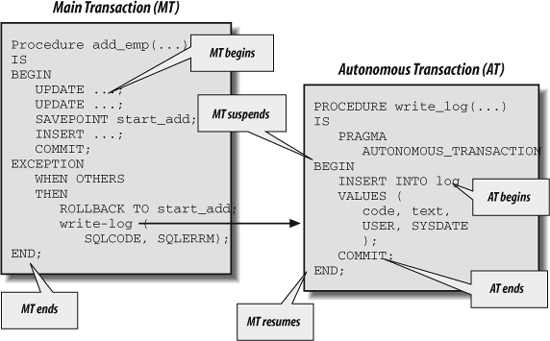
LOCK TABLE scott.emp@new_york IN SHARE UPDATE MODE;When you define a PL/SQL block (anonymous block, procedure, function, packaged procedure, packaged function, database trigger) as an autonomous transaction, you isolate the DML in that block from the caller’s transaction context. That block becomes an independent transaction that is started by another transaction, referred to as the main transaction.
Within the autonomous transaction block, the main transaction is suspended. You perform your SQL operations, commit or roll back those operations, and resume the main transaction. This flow of transaction control is illustrated in Figure 14-4.
There isn’t much involved in defining a PL/SQL block as an autonomous transaction. You simply include the following statement in your declaration section:
PRAGMA AUTONOMOUS_TRANSACTION;
The pragma instructs the PL/SQL compiler to establish a PL/SQL block as autonomous or independent. For the purposes of the autonomous transaction, a PL/SQL block can be any of the following:
Top-level (but not nested) anonymous PL/SQL blocks
Functions and procedures, defined either in a package or as standalone programs
Methods (functions and procedures) of an object type
Database triggers
You can put the autonomous transaction pragma anywhere in the declaration section of your PL/SQL block. You would probably be best off, however, placing it before any data structure declarations. That way, anyone reading your code will immediately identify the program as an autonomous transaction.
This pragma is the only syntax change made to PL/SQL to support autonomous transactions. COMMIT, ROLLBACK, the DML statements—all the rest is as it was before. However, these statements have a different scope of impact and visibility when executed within an autonomous transaction, and you will need to include a COMMIT or ROLLBACK in your program.
While it is certainly very easy to add the autonomous transaction pragma to your code, there are some rules and restrictions on the use of this feature.
If an autonomous transaction attempts to access a resource held by the main transaction (which has been suspended until the autonomous routine exits), a deadlock can occur in your program. Here is a simple example to demonstrate the problem. I create a procedure to perform an update, and then call it after having already updated all rows:
    /* File on web: autondlock.sql */
    CREATE OR REPLACE PROCEDURE
       update_salary (dept_in IN NUMBER)
    IS
       PRAGMA AUTONOMOUS_TRANSACTION;

       CURSOR myemps IS
          SELECT empno FROM emp
           WHERE deptno = dept_in
             FOR UPDATE NOWAIT;
    BEGIN
       FOR rec IN myemps
       LOOP
          UPDATE emp SET sal = sal * 2
           WHERE empno = rec.empno;
       END LOOP;
       COMMIT;
    END;

    BEGIN
       UPDATE emp SET sal = sal * 2;
       update_salary (10);
    END;
The results are not pretty:
    ERROR at line 1:
    ORA-00054: resource busy and acquire with NOWAIT specified
You cannot mark all subprograms in a package (or all methods in an object type) as autonomous with a single PRAGMA declaration. You must indicate autonomous transactions explicitly in each program. One consequence of this rule is that you cannot tell by looking at the package specification which (if any) programs will run as autonomous transactions.
To exit without errors from an autonomous transaction program that has executed at least one INSERT, UPDATE or DELETE, you must perform an explicit commit or rollback. If the program (or any program called by it) has transactions pending, the runtime engine will raise the exception shown below—and then will roll back those uncommitted transactions.
ORA-06519: active autonomous transaction detected and rolled back
The COMMIT and ROLLBACK statements end the active autonomous transaction, but they do not force the termination of the autonomous routine. You can, in fact, have multiple COMMIT and/or ROLLBACK statements inside your autonomous block.
You can roll back only to savepoints marked in the current transaction. When you are in an autonomous transaction, therefore, you cannot roll back to a savepoint set in the main transaction. If you try to do so, the runtime engine will raise this exception:
ORA-01086: savepoint 'your savepoint' never established
The TRANSACTIONS parameter in the Oracle initialization file specifies the maximum number of transactions allowed concurrently in a session. If you use lots of autonomous transaction programs in your application, you might exceed this limit, in which case you will see the following exception:
ORA-01574: maximum number of concurrent transactions exceeded
In this case, increase the value for TRANSACTIONS. The default value is 75.
The default behavior of autonomous transactions is that once a COMMIT or a ROLLBACK occurs in the autonomous transaction, those changes are visible immediately in the main transaction. But what if you want to hide those changes from the main transaction? You want them saved or erased—no question about that—but the information should not be available to the main transaction.
Oracle offers a SET TRANSACTION statement option to achieve this effect.
SET TRANSACTION ISOLATION LEVEL SERIALIZABLE;
The default isolation level is READ COMMITTED, which means that as soon as changes are committed, they are visible to the main transaction.
As is usually the case with the SET TRANSACTION statement, you must call it before you initiate your transactions (i.e., issue any SQL statements); in addition, the setting affects your entire session, not just the current program. The autonserial.sql script on the book’s web site demonstrates use of the SERIALIZABLE isolation level.
Where would you find autonomous transactions useful in your applications? First, let’s reinforce the general principle: you will want to define your program module as an autonomous transaction whenever you want to isolate the changes made in that module from the caller’s transaction context.
Here are some specific ideas:
- Logging mechanism
On the one hand, you need to log an error to your database log table. On the other hand, you need to roll back your core transaction because of the error. And you don’t want to roll back over other log entries. What’s a person to do? Go autonomous! This is probably the most common motivation for PL/SQL developers to use autonomous transactions and is explored at the end of this section.
- Perform commits and rollbacks in your database triggers
If you define a trigger as an autonomous transaction, then you can commit and/or roll back in that trigger, without affecting the transaction that fired the trigger. Why is this valuable? You may want to take an action in the database trigger that is not affected by the ultimate disposition of the transaction that caused the trigger to fire. For example, suppose that you want to keep track of each action against a table, whether or not the action completed. You might even want to be able to detect which actions failed. See the autontrigger*.sql scripts for examples of how you can apply this technique.
- Reusable application components
This usage goes to the heart of the value of autonomous transactions. As we move more and more into the dispersed, multilayered world of the Internet, it becomes ever more important to be able to offer standalone units of work (also known as cartridges) that get their job done without any side effects on the calling environment. Autonomous transactions play a crucial role in this area.
- Avoid mutating table trigger errors for queries
Mutating table trigger errors occur when a row-level trigger attempts to read from or write to the table from which it was fired. If, however, you make your trigger an autonomous transaction by adding the PRAGMA AUTONOMOUS TRANSACTION statement and committing inside the body of the trigger, then you will be able to query the contents of the firing table. However, you will still not be allowed to modify the contents of the table.
- Call user-defined functions in SQL that modify tables
Oracle lets you call your own functions inside a SQL statement, provided that this function does not update the database (and several other rules besides). If, however, you define your function as an autonomous transaction, you will then be able to insert, update or delete inside that function as it is run from within a query. The trcfunc.sql script demonstrates an application of this capability, allowing you to audit which rows of a table have been queried.
- Retry counter
Suppose that you want to let a user try to get access to a resource N times before an outright rejection; you also want to keep track of attempts between connections to the database. This persistence requires a COMMIT, but one that should remain independent of the transaction. For an example of such a utility, see retry.pkg and retry.tst on the book’s web site.
A very common requirement in applications is to keep a log of errors that occur during transaction processing. The most convenient repository for this log is a database table; with a table, all the information is retained in the database, and you can use SQL to retrieve and analyze the log.
One problem with a database table log, however, is that entries in the log become a part of your transaction. If you perform a ROLLBACK (or if one is performed to you), you can easily erase your log. How frustrating! You can get fancy and use savepoints to preserve your log entries while cleaning up your transaction, but that approach is not only fancy, it is complicated. With autonomous transactions, however, logging becomes simpler, more manageable, and less error prone.
Suppose that I have a log table defined as follows:
    /* File on web: log.pkg */
    CREATE TABLE logtab (
        code INTEGER,
        text VARCHAR2(4000),
        created_on DATE,
        created_by VARCHAR2(100),
        changed_on DATE,
        changed_by VARCHAR2(100),
        machine VARCHAR2(100),
        program VARCHAR2(100)
        );
I can use it to store errors (SQLCODE and SQLERRM) that have occurred, or even for nonerror-related logging. The machine and program columns record information available from the virtual V$SESSION table, as you will see.
So I have my table. Now, how should I write to my log? Here’s what you shouldn’t do:
    EXCEPTION
       WHEN OTHERS
       THEN
          v_code := SQLCODE;
          v_msg := SQLERRM;
          INSERT INTO logtab VALUES (
             v_code, v_msg, SYSDATE, USER, SYSDATE, USER, NULL, NULL);
    END;
In other words, never expose your underlying logging mechanism by explicitly inserting into it your exception sections and other locations. Instead, you should build a layer of code around the table (this is known as encapsulation). There are two reasons to do this:
If you ever change your table’s structure, all those uses of the log table won’t be disrupted.
People can use the log table in a much easier, more consistent manner.
So here is my very simple logging package. It consists of two procedures:
    CREATE OR REPLACE PACKAGE log
    IS
       PROCEDURE putline (
          code_in IN INTEGER, text_in IN VARCHAR2);

       PROCEDURE saveline (
          code_in IN INTEGER, text_in IN VARCHAR2);
    END;
What is the difference between putline and saveline? The log.saveline procedure (as you will see in the package body) is an autonomous transaction routine; log.putline simply performs the insert. Here is the package body:
    /* File on web: log.pkg */
    CREATE OR REPLACE PACKAGE BODY log
    IS
       PROCEDURE putline (
          code_in IN INTEGER, text_in IN VARCHAR2)
       IS
       BEGIN
          INSERT INTO logtab
               VALUES (
                  code_in,
                  text_in,
                  SYSDATE,
                  USER,
                  SYSDATE,
                  USER
               );
       END;

       PROCEDURE saveline (
          code_in IN INTEGER, text_in IN VARCHAR2)
       IS
          PRAGMA AUTONOMOUS_TRANSACTION;
       BEGIN
          putline (code_in, text_in);
          COMMIT;
       EXCEPTION WHEN OTHERS THEN ROLLBACK;
       END;
    END;
Here are some comments on this implementation that you might find helpful:
The putline procedure performs the straight insert. You would probably want to add some exception handling to this program if you applied this idea in your production application.
The saveline procedure calls the putline procedure (I don’t want any redundant code), but does so from within the context of an autonomous transaction.
With this package in place, my error handler shown earlier can be as simple as this:
    EXCEPTION
       WHEN OTHERS
       THEN
          log.saveline (SQLCODE, SQLERRM);
    END;
No muss, no fuss. Developers don’t have to concern themselves with the structure of the log table; they don’t even have to know they are writing to a database table. And because I have used an autonomous transaction, they can rest assured that no matter what happens in their application, the log entry has been saved.