
In addition to what you’ve read so far in this chapter, there are several other techniques and topics worth discussing. One is a method for getting the current date into your page titles. Considering how easy it is to do page numbers, it’s surprisingly difficult to do dates. Report headers and footers function similarly to page headers and footers, except that they print just once, at the beginning and end of a report.
If you find yourself printing reports only because you need to look at computed values such as group totals and report totals, you will want to read the section on summary reports that follows. You can save yourself a lot of network and other overhead by summarizing your data on the server instead of returning all the detail records and making SQL*Plus do the work.
It’s a very common practice to put the run date in the header of a report. It’s such a common practice, in fact, that it’s a wonder Oracle does not provide a convenient way to do it. Unlike the case with the page number, which SQL*Plus conveniently maintains in the SQL.PNO user variable, the date is not so easily available. How then, do you display the date in the page header? The answer is to retrieve it from the database, put it into a user variable, and display that variable in the header.
You saw how to display the contents of a user variable in the header when the Project Hours and Dollars Detail report was converted to a master/detail style. You also saw how to use the COLUMN command to tell SQL*Plus to continuously update the contents of a user variable with the value of a column in the query. Getting the system date to display in the header involves a little trick that takes advantage of this use of the COLUMN command. The trick is to execute a query that returns the current date, and use the NEW_VALUE clause of the COLUMN command to get that date into a user variable. That user variable sticks around for the duration of the session and can be used in a subsequent report.
The built-in SYSDATE function is used in the following example to return the current date from the database. Notice that the NEW_VALUE option of the COLUMN command is used to update the user variable report_date with the current value of SYSDATE as returned from the database.
COLUMN SYSDATE NEW_VALUE report_date
SELECT SYSDATE FROM DUAL;
SYSDATE is an Oracle built-in function that
returns the current date and time.
DUAL
is a special Oracle table that always exists, always contains exactly
one row, and always contains exactly one column. You could select
SYSDATE from any other table, but DUAL works well because it returns
only one row — all you need to set the date.
Tip
The date returned using this method is the date on the database server, not the client. If you are using a PC to access data on a remote database in a different time zone, the date returned may or may not match the local date. This depends on the time of day when the report is run and on the number of hours difference between the time zones.
You may find that the date format returned by SYSDATE is not what you would prefer. It depends on the setting of the NLS_DATE_FORMAT parameter, which can vary from one database to the next. You can use the ALTER SESSION command to specify a different format, for example:
ALTER SESSION SET NLS_DATE_FORMAT = 'DD-Mon-YYYY';
ALTER SESSION changes the format for the duration of the SQL*Plus session. Make sure you execute it prior to selecting SYSDATE from DUAL. Another alternative is to use the built-in TO_CHAR function to specify a format.
COLUMN current_date NEW_VALUE report_date
SELECT TO_CHAR(SYSDATE,'DD-Mon-YYYY') current_date FROM DUAL;
A column alias of current_date was used in this example to give a usable name to the date column, one that could be used easily with the COLUMN command.
Tip
Consider using ALTER SESSION to format all dates in your report rather than using TO_CHAR to format each date column separately. This makes your SELECT statements easier to write, gives you one point at which to make changes, and helps to ensure consistency.
Table 3.2 shows some typical date format strings that may be used with Oracle’s built-in TO_CHAR function or with the ALTER SESSION command.
You may or may not care whether the output of the SELECT SYSDATE statement appears on the display, but you can suppress it by using the SET TERMOUT command to toggle the display output off and then back on again. Here’s how to do that:
SET TERMOUT OFF
ALTER SESSION SET NLS_DATE_FORMAT = 'DD-Mon-YYYY';
COLUMN SYSDATE NEW_VALUE report_date
SELECT SYSDATE FROM DUAL;
SET TERMOUT ON
Finally, you need to add the date to either the report header or footer. Here’s an example of how to do that using the BTITLE command from the Project Hours and Dollars Detail report:
BTITLE LEFT `=============================================================' -
       SKIP 1 -
       LEFT report_date -
       RIGHT 'Page ' FORMAT 999 SQL.PNO
The addition of “LEFT report_date” to this BTITLE command causes the date to print left-justified on the same line as the page number. When you execute the report, the page footer will look like this:
=======================================================================
22-Feb-1998                                                   Page    1
In addition to the system date, this technique may be used to retrieve any other value from the database for inclusion in a report.
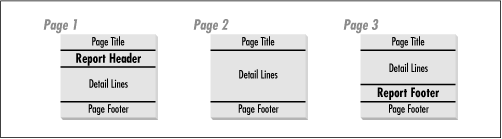
Report headers and footers work very much like page headers and footers, except that they print only once in a report. A report header prints at the beginning of the report, after the first page title, and before the first detail line. A report footer prints at the end of a report, after the last detail line, and before the final page footer. Figure 3.1 illustrates this by showing how the different types of headers and footers print relative to each other in a three-page report.
You define a report header using the REPHEADER command. The REPFOOTER command defines a report footer.
The syntax for the REPHEADER and REPFOOTER commands is the same. To define a report footer, simply use REPFOOTER in place of REPHEADER.
REPH[EADER] [[OFF|ON]|
            COL x|
            S[KIP] x|
            TAB x|
            LE[FT]|
            CE[NTER]|
            R[IGHT]|
            BOLD|
            FOR[MAT] format_spec|
            text|
            variable...]
The parameters you can use with REPHEADER and REPFOOTER are the same as, and work the same way as, those used with the TTITLE command.
One use for a report header is to define a report title that prints just on the first page of a report, leaving only column titles at the top of all subsequent pages. A report footer can be used to mark the end of a report, so you know for sure whether or not you have all the pages. Here, you will see an example showing how these things can be done.
Recall that the Project Hours and Dollars Report, the first one shown in this chapter, used the following commands to define page headers and footers:
TTITLE CENTER 'The Fictional Company' SKIP 3 -
       LEFT 'I.S. Department' -
       RIGHT 'Project Hours and Dollars Report' SKIP 1 -
       LEFT '=============================================+++============='

BTITLE LEFT '=============================================================' -
       SKIP 1 -
       RIGHT 'Page ' FORMAT 999 SQL.PNO
The TTITLE command defined a title containing the name of the report, which in this case was printed on each page of the report. By replacing TTITLE with REPHEADER, and adding a command to turn TTITLE off, the title containing the report name will print just once. The following example shows how this is done, and also defines a report footer:
TTITLE OFF
REPFOOTER CENTER '*** End of Hours and Dollars Report ***'
REPHEADER CENTER 'The Fictional Company' SKIP 3 -
       LEFT 'I.S. Department' -
       RIGHT 'Project Hours and Dollars Report' SKIP 1 -
       LEFT '============================================================='

BTITLE LEFT '=============================================================' -
       SKIP 1 -
       RIGHT 'Page ' FORMAT 999 SQL.PNO
The report footer, defined with the REPFOOTER command, will print on the last page, after the last detail record, to mark the end of the report. Here is what the Project Hours and Dollars report looks like when you run it using the heading commands shown in the previous example:
The Fictional Company


I.S. Department              Project Hours and Dollars Report
=============================================================
                                                      Dollars
Employee Name        Project Name          Hours      Charged
-------------------- -------------------- ------ ------------
Jonathan Gennick     Corporate Web Site       20    $3,380.00
Jonathan Gennick     Year 2000 Fixes          24    $4,056.00
Jonathan Gennick     Accounting System        24    $4,056.00
...
Bohdan Khmelnytsky   Corporate Web Site       20      $900.00
=============================================================
                                                    Page    1

                                                      Dollars
Employee Name        Project Name          Hours      Charged
-------------------- -------------------- ------ ------------
Bohdan Khmelnytsky   Year 2000 Fixes          24    $1,080.00
Bohdan Khmelnytsky   Accounting System        24    $1,080.00
...
Jacob Marley         TCP/IP                   16    $4,800.00
                     Implementation

           *** End of Hours and Dollars Report ***
...
=============================================================
                                                    Page    3
As you can see, the report title printed only on the first page of the report. Subsequent pages began with the column titles. The report footer printed on the last page, following the last detail line. Keep in mind when working with report headers and footers that these report elements still print within the context of a page. Page titles and footers print on each page, regardless of whether a report header or footer also prints on that page. Had the above report included a page title (TTITLE), the page title would have printed on the first page, prior to the report header.
Oracle8 introduced objects to Oracle’s relational database world. Users of Oracle may now define object types, then use those object types as datatypes for columns in a relational table. The following example shows an object type named employee_type, and also shows an EMPLOYEES table that contains an object column named employee. The employee column stores employee_type objects:
SQL>DESCRIBE employee_typeName Null? Type ------------------------------- -------- ---- EMPLOYEE_NAME VARCHAR2(40) EMPLOYEE_HIRE_DATE DATE EMPLOYEE_SALARY NUMBER(9,2) SQL>DESCRIBE employeesName Null? Type ------------------------------- -------- ---- EMPLOYEE_ID NUMBER EMPLOYEE EMPLOYEE_TYPE
When you select from this table using SQL*Plus, the employee object is treated as one database column, which in fact it is. The attributes of the employee object are displayed in parentheses, for example:
SQL> SELECT * FROM employees;

EMPLOYEE_ID
-----------
EMPLOYEE(EMPLOYEE_NAME, EMPLOYEE_HIRE_DATE, EMPLOYEE_SALARY)
-----------------------------------------------------------------------------
          1
EMPLOYEE_TYPE('Taras Shevchenko', '17-NOV-98', 57000)

          2
EMPLOYEE_TYPE('Ivan Mazepa', '17-NOV-98', 67000)

          3
EMPLOYEE_TYPE('Bohdan Khmelnytsky', '17-NOV-98', 77000)
This is some rather messy-looking output. You can tidy it up a bit by formatting the two columns so that both fit on one line. Note that as far as SQL*Plus is concerned, there are only two columns: employee_id and employee. Here’s an example that formats the columns a bit better.
SQL>COLUMN employee FORMAT A60 HEADING "Employee Data"SQL>COLUMN employee_id HEADING "Employee ID"SQL>SELECT * FROM employees;Employee ID Employee Data ----------- ------------------------------------------------------------ 1 EMPLOYEE_TYPE('Taras Shevchenko', '17-NOV-98', 57000) 2 EMPLOYEE_TYPE('Ivan Mazepa', '17-NOV-98', 67000) 3 EMPLOYEE_TYPE('Bohdan Khmelnytsky', '17-NOV-98', 77000)
Now, this is a little better. However, there is still a bit more you can do. SQL*Plus version 8 introduces a new command called ATTRIBUTE, which allows you to format the individual attributes of an object column. In this case, you can use ATTRIBUTE to format the employee salary so it prints as a dollar value. The following commands do this:
SQL>ATTRIBUTE employee_type.employee_salary ALIAS emp_salSQL>ATTRIBUTE emp_sal FORMAT $999,999.99
Notice that the ATTRIBUTE command referenced the object column’s type and not the object column’s name. In other words, employee_type was used, not employee. This is very important, and it’s easy to overlook.
Tip
When you format an attribute for an object type, that format applies any time an object of that type is displayed. This is true even when the same object type is used in more than one column of a table or in more than one table. If you were to have two tables, each with an employee_type object column, the ATTRIBUTE commands just shown would affect the display format of data from both columns in both tables.
Having used the ATTRIBUTE command to format the employee salary attribute, you can reissue the SELECT to get the following results, which have the salary figures formatted as dollar amounts:
SQL> SELECT * FROM employees;

Employee ID Employee Data
----------- ------------------------------------------------------------
          1 EMPLOYEE_TYPE('Taras Shevchenko', '17-NOV-98', $57,000.00)
          2 EMPLOYEE_TYPE('Ivan Mazepa', '17-NOV-98', $67,000.00)
          3 EMPLOYEE_TYPE('Bohdan Khmelnytsky', '17-NOV-98', $77,000.00)
Look again at the ATTRIBUTE commands shown earlier. You will see that two commands were used instead of just one. The first command defined an alias for the attribute. An alias is simply another name you can use in subsequent ATTRIBUTE commands to save yourself the trouble of typing in the entire object type and attribute name again. The second ATTRIBUTE command referred to the alias. If you have deeply nested objects, the dot notation for an attribute can be quite long, so this aliasing ability can come in handy.
As with the COLUMN command, the effects of ATTRIBUTE commands are cumulative. That’s why two commands were able to be used for the previous example in place of just one. Unlike COLUMN, there is no CLEAR ATTRIBUTES command. The CLEAR COLUMNS command will also erase any attribute settings you may have defined.
The syntax for the ATTRIBUTE command is similar to the COLUMN command, but because there aren’t as many options to deal with, it’s not quite as complex. It looks like this:
ATTRIBUTE [object_type.attribute|attribute_alias[ALI[AS]alias| CLE[AR]| FOR[MAT]format_spec| LIKEsource_attribute| ON| OFF...]]
where:
- ATTRIBUTE
Is the command. Issuing the ATTRIBUTE command with no parameters gets you a list of all current attribute settings.
- object_type
Is the name of an Oracle8 object type.
- attribute
Is the name of an attribute of the specified object type and the attribute you are formatting. If you stop here, and don’t supply any other parameters, the current display settings for this attribute are shown.
- ALI[AS] alias
May be abbreviated ALI. ALIAS allows you to specify an alternate name for this attribute that is meaningful to SQL*Plus. This alias may be used in other ATTRIBUTE commands in place of having to spell out the full object type and attribute name again.
- CLE[AR]
May be abbreviated to CLE. CLEAR erases any format settings for the attribute in question. This puts you back to the way things were before any ATTRIBUTE commands were issued for the attribute.
- FOR[MAT] format_spec
May be abbreviated to FOR, and allows you to control how the data for the attribute is displayed. For text fields, you can control only the maximum length. For numeric fields, you can control the width, placement of commas, placement of the dollar sign, and so on. Appendix B describes the format specification elements that can be used with the ATTRIBUTE command.
- LIKE source_column
Causes the attribute to be defined with the same format attributes as another attribute.
- ON
Causes SQL*Plus to print the attribute using the format you have specified. This is the default behavior. You don’t need to use ON unless you have previously used OFF.
- OFF
Disables the format settings for the attribute. SQL*Plus acts as if you had never issued any ATTRIBUTE commands for the attribute in question.
The only format element that can be used with a text attribute is A. For example, you might specify A10 as the format for the employee object’s employee name attribute. When used with the ATTRIBUTE command, a text format such as A10 serves to specify a maximum display length for the attribute. Any characters beyond that length are truncated and consequently not displayed. So, instead of a line like this:
1 EMPLOYEE_TYPE('Taras Shevchenko', '17-NOV-98', $57,000.00)applying a format of A10 to the employee name field results in the name being truncated to 10 characters in length, as shown here:
1 EMPLOYEE_TYPE('Taras Shev', '17-NOV-98', $57,000.00)Text attributes are never expanded to their maximum length. If you think about it, since they are delimited by quotes, that wouldn’t make sense. You couldn’t add the extra space inside the quotes, and there would be little point in putting it outside the quotes.
Sometimes you are only interested in summarized information. Maybe you only need to know the total hours each employee has spent on each project, and you could care less about the detail of each day’s charges. Whenever that’s the case, you should write your SQL query to return summarized data from Oracle.
Here is the query used in the master/detail report shown earlier in this chapter:
SELECT P.PROJECT_ID,
       P.PROJECT_NAME,
       TO_CHAR(PH.TIME_LOG_DATE,'dd-Mon-yyyy') time_log_date,
       PH.HOURS_LOGGED,
       PH.DOLLARS_CHARGED,
       E.EMPLOYEE_ID,
       E.EMPLOYEE_NAME
  FROM EMPLOYEE E,
       PROJECT P,
       PROJECT_HOURS PH
 WHERE E.EMPLOYEE_ID = PH.EMPLOYEE_ID
   AND P.PROJECT_ID = PH.PROJECT_ID
ORDER BY E.EMPLOYEE_ID, P.PROJECT_ID, PH.TIME_LOG_DATE;
This query brings down all the detail information from the PROJECT_HOURS table, and is fine if you need that level of detail. However, if all you were interested in were the totals, you could use the following query instead:
SELECT P.PROJECT_ID,
       P.PROJECT_NAME,
       max(PH.TIME_LOG_DATE) time_log_date
       sum(PH.HOURS_LOGGED) hours_logged,
       sum(PH.DOLLARS_CHARGED) dollars_charged,
       E.EMPLOYEE_ID,
       E.EMPLOYEE_NAME
  FROM EMPLOYEE E,
       PROJECT P,
       PROJECT_HOURS PH
 WHERE E.EMPLOYEE_ID = PH.EMPLOYEE_ID
   AND P.PROJECT_ID = PH.PROJECT_ID
GROUP BY E.EMPLOYEE_ID, E.EMPLOYEE_NAME, P.PROJECT_ID, P.PROJECT_NAME
ORDER BY E.EMPLOYEE_ID, P.PROJECT_ID;
You can practically plug this second query into your script in place of the first. There are only two other changes you would need to make. First, you would eliminate the project breaks and computations, changing the BREAK and COLUMN commands to:
BREAK ON REPORT -
      ON employee_id SKIP PAGE NODUPLICATES -
      ON employee_name NODUPLICATES
CLEAR COMPUTES
COMPUTE SUM LABEL 'Totals' OF hours_logged ON employee_id
COMPUTE SUM LABEL 'Totals' OF dollars_charged ON employee_id
COMPUTE SUM LABEL 'Grand Totals' OF hours_logged ON REPORT
COMPUTE SUM LABEL 'Grand Totals' OF dollars_charged ON REPORT
Then you might change the title of the date field, which now represents the most recent date an employee worked on a project, to something more descriptive:
COLUMN time_log_date HEADING 'Last Date|Worked' FORMAT A11
The resulting output would look like this:
The Fictional Company


I.S. Department                        Project Hours and Dollars Detail
=======================================================================

Employee:   101 Jonathan Gennick


                                        Last Date               Dollars
     Proj ID Project Name               Worked       Hours      Charged
------------ -------------------------- ----------- ------ ------------
        1001 Corporate Web Site         01-Nov-1998     20    $3,380.00
        1002 Year 2000 Fixes            01-Dec-1998     24    $4,056.00
        1003 Accounting System          01-Nov-1998     24    $4,056.00
             Implementation

        1004 Data Warehouse Maintenance 01-Dec-1998     20    $3,380.00
        1005 TCP/IP Implementation      01-Nov-1998     28    $4,732.00
                                                    ------ ------------
                                                       116   $19,604.00
...
                                                    ------ ------------
Grand Totals                                           786  $110,779.00
By letting the database handle the project-level summarization, you save both time and paper. You save time because SQL*Plus doesn’t need to pull all that data down from the database, and you save paper because you don’t print all the unneeded detail.
A union is a SQL construct that allows you to knit together the results of several SQL queries and treat those results as if they had been returned by just one query. I find them invaluable when writing queries, and one of the more creative uses I’ve discovered involves using unions to produce reports that need to show data grouped by categories, and that may need to show the same records in more than one of those categories.
A good example of this type or report would be one that fulfills the following request:
Produce an employee turnover report that lists everyone employed at the beginning of the year, everyone hired during the year, everyone terminated during the year, and everyone still employed at the end of the year. The report should be divided into four sections, one for each of those categories.
This is not an unusual type of request, not for me at least. The interesting thing about this request, though, is that every employee will need to be listed in exactly two categories. That means you would need to write a query that returned each employee record twice, in the correct categories.
When you are faced with this type of query, it can be helpful to simplify the problem by thinking in terms of separate queries, one for each category. It’s fairly easy to conceive of a query to bring back a list of employees that were on board at the beginning of the year. You just need to make sure the first of the year is between the hire and termination dates, and account for the fact that the termination date might be null. Here’s the query to return a list of people employed as of January 1, 1998:
SELECT employee_id,
       employee_name,
       employee_hire_date,
       employee_termination_date
  FROM employee
 WHERE employee_hire_date < TO_DATE('1-Jan-1998','dd-mon-yyyy')
   AND (employee_termination_date IS NULL
        OR employee_termination_date >= TO_DATE('1-Jan-1998','dd-mon-yyyy'))
This gives you the first section of the report — those employed at the beginning of the year. Retrieving the data for the remaining sections is a matter of using a different WHERE clause for each section. Table 3.3 shows the selection criteria for each section of the report.
Table 3-3. Union Query Selection Criteria
After separately developing the four queries, one for each section of the report, you can use SQL’s UNION operator to link those four queries together into one large query. There are four things to consider when doing this:
You need to return all the records retrieved by all four queries.
You need to be able to group the retrieved records by category.
You need to be able to control which category prints first.
You need to identify each category on the printed report so the end user knows what’s what.
To be certain of getting all the records back from the query, use the UNION ALL operator to tie the queries together. Using UNION by itself causes SQL to filter out any duplicate rows in the result set. That’s not really an issue with this example — there won’t be any duplicate rows — but it’s an important point to consider.
In order to properly group the records, you can add a numeric constant to each of the four queries. For example, the query to return the list of those employed at the beginning of the year could return an arbitrary value of 1:
SELECT 1 sort_column,
employee_id,
employee_name,The other queries would return values of 2, 3, and 4 in the sort column. Sorting the query results on these arbitrary numeric values serves two purposes. First, the records for each section of the report will be grouped together because they will all have the same constant. Second, the value of the sort column controls the order in which the sections print. Use a value of 1 for the section to be printed first, a value of 2 for the second section, etc.
The final thing to worry about is identifying the results to the reader of the report. The values used in the sort column won’t mean anything to the reader, so you also need to add a column with some descriptive text. Here’s how the final query for people employed at the beginning of the year looks with that text added:
SELECT 1 sort_column,
'Employed at Beginning of Year' employee_status_text,
employee_id,
employee_name,
employee_hire_date,
employee_termination_date
FROM employee
WHERE employee_hire_date < TO_DATE('1-Jan-1998','dd-mon-yyyy')
AND (employee_termination_date IS NULL
OR employee_termination_date >= TO_DATE('1-Jan-1998','dd-mon-yyyy'))The first column returned by this query is used to sort these records to the top of the report, while the second column serves to identify those records for the reader. The full-blown UNION query to produce all four sections of the report looks like this:
SELECT 1 sort_column,
'Employed at Beginning of Year' employee_status_text,
employee_id,
employee_name,
employee_hire_date,
employee_termination_date
FROM employee
WHERE employee_hire_date < TO_DATE('1-Jan-1998','dd-mon-yyyy')
AND (employee_termination_date IS NULL
OR employee_termination_date >= TO_DATE('1-Jan-1998','dd-mon-yyyy'))
UNION ALL
SELECT 2 as sort_column,
'Hired During Year' as employee_status_text,
employee_id,
employee_name,
employee_hire_date,
employee_termination_date
FROM employee
WHERE employee_hire_date >= TO_DATE('1-Jan-1998','dd-mon-yyyy')
AND (employee_hire_date < TO_DATE('1-Jan-1999','dd-mon-yyyy'))
UNION ALL
SELECT 3 as sort_column,
'Terminated During Year' as employee_status_text,
employee_id,
employee_name,
employee_hire_date,
employee_termination_date
FROM employee
WHERE employee_termination_date >=
      TO_DATE('1-Jan-1998','dd-mon-yyyy')
  AND (employee_termination_date <
       TO_DATE('1-Jan-1999','dd-mon-yyyy'))
UNION ALL
SELECT 4 as sort_column,
'Employed at End of Year' as employee_status_text,
employee_id,
employee_name,
employee_hire_date,
employee_termination_date
FROM employee
WHERE employee_hire_date < TO_DATE('1-Jan-1999','dd-mon-yyyy')
   AND (employee_termination_date IS NULL
        OR employee_termination_date
           >= TO_DATE('1-Jan-1999','dd-mon-yyyy'))
ORDER BY sort_column, employee_id, employee_hire_date;As you can see, the four queries have been unioned together in the same order in which the report is to be printed. That’s done for readability, though. It’s the ORDER BY clause at the bottom that ensures that the records are returned in the proper order.
All that’s left now that the query has been worked out is to follow the remaining steps in the report development methodology to format and print the report. To produce a fairly basic, columnar report, precede the query with the following commands:
--Setup pagesize parameters
SET NEWPAGE 0
SET PAGESIZE 55

--Set the linesize, which must match the number of equal signs used
--for the ruling lines in the headers and footers.
SET LINESIZE 75

TTITLE CENTER 'The Fictional Company' SKIP 2 -
       CENTER 'Employee Turnover Report' SKIP 1 -
       LEFT '===================================' -
            '=======================================' -
       SKIP 3

--Format the columns
CLEAR COLUMNS
COLUMN sort_column NOPRINT
COLUMN employee_id NOPRINT
COLUMN employee_status_text HEADING 'Status' FORMAT A29
COLUMN employee_name HEADING 'Employee Name' FORMAT A20
COLUMN employee_hire_date HEADING 'Hire Date' FORMAT A11
COLUMN employee_termination_date HEADING 'Term Date' FORMAT A11

--Breaks and computations
BREAK ON employee_status_text SKIP 2 NODUPLICATES
CLEAR COMPUTES
COMPUTE NUMBER LABEL 'Total Count' OF employee_name ON employee_status_text

--Set the date format to use
ALTER SESSION SET NLS_DATE_FORMAT = 'dd-Mon-yyyy';
When you execute this report, the output will look like this:
The Fictional Company

                          Employee Turnover Report
==========================================================================


Status                        Employee Name        Hire Date   Term Date
----------------------------- -------------------- ----------- -----------
Employed at Beginning of Year Jonathan Gennick     15-Nov-1961
                              Jenny Gennick        16-Sep-1964 05-May-1998
                              Jeff Gennick         29-Dec-1987 01-Apr-1998
                              Pavlo Chubynsky      01-Mar-1994 15-Nov-1998
                              Taras Shevchenko     23-Aug-1976
                              Hermon Goche         15-Nov-1961 04-Apr-1998
***************************** --------------------
Total Count                                      6


Hired During Year             Horace Walker        15-Jun-1998
                              Bohdan Khmelnytsky   02-Jan-1998
                              Ivan Mazepa          04-Apr-1998 30-Sep-1998
                              Jacob Marley         03-Mar-1998 31-Oct-1998
***************************** --------------------
Total Count                                      4


Terminated During Year        Jenny Gennick        16-Sep-1964 05-May-1998
                              Jeff Gennick         29-Dec-1987 01-Apr-1998
                              Pavlo Chubynsky      01-Mar-1994 15-Nov-1998
                              Ivan Mazepa          04-Apr-1998 30-Sep-1998
                              Hermon Goche         15-Nov-1961 04-Apr-1998
                              Jacob Marley         03-Mar-1998 31-Oct-1998
***************************** --------------------
Total Count                                      6


Employed at End of Year       Jonathan Gennick     15-Nov-1961
                              Horace Walker        15-Jun-1998
                              Bohdan Khmelnytsky   02-Jan-1998
                              Taras Shevchenko     23-Aug-1976
***************************** --------------------
Total Count                                      4
That’s all there is to it. It wouldn’t be a big leap to turn this report into a master/detail report, with each section starting on a new page. Using this technique, you can develop similar reports with any number of sections you need.