
Chapter 5. Disk Hacks
Introduction: Hacks #40-57
No matter how fast your CPU or memory are, disk drives and peripherals are the biggest bottlenecks to system performance. After you spend all day tweaking and revving up your CPU and memory, you’re rewarded with the same old sluggish disk drives, which undermine any other performance-improving hacks. In this chapter, we’ll cover some easy and often free tune-ups to get your disks living up to your system’s demands and your expectations of reliability by making informed partitioning choices and using the tools necessary to prepare a hard drive for file storage.
Partition and Format Wisely
Do you know how much of your hard disk space you’re wasting? If you are using Windows 95, 98, 98SE, or ME (even 2000 or XP without NTFS), you could be wasting at least 10% and possibly up to 30% of your hard drive space due to suboptimal allocation unit sizes.
Disk partitions are logical regions of a disk drive containing a filesystem. Partitioning a hard disk is like subdividing parcels of land and dictating how those parcels will be further subdivided into lots or common areas. Partitioning establishes how big the parcel of land to be used will be. The filesystem within a partition contains files and directories that are organized in what we see as a hierarchical tree structure.
We use the filesystem and the tools and support for it within an operating system to put things into and take them out of the “parcels” (called clusters ) of space allocated in the partition. If we put a small house in a large parcel (cluster) we have a lot of empty space. In terms of land, we could landscape or farm that space, but in terms of filesystems, we get only one “house” per cluster. One house may occupy many clusters, but nothing else can use that cluster, even if there is empty space within it.
The Different Partition Types
The different operating systems available for PCs provide support for various partition types and filesystems. There are five types of partitions you will encounter on x86 machines:
- Primary
A primary partition is the first and often the only partition on a hard disk drive, occupying all available disk space. A primary partition is required for DOS and Windows 9x-Me, but Windows NT and later, as well as Linux, can boot from an extended partition. The primary partition can contain only one logical drive. You may have up to four primary partitions, or a maximum of three primary and one extended partition.
- Extended
An extended partition can only exist if there is at least one primary partition. This partition may occupy the remainder of the drive’s free space or only a portion of it; the remainder may contain either NTFS or non-DOS partitions. The extended partition may contain one or more logical drives.
- Logical
Within an extended partition, at least one logical partition must be made if a DOS or Windows filesystem will access the space as a drive letter. If the extended partition is created but no logical partitions are created within it, any operating system may lay claim to the space or change the extended partition into a non-DOS partition.
- NTFS
An NTFS partition is typically created and used by Windows NT, 2000, XP, or 2003. DOS and Windows 9x-Me utilities have no direct control over or access to NTFS partitions. Each NTFS partition may contain logical partitions and drives of their own.
- Non-DOS
A non-DOS partition is any partition type not supported by DOS or Windows, which could be any of the different versions of Linux, FreeBSD, SunOS, or others. Those specific operating systems may allocate space and filesystem support through numerous other filesystem types.
Tip
The FDISK utility that comes with MS-DOS and Windows 95, 98, and Me refers to filesystems created by other operating systems (such as Linux or FreeBSD) as non-DOS partitions.
On most IBM, HP, Compaq, and Dell systems, the first partition may be a non-DOS rather than a primary partition, may have an MBR, and may be made Active, but instead of an operating system may contain a boot loader to access diagnostic, system setup, and recovery files. This partition may consume a few tens of megabytes to a few gigabytes, depending on what the vendor wants to store in it for later use.
The BIOS in these systems will present a boot loader option to press a specific key to access these features and boot from this partition, and if that key is not pressed within a preset amount of time the BIOS will set another partition (primary, NTFS, or other non-DOS partition) to Active to load the operating system. Alternatively, some systems require use of a recovery boot diskette or CD that provides access to the recovery files on the recovery partition.
Each partition type may be either the Active (bootable) partition or not. An Active partition is not automatically a system or bootable partition, but must be made into a system or bootable partition by whichever operating system you install.
The Active partition is the one the PC system BIOS looks for in order to find bootable files and an operating system. To be bootable, the Active partition must have a Master Boot Record and must contain the bootable operating system files to start. The remainder of the operating system’s non-boot files may reside on another partition and logical drive. DOS and Windows 9x-Me will only boot from an Active and primary partition.
Tip
Third-party multiboot utilities like BootMagic, LILO, GRUB and System Commander change the Active partition to select which operating system will boot up.
The boot loader in Windows NT through Windows Server 2003 can boot DOS or other versions of Windows in the same Active partition.
Windows 2000 and Windows Server 2003 support two types of disk configurations— Basic and Dynamic—created with Windows Disk Management console. A Basic disk can use the partition tables supported by respective versions of Windows, MS-DOS, and Windows NT. A Basic disk, the typical type of partition you use, can hold primary partitions, extended partitions, or logical drives.
Basic volumes include partitions and logical drives and may contain volumes created using Windows NT 4.0 or earlier, such as volume sets, stripe sets, mirror sets, and stripe sets with parity. In Windows 2000, these volumes are called spanned volumes, striped volumes, mirrored volumes, and RAID-5 volumes, respectively.
Like a Basic volume, a Dynamic disk can hold simple volumes, spanned volumes, mirrored volumes, striped volumes, and RAID-5 volumes. However, with Dynamic storage, you can perform disk and volume management without having to restart the operating system.
In most cases, you will encounter only primary and extended partitions, or NTFS partitions with Basic disks.
The Different Filesystems
After you’ve partitioned a drive, you need to decide which filesystems will actually live on it. There are dozens of different filesystems you may encounter in the wild. Here are a few:
- DOS FAT-12, FAT-16, FAT-32
DOS filesystems known as FAT-12, FAT-16, and FAT-32 (although no version of DOS supports FAT-32) have evolved from the early days (when only diskettes were available) to support increasingly larger hard drives. The “FAT” in the filesystem names stands for File Allocation Table, which is something every filesystem has in some form but that stuck as the exclusive name for DOS filesystems. The numeric designation refers to how many bits of information are available to identify the clusters where files are stored: 12 bits allows 4,096 clusters/files (including directories), 16 allows 65,536 clusters/files to be kept track of, and 32 bits allows up to 4.2 billion clusters/files to be kept track of in a single partition. The directory entry in a FAT filesystem keeps track of start and end clusters for each portion of a file that is stored, as well as the filesystem attributes—Read-Only, Archive status, Hidden, and System files. No file access security is provided for in a DOS/FAT file system.
- NTFS
One or more NTFS partitions may exist on a hard drive, with or without Primary and Extended or Non-DOS partitions. NTFS is a journaling filesystem, meaning that it records information about filesystem activity to improve recoverability in the event of a system crash. NTFS uses two methods to keep track of directories and files: first, a Master File Table (MFT) that “knows all” about the directories or folders and files on the disk and, second, the files themselves, which store information about the files. In fact, if a file is small enough, it is contained within the MFT itself rather than on a separate area of the disk. Directories in NTFS store information about the directory, not the files in them. The information about a file in an NTFS filesystem stores not only filename, location, and attributes, but also security information. The number of files and directories NTFS can store is almost limitless, unless the Master File Tables grow so large from keeping track of so many files that they consume all the free space on the drive.
- ext, ext2, and ext3
The ext filesystems are used by Linux. ext supports drives and individual files as large as 2 GB. ext2 supports partitions as large as 4 Terabytes and files as large as 2 GB (Linux 2.2) and over 2 GB for Linux 2.4 and above. ext3 is a journaling filesystem compatible with ext2. A journaling filesystems makes a record of filesystem changes before they are made, which adds greater reliability to the file activity.
- reiserfs
reiserfs is a journaling filesystem with exceptional granular security capabilities suitable for military applications, developed under DARPA (Defense Advanced Research Projects Agency) sponsorship. Significant information on reiserfs can be found at http://www.namesys.com.
- jfs
jfs is a journaling filesystem for Linux servers developed by IBM. More information about jfs can be found at http://oss.software.ibm.com/developerworks/opensource/jfs/.
The FAT and NTFS filesystems track disk space use in predefined allocations of clusters. Clusters are made up of one or more 512-byte units of storage space. Under the FAT-16 filesystem, the maximum number of clusters is determined by a 16-bit numbering system and a predetermined maximum number of 512-byte sectors of space per cluster. These days, the only place you are likely to encounter FAT-16 partitions is on much older computers, flash memory cards, and embedded systems, but you can still create a FAT-16 filesystem if you need to access the space through an older (6.22 and earlier) version of DOS.
Under these design constraints and limitations, the largest possible disk partition in a FAT-16 filesystem may consist of 65,536 clusters of data. The maximum allowable cluster data size is 64 sectors per cluster, or 32,768 bytes. In total, the maximum size of a FAT-16 disk partition is approximately 2,048 megabytes (2 gigabytes). (The previous partition size limitation under early DOS versions using the FAT-12 filesystem was a meager 32 megabytes.) Table 5-1 lists the FAT-16 cluster sizes for various partition sizes. By the way, a cluster may contain only one file reference, so there is also a limitation on the total number of files a FAT filesystem can keep track of: 65,536 files for FAT-16.
Partition size | FAT-16 cluster size |
0-127 MB | 2 KB = 2,048 Bytes (4 sectors) |
128-255 MB | 4 KB = 4,096 Bytes (8 sectors) |
256-511 MB | 8 KB = 8,192 Bytes (16 sectors) |
512-1,023 MB | 16 KB = 16,384 Bytes (32 sectors) |
1,024-2,047 MB | 32 KB = 32,768 Bytes (64 sectors) |
Tip
With a FAT filesystem it is possible under any filesystem to run out of disk space not because you’ve filled up your entire drive with files but because you’ve used up the number of file allocations the filesystem provides, so the more clusters you have, the higher the total number of files you can store.
The FAT-32 filesystem supported under Windows 95 OEM SR2, 98, 98SE, Me, NT (SP4 and later), 2000, and XP can accommodate disk drives up to 4 terabytes in size (32 GB under Windows 2000), with as many as 4 billion clusters/files with cluster sizes of 32 KB. For very small (512-byte) files this results in less than 2% file storage efficiency and a gross waste of space, indicating that partitioning your drive to use smaller cluster sizes is advisable for many of us. FAT-32 limits the maximum file size to 2 GB, which is adequate for most of us, but if you expect to work with larger files—large databases for example—you must use NTFS. Table 5-2 lists the cluster sizes for FAT-32 partitions.
Partition size | FAT-32 cluster size |
0-259 MB | 512 bytes (1 sector) |
260-511 MB | 4 KB (8 sectors) |
512-8,191 MB | 8 KB (16 sectors) |
8,192-16,383 MB | 16 KB (32 sectors) |
32,768 MB-2 Terabytes | 32 KB (64 sectors) |
The NTFS also allocates disk space in increments or units as little as 512 bytes—which, coincidentally, is the size of a single sector of disk space. Like the FAT filesystem, unless you select an allocation unit of 512 bytes when partitioning and formatting, sectors are usually combined to make up clusters, but NTFS has a large enough numeric range to keep track of a lot of clusters, so clusters can be as small as a single 512-byte sector or made up of multiple sectors. The maximum number of units—clusters or sectors—that NTFS can keep track of provides for maximum disk space capacities in the order of terabytes. The most space any file will waste is only some portion of the clusters—as is evident with FAT filesystems. As shown in Table 5-3, NTFS uses clusters to track file storage, but these clusters are much smaller than the clusters of FAT-16 or FAT-32 filesystems. It is possible to reformat NTFS partitions using XP’s Disk Management console to use smaller or larger cluster sizes at your discretion.
Partition size | NTFS cluster size |
0-512 MB | 512 bytes (1 sector) |
512-1,024 MB | 1,024 bytes (2 sectors) |
1,024-2,048 MB | 2,048 bytes (4 sectors) |
2,048-4,096 MB | 4,096 bytes (8 sectors); 8,192 bytes and larger possible |
4,096-8,192 MB | 8,192 bytes (16 sectors) |
8,192-16,384 MB | 16,384 bytes (32 sectors) |
16,384-32,768 MB | 32,768 bytes (64 sectors) |
> 32,768 MB | 65,536 bytes (128 sectors) |
In most cases, when you cannot predict the general size or types of files you will be saving, large or small, it is preferable for storage efficiency to use the smallest cluster size possible. By large files I mean those measured in tens or hundreds of megabytes, something that really chews up disk space that you want to access with as few repetitive disk operations as possible (such as huge database files that may be found on servers, or video files). Most of us, unless we collect a lot of audio and video files, have mostly small datafiles—far less than a megabyte—including all the text and graphics from web pages, email, and average documents and spreadsheets.
Depending on the disk-caching read-ahead method and amount of cache used within a specific disk drive, using a 1 KB cluster size under NTFS will require the equivalent of 1,000 discrete disk accesses to read or write a 1 megabyte file versus 250 accesses with a 4 KB cluster size, but the alternative is having your average 1-2 KB web page and little (50-256 byte) graphics files chewing up 2-4 KB more disk space than they need to. A measly 2-4 KB may not seem like much, but if you let Internet Explorer’s Temporary Internet File caching grow to 512 MB or larger, you’re easily wasting 256 MB of disk space on a bunch of web files you may never see again anyway. Figure 5-1 illustrates the size of the datafile on an NTFS volume with 8,192-byte (16-sector) clusters (483 512-byte sectors or 30.1875 8,192-byte clusters) and the amount of disk space the file actually consumes (488 512-byte sectors or 30.5 8,192-byte clusters). This file ends up wasting 0.5 clusters or 4,096 bytes of disk space. If you add up a lot of datafiles wasting half a cluster or more—especially if the cluster sizes are 8, 16, 32, or 64 KB each—you end up with a lot of unusable disk space, also known as “slack” space, occupied by absolutely nothing of value.

It is important to note that the disk operations and performance seen by the operating system can be significantly different than what goes on inside the drive itself. The drive, of course, has to read or write all sectors containing data the operating system wants and will be doing all of the mechanical work to find each and every sector needed, be they contiguous (unfragmented files) or spread out in different places on the drive (fragmented files).
The operating system’s file and directory scheme keeps track of files in the file tables (the directory of the Master File Table) and tells the drive where to get file fragments from. The drive only knows how to find tracks and sectors and doesn’t know where specific files are. If the drive’s firmware and caching scheme are smart, it will optimize file placement and file reads by itself. If the drive has a large internal cache, it will take in all or most of the operating system’s commands, tell the OS it’s “got it,” and go off and do the work, releasing the OS to do other things. Someday perhaps we’ll have operating-system-aware disk drives or specific disk drives that filesystems off-load functions to so the OS can be an OS rather than a file manager, but for now the operating system and driver vendors are responsible for optimizing their file- and disk-handling functions.
Determine Your Filesystem
How do you tell what type of filesystem your disk is partitioned with?
In Windows, open My Computer, right-click on your hard drive icon, and then select Properties. You’ll see a dialog similar to that shown in Figure 5-2. Within this dialog will be a designation of the hard drive’s filesystem, in this case NTFS. With NTFS under Windows NT, 2000, or XP, we are assured of significantly more efficient use of available drive space than with FAT-16 or FAT-32 under DOS, Windows 3.x, 9x, or Me.

The mount command under Linux will also show you filesystem types, as in the example below, which shows an ext3 filesystem type:
[root@rh9-lt root]# mount
/dev/hda2 on / type ext3 (rw)
/dev/hda1 on /boot type ext3 (rw)
Create a New Partition with NT, 2000, XP, and 2003
Use XP’s Disk Management console to create a new partition in unused disk space.
You can create a new partition in unallocated or unused space on a disk drive with Windows XP or partitioning software like PartitionMagic. In this hack, we’ll create a new 20 GB NTFS partition in unallocated disk space using Windows XP’s Disk Management tools. To do this, launch Control Panel, select Administrative Tools, then Computer Management, double-click Disk Management under Storage, and follow these steps:
Right-click on the area marked Unallocated. Select New Partition from the menu that appears (Figure 5-3).
When the New Partition wizard introduction dialog appears, click Next.
The New Partition wizard gives you the choice of making a new primary partition, or an extended partition, as in Figure 5-4. Create a primary partition, then click Next.
Next you can set the new partition (Figure 5-5) to the desired size (20 GB in this example).
The next option is to assign a drive letter to the new partition for when it is formatted. At this point, the next available drive letter is E:, as shown in Figure 5-6, which is fine for now. Normally a second disk or partition would become drive D:, but if you already have a CD-ROM drive as D:, that letter will be claimed. You can come back to Disk Management and change this later.
The final step in this process is to format the new partition. Figure 5-7 shows the default values to be used. You can elect not to format the partition at this time, which is fine if you intend to install another operating system to boot off this partition, or decide to format it later, but we’ll format it for NTFS now.
You may also choose between NTFS and FAT-32 for the partition type, select the allocation or cluster size, and give the new drive a label. When you are done with your selections and changes, click Next.
After you choose the formatting options, you’ll get a summary dialog of the actions to be taken with the new partition. You can still back up to revise your selections or cancel at this point. Once you click Finish, the partitioning and formatting process starts, and in a few minutes you’ll be ready to use the new space.


Partitioning During Windows Setup
By default, the Windows NT, 2000, XP, or Windows Server 2003 setup program will claim all of the space on a bare hard drive. This does not leave you any free space to dabble with different partitions or operating systems.
Instead of letting one operating system “own” the entire drive, change the amount of space for the operating system to a value large enough to hold all of the operating system files, your normal application programs, and as much data as you think you’ll cram onto the drive—20 to 30 GB is usually adequate. To constrain the installation to a smaller space, wait until you get to the screen showing the unpartitioned space, select that space, and press C to create a partition. When prompted for the size of the drive, type in the amount of disk space you want the installation to use. The rest will be available to hold other primary or logical partitions.
Create a New Partition with PartitionMagic
Create new partitions from free or existing partition space with PartitionMagic.
PartitionMagic is one of the most popular tools for working with disk partitions under Windows. It lets you create, delete, resize, merge, or prepare partitions for different operating systems. Working on a disk drive with a couple of existing partitions is one of the things PartitionMagic is great for because its wizards show you the state of existing partitions, let you borrow space from an existing partition (actually shrinking it to make room) for a new partition, and provide three levels of safeguards to help protect your existing data before any changes are made to your disk.
In this hack, I take you through making a new partition in free space on an existing drive. Your first step is to acquire a copy of PartitionMagic and install it on your PC. You can buy and download a copy online from Symantec’s web site (http://www.symantec.com). Once installed, PartitionMagic is at your service to help you perform many disk-related tasks. To create a new partition, follow these steps:
From the PartitionMagic menu select “Create a new partition” (Figure 5-8).
Select where you want the new partition to be created (Figure 5-9). This is where the value of a tool like PartitionMagic becomes impressive; the program can actually insert a partition before, after, or between two others. Inserting a partition causes two operations to happen: at least one of the partitions is moved and then the new partition is created. The typical choice is to create the new partition after any existing partitions.
If the partition you want to create will need more space than you have free to use, you can take space from another partition, as shown in Figure 5-10. In this case, there is ample free space (17 GB) to make a third partition and not have to take space away from another. If space is borrowed from another partition, then the existing partition is resized, optionally moved, and the new partition is created.
Next select the size and type for the new partition, as shown in Figure 5-11
The default settings, plus typing in a label for the new partition, are all that is necessary to get to the next step. If the drive letter seems out of sequence at this point, there are tools to change drive letters to suit your preferences or sense of logical order.
Review the details of the drive partitions before and after the changes, as shown in Figure 5-12. Click Back to make any changes and Next to queue up their execution.
Back at the main screen, you will see that the Apply button is available. Selecting it tells PartitionMagic to make the changes you’ve indicated. In a few minutes the process will be complete and you will have a new partition made to order, as you can see in Figure 5-13.


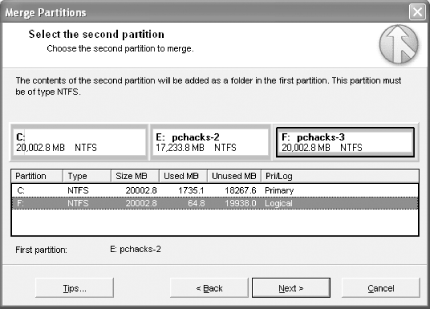
Merge Partitions with PartitionMagic
Merge two partitions into one with PartitionMagic.
Whether you have two partitions or ten and need to make an adjustment to shrink or grow the size of a specific partition, or you want to move the contents of one partition into another by merging them, PartitionMagic has the power to do the work for you.
In this hack we’ll take two of the partitions we had from the previous hack, [Hack #43] and merge them into one larger partition. Starting at the main PartitionMagic window, follow these steps:
Select Merge partitions under Pick a Task... from the main menu at the upper left.
Select the first partition to be merged with another, as shown in Figure 5-14.
Select the second partition to be merged, as shown in Figure 5-15.
The contents of the second partition will be moved into a folder on the first or merged partition, so the program needs to know the name of this new folder, as you see in Figure 5-16.
When you are done with the merge selections, you will return to the main window. Click the Apply button to let the program complete the operation.


In two hacks, the power of third-party partitioning software should be quite obvious and prove to be much easier and less risky that making a lot of backups, using FDISK or XP’s Disk Management tools, and moving data yourself.
Convert FAT to NTFS
Use NT/2000/XP/2003’s CONVERT program to change a FAT partition to NTFS.
CONVERT is a command-line program with one simple function: to change a FAT partition to
NTFS. Normally CONVERT applies user and system security settings to all
of the files in the partition, but the command-line option /NoSecurity leaves the access rights to all
files open to everyone, as if the partition were an unsecured FAT
partition.
To use CONVERT to make your C: drive NTFS:
Click Start, then Run. Type in
CMDor open a Command Prompt window.At the command prompt type:
convert c: /fs:ntfsIf the partition has a volume label, you will be prompted to type it in.
Press Y to proceed. If this partition is also the system root, you will see a message telling you the partition will be converted at the next reboot.
Close all open programs and restart your PC. Convert will run CHKDSK to verify the contents of the partition and then begin the conversion. After conversion the system will restart with the new partition.
Hacking the Hack
Converting an NTFS partition to FAT-16 or FAT-32 is not something Microsoft ever intended and does not support with FDISK, FORMAT, or Disk Management tools. Rarely do you need to gain access to files in an NTFS partition from a FAT-16 or FAT-32 OS, but it happens. To convert to FAT from NTFS, you need to use a third-party utility like Symantec’s PartitionMagic or V-Com’s Partition Commander. Since NTFS partitions are normally secured by the operating system, you must run the drive you are converting under the operating system that supports NTFS, have privileged access to the drive, and have rights to access the partition.
If you simply need to read data in an NTFS partition from a FAT-only operating system you can use NTFSDOS, NTFSDOS Professional, or NTFS for Windows 98, available from http://www.sysinternals.com.
Create or Delete NTFS Partitions from the Recovery Console
Create and delete NTFS partitions using the DISKPART from the Recovery Console.
Windows versions from NT to Windows Server 2003 know nothing about FDISK but provide their own partitioning tool, DISKPART, which is run from the Windows Recovery Console. DISKPART is a command-line utility used to add/create or delete NTFS partitions with some very simple commands.
Boot using your recovery diskettes or setup CD and select the Recovery Console option. Alternatively, you can boot with a DOS diskette that provides CD-ROM support and type:
i386winnt32.exe /cmdconsAt the command prompt, issue the DISKPART command followed by the appropriate command.
The following command lines delete a partition:
diskpart /delete DeviceHardDisk0Partition3diskpart /delete F:The following command line adds a 2,048 MB partition:
diskpart /add DeviceHardDisk0 2048Type
exitto leave the Recovery Console and restart the system.
The command line for DISKPART supports only the /add and /delete commands:
/addAdds a new partition. Supports the optional parameter
size, which specifies the partition size in megabytes./delete device_name | drive_name | partitionDeletes a partition.
device_namespecifies the device on which to create or delete a partition. Use theMAPcommand from the Recovery Console command line to get a list of device names (for example,DeviceHardDisk0).drive_namespecifies the partition you want to delete by drive letter (for example,D:).partitionspecifies the partition you want to delete by name (for example,DeviceHardDisk0Partition1).
Fix the Master Boot Record on FAT Partitions
Use FDISK to restore the ability to boot from your FAT-16 or FAT-32 hard drive.
FDISK is a DOS program that can actually help you out of some of those nasty “unable to locate operating system” and “no boot drive available” error conditions Windows 9x and DOS users encounter from time to time. The Master Boot Record can be corrupted by an improper shutdown, power glitch, or disk failure. Re-creating a new Master Boot Record at the first sector of the hard drive—which is what your system BIOS is looking for in order to turn over the startup operation to an operating system—is an easy fix.
Warning
If your hard drive is managed by a drive overlay utility from OnTrack or a specific program provided by your drive manufacturer (as indicated by a Disk Manager or similar announcement message during bootup) or is set to boot with the GRUB or LILO boot managers, or into Linux, using this hack will destroy access to the drive.
To use FDISK’s Master Boot Record restoration feature to get your main or additional drives back into bootable shape, follow these steps:
Boot with a DOS diskette, boot CD, or bootable USB FLASH drive or hard drive containing DOS and FDISK. A Windows 98 or Me startup diskette will do nicely.
At the command prompt type in either:
FDISK /MBRor
FDISK /CMBRxRemove the disk or device you booted to DOS with and then restart the system to verify that you can boot from the hard drive.
FDISK /MBR re-creates the
Master Boot Record, the first sector of the hard disk. This can be
helpful to repair a damaged or corrupted bootable drive.
                  FDISK /CMBR
x re-creates the boot sector of the first
(x = 1), second (x
= 2), third (x = 3), or fourth
(x = 4) hard disk(s).
Fix the Master Boot Record on NTFS Partitions
Windows NT, 2000, XP, and Windows Server 2003 users having problems accessing or booting from an NTFS disk can use the FIXMBR program to rewrite a new Master Boot Record on the hard drive.
FIXMBR is available only through the Recovery Console feature of Windows NT, 2000,
XP, or Windows Server 2003. To access the Recovery Console, you must
boot up with recovery diskettes you made during installation of the OS
or select the recovery options from the installation CD. FIXMBR has one
function, just like DOS’s FDISK /MBR:
to write a new Master Boot Record on the disk drive.
Warning
Do not use the DOS FDISK program to replace the Master Boot Record on an NTFS drive, as doing so can render the drive and data inaccessible.
To use FIXMBR follow these steps:
Boot using your Recovery diskettes or setup CD and select the Recovery Console option.
Log on to the drive/partition you wish to repair, typically C:WINNT or C:WINDOWS.
At the command prompt, issue the
MAPcommand to determine the device name for the disk partition you want to “fix”—typically it will be DeviceHardDisk0.At the command prompt, issue the
FIXMBRcommand followed by the name of the disk partition to be “fixed.” For example (press Enter after the command):fixmbr DeviceHardDisk0Type
exitto leave the Recovery Console and restart the system.
Warning
Do not use this method to repair a primary active boot partition that uses GRUB or LILO boot managers [Hack #50] . Apply it only to the specific drive or partition containing an NTFS boot sector.
If you do not supply a device name, a new Master Boot Record will be written to the default boot device, which is typically what you want to do anyway.
If an invalid or nonstandard partition table signature is detected by FIXMBR, you will be asked if you want to continue with FIXMBR or not. How you proceed is determined by whether or not you are having problems accessing the drive. If you are not having problems accessing your drives, you should not continue.
Fix the Partition Boot Sector on NTFS Partitions
Use FIXBOOT to restore the ability to boot from your NTFS hard drive.
Windows NT, 2000, XP, and 2003 users having problems accessing or booting from an NTFS disk can use the FIXBOOT program to rewrite a new Master Boot Record on the hard drive.
FIXBOOT is available only through the Recovery Console feature of Windows NT, 2000, XP, or Windows Server 2003. To access the Recovery Console, you must boot up with recovery diskettes you made during installation of the OS or select the recovery options from the installation CD. FIXBOOT has one function, similar to DOS’s SYS: to write fresh boot information on the disk drive.
Warning
Do not use this method to repair a primary active boot partition that uses GRUB or LILO boot managers [Hack #50] . Apply it only to the specific drive or partition containing an NTFS boot sector.
To use FIXBOOT, follow these steps:
Boot using your Recovery diskettes or setup CD and select the Recovery Console option.
Once booted, you will be prompted to log on to the drive/partition you wish to repair, typically indicated as
1for C:WINNT.At the command prompt, issue the
FIXBOOTcommand followed by the name of the disk partition to be “fixed.” For example (press Enter after you’ve typed the command):fixbootCType
exitto leave the Recovery Console and restart the system.
If you do not supply a drive letter, FIXBOOT will write a new partition boot sector to the current partition you logged on to.
Fix GRUB or LILO Boot Problems
Use the SystemRescueCD to repair a blown GRUB or LILO boot.
Linux has advanced disk management and repair tools too. Of note is the SystemRescueCD from http://www.sysresccd.com. SystemRescueCD is offered as an ISO file that can be written to a CD-R to make a bootable rescue CD. The packages includes several essential tools for fixing Linux boot-up problems, including:
- GNU Parted
Used for editing disk partitions under Linux.
- QtParted
A Linux-based clone of PartitionMagic.
- Partimage
A Linux-based clone of Ghost/Drive Image to create images of disks and partitions.
- Sfdisk
A tool that lets you back up and restore a partition table.
It also includes a variety of filesystem tools that allow you to format, resize, and debug an existing partition of your hard disk supporting e2fs, reiserfs, xfs, jfs, ntfs, and DOS partition types.
With these tools on hand, you may never have to reinstall a Linux operating system again.
Format Your Disk
Lay down some awesome data tracks on diskettes, hard drives, Zip disks, or LS-120 cartridges with FORMAT.
Logical drives and drive letters are created by the process of formatting a partition so that it is ready to accept files. Formatting is done by either the DOS FORMAT program, within the Windows 9x-2003 setup processes, or within the Disk Management console in Windows NT-2003. FORMAT provides limited options: it either creates nonbootable disk space, creates a bootable disk, or it can quick-format (erase) a diskette. For hard drives, FORMAT will lay out either NTFS, FAT-16, or FAT-32 file structures, depending on the filesystem of the partition. For 3.5” diskettes, Zip, and LS-120 media, the filesystem will always be FAT-16.
Tip
FORMAT also establishes a single partition for portable media such as diskettes, Zip (100 and 250), and LS-120 media because they have limited storage capacity well below 512 MB.
In the process, FORMAT also establishes the logical drives or drive lettering scheme we use to refer to our drives. Although the FORMAT program has more options applicable to various diskette capacities, it is also a very powerful utility when applied to hard drives.
To use all of the features of the FORMAT program, you need to be at a DOS or command prompt. Then follow these steps:
Boot with DOS or a startup diskette, boot CD, or bootable USB FLASH drive or hard drive containing the version of the operating system you wish to repair. A Windows 98 or Me startup diskette will do nicely.
At the command prompt, type in
FORMATfollowed by the parameters necessary to establish the type of format you want to create. To format a hard drive, the parameters would be:FORMATC/SThe program will advise you that formatting will overwrite all of the datafiles on the drive (which isn’t a problem on a new drive) and ask you to confirm that you really want to format the drive. Press the Y key for Yes and then press the Enter key and allow the program to start.
Formatting a drive can take quite a bit of time depending on its size and the speed of the computer. At the end, you will be prompted to give the drive a name or label (optional), and you’re done.
You have to format every partition you want to use for the operating system or data. FORMAT establishes the FAT filesystem and directory space. FORMAT is typically not used on NTFS partitions, which are instead formatted as part of the operating system setup process or with the Disk Management console within Windows (NT, 2000, XP, and 2003 only).
FORMAT provides the following command-line options:
FORMAT drive: [/V[:label]] [/Q] [/F:size] [/B | /S] [/C] FORMAT drive: [/V[:label]] [/Q] [/T:tracks/N:sectors] [/B | /S] [/C] FORMAT drive: [/V[:label]] [/Q] [/1] [/4] [/B | /S] [/C] FORMAT drive: [/Q] [/1] [/4] [/8] [/B | /S] [/C]
The purposes of these options are as follows:
/V[:label]Specifies the volume label.
/QPerforms a quick format.
/F:sizeSpecifies the size to format the disk to (such as 160, 180, 320, 360, 720, 1.2, 1.44, or 2.88).
/BAllocates space on the formatted disk for system files.
/SCopies system files to the formatted disk.
/T:tracksSpecifies the number of tracks per disk side.
/N:sectorsSpecifies the number of sectors per track.
/1Formats a single side of a floppy disk.
/4Formats a 5.25-inch 360 K floppy disk in a high-density drive.
/8Formats eight sectors per track.
/CTests clusters that are currently marked “bad.”
FORMAT under Windows 2000 and XP offers some additional command-line options:
/FS:filesystemSpecifies the type of the filesystem (FAT, FAT32, or NTFS).
/C(for NTFS only)Indicates that files created on the new volume will be compressed by default. - /X
Forces the volume to dismount first if necessary. All opened handles to the volume will no longer be valid.
/A:sizeOverrides the default allocation unit size. The following default settings are strongly recommended for general use:
NTFS supports 512, 1,024, 2,048, 4,096, and 8,192 bytes; 16 K, 32 K, and 64 K.
FAT supports 512, 1,024, 2,048, 4,096, and 8,192 bytes; 16 K, 32 K, and 64 K (128 K or 256 K for sector size greater than 512 bytes).
FAT-32 supports 512, 1,024, 2,048, 4,096, and 8,192 bytes; 16 K, 32 K, 64 K, (128 K or 256 K for sector size greater than 512 bytes).
Examples of common uses of FORMAT are:
format a:Erases all the contents of a disk. Commonly used on a diskette that has not been formatted or on a diskette you wish to erase.
format a: /qQuickly erases all the contents of a floppy diskette.
format a: /sFormats and makes a diskette bootable.
format c:Erases all the contents of your hard disk drive. Unless you wish to erase all of your computer’s information, this command should not be used. It is also the command used to format a hard drive partition for data use, without being bootable.
format d: /FS:NTFS
          /A:2048
Formats drive D: with the NTFS filesystem and forces the cluster size to 2 KB. You can accomplish the same thing in the Disk Management console of Windows 2000, XP, and 2003 systems.
Logical Drive Assignments Under DOS
While your system BIOS sees hard drives in the order they are attached to their interface cables and configured by jumpers, DOS dynamically assigns drive letters in a most unusual but quite logical order, alternating between physical/electronic order and partitions found. Drive letter assignments by default first follow physical and then logical/partition order.
For systems with only one partition, it’s simple: DOS assigns drive letter C: to the first partition it finds on that drive. If there are more partitions it assigns them drive letter D:, E:, and so on.
For systems with two hard drives, if the first hard drive has only one partition that is assigned drive letter C:, then the first partition on the second hard drive is assigned drive letter D:, and if the second hard drive contains more partitions they are assigned drive letters E:, F:, and so on. Simple enough.
For systems with two hard drives, where the first hard drive has two or more partitions, grab a pencil and paper or head to the nearest white board to map out what happens, or you can refer to Table 5-4. The first partition on the first hard drive is assigned drive letter C:—again, simple enough. The first partition on the second hard drive is assigned drive letter D:—nothing complicated so far. If you have two or more partitions on the first hard drive, they are then assigned drive letters E:, F:, and so on until you run out of partitions or letters. Now that’s interesting! If the second hard drive has two or more partitions, the drive letters for the second and all subsequent partitions are assigned in order after the last letter used for the partitions on the first hard drive.
Drive letter | One hard drive (any number of partitions) | Two hard drives, (two partitions each) | Two hard drives, (three partitions each) |
C: | First partition | First partition of first hard drive | First partition of first hard drive |
D: | Second partition | First partition of second hard drive | First partition of second hard drive |
E: | Third partition | Second partition of first hard drive | Second partition of first hard drive |
F: | Fourth partition | Second partition of second hard drive | Third partition of first hard drive |
G: | Fifth partition | None | Second partition of second hard drive |
H: | Sixth partition | None | Third partition of second hard drive |
Under Windows NT/2000/XP you cannot change the drive letter of the Active boot or system partition, but you may change the drive letters for subsequent partitions within the Disk Management console [Hack #52] .
Change Logical Drive Letters
Rearrange your drive letters with the Disk Management console in Windows NT-2003.
Changing drive letter assignments is useful if you have added a second hard drive to a Windows NT/2000/XP/Windows Server 2003 system. Suppose you start out with a hard drive as drive C:. The CD-ROM drive is automatically assigned as drive D:. A second hard drive added to this configuration would become drive E:, which is not what you might expect if you think hard disk drives are supposed to flow in logical, alphabetical order. What we have learned to expect from the days of DOS is for the second hard drive to become D: and the CD-ROM drive to become drive E:. You can make your new NT-2003 systems appear more like old DOS systems with a few simple drive-letter changes.
It may be more convenient now (and for later on if you add more hard drives or partitions) to move the CD-ROM drive letter up to a value far out of the way from any anticipated hard drive assignments. You can do the same for other removable media, such as digital cameras and USB FLASH drives that come and go—connecting the devices and then assigning them permanent drive letters so they will always show up as the same drive letter when used.
Warning
Reassign CD-ROM and DVD drive letters before installing or using any application or game that depends on the presence of a CD or DVD to run.
Although many programs can search for their respective CDs and adapt to a drive letter change, a change in drive letter may cause some applications or games to fail.
Follow these steps to shift the hard drive and CD-ROM drive letters to a more intuitive and predictable order:
Access the Disk Management console from StartControl PanelAdministrative ToolsComputer Management.
In the left pane of the Computer Management console, select Disk Management from the list.
Right-click on the drive whose letter assignment you want to change. In this case, start with your CD-ROM or DVD drive, D:, and then select Change Drive Letter and Paths...
Click on the Change button and change this to an “out of the way” drive letter like R: (for CD-ROM) or another unused letter, then click OK twice.
Right-click on the new hard drive and then select Change Drive Letter and Paths...
Click on the Change button and change this drive letter to D:, then click OK twice.
Restore DOS Bootability
Make your drive bootable to get a DOS or Windows 9x-Me drive back up and running quickly.
Just as the FDISK /MBR command [Hack
#47] can rebuild the lost boot information from the beginning
of a hard drive, a little command-prompt program named SYS.COM can help
you take that bootability to where it needs to be—containing the
operating system files to get the system started. If you’ve got a
nonbootable drive for DOS or Windows 9x-Me that is missing either the
IO.SYS, MSDOS.SYS, or COMMAND.COM DOS files, start your fix with
FDISK /MBR. Boot from a startup
diskette for the operating system you need to repair and then
execute:
SYS C:SYS copies the basic operating system files—IO.SYS, MSDOS.SYS, and COMMAND.COM—from the diskette to the drive letter designated: in this case, drive C:. Remove the diskette from the drive and restart the system from the hard drive.
Rescue a Blown 2000 or XP Installation
Corrupt installations of Windows 2000, XP, and 2003 can be fixed in minutes with their bootable setup disks.
Failed Windows 2000, XP, or Windows Server 2003 bootups—the ones that
hang somewhere before or while loading Windows or produce a missing file
error or blue screen—might be fixed in a few
minutes using the Repair feature of their setup programs. Although
FDISK /MBR and SYS C: can repair a blown boot record and
replace the operating system files for DOS and Windows 9x-Me, you cannot
use these commands to put the operating system boot files back onto an
NT-based boot drive or for NTFS partitioned drives.
Tip
Because many prebuilt systems come with recovery CDs and a non-configurable version of the operating system, the following recovery process may not work for you.
Instead, recovery forces you to reinstall the entire operating system, causing loss of at least the links and Registry entries for applications, if not all data if the recovery process also reformats your hard drive. Yet another reason that backups are so important.
If you want a more personalized recovery that preserves your applications, data, and settings, use a full backup program like Stomp’s Backup My PC or make a complete image of your drive with Symantec Ghost, Drive Image, or Acronis True Image.
Follow these instructions to repair a broken installation:
Start the system with the bootable setup diskettes or CD.
At the beginning of the installation process you are given three options:
Setup Windows now
Repair an existing installation
Quit setup (F3)
Press the R key to continue.
At the next screen you have three options:
Repair the installation using the Recovery Console, press C
Repair the installation using the emergency repair process, press R
Quit setup (F3)
Press the R key to continue.
At the next screen you have four options:
Manual Repair: To choose from a list of repair options, press M
Fast Repair: To perform all repair options, press F
Cancel this step and go back (press Esc)
Quit setup (F3)
The Fast Repair covers all bases easily and is the selection you want, so press F to continue. If you choose the Manual Repair option you have three choices: inspect the startup environment (to see what might be wrong), verify Windows system files, or inspect the boot sector. There are two other options at this step: cancel and go back, or quit entirely.
At the next screen you have four options:
If you have an Emergency Repair disk press Enter
If you do not have an Emergency Repair disk, press L. Setup will attempt to locate the Windows installation for you
Cancel with Esc to go back one screen
Quit setup (F3)
Tip
Emergency Repair disks for NT and 2000 can only be created at the time you install the operating system. They contain just enough boot and system configuration files to restore a hard drive and the operating system to a bootable condition.
Although most of us skip the distraction of creating the recovery diskettes in the anxious moments of installation, it is something that should be done.
Assuming that a set of Emergency Repair disks does not exist, press L to continue. If you have an Emergency Repair disk, place it into the diskette drive and press Enter.
If you chose L in the previous step, at the next screen you’ll have one more chance to provide the Emergency Repair disk or let Windows try to find the existing installation. Either way, press Enter to continue.
From this point on, the repair process will try to establish the
bootability of your drive and installation and restore files as needed.
Admittedly a rather involved process compared to a simple FDISK /MBR and SYS
C: for DOS and Windows 9x-ME systems, but it very often gets
the job done. If this fails, you will have to reinstall the operating
system.
Fix the Windows 95 File-Caching Bug
Implement this hack to fix the “Typical Role of This Computer” bug in Windows 95.
Windows 95/98/Me provide a bit of disk performance control through the “typical role” settings system parameter accessible through the Hard Disk tab of the My Computer/Properties dialog, shown in Figure 5-17. This setting does not control the amount of memory allocated for disk caching by VCACHE; instead it sets aside a specific amount of RAM to hold look-up references about most recently used files and folders.

The number of folders and files tracked, and the amount of memory for storing the folder and file references, varies depending on the “typical role” setting, as listed in Table 5-5.
Role | Number of accessed folders cached | Number of accessed files cached | RAM used |
Desktop | 32 | 677 | 10 KB |
Mobile/Docking | 16 | 337 | 5 KB |
Network Server | 64 | 2,729 | 40 KB |
The “typical role” settings for Windows 95 are incorrect according to Microsoft (http://support.microsoft.com/default.aspx?scid=kb;en-us;138012). The values for folders and files are reversed for Mobile and Network settings. Only the Desktop role is correct. If the Desktop setting seems right to you, leave the settings alone. If Mobile or Network settings appeal to you, then you need to correct or modify the values stored in the Windows Registry by following these steps:
Start the Windows Registry editor by selecting Start and then Run. Type in
REGEDITand then click OK.In the left pane of the Registry Editor double-click HKEY_LOCAL_MACHINE.
Double-click Software, then double-click Windows, then double-click CurrentVersion.
Click once on the FS_Templates listing.
Notice two data entries in the right pane, one named
NameCacheand the otherPathCache. If the “typical role” for this computer is Network (more folder and file lookup caching), enter the values shown underNetwork. If it’s Mobile (less memory used), enter the values shown underMobile:Network NameCache a9 0a 00 00 PathCache 40 00 00 00 Mobile NameCache 51 01 00 00 PathCache 10 00 00 00
When you are finished, close the Registry Editor and then restart your computer for the new values to take effect.
Avoid the Delayed-Write-Caching Blues
This Windows performance enhancer could make you a real loser, of your data. Make this simple tweak and compute with peace of mind.
In an effort to give us another performance boost, Windows provides the ability to cache (store in memory for later use) data that is to be written to your hard drives, writing the data only when the system is less busy. This feature puts your data at risk for some short period of time and can result in data being lost if the system crashes or the power fails before the data is safely transferred from memory to the disk drive. Write-caching is not a bad thing unless you live where power fluctuates or fails frequently. Admittedly the time window affecting this risk is very short, a second or two at most, but you cannot control when a power glitch will happen in that second or two to cause data loss.
If your PC gets power from an uninterruptible power supply, especially one that can tell Windows that power is failing so it can do a proper shutdown, you probably don’t need or want to use this hack.
Write-caching, or delayed writing, is enabled by default in all versions of Windows. We have to take deliberate steps to turn it off.
To remove the risks of delayed-write-caching for Windows 95/98/Me, follow these steps:
Go to Start, select Settings, select Control Panel, and double-click the System icon.
In the System Properties dialog select the Troubleshooting tab.
In the Troubleshooting tab dialog click the “File System...” button. The File System Properties dialog, shown in Figure 5-18, will appear.
To disable this risky feature, click on the box labeled “Disable write-behind caching for all drives” and then click OK.
Restart your system.

To disable delayed-write-caching under Windows 2000, XP, and 2003, follow these steps:
Double-click My Computer, right-click on the drive you want to change the settings for, and then select Properties.
In the Properties dialog, select the Hardware tab.
Highlight the listing for the disk you will make this change for and then click the Properties button.
In the Properties dialog for this drive, select the Policies tab.
In the Policies dialog (Figure 5-19), the “Enable write caching on the disk” checkbox is marked by default; click it to disable the feature.
Click OK to close all the dialogs, and then restart your system.

Write-caching does boost your performance, but it is best to use it only if you have a very stable system and are running your PC on an uninterruptible power supply with automatic shutdown of Windows enabled. It’s a good idea to enable the Self-Monitoring, Analysis, and Reporting Technology (S.M.A.R.T.) capabilities in your BIOS [Hack #57] .
Detect Drive Failure Before It Happens
Roughly 60% of all disk drive failures are mechanical in nature—from spindle-bearing wear to read/write heads banging into delicate disk platters—and now technology built into the drives can report anticipated and specific failures to give you a chance to rectify the situation, hopefully before it is too late to retrieve your data.
In addition to monitoring a variety of parameters related to mechanical events (disk platter RPM, time to spin up, motor current, head seek failures, and sudden shock to the drive chassis), S.M.A.R.T. (Self-Monitoring, Analysis, and Reporting Technology) can report read and write retry attempts necessary due to defective areas on the disk or head failure or drive temperature. Many S.M.A.R.T.-enabled drives can also report how many times they have been turned on and off and the number of hours the drive has been on.
If S.M.A.R.T. is enabled in your system BIOS, the BIOS will check and report any early or permanent signs of disk failure. You can also monitor your drive’s condition with a S.M.A.R.T.-aware disk monitoring program.
To view all available S.M.A.R.T. information about your drive, try the free DiskCheck utility from http://www.passmark.com/products/diskcheckup.htm. DiskCheck is a nonresident utility that will show you exact drive information and all of the supported S.M.A.R.T. statuses from your drive. There’s also Ariolic Software’s ActiveSMART (http://www.ariolic.com/activesmart/) resident monitoring tool, which provides a wealth of detail on drive status and notification of potential failures. If you get a S.M.A.R.T. warning about a drive failing, back up your data immediately and replace the drive.
Hacking the Hack
A failing disk drive is no fun. A failed disk drive is even less so. In my work in various IT shops, I’ve encountered a lot of grieving “Have I lost all of my data?” looks from end users. It is indeed a sad time, but an opportunity to become a hero. If you can spend the time with various tools to attempt, and even better succeed, at saving someone else’s work, you can feel like you actually accomplished something in the course of your day besides resetting some forgetful user’s password or plugging their mouse back in.
A plethora of disk drive repair and data recovery tools are available to help you emulate that fictional superhero “Super DataMan.” (OK, he doesn’t really exist, I made him up...)
I’ve long since given up on the pedestrian Norton Utilities like Norton Disk Doctor because it does not do enough to spend the time running it, especially for those really cranky lost partitions, erratic mechanical problems inside the drive, and when S.M.A.R.T. says the drive is bad or going to be bad soon.
When it’s time to recover partitions and data I unlock my arsenal of serious disk recovery tools, which are:
Steve Gibson’s SpinRite 6.0 (http://www.spinrite.com) for finding and fixing or moving bad data blocks on FAT, NTFS, Linux, Novell, Macintosh, and even TiVo volumes
Ontrack’s Easy Data Recovery (http://www.ontrack.com) for digging deep inside a drive and extracting recovered data to other media
Symantec’s GHOST (http://www.symantec.com) to “peel” data off a bad drive to a disk image for replacement onto another drive, or to extract individual datafiles with Ghost Explorer
Kurt Garloff’s dd_rescue (http://www.garloff.de/kurt/linux/ddrescue/) to image Linux partitions to other media for later recovery use (see http://www.oreillynet.com/pub/wlg/5205 for an excellent write-up and tips)
If your own data recovery efforts fail, you can always resort to a data recovery service like Ontrack (http://www.ontrack.com) or ActionFront (http://www.actionfront.com).