
Chapter 4. Memory Hacks
Introduction: Hacks #30-39
A fast CPU has a voracious appetite for instructions and data. Instructions and data come to the CPU (through two or more layers of caching) from the main RAM on the system board. Optimizing the timing and performance of the memory systems can keep your hungry CPU sated.
Before you get concerned with memory performance, you may have an issue or three with the amount of RAM your hardware or operating system can support. Even if you can’t kick your memory’s performance up a notch or two, you can learn how to make the most of what you have by taming your operating system.
Install More RAM
Having a significant amount of RAM in your PC provides enormous benefits, most notably that the operating system, drivers, programs, and data don’t need to swap out to your hard drive to keep things running smoothly and you will have more memory for disk caching to speed up disk read and write operations. More RAM is also obviously important for loading applications and data, especially large ones like spreadsheets, databases, graphics, and video.
While the minimum RAM requirement for Windows XP is a meager 64 MB and Microsoft recommends 128 MB, 512 MB of RAM is the bare minimum for what most of us consider a fast Windows XP system. Long gone are the days of Windows 98 and Me, when 128 MB was the most memory that the majority of systems needed. Running an unhacked Windows XP configuration with only 512 MB of RAM does not leave a lot of room for programs, data, and disk caching. With 1 GB, the VCache [Hack #32] gets all of the RAM it can handle, leaving much more RAM for your use.
Depending on the chipset and design of your system board, performance may be enhanced if you install as few RAM modules as possible—changing out two 128 MB DIMMs (Dual Inline Memory Modules) for a single 256 MB DIMM, two 256 MB DIMMs for a single 512 MB DIMM, and so on. Fewer modules means less addressing and data-signal delays as the chipset switches between modules.
If the chipset in your system supports Dual-Channel Double-Data-Rate (DDR) RAM modules, as the Intel 865G and 865PE and 875P chipsets do, memory performance can be enhanced by using matched pairs of modules, which allow the chipset to split the RAM signal bandwidth across two memory modules. Your system board documentation should tell you which chipset it uses and the type of memory it supports.
Tip
If you cannot determine which chipset your system board uses by looking at the chips on the board or from the manual, look up your system or system board model number using Google or http://www.motherboards.org.
Before adding more RAM, check your chipset against [Hack #32] to see if more RAM is fully cacheable in your system. Beware that the more you fill up your RAM with programs and data, the longer it will take to swap any one of the larger memory hogs to the swapfile.
Recognize Memory Limitations
Sometimes your system board and BIOS are your biggest limitations when it comes to adding more RAM—either a BIOS upgrade or a new system board is the answer.
When is any amount of RAM too much? When your system’s sockets, BIOS, or chipset cannot address more than 256 MB, 512 MB, 640 MB, or more of RAM chips. System boards with three or four 72-pin SIMM (Single Inline Memory Module) sockets ordinarily will not accommodate more than four 32 MB (4 32 = 128 MB) or four 64 MB (4 64 = 256 MB) sticks of RAM.
So stuff as much RAM in the system as you have available, and determine from startup if the system recognizes it or not. If you install more RAM than the system can handle, save the RAM for another system that can use the same type of RAM.
Your old 486, Pentium I, or Pentium II vintage system may present you with a chipset or BIOS limitation that does not support as much RAM as you can physically install. Check the manual for your system board or look it up on the Web to see how much RAM the board will support. These limitations may be imposed by chipset design assumptions that no one would ever get their hands on that much RAM, much less have an operating system or program that could use it. If the chipset on your system board is capable of handling more memory, the limitation may be in your BIOS.
If you think that a BIOS upgrade might help accommodate more RAM, first scour the Internet for tips and advice to see if anyone else has successfully applied large amounts of RAM to the system board you have. You may be able to locate information on your specific board through a search of Google or Usenet newsgroups through Google Groups. Other resources to check are the chipset makers to determine the amount of RAM your chipset will support. This requires downloading and reading a lot of esoteric product specification data, but the documents may be informative reading even if they reveal limitations you were hoping to exceed.
If you determine that a BIOS update might help, check with your system board vendor or the folks at Unicore [Hack #9] to see if an upgrade is available for your system board.
Why put a limitation on the amount of RAM in any system? First, the 8088 CPU could only address a megabyte of memory space. Second, the first PC came with only 16K of RAM, and DOS and the few programs or BASIC programming tools available would fit quite nicely into a mere 64K of RAM. Third, RAM was expensive. Fourth, if no operating systems or applications needed more capability, there was no economic or practical reason to create a more expensive system than people would buy.
Another consideration was physics. Hardware and chip manufacturers could barely get a PC to function at 12-16 MHz in 1984-1985, nevermind the 3 GHz they can today. Memory and data components had to be designed to work at higher speeds. Getting more data bits to more memory chips meant signal lines had to be longer (and as a result noisier), making for tremendous reliability concerns.
Subsequent to the early PC days (when PCs ran at 4.77 MHz, “turbo” models ran at a whopping 8 MHz, and 286 systems started out with 8 MHz CPU clock speeds and eventually reached the blazing 16-20 MHz barriers), computer industry biggies like Lotus, IBM, and Microsoft began to understand the need for applications and data to consume more RAM than 640 KB. So, they concocted Extended Memory for the 16-bit i80286 CPU chips that could address 64 MB of RAM, even though many systems supported or had only 16.
The i80286-class processors had a known bug in them that limited the use of Extended Memory, so in the mid-1980s Lotus, Intel, and Microsoft created the Lotus-Intel-Microsoft (LIMS) Expanded Memory Specification (EMS) or LIMS-EMS Version 3.2, which readily made use of 8 MB of RAM regardless of the type of CPU in use, and this got us around the 286 bug. In 1987, Version 4.0 of the LIMS-EMS specification was released, which supported the use of 32 MB of RAM. Because LIMS-EMS worked with any CPU, it was the preferred method of adding and using additional RAM, until the i80386-class CPUs and Windows 3.0 arrived. These systems virtually eliminated the need for LIMS-EMS because the CPU could address and use all of the Extended Memory (above one megabyte) that was available. If a program still needed LIMS-EMS memory, it could be emulated with the EMM386 device driver.
These were the baby and giant steps in technology development that have driven or limited certain aspects of PC development and capabilities—captive to a seesaw effect of hardware or software limitations and the attempts to overcome one or the other. As these developments crept forward, hardware, BIOS, operating system, and software developers had to jockey around whichever technology looked the most promising.
The best way to know for sure what the RAM limitations are for your system board is to check the manual or manufacturer’s web site. The documentation should indicate any special limitations on amount of RAM per socket or a requirement to install RAM in pairs. If you do encounter a limitation in the amount of RAM your system board supports, try these possible solutions:
Rather than one module (SIMM or DIMM) with a lot of RAM on it installed in one slot, try two, three, or four smaller modules in each slot. If this works, the limitation is that the chipset and board design have a limited addressing range per RAM slot.
Try a different type of module—switch from single- to dual-sided or dual- to single-sided. The limitation this addresses is module addressing/interleave incompatibility with the system board or chipset.
Try two modules instead of one. If this works, the limitation is in addressing range per slot or a system board design that requires a pair of SIMMs/DIMMs to accommodate interleaving memory addresses across two devices.
Try different or faster RAM. It could be that the memory you have is either not living up to its rated speed specification. The RAM could be too slow for or incompatible with the system board or chipset. Also, your modules could be defective.
Check your system board manufacturer’s web site or http://www.unicore.com for a BIOS upgrade that supports more memory.
Install the RAM Your Operating System Needs
Understand how your operating system and applications use RAM to solve memory dilemmas.
With today’s operating systems and applications, the more RAM you can feed them, the better. Yes, Windows 95 only required 4 MB of RAM while Microsoft recommended 8, but trying to run Windows 95 on a system with less than 32 MB of RAM is definitely frustrating. The memory requirements for all versions of Windows are listed in Table 4-1.
Operating system | Minimum amount of memory required | Amount of memory Microsoft recommends | Practical recommendation |
Windows 95 | 4 MB | 8 MB | 32 MB |
64 MB | 128 MB | 128-256 MB | |
16 MB | 24 MB | 32-64 MB | |
32 MB | > 32 MB | 64-128 MB | |
64 MB | 128 MB | 256-512 MB | |
128 MB | 256 MB | 256-512 MB | |
128 MB | 256 MB | 512-1,024 MB |
Windows 98 was rumored to go into a memory-addressing performance frenzy with over 128 MB of installed RAM, but after much research this appears to be myth rather than truth. There is, however, a certain truth out there that may have implicated Windows by coincidence.
I’ve been exposed to several different system board chipsets as well as a variety of CPU choices from AMD, Cyrix, and Intel. It is evident from the sampling of chipset data in Table 4-2 that mass use of these chipsets in PC hardware was coincident with the era of Windows 9x (1995-2000). Keep in mind that these caching limitations in hardware affect Linux and other operating systems as much as they do Windows.
A RAM caching limitation is known to exist within the L2 cache features of some Intel chipsets and early Pentium II CPUs. The L2 cache of pre-dA1 production stepping level Pentium II CPUs is limited to caching up to 512 MB of memory. The Pentium II is not the only culprit in RAM limitations.
Vendor | Chipset | Supported CPU | Cacheable limit |
ALi | Aladdin III | P54C | 256 MB |
AMD | 640 | P54C, P55C | 768 MB |
Intel | 430 FX | P54C | 128 MB |
430HX | Pentium | 512 MB | |
430LX | P5 | 192 MB | |
430VX, 430TX | Pentium | 64, 128, 256 MB | |
440EX | Pentium II, Celeron | 256 MB | |
440 FX | Pentium Pro, later | 4 GB | |
815, 815e | P II, P III, Celeron | 512 MB | |
OPTi | Python, Cobra | P5, P54C | 128 MB |
Viper | P54C, P55C | 512 MB | |
SiS | 501-503 | P5, P54C | 128 MB |
VIA | VP, VP2, VPX | P54C, P55C | 512 MB |
Cacheability significantly impacts overall system performance. Caching RAM significantly speeds up processing. If the L2 cache cannot, for example, accommodate more than 64 MB of RAM, that leaves any RAM in excess of 64 MB uncached, which means read and write performance is slower for a considerable amount of system memory (but faster than swapping to disk).
With the coincidence between Windows and various chipsets, it is quite possible that chipset and CPU limitations are to blame for the ill-placed rumors of Windows’s memory-handling concerns. But I won’t let Microsoft completely off the hook yet. According to Microsoft’s Knowledge Base article 304943, Windows 98 and Me are specifically not designed to handle more than 1 GB of RAM. Above that amount, Windows may not boot completely, or it can crash. As we’ll see in [Hack #33] , there is also another memory handling issue in Windows.
Certainly “huge” sums of RAM are possible with Windows 9x or Me (up to 1 GB), but unless your applications require it or you work with large datafiles, more RAM may not be possible, practical, or efficient for some PCs. In the good old days, 16 MB of RAM was considered a lot and was very expensive—as costly as 64 or 128 MB memory components are today.
The trick is to balance overall system performance with the ability to get your work done. If you have a caching-impaired system that runs acceptably with 64 or 128 MB of RAM but you cannot work with your applications, you may have to sacrifice a bit of system performance because of the caching limitations by adding more RAM to get the job done. In any case, when your applications and data need more RAM than you have installed, Windows will swap out certain portions of itself, programs, and data to the swapfile, but performance will be so degraded that you probably won’t be able to tolerate the sluggish behavior.
Large amounts of RAM are typically necessary only for processing graphic-intense programs like video games or drawing/rendering programs, as well as spreadsheet and database programs that process a lot of data. For these kinds of programs, adding more RAM (to 512-1,024 MB) has advantages in productivity, despite the overhead processing time the CPU consumes to address the “excess” RAM if it cannot be cached. More common activities like browsing the Web, reading or sending email, editing a chapter of a book, or figuring out your taxes are not as demanding of RAM and CPU time and will do just as well or better with an amount of RAM that is within the limits of your system’s chipset cache and Windows.
The old, basic PC and DOS only needed to address a megabyte of RAM, and 384 KB of that was occupied by I/O device addressing between 640 and 1,024 KB without the addition of LIMS-EMS memory-enhancement software, such as Microsoft’s EMM386 or the former Quarterdeck’s QEMM driver software. In this regard, you were considered an avant-garde PC user if you had 8-32 MB of RAM and had “hacked” QEMM into your system to allow you to run Windows 3.x or 9.x and assorted applications more efficiently, or even Quarterdeck’s DesqView or DesqView/X or IBM’s OS/2 to enjoy a higher level of protected multitasking.
Windows NT, 2000, XP, and 2003, and even Windows Me, are significantly different from the legacy DOS+Windows configurations. Windows Me started up with DOS but quickly dismissed 16-bit DOS, loading in 32-bit Windows instead—to give the consumer a taste that DOS was indeed on the way out. Just as corporations skipped over Windows Me and stuck with 98 for the longest time, most consumers never saw anything like Windows NT or 2000 until Windows XP appeared, combining the significantly more stable components of a proven Windows 2000 OS with glitzy graphics taken from 98/Me and enhanced to the next level.
With Windows NT, 2000, XP, and 2003, the old DOS ways and limitations were banished from PCs forever—replaced with a graphical operating system that took over the motherboard and all system resources from the moment the BIOS finished testing the hardware and located a suitable boot-up device and the operating system. Perhaps the most important thing about Windows NT through 2003 is that we don’t have to worry about different types of memory—DOS RAM, Extended Memory, Expanded Memory, etc. These operating systems see, address, and use all the memory that is available to them as one large chunk; there are no separate DOS and Windows portions of RAM to be concerned with.
The important message here is to provide an adequate amount of RAM based on your needs and system capacity. DOS alone is fine with 640 KB. For DOS+LIMS-EMS, with or without a memory manager like QEMM, with or without Windows 3.x-9x, 32-64 MB up to 128 MB of RAM is a real treat for select applications but not too practical or applicable for present-day computing applications.
Foraying into Windows based on Microsoft’s “New Technology” (as “NT” stands for), you have a long way to go to exceed their memory limitations—4 GB today—though you may still be chipset-limited on memory efficiency. NT—whether in the form of Windows 2000, Windows XP, or Windows Server 2003—handles 4 GB just fine; your applications may never use all of it, but Windows will put it to use. These operating systems completely control memory addressing from bootup through shutdown—no meager 16-bit DOS limitations involved, ever. All of the RAM in the PC is available to the operating system to parcel out for operating system needs or applications. With many applications consuming 16-32 megabytes of memory to simply load and run, this is an important capability.
NT-based systems will make efficient and effective use of as much RAM as you can supply—but you will do fine with 512 MB. If you have an application need for more than 1 GB of RAM, be sure to pick a system board that will handle more than a gigabyte. The majority of system boards in prebuilt, off-the-shelf PCs or available to do-it-yourself geeks handle a generous 1-2 GB of RAM just fine.
If you’ve been limping along on 64-128 MB of RAM with Windows XP, splurge a little and kick the amount of RAM up a few notches to 256 or 512 MB and you will be amazed at the performance difference. Your system will boot and run significantly faster because the operating system has enough RAM for itself and several applications without ever having to swap inactive or low-priority memory contents off to the hard drive. Remember that RAM is orders of magnitude faster than a disk drive, so the more you can use RAM instead of the swapfile the better.
To judge the “right” amount of RAM and the impact of having more, consider that Windows XP itself needs a bare minimum of 64 MB of RAM to boot up and run. Beyond that you can start adding up the memory requirements of various applications by looking at the list of processes in Windows Task Manager.
A typical Microsoft Office application and document like this chapter will consume 32-64 MB, forcing a lot of memory content to the swapfile, so 128 MB of RAM barely keeps the operating system, your application, and data out of the swapfile. With 256 MB of RAM, most of the operating system and application should stay in RAM with room left over for virus protection, instant messenger applications, and other software programs. At 512 MB, there is more than enough room for the entire operating system, system cache, a typical office application, browser, IM programs, and virus protection with very little swapping of memory to the swapfile.
Tame the Windows 95 and 98 Cache
Stop Windows 95 from consuming all your RAM by fixing the VCACHE bug.
Microsoft does admit to a specific limitation of Windows 9x memory use in their Knowledge Base article 253912 (http://support.microsoft.com/default.aspx?kbid=253912). The article points to very real problems you may encounter if your Windows 95 or 98 system contains more than 512 MB of RAM. The article addresses a known problem with the VCACHE disk and disk caching driver, and the possibility that it may consume all available memory, up to 800 MB, leaving no memory for programs and data. There is a simple workaround for this—control the amount of memory VCACHE can use by changing its parameters following these steps:
Using Notepad, Edit, or another suitable text-only editor of your choice, open the C:WINDOWSSYSTEM.INI file.
Find the
[VCache]section, which may have no contents under it. If a[VCache]section does not exist, create a new line entry for it just as it’s written here, usually below the[386Enh]section.Create or change the
MinFileCache=and theMaxFileCache=lines with the desired new values, expressed in kilobytes.If you want to create a 32 MB cache that does not grow larger than 40 MB, the lines should read:
[vcache]
MinFileCache=32000
MaxFileCache=40000
Save then close the modified SYSTEM.INI file and restart your PC.
Warning
Although VCACHE could consume more memory than it should, and supposedly will consume more than 512 MB, and Microsoft recommends setting the cache limit to 512000, they also claim they have not tested VCACHE settings larger than 40 MB, citing that unpredictable results or data loss may occur with values larger than 40 MB.
Manage the Paging File
Windows can get confused about what memory is and how it uses it. Giving Windows some guidance will keep things running smoothly.
Ever encounter an “out of memory error”? Been advised by an on-screen dialog message to “close some applications to free up memory”? These errors are usually not about adding or removing memory, but about how the operating system uses the memory available. Windows and some applications can present any number of “out of memory” error messages, such as:
“There is not enough memory available to run this program. Quit one or more programs, and then try again.”
“Insufficient memory to initialize windows. Quit one or more memory-resident programs or remove unnecessary utilities from your Config.sys and Autoexec.bat files, and restart your computer.”
“The system is dangerously low on resources. Would you like to terminate the following application...”
Microsoft Windows 3.x-95/98/Me manage many types of memory—mostly RAM, but within and beyond the obvious system RAM, other resources that store data while the operating system and applications do their things.
There are three causes for “out of memory” conditions under Windows 9.x: truly having too little RAM to support the operating system, having too little free disk space for the operating system to be able to swap memory contents to the swapfile on a hard drive, or forcing the swapfile size into too small and overcrowded small segments of memory called “system resources.”
A solution to the first problem is of course to add more memory [Hack#32] . When you’ve reached that point, 64-128MB of RAM or more if applications need it, it’s time to look elsewhere for what’s keeping Windows from being happy [Hack #35] or examine the Windows swapfile
The paging file or swapfile is controlled by Windows. While users can configure how much disk space to allocate to this file, only Windows decides how and when it is used. Left on its own, Windows could create a swapfile that is larger than necessary, or you could manually configure an unreasonably large swapfile yourself and waste hundreds of megabytes of disk space.
If the hard drive has too little free space available for making a swapfile, Windows can indicate “out of memory,” meaning it could not swap out enough RAM contents to disk to leave your applications or data and the operating system enough memory to work with.
If the swapfile size is left for Windows to decide, it will also suffer fragmentation and be broken up across many different regions of the disk drive, further reducing performance. Swapfile fragmentation will occur if there is no single area of free space large enough to contain the entire swapfile, or, if the swapfile starts out at one size, files are subsequently stored “around it,” and then the swapfile has to grow into a separate area of free space.
Tip
Defragmenting your hard drive every week, certainly every month, is an excellent way to improve both filesystem and swapfile performance. But see “Hacking the Hack” for instructions specific to Windows NT and later.
There are several rules of thumb that can be applied to configuring the size of the swapfile. In most cases, the swapfile size should be at least equal to the amount of RAM installed on the system—that is, if you have 32 MB of RAM, the swapfile should equal at least 32 MB of disk space and preferably 2-3 times more (64-96 MB). The debate rages at this point whether or not the size of the swapfile should be exactly equal to, 150%, or 200%, or more of the amount of RAM in the system. Depending on the amount of RAM installed, most of us use 150% as the maximum value to give Windows a little extra room, but not an excessive amount, to play with.
It is important to remember that each version of Windows has a minimum RAM requirement, as shown in Table 4-1. Your system should have enough RAM to accommodate Windows (the minimum requirement) plus your applications and data if you want to reduce swapfile use and manage its size.
Setting the swapfile size tells Windows how much disk space it can play with when it decides it’s time to swap a program or data out the file. You want Windows using the hard drive sparingly, and when it does use it, you want it to use it as efficiently as possible. So how do you determine what “size” to make the swapfile?
Tip
All swapfile setting recommendations come with an explicit or implied “rule of thumb” caveat. Most of the recommendations exist for two reasons: a desire or need to limit the amount of disk space the swapfile consumes and to try to contain or limit the fragmentation of the swapfile and other files on the same drive.
There are as many people telling us not to set a specific swapfile size as there are telling us what values to use for setting the swapfile. Nowhere is it documented that manually setting the swapfile size does any harm, unless you try to set it too low.
Windows will allow you to configure no swapfile but will “complain” at startup with a strong message telling you to create a swapfile. As a built-in “self-preservation” feature, even with a zero-byte or no swapfile setting, Windows will create a swapfile anyway.
If you have less than 128 MB of RAM, set the swapfile to be at least equal to, or up to 150% of, the amount of RAM. At less than 128 MB of RAM, Windows is going to swap out idle programs and data more than it would with 128 MB of RAM. Going to a 150% swapfile size gives Windows room to rattle around and enough space for applications to play in memory, and enough swapfile space to swap it all out if necessary.
If you have more than 128 MB of RAM, you have to start believing that you have more than enough RAM to keep the operating system (at least Windows 95-Me) and most of your applications happy, since you’ve met the minimum RAM requirement for the operating system plus additional RAM for applications. At 128, 256, or 512 MB of RAM, the swapfile size should be equal to no more than the amount of RAM—after all, even a portion of 128, 256, or 512 MB is a lot of disk space to waste and a lot of data to read and write on a disk drive if Windows has to swap out, which considerably slows the system performance but is better than running out of memory.
Tip
Windows XP is very “smart” about memory use and the swapfile. If you set the swapfile size too small and then run multiple large applications and open multiple documents, Windows XP can take precedence, ignore your maximum swapfile size setting, and force a larger swapfile size to protect itself and your work when both RAM and swapfile use have “maxed out.”
It is obviously far better to add more RAM than hit the ceiling of RAM+swapfile size or keep increasing the swapfile size to overcome having too little RAM. For systems with abundant amounts of RAM, certainly at the 512 MB to 1 GB level, setting the swapfile to no less than 50% of the amount of RAM typically provides good performance. However, if you frequently use multiple large applications or have multiple large datafiles open, the swapfile should equal the amount of RAM so Windows has adequate space to swap to. Table 4-3 gives recommendations for swapfile sizes.
Total system RAM | Recommended swapfile size |
16 MB | 32 MB |
32 MB | 32-64 MB |
64 MB | 64-96 MB |
128 MB | 128 MB |
256 MB | 256 MB |
512 MB | 256-512 MB |
768 MB | 512-768 MB |
1,024 MB (1 GB) | 512-1,024 MB |
To ensure the best performance of the swapfile and prevent the swapfile from changing size and becoming fragmented, set the minimum and maximum size of the file to the same values. For a recently defragmented PC, setting the swapfile size will create a new, unfragmented swapfile. If you set the minimum and maximum sizes to different values, the swapfile can become fragmented and only a disk defragmenter that can defragment the swapfile can put it back together for a short time.
To set the swapfile size, follow these specific instructions for your operating system:
Right-click the My Computer icon.
Select Properties and then follow the instructions below for your particular operating system.
Windows 95, 98, 98SE, Me
Select the Performance tab, then the Virtual Memory button.
The default setting is “Let Windows manage my virtual memory settings.” Instead, select “Let me specify my own virtual memory settings.”
Type in the size you want in both the Minimum and the Maximum edit boxes.
Click OK to close the dialogs but do not restart the system yet; there is one more change to make in the system configuration.
See [Hack #36] for the next set of steps to follow before restarting your computer.
Windows NT, 2000, XP, 2003
In the Performance section, click on the Settings button. The Performance Options dialog appears.
Under the Virtual memory section, click the Change button. The Virtual Memory dialog appears.
Select the “Custom size:” radio button.
Type in the minimum and maximum amount of disk space you want to allocate for the swapfile size.
Click OK to save the information and close the dialogs, but before you restart your PC, take a look at [Hack #37 .
Hacking the Hack
Windows NT, 2000, XP, and Windows Server 2003 can’t defragment the pagefile, because it is open for exclusive use while the system is up and running. Sysinternals PageDefrag (http://www.sysinternals.com/ntw2k/freeware/pagedefrag.shtml) gets around this problem by defragmenting your pagefile at the next reboot: it uses the same defragmentation mechanism that Windows uses, but it runs before the operating system has opened the pagefile for exclusive use.
Manage Windows System Resources
Windows System Resources have been misunderstood and maligned for years. There isn’t much you can do about them but change your software.
Many “out of memory” errors, specifically “out of resources” or “low on resources” error messages, on Windows 95, 98, and Me have nothing to do with how much RAM is installed in the system but how well specific portions of it are managed. The specific portions of RAM I’m discussing here are the system resources. Why Microsoft allows Windows to issue the same “out of memory” error for low resources that it issues for actually having too little system memory to run a program is anyone’s guess; they know better and so do we.
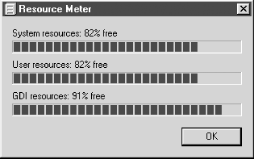
System resources are (poorly documented) bits of memory that Windows 95, 98, and Me play with internally. They comprise three fixed-size 64 KB blocks of RAM known as the GDI, User, and System resources, each used for a specific purpose within the operating system. The GDI (Graphical Device Interface) is used for communicating graphical device instructions and is not usually implicated in “out of memory” or “out of resources” error conditions. System resources are rarely implicated in these conditions, as Windows manages this block pretty well for itself. User resources, on the other hand, really are not under user control but used at the whim of applications that PC users use.
Each resource in Windows 95/98/Me is limited in size as well as in the number of processes or blocks of each range that can be used (16). Programs may request and use blocks of available resources on a temporary basis, primarily for moving small amounts of data between other applications or storing them for themselves. Windows will manage and keep track of resource use, but not if a resource is no longer needed by the program that requested it. If a program closes or crashes and fails to tell Windows that the resources it used can be relinquished back to other uses, Windows never knows the difference. If you restart one of these errant programs and close it again, or if it crashes and keeps the resources tied up, the problem gets worse, since a new block of data is consumed while the old one is never released.
If all of the system resource allocations are consumed, no other program can use them, and you could encounter a mysterious “out of memory” or “out of resources” error. Since Windows has no way to know if the program that used a resource allocation no longer needs it, the condition will not improve without a reboot.
Windows 95, 98, and 98SE (see also the upcoming section “How Systems Resource Use and Tracking Changed Under Windows Me”) keep pretty tight tabs on the amount of resources that are available and in use. You can monitor system resources and, as a result, the behavior of your application programs with regard to resource use and cleaning them up by using Windows’s System Resource Meter program, RSRCMTR.EXE. To use the System Resource Meter, first install it by following these steps:
Click Start, select Settings, and then select Control Panel.
Double-click Add/Remove Programs.
Select Windows Setup and then double-click System Tools.
Click System Resource Meter and then click OK twice.
Access the System Resource Meter tool by either of these methods:
Click Start and select Run.
Type in
rsrcmtr.exeand then click OK.
Or:
Click Start, then select Programs.
Select Accessories, then System Tools, and then Resource Meter.
The first time you run the System Resource Meter, you will receive a dialog like that of Figure 4-1 alerting you to the fact that Resource Meter itself consumes some resources, just to let you qualify your results knowing each tool you use may impact the readings.

Resource Meter displays a bar graph and percentages of each respective resource used, as shown in Figure 4-2. The measurements are an aggregate reading of the amount of memory consumed by resource use and the number of resources allocated.
Many programs will monitor resources on their own and may indicate that insufficient memory exists to run if any of the measured resources gets below some internally defined percentage, even though the program may not need to use more resources than it takes to start the program and test for available memory. This condition causes a lot of support calls and fruitless efforts to add more memory.
Tip
Unrecoverable or unreleased system resource abuse is one of the reasons Windows users feel the need to reboot so often, and rightfully so. Exiting some programs does not immediately or always release the resources they used—bad programming and the poor resource management of Windows are to blame. In cases where stubborn applications fail to release resources, restarting the system is the only way to get a “clean slate” of resources.
Some users watch the resource levels like hawks over new prey in hopes of participating in regulating the use of these resources and trying to keep as much of them available as possible. Manic users establish some self-imposed threshold levels on how much resource usage is too much, nearly panicking if a newly loaded program runs the bar up “too high” or if resource use doesn’t drop immediately once a program is terminated.
Preying on this memory-monitoring tech anxiety are many utility software programmers who create RAM management programs such as RAM Idle, RAM Booster, MemTurbo, Mem Free, FreeMem, and the like. These programs try to intervene in the process of knowing which programs use the resources when they are run and try to clean up after them by forcing the resources free if a program terminates without doing its own housekeeping. Oh the wasted anxiety of it all when, in fact, there is very little a user can do to control specific resource usage, especially since such memory management programs also consume resources and CPU time and often conflict with Windows’s own memory management functions. I really do not advocate the use of these programs for these reasons.
While the “sticky resource” problem is allowed by Windows it is almost certainly caused by improper application development. Instead of fighting resource issues with Windows 95/98/Me, you can avoid them by:
Monitoring Resource Meter and experimenting with each application you use to determine its resource use and if it frees up resources when terminated. Any program that does not clean up when it exits is a program that should be avoided at all cost; if the people who created the program cannot manage memory use properly, you have to wonder what else they neglected. Look for an upgrade to the application and specifically for an upgrade that indicates it has solved its resource-hogging problems.
Upgrading to a version of the program or a new operating system (like Windows 2000 or XP) that does not have issues with these legacy resources.
Unfortunately, rebooting at least daily. This is the way to absolutely assure that resources are cleared after use and provide a fresh start for your applications.
How Systems Resource Use and Tracking Changed Under Windows Me
Knowing that System Resource management under Windows 9x was inadequate, when Microsoft created Windows Me, they broke the system resources mold, ground it up into tiny pieces, and burned it. The biggest problem with fixed-resource allocations was not so much the 64 KB limit but that only so many blocks of any size (up to 64 K) could be allocated. So, if more than 16 programs needed resources, the system immediately “ran out” of them. With Windows Me, Microsoft replaced the static 64 KB System and User Resources with dynamically allocated and managed schemes that allowed nearly all system RAM to be used as resources by unlimited numbers of programs.
Resources could be allocated to as many programs as needed them, and they could take up to the limit of available RAM memory, though no program probably ever put a dent in the many megabytes of RAM most Me systems had available.
Given Me’s unlimited resources, you might think that a program would never produce an “out of memory” or “out of resources” error message and fail to run. Unfortunately, programs that kept track of Windows’s resources did so unnecessarily (because they were designed for 95 and 98, where resources were limited) and did so with the only tool they had—the same data the Resource Meter used, which under Me is completely erroneous.
Resource Meter and similar measurements based resource limits on the percentage of memory used and allocated. Under Windows 95 and 98, a system running either 8 programs of 16 maximum or using 32 KB of the total 64 KB of resources indicated that 50% of resources were free. Under Windows Me, if just one program used 32 KB of resources, Windows allocated 32 KB, which is 100% of the available resources (allocated at that time), and Resource Meter would always indicate 100% use no matter what. A program that checks resource use would see 100% use, determine that no resources were available to it, and might kick out an error message instead of knowing it could have requested a resource allocation and gotten it.
And no, Microsoft did not update the Resource Meter program for Windows Me, nor did they openly publish this information for developers or users. Indeed, Microsoft did publish a paper about the change in resource allocation methods, but for some reason the paper quickly disappeared off their web site after enough attention was called to the matter, which is unfortunate because it explained a lot of things and would have allowed programmers to correct their software accordingly. Windows NT, 2000, XP, and Windows Server 2003 have unlimited resources using a completely different style of memory management from Windows 9x and Me, and these NT-based operating system do not have resource problems.
Force Windows 98 and Me to Swap Less
Tame Windows use of the swapfile and improve your system’s performance in one simple parameter.
Windows 98 and Me can be configured to force the operating system to prefer operating in RAM, conserving swapfile use by not swapping memory to disk as much, and improving system performance. To do this, add a single line in the [386Enh] section of the C:WINDOWSSYSTEM.INI text. This hack is advantageous only if your computer exceeds the minimum RAM requirements for your operating system as listed in Table 4-1 by at least 2-3 times. This should give you more than enough RAM to hold the operating system and your applications.
Warning
If you have only the minimum amount of RAM required up to the recommended amount, you may not have enough room for applications and data and may encounter an “out of memory” error [Hack #34] .
To perform this hack, follow these steps:
Windows will now keep more of itself, applications, and data in memory and use the virtual memory swapfile less and more efficiently—a sure performance boost.
Pin the Kernel in RAM
Force Windows NT operating systems to keep themselves in RAM for faster performance.
An excellent performance hack for Windows 2000, XP, and 2003 is a feature that lets you specify whether or not to allow Windows to swap the main portion of itself, the operating system kernel, and swappable drivers out to the swap/pagefile or not.
This hack is intended for systems with large amounts of RAM (512 MB or more) and involves editing the Windows registry or using a system tweaking program. If your system has 256 MB of RAM or less, consult [Hack #30] before taking advantage of this hack.
To use the registry editing method follow these steps:
Start the Registry Editor by opening the Start menu, then selecting Run.
Type in
regeditand then click OK.Navigate through the registry tree to the following subkey:
HKEY_LOCAL_MACHINESYSTEMCurrentControlSetControlSession Manager
Memory Management
Change the
DisablePagingExecutiveentry to1. The complete registry information is:Value Name: DisablePagingExecutive Data Type: REG_DWORD Data: 0 or 1 Default
Close regedit and reboot.
Setting the value of this entry to 1 forces the kernel and drivers to remain in
physical memory. If it is set to 0,
these items can be swapped from memory to disk as needed, obviously
affecting performance because data transfers are slower to and from disk
than memory.
If editing the registry is not your style, you can use a tweaking program called X-Setup or X-Setup Pro from X-Teq Systems (http://www.xteq.com) for setting this and many other gimmicks in Windows, as shown in Figure 4-3.
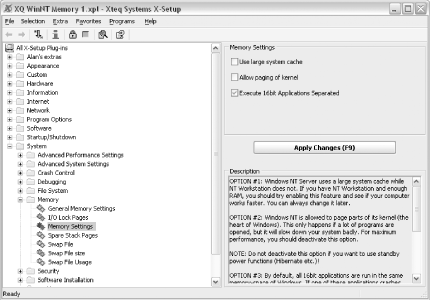
To use X-Setup to configure this hack, follow these steps:
Go to Start and then select Control Panel.
Double-click the X-Teq Systems X-Setup icon.
Select the X-Setup Default UI from the welcome dialog.
Expand the System folder.
Expand the Memory folder.
Select Memory Settings.
In the Memory Settings region to the right, remove the check from the “Allow paging of kernel” checkbox.
Click the Apply Settings button, close the X-Setup program, and restart your system.
From this point forward, the operating system’s kernel and swappable drivers will stay in RAM, and you should notice less swapping activity and slightly better performance over long-term use of the system.
Speed Up Your RAM
Get higher performance by optimizing the timing parameters for the faster memory in BIOS.
CPUs are not the only part of your system that can be overclocked. Memory timing settings have just as big an impact on RAM performance as the bus and CPU frequency. By hacking memory timing, you may be able to obtain as much as a 10-20% performance enhancement.
System board BIOS implementations may offer numerous settings to optimize your memory. These settings modify RAM functions that, while basic in nature, are often given widely different names.
Warning
This hack is purely trial and error and is intended for those with a real sense of technical adventure. Hacking RAM speed settings can yield unpredictable results, such as the inability to boot, crashes, or data loss.
It is unlikely but possible that changing any of these parameters will damage your RAM. Some BIOS may provide an automatic fall-back setting recovery mode so you can restart without the hassle of wiping out the CMOS memory [Hack #2] .
The first step to tweaking your memory is to turn off the Serial Presence Detect (SPD) function in your system’s BIOS, as shown in Figure 4-4.

The SPD function reads your RAM modules to determine what timing parameters to use; when it’s off, you’re in control of the clock speeds for your memory.
Warning
Once you take control of your memory timing parameters there are myriad combinations of settings that may speed up, slow down, or crash your system. You should not work with critical data when hacking settings that could cause system crashes or data loss.
The following list shows several common memory hacking parameters, some of the names given to these parameters, and their functions. Where possible the normal, safe, or default values are listed. Please note that not all BIOS setup programs offer all of these settings, use the same names for them, or have the same default values, while some parameters are known universally by their technical or functional names.
- Serial Presence Detect (SPD), Automatic Configuration (Auto)
If you want to manually configure your memory timings, you will have to deactivate the automatic RAM speed detection function.
- Bank Interleaving, Bank Interleave
Typically set to 4. Addressing RAM through interleaving improves performance.
- Burst Length, Block Transfers
Typical values are 8, 4, or 2 data blocks transferred in one memory cycle. Performance should increase with a higher value.
- Column Address Select (CAS), CAS Latency Time, CAS Timing Delay
CAS specifies the number of clock cycles between a column of memory address being activated and the availability of data at the RAM’s output. A lower number is better, but if this setting is set for too few cycles output data will be unreliable and the system will become unstable. If set longer than necessary, performance will suffer.
- Command Rate, Address Cycles
Command Rate specifies the number of clock cycles needed to access a memory chip to get to the specific address needed. This will take longer if you have a lot of memory modules in your system, making it desirable to use as few modules as possible for increased performance. A lower number is better, but a higher number may be necessary for your memory to work right, at the cost of slightly reduced performance.
- Row Address (RAS) Precharge Time
Number of clock cycles needed to precharge the circuits so that the row address can be determined. Lower should be faster, but higher may be necessary to maintain stability.
- RAS-to-CAS Delay, tRCD
Number of clock cycles between row address and column address. A smaller value can increase performance. However, if there are too few cycles, memory addressing errors will occur.
- Row Active Time, tRAS, Active to Precharge Delay, Precharge Wait State, Row Active Delay, Row Precharge Delay
The time between addressing two different rows in a memory chip. Too little time will make addressing unreliable; too much will make performance suffer.
- Memory Clock, DRAM Clock
The clock speed of the memory bus. With normal SDRAM, the rate is related to the front-side bus (FSB) clock. With DDR, the actual RAM speed is doubled.
The settings you are able to use are dependent on numerous factors: your BIOS default and changeable settings, system board chipset, RAM cacheability, CPU L1 and L2 cache sizes, system board design quality, memory module and chip manufacturer, memory speed, and type of memory used.
To test your hacks for performance gain or loss, you can use SiSoftware’s Sandra diagnostic and benchmarking program, shown in Figure 4-5, available for download from http://www.sisoftware.net. Sandra provides system information, testing, and benchmarking of PC components. For testing memory, use the memory bandwidth and combined memory and cache benchmark tests.

If you have an unhackable OEM system [Hack #9] or you have slow memory modules (PC100, DDR200) that are not reliable with faster timing settings, your only choice for improving performance through memory is if the BIOS supports SPD and you install faster RAM—PC133 instead of PC100 or DDR333 instead of DDR266. Hacking values for PC100 RAM may result in a mere 2-3% performance increase, while simply changing to PC133 RAM yields an expected 20-30% increase in performance with no hacking at all.
Enable Memory Interleave for Via Chipsets
Once in a while someone digs deep enough into an issue or exploits an opportunity and simply creates a single program or driver to take the guesswork out of fiddling with bits, bytes, microseconds, and clock rates.
Many Via chipset implementations do not have memory interleave enabled, which hinders performance. This feature is also not normally available in BIOS setup programs, and the only way to turn this feature on to gain a performance boost is to use a driver specifically written to enable it.
To find out if you have a Via chipset that could benefit from enabling memory interleave, visit http://www.cpuid.com/cpuz.php to download their CPU-Z program.
George Breese’s Memory Interleave Enabler for Via chipsets (http://www.georgebreese.com/sites/georgebreese_com/net/software/) is a driver you install in Windows to do the work of turning on and tweaking the memory-interleave values for your chipset. Figure 4-6 shows SiSoftware’s Sandra Memory Bandwidth Benchmark before installing Memory Interleave Enabler.

After installing Memory Interleave Enabler, you will notice at least a slight improvement in memory performance, as indicated in Figure 4-7. Any performance improvement, no matter how you get it, can be good for the overall system.

If you add up enough 0.5% improvements with subtle hacks, you’ll be up to an additional 5-10% in no time. The documentation at George Breese’s web site, http://www.georgebreese.com/net/software/readmes/venabler_v015_readme.htm, explains the details.