CHAPTER 3: EXPOSURE FOR PETS: GETTING IT RIGHT IN-CAMERA
In spite of the freedom digital photography has brought to the world of photography, it is important to capture well-exposed images. There are definitely some specific considerations to keep in mind when exposing for pet portraits. In this chapter, you’ll find direction on pet-specific camera settings for achieving accurately exposed images.
Why Should You Care About Accurate Exposure?
In the days when every photographer used film, proper exposure was essential for achieving the highest-quality color and black-and-white negatives; and it was critical for positives (slides). Poorly exposed film meant a lot more work in the darkroom, and if the exposures were really bad, you might not have been able to pull together a decent final print. Although we have far more leeway with digital than we ever did with film, the same scenario is true: a properly exposed digitally captured image will produce a higher-quality final result than a poorly exposed one.
When I’m photographing pets, one of my many goals is to capture well-exposed images. I’ll tell you a few reasons why.
TIME SAVINGS
The more accurate you can get your exposures, the more time you will save on the computer in postproduction. For me, this is hugely valuable. I’d rather be photographing animals than tweaking my exposures in Lightroom.
QUALITY
While digital is more “forgiving” than film, there is a limit. If you under- or overexpose your images and make extreme adjustments for them in postproduction, quality can be sacrificed. This could mean a lot of noise or a “muddy” look on a dog’s fur if it is severely underexposed, or no information on a severely overexposed cat’s face. Learning how to properly expose your images and read your histogram is a valuable practice that will absolutely pay off in quality.
OPPORTUNITY
There are many issues to consider when you’re photographing pets. You may not get a second chance with a special expression or body position of an animal, so if your exposures are way off, you may miss an opportunity. For this very reason, be sure to test your exposures as much as you can before positioning any of the animals.
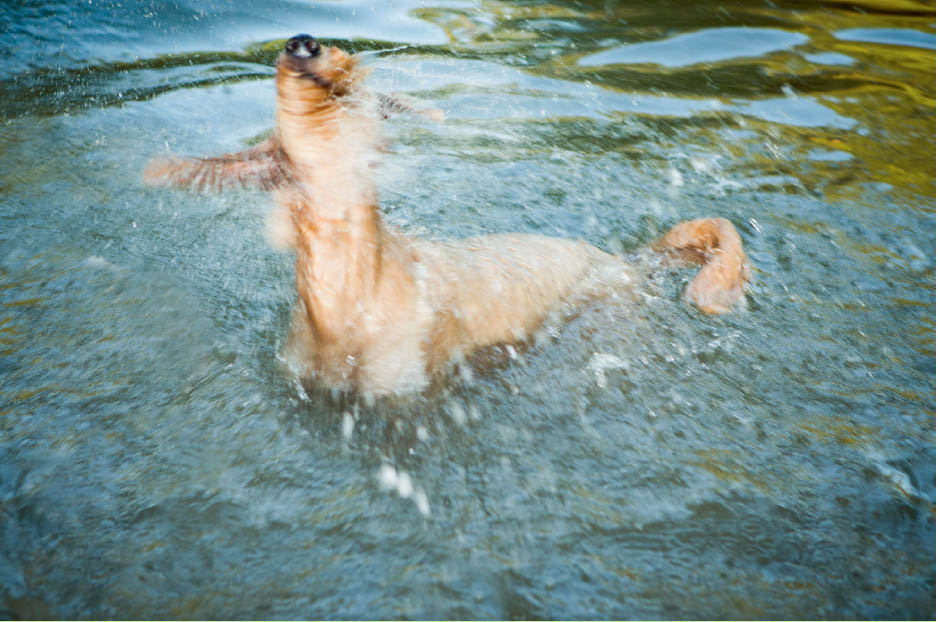
I had to consider the high contrast so as not to overexpose the highlights in this image—as well as pay attention to stopping the action. Settings: 1/1250 second, f/4.5, ISO 400
Which Setting Is “Right” for Pet Portraits?
Fortunately (because that would be boring) and unfortunately (because options can complicate things), there isn’t one particular setting that is right for pet portraits. I shoot in Manual mode, many photographers shoot in Aperture or Shutter Priority mode, and others photograph in fully automated program modes. Each photographer needs to make a decision about how to photograph that best suits his or her needs on a technical and creative level. Having said that, I certainly have opinions and suggestions based on what works for me, as well as what I have learned to be true for others.
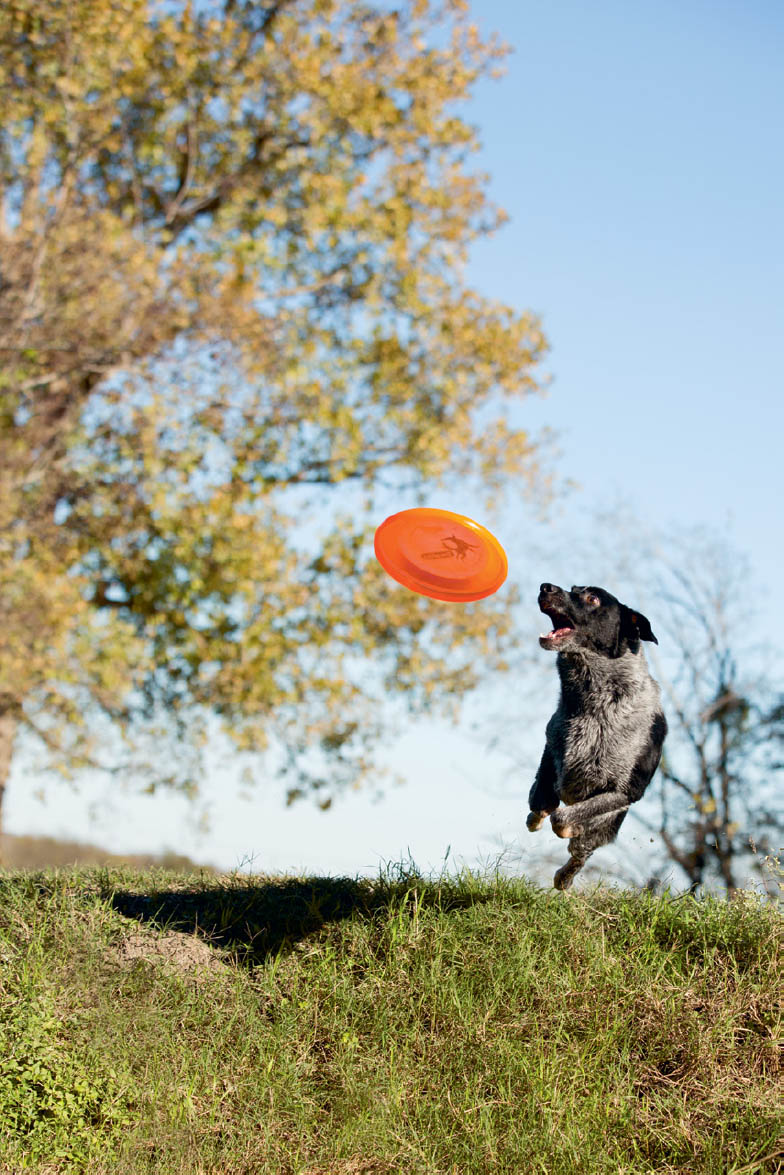
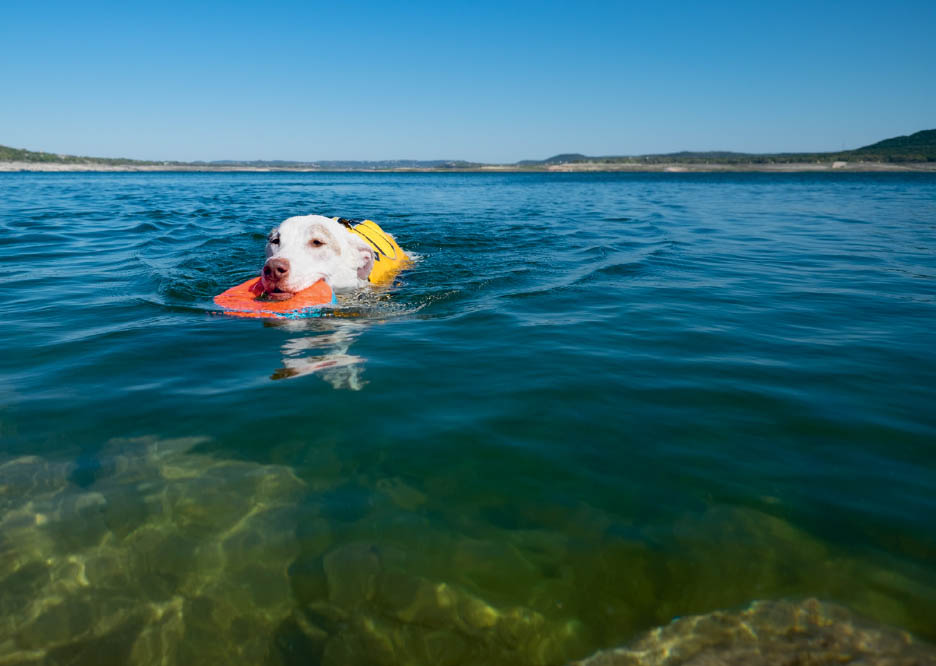
In this image, my priority was to stop the action of Oliver catching the Frisbee, so I had to prioritize a fast shutter speed. Settings: 1/3200 second, f/4, ISO 400
There are times when I look back at my images and wonder why I used a particular shutter speed, aperture, or ISO and cannot for the life of me explain my choices. In the moment of photographing pets, we make the best decisions we can and try to move fluidly while thinking creatively and technically. There’s a lot to think about. Sometimes we forget to change our ISO or make another seemingly random decision we’re not in love with, and that’s totally OK—it’s part of the experience. Just try to continue to be more intentional about your choices moving forward and learn from your experiences.
When I teach pet photography, one of the concepts I emphasize is prioritizing. I encourage you to approach each scenario by thinking about what is most important to you technically and, ultimately, creatively in the image. It doesn’t matter whether you’re shooting in a program mode or Manual, just that your actions are based on this factor: “What is my main goal for this image?”
STOP ACTION
Do you want to freeze action of a pet in motion? Perhaps you’re looking to stop the action of a horse running, a dog chasing a ball, or a cat swiping for a toy. Or maybe you’re photographing a very young puppy who doesn’t want to hold still for very long. If so, you’ll want to start with setting your shutter speed high enough to consider this priority.
SHOW MOTION
Are you interested in capturing movement of a dog’s tail, showing a blur of a cat’s figure as it struts by, or panning a horse as it runs? If so, make this a priority and set your shutter speed accordingly.
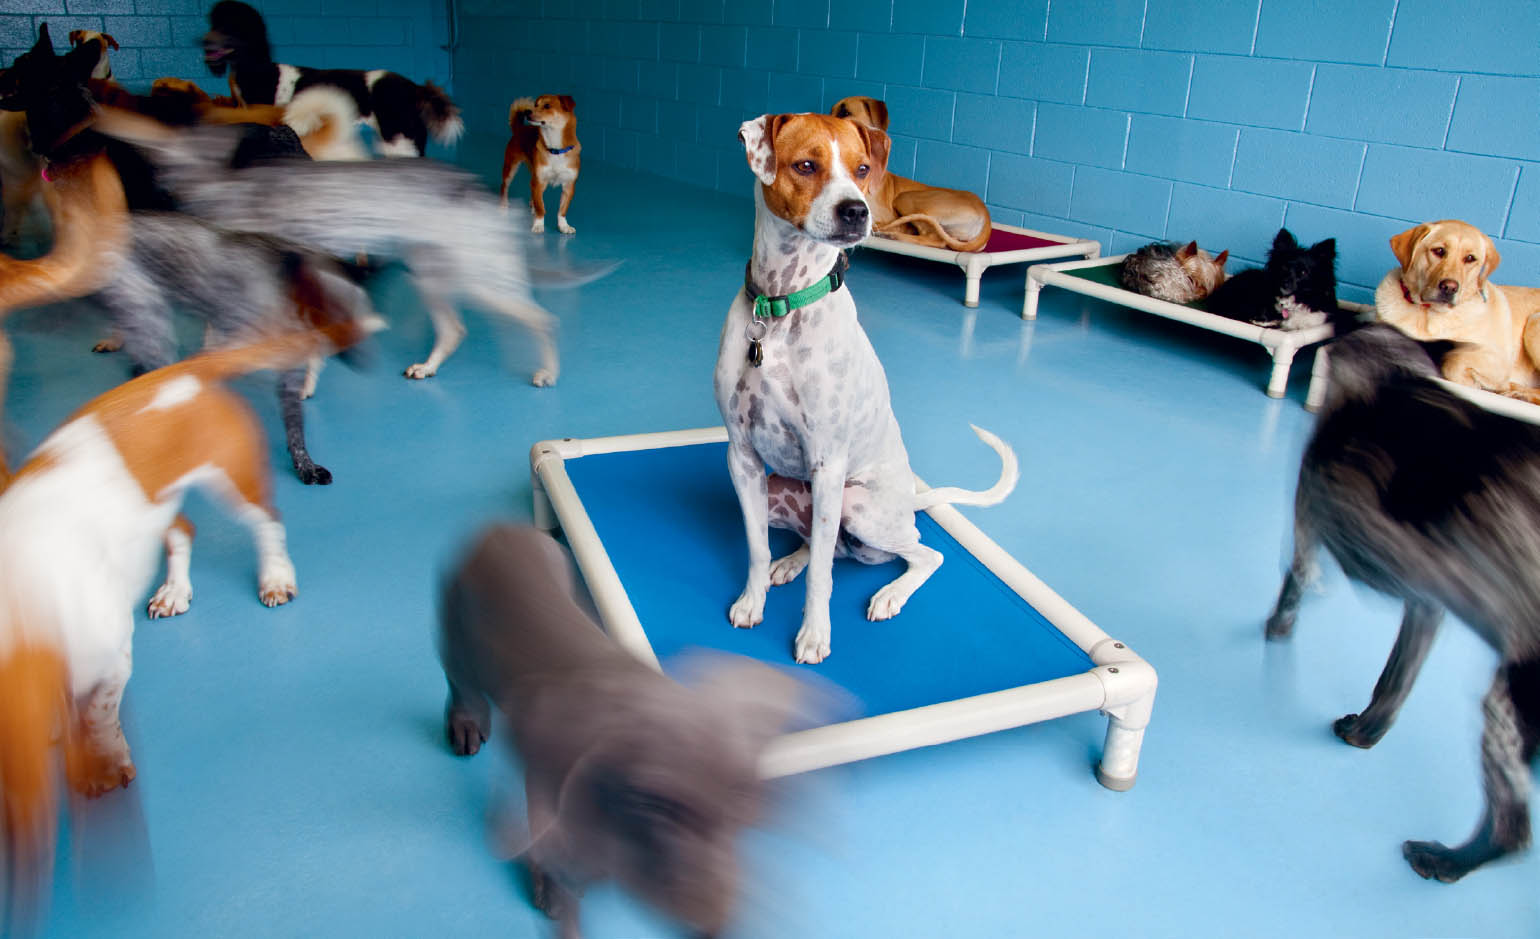
In this image, my priority was to show the motion of the dogs in Santa Fe Tails (a dog daycare in Santa Fe, New Mexico). I used a tripod to eliminate camera shake and took several images to get this image of the dog in the center holding still. Settings: 1/5 second, f/16, ISO 100
BLUR THE BACKGROUND
Is the background of your scene very busy, or would it look more interesting as just a block of shapes and color? Do you want to make sure the viewer is immediately directed to the pet in the frame rather than pay attention to other details? If so, your aperture setting will take priority.
INCLUDE LOTS OF DETAIL
Are you photographing a beautiful cat, and you want lots of detail in her whiskers? Do you have more than one animal in your image, and you want to have both or all in focus? If so, your priority will be to set your camera to allow for lots of depth of field.
As your priorities and creative ideas start to flow, you will want to change your settings to support those needs. I find that starting out by thinking about my creative priorities, I can more easily make technical decisions.

My priority in this image was to show detail, but also to have a high enough shutter speed to stop the action of the horse’s blowing mane. Settings: 1/1000 second, f/7.1, ISO 320
I choose to manually adjust my exposure settings on my camera, for a few reasons. Throughout my formal education (which started way back in ninth grade), I was taught to set my exposures manually. My first professional camera required me to set the exposure manually. I’ve practiced in this manner ever since. Therefore, I can quickly adjust my exposure settings without having to spend a lot of time thinking. Manually setting my camera’s exposure gives me control over the technical and creative side, rather than giving the camera the option to choose a setting for me. For some photographers, using a program mode is faster and makes more sense, but this is how I work. I always recommend that you, at the very least, have a solid understanding of shooting in Manual so you know what’s happening when and if you shoot in a program mode.
I shoot in RAW format and typically use my camera as a test for exposure. I use my histogram to help me get a sense of what my exposure looks like, given the particular scene and color of the pet. I used to use a light meter but don’t typically use one in my pet portrait sessions. I’ve found that if I am switching scenes quickly or don’t have a lot of time to set up, the camera can provide helpful information I need. I always take tests of the lighting and settings I’ve chosen before the pet is in place or “ready,” so I don’t waste their energy.
My “go-to” setting for shutter speed while photographing pets is 1/250 of a second. I find that this is the lowest shutter speed I’m comfortable regularly using even while photographing more static or posed pet portraits. If I am photographing a dog sleeping on a couch, I could certainly use a slower shutter speed (1/125 or even 1/60 if I am really holding still ) but dogs, cats, and horses generally tend to move frequently, and my results are more consistent for pet portraits when I start at 1/250. Even subtle movements of an animal or camera shake if I move too much can show up as blur when I use slower shutter speeds.
REVIEW YOUR SETTINGS
I HIGHLY RECOMMEND REVIEWING THE SETTINGS YOU’VE USED TO CREATE YOUR IMAGES. IF YOU’RE USING LIGHTROOM, PRESS THE LETTER “I” KEY WHILE IN THE LIBRARY OR DEVELOP MODULE (PRESS IT MULTIPLE TIMES TO SEE DIFFERENT INFORMATION) TO EASILY VIEW THE SETTINGS YOU USED TO CREATE THAT IMAGE. THIS IS REALLY HELPFUL FOR LEARNING!

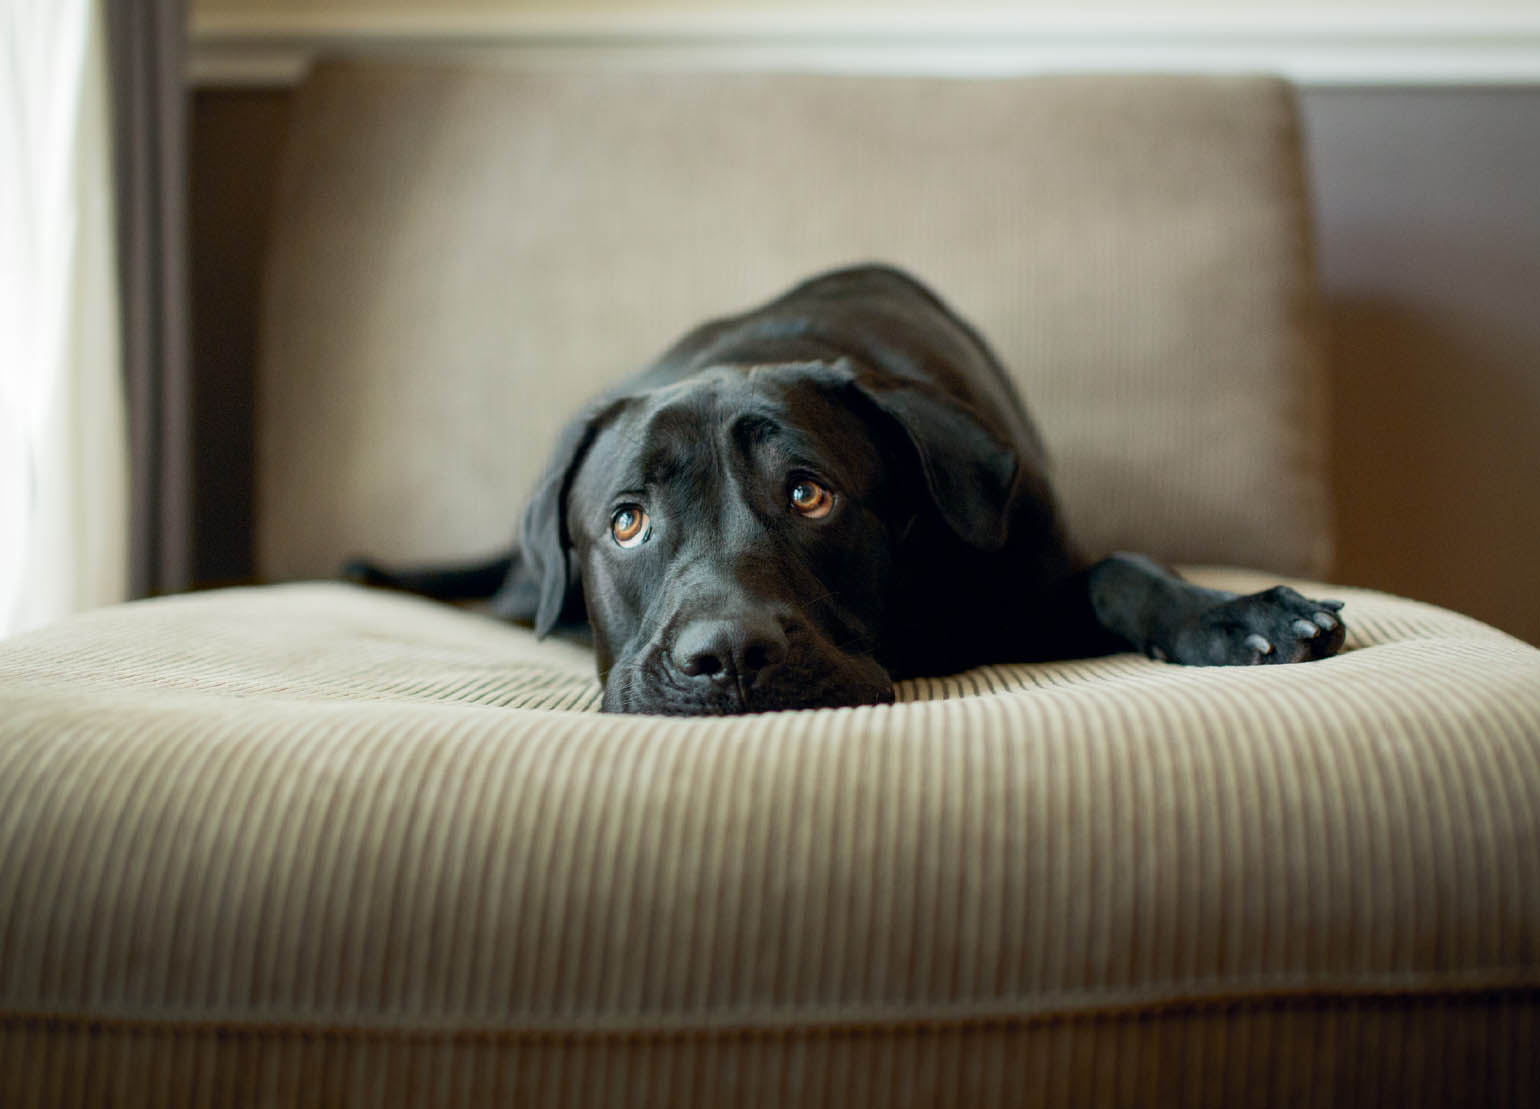
In this image of Sandy, I used auto focus with a single point to focus on her eye. Settings: 1/250 second, f/2.8, ISO 640
FOCUS
I use auto focus 98 percent of the time while I am photographing pets. Dogs run, cats pounce, and horses gallop far too quickly for me to be able to manually focus. Most of the time auto focus works well, but occasionally, I’ll switch to manual focus, for example, if the camera is having trouble with auto focus due to low contrast or light. In general, I don’t see any added value to using manual focus.
For non-action pet portraits, I typically use the single focus point (or points) in the center, lock the focus, and reframe my image. This is just how I’ve practiced for years and it’s comfortable for me, but of course, not necessarily the approach for everyone.
A focus-tracking mode (the names vary depending on the camera system) is definitely needed for capturing action photographs. I’ll go into further detail on capturing pets in action in later chapters.
METERING
I tend to use my light meter in-camera as a starting point. I use an evaluative meter setting on my camera most of the time. After many years, I’ve learned to read the lights and darks in a scene visually so that when I look at my histogram after I take a test shot, I can adjust accordingly.
Aperture Priority Mode
A lot of photographers use Aperture Priority mode, which can be an efficient way to photograph pets.
PROS
Using Aperture Priority mode can be a quick way to work when photographing pets in lighting situations that are constantly changing. For example, photographing a horse in a field on a partly cloudy day when the sun is popping in and out from behind the clouds can really be difficult in terms of exposure, because it shifts so much. Setting the aperture and allowing the camera to select the proper shutter speed can help you work more quickly and focus on other elements.
CONS
When I am photographing a pet, I can get very focused and caught up in the flow of the experience. If I am using Aperture Priority mode, I might set the aperture to f/5.6, and based on the lighting conditions and my current ISO, the camera may select a shutter speed of 1/30 of a second. I might spend five minutes photographing with these settings without realizing that the shutter speed is not high enough to stop action or to avoid producing blur from camera shake. This can get frustrating, and I’ve seen this impact my students many times.
Even though the camera is selecting what it believes to be the appropriate shutter speed based on the overall scene, the scene may still be too dark or light. In this case, I’ll need to set the exposure compensation, which works well but can take longer for me to change than if I were photographing in Manual mode. Again, if you are practiced in this program mode, you may have a different experience.
Shutter Priority Mode
When using Shutter Priority mode, you’re telling the camera you’d like to decide which shutter speed to use while it selects what it senses to be the best aperture for the pet and the scene.
PROS
If I had to pick a priority mode, I would use Shutter Priority for pet portraits, because it’s very important to me that my images do not have undesired movement or blur in them. As long as my ISO is set appropriately, using Shutter Priority with scenes in which the lighting is changing often (like the cloudy day I mentioned) can be quick and effective. This mode feels less “risky” to me than Aperture Priority mode, because my aperture will flash as a warning when it doesn’t seem to have enough light to make a proper exposure based on the selected shutter speed. At least in my camera, I don’t see the same “warning” signal when I am using Aperture Priority mode.
CONS
Similar disadvantages apply for Shutter Priority as with Aperture Priority mode.
Settings: 1/1250 second, f/2.8, ISO 400 (created using Shutter Priority Mode)
ISO
ISO is something I definitely keep in mind when I’m photographing pets. As I mentioned in chapter 2, “Bringing Your Gear and Your Bag of Tricks,” I love working with a camera that provides high quality in low-light situations, primarily because it allows me the freedom to keep my shutter speed high enough to photograph active dogs, cats, and horses without sacrificing quality.
Capturing the detail in an animal’s fur is very important to me, and I’ve found with my current camera that if the situation calls for it and I can get my exposures spot-on, I’m comfortable photographing with up to 1600 ISO.
You probably already know that lower ISO is going to give you higher image quality. This is always important to keep in mind as you’re photographing pets. Sometimes, however, it can be a little confusing to know where to start with your ISO settings.
In the next section, I’ll share some starting points and considerations for ISO. It is not unusual for me to change my ISO multiple times in a single pet portrait session, because the ISO I choose is dependent on the lighting scenario and my creative goals. These settings are based on my camera system, so be sure to test out your system and perhaps keep some notes on what you discover.
INDOOR LOCATIONS WITH NATURAL LIGHT
There are many factors to consider, but when working indoors in a very brightly lit interior space, I typically start with an ISO of 400. I find that my eyes can give me the impression that a room is much brighter than what the camera detects. If I’m working with a pet in a more dimly lit interior space, I will start my ISO at 800, because I know I am likely going to need the extra light sensitivity.
Because I like to set my shutter speed at a minimum of 1/250 or, at the very least, 1/125 for posed portraits, I need to select a high-enough ISO for these interior lighting conditions in order to do so.
The room was fairly dark while I was photographing Otis, so I used a higher ISO to get my settings where I wanted them. Settings: 1/250 second, f/2.8, ISO 1250
ISO STARTING POINT SUGGESTIONS
- INDOOR LOCATION WITH BRIGHT NATURAL LIGHT: ISO 400
- INDOOR LOCATION WITH DIM NATURAL LIGHT: ISO 800
- INDOOR LOCATION WITH SMALL FLASH: ISO 400
- INDOOR LOCATION WITH LARGE STROBE: ISO 200
- SUNNY, OUTDOOR LOCATION WITH NATURAL LIGHT FOR POSED SHOTS: ISO 200
- SUNNY, OUTDOOR LOCATION WITH NATURAL LIGHT FOR STOPPED ACTION: ISO 400
INDOOR LOCATIONS WITH SMALL FLASH AND LARGER STROBE
In order to save battery power for my small flash unit, I typically set my ISO to 400 when working indoors. This ensures that the flash does not have to work too hard and enables me to shoot more quickly, since I will not have to wait as long for the flash to recycle. Flash recycle time is very important when working with pets, because you can easily miss a sweet expression or action if the flash fails to fire.
Larger strobes that are not battery-powered typically have a faster recycle time, so I will work with them at 200 ISO as a starting point when photographing an animal indoors.
This photograph was created indoors with a large strobe light. Settings: 1/125 second, f/3.2, ISO 160
OUTDOOR LOCATIONS WITH NATURAL LIGHT ONLY
If I’m photographing posed portraits outdoors on a sunny day, I’ll begin with a low ISO, usually 200, in order to keep the image quality high. If I am photographing stopped action in the same scenario, I may start with my ISO set to 400, because I know I’ll need to get a very high shutter speed.
When I’m creating portraits outdoors on a cloudy day, I’ll start with an ISO setting of 400. If I find myself working in extreme shade, I’ll initially set my camera’s ISO to 800.
Cameras Aren’t Creative
The important thing to remember when it comes to exposure is that cameras aren’t creative beings; they allow for creative action, and they are “smart” in the sense that they can react based on the settings you choose. But the camera doesn’t know anything about your goals as a pet photographer. Your camera doesn’t have any opinions about whether the background should be sharp or blurry, whether you are underexposing a white dog or overexposing a black horse. It’s up to you to decide what’s important in your images and to set your camera in a way that gives you creative control.
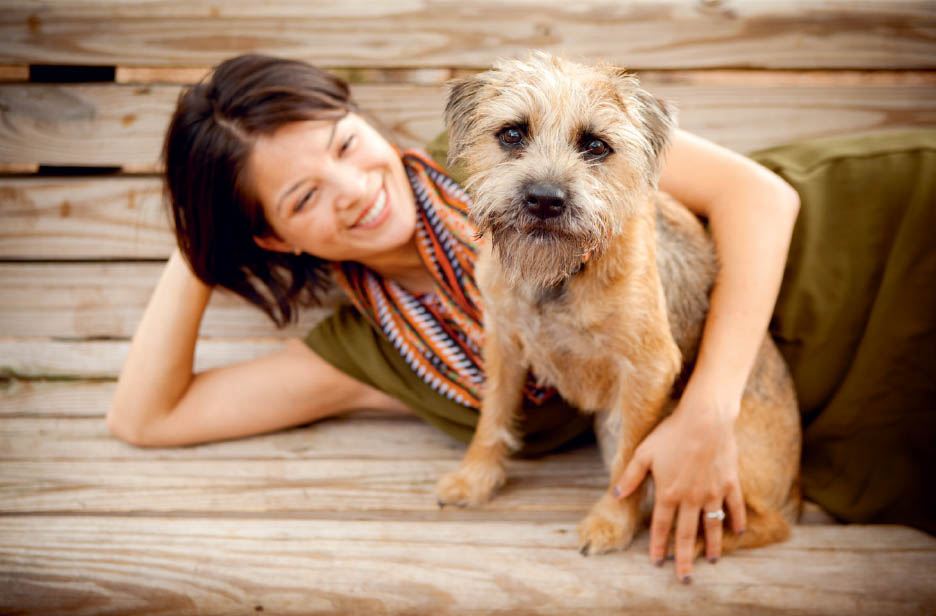
An intentional choice was made to focus on the dog and let the woman fall out of focus. Settings: 1/500 second, f/3.2, ISO 800
Even though cameras and built-in meters are becoming increasingly sophisticated, photographing very dark-colored and light-colored pets can be technically challenging.
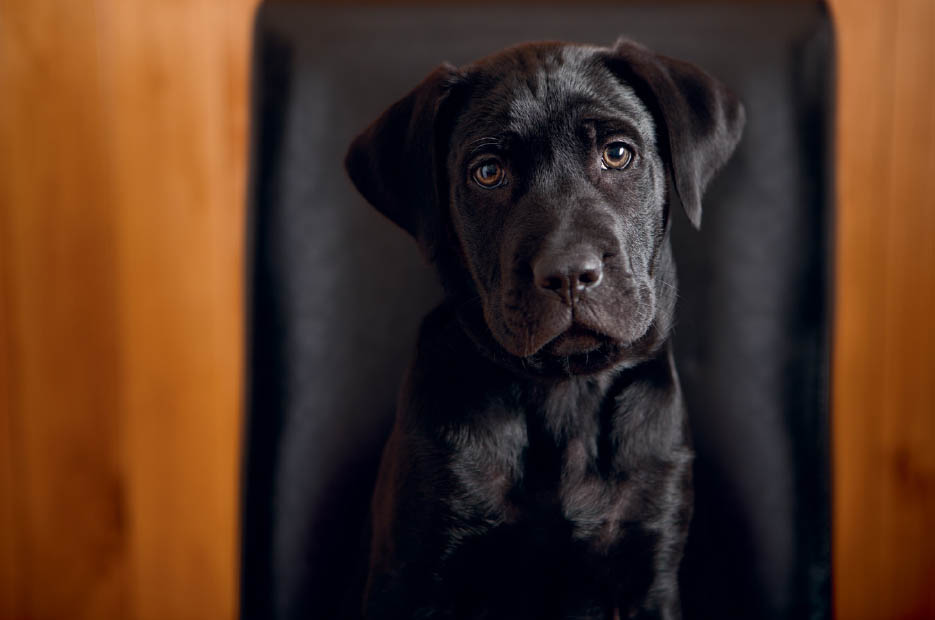
DARK-COLORED PETS
As you probably already know, photographing dark pets can be difficult. One of the challenges is that dark fur absorbs light, so when we are photographing a black dog, the image can be underexposed because there just isn’t enough light bouncing off him. When I am photographing dark animals, I know immediately that I will need to make sure I have enough light falling directly onto that dog or cat. If the dog, cat, or horse has shiny fur or hair, I’m in luck because the light bounces off that shine and provides a nice surface for capturing detail. If there is little or no shine, I have to make even more effort to bring light directly onto the fur.
My dog, Otis, is pure black. When he is being photographed, his fur requires more light than a white dog’s fur, but because his fur has sheen to it, the light bounces off the black and creates highlights that give dimension to his face and body. Reflectors (I typically use silver or white) can often help reflect an animal’s fur quite nicely.
Another potential challenge when photographing dark animals is the camera’s built-in meter. If I am metering off of a dark dog with evaluative metering, for example, my camera will want to provide an overall exposure that is an 18% gray, and as a result, the dog will be overexposed and look more gray than black. If this situation occurs while I am in Manual mode, I will have to decrease my exposure in some way via the shutter speed, aperture, or ISO. If I am using a priority mode, I’ll have to decrease my exposure compensation or adjust the ISO in order to lower the overall exposure. In order to really ensure that values are falling where I want them, I look at my histogram.
Another potential challenge with dark animals is that if I am photographing a low-key scene (dark animal and a dark-toned background), my camera can sometimes struggle a bit with auto focus. The camera needs contrast to focus, and if everything is dark, my camera might sometimes become confused.
Try not to be intimidated by photographing dark animals, but do expect that they might need a little more technical attention than other pets.
This image of Otis was created with a large strobe light, which you can see reflecting in his shiny fur. Settings: 1/160 second, f/3.2, ISO 200
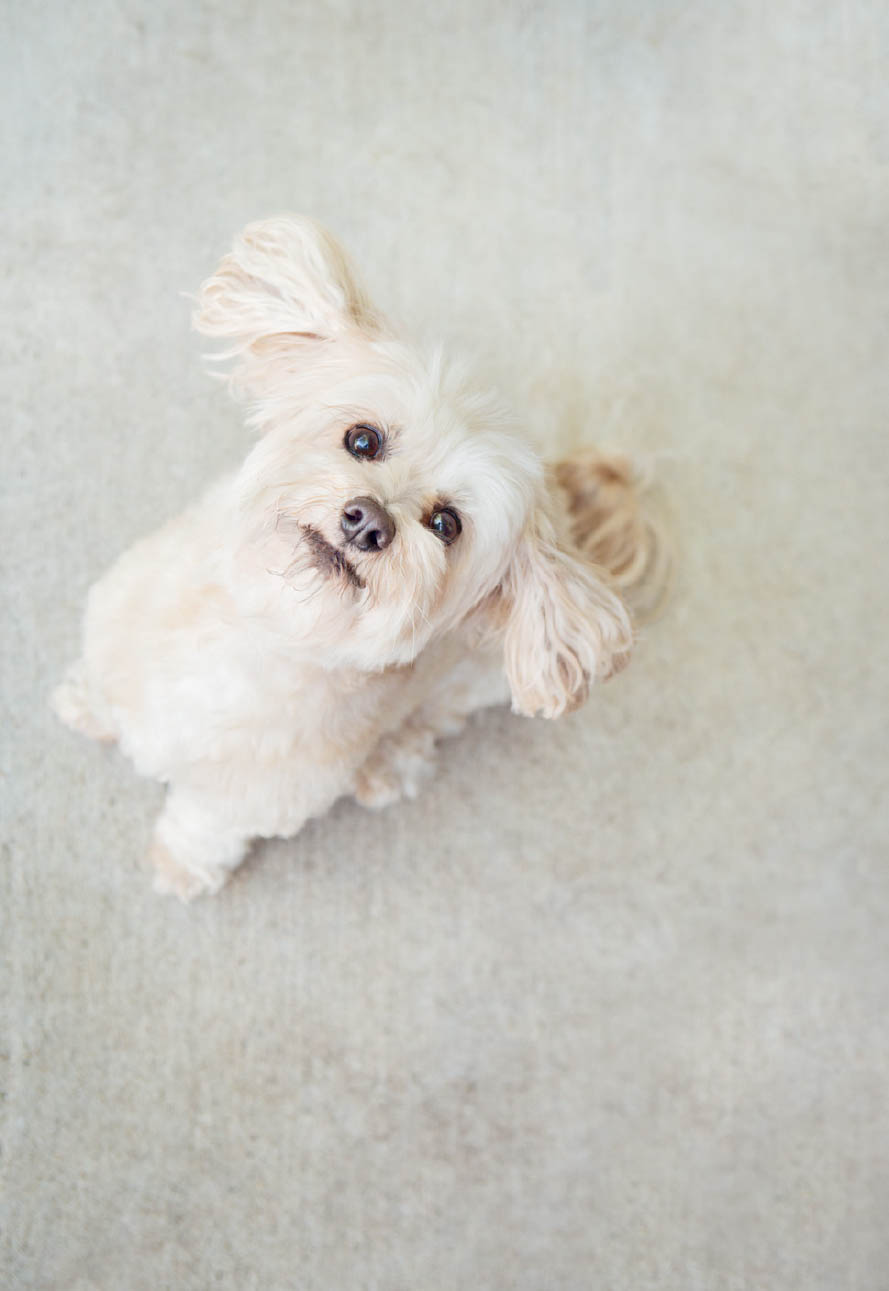
LIGHT-COLORED PETS
When creating images of light-colored pets, you may run into a similar, but slightly different, challenge as with dark pets. Your camera’s internal meter may see a bright, white dog and want to make that white an 18% gray. To do this, your camera may underexpose the white fur, causing it to look gray rather than white. This situation is definitely more noticeable for me when the animal’s fur and body are filling the frame and when I’m using a priority mode. If you run into this problem, you’ll want to use your exposure compensation and dial it to +1 or another positive increment to give the image more exposure and essentially override your meter’s suggestion.
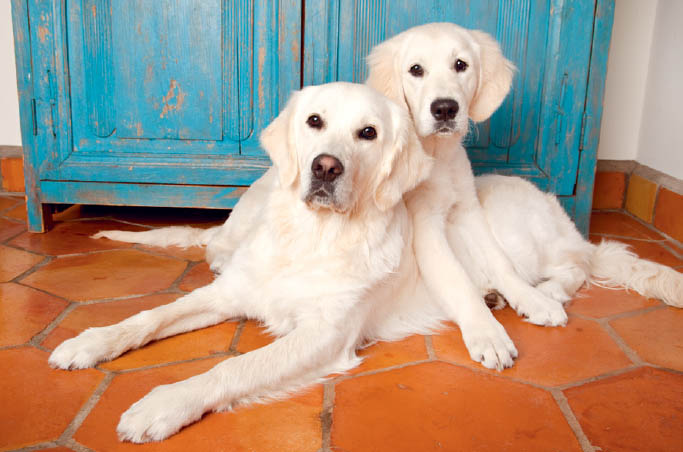
These two beautiful dogs were photographed with a large studio strobe. Settings: 1/125 second, f/11, ISO 200
Overexposing light-colored pets can also become an issue if I’m not paying close enough attention to my exposure compensation and settings in general. I don’t want to blow out any highlights if I can help it, especially on an animal’s face, because that is often not recoverable in postproduction.
DARK- AND LIGHT-COLORED PETS IN THE SAME FRAME
Photographing dark- and light-colored pets in the same frame can sometimes be a challenge. A good plan for this scenario is to try to position the light-colored pet away from the main light source and the dark pet closer to the light. I may also use a bounce card or reflector to add light to the dark-colored pet in order to help balance the light for both animals. In worst-case scenarios, I may take two separate exposures—one for each pet—and then composite later in postproduction.
Dynamic Range and Understanding Contrast of a Scene
When creating pet portraits, having a strong grasp of the information your camera is capable of recording, as well as the contrast of a particular scene, can be very helpful for both technical and creative purposes.
CONTRAST OF PET VERSUS BACKGROUND FOR EXPOSURE
Dark pets against light backgrounds and light pets against dark backgrounds have high contrast and may require some extra technical considerations. When I use the terms “dark” and “light,” I am referring to both the color of a scenario or animal and the amount of light in a given situation. For example, a white wall can appear dark compared to a foreground if there isn’t much light on the wall, or if the foreground in comparison is much more illuminated.
If your objective is to capture detail in both the pet and the background in high-contrast scenarios, you’ll need to make sure you’re being realistic about how much information your particular camera can capture at once—this is the dynamic range. As a reminder, dynamic range is the difference between the lightest light and the darkest dark in your image.
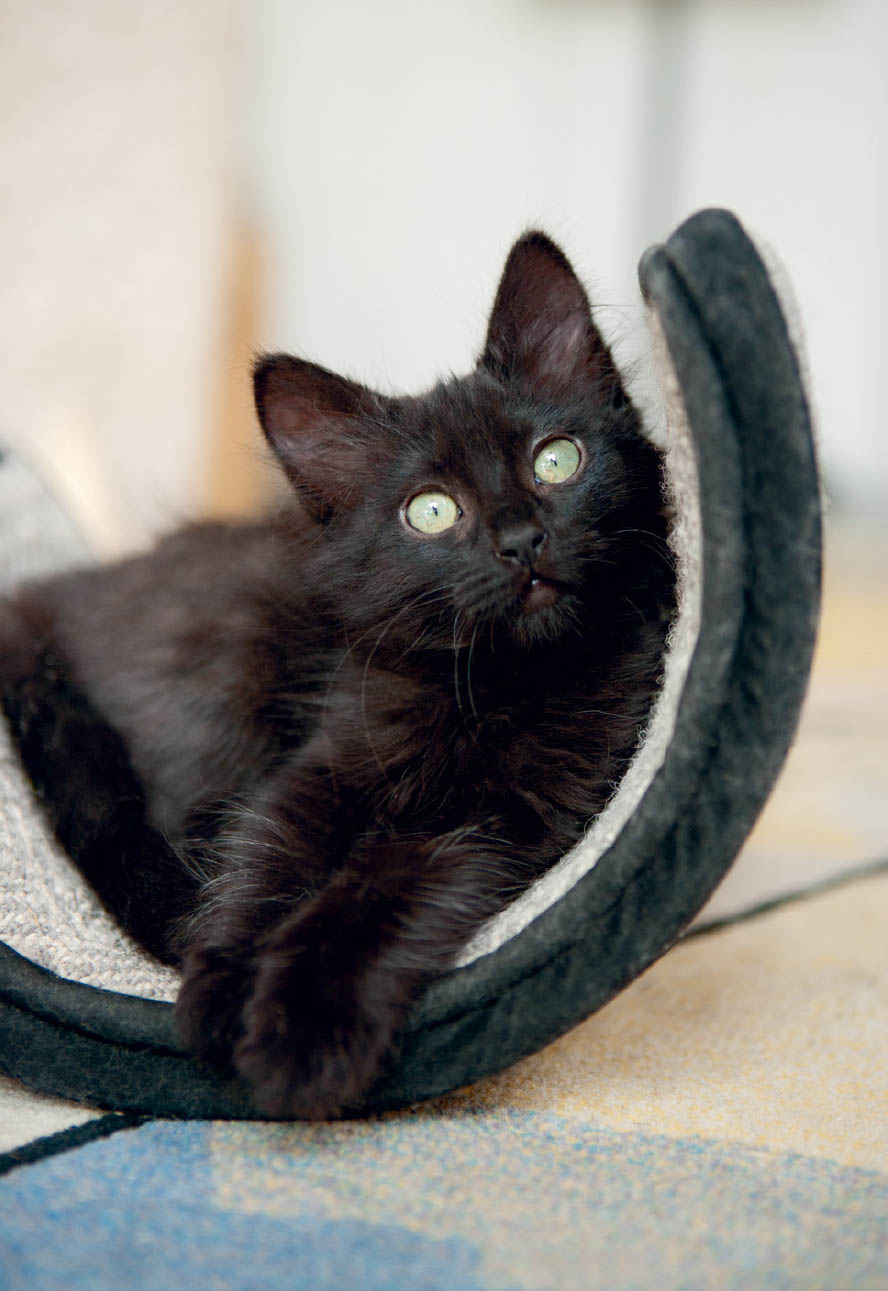
This black kitten photographed against a bright background created a high-contrast scene. Settings: 1/180 second, f/2.8, ISO 400
I photographed Gracie, a light-colored Maltipoo, against a fairly light-colored flooring, which is a lower-contrast, more “high-key” situation. Settings: 1/320 second, f/4, ISO 800
Photographing a light dog on a lighter background (a high-key image) will be easier for the camera to capture than a high-contrast scene, because the contrast is lower. Dark dogs against dark backgrounds will be simpler for a camera to expose.
One challenge with low-contrast scenes is making sure that the pet and background have separation. Neither high nor low contrast is necessarily better; they’re just different. If you’re struggling while photographing a high-contrast scene, try to make a note of whether you’re being realistic about how much information you’re asking your camera to gather. Practice noticing which backgrounds you’re choosing and how they compare in contrast with the pets’ fur so you can make some intentional choices.
USING CONTRAST TO CREATE STUDIO-LIKE LIGHTING
You can use a high-contrast scenario with pet portraits to your creative advantage. For example, if the proper exposure for a dimly lit, dark background is 5 stops of exposure more than the necessary exposure on the cat or dog in the foreground, you will have to decide which takes priority. This is because of the limited dynamic range I mentioned earlier. If you need detail in the background, you’ll have to add light to the background or lower the light from the foreground in order to decrease the overall contrast of the scenario. The contrast in the image I’m describing is too great to accurately expose both for detail without making some adjustment. No worries, though—you can use this kind of scenario to your advantage and just let the background fall dark, which can result in a more studio lit–looking image.
I used this method in the image of Neema, the cat. I noticed that the beautiful window light allowed me to photograph detail in both the cat and the background if I had my back to the window. I saw a television stand to camera right in the same room and knew that if I repositioned myself and the cat just slightly, I could expose the cat properly and let the television stand fall into darkness.
In this situation, I knew that the dynamic range of the camera was not great enough to capture details in both the cat and the background, because the difference in exposure was too much. (Note that if the contrast weren’t extreme enough, I could potentially increase the distance between the cat and the background in order to increase the contrast.) This approach resulted in a more studio lit–looking image.
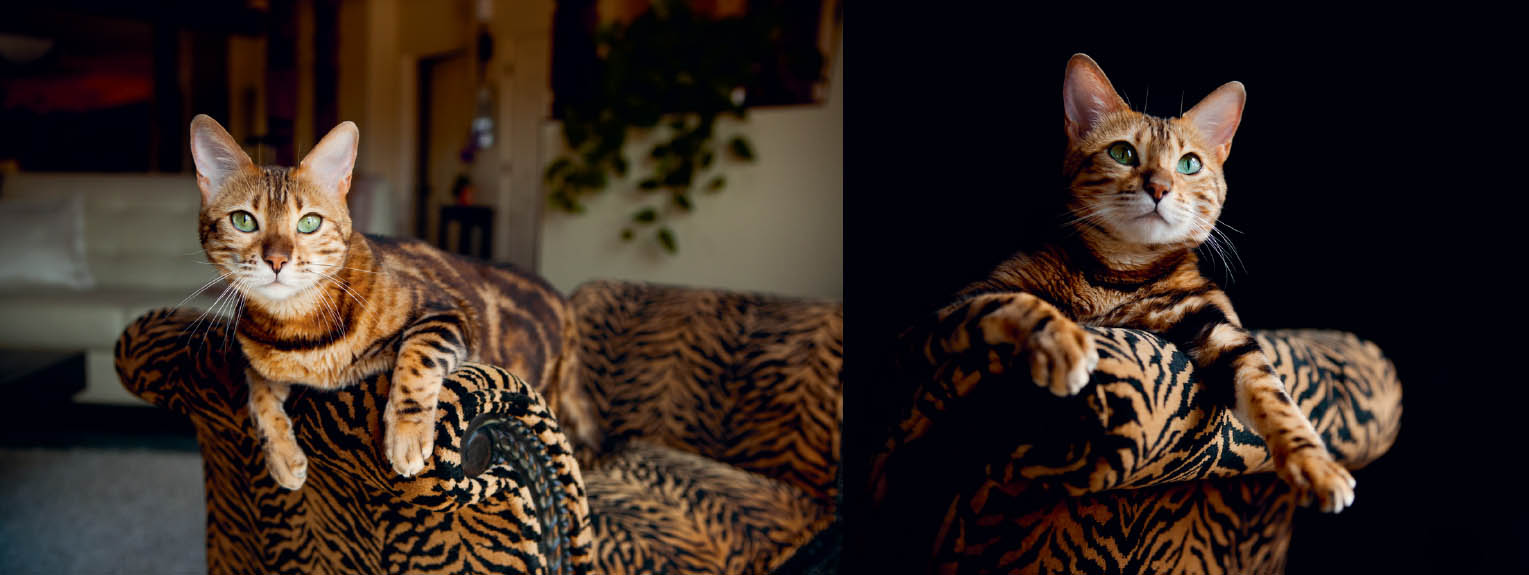
Neema, a gorgeous Bengal cat, photographed indoors with natural light. I used the contrast of the scene to create lighting that looked similar to studio lighting. Settings: 1/250, f/4, ISO 640; and 1/400, f/2.8, ISO 800 (for the second image)
Keep these kinds of opportunities in mind as you’re assessing your locations for pet portraits and comparing foregrounds to backgrounds, and think about how you can use contrast in lighting to create drama or variety.
In-camera Versus Retouching Later
Getting things right in-camera is always my intention. If I say to myself, “I’ll fix that later,” it’s for a good reason. In chapter 2, I discussed my philosophy of retouching, and in this chapter, I’ll address the subject a bit more with regard to how I make these decisions when I am actually in a photo shoot with a pet.
As I mentioned, I don’t consider myself to be a heavy retoucher, meaning that I don’t typically use a lot of plug-ins in Photoshop or Lightroom, and I don’t usually create a lot of special effects with my pet images. While I am pretty traditional in terms of how I finalize my images, I encourage you to find a style that works well for you and that excites you.
I typically use Lightroom and Photoshop to enhance my images by cleaning up the pet or the scene in general, or to make changes that lead the viewer’s eye to the pet as much as possible via masking.
When I am photographing a dog, for example, I try to get as much right in-camera as I can, given the specific situation and animal. I try to make sure things are clean and orderly with the background and that any props involved are looking organized and intentionally placed. I make sure large items are where I want them and the dog looks clean and presentable. If something major is out of place within the scene or on the dog and I have the time and dog’s energy to fix it, I will.
A little drool isn’t worth stopping for, but a lot of drool is a different story and totally worth a pause in activity to get it right in-camera. Settings: 1/500, f/2.8, ISO 500

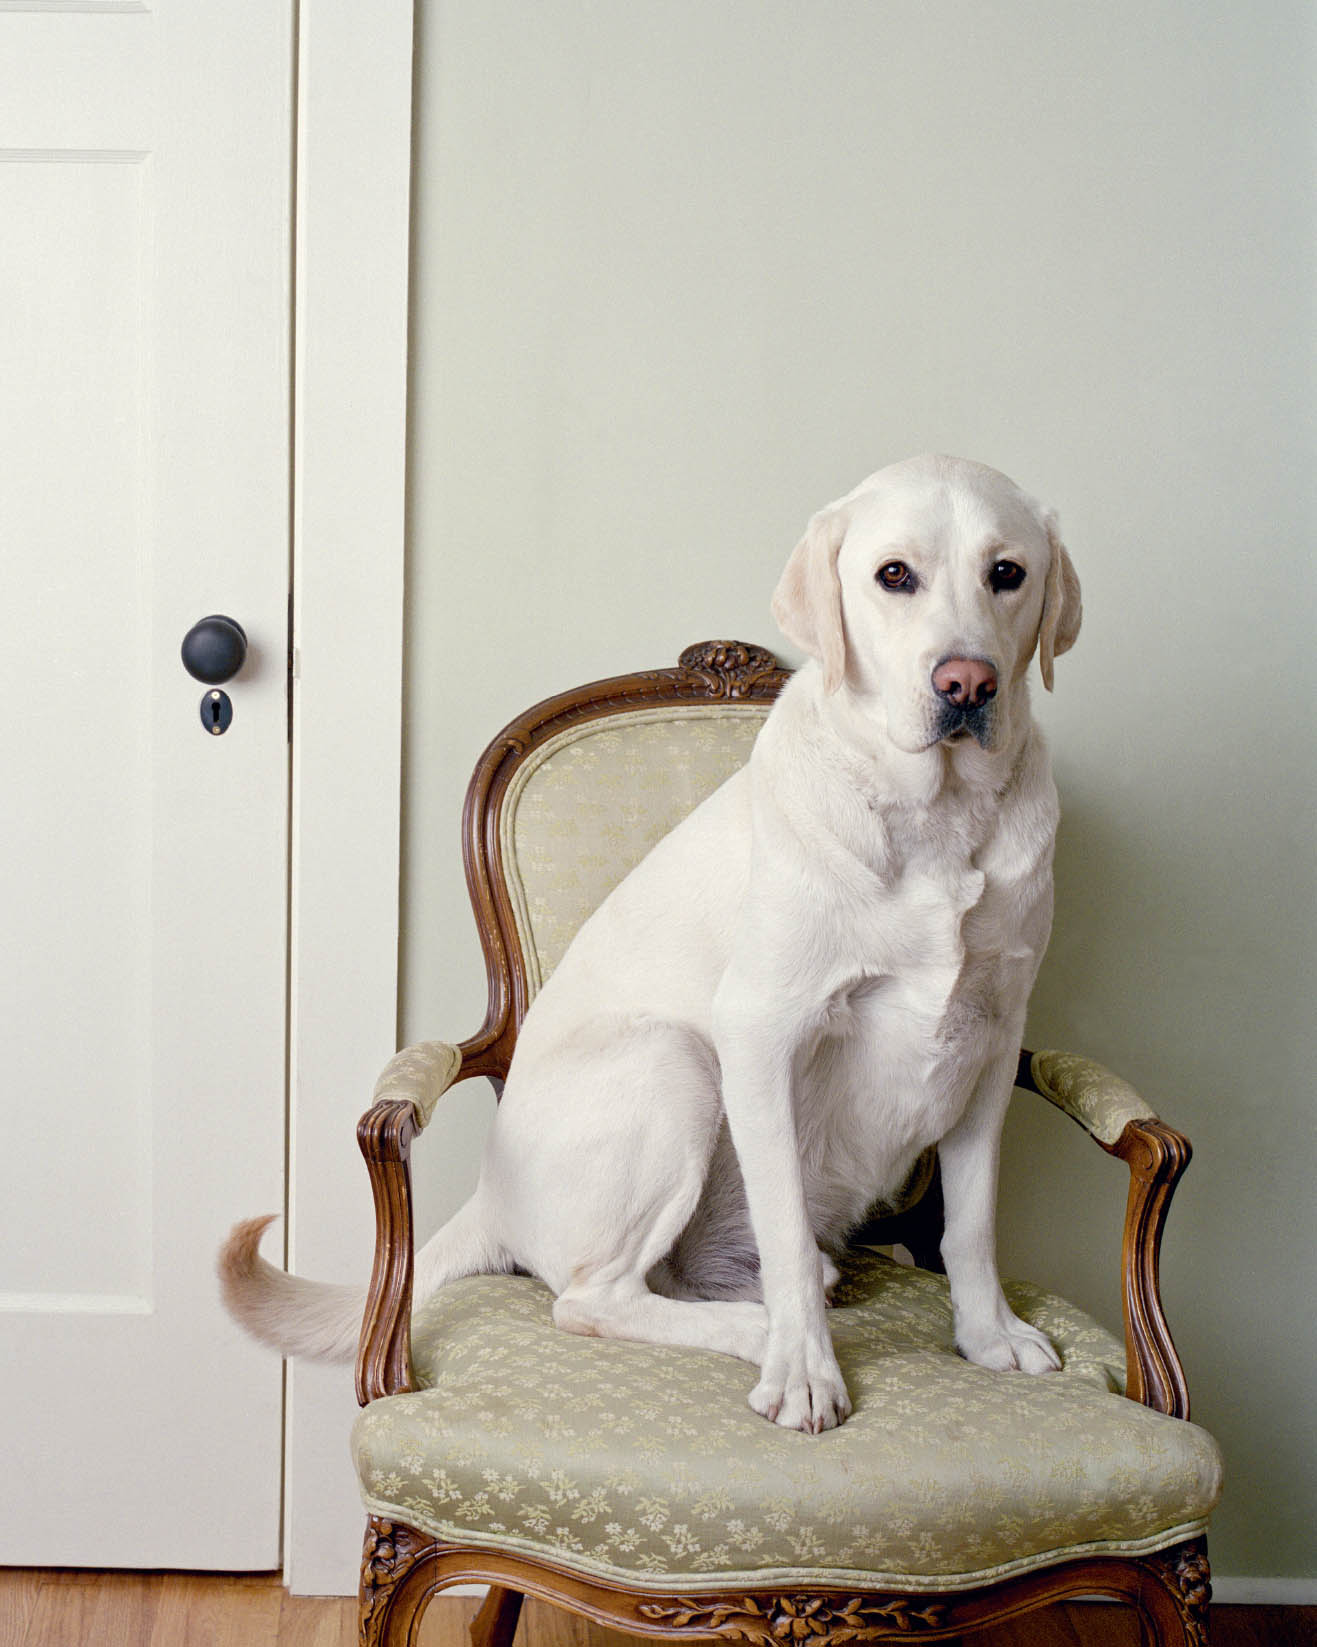
I could have removed this dog’s collar before I photographed her, but I loved the way she was sitting in the kitchen and didn’t want to risk moving her. If I later found the collar distracting, I would remove it in Photoshop. Settings: 1/125 second, f/2.8, ISO 1600
WHEN TO RETOUCH, WHEN TO GET IT RIGHT IN-CAMERA
CONSIDER RETOUCHING IN POSTPRODUCTION: ELECTRICAL OUTLETS AND SWITCHES (IF I LIKE THE LOCATION, I WON’T MOVE BECAUSE OF AN OUTLET), SMALL AMOUNTS OF DROOL AND SLOBBER, EYE BOOGERS (IF RUNNING SHORT ON TIME AND PET ENERGY DURING A SHOOT), VERY SMALL ITEMS IN THE BACKGROUND, TREAT SCRAPS ON THE FLOOR, SMALL AMOUNTS OF HAIR/FUR ON CLOTHING AND ENVIRONMENT, AND SMALL BITS OF FOOD ON PETS’ FACES. GET IT RIGHT IN-CAMERA BY FIXING DURING THE SHOOT (WHEN POSSIBLE): COLLARS, GENERAL GROOMING, FURNITURE AND OTHER LARGE ITEMS, LIGHTING, LARGE AMOUNTS OF DROOL OR SLOBBER, DIRT, FRAMING AND CROPPING, AND THE CAMERA BAG YOU FORGOT WAS IN THE BACKGROUND.
I like to take the time to be intentional about what I am including in my frame and confident in the set overall when I capture images, but sometimes I have to let it go and know that I may have to fix these issues in postproduction. For example, there are instances when it is better for me to fix a dog’s collar or clean food off its face in postproduction than take up time and the dog’s energy during the session, because if I choose to stop and adjust something small, I may miss the moment or lose the dog’s attention entirely. I make these decisions based on the individual pet and the flow of the photo shoot. But overall, I’d rather be photographing or making other art than sitting at my computer retouching something I could have easily moved or adjusted during the session.
MULTIPLE FACES
If I am photographing more than one animal at a time and the goal is to have every face looking straight into the camera, I will do my best to get every face aligned in-camera just the way I want, but I realize I may have to composite two or three images together. Again, I am considering the amount of time and the animals’ energy that it takes to get everything to align in one shot versus saving their energy to be used in the creation of other fun images.
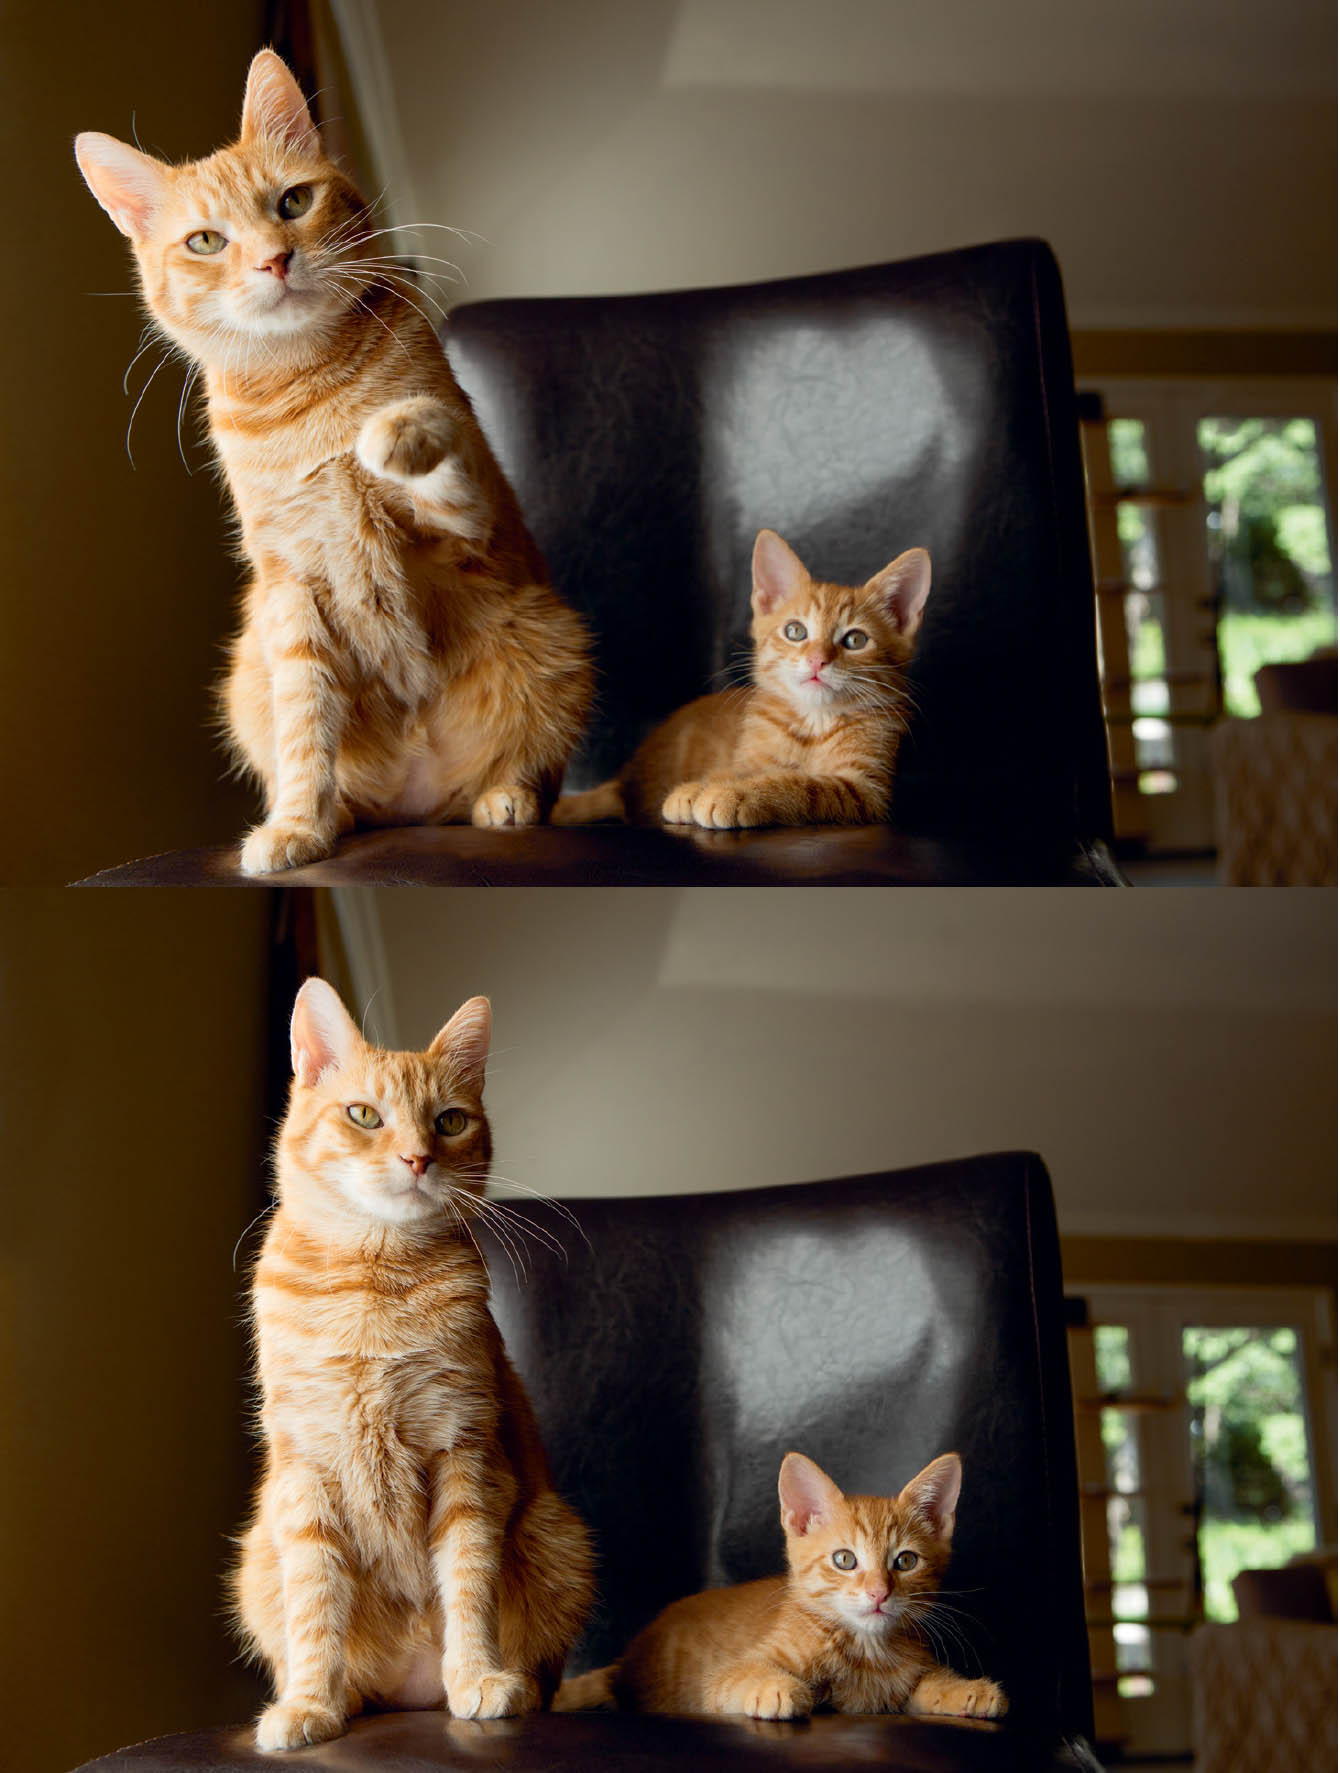
I love the action of the cat on the top, but the kitten is out of focus. I might choose to composite these two images to get the action on the top and an in-focus kitten if sharp focus on both were needed. I always try to get action and focus exactly how I want it in-camera, but with multiple faces and bodies, I occasionally choose to composite in postproduction. Settings: 1/250 second, f/5.0, ISO 400
LIGHTROOM VERSUS PHOTOSHOP FOR RETOUCHING
In terms of retouching, I use Lightroom for graduated filters, exposure adjustments, color balance, clarity, contrast, and a small amount of spot removal. I also play around with virtual copies to see how images look with varying degrees of adjustments or in black and white.
I open images from Lightroom into Photoshop for more detailed retouching. I remove excessive amounts of slobber and drool, eye boogers, stray hairs, and debris in Photoshop. Occasionally, I’ll swap a face or eyes out from one image and transfer it to another in Photoshop. This is helpful if I wasn’t able to get the parts to align in-camera, as mentioned earlier. I also love making detailed selective adjustments using layer masks to keep the viewer’s eye focused where I want it, which is something you can now do pretty well in Lightroom, too.
How the final product looks is important, and precisely how you arrive there is entirely up to you as an artist. Increasing your attention to detail and practicing getting your pet portraits very close to the final product in-camera will not only help you continue to train your eye and skills, but also save you time on the computer. Knowing why you are making decisions in-camera, as opposed to letting the camera make selections for you without that knowledge, will help you make more intentional and creative choices.
The more you can become intentional about how you capture your images in-camera, the more freedom you’ll find to enjoy playing around.