Chapter 9: Equipment for the Children’s Photographer
Considering a Camera Upgrade
Using Interchangeable Lenses
Looking Inside Your Camera Bag
Although the emphasis throughout this book has been that equipment and technology are secondary to making your images of children, it is helpful to have a starting point when purchasing expensive equipment. There are so many equipment options available: where do you start? The choices and preferences are personal and change a bit from photographer to photographer. Making your own decisions depends on your needs, your level of experience, your budget, and even your brand preferences.
Chapter 2 covers more advanced camera settings and photography concepts, such as aperture, ISO, and depth of field.
Considering a Camera Upgrade
Consider that updates, upgrades, and new products hit the market on a daily basis. What is perfectly suited for you today could change on a moment’s notice. If you are in the market for some new equipment or are just interested in learning what’s out there, do your research first. Here are a few websites that might aid you in your camera and post-production research:
www.imaging-resource.com/TIPS/CHOOSE/CHOOSE.HTM
www.photo.net/equipment/digital/choosing2/
www.tamron-usa.com/lenses/fundamentals.asp
You save time and money by deciding ahead of time what you really need in the near future. The best advice is to start with what you have. Learn whatever camera you have inside out and backward and forward and only upgrade when you know what you need to move on. Technology moves very fast, so don’t leap before you know what you need or you’ll find yourself with old technology that you still don’t know how to use. Most beginners start with a simple point-and-shoot camera and use its automatic settings. However, inexpensive SLR cameras with zoom lenses are also an option. If you need to advance to a camera that gives you more control over your settings (as covered in Chapter 2) ask yourself the following questions:
• Do you have the time and motivation to learn new things?
• What will you be comfortable using for the challenge of photographing children?
• Do you need a camera that enables you to choose your depth of field, either by modes such as Portrait, Landscape, and so on, or by Aperture Priority (Av) mode? Does your existing camera offer that now?
• What size prints do you want to make? Are you ready to progress to a camera that produces higher-quality, larger-image files? This is going to be determined by the number of megapixels the camera offers. If you eventually want to print a high-quality 8-×-10-inch print, you need to buy a camera with at least 5 megapixels. If you are making photographs for e-mail or the web, you don’t need to worry about having a lot of megapixels. Megapixel is the measurement of resolution: the larger the number, the greater the resolution or quality of the photograph produced.
• Do you want to be burdened with a lot of equipment when you are photographing children? Usually, you must make a trade-off here. Point-and-shoot cameras are light and lend themselves to spontaneous moments.
• Would you like to use interchangeable lenses? In that case, you need an SLR camera. Are you intimidated by all the bells and whistles, or can you simplify your approach? Can your budget afford a selection of lenses?
• Is video capability important to you? Many consumer-level cameras can capture both still and video beautifully.
• How much can you afford to spend? More expensive doesn’t always mean better. The best camera for you is the one that meets your needs without having more features than you’ll use.
When you are ready to purchase equipment and have narrowed your search, here are a few items to consider:
• Ergonomics. When you hold the camera in your hands, does it fit your hands well? Can you find the basic settings without having to get out the manual?
• Reviews. Check the reviews and get opinions from photographers whose work you admire. Find out what they are using. You may be surprised that it’s not as flashy as you thought.
• Future upgrades. If you upgrade your camera, can your computer equipment handle the change too? With digital photography, the camera and lenses are only half of the equation. You may need to upgrade your computer and software as well, as discussed in Chapter 10.
• Rent before you buy. Renting equipment for a weekend before you decide to buy can save you money and buyer’s remorse. Often, you don’t realize how heavy the lens/camera is or that it might not give you the effect you are looking for. Rent equipment first and check out the options. If you are near a large city, you will have more local rental resources. Some great online resources for lens rentals are: www.lensrentals.com or www.borrowlenses.com.
Once you have purchased your camera, read your manual. You can also try to find online classes or instructions for your particular camera. Some people don’t find camera manuals very captivating, so seek out any and all ways to learn all you need to use your camera to its fullest capacity.
Using Interchangeable Lenses
When it comes to photography, the look or quality of your image is strongly influenced by the lenses you use. Lenses are your most important investment. You would be smart to buy a less-expensive camera and put your money into good lenses that can grow with you. The price of lenses is directly related to their speed and quality. Today’s manufacturers produce lenses of exceptional quality and sharpness.
Fast lenses
Aperture, or the lens opening, can only open as wide as the maximum aperture for that particular lens. Lenses with very large maximum apertures (that is, f/1.2, f/1.4, f/2.8) are considered fast lenses because, at their widest settings, they let in two, three, even four times more light than a lens with a maximum aperture of f/3.5, f/4.0, or f/5.6, for example. These wider apertures let in so much more light than their slower counterparts that it takes less time for an image to record on your digital sensor, allowing you to work at faster shutter speeds. Many of the photographs in this book were taken with faster lenses. For example, if you look at the technical information under each photo, you can see that many of the images were captured with apertures of f/2.8.
In Chapter 2, I introduced the concept of aperture.
In Chapter 2, depth of field was discussed at length. As I stated there, “Depth of field is the field or area in the photograph that is in focus. A photograph where just the family is in focus but everything else in the foreground and background is out of focus would have a narrow or shallow depth of field.”
Lens focal lengths
You will notice that the focal lengths in Table 9-1 are listed individually. If you own a zoom lens, your lens length will likely encompass several of these focal length ranges (such as 12-24mm or 70-200mm). Breaking them down individually gives you more information as to which focal length is used for certain types of photography.
Table 9-1
Lens Types
|
Common Focal Lengths |
Type of Lens |
Uses |
|
12mm |
Wide Angle |
Good for large groups |
|
14mm |
Wide Angle |
|
|
18mm |
Wide Angle |
|
|
24mm |
Wide Angle |
|
|
35mm |
Wide Angle |
|
|
50mm |
Standard Lens |
Similar to what the eye sees |
|
85mm |
Telephoto |
I use this for portraits |
|
105mm |
Telephoto |
Often considered ideal for portrait close-ups |
|
200mm |
Telephoto |
Good for blurring out backgrounds or for getting in close to the action |
Prime lenses
Prime lenses are fixed focal length lenses. That means, instead of zooming from 12-24mm or 70-200mm, theses lenses are fixed at 50mm, 85mm, and so on. In the case of prime lenses, you are the zoom. High-quality prime lenses are often significantly more expensive than zoom lenses. They are often overlooked by beginning photographers for several reasons, including the following:
• New photographers usually have a zoom lens that came with their camera when they bought it.
• No one bothered to tell the newbie just what a great investment quality prime lenses are.
Photographers who are purists use only prime lenses for their speed, quality, and sharpness. The photograph in 9-1 was taken with a 50mm prime lens.

9-1
ABOUT THIS PHOTO This photo was taken using a 50mm prime lens. Prime lenses are prized for their speed, sharpness, and quality. Taken at ISO 100, f/2.8, and 1/250 second. ©Allison Tyler Jones / www.atjphoto.com
If you are unsure about a new equipment purchase, rent it first. Many camera stores rent equipment for a few days or over a weekend so you can get some hands-on experience with the object of your desire. Some stores may apply the rental fee to the purchase of the new item.
You can pick up prime lenses new or used online and in your local camera store or, better yet, rent one from your local camera store or online (www.borrowlenses.com) for the weekend and see if it’s a good fit for you.
How Can You Determine the Maximum Aperture of Your Lens?
Look on your lens (sometimes around the end of the lens barrel and sometimes on the front element of your lens) for a number that starts with “1:” (for example, 1:2.8). These numbers indicate the largest or maximum aperture for this lens is f/2.8. Your lens might have more than one number (for example, 1:3.5-5.6). A number like this can be found on a zoom lens. Having two numbers means your aperture gets smaller as you zoom your lens in. So, when you shoot photos and your lens is pulled back, your maximum aperture is f/3.5, but when you zoom all the way in to pull your subject in closer, your maximum aperture is f/5.6 (hence the term variable aperture lenses). There are also zoom lenses with apertures that remain constant as you zoom in and out.
Zoom lenses
Zoom lenses provide several focal lengths in a single lens. You might be familiar with them already if your point-and-shoot camera is equipped with one. This is the most common type of lens in use today. If you look at your zoom lens, you will notice that there are two numbers denoting the focal length (such as 18-70mm or 35-135mm); this means that your lens will provide focal lengths from the smallest to the largest number. Zoom lenses are perfect for photographing children because they allow you to constantly change your focal length without actually switching out lenses or walking closer to the subject.
The images in 9-2 and 9-3 were taken with a zoom lens, illustrating the advantage of being able to capture images from a wide angle as well as a close-up without having to switch lenses.
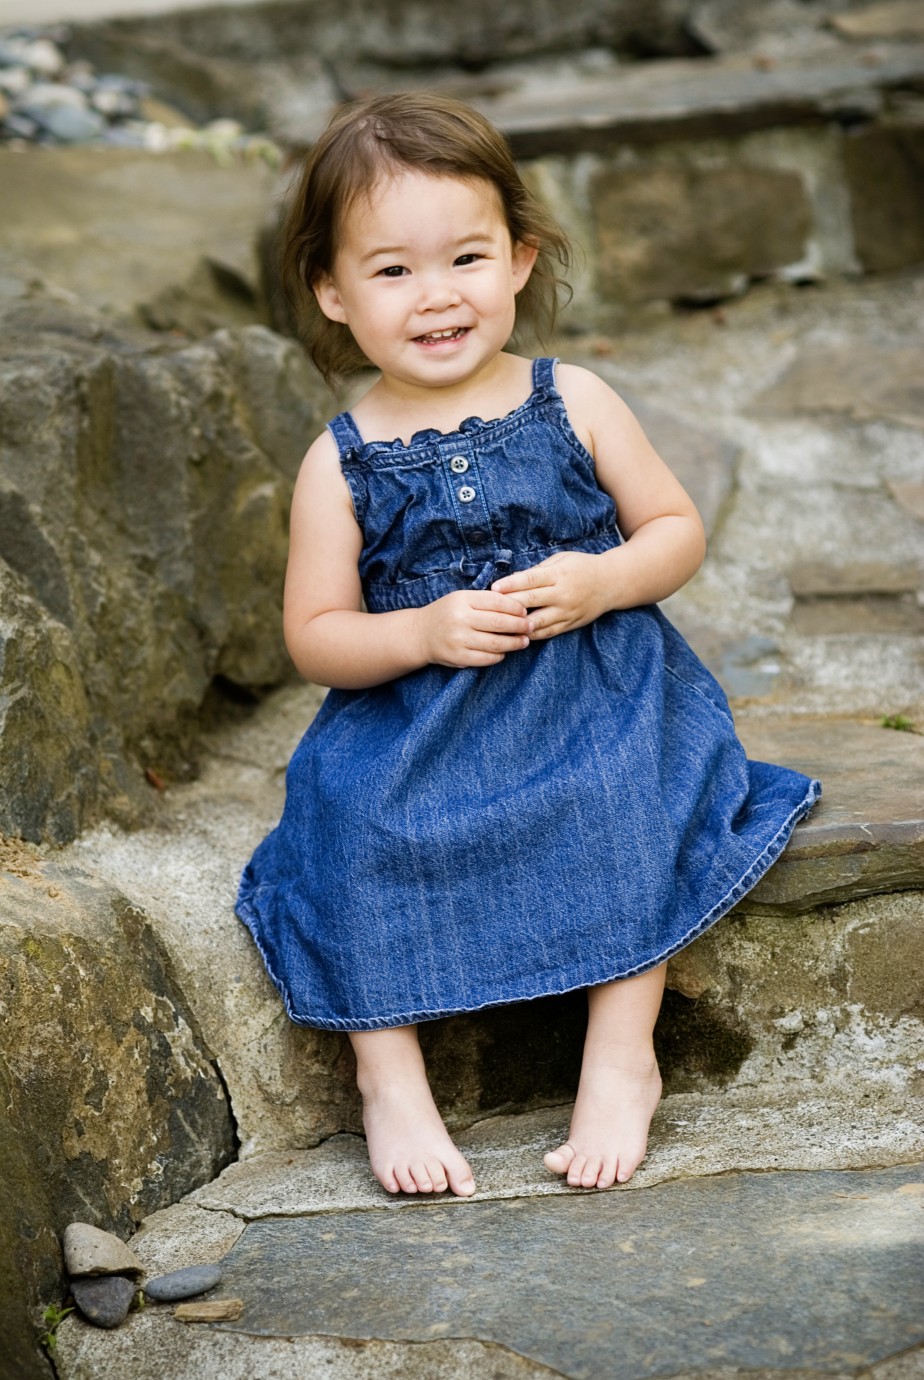
9-2
ABOUT THIS PHOTO This photo was taken using a 70-200mm zoom lens at approximately 85mm. Taken at ISO 100, f/2.8, and 1/125 second. ©Allison Tyler Jones / www.atjphoto.com
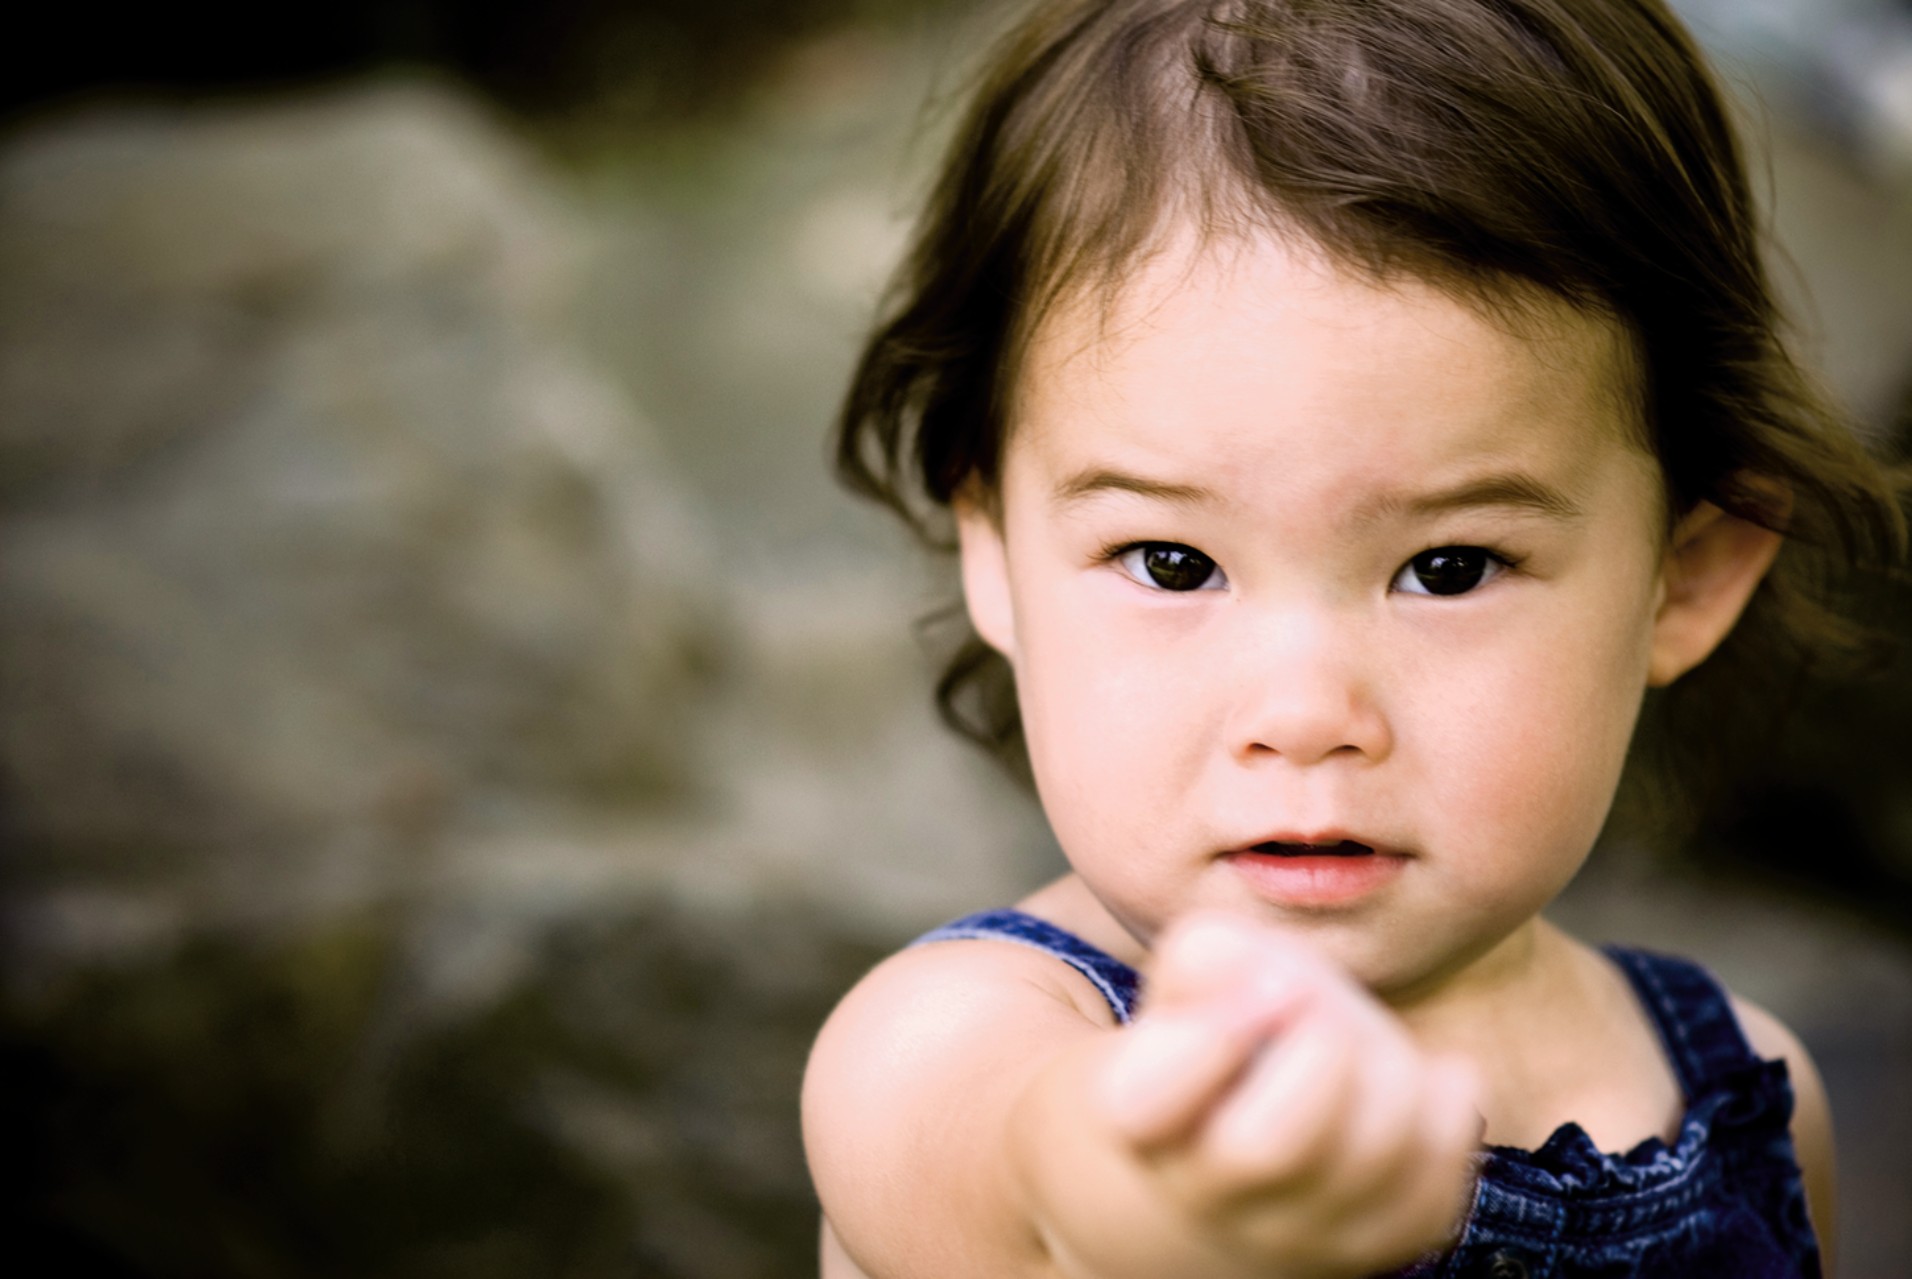
9-3
ABOUT THIS PHOTO This photo was taken using the same 70-200mm zoom lens as in 9-2, but this time the lens was zoomed in to approximately 200mm. Taken at ISO 100, f/2.8, and 1/125 second. ©Allison Tyler Jones / www.atjphoto.com
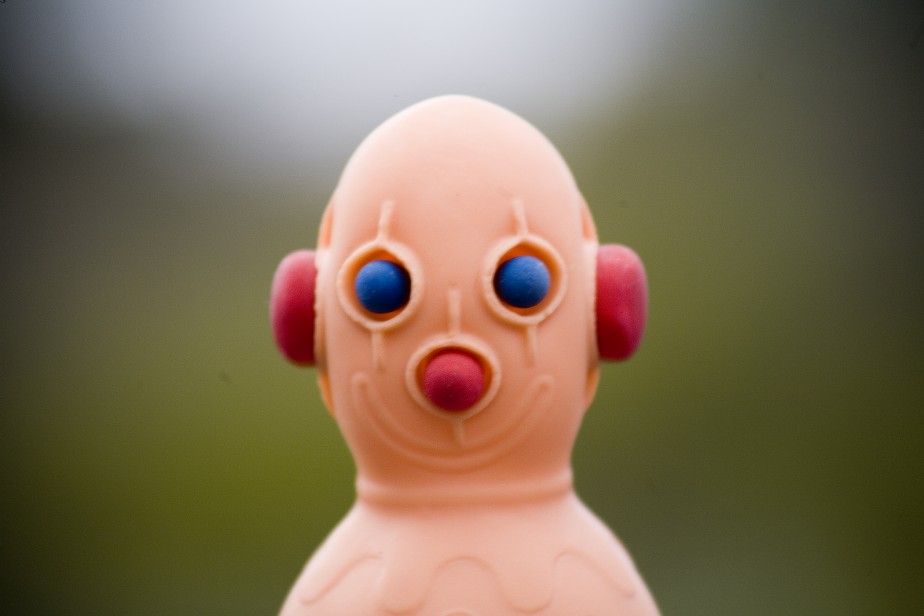
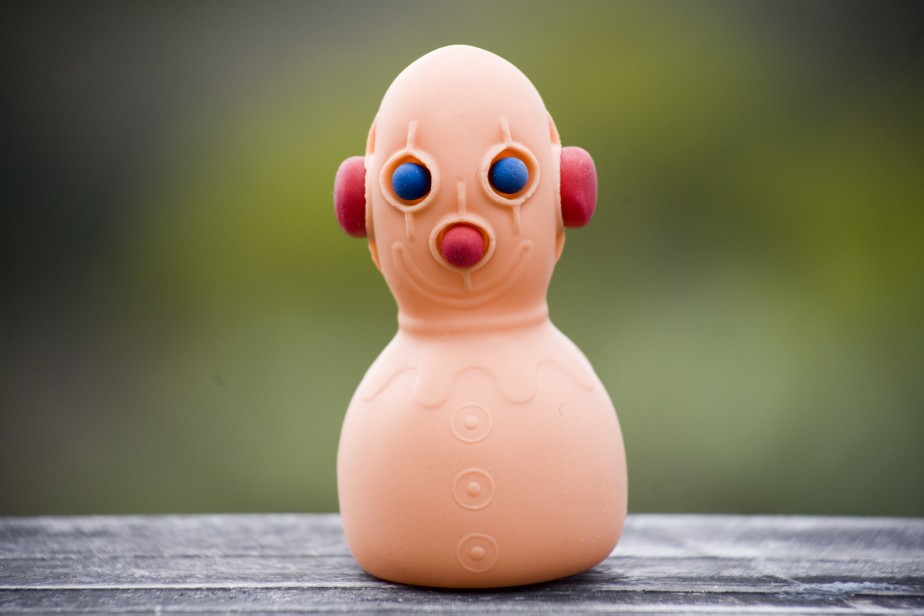
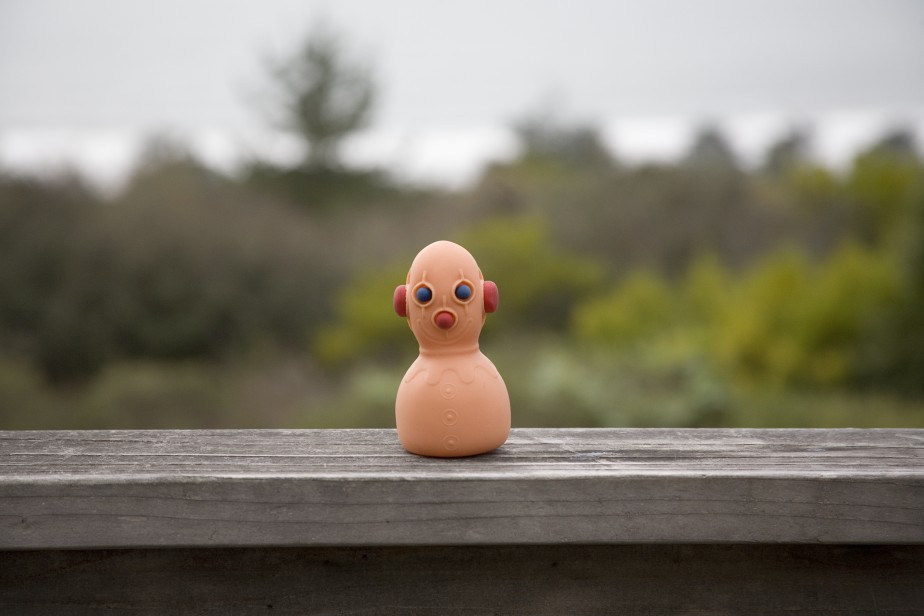
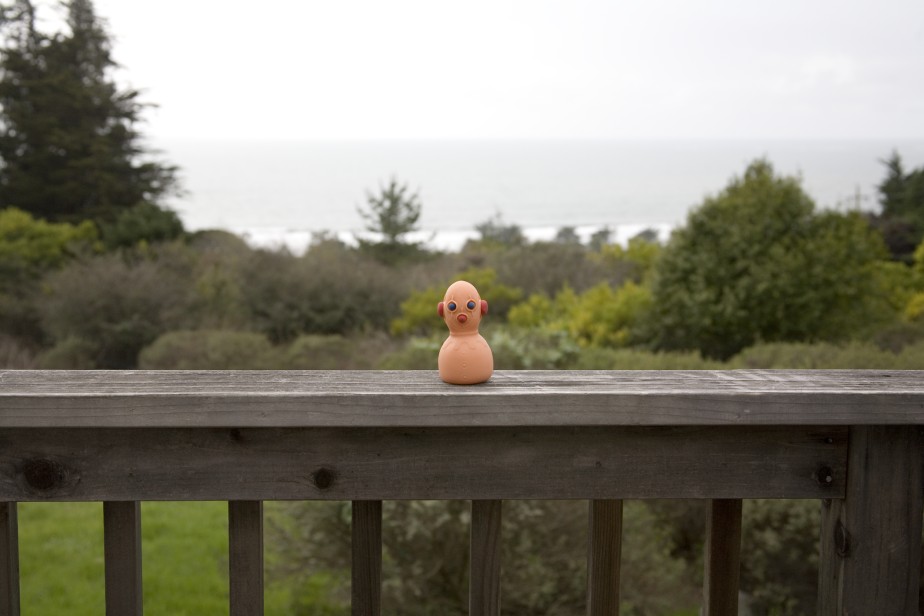
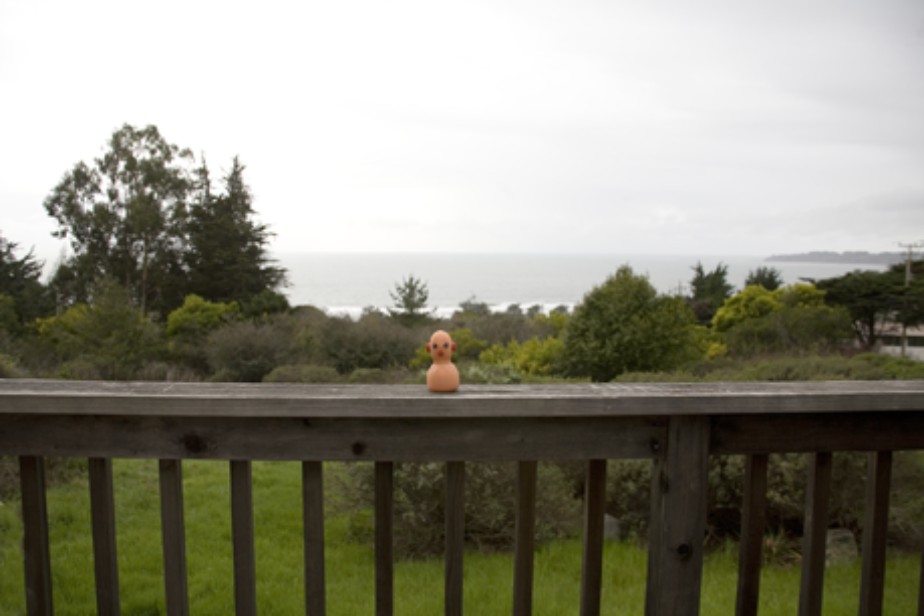
The five photographs shown in 9-4 through 9-8 are of Obie, a toy you met in Chapter 7. These images were shot with the photographer standing in exactly the same place while using a zoom lens at different focal lengths. Use these as a guide to see the effects that various focal lengths can create in image width and depth of field.
A 300mm lens, used for 9-4, is considered a telephoto lens, which magnifies objects that are very far away. These lenses can be quite expensive, especially if you buy one that is fast. You could pay around $1,500 or more. A 300mm lens is great for taking shots of children at the beach or sporting events when they are far enough away that you want to hone in on them more closely.
A 200mm focal length is achieved using a 75-300mm telephoto lens, as in 9-5. The 200mm doesn’t bring Obie as close as the 300mm, but it is a good choice for some portraits when you’re taking a picture of a child in the distance.
A 135mm focal length is also achieved using a 28-135mm telephoto lens, as in 9-6. It still allows a longer focal length than a wide-angle lens, but has a narrower area that it will capture. I recommend it for portraits and great candid shots as long as your subject isn’t too far away.
A 50mm focal length is achieved using the same 28-135mm zoom lens, as in 9-7. This wider-angle perspective is great if you are taking family or sibling portraits because it allows you to get in closer and eliminates more of the background.
A 28mm focal length, used for 9-8, is a standard wide-angle lens. This is a good focal length for group pictures, but not for close-up portraits because it can distort your image, making whatever is closer to the lens appear larger (like noses).
9-4
9-5
9-6
9-7
9-8
ABOUT THESE PHOTOS 9-4 was taken with a 75-300mm lens at ISO 400, f/5.6, and 1/160 second. 9-5 was taken with a 75-300mm lens set at 200mm at ISO 400, f/5.6, and 1/200 second. 9-6 was taken with a 28-135mm lens set at 135mm at ISO 400, f/5.6, and 1/250 second. 9-7 was also taken with a 28-135mm lens, this time set to 50mm, at ISO 400, f/5.6, and 1/250 second. 9-8 was taken with a 28-135mm lens set to 28mm at ISO 400, f/5.6, and 1/400 second. ©Ginny Felch / www.photographingchildren.com
Looking Inside Your Camera Bag
Most professional photographers learn very quickly to streamline their equipment to the bare essentials so that they aren’t hauling tons of equipment to every session. Being loaded down with too much equipment can affect your spontaneity. If you carry your camera by its strap over your shoulder, try carrying a Shootsac over the other shoulder to hold your lenses and cards (www.shootsac.com). This gives you a great deal of freedom and flexibility.
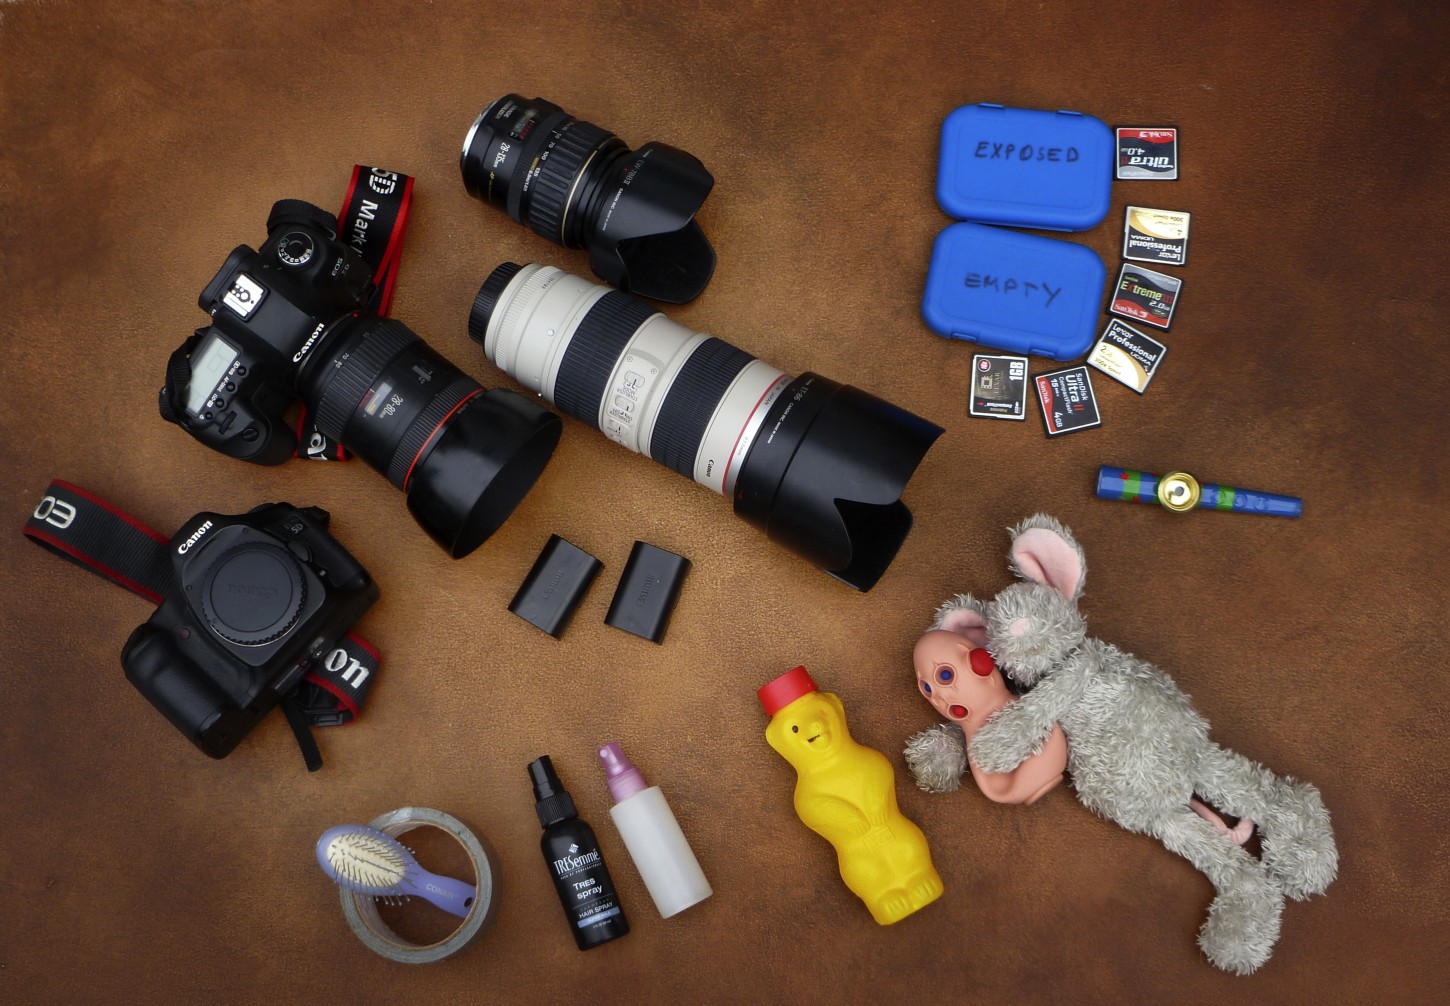
Consolidate your equipment so that everything fits into one bag. The contents of my camera bag is shown in 9-9. Take a peek into a working photographer’s bag.
9-9
ABOUT THIS PHOTO Here is a photograph of the equipment and other goodies that I always keep in my carrying case or in my car. Taken at ISO 80, f/3.7, and 1/200 second. ©Ginny Felch / www.photographingchildren.com
To be a successful children’s photographer, you need some non-camera-specific equipment with you at all times. This equipment is entirely optional and depends on how much you want to carry and how you interact with your subjects. Here’s a list of the items in my bag:
• Spray bottle of water (for bad hair days)
• Small brush (for bad hair days)
• Small bottle of hair spray (for hair emergencies, with parent’s permission)
• Duct tape (for clothing emergencies)
• Child’s toy or comfort item such as a small, stuffed animal
• A few small noisemakers like a kazoo (to distract restless subjects)
Your camera bag also should include the following pieces of camera equipment:
• Extra memory cards, preferably 1 to 8 GB
• Your favorite lens (mine is 85mm)
You can also pack some optional items in your bag or in a separate bag that you keep in your car:
• A backup camera (I use a Canon 5D as a backup to my Canon Mark II 5D)
• Additional lenses (I also use my 70-200mm 1:2.8 zoom lens)
• Two extra batteries, charged
Always double-check that you have packed those extra batteries and media cards before you leave the house or studio for a photo shoot. These are two items that you can’t make an image without, no matter how fancy your camera is! Of course, be sure your camera default is set so that you can’t press the shutter button if a memory card is not in the camera.
Assignment
Exploring the Limits of Your Zoom Lens
Take the time to shoot some reference images using your zoom lens. Photograph the same subject from the widest to the longest focal length your lens will accommodate and notice how the appearance of each image changes. Print the images and keep them for future reference to help you visualize what your lens is capable of.
This image was taken by zooming all the way in at 200mm on a 70-200mm lens. This allowed the photographer to be on dry land and still capture the boy in the middle of a very large pool during his swimming lesson. You can see that the depth of field is very short (shallow) with just his goggles being in sharp focus, which enhances the mood as he breaks through the surface of the water. Taken at ISO 200, f/2.8, and 1/1000 second.

©Allison Tyler Jones / www.atjphoto.com
Remember to visit www.pwsbooks.com after you complete this assignment and share your favorite photo! It’s a community of enthusiastic photographers and a great place to view what other readers have created. You can also post comments, read encouraging suggestions, and get feedback.
©Deidre Lingenfelter / www.imagesbydeidre.com

