Chapter 3. Your Photo Library

Photo editing gets all the attention, but at its heart the Photos app is a place to collect all your photos into a single place. Having a unified library makes it easy to grab photos to edit, of course, but there’s more to it than that.
The library gives order to your thousands of images, removing the need for you to track it all in folders on your Mac. Since the photos are all digital files, you can add important information to them, such as the identities of people that appear in the shots and keywords that describe what’s depicted. That data joins a host of other information that lives in the files.
And what do you do with all that information? Mark favorites, locate photos in albums and smart albums, and use the search feature to ultimately spend less time digging through your photos and more time enjoying the ones you want to see.
View and Navigate Photos
The Photos apps on the Mac and on iOS devices share the same scheme for organizing your photos, which makes it easy to jump between the two. However, it can be a bit bewildering at first. Roughly speaking, in the main Photos view, images are organized based on time, with the additional ability to view locations. You can also view photos in the Albums view (in which the images are organized by time).
View by time
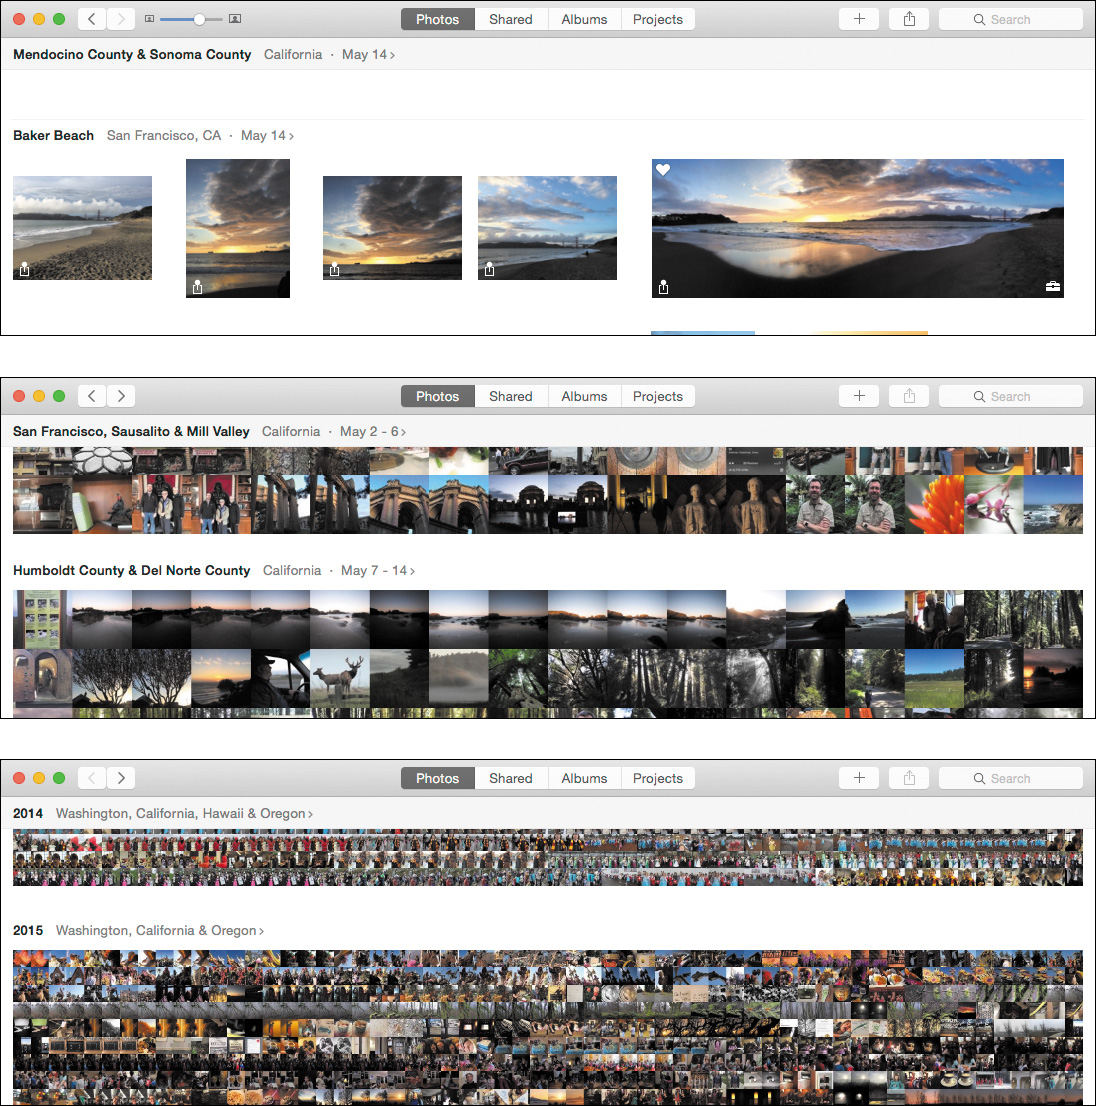
The Photos approach is to initially show you photo thumbnails at a size at which the contents are easy to identify, with the option to “zoom out” to view more, smaller thumbnails that represent greater blocks of time (3.1).
• Moments reveals photos in smaller chunks based on time and location.
• Collections shows you photos grouped into horizontal blocks by date, usually a few days in each block. Collections are the closest analogue to events in iPhoto.
• Years groups photos based on the year they were shot.
![]() Tip
Tip
Even though the Years and Collections views use smaller thumbnails, you can preview photos without jumping back and forth to the Moments view (which includes a slider for resizing the thumbnails). On the Mac, click and hold on a thumbnail to view a larger version of it; continue holding the mouse button and drag to view other thumbnails. When you release the mouse, the last photo you previewed opens. On iOS devices, touch and hold to do the same thing.
Switching between views is done by tapping or clicking a control at the top of the screen.
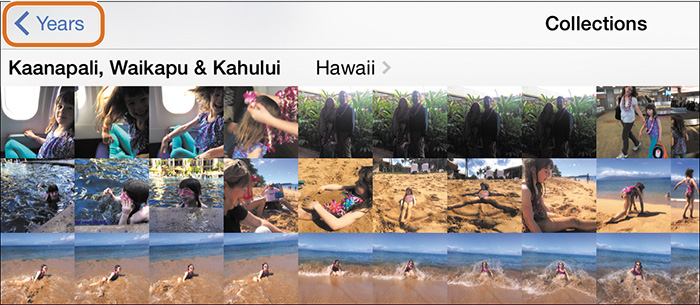
In Photos for iOS, the current view appears at the top of the screen. Tap the word at the upper-left corner to navigate to that view (3.2).
![]() Tip
Tip
If, by chance, you are coming to the Photos app completely fresh and are faced with an empty library, skip ahead to “Import Photos” in this chapter to learn how to start populating the library. (And then come back here.)
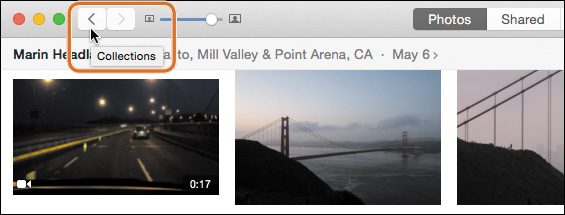
In Photos for OS X, click the navigation buttons in the upper-left corner (3.3). (If you hold over the button for a moment, a tooltip tells you where the button will take you.) The left button zooms out to the Years view; the right button zooms in to the Moments view.
In both environments, the most recent photos appear at the bottom of the list; the oldest are at the top.
![]() Tip
Tip
On iOS, tap the menu bar to scroll to the top of the current view. To jump down to the most recent photos, tap the Photos button at the bottom of the screen (or the Shared or Albums buttons if you’re navigating one of those views).
To view a single photo (3.4), double-click it in any view in Photos for OS X, or, in iOS, tap it from the Moments view.

3.4 Viewing a single photo on the Mac (and delivering a public service announcement: When in Portland, Oregon, go to Blue Star for donuts instead of to the touristy alternative you’ve probably heard more about).
You can zoom in on the image on the Mac by dragging the size slider or using gestures (see the sidebar below). To go to the previous or next photo without returning to the Moments view, press the left or right arrow keys on your keyboard.
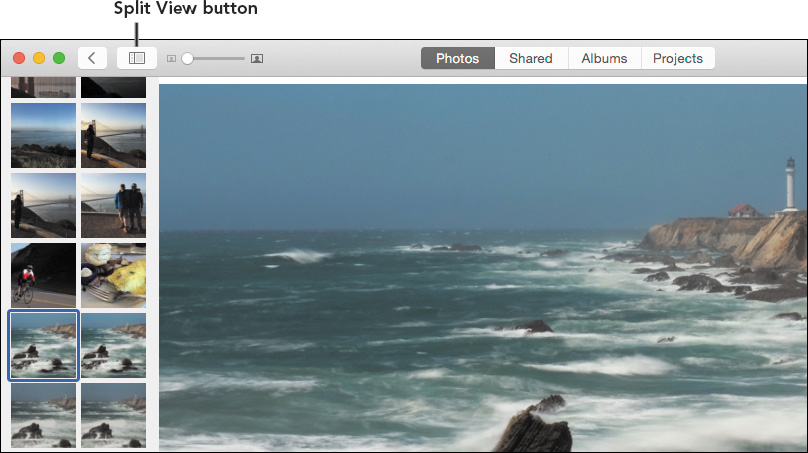
When viewing a single photo, the image occupies most of the Photos interface. You can also display thumbnails of other images within the same moment by clicking the Split View button or choosing View > Show Split View (3.5). Normally the thumbnails are square, but you can opt to show the images in their actual aspect ratios by choosing View > Display Square Thumbnails in Split View to toggle the setting off.
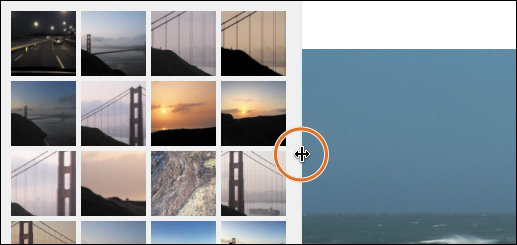
To further arrange the split view to your liking, drag the border between the image and the thumbnails to increase or decrease the number of columns that are shown (3.6).
Still Miss iPhoto? Turn On the Sidebar
• The navigation tabs at the top of the window (Photos, Shared, Albums, and Projects) go away.
• The main Photos view persists (incorporating Moments, Collections, and Years), but appears as the top item in the sidebar.
• Shared albums and local albums appear in the sidebar list. You can hide the items by clicking the Hide button that appears when you position the mouse pointer next to the category name.
• If you frequently access the smart albums that Photos creates, such as Favorites or Panoramas, making the sidebar visible saves you a click: select the album in the sidebar instead of first clicking the Albums tab and then clicking the album you want.

View locations
Whenever your iPhone takes a photo, the GPS coordinates are added to the image file. No longer do you need to wonder where you captured a shot—just look in the Photos app (on OS X and iOS). That said, it’s not obvious at first just how to view that information.
In any of the three main views (Moments, Collections, or Years), a place name (or several) appears at the top of each group (3.8). Click it to reveal a map with thumbnails at the locations where the geotagged photos were taken (3.9).
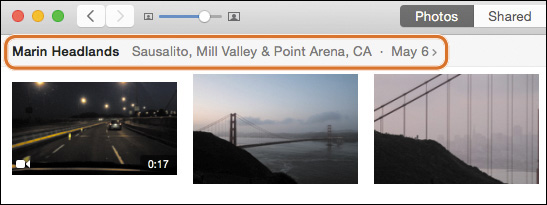
3.8 Accessing location data is almost too subtle; Photos for OS X shown here, but the same control appears in Photos for iOS.
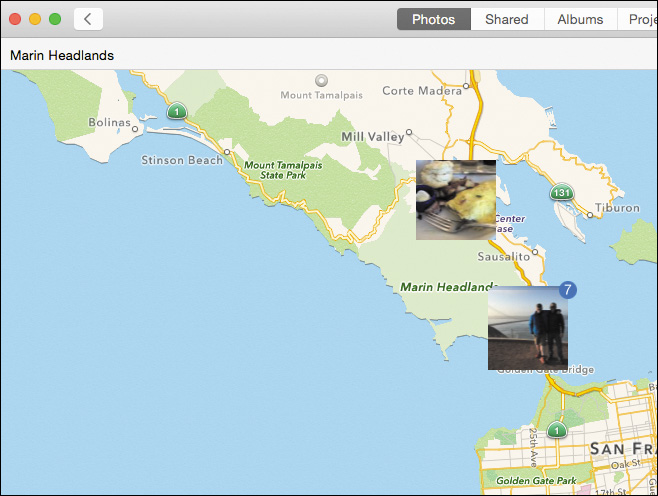
When you zoom in to the map, the locations become more specific. Clicking a thumbnail group (indicated by a number badge for how many photos are at that location) opens a window containing those photos; clicking a single image opens the photo.
Choose between Standard, Satellite, and Hybrid renderings, and pan, zoom, and tilt the map to get different views of locations. Use the navigation controls at the lower-right corner of the window (3.10), use gestures on a trackpad, or use keyboard shortcuts combined with mouse clicks to navigate a map:
• Hold Shift and drag up or down to zoom in or out.
• Hold Option and drag up or down to tilt the map into 3D mode. Some views don’t support 3D maps.
• Hold Option and drag left or right to rotate the map around the spot where you clicked.

Click the 3D button in the middle to re-orient the map to due north.
Another way to view location information in Photos for OS X is in the Info window. Choose Window > Info to display the floating Info window. If any photos in the current view include location information, they appear as pins on a small map (3.11). When you view a single photo, its location shows up along with its other information.
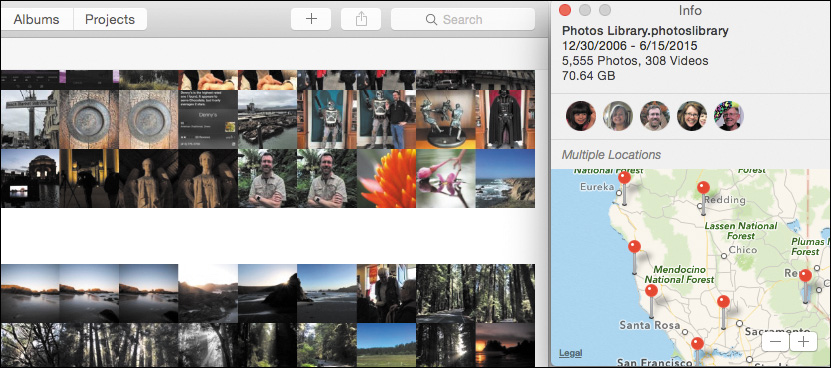
Unfortunately, the Info window is just a reference: you can zoom in and out of the mini-map, but clicking the pins doesn’t take you to the photos shot at that location, as you might expect.
View by Albums
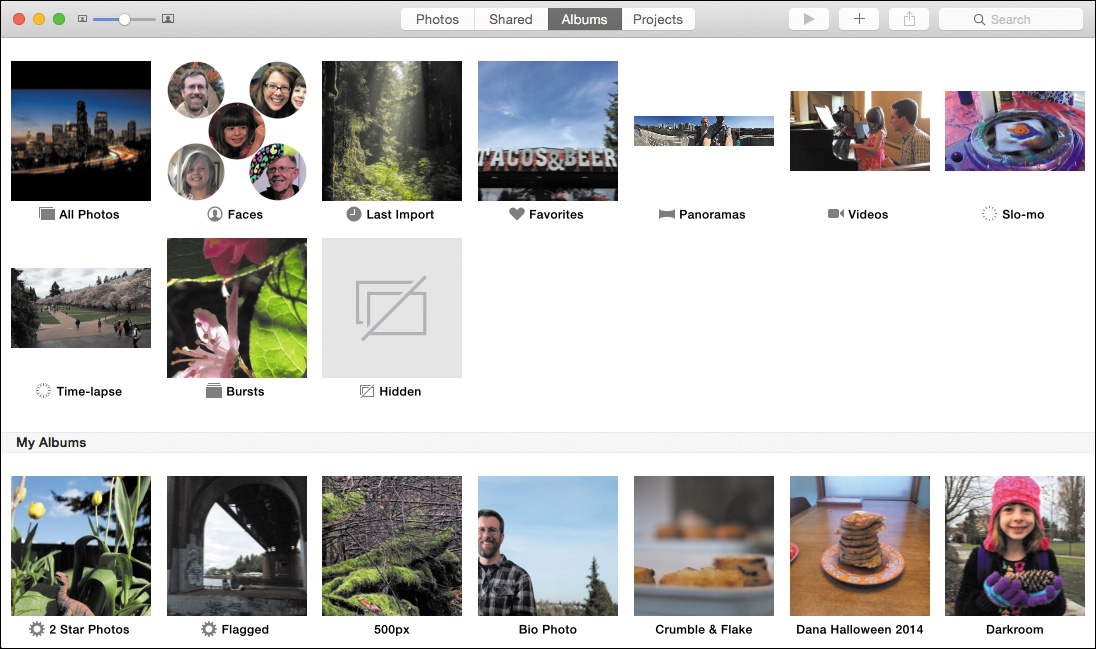
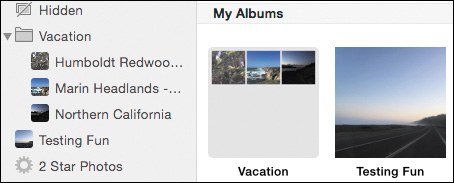
Click the Albums tab in Photos for OS X to view the smart albums that Apple creates (such as All Photos, Last Import, and Favorites) as well as any albums or smart albums that you create (3.12). Double-click an album’s thumbnail to open it. (See “Albums,” later in this chapter, for more on creating and editing albums.)
If you’ve turned on the sidebar, your albums are listed there; a single click on one selects it and displays its contents.
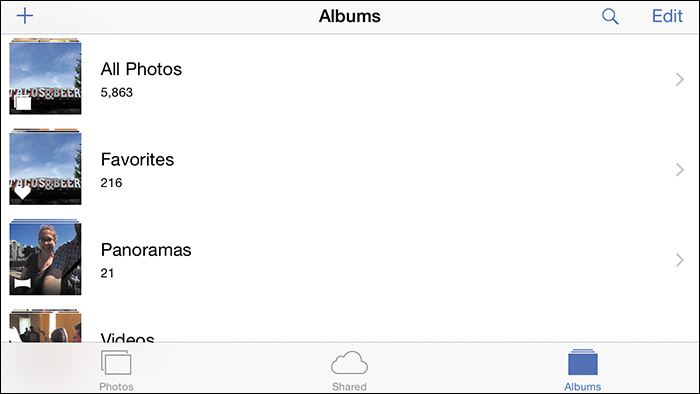
On the iPhone and iPad, tap the Albums button at the bottom of the screen to view the same groupings (3.13). Tap an album to view its contents.
![]() Tip
Tip
Apple’s automatic smart albums appear only when needed. If you have no panoramas in your library, for example, that smart album doesn’t show up. Also, since the iOS version of Photos doesn’t support the Faces feature found in Photos for OS X, you won’t see a Faces album on mobile devices.
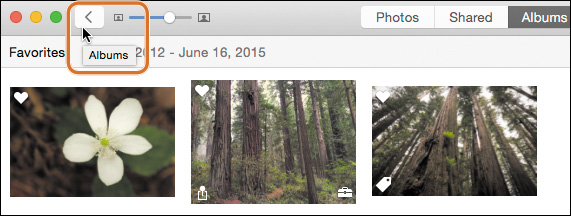
When you’re viewing an album, the navigation buttons change to a single back button that takes you back to the Albums screen (3.14).
![]() Tip
Tip
You may see a Camera Roll album on your Mac or iOS device, which isn’t included in the two figures here. The Camera Roll is the destination for photos you take with the iPhone or iPad’s camera, or photos you import directly to an iOS device by other means. The Camera Roll doesn’t appear here because iCloud Photo Library is enabled—the Camera Roll is replaced by All Photos. See “iCloud Photo Library,” later in this chapter, for more on Apple’s cloud service.
Import Photos
The first step toward organizing and editing new photos is to import them into the Photos app. Most likely this will be from a camera or a memory card, but Photos can also import photos that are on your hard disk. (If you’re looking to bring in photos from an iPhoto or Aperture library, see Chapter 2.) It’s also possible to import photos directly to an iPad.
Import from a camera or a memory card
Connect your camera via a USB cable, or pop out its memory card and insert that into a reader so the Mac can read it. From there, do the following:
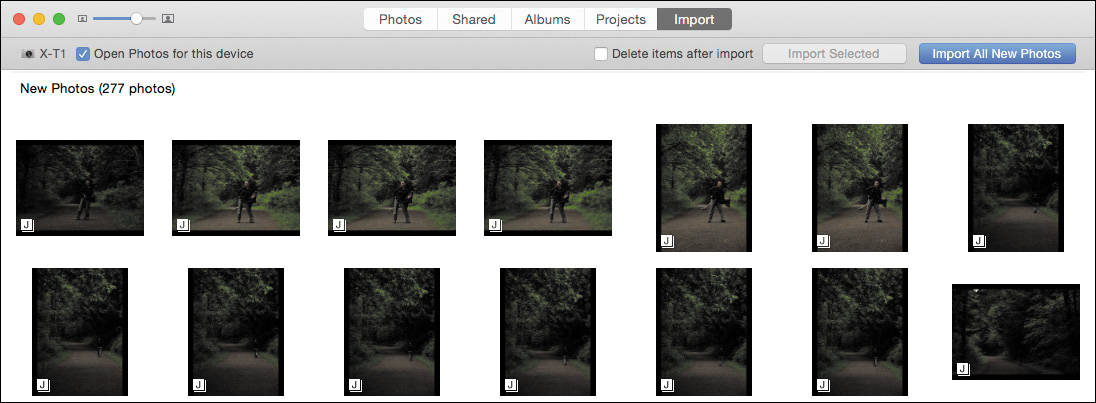
1. In Photos, a new Import tab appears at the top of the screen; click it to view the contents of the camera or card (3.15). If, instead, the sidebar is visible, look for the name of the camera or card under Import.
You may need to power on the camera or switch to its reviewing mode. Also, when you connect the camera, Photos may automatically switch to the Import tab.
Feel free to adjust the thumbnail size slider to get a better look at your photos.
![]() Note
Note
The photos above include a badge marked “J” in the corner. That indicates two things: my camera was in Raw+JPEG mode, which captures both a raw and a JPEG version of each shot. The “J” indicates that I’m viewing the JPEG portion of the pair. This feature becomes more important when editing the shots; see Chapter 5 for more information.
If you’re not using iCloud Photo Library or My Photo Stream to sync photos from an iPhone or iPad, connect the device to your Mac using its sync cable. The Photos app sees the device as a camera, enabling you to import the photos just as if it were any other camera.
2. Ensure that the “Delete items after import” checkbox is not selected. Call me paranoid, but I prefer to erase the memory card within the camera later, after I’m certain everything has imported successfully.
3. To import all the photos on the card, click the Import All New Photos button.
To import just some of the photos, click to select the items you want; you can also Shift-click or click-and-drag to select multiple images quickly. Then, click the Import Selected button to copy the image files.
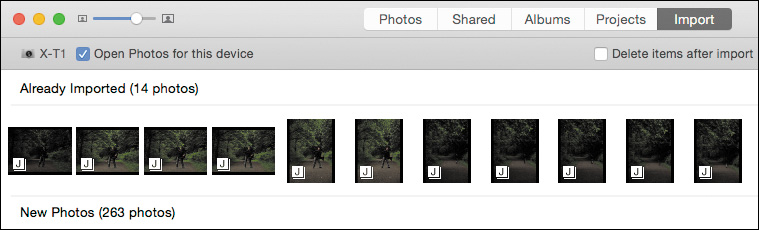
If you’ve previous added photos from this source, those images are recognized as Already Imported (3.16).
A small progress wheel appears to give you an idea of how much of the import has completed (3.17). The images are copied to your library, and then show up in the Last Import album. If you need to cancel the import, click the progress wheel and then click the X button.
![]() Tip
Tip
Your Mac will recognize a memory card or camera the next time it’s connected, and can automatically open Photos. If you’d prefer not to launch the application each time, turn off the “Open photos for this device” option at the top of the Import window.
Import from the hard disk
Images can come from other sources besides directly from a camera. To import photos stored on your Mac’s hard disk, or perhaps on an attached USB drive, do this:
1. Choose File > Import, or press Command-Shift-I.
2. In the dialog that appears, navigate to the folder containing the images you want to import (3.18).
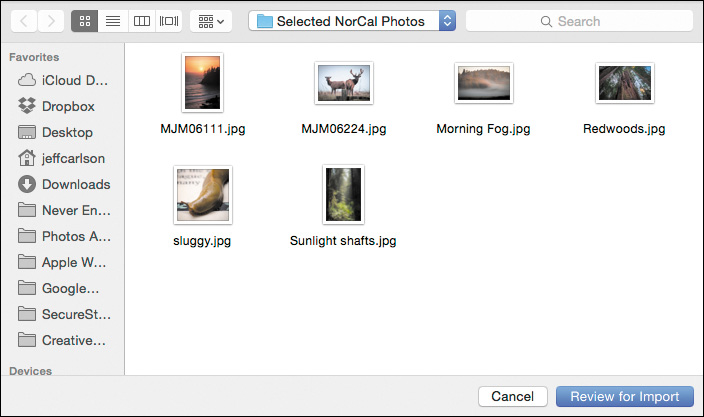
3. Click the Review for Import button. The same interface for importing photos from the camera appears.
4. Click Import All Photos to grab everything, or select the images you want and click Import Selected.
![]() Tip
Tip
To speed up the import process, hold Option when you choose File > Import, which changes the command to Import without Review. After you navigate to the folder you want, Photos adds the images without going through the standard Import interface.
![]() Tip
Tip
For an even faster method of importing the photos, simply drag the image files from the Finder to the Photos window.
Import photos without moving their files
When you import photos from a camera or memory card, the image files are copied to the library file that Photos opens. (The file is actually a special folder called a package, which stores the images, thumbnails, and the database that keeps track of everything.) A problem with this approach is that your hard disk can quickly fill up—especially smaller-capacity solid-state drives. The alternative is to store files in a separate location, such as an external hard disk, and make sure Photos doesn’t move them when you import them.
![]() Tip
Tip
This setting applies only to images imported from the hard disk. Since photos coming from the camera or a memory card need a home on disk, the library’s location is the destination, so this option doesn’t apply to those imports.
To do this, go to the Photos preferences and, in the General tab, turn off the Copy Items to Library setting. An icon on the thumbnails indicates which photos are stored outside the library file (3.19).

Consolidate the library
The good news is that Photos keeps track of all your photos, even if they’re not in the same location—and even if the drive they’re on isn’t currently connected (an inexcusable failing of iPhoto; see Chapter 2). However, if you want to bring photos under the same roof at some point, it’s easy to do: Select the photos you want to copy to the library file, and choose File > Consolidate. The app reminds you that copying can’t be undone; click Copy.
![]() Tip
Tip
Consolidating the library is important for setting up iCloud Photo Library, since the service doesn’t support referenced photos. See “iCloud Photo Library,” later in this chapter.
Adjust the date and time
Have you ever traveled to a different time zone but forgot to change the date and time in your camera? You can easily fix that after you’ve imported your photos. Select the affected images and choose Image > Adjust Date and Time. In the dialog that appears, change the time, date, or both in the Adjusted field; or, in the world map, click the correct time zone. Click the Adjust button to apply the change.
Import into the Photos app on an iPad
There aren’t as many options on the iOS side of the fence when it comes to importing photos—that’s really the thrust of iCloud Photo Library and having all your devices synchronized via iCloud (see “iCloud Photo Library,” later in this chapter). However, the iPad is able to import photos directly, using a camera adapter you can purchase separately.
This setup gives you the ability to view and share files when you’re away from your Mac. If you’re not syncing photos via iCloud, you can add the images to Photos for OS X later by connecting the iPad via its sync cable and importing them as if the iPad were a regular camera.
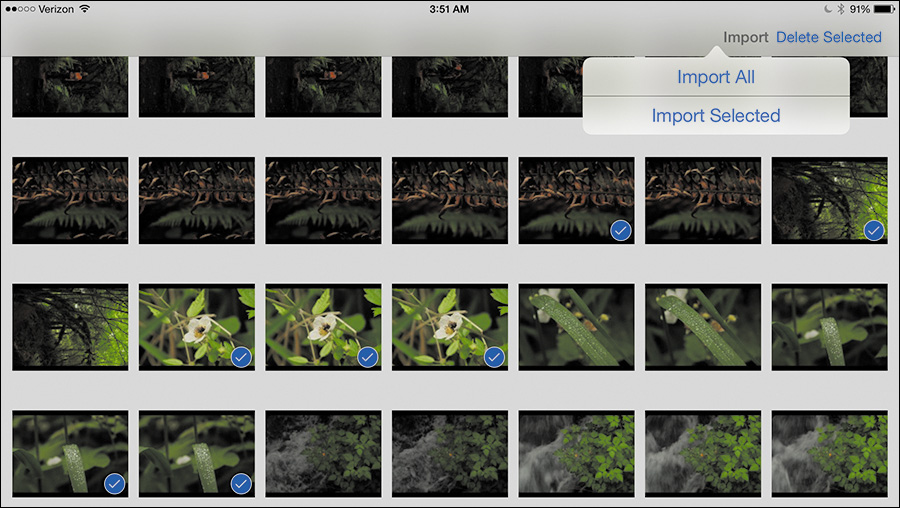
1. Connect the camera or card to the adapter, and then plug that into the iPad.
2. Open the Photos app and tap the Import button that appears at the bottom of the screen.
3. Tap the Import All button to copy everything available, or select the photos you want to add and tap the Import button; for the latter option, you’re asked if you want to Import Selected or Import All (3.20).
![]() Note
Note
Other methods exist for importing photos to an iPad or an iPhone. Apps from camera manufacturers like Fuji, Nikon, and Canon can import images from cameras equipped with Wi-Fi (or that use wireless adapters). ShutterSnitch (shuttersnitch.com) can communicate with a variety of cameras, devices, and Wi-Fi–enabled memory cards (like EyeFi cards). In most cases, the images are saved to the Camera Roll; ShutterSnitch stores the photos in its own memory, but copies them to the Camera Roll when you’re ready to export to your photo library.
![]() Note
Note
Allow a humble plug for another book of mine that’s relevant in this situation: The iPad for Photographers, Third Edition tells you everything you need to know about using an iPad for photographic ends. It focuses on how the iPad can replace a laptop while you’re in the field, editing on the device itself, controlling a camera remotely from the tablet, and more. You’ll find it at your favorite bookstore, online bookseller, or from my site at ipadforphotographers.com.
Mark Favorites
Good photos always rise above mediocre ones, but how do you find them easily? In the Photos ecosystem, an image can be marked as a favorite. The next time you want to show some images to a friend or build a slideshow of standout photos, you can choose from the ones you’ve marked instead of slogging through the rest.
![]() Note
Note
As mentioned in Chapter 2, the Photos application abandons the star-rating system used by iPhoto and Aperture in favor of just the single Favorite designation. Keep reading to learn how to incorporate a similar rating system using keyword tags.
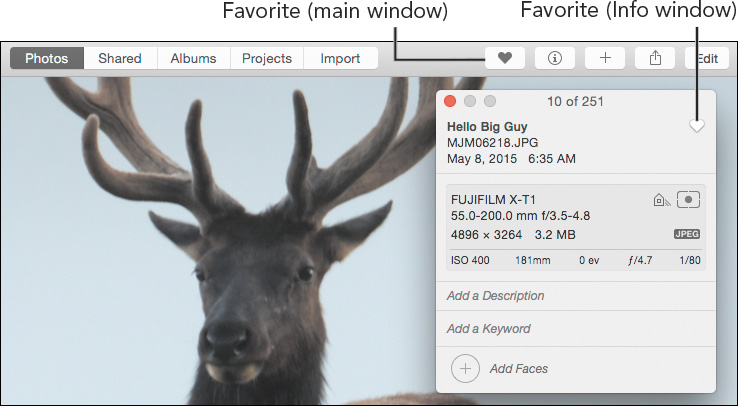
Marking a photo as a favorite (all heart icons) can be accomplished in several ways (3.21):
• In the Info window, click the Favorite button.
• With the photo viewed in single image mode, click the Favorite button on the toolbar.
• When viewing the thumbnail view of your library, click the Favorite button in the upper-left corner of a thumbnail.
• Press the period (.) key.
• On an iOS device, open a photo and tap the Favorite button at the top (iPad) or bottom (iPhone) of the screen.
Add Information to Photos
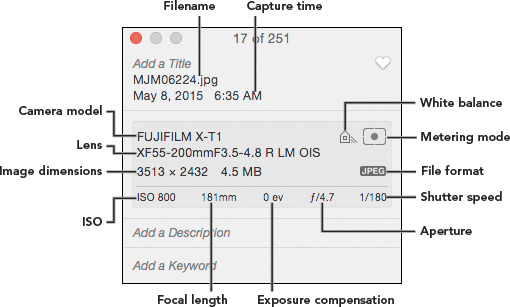
When you capture a photo, the camera records a host of other information about the shot. This metadata ranges from the time and date you pressed the shutter button to the lens, aperture, shutter speed, and ISO in use for that image. Photos for OS X reveals this information in the Info window (3.22), accessible from the Window menu or by pressing Command-I.
Add a title and description
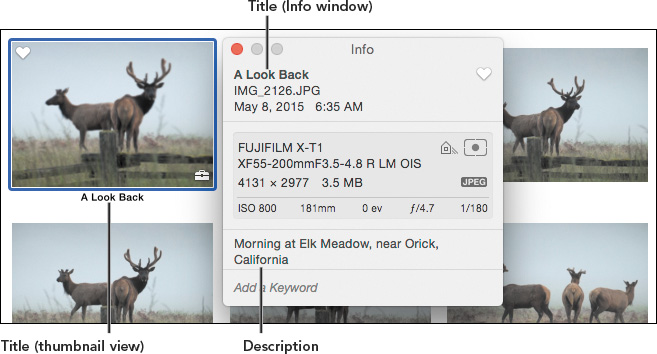
At import, each photo is known only by the name the camera gives it. You can add a name or a description (or both), which will appear when you share photos to social media sites (instead of displaying something like IMG_1234.JPG) and which will help you find the files in your library later. Do any of the following (3.23, on the next page):
• In the Info window, click the Add a Title field and type a title.
• Choose View > Metadata > Titles to reveal the Title field beneath each thumbnail, and type a title there. I like this option for titles because it doesn’t require the Info window to be open all the time.
• Also in the Info window, click the Add a Description field and enter some descriptive text.
Add keywords
Keywords are metadata that people rarely see, but they turn out to be important behind the scenes. Adding keywords helps you locate photos later—for example, a search for “elk” will bring up every photo containing an elk. Also, many photo sharing sites use keywords to categorize images and potentially lead buyers or licensors to photos that match their interests.
Keywords in the Info window
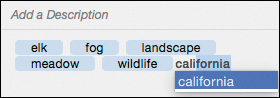
Select one or more photos. In the Info window, type keywords into the Add a Keyword field, separating each one with a comma or by pressing Return. Keywords can be anything you like, ranging from the contents of the image (“elk,” “meadow”) to the type of image (“landscape,” “wildlife”). The Photos application adds them to the photo(s) and also to its library of keywords so the next time you start to type one, it autocompletes for you (3.24).
Keyword Manager
The Keyword Manager is a more visual approach to assigning keywords, and is useful when you’d prefer to choose existing keywords. Choose Window > Keyword Manager (or press Command-K) to view the window and all the keywords used in your photo library (3.25). Click a keyword button to apply it to the selected photo(s).
Overall, I’m not a fan of the Keyword Manager, because it’s really a cumbersome, old-fashioned way of adding and editing keywords. However, it does have an advantage: You can add frequently used keywords to the Quick Group, which assigns keyboard shortcuts to them for easy tagging.
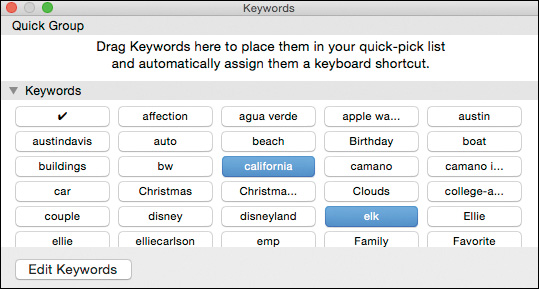
Drag keywords to the Quick Group area; Photos automatically assigns a shortcut based on the first character of the keyword (3.26). (If a letter is already taken, Photos uses the next letter. So, “wildlife” would be W and “woods” would be O.)

You can change the shortcut key by clicking Edit Keywords, selecting one of the terms, and clicking the Shortcut button. To remove a keyword from the Quick Group, drag it out of the Quick Group area.
To apply keywords using shortcuts, make sure the Keyword Manager is open, select the photos you want to tag, and then press the shortcut key. If the Keyword Manager isn’t open, the shortcut keys don’t work.
Photos with keywords applied gain a keyword badge (3.27).
Replicate star ratings using keywords
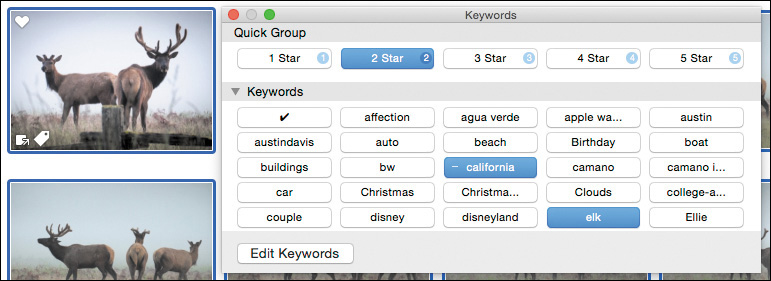
This brings me to one of the most useful ways of using keywords, especially if you miss the ability in iPhoto and Aperture to apply star ratings to your photos. When you think about it, ratings are just another type of metadata...like keywords. When you convert an iPhoto or Aperture library to Photos (see Chapter 2), star ratings are automatically converted to keywords such as “1 Star.”
The great advantage to using ratings in iPhoto and Aperture was how easy it was to apply them using keyboard shortcuts. By adding these faux star ratings to the Quick Group in Photos for OS X, you regain the ability to rate photos by simply pressing a key (3.28).
Hide and Delete Photos
It’s time to own up to a common truth: Not all of our photos are great, or good, or even half-decent. For a long time I assumed that I’d reach a point where the misfires, the unfocused shots, and the plain ol’ goofs would stop happening when I took photos, but that’s just not the case. If anything, I think my good photos are better than the ones I thought were good years ago, but that still leaves a lot of room for flubs.
The Photos application, both on OS X and iOS, offers two actions to weed out the less-desirable shots—and interestingly, both leave the door open in case you think that maybe an action shot of your cat that’s actually just a dark blur against a shaky background was what you wanted all along.
Hide photos
When you hide photos, they don’t appear in the Years, Collections, and Moments views, but they still exist in your library.
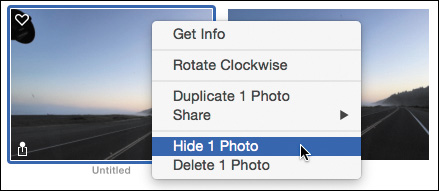
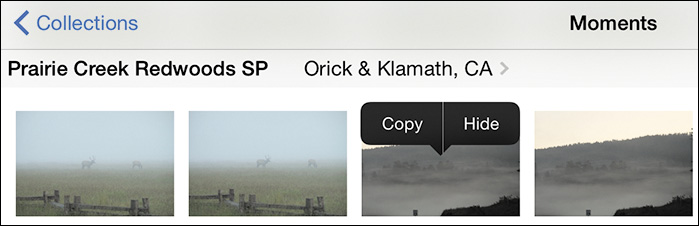
• In the Moments view in Photos for OS X, select one or more photos and choose Image > Hide Photo (or press Command-L), or right-click the photo and choose Hide Photo from the contextual menu (3.29). Confirm that you want to hide the photo in the dialog that appears.
![]() Note
Note
When I say that photos are hidden, what I mean is that they’re “hidden.” If a hidden photo is already in an album (including All Photos), or picked up by a smart album, it still shows up there. So be warned that “hiding” applies only to the Years, Collections, and Moments views.
• In the Moments view in Photos for iOS, touch and hold on a photo until you see the Hide option appear (3.30). Tap Hide and then confirm your action in the popup that appears.
To view photos you’ve hidden, go to the Albums view and open the Hidden album. From there you can make hidden photos visible by choosing Unhide Photo from the Image menu or the contextual menu (OS X), or touching and holding a photo and choosing Unhide from the popup that appears (iOS).
Delete photos
To remove a photo from your library in Photos for OS X, select it in the Moments view and choose Image > Delete Photo (or press the Delete key), or right-click the image and choose Delete Photo from the contextual menu.
On the iPhone or iPad, do one of the following:
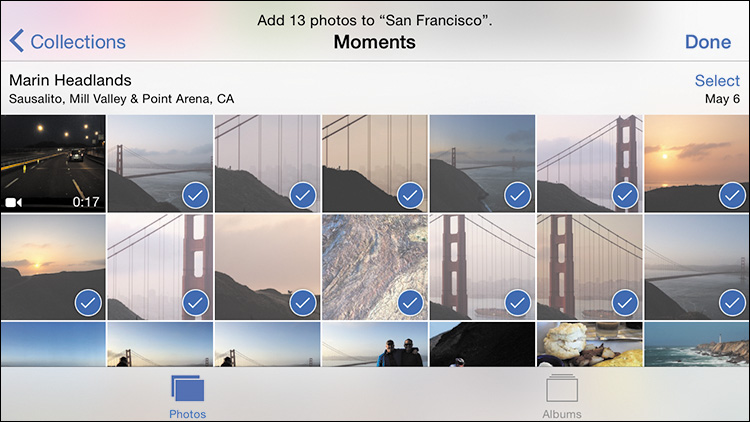
• Open a photo in the Moments view, tap the Delete button (the trash can), and confirm your action.
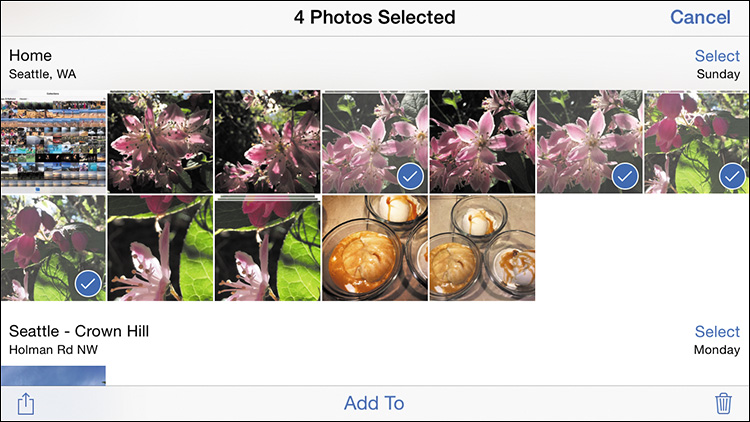
• To delete multiple photos, first tap the Select button at the upper-right corner, and then tap to select photos to be removed (3.31). In the Select mode you can also choose all photos in a moment by tapping the smaller Select button to the right. Tap the Delete button (the trash can) and confirm the deletion.
![]() Note
Note
If any of the photos you delete were pulled out from a burst, the original versions remain part of the burst.
Recover deleted photos
So, it turns out that even deleted items aren’t completely gone. The Photos app treats them as if they’ve been removed, but also stores them in a Recently Deleted album just in case you change your mind.
Deleted photos don’t linger forever, though. Shots in the Recently Deleted album that are older than 30–40 days are automatically removed, and the rest appear with the number of days before they’re sent to the bit compacter.
• In Photos for OS X, choose File > Show Recently Deleted (3.32). Although Recently Deleted is an album, on the Mac it’s not listed with the other albums; you can view it only from the File menu. Select the photos you want to save and click the Recover button.

• In Photos for iOS, tap the Albums button and then tap the Recently Deleted album to open it. Tap a photo to view it and then tap Recover; or, to recover multiple images at once, tap Select, choose the photos you want, and then tap the Recover button.
Delete photos permanently
Automatically expiring photos after 30 days is fine if you’ve got the room to spare, but what if you want to remove photos immediately? The Recently Deleted album includes another option: Select the photos you want to eradicate, and click the Delete Item button (OS X) or tap the Delete button (iOS). You can also click or tap the Delete All button to clear out everything in the album.
![]() Note
Note
When you have iCloud Photo Library enabled, recovering or permanently deleting photos from Recently Deleted applies the action to all computers and devices that share the library.
Albums and Smart Albums
Our photo libraries continue to grow, and automatically sorting them by date and location certainly helps to manage the volume. But those aren’t the only options. Sometimes it’s helpful to separate photos and videos into albums—or let the software do the work for us.
In Photos for OS X, you can create regular albums into which you manually add photos, as well as smart albums that display contents based on criteria you specify. On iOS, the Photos app supports regular albums but not user-created smart albums.
Create an album in Photos for OS X
Photos for OS X provides several ways to create a new album and add photos to it—the idea is that you should be able to do it nearly anywhere in the application, not just within the Albums view. Here’s how:
1. In any view, and with no photos selected, choose File > New Album.
2. In the dialog that appears, make sure New Album is selected in the Album pop-up menu and enter a title in the Album Name field. Click OK.
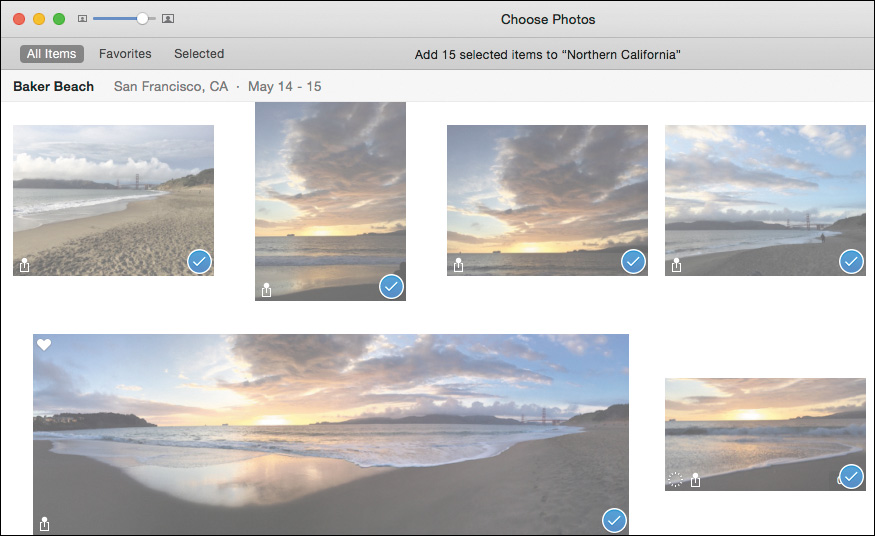
3. Select some photos to add to the album (3.33). You can scroll through all photos to locate them, or click the Favorites button to browse photos you’ve marked as favorites. Click Add.
The album is created with the selected images inside, and you’re switched to the Albums view with that album open.
![]() Note
Note
You can also create an album without going through the steps of populating it right away. Choose File > New Empty Album, give it a name, and click OK. The empty album shows up in the Albums view.
A quicker method is to select the images you want to include in an album and then choose File > New Album. The album is created immediately with the images in place.
But wait, there’s more! It’s easy to turn a moment into a new album:
1. In the Moments or Collections views, click the Add button (+) to the right of the name of a moment or collection (3.34, on the next page).
2. Choose Album from the pop-up that appears.
3. In the dialog that appears, the location and date of the moment are used as the album name; change it if you wish. Click OK.
Add more photos to an album
When you want to add additional photos to an album, you can’t just drag the images from one of the standard views to the album. Instead, you use the Add To mechanism:
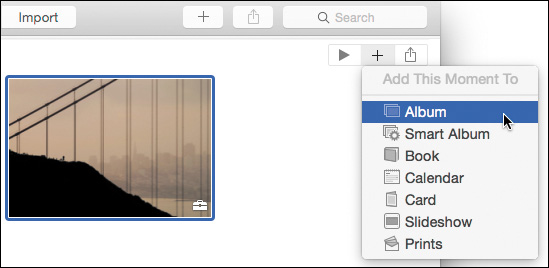
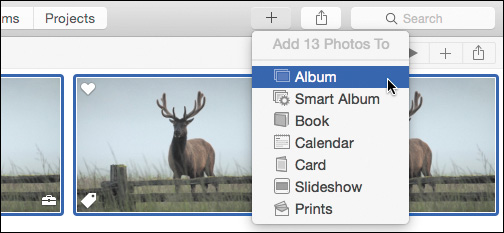
1. Select the photos you want to add.
2. Click the Add button (+) in the toolbar and choose Album (3.36).
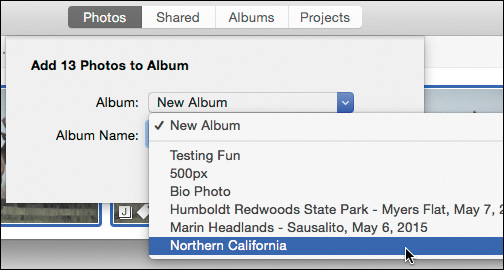
3. In the dialog that appears, click the Album pop-up and choose the destination album (3.37).
![]() Tip
Tip
Did I say there was no way to drag photos to albums? Silly me, I forgot about the sidebar: drag images directly to albums in the sidebar.
Reorganize photos in an album
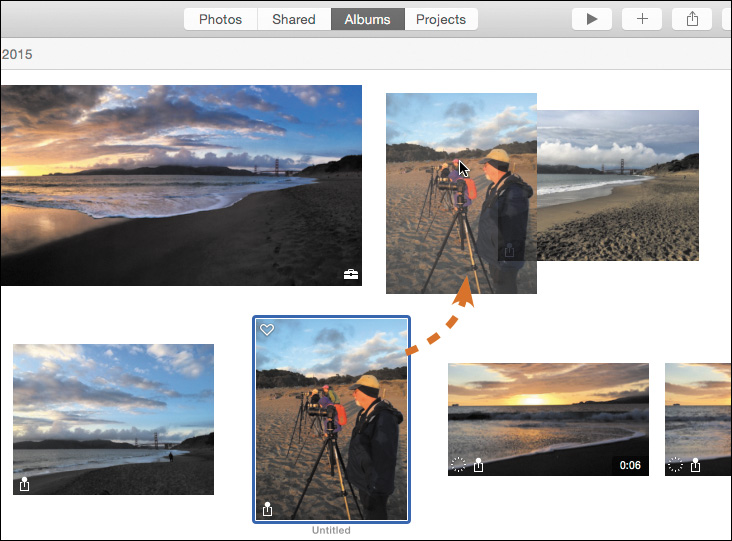
One advantage albums have over the standard views is the ability for you to arrange photos into whatever order you like. This option is great for playing spontaneous slideshows from albums, where you have a preference for the order the photos appear. Drag images to reorganize them (3.38).
Or, you can let the Photos app keep everything organized by choosing View > Keep Sorted by Date.
![]() Tip
Tip
In the Albums view, you can also drag album icons to rearrange them. Or, in the sidebar, drag albums up or down in the list.
Choose an album’s cover photo
Did Photos choose the most unflattering photo as the thumbnail for an album? Open the album and find an image you’d rather use; then, choose Image > Make Key Photo (or press Command-Shift-K). You can also right-click or Control-click the shot and choose Make Key Photo from the contextual menu (3.39).

Remove photos from an album
When you add photos to an album, the images aren’t copied or moved anywhere; an album is simply an internal way of organizing images in the Photos application. So, when you remove a photo from an album, the image still exists in the library.
In an album, select the image(s) you want to remove and choose Image > Remove Photo(s) from Album, or press the Delete key. You can alternatively choose Remove from Album from the contextual menu.
![]() Note
Note
The Show in Moment command that appears under the Image menu and in the contextual menu takes you to the Moments view so you can browse the image with the other photos captured or imported at the same time.
Create an album in Photos for iOS
On the iPhone and iPad, the process of creating a new album is similar in spirit to how it’s done on the Mac, but different in a few details.
1. In the Albums view, tap the Add button (+), enter a name for the album, and tap Save.
2. On the next screen, browse the Moments or Collections screen and select the photos you wish to add (3.40). You can also select entire moments to be added.
3. Tap Done to create the album with those photos included.
Just as with Photos for OS X, you can create an album by first selecting the photos you want to put in it.
1. In the Moments view, select the photos you want to add to the new album.
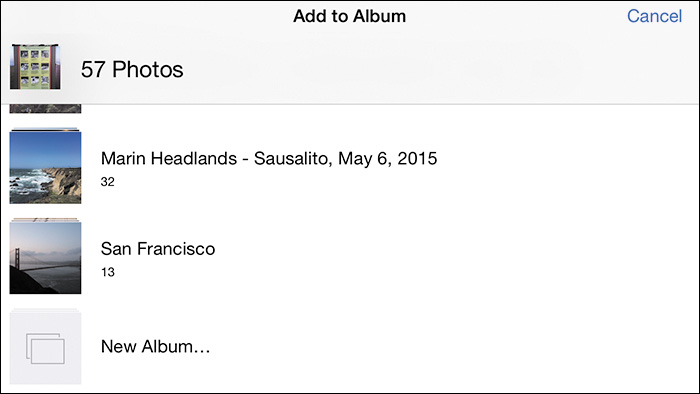
2. Tap the Add To button at the bottom of the screen.
3. In the Add to Album screen, scroll to the bottom of the album list and tap New Album (3.41).
4. Enter a name for the album and tap Save.
Add more photos to an album in Photos for iOS
As you can guess, the Add To route is also the way to add photos to an existing album: in step 3, choose an existing album instead of tapping New Album.
Or, when you’re viewing the contents of an album, tap Select and then tap the Add button to select more photos to include in that album.
Apple’s smart albums
A smart album is one that automatically grabs photos based on some criteria—you don’t add photos manually at all. Since Apple provides several types of photos that aren’t your standard still shots, the Photos app on both OS X and iOS includes smart albums for favorites, panoramas, burst shots, hidden items, videos, Slo-Mo videos, and time-lapse videos. You’ll also find a special Last Import album and an All Photos album that collects everything. (Photos for OS X additionally has a Faces album, which is actually the portal for the Faces feature and behaves a bit differently than most albums. See “Identify Faces,” later in this chapter.)
You’ll find these in the Albums view.
![]() Tip
Tip
A smart album appears only if that type of image is in your library. If you haven’t made any panoramas, for example, you won’t see the Panoramas album.
For the most part, the built-in smart albums merely collect these types of images to make them easier to find. One exception is the Bursts album, where you can extract single shots from the bursts, just as you can do on the iPhone or iPad. Here’s how to do it in Photos for OS X:
1. In the Albums pane, open the Bursts smart album.
2. Double-click a burst to open it.
3. Click the Make a Selection button that appears in the upper-left corner (3.42).

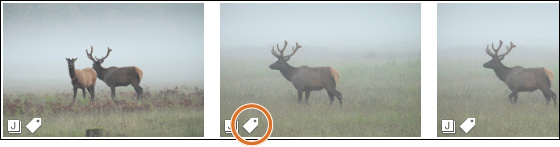
4. Click the thumbnails below the photo to view each image (3.43). The circle below the thumbnails is the one that the iPhone or iPad chose as the best of the bunch; the triangle indicates which image is currently being viewed.
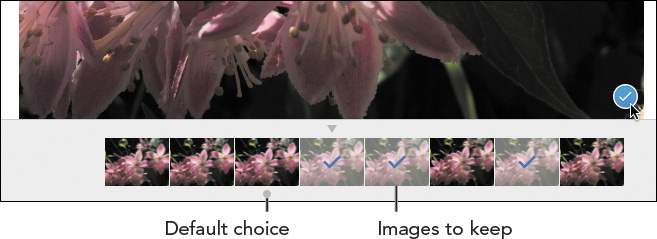
5. Click the image if it’s one you want to extract; a blue checkmark appears in the lower-right corner.
6. Click the Done button.
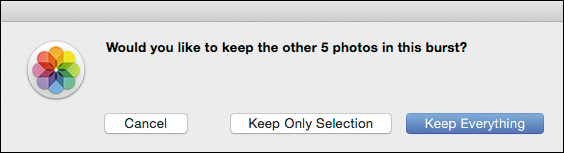
7. In the dialog that appears, decide whether you want to keep all of the photos in the burst (Keep Everything), or keep just the selected shots and delete the others (Keep Only Selection) (3.44).
Create a smart album in Photos for OS X
The power of a smart album is that you can define all sorts of criteria beyond what Apple offers in its built-in smart albums. To throw out a few examples:
• Show all photos taken between July 1 and July 15.
• Show all photos marked as Favorite that also contain the keyword “landscape.”
• Show all referenced photos.
• Show all photos captured using a Fuji X-T1 with aperture settings wider than f/2.8.
![]() Note
Note
Alas, the only smart albums that work in the Photos app on the iPhone and iPad are the built-in Apple ones. Smart albums you create on the Mac do not transfer to the mobile devices, and there’s no feature for creating smart albums in Photos for iOS.
You get the idea. Now let’s look at how to create a smart album. By way of example, let’s create a smart album that finds the best photos captured in the past six months using a specific camera model:
1. Choose File > New Smart Album, or press Command-Option-N.
2. In the dialog that appears, enter a descriptive name in the Smart Album Name field (3.45).
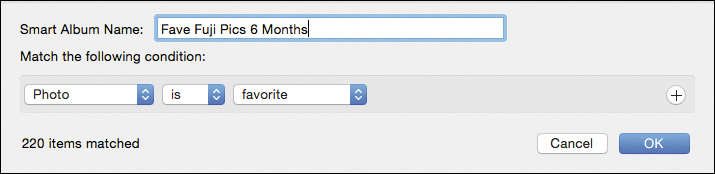
3. Next, start defining the album’s criteria; the default is “Photo is favorite,” represented in three pop-up menus, so keep that.
The first pop-up is the thing to which you want to match, like the photo, text, or a camera setting. The second pop-up is the action, such as “is,” “is not,” “includes,” or “does not include.” And the third pop-up describes the data that should be matched or ignored.
Notice that the filtering happens in real time: the lower-left corner of the dialog tells you how many photos match the current conditions.
4. Click the Add (+) button to the right of the criterion to add a new one. Not only does another set of pop-up menus appears, but a new Match condition shows up above the criteria (3.46).
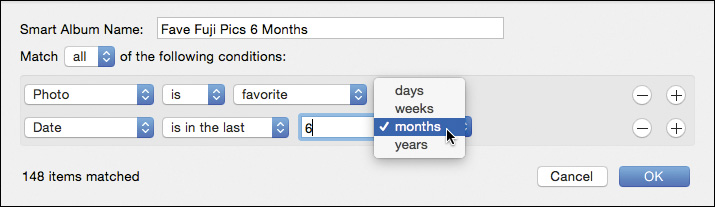
The Match qualifier specifies that “any” or “all” of the conditions must be met to include an image in the smart album. In this example, choose “all” because we want only photos that are described by all of the conditions.
5. In the second condition, set it to “Date is in the last 6 months.”
6. Click the Add (+) button next to the second condition to add a third.
7. Set the new condition to “Camera Model is” and choose your camera from the third pop-up menu (3.47).
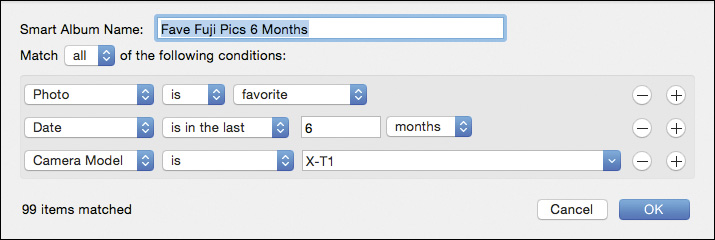
8. Click OK to create the smart album and view its contents.
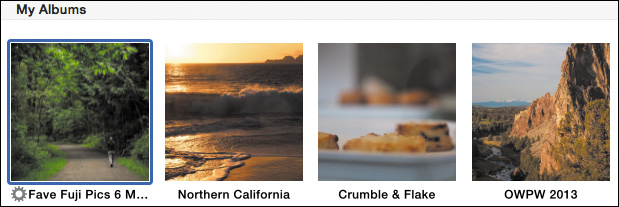
When you go to the Albums view, the smart album appears with a gear icon next to the name to indicate what a smartypants it is (3.48).
![]() Note
Note
If your library was migrated from iPhoto or Aperture, you could replace the Favorite condition and account for the former star ratings, which were converted to keywords (see Chapter 2), such as “Keyword is 4 Star.” Unfortunately, this is where the lack of a rating system gets in the way: You can’t specify “images rated 4 stars or higher” as was possible in iPhoto and Aperture, and the conditions in the Photos application aren’t granular enough to specify “Keyword is 4 Star or 5 Star.” It’s a new Favorites world, and we’re along for the ride.
Identify Faces
I’ve written much in this chapter about various ways to organize your photos, such as adding keywords and marking favorites. In those cases, you’re doing work to make it easier for the application to locate images (which we’ll put to use soon, I promise). How about we let the computer shoulder some of the work, eh?
The Faces feature in Photos for OS X picks out people’s faces in your photos—not just which images include shapes and colors that are vaguely face-like, but which faces belong to which people. It does require that you give the feature a nudge by identifying the folks you want, which isn’t difficult or even time consuming.
To access the Faces feature, go to the Albums view or show the sidebar. Faces appears as one of the application’s smart albums, but it’s a little more tricky than that. Double-click the Faces album to get started.
Add new faces to the library
The Photos application has no trouble figuring out when a person’s face appears in a photo, but first you must add a face to the library:
1. From the row of found faces in the Faces album, double-click one.
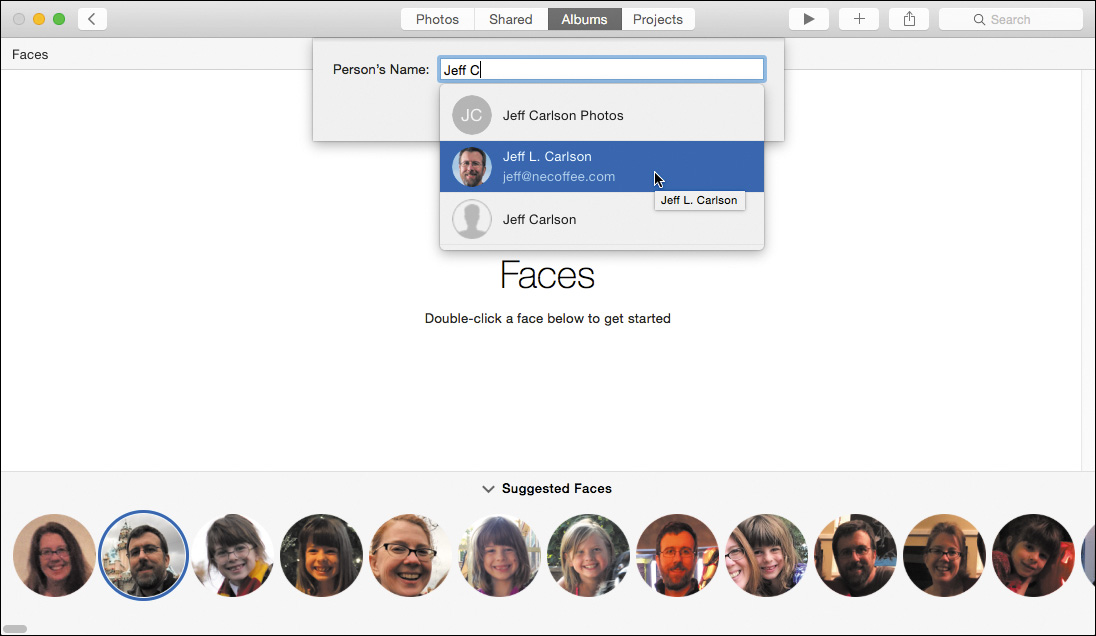
2. Type the person’s name in the field provided (3.49). The app cross-references your Contacts list and brings up suggestions; choose one and click Continue.
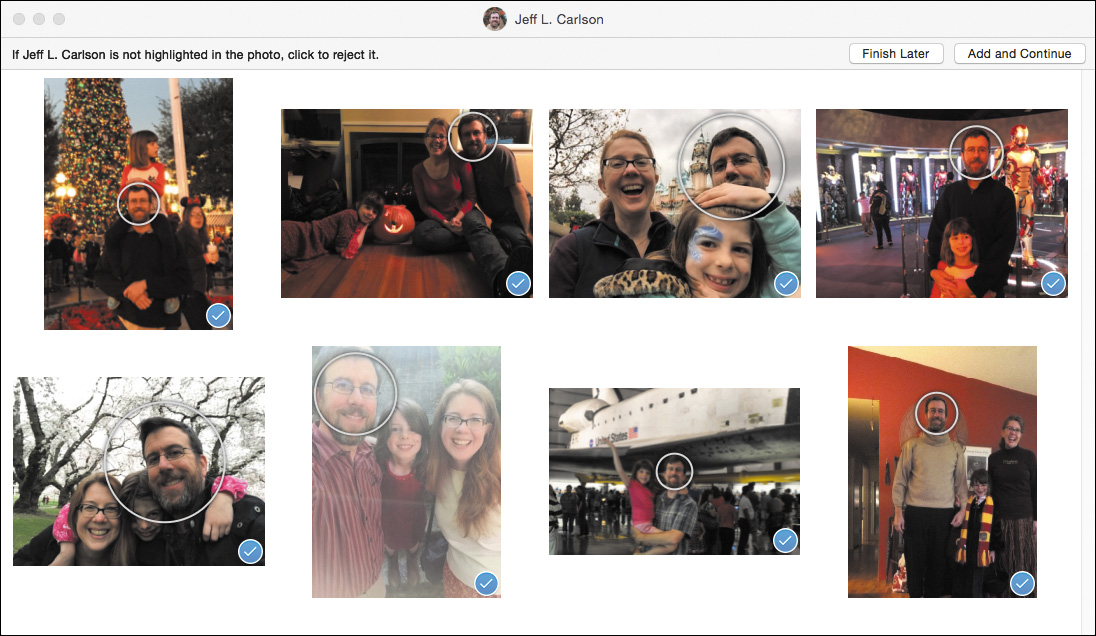
3. On the next screen, verify that the same person appears in the photos presented (3.50). If a match is incorrect, click the image to deselect it. Click Add and Continue to review more; or, click Finish Later to pick it up some other time.
![]() Tip
Tip
Position the mouse pointer within the circle identifying a person to zoom in for a better look at the face.
4. Continue identifying faces until Photos reaches the end of its queries. The app adds many photos automatically. Click Done. The person appears in the main portion of the Faces album.
![]() Tip
Tip
Once you’ve added a person, you can also drag other instances of them from the Suggested Faces row to the person’s icon in the Faces area.
If you chose to finish verifying faces later, you can start again by double-clicking a suggested face that matches a person you’ve identified; Photos returns to the confirmation sequence. Or, double-click a person in the Faces screen and look for an Add button at the upper-right corner with the text “[Name] may be in additional photos.”
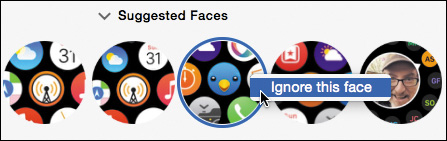
When you run across a face in the Suggested Faces row that you don’t want to identify—someone you don’t know in the background of a photo, for example, or something that isn’t a face—select it and press Delete, or right-click and choose “Ignore this face” from the contextual menu (3.51).
![]() Tip
Tip
Don’t like the photo that the application chose for the Faces icon? Double-click the icon to reveal all photos marked with that person, and locate a better alternative. Right-click to bring up the contextual menu, and choose Make Key Photo.
Identify faces in photos
Another way to pinpoint people in pictures is to identify them as you’re looking at each photo. Choose View > Show Face Names to reveal tags in images where Photos has located a face. If it’s a face you’ve already defined in the Faces album, that name will be listed.
If not, the person is Unnamed; click the badge and type the person’s name, matching it with your contacts if applicable (3.52).

Remove faces from the library
If you don’t want to track someone in the Faces album—perhaps they appear in only a few shots—right-click or Control-click their icon in the Faces view and choose Remove Person from Faces. Doing so won’t erase any photos from your library, just the internal tag that identifies the person on those shots. Click Delete in the confirmation dialog.
Browse photos using faces
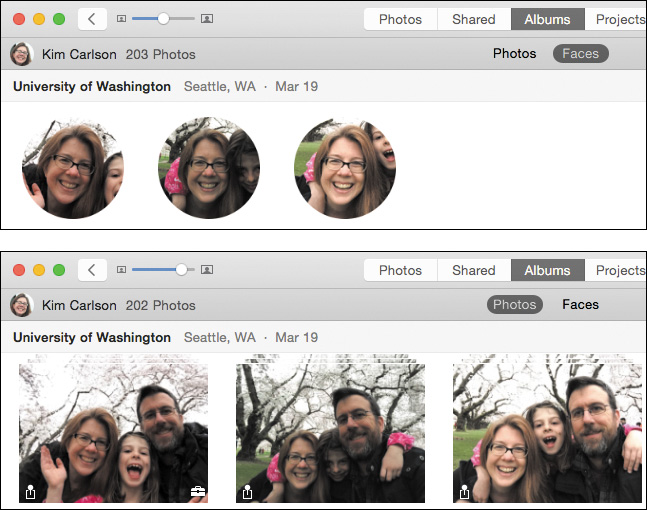
After you’ve set up a few faces, double-clicking one leads to a listing of every photo in which that person appears. Initially you see just the person’s face in a circular thumbnail; click the Photos button at the top of the window to view the actual photos (3.53).
What if you accidentally approved a face that isn’t correct, or the Photos application guessed incorrectly? When reviewing a person in the Faces album, right-click the thumbnail or photo that doesn’t belong and choose “This is not [Name]” (Faces view) or “[Name] isn’t in this photo” (Photos view) (3.54).

Search for (and Find) Photos
Most people probably search through their photo libraries by scrolling, going back in time to the point at which they think a photo was taken. That’s a fine method that becomes more difficult the more photos you add to the library. Most of the steps we’ve taken in this chapter, from assigning keywords to identifying faces, have been in the service of doing a better job of finding photos when you need to. If you’ve ever spent an hour looking for one image, you know what I’m talking about.
Photos for OS X and Photos for iOS each include a Search field that’s designed to locate images fast.
Search in Photos for OS X
To locate photos on the Mac, do the following:
1. Click the Search field and start typing a search term. That could be a keyword, location, name, camera model—pretty much anything.
2. The application starts building a list of results as you type (3.55). Select one to view the results.
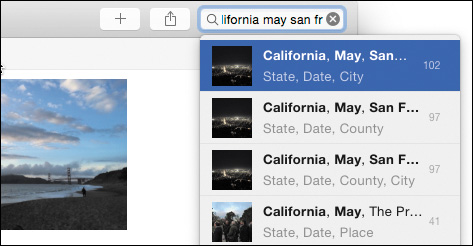
3.55 The Search field finds several types of criteria. In this case it knows that I’m looking for photos taken in California during the month of May; I added San Francisco at the last minute to narrow the search without starting over.
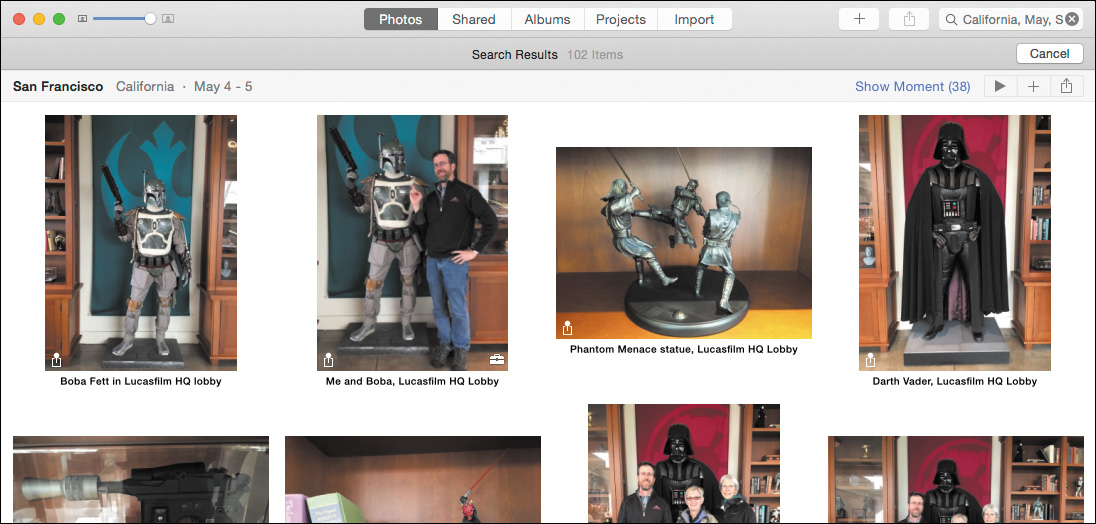
The photos that appear are only those that match the search criteria (3.56). If you want to return to the full library, you can either click the Cancel button or, to view a photo in the context of other images captured with it, click the Show Moment button.
Search in Photos for iOS
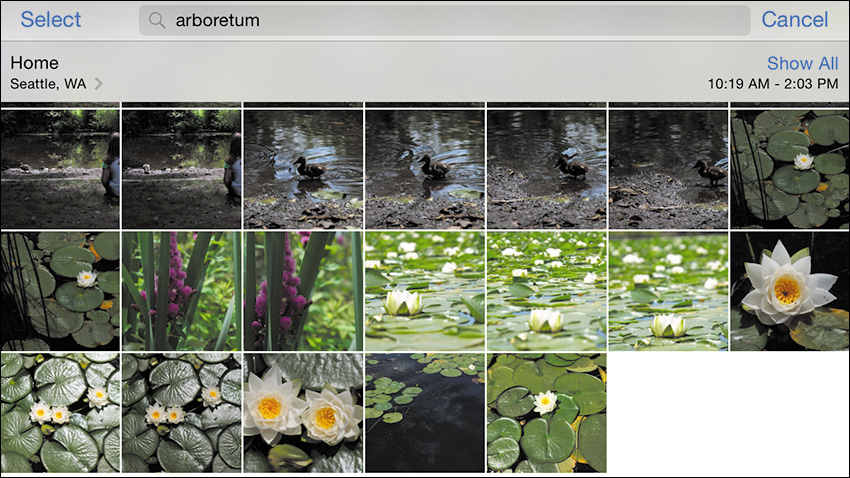
The search feature is similar on the iPhone and iPad, with a couple of wrinkles. Although there’s no feature for adding keywords or identifying faces on iOS, the Photos app recognizes them and uses them when searching the library if your library is synced via iCloud. There are also shortcuts to photos captured near your current location, to your favorites, to photos taken at home (the address in your Contacts list that you identify as your home), and to others.
1. In the Photos app, tap the Search button (the magnifying glass icon) to reveal the Search field (3.57).
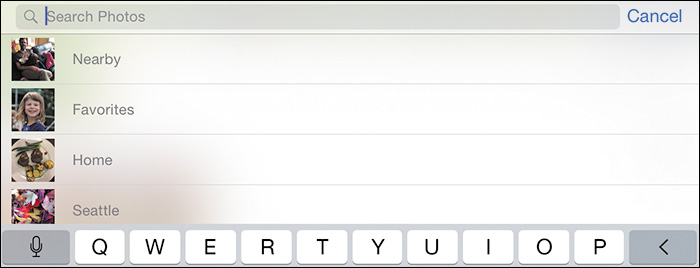
2. Tap one of the shortcut searches, or start typing a search term (3.58).

3.58 A text search brings up keywords I applied in Photos for OS X (this is for a library that is synchronized using iCloud Photo Library).
3. Tap one of the results to view the photos (3.59).