Chapter 4. iCloud Photo Library

Over the years, iPhoto got to be pretty creaky and slow, which by itself is reason enough to overhaul the whole thing. But Apple’s work to replace iPhoto with the Photos for OS X app was, I believe, less about modernizing iPhoto’s code and more about making cloud synchronization work.
Here’s the problem: We have thousands of photos, and we also have mobile devices that can’t possibly store them all. Even though we rarely, if ever, need entire libraries on our iPhones, we also don’t like monkeying about with manual syncing.
iCloud Photo Library is Apple’s grand attempt at making all your photos and videos available on any device, at any time. It’s easy to set up, and has genuinely changed how I work with my library and also changed my expectations for how photos should work on mobile devices.
iCloud Photo Library Basics
Before I get into how to use iCloud Photo Library, let’s cover just what it is, what’s involved, and other important things to know before you decide to set it up.
iCloud Photo Library is not required
When Photos for OS X was first announced, Apple emphasized iCloud Photo Library to the extent that many people assumed (and still assume) it’s required to use the new software. The feature is entirely optional. In fact, in some cases you may not be able to use it.
If you own a Mac and have no interest in viewing photos on mobile devices, you can ignore this feature. If you do own an iPhone or iPad and want the photos you capture with those to transfer easily to your Mac, you can enable My Photo Stream (see the next item).
Telling Apple’s cloud photo services apart
Apple offers three separate, but sometimes linked, cloud photo services, which were introduced at separate times.
• iCloud Photo Library: The most recent service makes your entire photo library available via iCloud to iOS devices and the Web (when you log in with your Apple ID).
• iCloud Photo Sharing: This service lets you create shared albums to which other people subscribe. When new photos are added to an album, everyone receives the images. For example, I created a shared album of recent photos of my daughter so family members near and far get to stay current with what she’s up to. Subscribers can comment and like the photos, and in some cases contribute their own photos for everyone else to see.
• My Photo Stream: Apple’s first foray into cloud-based photo sharing, this service automatically transfers photos you capture using an iOS device to the cloud. Within a few seconds, the photos appear on other iOS devices and in Photos for OS X (if enabled). You can do the same thing with iCloud Photo Library, but there are restrictions you need to be aware of (see “My Photo Stream,” later in this chapter).
How iCloud Photo Library works
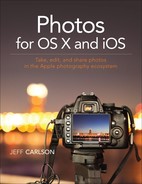
The key component is iCloud—it’s the central hub from which photos and videos are propagated to your devices (4.1).
4.1 iCloud Photo Library is the hub for all photos created in or imported into the Photos apps on your devices.
The images in Photos for OS X and in Photos for iOS on your devices are uploaded to the iCloud servers and stored as your photo library. From there, images that appeared in one location but not the others, such as photos you capture using the iPhone’s camera, are copied to the other destinations.
The result is the same library—including the same albums—on every device.
Here we run into a conundrum: Not all devices have the same amount of storage. If your iPhone is a 16 GB model, but your photo library is larger than that, how does your entire library show up on the iPhone?
The Photos apps store compressed, low-resolution versions of your photos on the mobile devices—and optionally on the Macs—so you can access your entire library. When you want to view a photo, a higher-resolution version is downloaded as needed.
Depending on the amount of free space on your devices and Macs, you can opt to store originals instead of low-resolution versions. See “Set Up iCloud Photo Library,” just ahead.
![]() Note
Note
What about raw images? Your raw originals (and Raw+JPEG pairs) are uploaded to iCloud and stored there. iCloud creates low-resolution JPEG versions for storage on devices. Opening one on the Mac loads the original for editing. Opening one on an iOS device loads a high-resolution JPEG for editing, since iOS does not support working with raw formats; any edits you make on iOS, however, apply to the raw version on the Mac when they’re synchronized.
iCloud storage requirements
Depending on the size of your photo library, you’ll need to pay Apple for iCloud storage. A free iCloud account includes 5 GB of storage, but that amount is used by all iCloud services, such as iCloud Drive and iOS device backups (if you back up to iCloud). If your photo library is larger than that, you need to pony up for a paid service tier:
• 20 GB for $0.99 a month
• 200 GB for $3.99 a month
• 500 GB for $9.99 a month
• 1 TB for $19.99 a month
That 1 TB plan is the largest option available. If your library is larger than 1 TB, you can’t use iCloud Photo Library.
Also, if you bump up against the limit of your current plan (say, you import a bunch of photos that push you past 20 GB), the Photos apps will stop updating until you either delete photos to make room or move up to another paid tier.
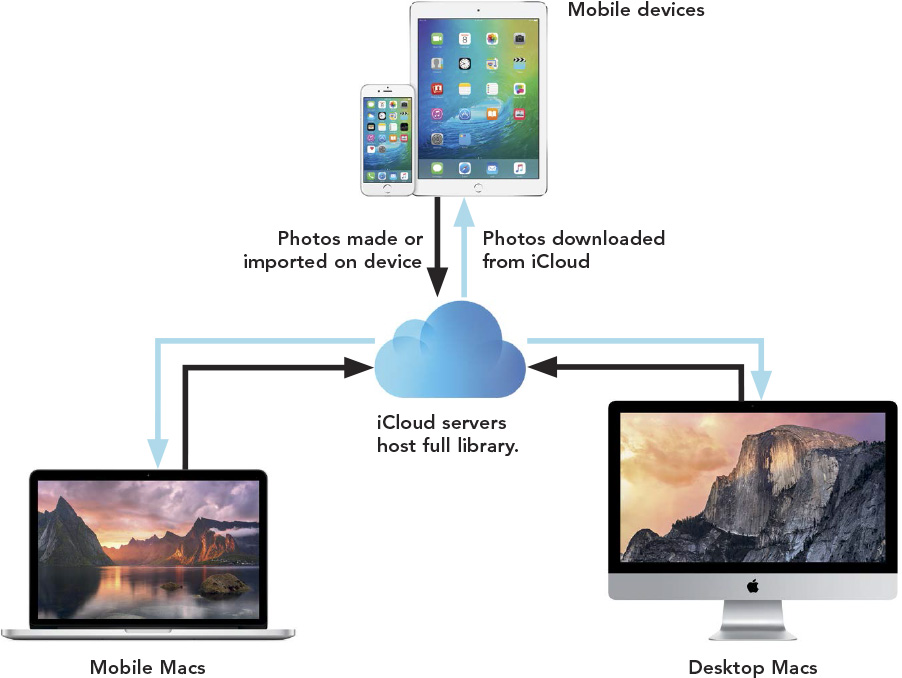
To see how large your library is, do this:
1. In Photos for OS X, go to the Photos tab and make sure no images are selected.
2. Choose Window > Info and look at the size listed at the top (4.2).
![]() Note
Note
If you’re not subscribed to a higher tier and your library exceeds 5 GB, the Photos app won’t even let you turn on iCloud Photo Library in the first place.
![]() Note
Note
Yes, Apple’s prices for cloud storage are higher than competing services like Dropbox, Google, or Flickr. I hope Apple reconsiders their pricing in light of these other services. For now, you can justify the price of using iCloud Photo Library as being part of Apple’s ecosystem and the way the Photos apps work on all Apple products. To stay on topic, I’ll be covering just Apple’s service in this book, not the others.
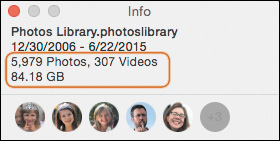
Library must be the System Photo Library
If you have multiple Photos library files (such as if you converted old libraries or created separate ones; see Chapter 3), only one of them can be used as the iCloud Photo Library. To set this up, open the Photos preferences, click the General button, and then click Use as System Photo Library. If the option is grayed out, it means that library is already set as the System Photo Library (4.3).
Set Up iCloud Photo Library
In true Apple fashion, turning on iCloud Photo Library is almost a one-click operation. Here’s how to enable it in Photos for OS X and Photos for iOS, plus the settings you need to be aware of to make it work well.
Photos for OS X
To get iCloud Photo Library working on your Mac, do the following:
1. First, you need to be signed in to iCloud. If you’re not already, open System Preferences, click the iCloud icon, and enter your Apple ID and password. You can also reach the same point from the preferences window in the Photos application, under iCloud.
2. In Photos, go to the iCloud preferences window and click the iCloud Photo Library checkbox (4.4). Once it’s enabled, Photos begins uploading the contents of your library to iCloud.
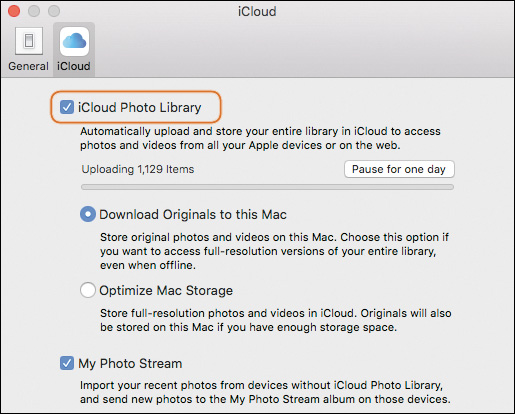
3. Choose how to store the image files on the machine:
• Download Originals to this Mac: The original files are stored locally as well as in the cloud.
• Optimize Mac Storage: The original files are kept in the cloud, and if space permits, originals remain on the Mac. However, most photos stored on the computer are compressed, low-resolution versions.
![]() Tip
Tip
Photos for OS X takes into account the overall unused storage space on your Mac and calculates more than the size of your actual library size for its use. If you’re running thin on free space, the Download Originals to this Mac option is unavailable—even if all the originals are already stored there! See the sidebar “Working with Optimized Libraries” for more information.
Photos for iOS
The steps to enable iCloud Photo Library on an iOS device are nearly identical:
1. Open the Settings app.
2. Tap the iCloud setting and sign in using your Apple ID and password (the same ones you use on the Mac).
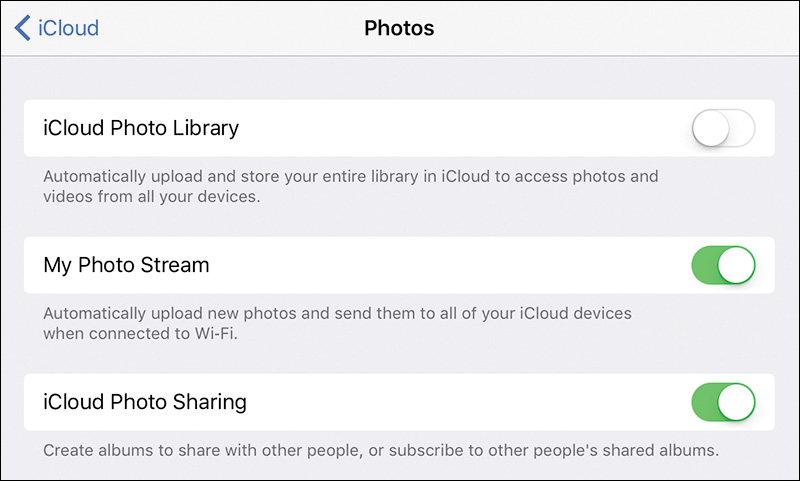
3. Tap the switch for iCloud Photo Library to turn it on (4.5).
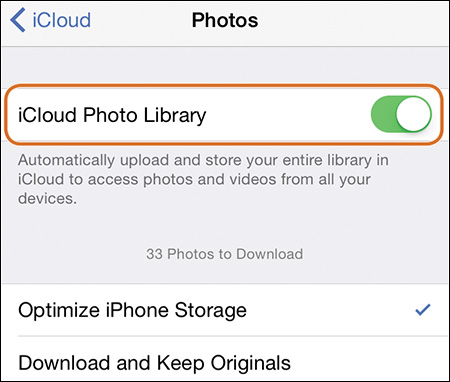
4. Choose whether originals or optimized versions of photos should be stored on the device (see step 3, above).
View Photos Everywhere
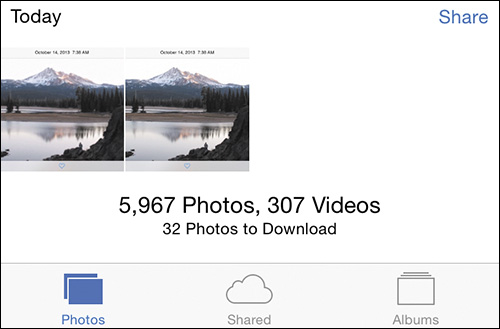
Once iCloud Photo Library is set up, photo synchronization happens automatically when you’re connected to a Wi-Fi network; photos don’t transfer over the cellular connection, so they don’t consume your phone plan’s data allotment. At any time, scroll to the bottom of the Photos window to view the status of uploads and downloads (4.6).
Pause iCloud Photo Library syncing
The best part of iCloud Photo Library is that you don’t have to think about it. However, there might be times when you want to put it on pause—for example, if you’re tethering a laptop to your iPhone’s cellular network connection, or if you have just imported a lot of photos and don’t want the uploading to compete with other activities on your network.
In that case, open the Photos for OS X preferences, click the iCloud button, and then click the Pause for One Day button. The application stops checking for new images and resumes after 24 hours. To start it up again before then, click the Resume button that appears in place of Pause for One Day.
![]() Note
Note
The 1.0 version of Photos for OS X has a bug such that the application can completely swamp your network bandwidth as it’s downloading and uploading files to keep the library in sync. Even quitting the application doesn’t prevent the problem, because what’s actually handling the transfers is an invisible background task. The temporary solution is to click the Pause for One Day button in the Photos preferences to halt the activity. I’m hoping this gets resolved in an upcoming release.
View photos in optimized libraries
When you open a photo that has been optimized to save storage space, you’ll experience a slight delay while the high-resolution version downloads (4.7). You don’t need to perform any extra action—I just don’t want you to be surprised (as I was) when a blurry version appears the first time.
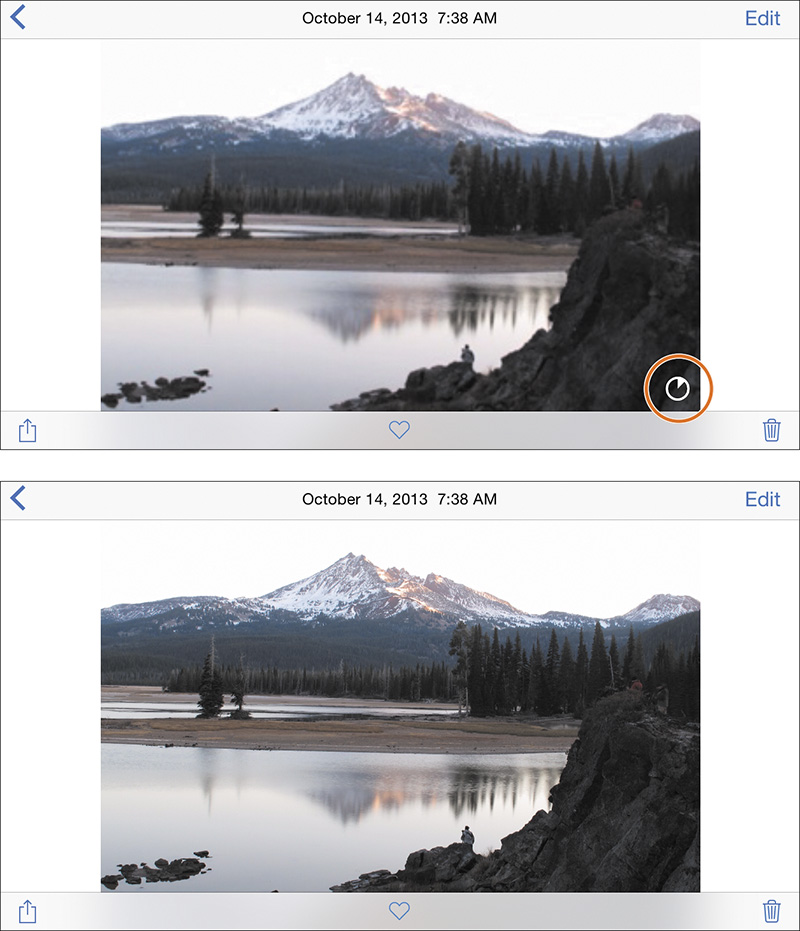
4.7 When opening an optimized image, a low-resolution version appears (note that it’s slightly fuzzy) with an indicator that the high-resolution version is downloading (top). After a few seconds, the high-quality one is loaded (bottom).
Behind-the-scenes nerdery here: All the screenshots of iOS devices in this book were made by taking advantage of iCloud Photo Library’s synchronization. My iPhone, iPad, and MacBook Pro all share the same library, so when I created a screenshot on my iPhone or iPad (by pressing the Home button and Sleep/Wake button simultaneously), the image was immediately synced to iCloud and appeared in Photos for OS X on my Mac within a couple of minutes.
iCloud Photo Library on the Web
Having your photo library available no matter where you are isn’t limited to just the devices you own. As long as you can access the Web, you can view your photo library.
1. In a Web browser, go to www.icloud.com.
2. Sign in using your Apple ID and password.
3. On the Home screen that appears, click the Photos button. You can do most everything in your library that you can in the Photos application aside from editing the images, including sharing and marking favorites (4.8). Albums remain intact, but smart albums show up empty, since their contents aren’t auto-generated via the Web interface.
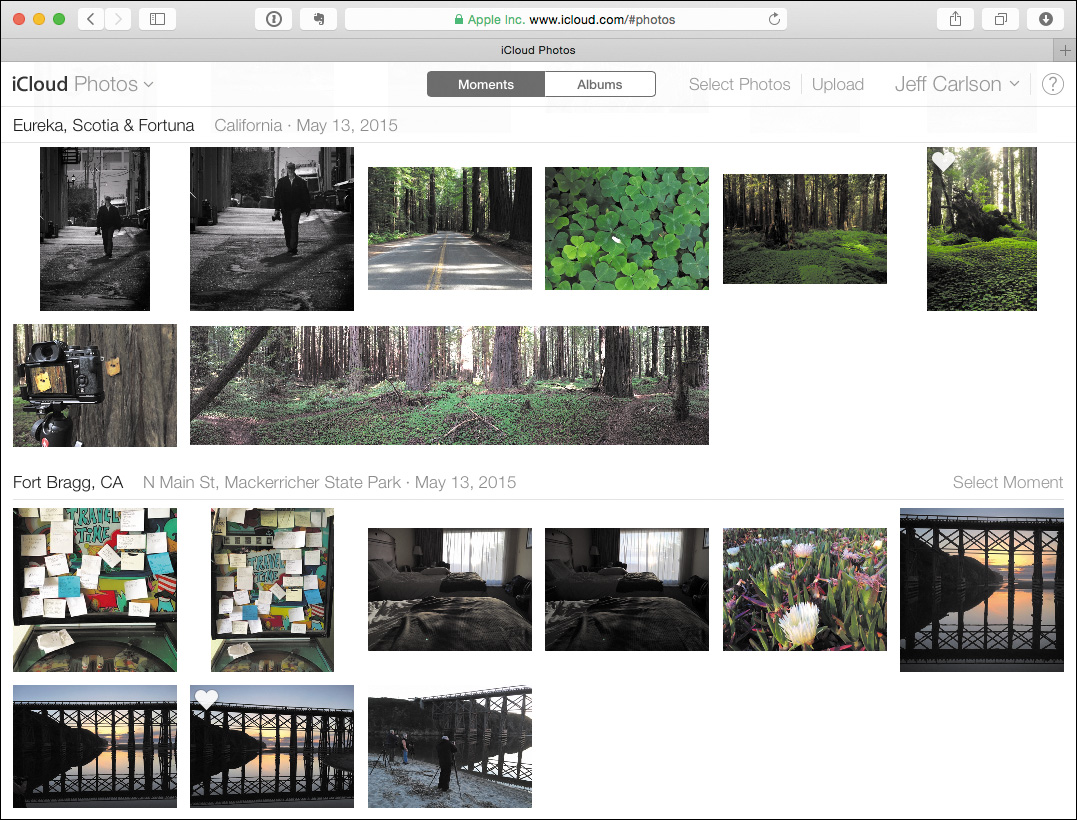
4.8 Your photo library at iCloud.com
My Photo Stream
With the rollout of Photos for OS X and iCloud Photo Library, the My Photo Stream feature has gotten pushed out of the spotlight. If you’ve decided that iCloud Photo Library isn’t a good fit for you—or it was decided for you, if your library is too large, your network connection too slow, or your library includes referenced photos—My Photo Stream is still helpful for automatically transferring photos between devices. It also works for syncing photos to devices that share the same iCloud account but don’t have iCloud Photo Library turned on.
Set up My Photo Stream
Here’s the easy part. In Photos for OS X, open preferences, click the iCloud button, and then turn on My Photo Stream.
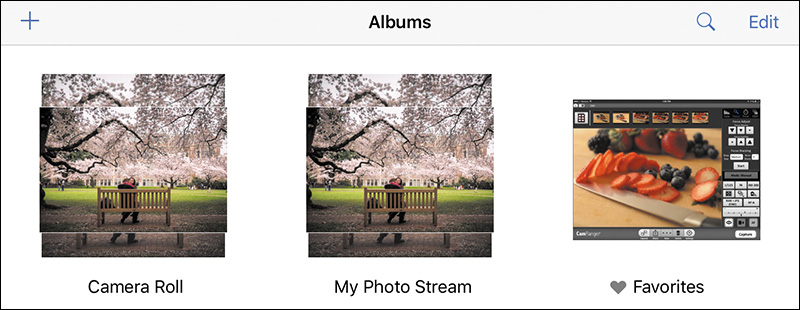
On an iOS device, go to Settings > iCloud > Photos and turn on My Photo Stream (4.9). After you do, a new My Photo Stream album shows up in the Albums view (4.10).
![]() Tip
Tip
If iCloud Photo Library is enabled, you won’t see a My Photo Stream album, because all synced photos and videos go to the All Photos album.
My Photo Stream limits
Unlike iCloud Photo Library, the My Photo Stream service does not count against your iCloud storage allotment—in fact, you can stick with the free 5 GB iCloud account and still use My Photo Stream. However, there are limitations to how much you can store. As its name suggests, it’s a stream of data that rushes by, not a pool where all your photos are stored indefinitely. So here’s the breakdown:
• Photos in My Photo Stream are stored at iCloud for 30 days. Older photos are removed from the stream after 30 days.
• On iOS devices, the last 1000 items are saved in the My Photo Stream album.
• If you’d like to keep a photo on an iOS device before it’s deleted, move it to the Camera Roll by selecting the photo, tapping the Share button, and choosing Save Image.
• Only photos are supported in My Photo Stream, not videos.
![]() Note
Note
For more information about My Photo Stream, see Apple’s support document at support.apple.com/en-us/HT201317.