“Dangerous Type,” named after the song by The Cars, is just about the perfect name for a chapter on creating type effects. Now, in all actuality, the really perfect name for a chapter on type effects would be “Type Effects,” but I couldn’t find a movie, TV show, band, or song named “Type Effects,” however I was able to find a song named “The Darker Type” (by the band The Dying Effect, from their album “Bleed the Night”), which is what I was going to use, but when I heard the 30-second online preview of the “death metal” song, I realized that I could actually understand more of the words from any song by French pop musician Maxime Le Forestier, than I could from “The Darker Type,” despite my complete inability to speak French, with the possible exception of the phrase, “J’ai une urgence de salle de bains,” which I memorized just in case (which loosely translated means, “It’s urgent that you call Sally Jessy Raphael, or actor Conrad Bain”). Anyway, I have to tell you—you don’t want to play “The Darker Type” when you’re alone with the lights out, because it’s really scary sounding (which is surprising for the tender love song it sounds like it is). So, I went with “Dangerous Type,” mostly because none of the lyrics made me want to bludgeon myself, which I think is a real plus.

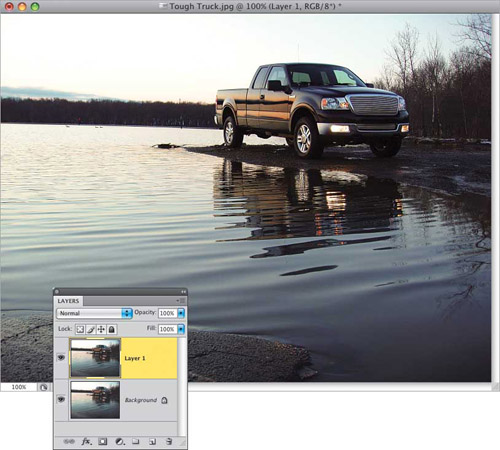
This look was made popular by a very slick series of TV and Web ads for Ford’s F-150 truck. While the type effect itself is pretty simple, what makes the project a lot of fun (and a great learning experience) is going through all the steps you need to create the whole look of the ad from scratch, which is what we’re going to do here. This particular look is incredibly popular right now (the overall grungy look, not just the type effect), so learning this look will probably come in even more handy than the type trick. Here’s how it’s done:
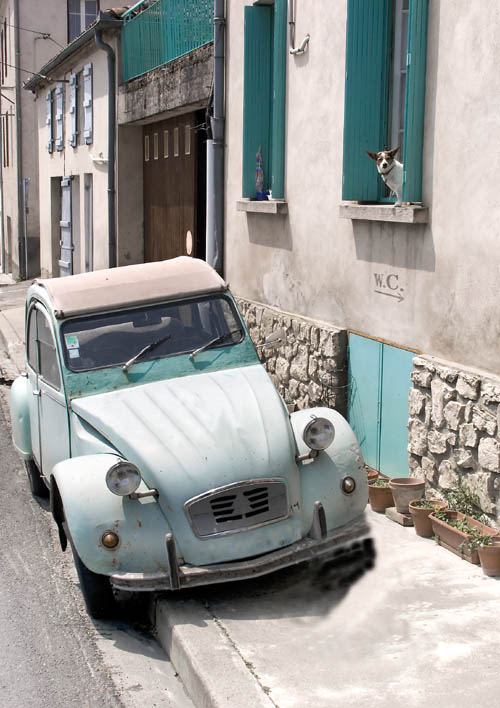
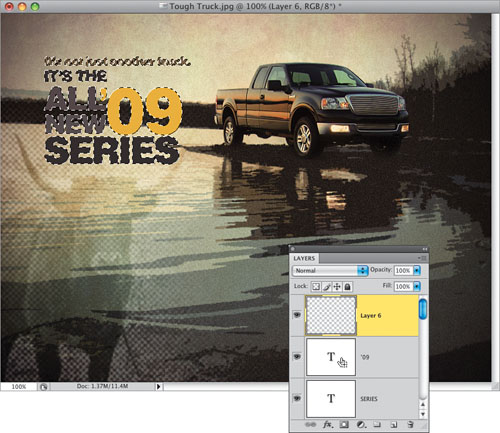
Open the photo you want to apply this type effect to (you can download the photo shown here from the book’s downloads page, mentioned in the book’s intro). Now duplicate the Background layer (as seen here in the Layers panel) by pressing Command-J (PC: Ctrl-J).
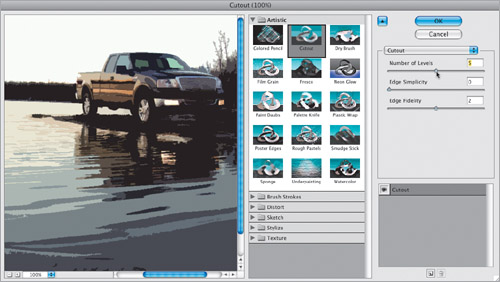
Go under the Filter menu, under Artistic, and choose Cutout. This filter will give us a posterized look to our image (a look using only a few colors), without it looking as harsh as it would if we actually posterized the image. When the dialog appears, at the top right, choose 5 for Number of Levels (as shown here), set the Edge Simplicity to 0, the Edge Fidelity to 2, then click OK to apply this effect to the photo. As you can see here in the preview on the left side of the dialog, there’s a cool effect on the photo, but we lost all the detail in the truck (and if you’re doing this for a truck manufacturer or truck dealer, they’re not going to want you to mess with the truck. That’s why we duplicated the layer when we started—so we can go back and get parts of the original untouched image if we need it (and as it turns out, we need it).
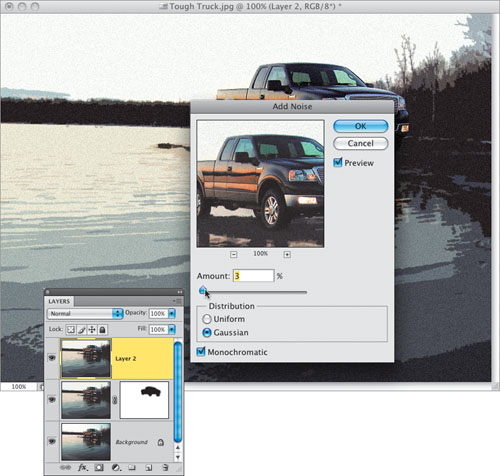
Go to the Layers panel and click on the Add Layer Mask icon at the bottom of the panel. Press X to set your Foreground color to black, get the Brush tool (B), choose a medium-sized, soft-edged brush (from the Brush Picker up in the Options Bar), and paint over the truck. As you do, the original untouched truck (from the layer below) is revealed, and now all our detail is back. Press Command-Option-Shift-E (PC: Ctrl-Alt-Shift-E) to make a new layer that looks like a flattened version of your file (doing this leaves all the other layers intact, in case we have to go back and make a change later). Now let’s add some noise to grunge things up a bit. Go under the Filter menu, under Noise, and choose Add Noise. When the dialog appears (shown here), set your Amount at 3%, choose Gaussian as the Distribution (it looks better), and turn on the Monochromatic checkbox (so your noise doesn’t look like little red, green, and blue dots). Click OK.
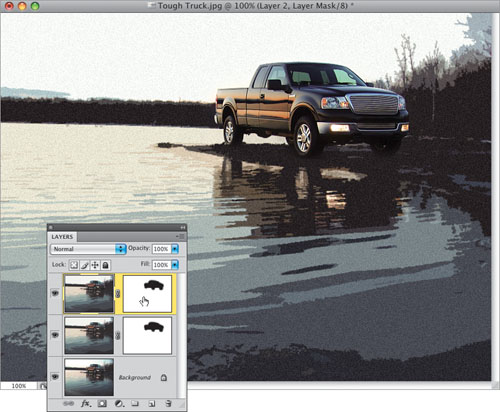
Now, to keep the truck looking good, you don’t want noise all over it, but that’s an easy fix. Go to the Layers panel and press-and-hold the Option (PC: Alt) key. Don’t change layers, but click directly on the layer mask thumbnail in the center layer (the one where you painted back in the truck), and just drag-and-drop that layer mask onto the top layer in the stack (your noise layer). Pressing-and-holding the Option key copies the layer mask from one layer to another, and since your mask was of the truck, the noise is instantly removed from just the truck. (I know, copying masks is sa-weet!)
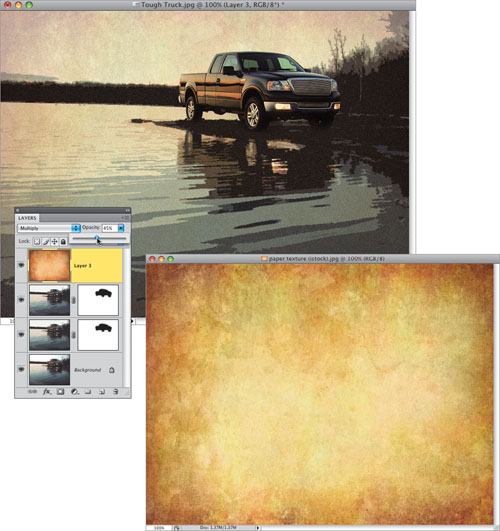
Now we’re going to grunge things up even more. Open the paper texture file (shown here below) you downloaded from the book’s downloads webpage (it’s the same one we used in the “Adding Texture and Aging to a Photo” project in Chapter 2). Get the Move tool (V), and just drag-and-drop that paper texture photo right onto your truck photo. Of course, this will just cover your truck photo, so at the top of the Layers panel, change the blend mode of this layer to Multiply (so it blends in and darkens the whole photo at the same time) and, since it’s too dark, lower the Opacity of this layer to 45% (shown here). Okay, time for another one of those merged layers on top (like we did in Step Three), so press Command-Option-Shift-E (PC: Ctrl-Alt-Shift-E).
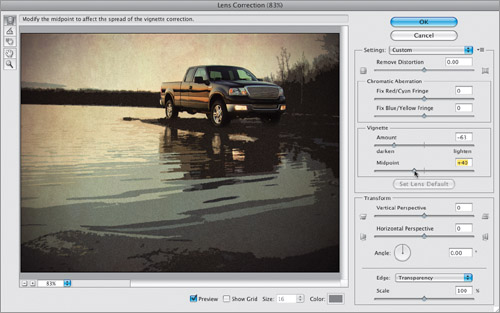
Let’s add some edge darkening by going under the Filter menu, under Distort, and choosing Lens Correction. When the dialog appears, first turn off the annoying Show Grid checkbox (yes, that’s its official name—annoying Show Grid checkbox) at the bottom of the dialog. Now that you can actually see what’s going on (don’t get me started), go to the Vignette section on the right side of the dialog, and for Amount, enter –63 (that controls how dark your corners get), for Midpoint, choose 40 (that controls how far the edge darkening extends in toward the center of your photo), then click OK to darken the edges around your photo (as seen here).
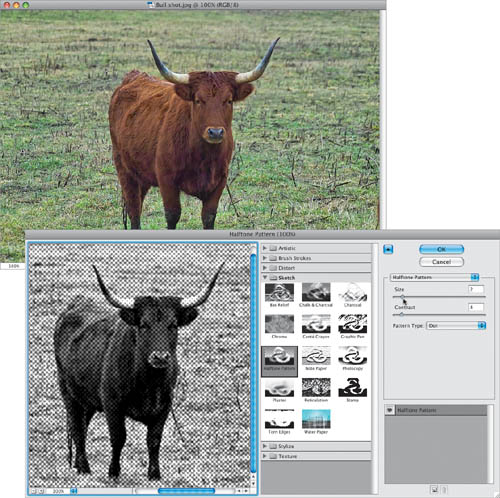
Now open the photo of a bull (think: “Strong like a bull”), and then go under the Filter menu, under Sketch, and choose Halftone Pattern. When the dialog appears, at the top right, set the Size to 2, the Contrast to 4, make sure the Pattern Type is set to Dot, and click OK to give you the effect you see here in the preview on the left side of the dialog (a grayscale image with lots of repeating dots).
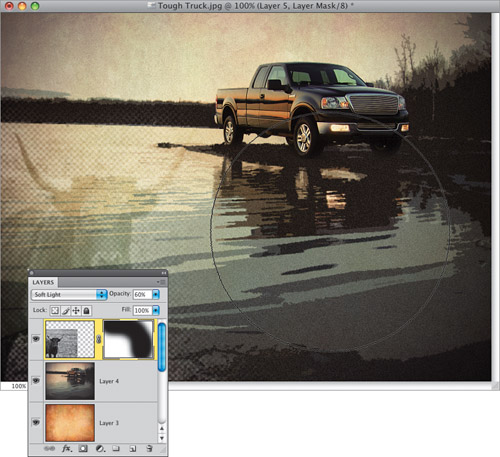
With the Move tool, click-and-drag that gray-dotty bull over onto your main image, and position him over to the far left (like you see here). You’re probably noticing that on your screen, he doesn’t exactly “blend in,” so change the layer blend mode for this layer to Soft Light, then lower the Opacity to around 60% to give you the effect you see here. Now, you can still see hard edges along the right side and top of the bull photo, but don’t worry—you’ll fix that in the next step.
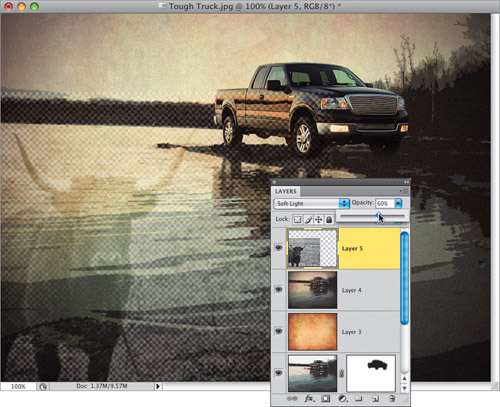
Go to the Layers panel and click on the Add Layer Mask icon at the bottom of the panel. With your Foreground color set to black, get the Brush tool (B), and choose a really huge, soft-edged brush from the Brush Picker in the Options Bar (notice the size of my brush here). Just paint over those hard outside edges and, in seconds, they are gone, blending in nicely with the rest of the photo. The key is to start far away from the edges, and move slowly in as you paint short strokes up and down. You’ll see your edges start to fade away as you get close to them. Now it’s time (finally!) to add the text effect we came here for in the first place. We’ll look at some tips on how to design with type, as well.
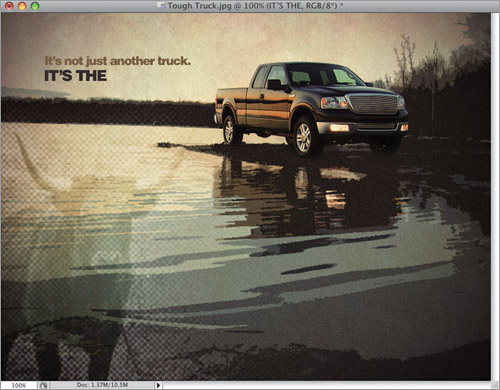
Start by getting the Horizontal Type tool (T) and choose a bold sans serif font. I used Helvetica Black, and in the Character panel (found under the Window menu), I set the Tracking (the space between the letters) to a negative amount, so that the letters are very close together—the top line of type is 6 points with the Tracking set to –80, which is very tight—and I chose a light brown for the text color by clicking on the Color swatch in the Character panel. Type in the line, “It’s not just another truck.” We’re going to be using just one font for everything we do here, so it’s quickest to just duplicate that first line of type, highlight it, and type in your new text. To do that, get the Move tool, then duplicate your Type layer, and click-and-drag that duplicate type straight downward, so it’s beneath your original type. In the Layers panel, double-click directly on the dupicate text layer’s thumbnail to highlight its text, then change its color to a dark gray. Now, you can just type “IT’S THE,” like you see here, make it slightly larger (between 7 and 8 points), get back the Move tool, and position it so the left side is aligned with the top line of text (as seen here).
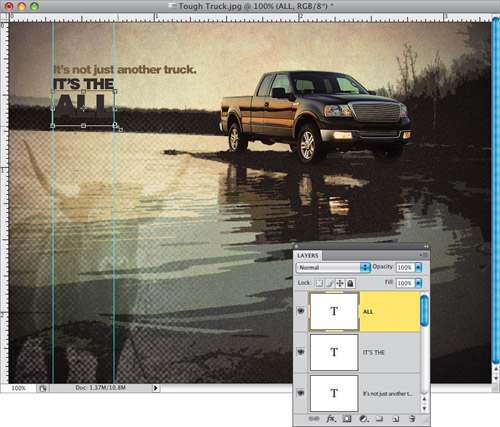
We want the lines of type below this to line up, so press Command-R (PC: Ctrl-R) to make the Rulers visible, then click on the left-side ruler and pull out a vertical guide, aligning it with the left side of your type. Pull out another vertical guide and align it with the right side of the word “THE” (as seen here). Now duplicate the IT’S THE layer, click-and-drag it downward, highlight the text, and type in the word “ALL,” which needs to fill the area between the two guides. To do that, switch back to the Move tool, press Command-T (PC: Ctrl-T) to bring up Free Transform, press-and-hold the Shift key, click on the bottom-right corner handle, and drag outward until the text scales up to fill in that space. Reposition it as needed, then press Return (PC: Enter) to lock in your resizing. Do the same thing again, but change the text to read “NEW” (seen in the next step).
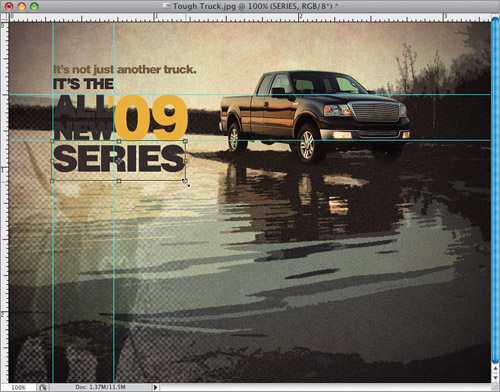
Now you’re going to add “’09,” but before you do, create two horizontal guides (click-and-drag them out from the top ruler), and position them as you see here, because the “’09” has to be exactly as tall as the lines “ALL” and “NEW.” Duplicate the word “NEW,” click-and-drag it to the right, highlight it, change the color to a dark yellow (I used R: 217, G: 168, B: 76), and then type in “’09.” Use Free Transform to resize it, so it fits within the two horizontal grid lines. Note: To create the backwards apostrophe, press the Apostrophe key twice, then delete the first one. Also, I shrank the apostrophe, so it fit inside the “L” in the word “ALL.” Then I did a baseline shift to move it upward by highlighting the apostrophe, then pressing Option-Shift-Up Arrow key (PC: Alt-Shift-Up Arrow key) a few times. Duplicate the word “NEW” again, reposition it, highlight it, and change it to “SERIES.” Use Free Transform to scale it up until it reaches the end of the “9” (everything has to line up to something in type design).
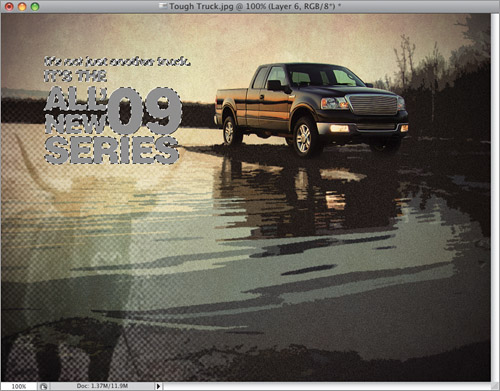
You’re going to start to apply the effect to the text. (Note: I’ve turned off the Rulers [Command-R; PC: Ctrl-R] and removed the guides [by choosing Clear Guides from the View menu] because we no longer need them.) First, click on the top layer in your layer stack and create a new blank layer at the top by clicking on the Create a New Layer icon at the bottom of the Layers panel. Command-Shift-click (PC: Ctrl-Shift-click) directly on the thumbnail for your top Type layer (the ’09 layer, as shown here) to put a selection around the type on that layer. Then go to the next layer down (keep holding down those keys) and click on its thumbnail. It will add the word on that layer to your selection. Keep doing that (and keep holding those two keys down) for the rest of your Type layers, until there’s a selection around all the Type layers you created (as seen here). By the way, what’s making this work like this is the Shift key—when you hold it down, along with the Command key, it tells Photoshop to add the next thing you click on, so as you keep clicking on Type layer thumbnails, it keeps adding that layer to your selection already in place.
Click on the Foreground color swatch and set your Foreground color to a medium gray. Make sure you still have that new top layer selected in the Layers panel, and press Option-Delete (PC: Alt-Backspace) to fill the type selection with gray (as seen here). Don’t deselect quite yet.
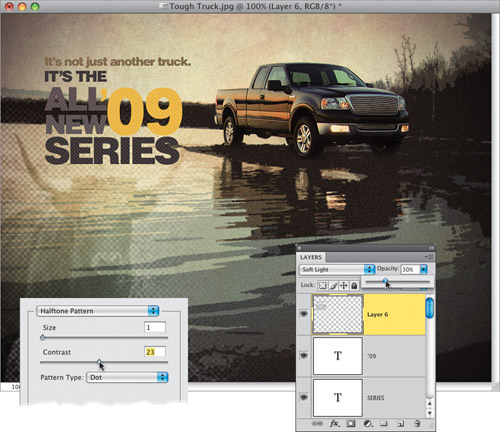
Go under the Filter menu, under Sketch, and choose Halftone Pattern. When the dialog appears, for Size, choose 1, for Contrast, choose 23 (as shown here), set your Pattern Type to Dot, then click OK. This puts a tight dot pattern over your type that looks pretty cool (I know it’s hard to see here in the book, but you’ll see it on your screen big time!). Now you can Deselect by pressing Command-D (PC: Ctrl-D). To have your dots layer blend in with your type on the layer below it, go to the Layers panel and change the layer blend mode to Soft Light, and lower the Opacity to 30% (as shown here). Now, it nicely blends over the type, and most of the original color is still there.
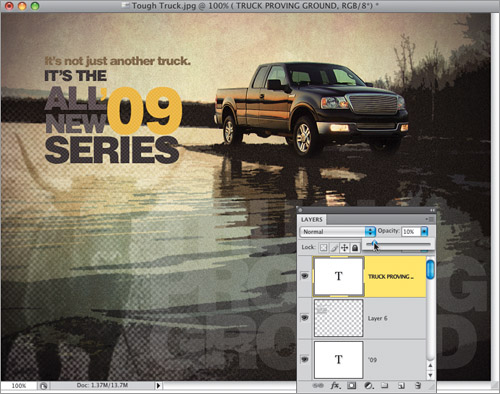
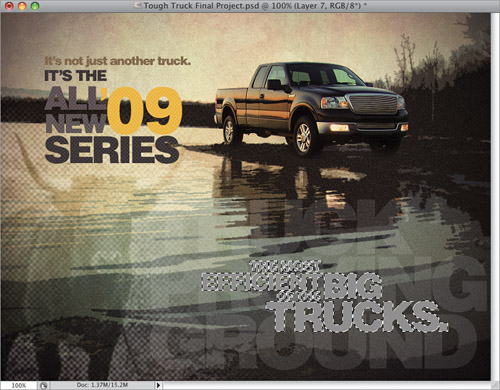
Let’s add some really huge type, just for looks. Duplicate your “SERIES” Type layer, then click-and-drag the duplicate layer above your gray dots layer. Highlight the text on the layer, change the color to white, and type “TRUCK PROVING GROUND” (one word on each line). Use the same font and make it really huge. I made mine 38 points at –100 tracking. I also made the Leading (the vertical space between the lines of text) really tight, too—in the Character panel, I set the Leading to 28. Now, get the Move tool and move this type over to the lower right of the image and then lower the layer Opacity of this Type layer to 10% (as shown here), so the text is just barely there.
You’re going to build another block of text, but these words are going to line up differently. Duplicate one of your Type layers (like the “SERIES” layer) and click-and-drag it up to the top of the layer stack. Highlight it, type “THE MOST,” and then move it over to the right with the Move tool. Repeat this to create new Type layers for “EFFICIENT,” “OF THE,” “BIG,” and finally “TRUCKS.” Highlight the “EFFICIENT” text and change the color to that same yellow color you used on the ’09 text. Do the same thing for “TRUCKS.” Next, change the color of “THE MOST,” “OF THE,” and “BIG” to white. Now, you just have to resize them and then align them. If you look at the type here, you’ll see that the first three lines (“THE MOST,” “EFFICIENT,” and “OF THE”) are all aligned along the right, and they line up with the right side of the letter “R” in “TRUCKS.” The word “BIG” is as tall as “EFFICIENT” and “OF THE” combined, and it’s aligned with the letters “UC” below it. Again, everything has to line up with something, but that’s actually good, because now it’s no longer a guessing game, right? Now you know, “Oh, this should line up with these other letters.”
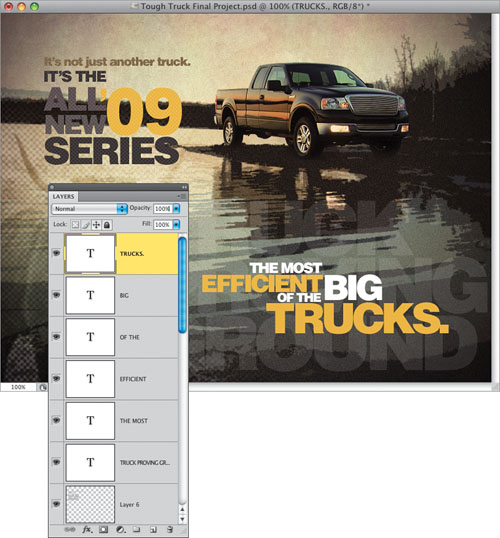
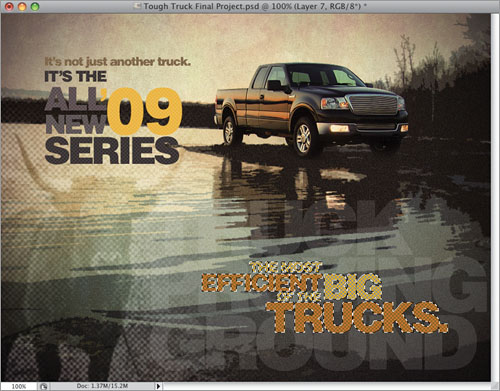
Now it’s time to put a selection around all those new Type layers, so we can add our text effect to them. Create a new blank layer at the top of your layer stack. Command-Shift-click (PC: Ctrl-Shift-click) directly on the thumbnails for all your new Type layers to put a selection around them (as shown here). Once all of them are selected, set your Foreground color to a medium gray, and fill your selection with this color. Don’t deselect yet.
Press Command-F (PC: Ctrl-F) to apply the Halftone Pattern filter, using the exact same settings you used a few moments ago when applying the filter to the type at the top left (that keyboard shortcut does just that—it repeats your last filter using the same settings). Now, at this point, it’s covering your type, but you want it to blend in. Last time, we changed the layer blend mode to Soft Light, but this time we’re going to choose Multiply instead, because our text is white and yellow, rather than dark gray, brown, and yellow, so in this case, Multiply looks better (by the way, I didn’t just magically know that. When I chose Soft Light it looked bad, so I went through some of the other blend modes until I found one that looked good—Multiply). This makes the text color look a little funky, and the effect appears too intense, but we’ll fix both of those in the next step. Now you can deselect.
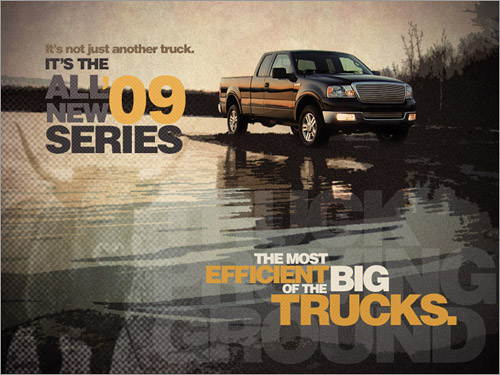
To finish this project off, all you have to do is lower the Opacity of this layer to 30%, which brings back the color, and makes the text effect not appear too intense. Here’s the final image with that last tweak.
I saw this technique most recently in the movie poster for the movie Fracture, starring Anthony Hopkins and Ryan Gosling (fracturemovie.com). This technique has been used in a number of different ways, but besides just learning the technique, there are a few other interesting little techniques to learn along the way (plus, you’ve got to love a technique you can wrap up in just two pages).
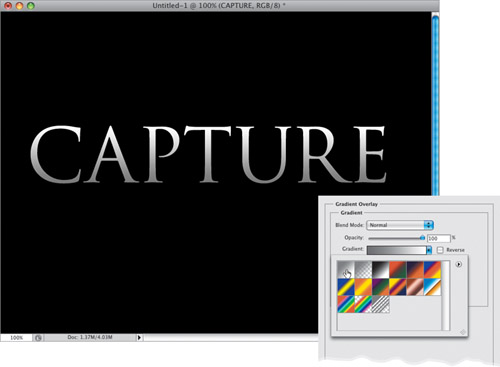
Start by pressing Command-N (PC: Ctrl-N) to create a new document (I made mine 800×600 pixels at a resolution of 72 ppi). Press D to set your Foreground color to black, then press Option-Delete (PC: Alt-Backspace) to fill your Background layer with black. Get the Horizontal Type tool (T) and create your text (I used the font Trajan Pro, which comes with the Creative Suite, in white at 135 points). Click on your Foreground color swatch and choose a light gray in the Color Picker, then click on the Add a Layer Style icon at the bottom of the Layers panel and choose Gradient Overlay. When the Layer Style dialog appears, click on the down-facing arrow to the right of the gradient thumbnail to bring up the Gradient Picker. Choose the first gradient, which is the Foreground to Background gradient (your gradient will go from white at the top to light gray at the bottom, as shown here), and click OK.
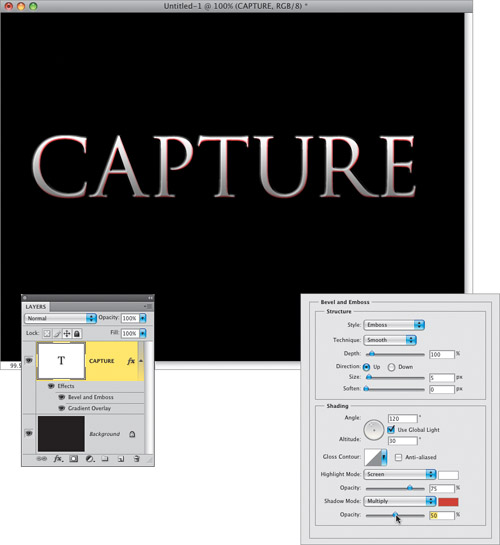
Here you’re going to add a little bit of a bevel, with some red in its shadow areas. Click on the Add a Layer Style icon at the bottom of the Layers panel and choose Bevel and Emboss from the pop-up menu. When the dialog appears, change the Style to Emboss, then at the bottom of the dialog, next to Shadow Mode, click on the black color swatch. When the Color Picker appears, choose a bright red as your color, click OK, then lower the Opacity of the bevel’s shadow to 50% (as shown here), so the red doesn’t stand out too much. Click OK to apply the subtle bevel effect you see here.
Now, we have two issues to deal with: (1) to be able to cut through the type on the Type layer, we’re going to have to convert it from editable type to regular pixels (like any other object in Photoshop), and (2) when we cut the text, the bevel and gradient layer styles will change. Here’s how we get around both: Go to the Layers panel and click on the Background layer. Then create a new blank layer above it by clicking on the Create a New Layer icon at the bottom of the Layers panel. Now click on your Type layer, then press Command-E (PC: Ctrl-E), which merges your Type layer with the new blank layer. This rasterizes your type and applies the bevel permanently. Problem solved. Now take the Polygonal Lasso tool (press Shift-L until you have it) and draw a selection over the top of the last three letters (like you see here).
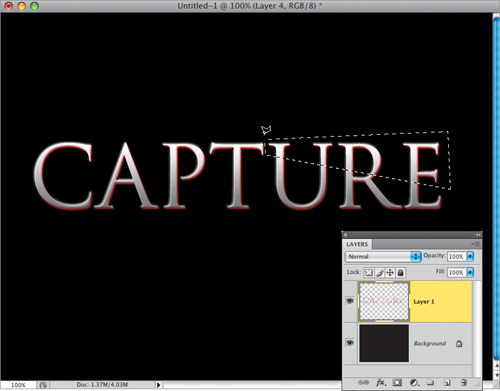
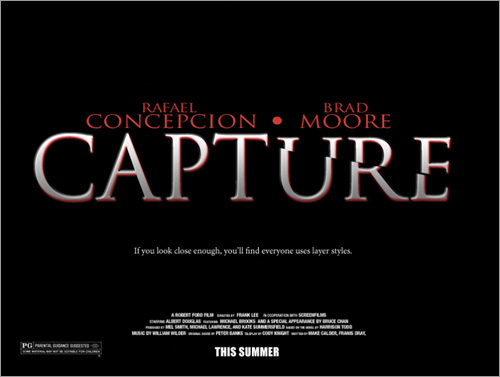
Get the Move tool (V) and press the Right Arrow key on your keyboard a few times, and it automatically selects the letters within the selection and moves them to the right to create the effect you see here. There is one more thing they did in the actual movie title: while the broken letters were still selected, they used Free Transform (Command-T [PC: Ctrl-T]) to shrink those letters down a little bit, and then they nudged them back up a few pixels (using the Up Arrow key on their keyboard). You can now press Command-D (PC: Ctrl-D) to Deselect. The actors’ names up top are in the same font (Trajan Pro), but in the Character panel (found under the Window menu), I increased the Horizontal Scaling to 130% to stretch the letters a bit. The tagline below the movie title is in the font Minion Pro (which also comes with the Adobe Creative Suite).
I actually saw this technique at the end of a TV ad for a game built for Sony’s PlayStation 3 game console, and I thought two things: (1) hey, that is pretty cool, and (2) I’ll bet I can figure that one out. As it turned out, it was easier than I thought. Here’s how it’s done:
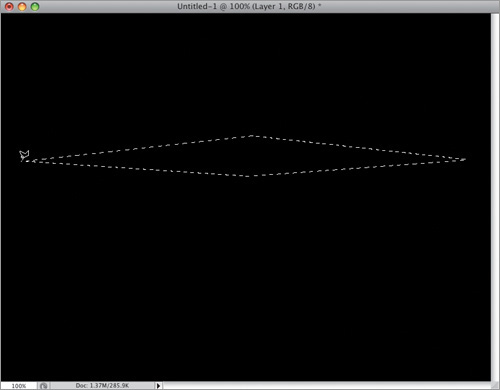
Press Command-N (PC: Ctrl-N) to create a new blank document (I made mine 800×600 pixels at a resolution of 72 ppi). Press D to set your Foreground color to black, then press Option-Delete (PC: Alt-Backspace) to fill your Background layer with black. Next, add a new blank layer above your black Background layer by clicking on the Create a New Layer icon at the bottom of the Layers panel. Get the Polygonal Lasso tool (press Shift-L until you have it) and draw a long, thin diamond shape like the one you see here (this tool draws straight line selections, so it takes just five clicks to create this diamond shape).
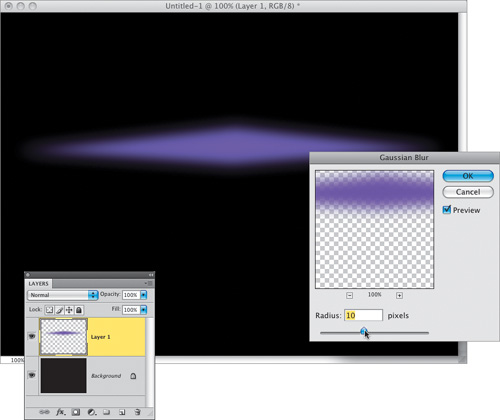
Now click on the Foreground color swatch and set your Foreground color to a purple in the Color Picker (I used R: 98, G: 95, B: 166), then fill your selection with this purple color by pressing Option-Delete (PC: Alt-Backspace). Deselect by pressing Command-D (PC: Ctrl-D). Next, go under the Filter menu, under Blur, and choose Gaussian Blur. For your Radius, enter 10 pixels (as shown here), then click OK to soften the diamond shape.
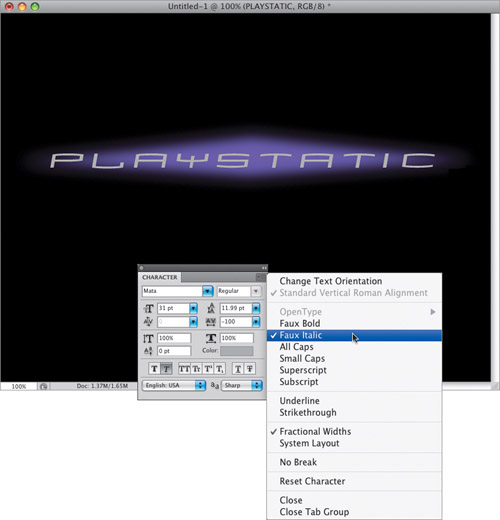
This time, set your Foreground color to a medium gray, then get the Horizontal Type tool (T). Click inside your image area, then type in your text. (I used the font Mata, which, besides having a version of it used for PlayStation, is the same typeface used for the movie Spiderman, which automatically makes it cool. At least to my son.) Also, the PlayStation version is in italic, and while I don’t have an italic version of the font Mata, you can actually have Photoshop “fake it.” Select your text, then go to the Character panel (found under the Window menu), click on the down-facing arrow at the top right, and from the flyout menu, chose Faux Italic to create a fake italic version of the font. Now, with the Move tool (V) position this text in the center of your blurry purple diamond (yes, that’s its official name, but you can call it BPD).
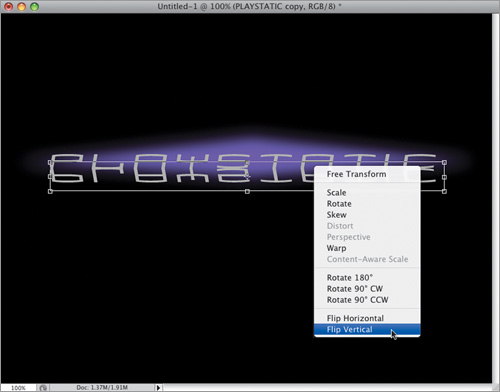
Make a duplicate of this Type layer by pressing Command-J (PC: Ctrl-J). Now press Command-T (PC: Ctrl-T) to bring up Free Transform, then Control-click (PC: Right-click) inside your image and choose Flip Vertical from the contextual menu, which flips your duplicate layer’s text upside down. Press-and-hold the Shift key and click-and-drag the upside down text straight down until the bases of the two Type layers line up, creating a mirror reflection like you see here. Press Return (PC: Enter) to commit the transformation.
At the top of the Layers panel, lower the Opacity of this duplicate layer to 40% to help it stand out from the original Type layer above it. Now, click on the Add Layer Mask icon at the bottom of the Layers panel. With your Foreground and Background colors set to their layer mask defaults of white and black, take the Gradient tool (G), choose the Foreground to Background gradient in the Options Bar, and click-and-drag from the top of your flipped type layer down to almost the bottom of the type to make it fade away (as seen here).

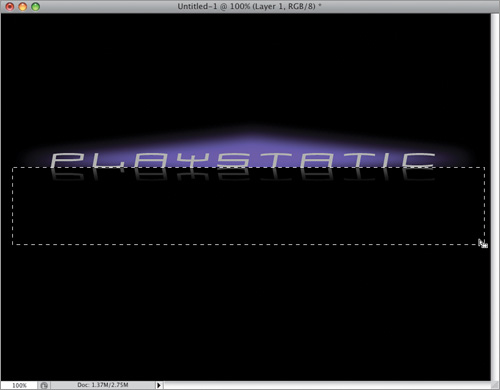
In the Layers panel, click on the diamond shape layer (Layer 1), then get the Rectangular Marquee tool (M), and click-and-drag a rectangular selection right along the baseline where the text meets, to down below the bottom of the diamond (in other words, select the bottom half of the diamond), and then press Delete (PC: Backspace). This leaves only the top of the diamond visible behind the regular text—not the reflected text (as seen here), which kind of gives you that “planet rising” effect. Now you can deselect, because we have to tweak a few things to finish this puppy off.
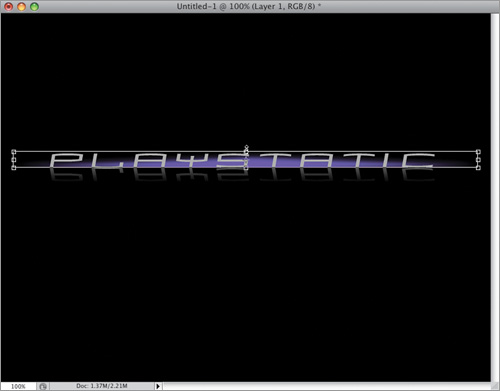
The glow looks a little too high (we want it fully contained behind the letters—not sticking out the top), so bring up Free Transform again. Click on the top-center handle and drag straight downward to squash your glow a bit, so it isn’t quite as high as the letters (like you see here), and then lock in your changes.
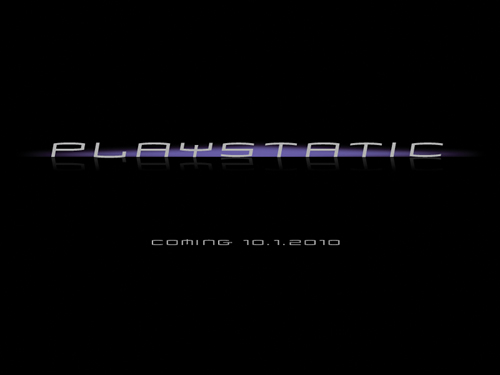
When I looked at the final image (shown here), I thought the reflection was a little too pronounced, so I went back to the reflected-type layer and lowered the Opacity from 40% down to 20%, for the look you see here, which is a bit more subtle. Also, I added the line of text near the bottom using the same typeface, but I went to the Character panel and turned off Faux Italic. By the way, that’s a good thing, because the one “gotcha!” about using Faux Italic is that it doesn’t automatically turn itself off. It’ll stay on, faux italicizing every typeface until you remember to go turn it off. Now, does this make any sense to work like that? (I’m not a good guy to ask, because my answer may contain words not fit to print.)
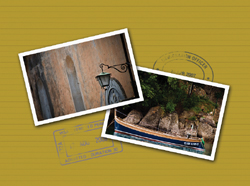
A lot of people use Apple’s iPhoto to create their photo books, because it comes with such cool built-in templates, making the process really simple with great results (I use it for all my vacation photo books). In an older version of iPhoto, Apple had templates with little passport stamps on the pages, and they really had a nice look, but sadly, those templates have been replaced. Be that as it may, the passport stamp idea was really cool, and if you learn how to create those passport stamps, you can apply them anywhere. The trick is making them not look “too neat,” because passport stamps are notoriously smudgy.
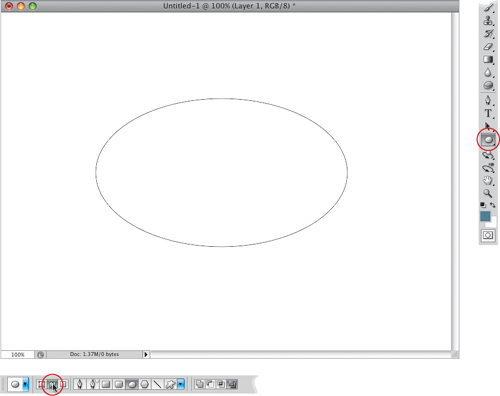
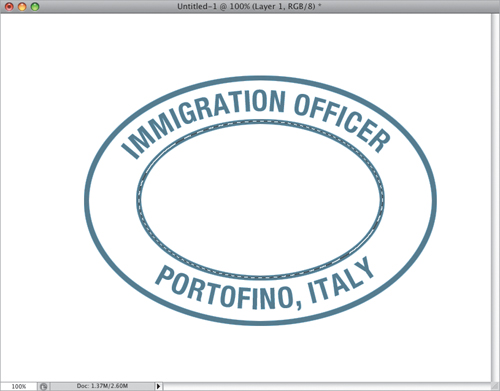
Start by pressing Command-N (PC: Ctrl-N) to create a new document (I created a document here that’s 800×600 pixels at a resolution of 72 ppi), and then create a new blank layer by clicking on the Create a New Layer icon at the bottom of the Layers panel. Next, get the Ellipse tool (press Shift-U until you have it), go up the Options Bar and click on the second icon from the left (so the tool creates a path, rather than pixels or a Shape layer), and then click-and-drag out an oval like the one you see here. Now click on your Foreground color swatch and choose a dark bluish gray color (I used R: 72, G: 80, B: 101).
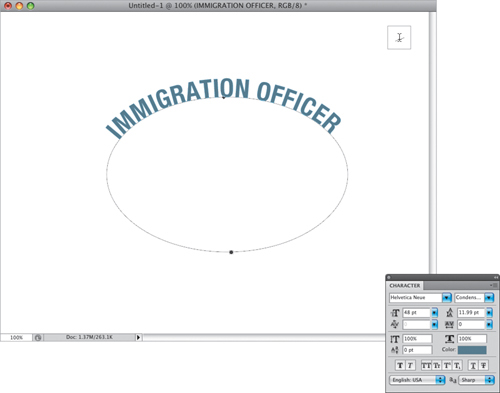
Now you’re going to create some text and have it follow along that oval-shaped path you just created. Get the Horizontal Type tool (T), then go up to the Options Bar and click on the Center Text icon (it’s two icons to the left of the color swatch). I chose Helvetica Neue Condensed Bold for my type, but you can use any sans serif bold condensed font. Now move your Type cursor right over the top part of the path and you’ll see your cursor change into the one you see inset here. Just click and start typing the words “IMMIGRATION OFFICER,” and it will wrap along the top of your oval (as seen here).
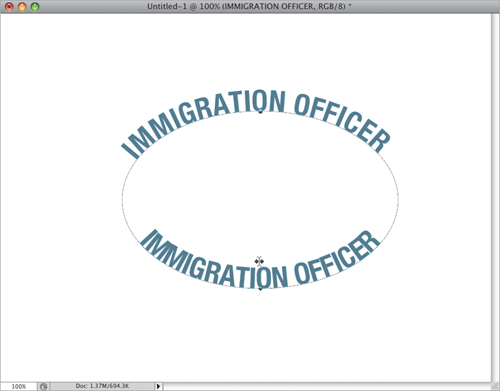
Press Command-J (PC: Ctrl-J) to duplicate this layer, then switch to the Path Selection tool (A; the black-filled arrow just below the Horizontal Type tool in the Toolbox). Move your cursor over the curved text at the top, and it will change into a double-sided arrow. That’s your indicator that you can now click-and-drag your copied text around the oval, so... do it—click-and-drag to the left until the duplicate of your of text rotates all the way down to the bottom of the oval (as shown here).
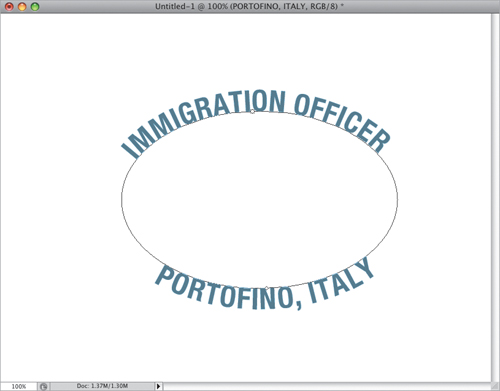
Go to the Layers panel, and double-click directly on the “T” thumbnail for this duplicate Type layer. This highlights the type at the bottom of your oval. Now, type in the city you want your passport stamp to be from (in this case, I typed in “PORTOFINO, ITALY”). If you look at the position of the text at the bottom of the oval in the previous step, you’ll see it sits inside the path (the bottom of the type is resting on the path), but here it’s moved down so the tops of the letters are touching the path instead (which is what you actually want). To make this happen, highlight your new text, and just press Option-Shift-Down Arrow key (PC: Alt-Shift-Down Arrow key). Keep pressing that shortcut a few times until your text moves downward into the position shown here. This is the keyboard shortcut for Baseline Shift and what you’re doing is shifting the type below its original baseline.
Create a new blank layer, then get the Elliptical Marquee tool (press Shift-M until you have it) and draw a large oval-shaped selection that’s a little larger than your text-on-a-path (by the way, when you do this, the path you created back in Step One will be hidden from view). Once your selection is in place, go under the Edit menu and choose Stroke. When the Stroke dialog appears, set 8 px as your Width, for your Location, choose Center, and click OK to put a stroke around your oval-shaped selection.
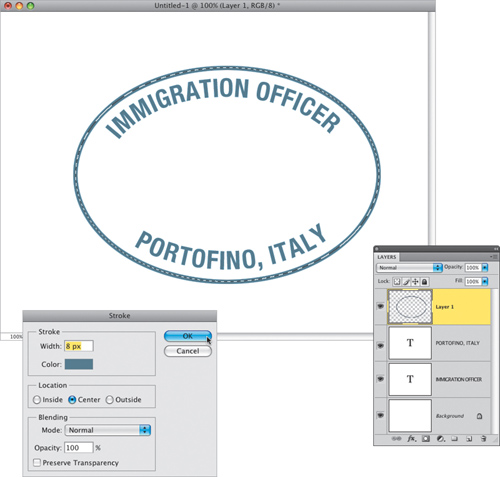
You’re going to make another oval selection inside your text area (like the one you see here), and then you’ll add an 8-pixel stroke to this selection, as well. Press Command-D (PC: Ctrl-D) to Deselect.
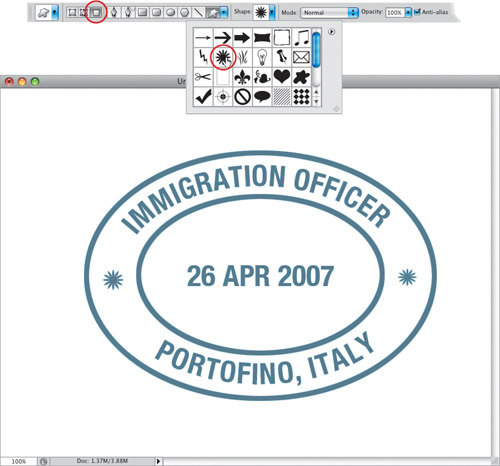
Go back to the Horizontal Type tool and create a line of text in the center with the date of your trip (as shown here). Add another blank layer, and then get the Custom Shape tool (press Shift-U until you have it). Go up to the Options Bar, and click on the third icon from the left (so the shapes it draws are made of pixels, rather than a path). Then click on the Shape thumbnail and, from the Shape Picker, choose the Flower 5 starburst shape, and add one on either side of the oval (like you see here). They seem to add these little ornaments and shapes, like stars, or little airplanes, or other little do-dads, to these stamps, and since you’re creating your own, you can pretty much choose any shape you’d like.
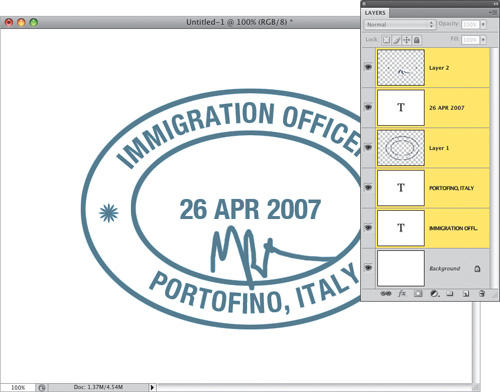
While you’re still on this same layer, grab the Brush tool (B), choose a very small brush tip, and scribble out the signature of your pretend Immigration Officer (all passport stamps don’t have a signature, but we’re going to add one here). Once the scribbly signature is in place, you’ll need to select all these layers and merge them into one single layer. Go to the Layers panel, press-and-hold the Shift key, and click on each of the Type and oval layers until they’re all selected (as seen here, where all those layers are highlighted in the Layers panel).
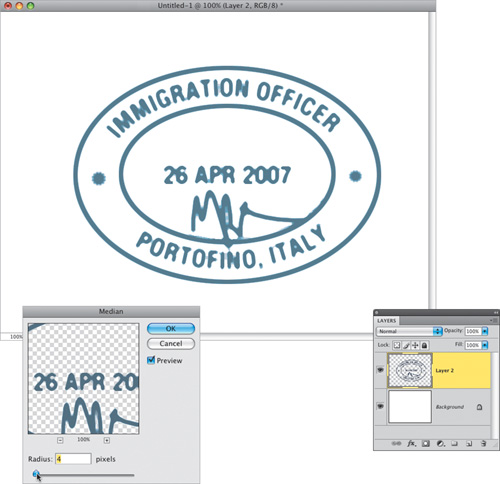
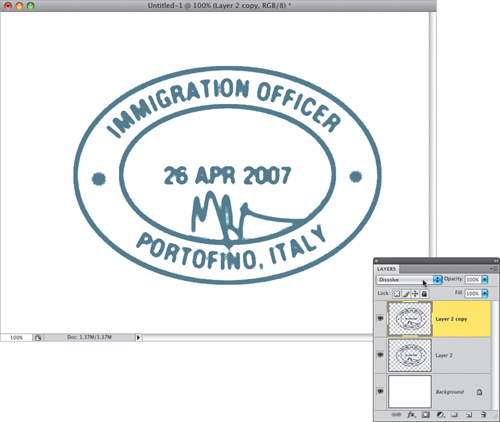
Now, press Command-E (PC: Ctrl-E) to merge all the selected layers into one single layer, and then you can apply some effects that will make the stamp look more realistic. One attribute that is pretty common among passport stamps is that they’re kind of smudged a bit. You can get a similar look by going under the Filter menu, under Noise, and choosing Median. When the Median filter dialog appears, choose a Radius of 3 or 4 (see which looks better to you, based on which font you used), and then click OK.
Duplicate your stamp layer, then change the layer blend mode of this layer to Dissolve (as shown here). This makes the edges of your stamp a bit frayed, and helps make the stamp look more realistic. Merge this layer with the one beneath it. Now you can set this document aside, as we’re going to build a page for your photos, and stamps, to sit on, and just for fun, we’ll build a background that’s pretty much like one of the page backgrounds Apple used to use in their photo book travel templates (the ones I talked about in this project’s intro).
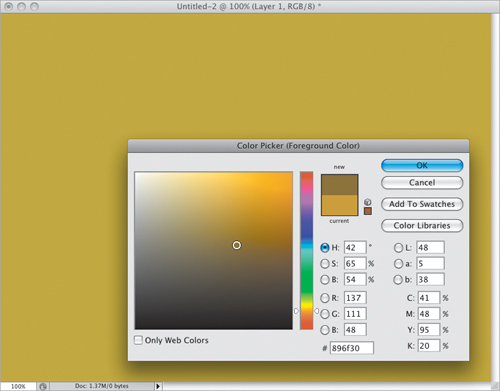
Create a new document that’s 800×600 pixels at 72 ppi. Set your Foreground color to a light brown color (I used R: 196, G: 159, B: 68), then press Option-Delete (PC: Alt-Backspace) to fill your Background layer with this color. Now add a new blank layer, then click back on your Foreground color swatch and choose a darker shade of your brown color (as shown here, where I chose R: 137, G: 111, B: 48).
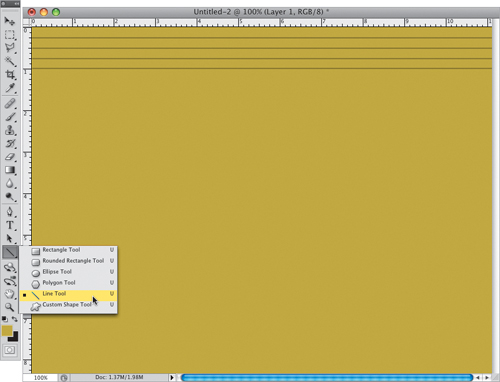
Press Command-R (PC: Ctrl-R) to make your Rulers visible, then get the Line tool from the Toolbox (as shown here, or just press Shift-U until you have it), press-and-hold the Shift key, and draw a series of straight horizontal lines, each ¼″ down. Here I’ve drawn four lines, but you’ll need to continue this all the way down the page. You can either draw all the lines, or once you’ve drawn those four lines, you can duplicate the layer, get the Move tool (V), and then click-and-drag it down to add four more lines. Just keep repeating this again and again, until you’ve filled the image (if that sounds confusing, then just draw all the lines. It doesn’t take long at all).
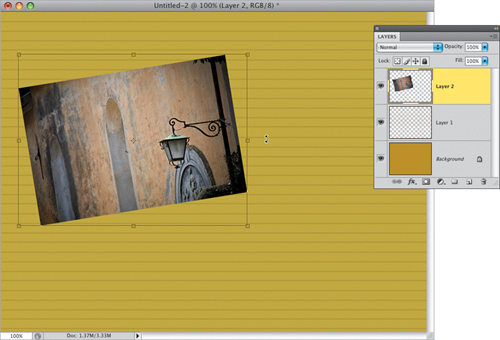
The lines stand out a bit too much, so once you’re done, go to the Layers panel and lower the Opacity of this layer to 30% (as shown here). Here’s what the image looks like after you’ve filled the layer with these lines and lowered the opacity. Okay, now go open the photos you want to appear on this page (I’m using two photos for this particular layout, and they’re shown here). Note: You can turn off the Rulers now.

Get the Move tool and drag-and-drop one of those photos onto your background image. Once it appears, press Command-T (PC: Ctrl-T) to bring up Free Transform, press-and-hold the Shift key, grab a corner point, and click-and-drag inward to scale the photo down to size if needed, so it fits better on the page (as seen here). While Free Transform is still in place, move your cursor outside the Free Transform bounding box, and your cursor changes into a two-headed arrow. Click-and-drag in a counterclockwise motion to rotate your photo (as shown here), and then press Return (PC: Enter) to lock in your rotation.
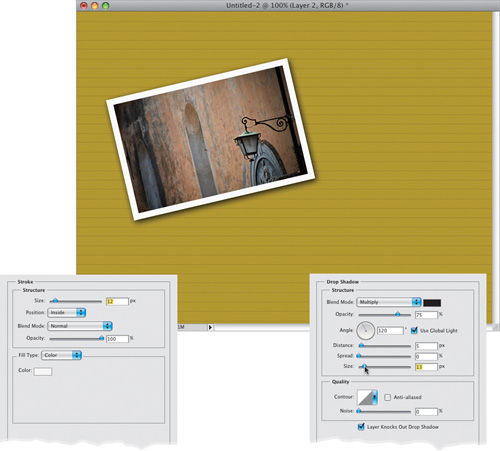
To add a white photo border effect to your image, click on the Add a Layer Style icon at the bottom of the Layers panel and choose Stroke from the pop-up menu. When the dialog appears (shown below left), increase the Size of your stroke to 12 px, click on the black Color swatch and change your stroke color to white, then from the Position pop-up menu, choose Inside (so your stroke doesn’t have rounded corners). Now, in the Styles section on the left side of the dialog, click on Drop Shadow. In the Drop Shadow options (shown below right), raise the Size to 13 to increase the softness of the drop shadow, then click OK to apply both the Stroke and Drop Shadow effects to your photo (as seen here).
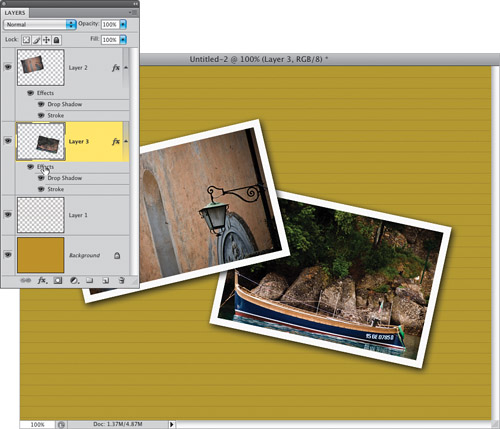
Bring in your second photo and, in the Layers panel, click-and-drag it beneath your first photo. Now resize it to fit, and rotate this photo in the opposite direction (as seen here). To get the exact same Stroke and Drop Shadow effects applied to this new image, just press-and-hold the Option (PC: Alt) key and, in the Layers panel, click-and-hold directly on the word “Effects.” Drag-and-drop this word directly onto the second photo’s layer, and it copies the effects from that first layer and applies the same settings to the second layer (as seen here).
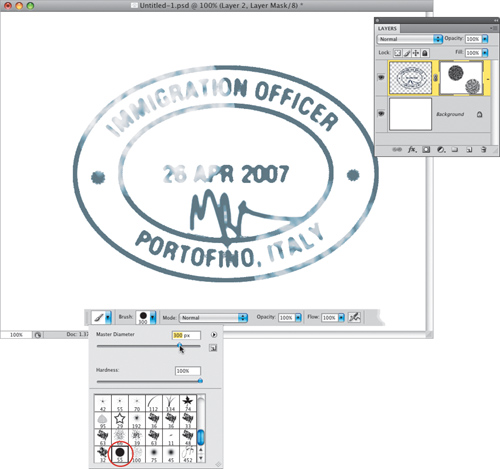
Head back to your passport stamp document. You’re going to distress the stamp a little bit more before we apply it to your main page. In the Layers panel, click on the Add Layer Mask icon at the bottom of the panel. Now, press X to make black your Foreground color, and then get the Brush tool (B). From the Brush Picker in the Options Bar, scroll down to the last row of brushes, and choose the Wet Sponge brush (it’s second from the left in the bottom row). Click-and-drag the Master Diameter slider over to around 300 pixels. Then move your cursor out over the image, and just click once or twice on different parts of the stamp to age and distress it a little (a pretty common look for real passport stamps).
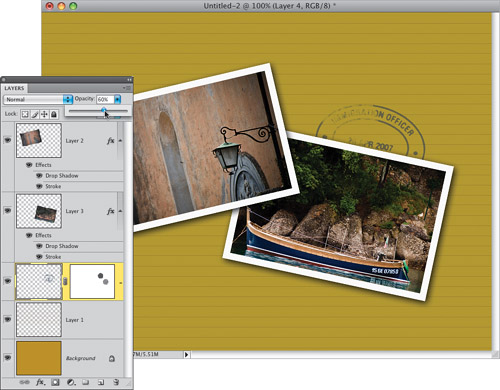
Now get the Move tool and drag-and-drop your passport stamp onto your main image document. When it appears in your main document, use Free Transform to resize and position it, then go to the Layers panel and click-and-drag its layer down in the layer stack, so your passport stamp appears behind the other photo layers (as seen here). Lower the Opacity of this layer (like you see here) to help it blend into the background a little.
You now know the formula for creating other passport stamps (I used the exact same formula you just learned to create another stamp, which is shown here below). This one was easier because there’s no circular type on a path, and because it’s mostly text. Start by getting the Rounded Rectangle Tool (press Shift-U until you have it) and, up in the Options Bar, choose 20 as your corner Radius (the higher the number, the more rounded your corners will become). Then you do all the same things you just learned, but this time, finish it off using a round soft-edged brush.
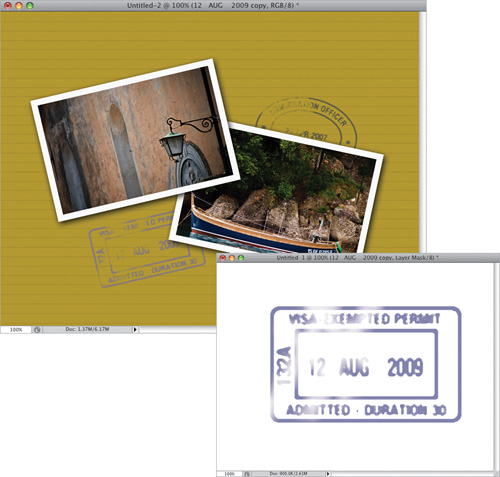
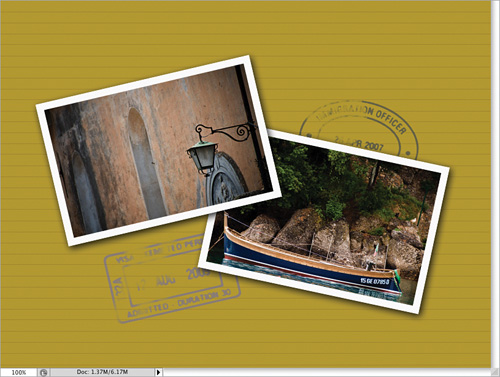
Here’s the final image with a couple of photos, a couple of passport stamps, and the background you created from scratch.
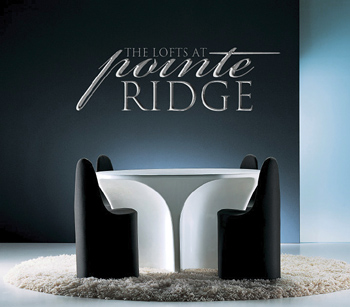
Photoshop lets you do something that I’ve found surprises a lot of people—it lets you create custom letterforms by tweaking an existing font. This is very popular in logo design. So, in this project, you’re going to learn how to give yourself an advantage by delivering a custom look for your client that can’t be duplicated by just typing in a name with a typeface. If you’ve never worked with paths before, don’t let it freak you out, because what you’re going to do is so simple anyone will be able to do it (plus, if you’re a creative type—and if you’re reading this book, my guess is you are—then this will open a new world of creating with type that’s actually a lot of fun).
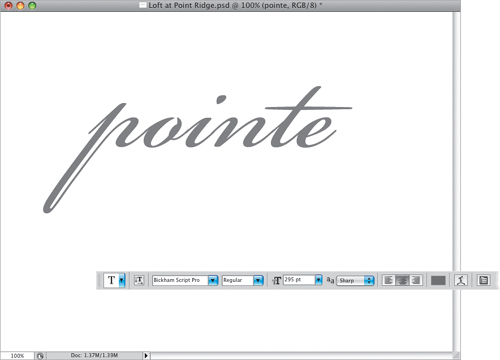
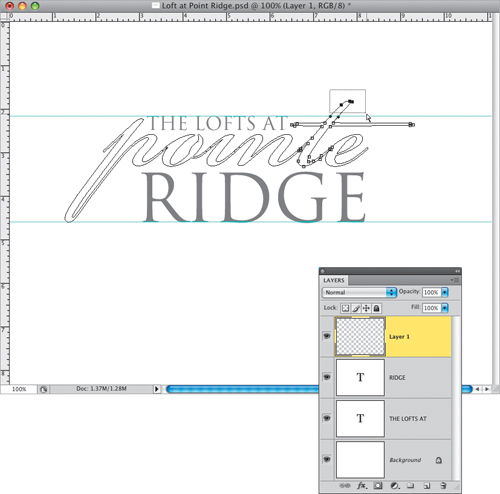
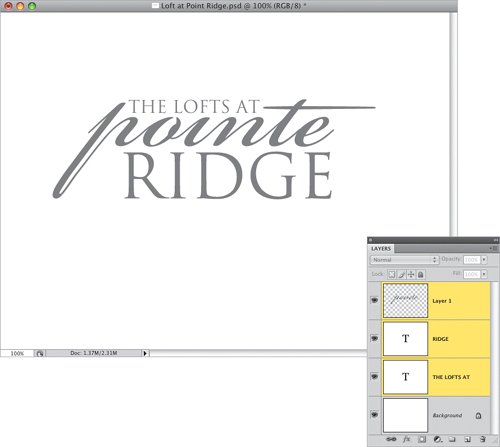
Press Command-N (PC: Ctrl-N) to create a new document (mine is 800×600 pixels at a resolution of 72 ppi). Click on the Foreground color swatch and choose a medium gray, then get the Horizontal Type tool (T), and choose the font Bickham Script Pro from up in the Options Bar or in the Character panel (found under the Window menu). (Note: If you upgraded to CS4 from Photoshop CS3, you already have this font installed. If you started with CS4, then it’s not there because Adobe no longer includes this font, and you can download the paths to this font from this book’s downloads page—this will make more sense in a moment.) Set the font size to 295 points, and type the word “pointe” in all lowercase letters.
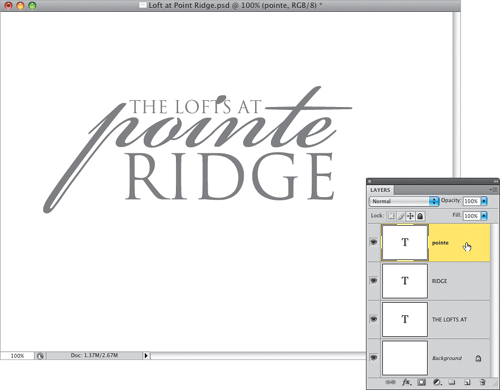
Now you’re going to create some text above and below the word “pointe.” In the Layers panel, click on the Background layer, then choose the font Trajan Pro (it comes installed with Photoshop) at a size of 30 points. Click on your document (you may have to click to the side of “pointe” since that font is so large), type in “THE LOFTS AT,” then move your cursor away from your type until you get an arrow, and click-and-drag to position it nice and snug above the word “pointe.” You can already see the first problem we have to deal with—the dot of the letter “i” is colliding with the word “LOFTS.” We’ll fix that, but first we need to add another line of text (in the next step).

With the Horizontal Type tool, click on the far-right side of your document, and type “RIDGE” in the same Trajan Pro font, but at a size of 108 points. Again, move your cursor away from the text until it becomes an arrow, then click-and-drag to position it just below the word “pointe” (as seen here). By the way, those two lines of text should line up on the left—the left side of the letter “T” in “THE,” and the left side of the “R” in “RIDGE” should both be lined up with each other, like you see here. Okay, all our text is now in place, and it’s time to start customizing. In the Layers panel, click on the “pointe” layer (as seen here) to make it the active layer.
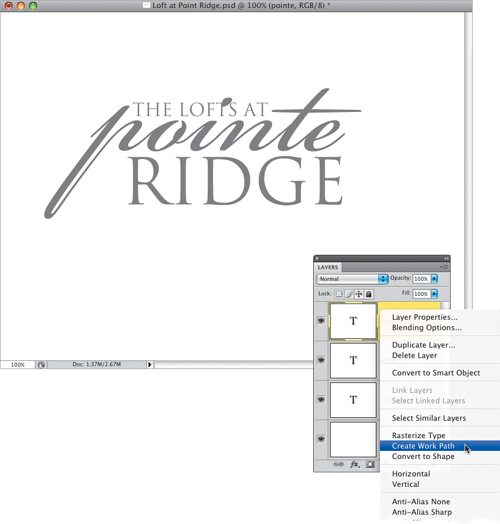
Control-click (PC: Right-click) directly on the “pointe” layer to bring up a contextual menu of options. From this menu, choose Create Work Path (as shown here). This puts a perfect path around your letters, as if you had drawn them from scratch using the Pen tool. The reason you’re doing this is because now that this type has become a path, you can create your own custom letters (clients always love it when you tell them the font has been customized just for them).
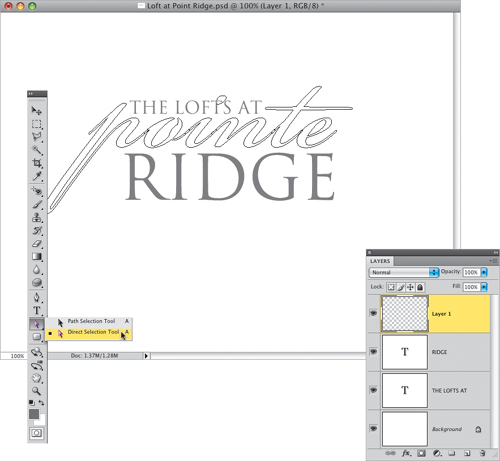
Now that you have a path in place, you no longer need that “pointe” Type layer, so click-and-drag it onto the Trash icon at the bottom of the Layers panel to delete it. Next, add a new blank layer by clicking on the Create a New Layer icon at the bottom of the panel. Now we can get to editing our path. The tool we use for this is the Direct Selection tool, and it appears nested with the Path Selection tool, directly below the Type tools in the Toolbox (as shown here—it’s the hollow arrow, not the black one), so go ahead and get that tool now.
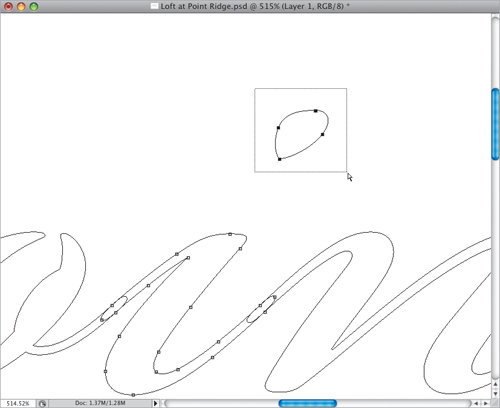
First, let’s hide the “THE LOFTS AT” Type layer, so it doesn’t distract us while we’re making our edits. Click on the Eye icon to the left of that layer in the Layers panel and that layer will be hidden from view. Now, let’s start editing. I used the Zoom tool (Z; it looks like a magnifying glass) to zoom in really tight on the dot over the “i.” Take the Direct Selection tool and click-and-drag out a square selection around the dot (as seen here) to select the four points that make up this dot. While it might look like you’ve selected other points in the word, don’t worry, as long as your selection is just around that dot, that’s the only part that will be affected by your next edit.
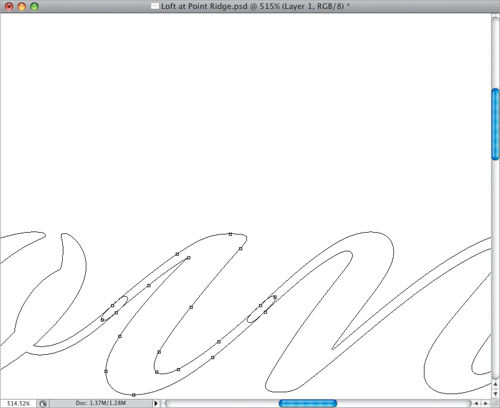
Press the Delete (PC: Backspace) key and your selected dot is gone. Problem solved. Of course, that’s not the main reason we converted to paths. We really did it to create our own custom versions of some of the letters, but while we’re here, we might as well fix stuff, eh?
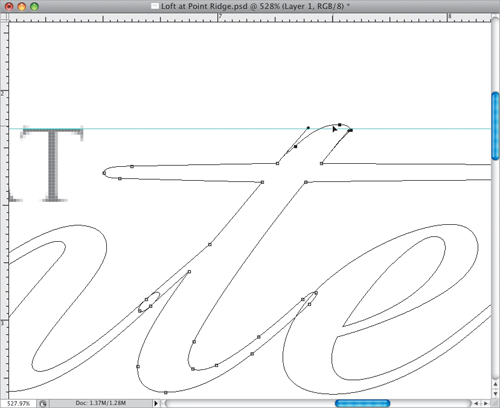
Now, while still zoomed in, let’s scroll over to the right end of the letter “t” in “pointe.” We’re going to extend the far-right side of the crossbar quite a bit, and you do that by clicking-and-dragging out another square selection around the end of the crossbar on the “t” (as shown here). This selects the three points that make up that end of the bar.
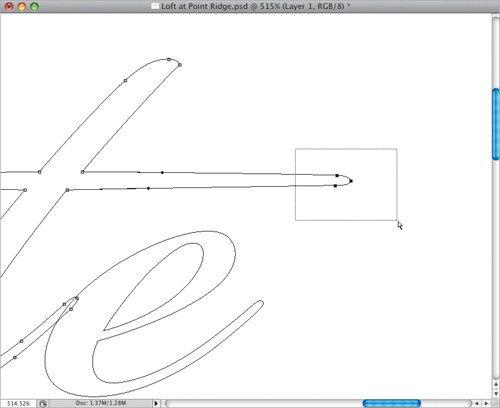
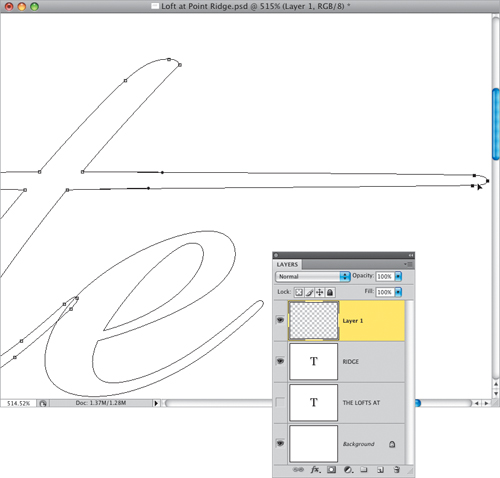
Click on the path itself, right near the end (I clicked on the bottom—you can see my little arrow cursor on the far-right side of the crossbar), then just drag to the right (as shown here), and that part of the letter extends. Press-and-hold the Shift key as you drag to keep it straight, because you want to keep as much of the original shape as possible—you just want that one piece to be longer. Now, just click off the path (click anywhere else but the path). That’s it—you’ve customized your first letter (wild cheers ensue!). Of course, you’re not done yet (the crowd groans). By the way, you can make your “THE LOFTS AT” layer visible again—just go to the Layers panel and click where the Eye icon used to be.
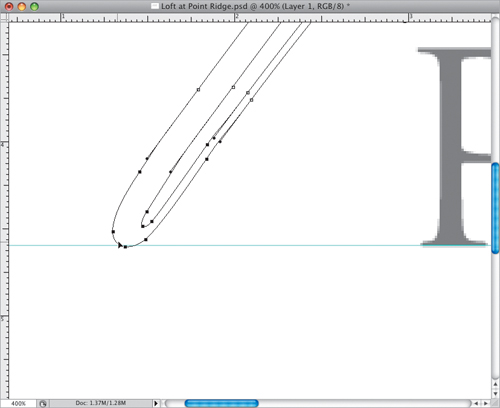
Press Command-R (PC: Ctrl-R) to make Photoshop’s Rulers visible (seen here). Now, click directly inside the top ruler, drag down a guide, and position it right along the bottom of the word “RIDGE.” See how the bottom of the “p” extends below the guide, which marks the baseline of where the word “RIDGE” sits? We want that lower part of the “p” (called the descender in typography circles) to be no lower than that guide. So, with the Direct Selection tool, drag out a square selection around the bottom of that descender (as shown here) to select the points in that area.

Now, click at the bottom of that “p” and drag upward to shrink the length of that descender, so it fits right along that guide (as shown here). Remember to keep an eye on the rest of the descender as you’re dragging upward, so you don’t accidentally change the shape—you want it shorter, but you don’t want to change the shape of the letter. Then, just click off the path.
Click-and-drag another horizontal guide down from the top ruler and place it along the top of the words “THE LOFTS AT” (as seen here). You can probably guess what’s next—that’s right, we want to shrink the top of the “t” (called the ascender), so it fits within that guide. With the Direct Selection tool, put a rectangular selection around that part of the letter (as shown here) to highlight the points that control that part of the letter.
Switch to the Zoom tool again, and zoom in tight, so you can really see what’s going on. Then go back to the Direct Selection tool (A), grab the top of the ascender and carefully drag it in toward the rest of the letter, until it’s right around that guide (as shown here), and then click anywhere off the path.
At this point, all your letter editing is done, so now it’s time to turn those paths into a selection, which you do by pressing Command-Return (PC: Ctrl-Enter). You can see here, the path has been turned into a selection. Also, you can press Command-R (PC: Ctrl-R) to turn off the Rulers and, from the View menu, choose Clear Guides to remove the guides.
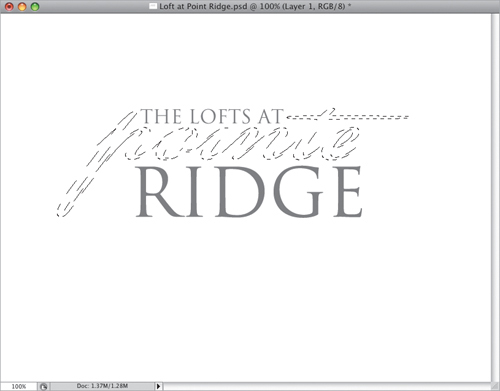
With your selection in place, press Option-Delete (PC: Alt-Backspace) to fill it with your gray Foreground color (as seen here), then you can Deselect by pressing Command-D (PC: Ctrl-D). Next, we need all three of these layers with type to become just one layer, so go to the Layers panel, press-and-hold the Shift key, and click on the two other Type layers, so that all three of your layers with type are highlighted (as seen here). Now, just press Command-E (PC: Ctrl-E) to merge them into one layer.
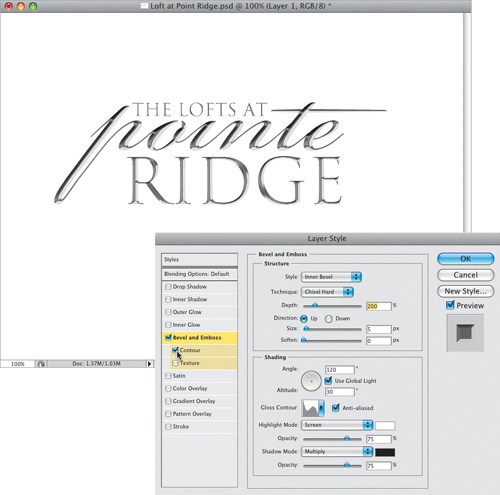
Now that your type is all on one layer, let’s add an effect to finish things off (of course, this step is totally optional, but since this is a special effects book at heart, let’s add a special effect). Click on the Add a Layer Style icon at the bottom of the Layers panel, and choose Bevel and Emboss from the pop-up menu. When the Layer Style dialog appears, from the Technique pop-up menu (in the Structure section, near the top), choose Chisel Hard. Increase the Depth to 200%, then down in the Shading section, turn on the Anti-Aliased checkbox (so the edges of the effect are smoother), and click on the down-facing arrow next to Gloss Contour to bring up the Gloss Contour Picker. Click on the Rolling Slope–Descending icon (the fourth icon from the left, in the second row) to add a metallic, chiseled look to your type (as seen here). To give it a little more “oomph,” go to the Styles section on the left side of the dialog, and under Bevel and Emboss, turn on the Contour checkbox (as seen here), and then click OK to apply this effect.
Our effect is essentially done at this point, but we might as well put it into action. Open the photo you see here (you can download it from the book’s downloads page, or you can open a photo of your own). Get the Move tool (V), click on your Type layer, and drag-and-drop it onto your photo. It’ll probably be too big, so press Command-T (PC: Ctrl-T) to bring up Free Transform, press-and-hold the Shift key, grab a corner point, and drag inward (as shown here) to scale the text down in size, then reposition it over the center of the image, and press Return (PC: Enter) to commit your transformation.

Here’s the final image, with the customized letterforms, and the special effect, scaled down to size and positioned.
