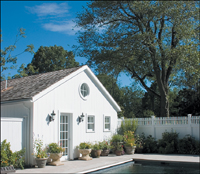
© Elaine Weinmann, access to garden courtesy firstbornmultimedia.com
This chapter will help you become more intimately acquainted with a part of the Photoshop interface that you will be using constantly as you work: the panels. In the previous chapter, you learned how to arrange them onscreen. Here, you’ll be introduced to the specific function of each one—from choosing color swatches (Swatches panel), to accessing and editing masks (Masks panel), to styling type (Character and Paragraph panels), to editing layers (the all-important Layers panel—keep it open!). Note: In-depth instructions for using specific panels are amply provided throughout this book (such as creating and editing different kinds of adjustment layers by using the Adjustments panel).
You can read through this chapter with or without glancing at or fiddling with the panels onscreen, and also use it as a reference guide as you work. The panel icons are illustrated on the next page to help you identify them quickly. After that, you’ll find instructions for using the Tools panel and an illustration of the tools, followed by illustrations of the other panels, in alphabetical order, with descriptions of their function.
Choosing Values Quickly
• You can change the numerical values in most panels and dialogs by using the scrubby sliders: drag slightly to the left or right over the option name or icon. Examples include many values on the Options bar, the Opacity and Fill controls on the Layers panel, settings in the Filter Gallery, and controls on the Adjustments, Masks, Character, and Paragraph panels.
A scrubby slider
• To access a pop-up slider (e.g., to choose an Opacity percentage) click the arrowhead. To close a slider, click anywhere outside it or press Enter/Return. If you click an arrowhead to open a slider, you can press Esc to close it and restore the last chosen setting.
• To change a value incrementally, click in a field in a panel or dialog, then press the up or down arrow key.
Each panel in Photoshop has been assigned a unique icon.A Try to memorize the icons for the panels—at least for the ones you use most often—so you’ll be able to identify them quickly as you work.
A When collapsed, each panel has a unique icon.
Using Context Menus
When you right-click/Control-click in the document window—depending on where you click and which tool happens to be selected—a menu of context-sensitive commands pops up onscreen. Many panel thumbnails, names, and features also have related context menus. If a command is available on a context menu (or can be executed quickly via a keyboard shortcut), we’ll let you know, so we can spare you from having to trudge to the main menu bar.
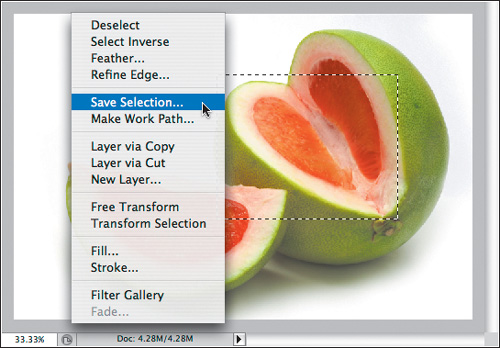
The context menu for a selection

The context menu for the color bar on the Color panel
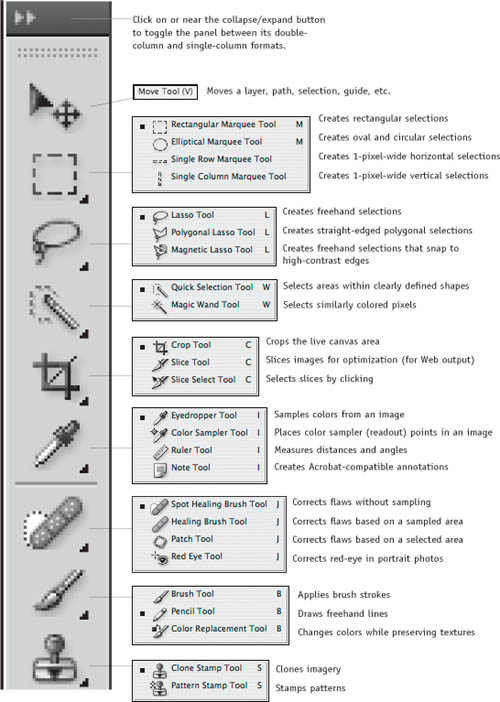
The Tools panel, which is illustrated on pages 80–82, contains 60 tools and a handful of buttons. Believe it or not, by the end of this book, you’ll be intimately—or at least marginally—familiar with most of them! To display the Tools panel, choose Window > Tools.
To choose a tool, do one of the following:
• If the desired tool is visible on the Tools panel, click the icon.
• To cycle through related tools in the same slot, Alt-click/Option-click the one that’s visible.
• To choose a related tool from a menu, press and hold on the tiny arrowhead next to the tool icon.
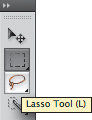
• For fast access with your cursor anywhere (except if you’re creating type), press the designated letter shortcut. The shortcuts are shown in the screen captures on the next three pages and in the tool tips onscreen. If Use Shift Key for Tool Switch is unchecked in Preferences > General, simply press the designated letter to cycle through related tools in the same slot (for example, press L to cycle through the three Lasso tools). With the Use Shift Key for Tool Switch option checked, you would have to press Shift plus the designated letter.
• To use a tool temporarily while another tool is selected, press and hold down its assigned letter shortcut key (see the sidebar below).
![]()
To learn about the function of a tool as you’re using it, read the brief description (tool hints) at the bottom of the Info panel. If you don’t see this, choose Panel Options from the Info panel menu,
![]() then check Show Tool Hints (see page 89).
then check Show Tool Hints (see page 89).
Before using a tool that you’ve selected, you need to choose settings for it from the Options bar at the top of your screen. For example, for the Brush tool, you would choose a brush tip, diameter, hardness setting, blending mode, opacity percentage, and other settings. If the Options bar is hidden, display it by choosing Window > Options (see page 76).
Options bar settings remain in effect for each tool until you change them, reset the tool, or reset all tools. To restore the default settings to a tool, right-click/Control-click the thumbnail on the Tool Preset picker on the Options bar and choose Reset Tool from the context menu.A Or to reset all tools, choose Reset All Tools from the menu.
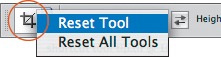
A To access these commands, right-click/Control-click the Tool Preset picker thumbnail at the far left end of the Options bar.
In Preferences > Cursors, you can specify whether tool pointers are crosshairs, or look like their icon (as on the Tools panel) or, for some tools, a circle either the size or half the size of the current brush diameter, with or without crosshairs (see page 394).
Spring-Loading Tools
![]()
If you want to quickly access a tool and its Options bar settings temporarily without having to actually click the tool on the Tools panel, hold down the default letter that is assigned to that tool.
For example, say you happen to have the Brush tool selected but you want to move a layer with the Move tool. You would hold down the V key, drag in the document window, then release V. Or to access the Zoom tool temporarily, you would hold down the Z key. This process is a little less efficient if you want to access a tool that shares a slot with other tools (as most tools do). In this case, the letter shortcut accesses whichever tool happens to be visible on the Tools panel, so you would have to plan ahead and select the two tools that you want to switch back and forth between first.
A The upper part of the Tools panel

A The midsection of the Tools panel
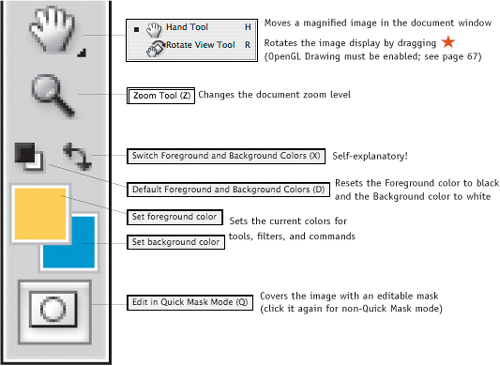
A The lower part of the Tools panel
Using the Available Info
• Are you unsure what an icon means or a panel or dialog option does? If Show Tool Tips is checked in Photoshop > Preferences > Interface and you rest the pointer on a tool icon without clicking the mouse button, the tool name and shortcut pop up onscreen. You can also use the tool tips to learn the function or name of most panel, Options bar, and dialog features.
• Some dialogs (such as Select > Refine Edge) have a Description area that contains information about the option your pointer is currently hovering over.
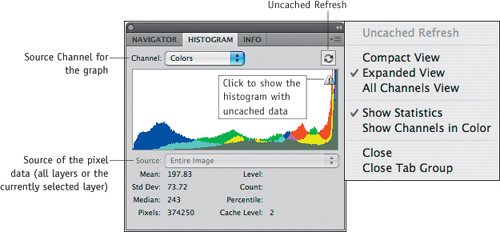
• Keep an eye on the Info panel for color breakdowns, document data (e.g. file size, color profile, dimensions, resolution), and tool hints (ways to use the currently selected tool). See page 89.
• Use the Histogram panel to monitor changes to the tonal ranges in an image as you apply color and tonal adjustments. See pages 184–185.
Use the tool tip to refresh your memory of a tool name or shortcut.
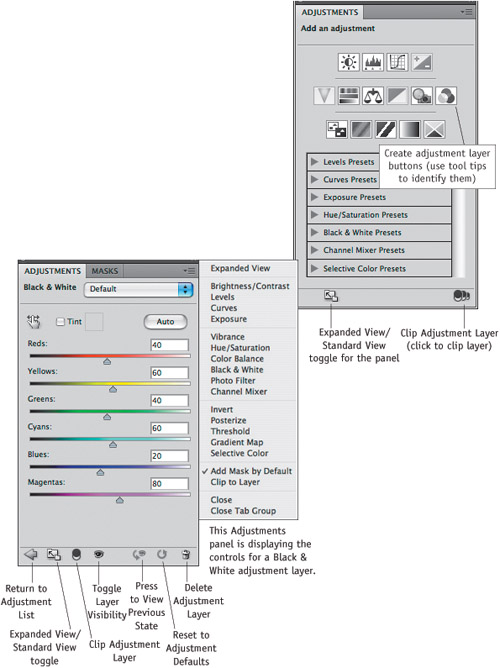
Unlike commands applied via the Image > Adjustments submenu, adjustment layers don’t alter image pixels until you merge them with their underlying layers. They are a great mechanism for trying out color and tonal adjustments, because you can edit their settings and delete them at any time. Plus, adjustment layers automatically have a layer mask. By editing the mask, you can hide or reveal the adjustment effect in specific areas of the image.
Using the new Adjustments panel, you can even more easily create and edit the settings for adjustment layers. The panel also lets you restore the default settings to an adjustment; hide and show the adjustment effect; view the previous adjustment state; or, in a multilayered document, clip (limit) the adjustment effect to just the underlying layer.
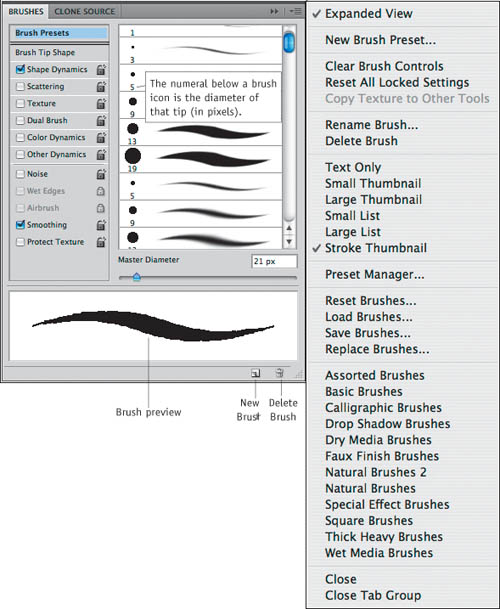
You’ll use the Brushes panel to choose and customize brush tips for many tools, such as the Brush, Pencil, Clone Stamp, Pattern Stamp, History Brush, Art History Brush, Eraser, Blur, Sharpen, Smudge, Dodge, and Burn tools. You can also use it to choose options for a graphics tablet and stylus. Click an options set on the left side of the panel to display options on the right. The preview at the bottom of the panel shows an example of the current brush tip and settings.
Picker or Panel?
You can choose brush tips for the painting and editing tools from either the Brushes panel or the Brush Preset picker, a pop-up panel that you open from the Options bar (click the arrowhead, as shown below). To close the Brush Preset picker, click outside it or click the Brush arrowhead again. Commands that let you load, append, and save brushes and brush libraries are available on both the Brushes panel menu and the Brush Preset picker menu.

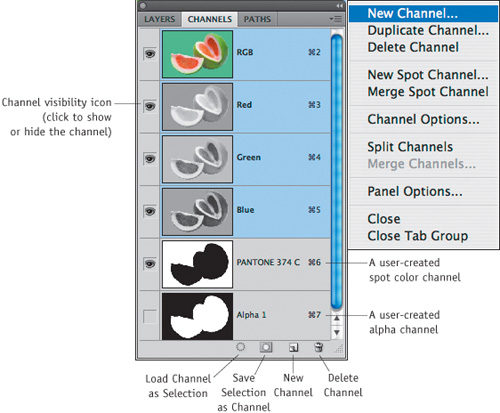
The Channels panel displays a list of the color channels in an image. To show an individual channel in the document window, click the channel name or use the keystroke listed on the panel. To redisplay the composite image (all the channels), such as RGB or CMYK, click the topmost channel on the panel, or press Ctrl-2/Cmd-2.
![]()
You can also use this panel to save and load alpha channels (saved selections), and to create and store spot color channels, which commercial print shops use to produce individual color plates for premixed inks, such as PANTONE inks.
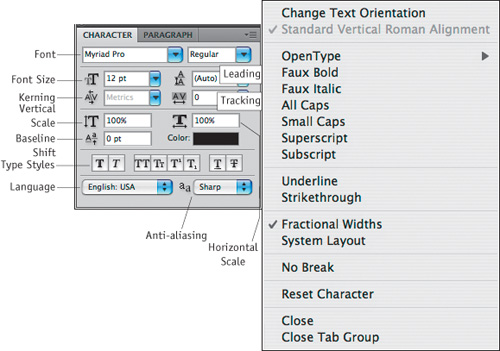
You can choose attributes for the type tools from either the Character panel, illustrated below, or the Options bar. Open this panel from the Window menu, or by clicking the Toggle Panel button
![]() on the right side of the Options bar when a type tool is selected.
on the right side of the Options bar when a type tool is selected.
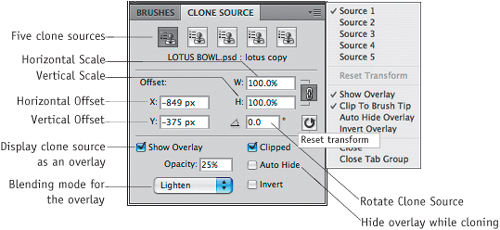
The Clone Source panel lets you keep track of up to five different sources when cloning (represented by a row of source buttons at top of the panel); reassign new sources; hide, show, and control the opacity and mode of the clone overlay; clone repeatedly from the same source; and scale, rotate, and reposition source pixels before or as you clone them.
The Color panel is but one of the vehicles that Photoshop provides for mixing colors. Choose a color model for the sliders or color bar from the panel menu, then mix a color using the sliders or quick-select a color by clicking the color bar. To open the Color Picker or Color Libraries dialog, from which you can also choose colors, click once on the Foreground or Background color square if it’s already selected (has a black border), or double-click the square if it’s not selected. Colors are applied via painting and editing tools and via some commands, such as Edit > Fill.

While a file is being edited or while an adjustment layer is being created or edited, the Histogram panel diagrams either just the current light and dark (tonal) values of the image or both its current and modified tonal values. This panel is provided for reference only, but the feedback it provides is useful.
Via the Channel menu, you can choose to have the panel display data about the composite channel (combined channels) or about just one channel. You can also display a separate histogram for each channel by expanding the panel.
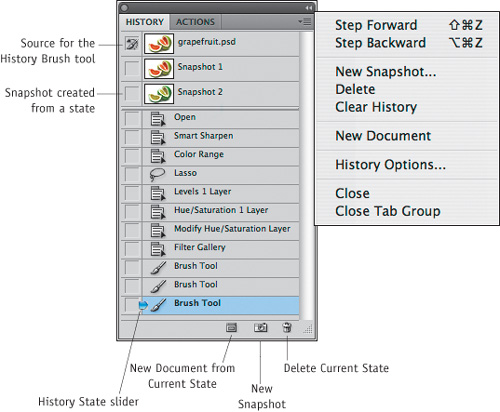
By using the History panel, you can reverse your editing steps in the current work session. Each brush stroke, filter application, or other image-editing command is listed as a separate state on the panel, with the bottommost state being the most recent. If you click a prior state, the document reverts to that stage of the editing process. In linear mode, the default mode for the panel, if you click an earlier state and then resume image editing from that state (or delete that state), all subsequent (dimmed) states are discarded.
History states are deleted from the palette as new edits are made (when the maximum number of history states is reached, as specified in Preferences > Interface), whereas the New Snapshot command creates states that stay on the panel. States and snapshots are discarded when you close the image.
The History panel has two related tools. When you drag with the History Brush tool, the areas under your strokes are restored to the state that you’ve designated as the source. The Art History Brush does the same thing, but in stylized (sorta tacky) strokes.
The Info panel displays a color breakdown of the pixel under the pointer at its current location in the document window. While any color adjustment dialog is open or the Adjustments panel is being used, the panel displays before and after color readouts. The Info panel also lists the current location of the pointer on the x/y axes.
Other information may display on the panel, depending on which tool is being used, such as the distance between points when you move a selection, draw a shape, or use the Ruler tool; the dimensions of a selection or crop marquee; or the width (W), height (H), angle (A), and horizontal skew (H) or vertical skew (V) of a layer, selection, or vector object as you transform it. The panel also displays readouts for up to four color samplers that you can place in a document.
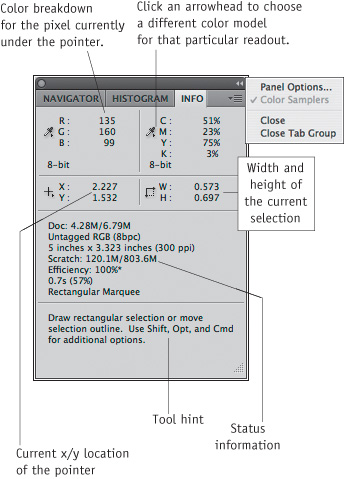
Press one of the tiny arrowheads to choose a color model for that readout (this model can differ from the current document color mode). Or to do this via a dialog, choose Panel Options from the panel menu, then in the Info Panel Options dialog (shown below), change the Mode for the First Color Readout and Second Color Readout. In the same dialog, you can also change the Ruler Units for the panel (Mouse Coordinates); check which Status Information you want displayed in the lower part of the panel; and check Show Tool Hints to display dynamic information about the current tool or edit.
• To choose a different unit of measurement for the Info panel and for the rulers in the document window, click the arrowhead on the panel for the X/Y readout.

Use the Info Panel Options dialog to choose display preferences for the panel.
When you create a layer comp (short for “composition”), it includes, collectively, any of the following current document characteristics: the layer Visibility (which layers are showing or hidden), its Position (the location of imagery on each layer), and its Appearance (layer styles, including the layer blending mode and opacity, plus any layer effects). As shown in the dialog below, you can decide which document attributes will be included in the comp, as well as add comments.
Layer comps might come in handy if you need to decide between multiple versions of a document or present document variations to a client. For example, say you’ve created a few versions of a book cover. You would make each version into a layer comp, say, with or without lettering, or with the lettering or background image in two different colors. When presenting the design to your client, instead of opening and closing separate files, you would simply display each version sequentially within the same file by clicking the Apply Layer Comp icon on and off for each comp on the panel.
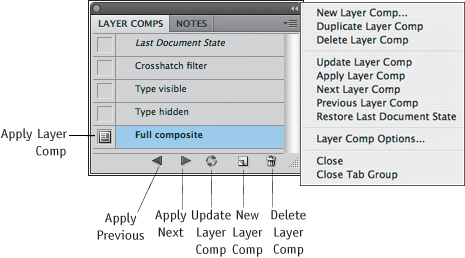
Layer comps save with the document in which they’re created. Whereas histories affect all editing done to an image but can’t be saved, layer comps can be saved but let you display only layer options and settings.
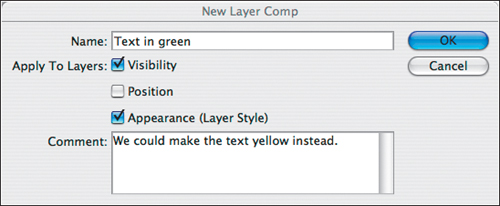
Use the New Layer Comp dialog to name the comp and to specify which attributes it will contain.
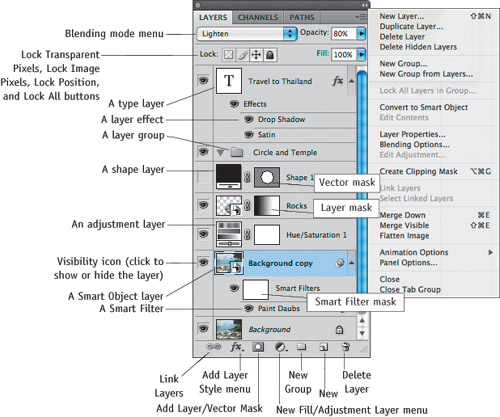
Every new image contains either a solid-color Background or a transparent layer, on top of which you can add layers of many types. Using the Layers panel, you can create, hide, show, duplicate, group, link, merge, flatten, delete, and restack layers; change the layer blending mode, opacity, and fill opacity; attach masks; and apply layer effects.
Only the currently selected layer can be edited. To select a layer, click the thumbnail or click next to the layer name. The panel looks complex (Egads![*]), but you’ll soon be using it all the time!
[*] We crammed almost every Layers panel feature we could think of into this screenshot. Your Layers panel is unlikely to look as scary as this one.
These are the kinds of layers that either you create or Photoshop creates automatically:
• Image layers.
• Editable type layers, which are created by the Horizontal Type or Vertical Type tool.
• Fill and adjustment layers for applying temporary color or tonal adjustments to underlying layers.
• Smart Object layers, which are created manually when you convert one or more layers in a Photoshop image into a Smart Object, or automatically when you place an Illustrator or PDF file, another Photoshop file, or a Camera Raw file into a Photoshop document. Double-click a Smart Object layer and the object reopens in its original application for editing; save and close it and the object updates in Photoshop. Apply a filter to a Smart Object layer and it becomes an editable and removable Smart Filter.
• Shape layers, which contain vector shapes.
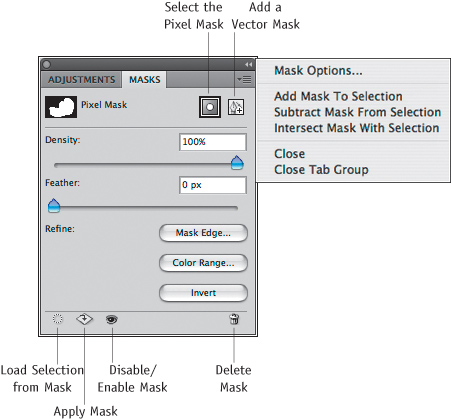
The new Masks panel gives you quicker access to many preexisting controls and also offers some new controls. In addition to letting you add a pixel, vector, or filter mask to a layer, the panel lets you disable or enable a mask, load it as a selection, and when you’re done using it, either apply its effect to your document or delete it.
New controls include a Density slider for adjusting the opacity of a mask and a Feather slider for adjusting the sharpness of the edges between white and black areas in the mask. The settings for those controls can be readjusted at any time without permanently altering the original mask. The Mask Edge button opens a Refine Mask dialog that offers the same controls for a mask as the Refine Edge dialog does for a selection; the Color Range button gives you quick access to the Color Range dialog for reshaping a mask; and the Invert button swaps the black and white areas in the mask.
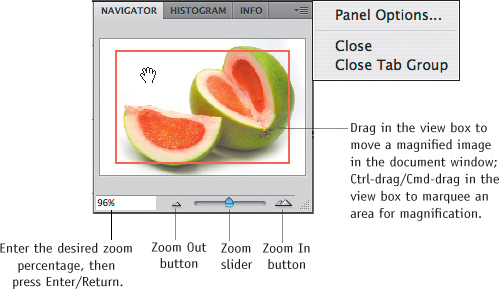
You can use the Navigator panel to move a magnified image in the document window or change the document zoom level—or if you prefer, you can accomplish the same tasks by using tools or keyboard shortcuts.
© ShutterStock.com, Ultimathule
After creating paragraph type, you can use the Paragraph panel to apply attributes such as horizontal alignment, indentation, space before, space after, and auto hyphenation. Additional type formatting commands and dialogs are accessed from the panel menu.

To the bitmap image that serves as the foundation of every Photoshop document, you can add vector shapes, called paths, which consist of curved and straight-line segments connected by anchor points. The Paths panel lets you save, activate, duplicate, and apply a fill or stroke color to any path, and load a path as a selection.
You can draw a path directly with a shape tool or the Pen tool, or you can create a selection and then convert the selection to a path. Conversely, to create a precisely drawn selection, you can draw a path and then convert it to a selection. You can reshape a path by using the Pen tool or any of its relatives, the Add Anchor Point, Delete Anchor Point, and Convert Point tools.

Each style is a unique collection of layer settings that is saved to and stored in the Styles panel. A style can include the settings for one or more layer effects and/or blending options (layer visibility, opacity, and blending mode, etc.). Like swatches on the Swatches panel, the styles on this panel are available for use in any document. Commands on the Styles panel menu let you save, load, and append style libraries, which are collections of styles.

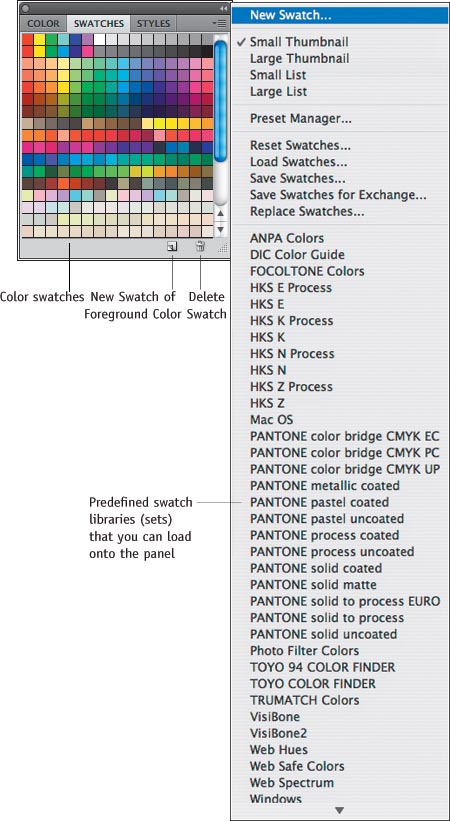
The Swatches panel stores predefined and user-saved color swatches, to be applied by various tools, filters, and commands. A large assortment of predefined swatch libraries can be saved, loaded, and appended via commands on the panel menu.
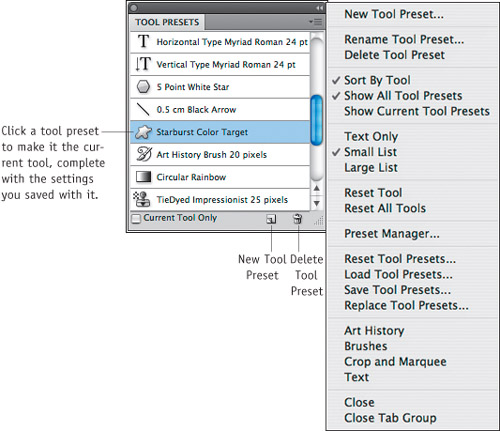
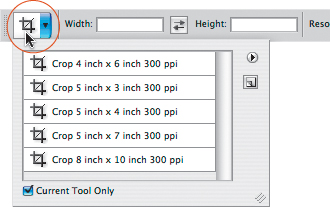
You can save and reuse settings for tools as you would create and use other types of presets, and they are available for all Photoshop files. This is a great way to customize and personalize the Photoshop interface. Say, for example, you frequently resize and crop images to a particular set of dimensions with the Crop tool. By saving a preset for the tool with those width, height, and resolution parameters, the next time you use the tool, instead of having to tediously choose the same settings, all you would have to do is click the preset on either the Tool Presets panel or the Tool Preset picker (both of which are shown below). To open the picker, click the Tool Preset picker thumbnail on the far left end of the Options bar.
By using the Tool Presets panel or picker, you can create, save, load, sort, rename, reset, and delete presets for any tool. To have the panel or picker list the presets for just the current tool (for a streamlined approach), check Current Tool Only, or uncheck this option to display the presets for all tools.
To open the Tool Preset picker, from which you can also choose presets for tools, click the tool thumbnail or arrowhead at the far left end of the Options bar.