In This Chapter
You’ll need to choose brush settings when using the Brush tool, and also for many other tasks, such as when editing a Quick Mask or layer mask “by hand” or when using the History Brush or Healing Brush tool. In this chapter, you’ll master the Brush tool, use the Brush Preset picker and Brushes panel to customize your brush settings, smudge colors with the Smudge tool, and erase parts of a layer with the Eraser and Magic Eraser tools.
Before getting into the complexities of custom brush presets, take a few minutes to get acquainted with the Brush tool. In these instructions, you’ll choose an existing brush preset (brush tip) for the Brush tool and choose Options bar settings to control the tool’s behavior. In the next section, you’ll learn how to customize brush presets via the Brushes panel.
To use the Brush tool:
- Click an image layer or create a new layer. Optional: Create a selection if you want to confine your brush strokes to a specific area.
- Choose the Brush tool
 (B or Shift-B).
 - Choose a Foreground color.
- On the Options bar, do the following:
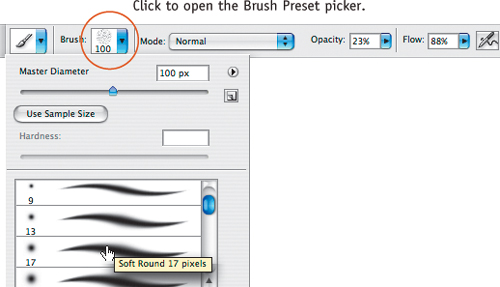
Click the Brush Preset picker arrowhead or thumbnail, then click a preset.A
A On the Brush Preset picker, double-click a brush preset for the Brush tool.
Choose a blending Mode (see pages 198–202).
Choose an Opacity percentage. At 100%, the stroke will completely cover underlying pixels.
Choose a Flow percentage to control how fully and smoothly the brush applies paint.
Click the Airbrush button
to have paint spread and build up when you hold down the mouse, as in traditional airbrushing. - Draw strokes in the document window. If the Airbrush option is on and you press and hold in one spot, the paint drop will gradually widen (up to the maximum diameter of the brush) and become more dense and opaque.A–B Feel free to change Options bar settings between strokes.
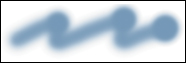
A This brush stroke was created with the Airbrush option off.
B This brush stroke was created with the Airbrush option on.

• On the Layers panel, click the Lock Transparent Pixels button
![]() for the current layer to allow the tool to recolor only nontransparent pixels.
for the current layer to allow the tool to recolor only nontransparent pixels.
• To draw a straight stroke, hold down Shift while dragging; or click in a starting location, then Shift-click to end the stroke.
• To sample colors with a temporary Eyedropper while using a painting tool, Alt-click/Option-click anywhere in the document window.
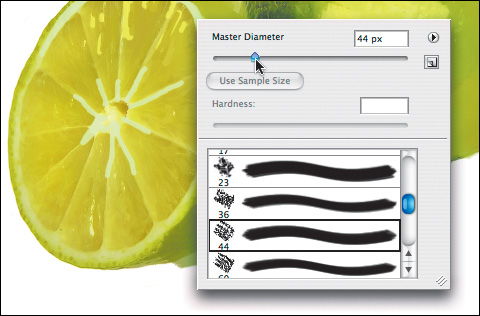
Each brush preset has its own built-in Master Diameter and Hardness settings, but you can make temporary changes to either setting via a context menu or the Options bar.
To choose temporary settings for a brush preset:
- Choose any tool that uses brush presets, such as the Brush, Pencil, Dodge, Burn, or Eraser tool.
- Do either of the following:
Right-click/Control-click in the document window, then change the Master Diameter and, if available, the Hardness setting.C These settings can also be changed on the Brush Preset picker (see A, previous page).
C You can change the Master Diameter and Hardness for a preset quickly via the context menu.
To change the brush diameter interactively, Alt-right-click-drag/Control-Option-drag to the left or right. If OpenGL is turned on in Preferences > Performance, a color will display within the brush cursor as you scale it.

- Press Enter/Return or just start dragging in the document window. Your settings will remain in effect only until you choose a different preset.

The Brushes panel offers a huge assortment of options for customizing brush presets. The presets, in turn, are available for the Brush, Pencil, History Brush, Art History Brush, Clone Stamp, Pattern Stamp, Eraser, Blur, Sharpen, Smudge, Dodge, Burn, and Sponge tools.
The first step is to familiarize yourself with the Brushes panel. This is “Brushes Panel 101”; in the next set of instructions, you’ll explore panel settings.
To use the Brushes panel:
- Choose one of the tools listed in the first paragraph on this page.
- To show the Brushes panel, click the panel tab or icon
 ; or choose Window > Brushes (F5); or click the Toggle Panel button
 on the Options bar.
 - If you don’t see a list of option sets on the left side of the panel,A choose Expanded View from the panel menu. To resize the panel, drag any corner or edge.
A Use the Brushes panel to choose and customize brush presets.
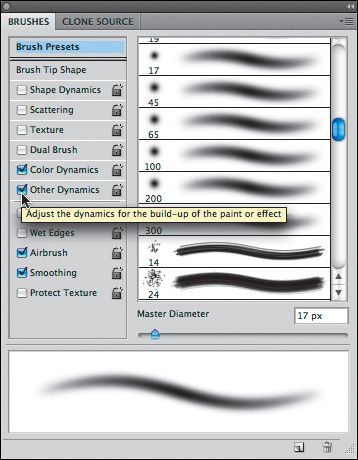
- Check the box for any of the first six option sets to activate the features for that set. If a set name is dimmed, it means it’s not available for the current tool. The option sets are discussed in depth in the next set of instructions.
- To display the options for an option set, click the set name, such as Scattering or Texture. The bottom five options can be checked on and off, but you can’t choose settings for them.
- To choose a different display type for the panel, click Brush Presets in the upper left corner of the panel, then from the panel menu, choose Text Only, Small Thumbnail, Large Thumbnail, Small List, Large List, or Stroke Thumbnail. The “Small” choices make the list more compact, whereas the “Large” choices enable you to see the brush tips more easily.
• To learn how to load additional brush preset libraries onto the picker, see page 403.
The options that you can use to customize a brush preset are organized into sets on the Brushes panel, except for a handful of options that you can simply switch on or off. Some features apply specifically to input devices for a stylus. Your choices for customizing brush presets are infinite, but we’ll make the job manageable for you by listing the features we use most often separately from the ones we rarely touch (writing a book is more fun when you can reveal your biases). You can pick and choose among the various options to create your dream brush.
Note: Custom settings you choose for a preset are lost as soon as you choose another preset. In step 9, we’ll show you how to save your custom brush as a new preset. Note also that brush presets are used with many other tools besides the Brush tool. Keep this in mind when you read the word “pigment” in our instructions.
To customize a brush preset (main course):
- Choose a tool that uses brush presets, and show the Brushes panel.
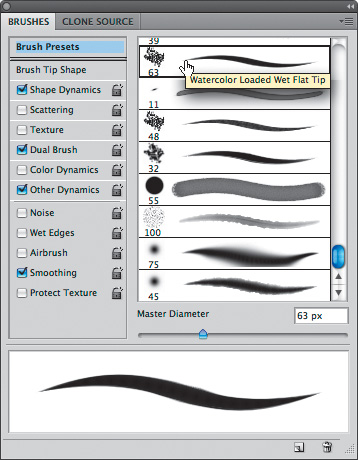
- Click Brush Presets A in the upper left corner of the Brushes panel, then click a preset on the right side of the panel (scroll down the list, if necessary).
A Click Brush Presets on the left side of the Brushes panel, then click a preset on the right.
- To change basic shape and/or size settings for the chosen preset, click Brush Tip Shape at the top of the list,B then keep an eye on the brush preview at the bottom of the panel as you make any of these changes:
B The preview at the bottom of the Brushes panel updates dynamically as you change settings.
To change the Diameter (brush size), move the slider or enter a value (1–2500 pixels).
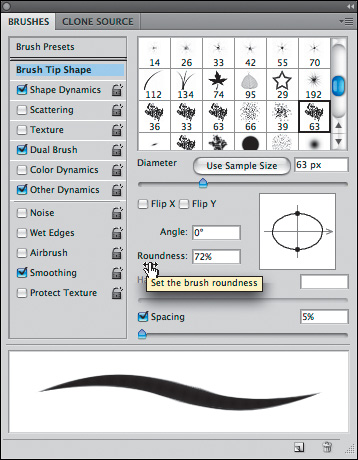
To change the Angle (brush slant), use the scrubby slider, or drag the arrowhead around the circle, or enter a new Angle.
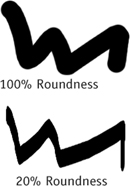
To change the Roundness (brush shape),C use the scrubby slider (0–100%) or drag either of the two tiny dark circles on the ellipse inward or outward.
C
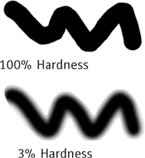
To change the Hardness (feather or sharpen the edge of the brush),D move the slider or enter a value (0–100%). This option isn’t available for all brush tips.
D
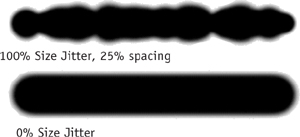
To control the distance between marks within the stroke, check Spacing, then move the slider (1–1000%).E–F
E 25% Spacing (top) and 150% Spacing (bottom): Spacing is checked, so the spacing is uniform.
F A slow stroke (top) and a fast stroke (bottom): Spacing is unchecked, so the spacing is uneven.
- To control how much variation is allowable in the brush tip shape, click Shape Dynamics (click the words—the box will become checked automatically), then do any of the following:
Change the Size Jitter,A Angle Jitter, and Roundness Jitter values to establish variation parameters for those attributes. “Jitter” is the amount of random variation allowable for that option. These variations are more noticeable when the Spacing value (in the Brush Tip Shape option set) is greater than 10%.
A
From the Control menus, choose a feature for your stylus to control that option’s variation directly. Note that variations will occur even if you choose Off.
Change the Minimum Diameter value for the brush size variations.
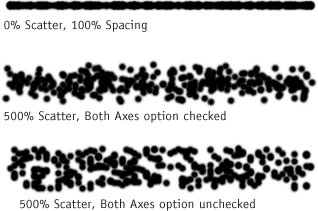
- To control the placement of pigment in the stroke, click Scattering, then do any of the following:
Check Both Axes B to scatter pigment along and perpendicular to the path you draw, or uncheck Both Axes to scatter pigment perpendicular to, but not along, the path. Also choose a Control option, if desired.
B
Change the Scatter value (1–1000%) to control how far pigment can veer off the path you draw. The lower the Scatter value, the more solid the stroke.
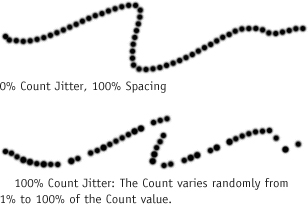
Change the Count value (1–16) to control the overall density (amount of pigment) in the stroke.
Change the Count Jitter value C (0–100%) to control how much the Count (density) can vary.
C
- To control how randomly the overall stroke opacity can vary as you use the tool, click Other Dynamics, then do any of the following:
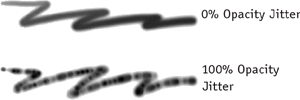
Change the Opacity Jitter (0–100%) D–F for the amount the opacity can vary. Choose a Control option to control fading.
D
E 100% Opacity Jitter, Control off: The Opacity varies randomly from 1% to 100%.
F 0% Opacity Jitter, Control set to Pen Pressure: The Opacity is controlled by the amount of pressure exerted on the tablet by the stylus.
Change the Flow Jitter (0–100%) to control how smoothly the pigment is applied. A high Flow Jitter will make the stroke blotchy, but that may be the look you’re after. Choose a Control option.
- And last but not least (you’re almost done!), check any or all of these options:
Noise to add random grain to your brush strokes to make them more rough-looking.
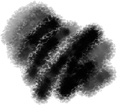
Wet Edges to simulate the buildup of pigment that occurs at the edges of brush strokes in traditional watercoloring.A–D
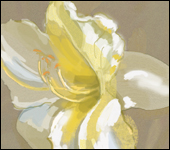
A This image was created with the Brush tool using various presets and settings.
B The Wet Edges option produced the pooling effect in this image.
C This stroke was drawn with Wet Edges unchecked.
D This stroke was drawn with Wet Edges checked.
Airbrush to allow a stroke to build up for as long as the mouse button is held down in the same spot. Clicking the Airbrush
 button on the Options bar does the same thing.
Smoothing to draw smoother curves.
Protect Texture to apply the same texture pattern and scale to other brushes that currently use the Texture option, or to which you add a texture option, for a uniform surface texture across the entire canvas.
- Optional: Click an open lock icon
 next to the name of any option set to prevent the current settings for that set from being edited, even if you change presets (note the closed lock icon). Locked settings are applied, but not saved, to any other preset you choose. Click a closed lock icon to make those settings editable again. (To unlock all locked settings, choose Reset All Locked Settings from the panel menu.)
 - Changes made to a preset remain in effect only until you choose a different preset. To save your custom preset for future use (which we recommend), click the New Brush button
 at the bottom of the panel or choose New Brush Preset from the panel menu. Change the name in the Brush Name dialog, if desired, then click OK. To learn about saving and managing brush preset libraries, see pages 400–403.

To customize a brush preset (side dishes):
- Choose a tool that uses brush presets, and show the Brushes panel.
- To use the texture from a pattern in your brush strokes, click Texture on the left side of the panel,A then monitor the preview as you do any of the following:
A These strokes were drawn using a texture preset, with Pen Pressure chosen as the Opacity Jitter Control.
Click the Pattern Preset arrowhead, then click a pattern in the picker.
Check Invert to swap the light and dark areas in the pattern.
Change the Scale of the texture (1–1000%).
Check Texture Each Tip to allow the Depth (see below) to vary within each stroke, or uncheck to keep the Depth value constant.
Choose a blending Mode to control how the texture mixes with the brush stroke.
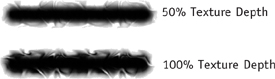
Choose a Depth value (0–100%) B to control how deeply paint sinks into the texture. At a high Depth value, paint is applied only to the high points in the texture, which makes the texture more prominent.
B
If you checked Texture Each Tip, you can choose a Minimum Depth to keep the texture from looking too flat. Some brushes reveal texture more than others. Also choose a Depth Jitter value to control how much the Depth can vary, and choose an option from the Control menu to specify if and how the stroke can fade.
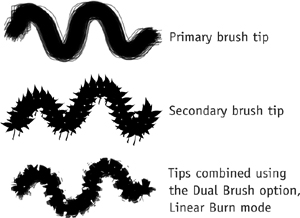
- To make the brush preset more interesting, you can add another tip to it. Click Dual Brush,C click a tip; choose a Mode to control how the two tips interact with each other, then choose Diameter, Spacing, Scatter, and Count values.
C
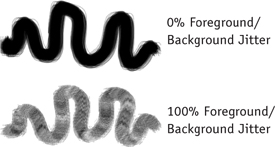
- To control how much the color can vary as you use the brush, click Color Dynamics, then do any of the following:
Choose a Foreground/Background Jitter value D for the amount of allowable variation between the Foreground and Background colors. Choose an option from the Control menu to specify if and how colors can fade.
D
Choose Hue Jitter, Saturation Jitter, and Brightness Jitter values to establish variation parameters for those attributes.
Choose a Purity value to control the degree of color saturation in the stroke.
To smudge colors:
- Click an image layer.
- Choose the Smudge tool
 (it’s on the Blur tool pop-out menu).
 - On the Options bar, do the following:
Click a brush preset on the Brush Preset picker.
Choose a blending Mode. Normal smudges all shades or colors; Darken pushes only dark colors into lighter ones; Lighten pushes only light colors into darker ones; Hue, Saturation, and Color smudge only that color attribute without changing the tonal (light and dark) values; and Luminosity smudges tonal values without changing the hues.
Choose a Strength percentage to control how forcefully the stroke smudges pixels.
Check Sample All Layers to smudge colors found on all the currently visible layers and send the results to the active layer (uncheck Finger Painting if you use this option); or uncheck Sample All Layers to smudge colors from only the currently selected layer.
To start the smudge with the current Foreground color, check Finger Painting; or leave this option unchecked to have the smudge start with the color under the pointer where the stroke begins. (For your first use of the Smudge tool, we recommend keeping this option off.)
- Press [ or ] or Alt-right-click-drag/Control-Option-drag sideways if you want to adjust the diameter of the brush tip, then drag across any area of the image.A–D Pause between strokes, if necessary, to allow the screen to redraw.
A This is the original image.
© ShutterStock.com, Afaizal
B With Normal mode chosen for the Smudge tool, all colors were smudgeable.
C With Lighten mode chosen, only light colors smudged.
D With Color mode chosen, hues smudged but luminosity values did not.

• To toggle the Finger Painting option on or off for the Smudge tool, hold down Alt/Option.
The Eraser tool is handy for removing stray blobs, perhaps to tidy up after deleting most of the background area behind an object or for erasing part of a layer in an isolated area.
Note: The Eraser tool results are permanent, so you may want to work on a duplicate layer. As an alternative to using this tool, you can block out part of a layer with an editable and removable layer mask (see pages 302–303).
To use the Eraser tool:
- Choose the Eraser tool
 (E or Shift-E).
 - On the Options bar, do the following:
Choose a brush preset from the Brush Preset picker.
Choose Mode: Brush, Pencil, or Block. For the Block option (a square-shaped eraser), no Options bar settings are available.
Choose an Opacity percentage.
If you chose Brush mode, you can choose a Flow percentage to control the uniformity of the erasure.
Click the Airbrush button off.
- Click a layer or the Background (or create a duplicate layer).
- Decide whether to click the Lock Transparent Pixels button
 on or off:
If Lock Transparent Pixels is on for the currently selected layer (or you clicked the Background), the area you erase is going to fill with the current Background color; choose that color now.A
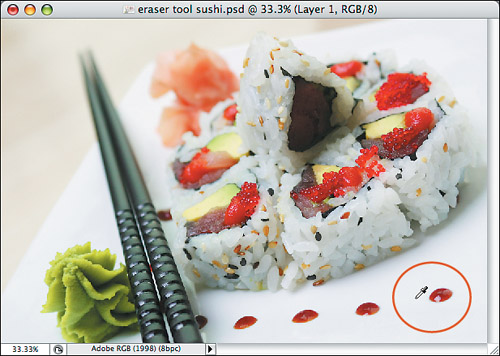
A We used the Eyedropper tool to sample the white background color first, then pressed X to swap the Foreground and Background colors.
© ShutterStock.com, Rohit Seth
If Lock Transparent Pixels is off for the current layer, the erased area will fill with transparency.
- To change the brush diameter interactively, press [ or ] or Alt-right-click-drag/Control-Option-drag sideways. If you want to adjust the diameter of the brush tip, then click on or drag across the area(s) of the image that you want to erase.B–C
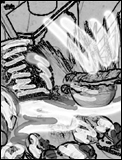
B Next, we’re using the Eraser tool (80% Opacity) to erase four of the “dots” of sauce. Because we clicked Lock Transparent Pixels on for the layer, the erased area is being replaced by the current Background color (the color we sampled with the Eyedropper).
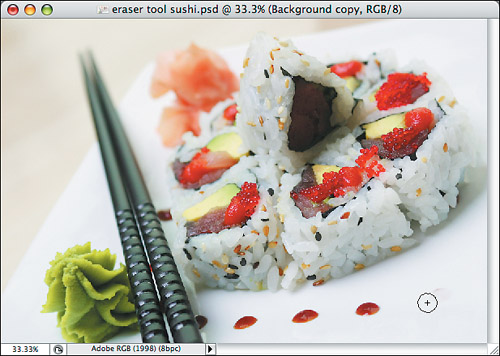
C All the dots are erased in the final image.

With the Magic Eraser, you erase only by clicking with the mouse, not by dragging. The tool erases only pixels that are similar in color to the pixel you click on, within a user-defined tolerance range. Unlike the Background Eraser, you can lower the Magic Eraser tool opacity to render areas of a layer semitransparent.
To use the Magic Eraser tool:
- Click an image layer; or click the Background, duplicate it, and keep the duplicate selected.A If you edit a layer with transparency unlocked, the erased pixels will be replaced with transparency; if you edit a layer with transparency locked, choose a Background color to replace the erased pixels.
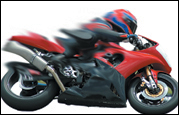
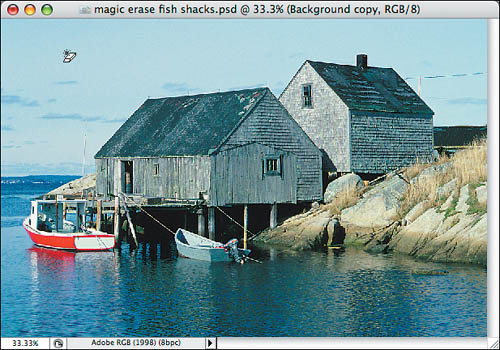
A The sky in this image is mostly uniform in color and is lighter than the areas adjacent to it, so the Magic Eraser tool should be able to remove it with just a couple of clicks. Our first step was to duplicate the Background, then hide it.
© 2007 JupiterImages.com
- Choose the Magic Eraser tool
 (E or Shift-E).
 - On the Options bar, do the following:
Choose a Tolerance value (you could start with a value of around 30). The higher the Tolerance, the wider the range of colors the tool can erase. To erase only colors that are very similar to the color you click on, choose a lower Tolerance of around 5–8; or to erase just one color, make the Tolerance 0.
Check Anti-alias to slightly soften the edges of the erasure.
Check Contiguous to erase only pixels that are adjacent to one another, or uncheck this option to erase similarly colored pixels throughout the currently selected layer.
Check Sample All Layers to erase colors found on all the currently visible layers, or uncheck this option to erase colors found only on the current layer. We find it easier to control what we’re erasing when this option is unchecked.
Choose an Opacity percentage of 100% to replace colored pixels with transparent ones, or choose a lower opacity to replace them with semitransparent pixels.
- In the document window, click the area that you want to erase.B–C To make it easier to position the pointer, press Caps Lock to turn the pointer into crosshairs.
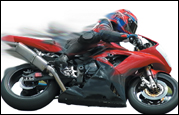
B The first click of the Magic Eraser tool removed most of the sky (tool settings of Tolerance 38, Contiguous on, and Opacity 100%), and a click on the remaining section of sky finished the job.
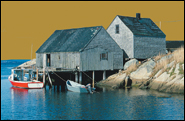
C After removing the sky, we created a new layer, filled it with a solid color, and restacked it below the duplicate image layer.

• If the erasure is too large or small, either undo or click a prior state on the History panel, change the Tolerance value on the Options bar, then click again with the Magic Eraser tool.