
In This Chapter
Choosing Properties/Page Setup settings for inkjet printing 406
Choosing Print dialog settings for inkjet printing 407
Printing the file in Windows 411
When your Photoshop image is done, you can output it on a laser printer, color printer (such as an inkjet), or imagesetter. In this chapter, you’ll learn how to output a document to an inkjet printer, set up a file to be printed as a duotone, and prepare a file for commercial printing. (To export your file to another application or to optimize it for the Web, see the next chapter.)
To obtain a quality color print from an inkjet printer that closely matches your onscreen image, you will complete the color management setup that you started in Chapter 1. We also recommend that you refer to Photoshop Help, which contains a wealth of specialized technical information, and the documentation for your specific printer model.
When preparing files for an output service provider, be sure to consult those experts about which specific settings and formats to choose. In addition to following our basic instructions for printing from Photoshop, keep in mind that getting a good color print of an image requires a thorough understanding of the color management software that’s built into your computer’s operating system and the settings available on your printing device—as well as practice.
Continuing the color management workflow that we started in Chapter 1, we’ll show you how to print an image using a desktop inkjet color printer. The first step for any kind of print job is to tell Photoshop what type of printer and paper size you’re using. Your printer driver and operating system determine which print options are available. A button in the Print dialog provides one-click access to the Page Setup dialog.
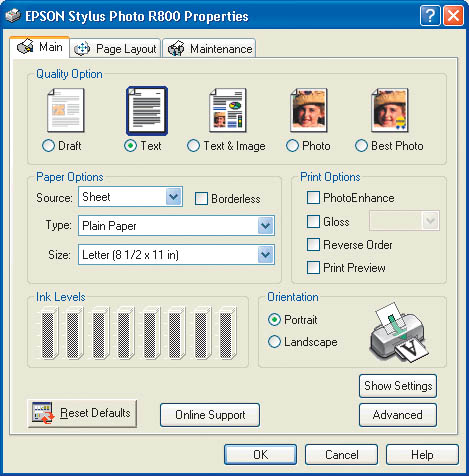
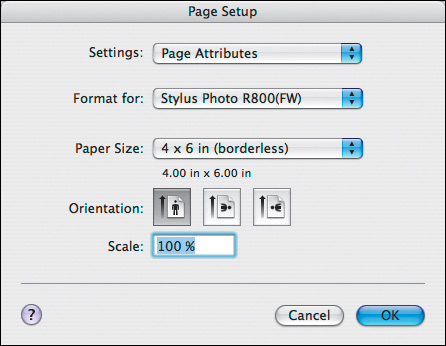
In Windows, the Page Setup command opens the confusingly named “[your printer] Properties” dialog. Here you’ll find many printer-specific options beyond the basics of page size and paper type. In the Mac OS, you’ll find equivalent options in the Print dialog for your system, which opens when you click the Print button in the Print dialog in Photoshop. Clear as mud?
To choose Properties/Page Setup settings for an inkjet printer:
- Choose File > Print (Ctrl-P/Cmd-P). The Print dialog opens (A, next page).
- From the Printer menu, choose the inkjet printer you want to use.
- Click Page Setup to open the [Printer] PropertiesA/Page Setup dialog.B
A This is the Properties dialog for an Epson printer, in Windows.
B This is the Page Setup dialog in the Mac OS.
- In Windows, from the Source menu, choose the tray that holds the media you want to print on. From the Type menu, choose the specific kind of media you want to use. The actual names of these menus may be different for your printer.
In the Mac OS, from the Format For menu, choose your inkjet printer (yes, again!). From the Paper Size menu, choose a paper size to print on. If your printer can print borderless pictures, you can choose a paper size that is listed as “(borderless).” Leave the Scale value at 100%. If you need to change the scale, it’s better to do so in the Print dialog, where you can preview the results.
- Click an Orientation button.
- Click OK to close the Properties or Page Setup dialog. Now you’re ready to choose options in the Print dialog (see the next page).
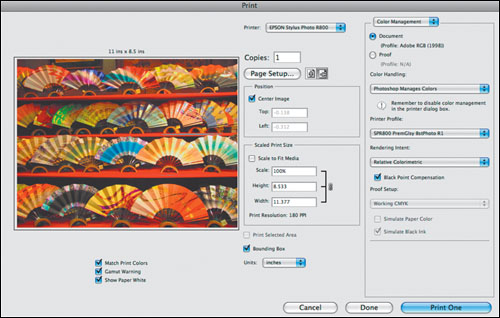
The Print dialog provides a preview of the image on your chosen paper size, along with position, print size, color management, and output options.
To print to an inkjet printer:
- Choose File > Print (Ctrl-P/Cmd-P). The Print dialog opens,A complete with a preview.
- Make sure the correct inkjet printer is chosen from the Printer menu.
- If you haven’t chosen page settings yet, follow steps 3–6 on the previous page.
- Check Center Image to position the image in the center of the paper. Or to reposition the image on the paper, uncheck Center Image and enter new Top and Left values (note the preview); or check Bounding Box as well, then drag the bounding box in the preview.
- Optional: To scale the print output slightly (not the actual image), do one of the following:
Check Scale to Fit Media to have the image fit automatically to the paper size you chose in Properties/Page Setup.
Change the Scale percentage or enter specific Height and Width values (choose from the Units menu). These three values are interdependent; changing any one option causes the other two to change.
Check Bounding Box to display the image boundary in the preview, then drag a handle or the side of the box to scale the print slightly.
A The Color Management panel is showing in this Print dialog.
© Victor Gavenda
Use the scaling features to scale the print by a small amount (i.e., fractions of an inch or a few percentage points). To scale more than that, cancel out of the dialog and use Image > Image Size to scale your image (see pages 98–100).
- For the Output options, see page 410.
- From the menu in the top right corner of the dialog, choose Color Management (A, next page). This is where you will tell Photoshop to use the profile for your specific printer and paper.
- Click Document to use the color profile that’s embedded in the image, which will be Adobe RGB (1998) if you’re continuing with the color management workflow that you started in Chapter 1.
- From the Color Handling menu, choose Photoshop Manages Colors to let Photoshop handle the color conversion. Assuming you downloaded and installed a profile for your specific printer, ink, and paper (see the instructions on pages 14–15), this option will ensure optimal color management.
- Next, choose the installed printer, ink, and paper profile from the Printer Profile menu.
- From the Rendering Intent menu, choose the same intent that you used when you created the soft-proof setting for your inkjet printer—most likely either Perceptual or Relative Colorimetric (see pages 17–18).
• You could run one test print for the Perceptual intent and one for the Relative Colorimetric intent, and see which one produces better results.
- Check Black Point Compensation. This option, which preserves the darkest blacks and shadow details by mapping the full color range of the document profile to the full range of the printer profile, is recommended when printing an RGB image.
- Below the preview, check Match Print Colors to display a color-managed soft proof of the image in the preview, based on the chosen printer and printer profile settings; check Gamut Warning to display out-of-gamut colors as gray in the preview, based on the current print profile; and check Show Paper White to set any white in the preview to the color of the paper, also based on the current print profile.

- Click Print to access the systemwide Print dialog, then carefully follow the steps on page 411 for Windows or 412 for the Mac OS to turn off color management for your printer before sending the file to print.
• Click Done in the Print dialog to preserve most (but not all) of your settings and close the dialog.

A To optimize the color accuracy of your printout, choose Color Management settings in the Print dialog in Photoshop.
This list of output options will be limited to the basic ones we think you need to be aware of. For other options, see Photoshop Help.
To access options for printouts, from the menu in the upper right corner of the File > Print dialog (in Photoshop), choose Output. In the Printing Marks area, you’ll find these options:A
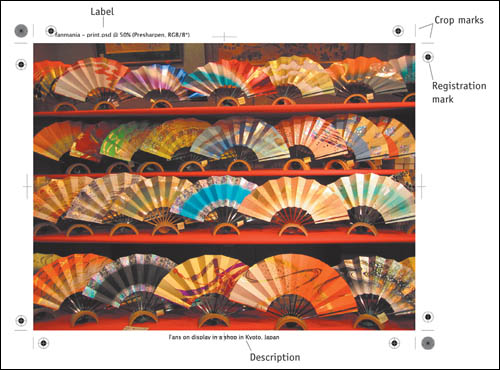
A This printout shows some of the Output options that can be produced from the Print dialog in Photoshop.
© Victor Gavenda
• Calibration Bars prints a grayscale and/or color calibration strip outside the image area.
• Registration Marks prints marks that a print shop uses to align color separations.
• Corner Crop Marks and Center Crop Marks print short little lines that a print shop uses as guidelines when trimming the printed pages.
• Description prints, outside the image area, whatever information is listed in the Description heading of File > File Info.
• Labels prints the file name, document color mode, and current channel name on each page (outside the image area).
The Functions area contains these options, among others:
• Bleed lets you specify the Width (distance) inward from the edge of the canvas area for the placement of crop marks (0–9.01 pt.).
• Include Vector Data causes the edges of any vector objects (such as type or shapes) to print at the printer resolution, not at the document resolution.
• In the Mac OS, Send 16-Bit Data enables color data from a 16-bits-per-channel file to be sent to the printer (the output device must be capable of handling 16-bit files). Because of the higher bit depth, the printouts will have finer details and smoother color gradations.
![]()
The last step before outputting your file from an inkjet printer is to turn off color management for that device to allow Photoshop to manage the color conversion. In Windows, the dialog that contains color management settings for printing is part of the printer driver software, not part of the system software. Therefore, the names and locations of the controls will vary from one manufacturer to another. In these instructions, printer color management will be turned off for an Epson printer driver. If you have a different printer model, research how to access print quality and color management settings for it, and use our steps as general guidelines.
To turn off color management for your printer in Windows, and print the file:
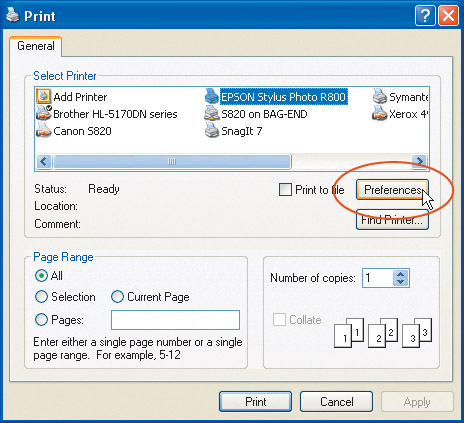
- Open the File > Print dialog in Photoshop, then click Print to get to the Print dialog for your system.
- In the Select Printer area of the General tab, choose the name of your inkjet printer.
- Click Preferences A to open the Printing Preferences dialog for your printer, which is identical to the Properties dialog that you used to specify the size and media type.
A In this Print dialog in Windows, an Epson printer is selected. We click Preferences to open the next dialog.
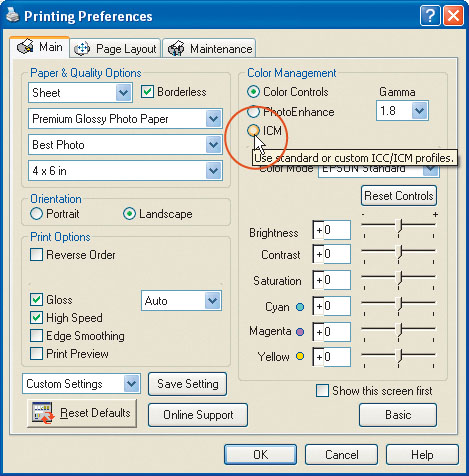
- In the Main tab of the Printing Preferences dialog, click Advanced.B A different set of options appears, including controls for color management.
B In the Main tab of the Printing Preferences dialog for an Epson printer, click Advanced.
- In the Color Management area, click ICM C to switch color management from the Epson driver to the color management system that’s built into Windows XP.
C These Color Management options are revealed when you click the Advanced button.
- In the ICC/ICM Profile area, click Off (No Color Adjustment) to disable color management for the printer.
- Click OK to close the Printing Preferences dialog and return to the Print dialog. Now you’re ready to click Print. Phew! You made it.
• If you need to enable printer-based color management in Windows, follow the steps above, except in step 6, click Applied by Printer Software.

In the Mac OS, the dialog that contains color management settings for the printer builds its list of options from both the system and the printer driver. Therefore, option names in the dialog will vary depending on the printer manufacturer. In these instructions, printer color management will be turned off for a Canon or Epson printer driver. If you have a different printer model, research how to access print quality and color management settings for it, and use our steps as general guidelines.
To turn off color management for your printer in the Mac OS, and print the file:
- Open the File > Print dialog in Photoshop, then click Print to open the Print dialog for your system.
- From the Printer menu, choose the name of your inkjet printer.
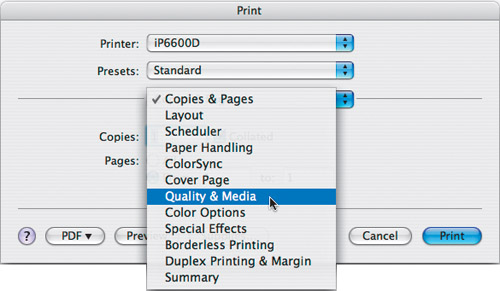
- From the third menu, choose Quality & Media for a Canon printer A or Print Settings for an Epson printer.
A In the Print dialog for the Mac OS, we chose the Canon Pixma iP6600D printer from the Printer menu and are now choosing Quality & Media from the third menu.
- Choose the Media Type (kind of paper); and for a Canon printer, choose the Paper Source (how the paper feeds into the printer).B
B For the Quality & Media settings, choose your paper type and source, and click the desired Print Mode.
- In the Print Mode area, click an option for the print quality.
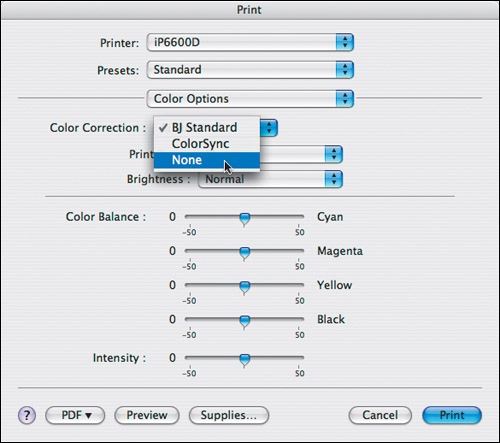
- Returning to the third menu from the top, choose Color Options for CanonC or Color Management for Epson. A new set of options displays in the dialog. Choose None from the Color Correction menu (Canon), or click Off (No Color Adjustment) (Epson).
C From the third menu, choose Color Options, then choose Color Correction: None.
- Click Print. Congratulations!

Here’s a low-budget—but effective—way to print a grayscale image with a color tint. It will output as a monotone (from one plate).
To print a grayscale image using a spot color tint:
- Either open a file that’s in Grayscale mode or convert a copy of your file to Grayscale mode (you can use a Black & White adjustment layer to fine-tune the initial shift from color to grayscale before performing the actual conversion).
- Choose Image > Mode > Duotone. The Duotone Options dialog opens.
- Choose Type: Monotone.
- Click the Ink 1 (black) color square, click Color Libraries, if necessary, choose a spot (nonprocess) color, such as a PANTONE color, then click OK.
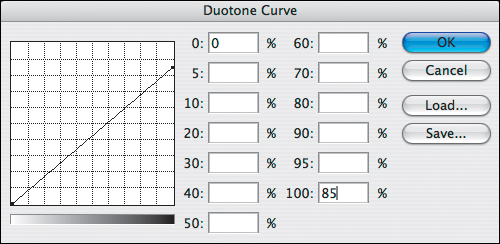
- In the Duotone Options dialog, click the Ink 1 curve (the square that contains a diagonal line).
- In the 100% field (for the darkest shadow value), enter the desired tint percentage value.A Leave the 0% field at 0 and all the other fields blank, then click OK.
A This is the Duotone Curve dialog for a Monotone print. The 100% value has been lowered to the desired PANTONE tint percentage.
- Click OK to close the dialog. Use File > Save As to save the file in the Photoshop format; or if you’re going to import the file into an Adobe Creative Suite version of InDesign, you could save the file in the Photoshop PDF format.
Computer monitors display additive colors by projecting red, green, and blue (RGB) light, whereas commercial presses print subtractive colors using CMYK (cyan, magenta, yellow, and black) and/or spot color inks. Obtaining good CMYK color reproduction from a commercial press is an art.
Nowadays, with print shops creating their own profiles for their commercial presses, you don’t need to concern yourself with creating a custom profile; you can leave this step to the pros. Do concern yourself with saving the custom profile from your print shop to the correct folder (as we showed you on page 14) so it can be accessed from the Color Settings dialog. The profile will control the CMYK conversion and can also be used to create a soft (onscreen) proof.
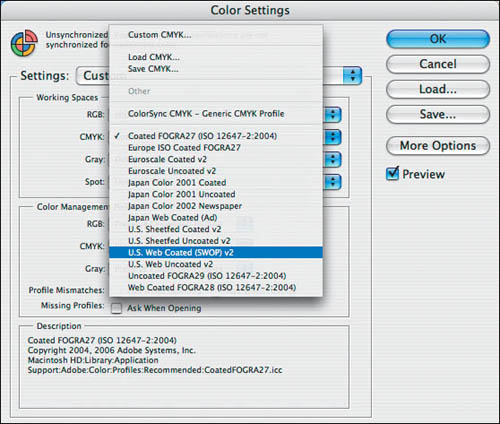
When you’re ready to convert your file for commercial printing, the first step is to set the current CMYK working space to either the custom profile your print shop provided or to a predefined prepress profile. This CMYK profile will control the conversion of your images from RGB to CMYK color mode.
To choose a predefined CMYK profile:
- Choose Edit > Color Settings (Ctrl-Shift-K/Cmd-Shift-K).
- Do either of the following:
From the Settings menu, choose the .csf profile that you received from your commercial printer.
From the CMYK menu in the Working Spaces area, choose the .icc predefined prepress profile that your print shop sent you or choose a profile that matches your chosen press and paper type.A
A In the Color Settings dialog, from the menu in the Workspace Spaces area, choose the correct CMYK profile.