
V. Potion Brewing for Hogwarts Students
In This Section
• A Successful Potion Starts with the Perfect Cauldron
• Shop for Potion Ingredients at the Apothecary
• Potion Brewing for Fun and to Earn House Points
You could say that potion mixing and brewing is a lot like baking. If you’re in your kitchen at home and mix all the right ingredients to bake chocolate chip cookies from scratch, and then bake the cookie dough for just the right amount of time, the end result is something incredibly delicious.
But, if you forget an ingredient, use the wrong ingredients, don’t bake the dough long enough, or you accidently leave the cookies in the oven for too long, what you wind up with is a yucky mess that nobody wants to eat. The same is true when it comes to brewing potions.
Like spell casting, potion brewing is a skill that all Hogwarts students absolutely must learn to do well. This is why one of the things you’re required to bring with you to Hogwarts is your very own cauldron, which you buy at Potage’s Cauldron Shop along Diagon Alley.
Beyond having to successfully brew specific potions to help you get through your Pottermore adventure, you can brew all sorts of potions at anytime after you’ve unlocked the Potions area of Pottermore. When this happens, you’re able to click the Potions icon within the gateway.
In Pottermore, successfully brewing potions is one of the ways you can earn house points (and help your house work toward winning the Pottermore House Cup). But, if you fail to brew a potion correctly, instead of being awarded house points, you lose house points. Plus, you could accidently melt your cauldron, which means you’d need to purchase a replacement.
A Successful Potion Starts with the Perfect Cauldron
Depending on the potion you’re trying to brew, you need to use a brass, copper, or pewter cauldron. Yes, in most cases, the type of cauldron you use is as important as the ingredients you put into it. This is why you need to follow the potion recipe from your potion books perfectly.
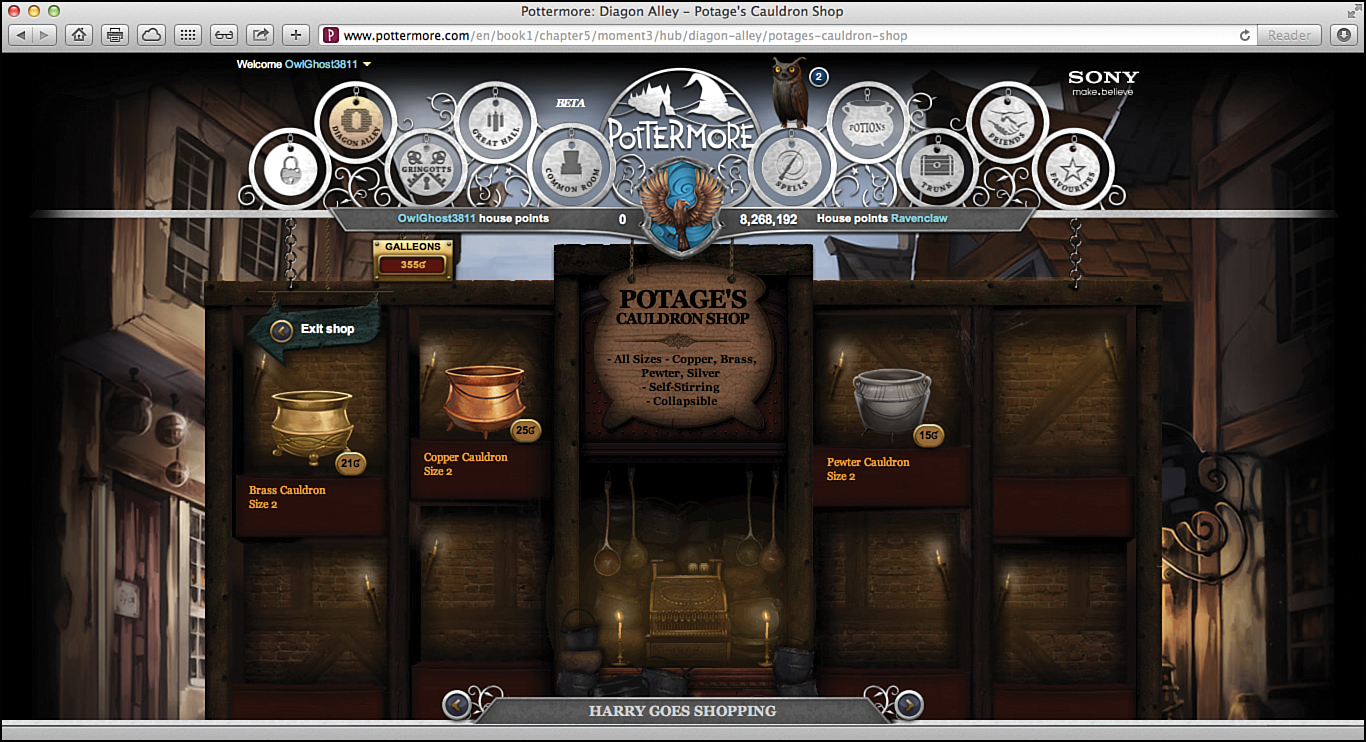
When you visit Potage’s Cauldron Shop along Diagon Alley, you find all the different types of cauldrons available for sale.
In Book 1, Chapter 5, Scene 3, “Harry Goes Shopping,” you have the opportunity to explore the shops along Diagon Alley and purchase all the items listed on the shopping list that came with your admission letter for Hogwarts School of Witchcraft and Wizardry.
At anytime after that, you can return to Diagon Alley by clicking the Diagon Alley icon within the gateway. As long as you have enough galleons, you can purchase any of the cauldrons and the ingredients you need to brew various potions.

It’s also possible to receive a cauldron or potion ingredients as gifts from other people.
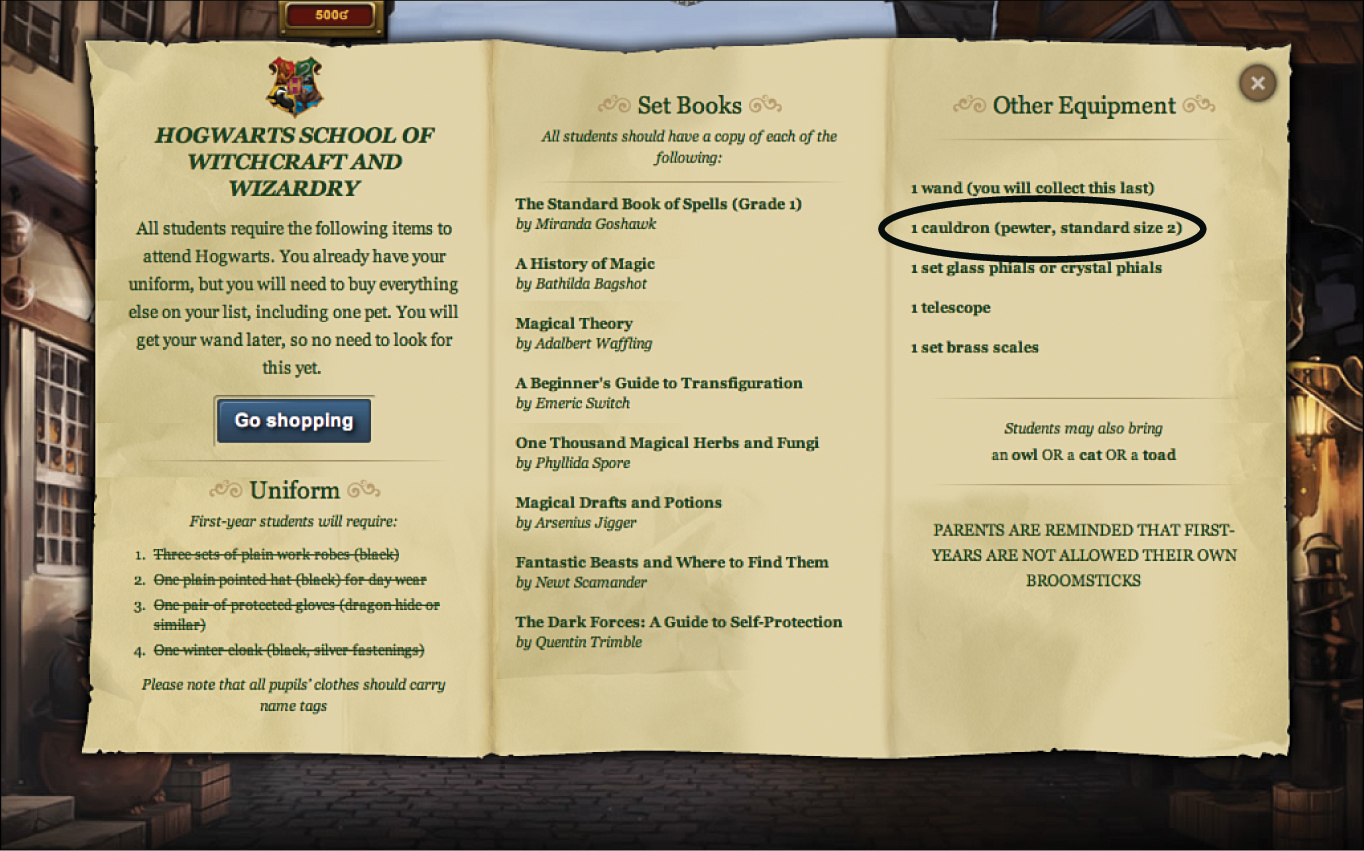
Your shopping list from Hogwarts requires you to buy a size 2 pewter cauldron. It’s listed under Other Equipment. After you purchase the cauldron, it gets stored within your trunk and becomes available whenever you need it.
As you arrive at Diagon Alley, Potage’s Cauldron Shop is the first store you see on the left. The shop’s sign is shaped like a cauldron. Click the door to go inside. After inside the shop, you find the selection of cauldrons currently available on the shelf.
While you’re experiencing Book 1 within Pottermore, you’re able to buy a size 2 brass cauldron for 21 galleons, a size 2 copper cauldron for 25 galleons, or a size 2 pewter cauldron for 15 galleons.

After you’ve purchased the type of cauldron you need, click the Potions icon within the gateway to begin brewing a potion. Or, while still visiting Diagon Alley, drop into the Apothecary (which is next door to Potage’s Cauldron Shop, also on the left) to stock up on ingredients.
Shop for Potion Ingredients at the Apothecary
During your Pottermore adventure, you find and are able to collect a wide range of potion ingredients that you can later use to brew potions. However, from the Apothecary on Diagon Alley, you can shop for all the additional ingredients you need, as long as you have the galleons to pay for them.
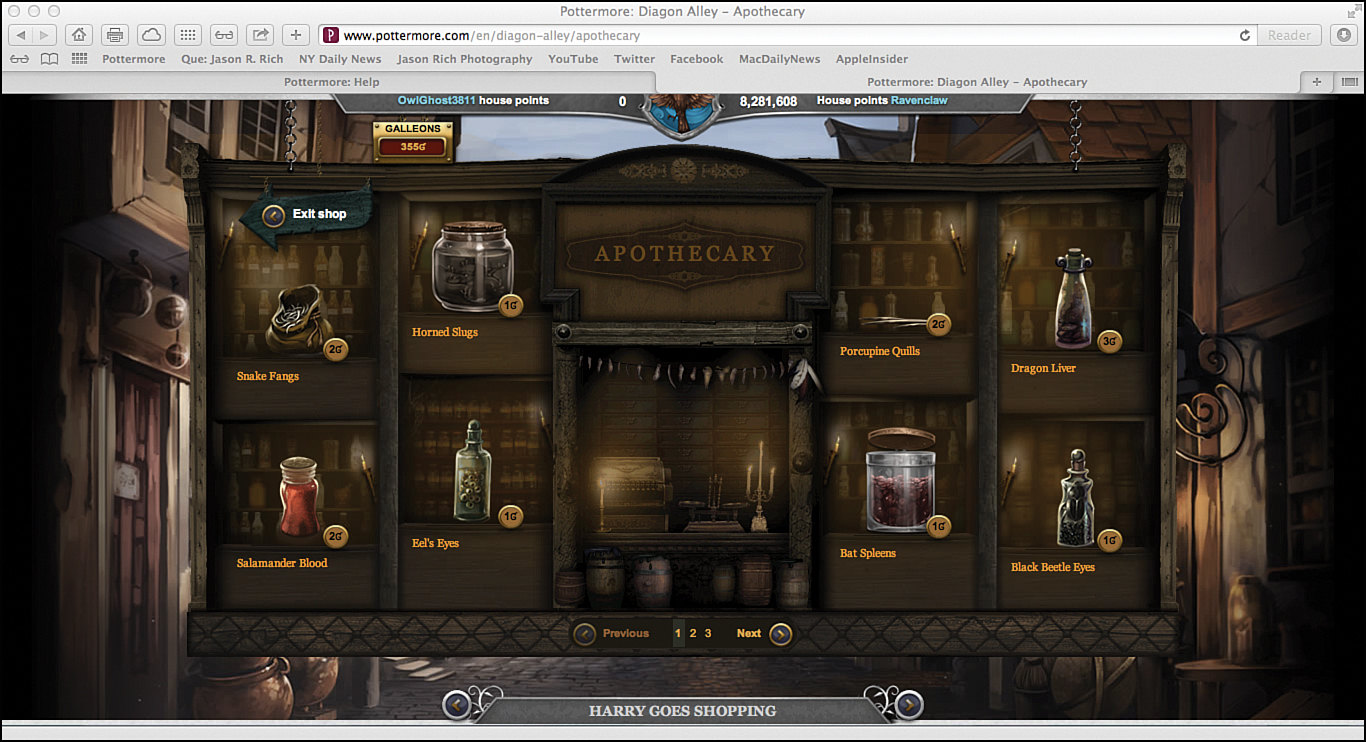
The Apothecary along Diagon Alley is where you shop for the additional ingredients you need to mix potions. You can return here anytime by clicking the Diagon Alley icon within the gateway and then clicking the door to this shop.
As you’ll discover, the Apothecary contains three shelves worth of ingredients. Each is displayed separately. You can view the different shelves within the shop by clicking the 1, 2, 3, or Next or Previous options near the bottom center of the screen.
While visiting the Apothecary, when you click the name of an ingredient a pop-up window shows a description of the item, how many of the items you currently own, and its price. You also see a blue Buy button you can click to purchase more of that item.
Don’t waste galleons purchasing ingredients you don’t need or that you already own plenty of. You can always come back later to the Apothecary and purchase the additional ingredients you need, when you need them.
As you continue on within your Pottermore adventure, you find and are able to collect additional ingredients along the way, without having to purchase them.
Replenish Your Ingredients Without Having to Buy Them
During your Pottermore adventure, when you find and collect a potion ingredient it is added to your trunk. However, when you use it up by brewing a potion, you need to replace that ingredient.
Instead of purchasing the ingredient from the Apothecary (and using up galleons), you can return to the exact book, chapter, and scene within your Pottermore adventure where you first found the ingredient and re-collect it, for free, an unlimited number of times. (You need to return to the location within Pottermore each time you use up that ingredient. You cannot stock up during a single return visit to a location.)
Potion Brewing for Fun and to Earn House Points
In addition to the potions you’re required to brew as part of your main Pottermore adventure, after you unlock the Potions area you can click the Potions icon within the gateway at anytime and then brew potions to earn house points.
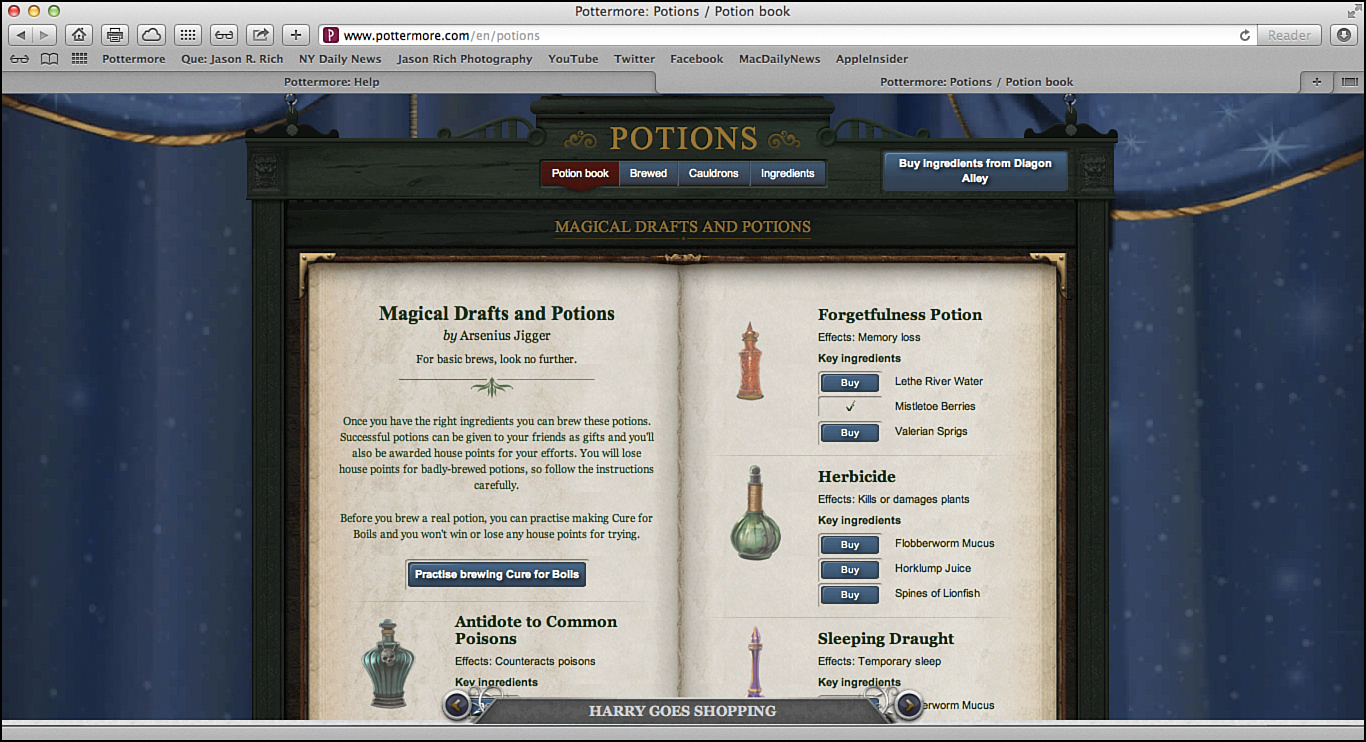
Before you can start brewing a potion, however, you must collect or purchase all the necessary ingredients. The potion book you’re using, such as Magical Drafts and Potions, provides a list of exactly what you need for each potion.
Brewing potions successfully requires several important steps. First, you need to collect or purchase all the necessary ingredients. Then, you need to follow the step-by-step directions within the potion book exactly as you mix together the right amount of each ingredient.
Next, it’s necessary to brew the potion within a cauldron at just the right temperature and for the ideal amount of time. You also need to use your wand when instructed to add the perfect touch of magic.
By the way, it’s also necessary to race against the clock (well, actually, it’s a sand-filled hourglass) to complete each potion within a specific time limit; otherwise, it fails.
Achieving success requires practice, forces you to work at a steady pace and utilize perfect timing, and tests your ability to read and follow directions.
When you click the Potions icon within the gateway, the Potions page appears. Near the top center of this page, just under the Potions heading, are four options: Potion Book, Brewed, Cauldrons, and Ingredients.
• Click the Potion Book option to view a list of potions you’re currently able to brew, based on how far along within your Pottermore adventure you’ve progressed.
• Click the Brewed option to see a list of potions you’ve successfully brewed already.
• Click the Cauldrons option to see a list of the cauldrons you own, and then choose which one you want to use for a specific potion. When you are viewing your cauldrons, each has a Use This Cauldron button below it. Click this button to select it. You also have the option to send a cauldron as a gift to someone else by clicking the Send as Gift button.
• Click the Ingredients option to view a complete list of ingredients you currently have at your disposal. This includes ingredients you’ve already purchased, ingredients you’ve found and collected during your Pottermore adventure, and ingredients that other people have sent you as a gift.
The Potions page within Pottermore is where you initially prepare to brew potions and gather the ingredients and equipment that you need.
You can send any ingredient in your possession as a gift to someone else. However, do not give away rare ingredients that you can only find and collect during your adventure and not purchase within the Apothecary; otherwise, you might wind up being unable to complete an important potion later without having to retrace your steps and return to specific scenes.
To stock up on new ingredients or replenish your supply, from the Potions page click the Buy Ingredients from Diagon Alley button (on the right side of the page) to visit the Apothecary along Diagon Alley.
You can also click the Diagon Alley icon within the gateway to return to this location, and then click once again on the Potions icon to return to the Potions page.
When you use an ingredient for a potion, it is removed from your trunk and must be replaced if you need more of that ingredient later.
Prepare to Brew a Potion
When you’re ready to begin brewing portions (and earn house points for doing this successfully), click the Potions icon within the gateway to access the Potions page.
On the Potions page, click the Potion Book option. This provides a detailed listing of the potions you’re currently able to brew and ingredients list for each potion.
As you’re looking at the ingredients list, under the Key Ingredients heading, each ingredient is listed separately. If you see a check mark to the left of the listing, you already have the required ingredient (and the right amount of it). However, if you see a Buy button to the left of the listing, you need to purchase that ingredient before you can brew the potion.
So, if you see all check marks next to the list of required ingredients, you’re ready to brew the potion. A Brew This Potion button appears to the left of the ingredients list.
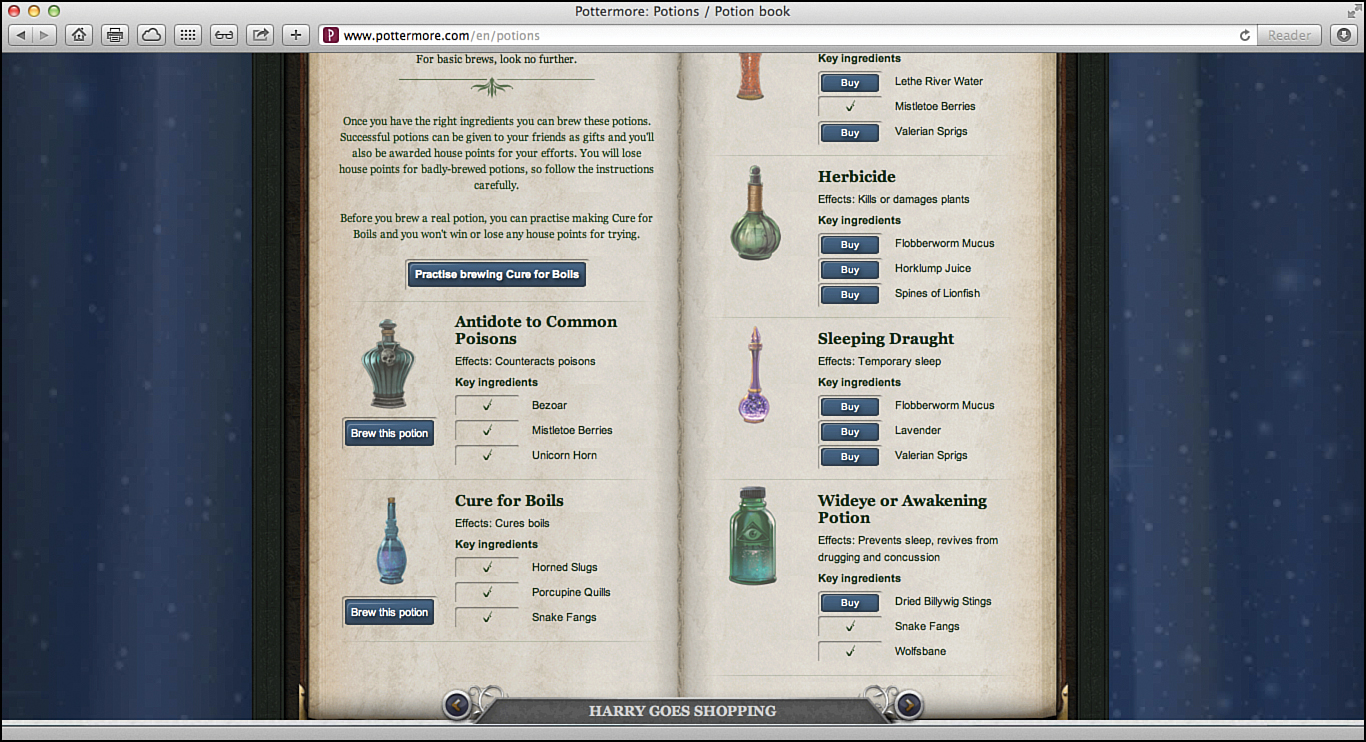
As you can see, the Antidote to Common Poisons and Cure for Boils are both ready to be brewed; all the ingredients have been collected. The Brew This Potion button is displayed for both of these potions. However, the ingredients needed for the potions listed to the right have not all been acquired, so none of those potions can currently be brewed.
You earn house points for each potion you successfully brew, but you lose house points each time you fail at brewing a potion. Seriously consider practicing the Cure for Boils potion before trying any others.
This is a practice potion that you can try as often as you want with no negative consequences if you fail.
To try brewing the Cure for Boils, click the Practice Brewing Cure for Boils button on the Potions page, after you click the Potion Book option. The necessary ingredients for this potion are provided.
From the Potions page, click the Potion Book option, and then choose which potion you want to try brewing. You can select the Cure for Boils anytime, or you can choose any other potion that has a Brew This Potion button associated with it.
Get Started Brewing a Potion
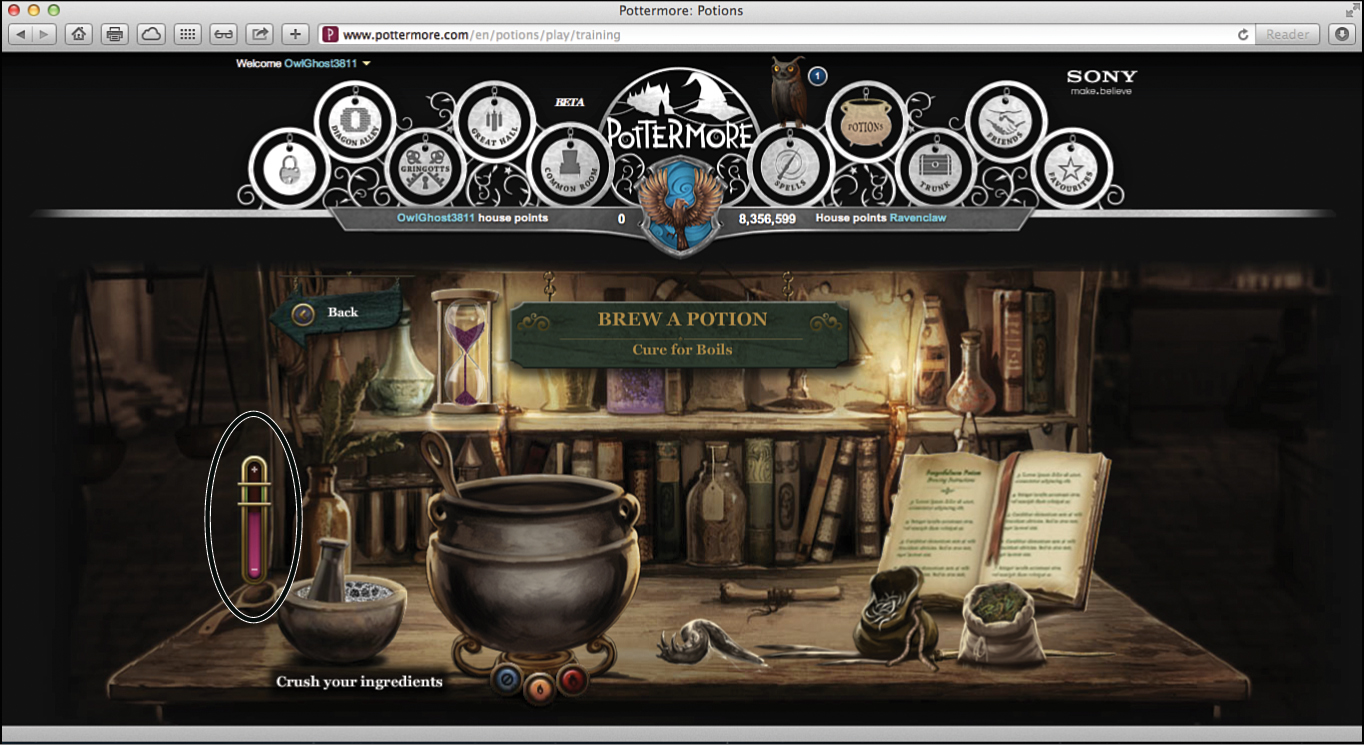
When you click the Practice Brewing Cure for Boils button, or the Brew This Potion button associated with any other potion, the Brew a Potion page appears. The first thing you see is the recipe for that potion and the brewing instructions from the appropriate page within your potion book.
After you begin brewing a potion, you have only a limited amount of time to complete it successfully. You notice an hourglass on the left side of the Brew a Potion screen. When the sand in the hourglass all reaches the bottom, you have run out of time. If the potion isn’t completed, it fails.
To save valuable time, either memorize the list of steps required to brew the potion or write them down, in order, on a separate sheet of paper. Otherwise, you waste valuable time having to click the Potions book repeatedly to review the brewing directions.
Another option is to open a separate browser window, sign in to Pottermore twice (once using each browser window), and then leave the potion book displayed in one window while you brew the potion in the other browser window. This allows you to refer back to the potion book while you’re brewing the potion, without wasting time.
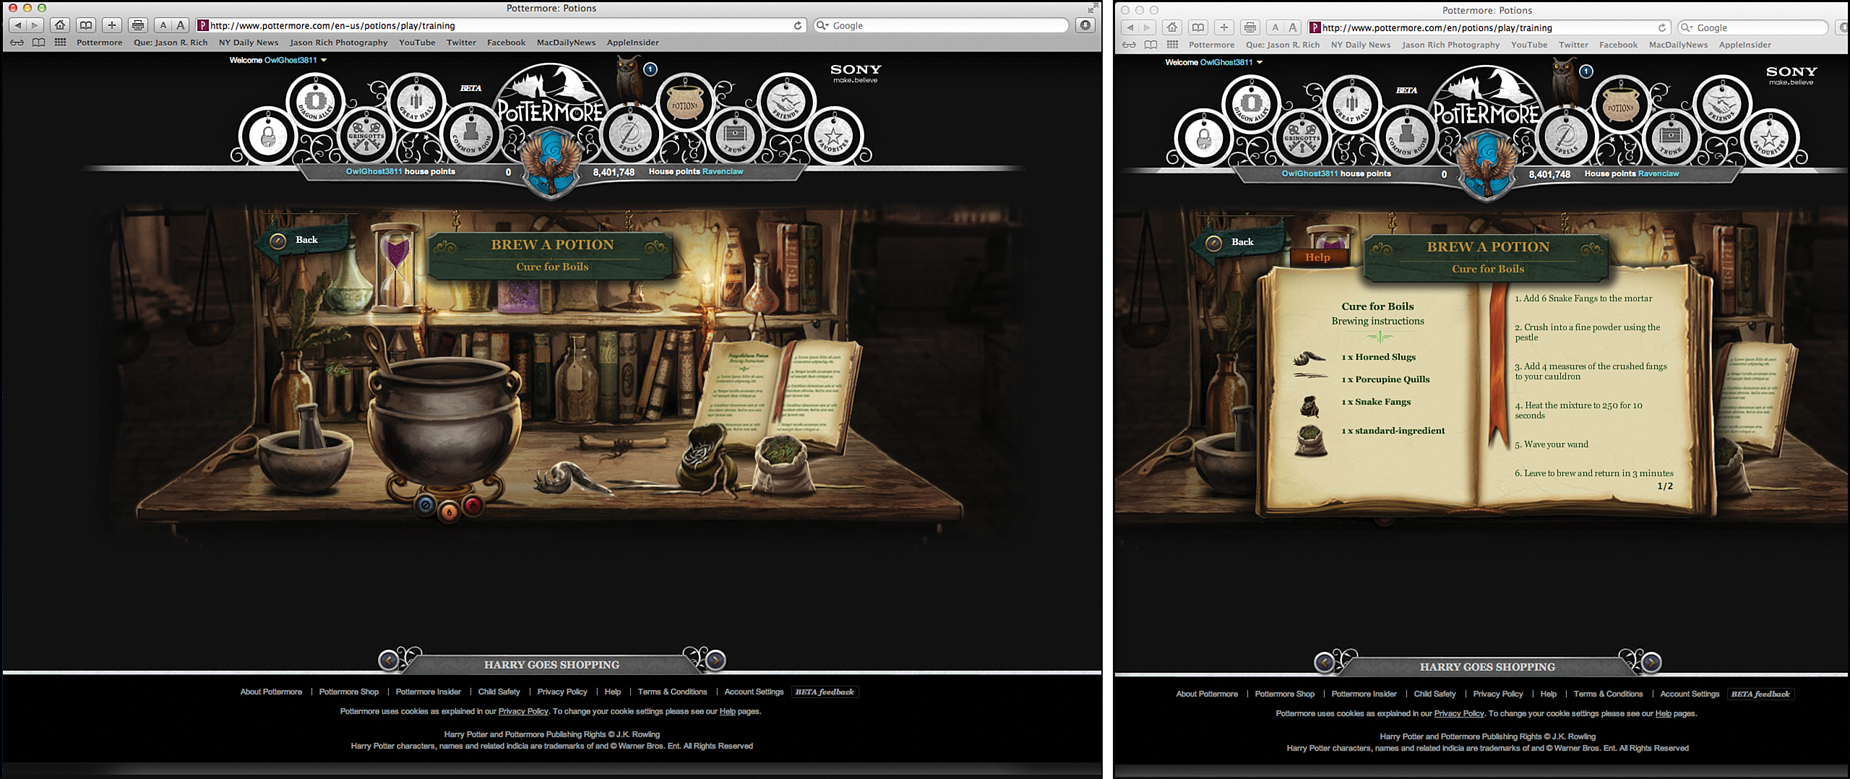
Open two separate browser windows to display the potion book (right) and be able to brew a potion at the same time (left).
To successfully brew a portion, it is absolutely essential that you follow the steps outlined within the potion book in order and perform each step accurately. During the potion-brewing process, you stand in front of a table. On the table is everything you need to successful brew the potion. You have several tools at your disposal, including the following:
• Cauldron: This is the large pot in which you mix and brew your ingredients.
• Cauldron spoon: Placed within the cauldron is a large spoon that you use to stir your potion, as directed. Click the spoon’s handle and drag it around to stir your potion.
• Heat source: Your cauldron is already positioned on top of a hot plate used to heat up and brew your potion. However, you need to turn on and off the heat and adjust the temperature as you’re instructed to. To do this, click the orange or red buttons to turn on the heat and use the blue button to turn off the heat.
Most potions require a certain amount of heat for a specific about of time. A meter helps you determine the correct temperature you need to maintain.
Use the orange (middle) heat control button to turn on and maintain a low flame. Click the red (right) button to turn on and maintain a high flame. Use the blue button to turn off the flame and allow the contents within the cauldron to cool down.
It’s often necessary to turn on and off the heat controls or change the temperature (by switching between low and high heat) multiple times while brewing a single potion. Use the meter that appears to help you gauge and maintain the proper temperature for the correct amount of time.
You can leave the heat turned on at the correct temperature for up to twice the amount of time that’s instructed before the cauldron overheats. However, leaving a potion cooking for too long wastes valuable time. As soon as the timer shows you’ve reached the perfect cooking time, turn off the heat and move on to the next step.
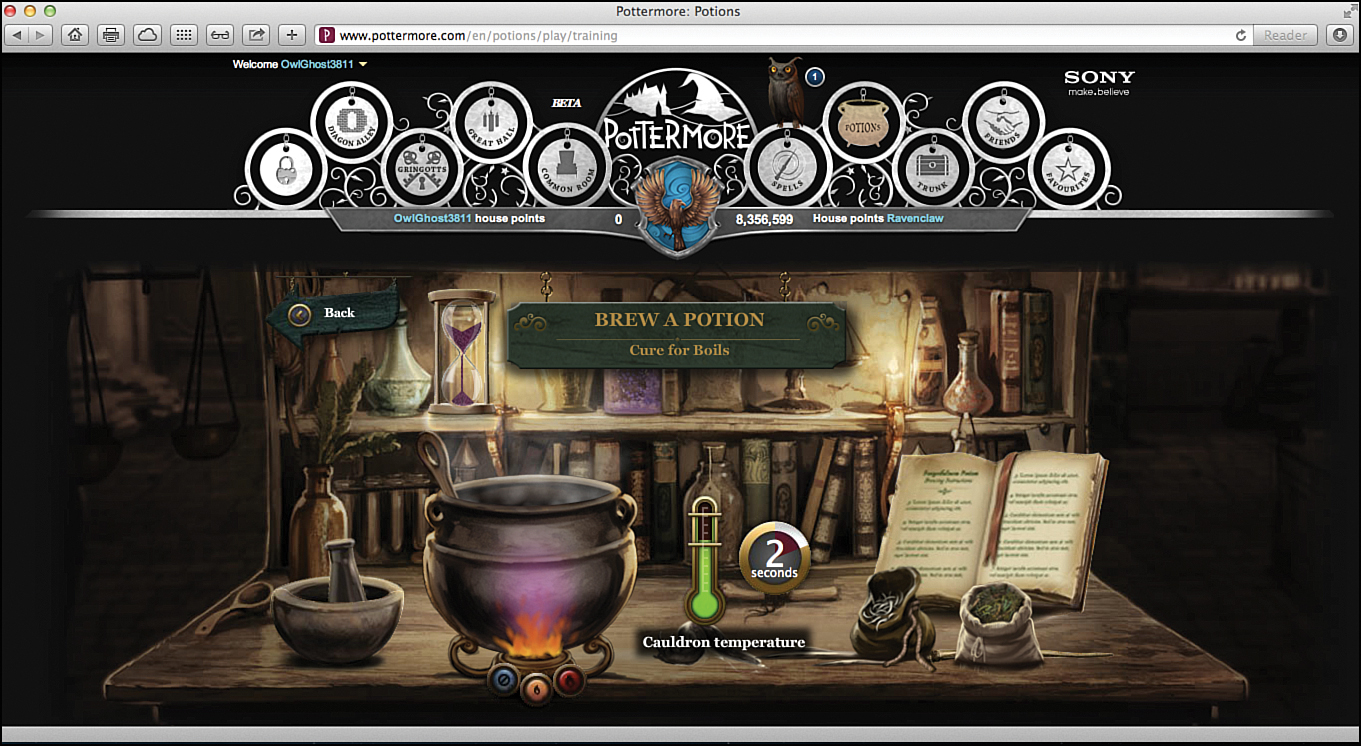
When you achieve the right temperature, a timer appears so you can determine how long to keep that temperature steady before turning off the heat. For example, the recipe says, “Heat the mixture to 250 for 10 seconds.”
If you give your potion too much heat or leave the fire on for too long, you could melt your cauldron and then need to replace it by purchasing another one. When this happens, the potion you were attempting to brew fails.
• Ingredients: All the necessary ingredients for each potion are laid out for you on the right side of the table, in front of the potion book. Use your mouse to pick up and move each ingredient, one at a time, between the right side of the table, the mortar and pestle, and the cauldron. When moving items to the mortar and pestle, don’t accidentally hit the cauldron. You need to move the ingredients up and over the cauldron to place them into the mortar and pestle.
• Magic wand: Although it might be hidden behind some of the ingredients on the table, you can always find the magic wand on the right side of the table, behind the ingredients, but in front of the potion book. You need it to complete every potion, so be ready to grab it at the right time and give it a wave.
• Mortar and pestle: These tools are used to crush up ingredients and turn them into powder before adding them to the cauldron. If the directions call for it, place the necessary ingredients into the mortar (which is the stone bowl to the left of the cauldron), and then use your mouse to control the pestle and crush the ingredients.
For example, in the directions for the Cure for Boils, Step 1 involves adding six snake fangs into the mortar. You’re then instructed to crush them into powder. To do this, grab one snake fang at a time from the right side of the table and place it into the mortar.
Each time the ingredient lands in the mortar, a small number appears to the left of the mortar. After you move all six snake fangs into the mortar, click the pestle repeatedly until the meter turns from red to green. When the meter turns green, the task is complete, and you’re ready to move the ingredient into the cauldron, as instructed.
After the required ingredient is placed into the mortar, use the mouse to control the pestle and smash up the ingredient into powder. The meter starts off red (shown here), but it turns green when the process is done.
• Potion book: As you’re brewing a potion, the potion book you’re working from is always available from the right side of the table (if you don’t have a second browser window open to the potion book). Click it to reread the directions for a potion. Keep in mind that the hourglass does not stop when you do this, so referring back to the potion book repeatedly wastes valuable time!
Each time you successfully complete a step as you’re brewing a potion, if you refer back to the potion book that step is crossed off. This is a good way to see whether you’ve completed a specific task correctly. However, don’t get into the habit of constantly checking the potion book or you waste too much time and aren’t able to complete the desired potion.
• Hourglass: On the shelf behind the table (to the left), you see the sand-filled hourglass. As soon as you begin mixing the potion, the timer starts. When the sand in the hourglass runs out, you’re out of time and the potion fails. A circular timer appears and counts down the last 10 seconds you have before the sand runs out.
As you’re placing ingredients on the right side of the table into the mortar or the cauldron, sometimes you’re able to grab several of the same items at once. Keep an eye on the Number icon when you place something into the mortar or cauldron to determine how many of that particular item you’re transferring. For example, a recipe might call for 10 drops of an ingredient, but each time you place that item into the cauldron or mortar it might count as 2 drops. So, you only have to move ingredients 5 times, not 10. Each ingredient, however, is handled and measured differently.
Some potions take only a few minutes to complete from start to finish. Others, however, require that you leave them simmering over the fire for an hour or longer. If this is the case, you can exit out of the Potions area of Pottermore, or leave the website altogether, and then return at the appropriate time to finish up the potion. There’s no need to sit there and watch it brew for extended periods, unless the recipe for the potion tells you otherwise.
While a potion is actually brewing, you see a Brewing option appear within the page of the Potions book. Click this to view a timer. Click the Next button to return to the potions table when something requires your attention.
The Number of House Points You Earn Depends on the Potion You Brew
After you begin brewing potions, you discover that some are much easier to complete successfully than others. However, you’re rewarded more handsomely with house points for successfully brewing the more difficult potions.
The most house points you can lose as a result of failing to brew a potion is five. However, this maximum deduction is taken only if you manage to melt or blow up your cauldron. Otherwise, you are penalized a fewer number of points if the potion fails for another reason.
Brewing potions is a great way to practice becoming a better witch or wizard, plus you’re able to earn valuable house points for your house. Who knows, maybe we’ll see your Pottermore username displayed on your house’s leaderboard sometime soon.