
Chapter 7. The Programming Process
It’s just a simple matter of programming.
Programming is more than just writing code. Software has a life cycle. It is born, grows up, becomes mature, and finally dies, only to be replaced by a newer, younger product. Understanding this cycle is important because as a programmer you will spend only a small amount of time actually writing new code. Most programming time is spent modifying and debugging existing code. Software does not exist in a vacuum; it must be documented, maintained, enhanced, and sold. In this chapter we take a look at a small programming project using one programmer. Larger projects that involve many people are discussed in Chapter 23 . Although the final code is fewer than a hundred lines, the principles used in its construction can be applied to programs with thousands of lines of code. Figure 7-1 illustrates the software life cycle.
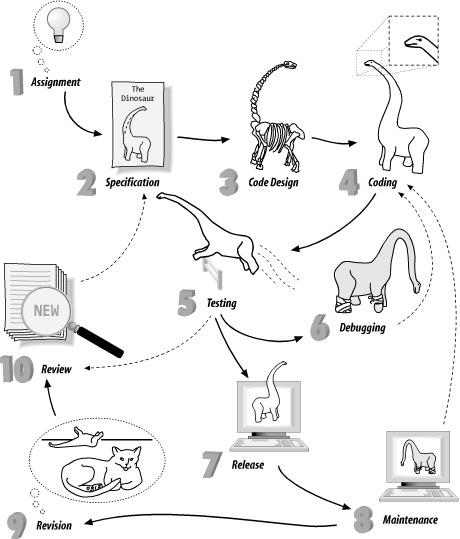
The major steps in making a program are:
- Assignment
It all starts when someone gets a bright idea. Then they usually assign someone else to implement it.
- Requirements
Programs start when someone gets an idea and assigns you to implement it. This is written down in a requirements document, which describes, in very general terms, what is wanted.
- Specification
This is a description of what the program does. In the beginning, a Preliminary Specification is used to describe what the program is going to do. Later, as the program becomes more refined, so does the specification. Finally, when the program is finished, the specification serves as a complete description of what the program does.
- Code design
The programmer does an overall design of the program. The design should include major algorithms, class definitions, module specifications, file formats, and data structures.
One thing cannot be over-stressed: Think before you act. Studies have shown that a good design can result in a program that is one tenth the size of a poorly designed one. This is especially true when using C++, where designing good objects is critical to writing a good program. (You will find out what objects are in Chapter 13.)
Note: “Think before you act” is good advice not only for coding, but also for life in general.
See Chapter 26 for information on code design techniques.
- Coding
The next step is writing the program. This involves first writing a prototype and then filling it in to create the full program.
- Testing
The programmer should design a test plan and use it to test the program. This is the first level of testing.
The next level involves having someone else test the program. Testing can result in bug reports, which means that you need to do some debugging. It can also uncover flaws in the original specification, in which case you need to review the results and see if a revised specification is needed.
Finally, testing can show the absence of bugs. (Experienced programmers never say a program works; they say only that it has no observed bugs.) When testing shows that the number of bugs is acceptably low, the software is released.
- Debugging
Unfortunately, very few programs work the first time. They must be corrected and tested again.
- Release
The program is packaged, documented, and sent out into the world to be used.
- Maintenance
Programs are never perfect. Bugs will be found and will need correction.
- Revising and updating
After a program has been working for a while, the users will want changes, such as more features or more intelligent algorithms. At this point, a new specification is created and the process starts again.
Setting Up Your Work Area
The operating system allows you to group files in directories. Just as file folders serve to keep papers together in a filing cabinet, directories serve to keep files together. In this chapter you will be creating a simple calculator program. All the files for this program will be stored in a directory named calc. To create a directory in Unix, execute the following commands:
%cd ~%mkdir calc
In MS-DOS, type:
C:>cdC:>mkdir calc
To tell the operating system which directory you want to use, in Unix type the command:
% cd ~/calcIn MS-DOS, type:
C:> cd calc
C:CALC>
More information on how to organize directories can be found in your operating system documentation.
The Specification
For this chapter we are going to assume that you have been given the assignment to “write a program that acts like a four-function calculator.” Typically, the specification you are given is vague and incomplete. It is up to you to refine it into something that exactly defines the program you are going to produce.
The first step is to write a document called The Preliminary Users’ Specification, which describes what your program is going to do and how to use it. This document does not describe the internal structure of the program or the algorithm you plan to use. Following is a sample specification for the four-function calculator:
Calc
A four-function calculator
Preliminary Users' Specification
Dec. 10, 2002 Steve OuallineWarning: This is a preliminary specification. Any resemblance to any software living or dead is purely coincidental.
Calc is a program that allows the user to turn his $10,000 computer into a $1.98 four-function calculator. The program adds, subtracts, multiplies, and divides simple integers.
When the program is run, it zeros the result register and displays its contents. The user can then type in an operator and number. The result is updated and displayed. The following operators are valid:
Example (user input is in boldface):
calcResult: 0 Enter operator and number:+ 123Result: 123 Enter operator and number:- 23Result: 100 Enter operator and number:/ 25Result: 4 Enter operator and number:* 4Result: 16
The preliminary specification serves two purposes. First, you should give it to your boss (or customer) to ensure agreement between what he thought he said and what you thought he said. Second, you can circulate it among your colleagues to see whether they have any suggestions or corrections.
This preliminary specification was circulated and received two comments: “How are you going to get out of the program?” and “What happens when you try to divide by 0?”
So a new operator is added to the Preliminary Users’ Specification:
q -- quit
We also add another paragraph:
Dividing by 0 results in an error message and the result register is left unchanged.
Code Design
After the preliminary specification has been approved, you can start designing code. In the code-design phase, you plan your work. In large programming projects involving many people, the code would be broken up into modules for each programmer. At this stage, file formats are planned, data structures are designed, and major algorithms are decided upon.
This simple calculator uses no files and requires no fancy data structures. What’s left for this phase is to design the major algorithm, which we can outline in pseudocode, a shorthand halfway between English and code. In pseudocode, our code design looks like this:
Loop
  Read an operator and number
  Do the calculation
  Display the result
End-Loop
The Prototype
Once the code design is completed, you can begin writing the program. But rather than try to write the entire program at once and then debug it, you will use a method called fast prototyping . This consists of writing the smallest portion of the specification you can implement that will still do something. In our case, you will cut the four functions down to a one-function calculator. Once you get this small part working, you can build the rest of the functions onto this stable foundation. Also, the prototype gives the boss something to look at and play around with so he has a good idea of the direction the project is taking. Good communication is the key to good programming, and the more you can show someone, the better. The code for the first version of the four-function calculator is found in Example 7-1.
#include <iostream>

int   result;    // the result of the calculations
char  oper_char; // operator the user specified
int   value;     // value specified after the operator

int main(  )
{
    result = 0; // initialize the result

    // Loop forever (or till we hit the break statement)
    while (true) {
        std::cout << "Result: " << result << '
';

        std::cout << "Enter operator and number: ";
        std::cin >> oper_char >> value;

        if (oper_char = '+') {
            result += value;
        } else {
            std::cout << "Unknown operator " << oper_char << '
';
        }
    }
    return (0);
}
The program begins by initializing the variable result to zero. The main body of the program
is a loop starting with:
while (true) {This will loop until a break statement is reached. The code:
    std::cout << "Enter operator and number: ";
    std::cin >> oper_char >> value;
asks the user for an operator and number. These are parsed and
stored in the variables oper_char
and value. (The full set of I/O
operations such as << and
>> are described in Chapter 16.) Finally, you start
checking the operators. If the operator is a plus (+), you perform an
addition using the line:
    if (oper_char = '+') {
        result += value;
So far you recognize only the plus operator. As soon as this works, you will add more operators by adding more if statements.
Finally, if an illegal operator is entered, the line:
    } else {
         std::cout << "Unknown operator " << oper_char << '
';
    }
writes an error message telling the user he made a mistake.
The Makefile
Once the source has been entered, it needs to be
compiled and linked. Up to now we have been running the compiler
manually. This is somewhat tedious and prone to error. Also, larger
programs consist of many modules and are extremely difficult to
compile by hand. Fortunately, both Unix and Borland-C++ have a utility
called make that handles the
details of compilation. Microsoft Visual C++ comes with the same
thing, but the program is named nmake.
Basically, make looks at the
file called Makefile for a description of how to
compile your program and then runs the compiler for you. The makeprogram is discussed in detail in Chapter 23. For now, just use one of
the examples below as a template and substitute the name of your
program in place of calc.
The following examples contain Makefiles for various C++ compilation environments. These include:
The Unix operating system using a generic CC compiler (Example 7-2)
The Unix or Linux operating system using the Free Software’s g++ compiler (Example 7-3)
The Microsoft Windows operating system using the Borland C++ compiler (Example 7-4)
The Microsoft Windows operating system using the Microsoft Visual Studio .NET C++ compiler (Example 7-5)
#
# Makefile for many Unix compilers using the
# "standard" command name CC
#
CC=CC
CFLAGS=-g
all: calc

calc: calc.cpp
$(CC) $(CFLAGS) -o calc calc.cpp

clean:
rm calc
#
# Makefile for the Free Software Foundation's g++ compiler
#
CC=g++
CFLAGS=-g -Wall
all: calc

calc: calc.cpp
        $(CC) $(CFLAGS) -o calc calc.cpp

clean:
rm calc#
# Makefile for Borland's Borland-C++ compiler
#
CC=bcc32
#
# Flags
# -N -- Check for stack overflow
# -v -- Enable debugging
# -w -- Turn on all warnings
# -tWC -- Console application
#
CFLAGS=-N -v -w -tWC
all: calc.exe
calc.exe: calc.cpp
$(CC) $(CFLAGS) -ecalc calc.cpp
clean:
erase calc.exe#
# Makefile for Microsoft Visual C++
#
CC=cl
#
# Flags
# GZ -- Enable stack checking
# RTCsuc -- Enable all runtime checks
# Zi -- Enable debugging
# Wall -- Turn on warnings (Omitted)
# EHsc -- Turn exceptions on
#
CFLAGS=/GZ /RTCsuc /Zi /EHsc
all: calc.exe
calc.exe: calc.cpp
$(CC) $(CFLAGS) calc.cpp
clean:
erase calc.exeTo compile the program, just execute the command make. (Under Microsoft Visual C++ use the
command nmake
.)Themake
program determines what compilation commands are needed and executes
them.
For example, on Linux and Unix we compile our program with the command:
$ make
g++ -g -Wall -o calc calc.c
calc.cpp: In function 'int main(  )':
calc.cpp:19: warning: suggest parenthesis around assignment used as truth value
$
Using Microsoft Visual C++ the command is:
C:> nmake
Microsoft (R) Program Maintenance Utilitity Version 7.00.9392
Copyright (C) Microsoft Corporation. All rights reserved.

cl /FeCALC /RTCsuc /Zi /Wall calc.cpp
Microsoft (R) 32-bit C/C++ Compiler Ver. 13.00.9392 for 80x86
Copyright (C) Microsoft Corporation 1984-2001. All rights reserved.
/out:CALC.exe
/debug
calc.obj
LINK : LNK6004: CALC.exe not found or not built by the last incremental link;
performing full link
The make program uses the
modification dates of the files to determine whether a compilation is
necessary. Compilation creates an object file. The modification date
of the object file is later than the modification date of its source.
If the source is edited, its modification date is updated, making the
object file out of date. make
checks these dates, and if the source was modified after the object,
make recompiles the
object.
Testing
Once the program is compiled without errors, you can move on to the testing phase. Now is the time to start writing a test plan. This document is simply a list of the steps you perform to make sure the program works. It is written for two reasons:
If a bug is found, you want to be able to reproduce it.
If you ever change the program, you will want to retest it to make sure new code did not break any of the sections of the program that were previously working.
The test plan starts out as something like this:
Try the following operations

+ 123    Result should be 123
+ 52     Result should be 175
x 37     Error message should be output
Running the program you get the following results:
Result: 0 Enter operator and number:+ 123Result: 123 Enter operator and number:+ 52Result: 175 Enter operator and number:x 37Result: 212
Something is clearly wrong. The entry x 37
should have generated an error message but didn’t. There is a bug in
the program, so you begin the debugging phase. One advantage to making
a small working prototype is that you can isolate errors early.
Debugging
First you inspect the program to see if you can detect the error. In such a small program it is not difficult to spot the mistake. However, let’s assume that instead of a 21-line program, you have a much larger one containing 5,000,000 lines. Such a program would make inspection more difficult, so you need to proceed to the next step.
Most systems have C++ debugging programs, but each debugger is
different. Some systems have no debugger. In that case you must resort
to a diagnostic print statement. (More advanced debugging techniques
are discussed in Chapter 17.) The
technique is simple: put a std::cout where you’re sure the data is good
(just to make sure it really is good). Then put a
std::cout where the data is bad.
Run the program and keep putting in std::cout statements until you isolate the
area in the program that contains the mistake. The program, with
diagnostic std::cout lines added, looks like:
std::cout << "Enter oper_char and number: ";
std::cin >> value;
std::cin >> oper_char;

std::cout << "## after cin " << oper_char << '
';

if (oper_char = '+') {
    std::cout << "## after if " << oper_char << '
';
    result += value;
Tip
The ## at the beginning of
each std::cout line is my trick
to flag the line as a debug line. This makes it easy to tell the
temporary debug output from the real program output. Also, when you
finally find the bug, the ##
makes it easy to find and remove the debug lines with your
editor.
Running the program again results in:
Result: 0 Enter operator and number:+ 123## after cin + ## after if + Result: 123 Enter operator and number:+ 52## after cin + ## after if + Result: 175 Enter operator and number:x 37## after cin x ## after if + Result: 212
From this you see that something is going wrong with the
if statement. Somehow the variable
operator is an x going in and a
+ coming out. Closer inspection
reveals that you have the old mistake of using = instead of ==. After
you fix this bug, the program runs correctly. Building on this working
foundation, you add in the code for the other operators, -, *, and
/, to create Example 7-6.
#include <iostream>

int   result;    // the result of the calculations
char  oper_char; // operator the user specified
int   value;     // value specified after the operator

int main(  )
{
    result = 0; // initialize the result

    // loop forever (or until break reached)
    while (true) {
        std::cout << "Result: " << result << '
';
        std::cout << "Enter operator and number: ";

        std::cin >> oper_char >> value;

        if ((oper_char == 'q') || (oper_char == 'Q'))
            break;

        if (oper_char == '+') {
            result += value;
        } else if (oper_char == '-') {
            result -= value;
        } else if (oper_char == '*') {
            result *= value;
        } else if (oper_char == '/') {
            if (value == 0) {
                std::cout << "Error:Divide by zero
";
                std::cout << "   operation ignored
";
            } else
                result /= value;
        } else {
            std::cout << "Unknown operator " << oper_char << '
';
        }
    }
    return (0);
}
You expand the test plan to include the new operators and try it again:
+ 123    Result should be 123
+ 52     Result should be 175
x 37     Error message should be output
- 175    Result should be zero
+ 10     Result should be 10
/ 5      Result should be 2
/ 0      Divide by zero error
* 8      Result should be 16
q        Program should exit
Testing the program, you find much to your surprise that it works. The word “Preliminary” is removed from the specification and the program, test plan, and specification are released.
Maintenance
Good programmers put their programs through a long and rigorous testing process before releasing them to the outside world. Then the first user tries the program and almost immediately finds a bug. This starts the maintenance phase. Bugs are fixed, the program is tested (to make sure the fixes didn’t break anything), and the program is released again.
Revisions
Although the program is officially finished, you are not finished with it. After it is in use for a few months, someone will come to you and ask, “Can you add a modulus operator?” So you revise the specifications, add the change to the program, update the test plan, test the program, and release it again.
As time passes, more people will come to you with additional requests for changes. Soon the program has trig functions, linear regressions, statistics, binary arithmetic, and financial calculations. The design is based on the idea of one-character operators. Soon you find yourself running out of characters to use. At this point the program is doing work far beyond what it was initially designed to do. Sooner or later you reach the point where the program needs to be scrapped and a new one written from scratch. At this point you write a new Preliminary Specification and start the process over again.
Electronic Archaeology
Unfortunately, most programmers don’t start a project at the design step. Instead they are immediately thrust into the maintenance or revision stage. This means most programmers are faced with the worst possible job: understanding and modifying someone else’s code.
Contrary to popular belief, most C++ programs are not written by disorganized orangutans using Zen programming techniques and poorly commented in Esperanto. They just look that way. Electronic archeology is the art of digging through old code to discover amazing things (like how and why the code works).
Your computer can aid greatly in your search to discover the true meaning of someone else’s code. Many tools are available for examining and formatting code. Some of these tools include:
- Cross-referencers
These programs have names like
xref,cxref, andcross. System V Unix has the utilitycscope. They print out a list of variables and where the variables are used.- Program indenters
Programs such as
cbandindentindent a program “correctly” (correct indentation is something defined by the tool maker).- Pretty printers
A pretty printer such as
vgrindorcprinttypesets source code for printing on a laser printer.- Call graphs
On System V Unix, the program
cflowanalyzes the structure of a program. On other systems there is a public domain utility,calls, that produces call graphs, showing who calls whom and who is called by whom.- Class browsers
A class browser allows you to display the class hierarchy so you can tell what components went into building the class, as well as its structure. You’ll learn what a class is in Chapter 13.
- IDEs
Both Borland-C++ Builder and Microsoft Visual C++ .NET contain an integrated development environment (IDE). This means that the tool has both an editor and source browsing tools built in. Commercial and free IDEs are available for Unix as well. One of the better free ones is Source Navigator, which can be obtained from http://sources.redhat.com/sourcenav (Appendix E gives the location of this and many other freely available tools).
Which tools should you use? Whichever ones work for you. Different programmers work in different ways. Some techniques for examining code are listed in the following sections. Choose the ones that work for you and use them.
Mark Up the Program
Take a printout of the program you are trying to figure out and make notes all over it. Use red or blue ink so you can tell the difference between the printout and the notes. Use a highlighter to emphasize important sections. These notes are useful; put them in the program as comments, and then make a new printout and start the process over again.
Use the Debugger
The debugger is a great tool for understanding how something works. Most debuggers allow you to step through a program one line at a time, examining variables and discovering how things really work. Once you find out what the code does, make notes and put them in as comments.
Use the Text Editor as a Browser
One of the best tools for going through someone else’s
code is your text editor. Suppose you want to find out what the
variable sc is used for. Use the
search command to find the first place sc is used. Search again and find the
second. Continue searching until you know what the variable
does.
Suppose you find out that sc
is used as a sequence counter. Since you’re already in the editor, you
can easily do a global search-and-replace to change the variable
sc to sequence_counter. (Disaster warning: make
sure sequence_counter is not
already defined as a variable before you make the
change. Also make sure you do a word replacement
or you’ll find you replaced sc in
places you didn’t intend.) Comment the declaration, and you’re on your
way to creating an understandable program.
Add Comments
Don’t be afraid to put any information you have, no matter how little, into the comments. Some of the comments I’ve used include:
int state;  // Controls some sort of state machine
int rmxy;   // Something to do with color correction?
Finally, there is a catch-all comment:
int idn; // ???
which means, “I have no idea what this variable does.” Even though its purpose is unknown, the variable is now marked as something that needs more work.
As you go through someone else’s code, adding comments and improving style, the structure will become clearer to you. By inserting notes (comments), you make the code better and easier to understand for future programmers.
Suppose you are confronted with the following program written by someone from the “The Terser the Better” school of programming. Your assignment is to figure out what this program does. First you pencil in some comments, as shown in Figure 7-2.
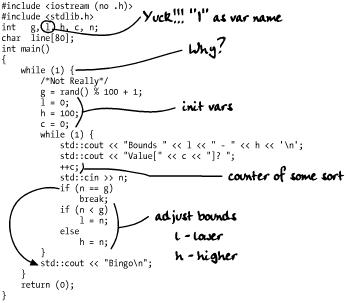
This mystery program requires some work. After going through it and applying the principles described in this section, you get the well-commented, easy-to-understand version shown in Example 7-7.
/********************************************************
 * guess -- a simple guessing game                      *
 *                                                      *
 * Usage:                                               *
 *    guess                                             *
 *                                                      *
 *    A random number is chosen between 1 and 100.      *
 *    The player is given a set of bounds and           *
 *    must choose a number between them.                *
 *    If the player chooses the correct number, he wins.*
 *    Otherwise the bounds are adjusted to reflect      *
 *    the players guess and the game continues          *
 *                                                      *
 * Restrictions:                                        *
 *    The random number is generated by the statment    *
 *    rand(  ) % 100.  Because rand(  ) returns a number   *
 *    0 <= rand(  ) <= maxint  this slightly favors       *
 *    the lower numbers.                                *
 ********************************************************/
#include <iostream>
#include <cstdlib>

int   number_to_guess;  // random number to be guessed
int   low_limit;        // current lower limit of player's range
int   high_limit;       // current upper limit of player's range
int   guess_count;      // number of times player guessed
int   player_number;    // number gotten from the player

int main(  )
{
    while (true) {
        /*
         * Not a pure random number, see restrictions
         */
        number_to_guess = rand(  ) % 100 + 1;

        // Initialize variables for loop
        low_limit = 0;
        high_limit = 100;
        guess_count = 0;

        while (true) {
            // tell user what the bounds are and get his guess
            std::cout << "Bounds " << low_limit << " - " << high_limit << '
';
            std::cout << "Value[" << guess_count << "]? ";

            ++guess_count;

            std::cin >> player_number;

            // did he guess right?
            if (player_number == number_to_guess)
                break;

            // adjust bounds for next guess
            if (player_number < number_to_guess)
                low_limit = player_number;
            else
                high_limit = player_number;

        }
        std::cout << "Bingo
";
    }
    return (0);
}
Programming Exercises
For each assignment, follow the software life cycle from specification through release.
Exercise 7-1: Write a program to convert English units to metric (e.g., miles to kilometers, gallons to liters, etc.). Include a specification and a code design.
Exercise 7-2: Write a program to perform date arithmetic, such as how many days there are between 6/6/90 and 8/8/92. Include a specification and a code design.
Exercise 7-3: A serial transmission line can transmit 960 bytes per second. Write a program that will calculate how long it will take to send a file, given the file’s size. Try it on a 400MB (419,430,400 byte) file. Use appropriate units. (A 400MB file takes days.)
Exercise 7-4: Write a program to add an 8% sales tax to a given amount and round the result to the nearest penny.
Exercise 7-5: Write a program to tell whether a number is prime.
Exercise 7-6: Write a program that takes a series of numbers and counts the number of positive and negative values.