
Chapter 2. The Basics of Program Writing
The first and most important thing of all, at least for writers today, is to strip language clean, to lay it bare down to the bone.
Computers are very powerful tools that can store, organize, and process a tremendous amount of information. However, they can’t do anything until someone gives them detailed instructions.
Communicating with computers is not easy. They require instructions that are exact and detailed. Wouldn’t life be easier if we could write programs in English? Then we could tell the computer, “Add up all my checks and deposits, and tell me the total,” and the machine would balance our checkbooks.
But English is a lousy language when you must write exact instructions. The language is full of ambiguity and imprecision. Grace Hopper, the grand old lady of computing, once commented on the instructions she found on a bottle of shampoo:
| Wash. |
| Rinse. |
| Repeat. |
She tried to follow the directions, but she ran out of shampoo. (Wash-rinse-repeat. Wash-rinse-repeat. Wash-rinse-repeat. . . .)
Of course, we can try to write in precise English. We’d have to be careful and make sure to spell everything out and include instructions for every contingency. If we worked really hard, we could write precise English instructions, right?
As it turns out, there is a group of people who spend their time trying to write precise English. They’re called the government, and the documents they write are called government regulations. Unfortunately, in their effort to make the regulations precise, the government also has made the documents almost unreadable. If you’ve ever read the instruction book that comes with your tax forms, you know what precise English can be like.
Still, even with all the extra verbiage the government puts in, problems can occur. A few years ago California passed a law requiring all motorcycle riders to wear a helmet. Shortly after this law went into effect a cop stopped a guy for not wearing a helmet. The man suggested the police officer take a closer look at the law.
The law had two requirements: 1) that motorcycle riders have an approved crash helmet and 2) that it be firmly strapped on. The cop couldn’t give the motorcyclist a ticket because the man did have a helmet firmly strapped on—to his knee.
So English, with all its problems, is out as a computer language. Now, how do we communicate with a computer?
The first computers cost millions of dollars, while at the same time a good programmer cost about $6,000 a year. Programmers were forced to program in a language where all the instructions were reduced to a series of numbers, called machine language. This language could be directly input into the computer. A typical machine-language program looks like this:
1010 1111
0011 0111
0111 0110
.. and so on for several hundred instructions
Whereas machines “think” in numbers, people don’t. To program these ancient machines, software engineers would write out their programs using a simple language where each word would stand for a single instruction. This was called assembly language because the programmers had to manually translate, or assemble, each line into machine code.
A typical program might look like:
            Program				Translation
MOV A,47 				1010 1111
ADD A,B 				0011 0111
HALT 				0111 0110
.. and so on for several hundred instructions
This process is illustrated in Figure 2-1.
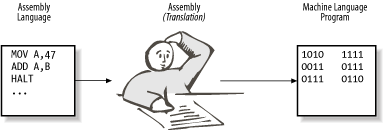
Translation was a difficult, tedious, exacting task. One software engineer decided this was a perfect job for a computer, so he wrote a program, called an assembler, that would do the job automatically.
He showed his new creation to his boss and was immediately chewed out: “How dare you even think of using such an expensive machine for a mere `clerical’ task?” Given the cost of an hour of computer time versus the cost of an hour of programmer’s time, this was not an unreasonable attitude.
Fortunately, as time passed the cost of programmers went up and the cost of computers went down. So it became more cost-effective to let the programmers write programs in assembly language and use a program called an assembler to translate the programs into machine language.
Assembly language organized programs in a way that was easier for the programmers to understand. However, the program was more difficult for the machine to use. The program had to be translated before the machine could execute it. This was the start of a trend. Programming languages became more and more convenient for programmers to use and started requiring more and more computer time to translate them into something useful for computers.
Over the years a series of high-level languages has been devised. These languages are attempts to let programmers write in something that is easy for them to understand and also precise and simple enough for computers to understand.
Early high-level languages were designed to handle specific types of applications. FORTRAN was designed for number crunching; COBOL, for writing business reports; and PASCAL, for student use. (Many of these languages have far outgrown their initial uses. It is rumored that Nicklaus Wirth has said, “If I had known that PASCAL was going to be so successful, I would have been more careful in its design.”)
Later on, Brian Kernighan and Dennis Ritchie developed C and Bjarne Stroustrup turned it into C++.
Programs from Conception to Execution
C++ programs are written in a high-level language using letters, numbers, and the other symbols you find on a computer keyboard. Computers actually execute a very low-level language called machine code (a series of numbers). So, before a program can be used, it must undergo several transformations.
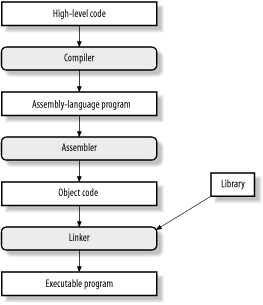
Programs start out as an idea in a programmer’s head. She writes down her thoughts in a file, called a source file or source code, using a text editor. This file is transformed by the compiler into an object file . Next a program called the linker takes the object file, combines it with predefined routines from a standard library, and produces an executable program (a set of machine-language instructions). In the following sections, you’ll see how these various forms of the program work together to produce the final program.
Figure 2-2 shows the steps that must be taken to transform a program written in a high-level language into an executable program.
Fortunately you don’t have to run the compiler, assembler, and linker individually. Most C++ compilers use “wrapper” programs, which determine which tools need to be run and then run them.
Some programming systems go even further and provide the developer with an integrated development environment (IDE). The IDE contains an editor, compiler, linker, project manager, debugger, and more in one convenient package. Both Borland and Microsoft provide IDEs with their compilers.
Creating a Real Program
Before you can actually start creating your own programs, you need to know how to use the basic programming tools. This section will take you step by step through the process of entering, compiling, and running a simple program.
This section describes how to use two different types of compilers. The first type is the standalone or command-line compiler. This type of compiler is operated from the command line. You type a command, and the compiler turns your source code into an executable program. The other type of compiler is contained in an IDE.
Most Unix systems use command-line compilers. A few IDE-type compilers are available for Unix, but they are rare. On the other hand, almost all the compilers used with Microsoft Windows are part of an IDE. For command-line die-hards, these IDEs contain command-line compilers as well.
Creating a Program Using a Command-Line Compiler
In this section you’ll go through the step-by-step process needed to create a program using a command-line compiler. The program you’re going to create will display the message “Hello World” on the screen. Instruction is given for using a generic Unix compiler, the Free Software Foundation’s g++ compiler, Borland C++, and Microsoft Visual C++.
However, if you are using a Borland or Microsoft compiler, you might want to skip ahead to Section 2.2.2.
Note that, because compilers are continually being improved, the information in this section may not be accurate by the time you read it. As new compilers come out, we’ll update this section and post the update on the O’Reilly web site at http://www.oreilly.com/catalog/cplus2.
Step 1: Create a place for your program
It is easier to manage things if you create a separate
directory for each program you are working on. In this case you’ll
create a directory called hello to hold your
hello program.
In Unix, type:
% mkdir hello
% cd hello
In MS-DOS, type:
C:> MKDIR HELLO
C:> CD HELLO
Step 2: Create the program
A program starts out as a text file. Example 2-1 shows the hello program in source form.
#include <iostream>

int main(  )
{
    std::cout << "Hello World
";
    return (0);
}
Use your favorite text editor to enter the program. Your file should be named hello.cpp.
Step 3: Run the compiler
The compiler changes the source file you just created into an executable program. Each compiler has a different command line. The commands for the most popular compilers are listed below.
Unix CC Compiler (Generic Unix)
Most Unix-based compilers follow the same generic
standard. The C++ compiler is named CC. To compile your hello program, you need the following
command:
% CC -g -ohello hello.cppThe -g option enables debugging. (The compiler adds
extra information to the program to make it easier to debug.)
The switch -ohello tells the
compiler that the program is to be called hello, and the final hello.cpp is the name of the source
file. See your compiler manual for details on all the possible
options. There are several different C++ compilers for Unix, so
your command line may be slightly different than is shown
here.
Free Software Foundation’s g++ Compiler
The Free Software Foundation, the GNU people, publishes a number of high-quality programs. (See the glossary entry “Free Software Foundation” for information on how to get their software.) Among their offerings is a C++ compiler called g++.
To compile the hello program using the g++ compiler, use the following command line:
% g++ -g -Wall -ohello hello.cppThe additional switch -Wall turns on all the warnings. When
warnings are turned on, the compiler will warn you when it sees
questionable code.
Borland’s Turbo C++
Borland International makes a free Microsoft Windows C++ compiler called Borland-C++. This compiler is ideal for learning. The command line for Borland-C++ is:
C:> bcc32 -v -N -w -tWC -ehello hello.cppThe -v switch tells
Borland-C++ to put debugging information in the program.
Warnings are turned on by -w
and stack checking by -N. The
-tWC option tells Borland-C++
to output a “Console Application.” That’s a program that uses
the standard C++ API (as opposed to the Windows API) and uses a
MS-DOS console window for its input and output. Finally,
-ehello tells Borland-C++ to
create a program named hello,
and hello.cpp is the name of
the source file. See the Borland-C++ reference manual for a
complete list of options.
Microsoft Visual C++ .NET
Microsoft Visual C++ .NET is another C++ compiler for Microsoft Windows. To compile the HELLO program, use the following command line:
C:> cl /FeHELLO /GZ /RTCsuc /Zi /Wall hello.cppThe /FeHELLO option
tells the program to generate a program named
HELLO.exe. Runtime checking is enabled by
/GZ and /RTCsuc, and debugging is turned on
with the /Zi option. All
warning messages are enabled by /Wall.[1]
Creating a Program Using an Integrated Development Environment
The IDE provides a one-stop shop when it comes to programming. It take a compiler, editor, and debugger and wraps them into one neat package for the programmer. This package is presented inside a unified graphical interface that allows you to perform most program development operations with a few clicks of the mouse.
Since development environments tend to change, the particular version you use may operate slightly differently than is described in this chapter.
Each IDE is a little different, so we’ve included separate instructions for each one. (Note that compilers change much faster than books, so the information presented in these sections may be outdated. Check this book’s page at the O’Reilly web site, http://www.oreilly.com/catalog/cplus2, for the latest information on compilation environments.)
Borland C++
Create a directory called HELLO to hold the files for our
helloprogram. You can create a directory using the Windows desktop tools or by typing the following command at the MS-DOS prompt:mkdir HELLO
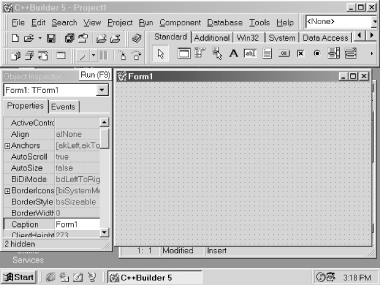
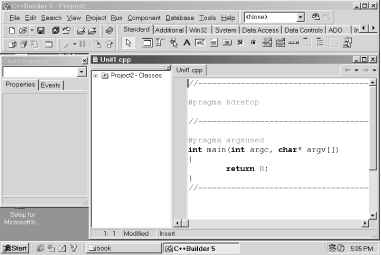
From Windows, double-click on the Borland C++ icon to start the IDE, or start the IDE using the “Start” menu. The program begins execution and displays a blank workspace, as shown in Figure 2-3.
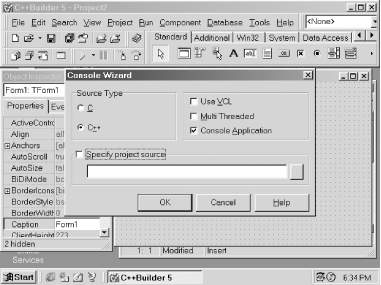
Select the File→New item to create a project for our program. Select Console Wizard as shown in Figure 2-4 and click OK.
The Console Wizard dialog appears as shown in Figure 2-5. Select C++ for Source Type and click OK.
The initial editing window appears as shown in Figure 2-6.
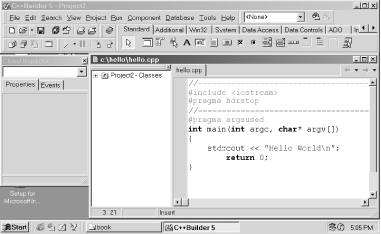
Add your code to the file Unit1.cpp. The resulting code should look like:
#include <iostream>
int main(  )
{
    std::cout << "Hello World
";
    return (0);
}
You can ignore the
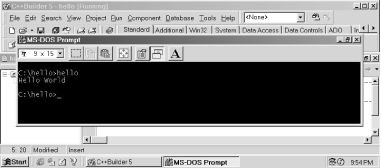
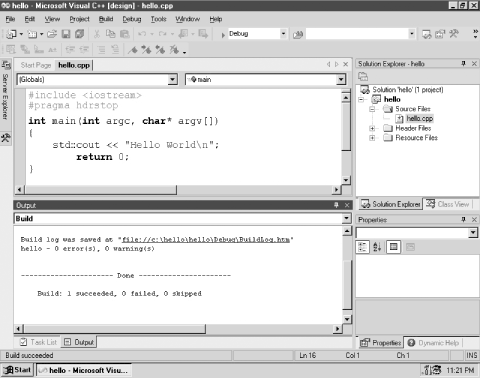
#pragmastatements and comments that Borland-C++ has added. When you have finished, your screen will look like Figure 2-7.Compile and run the program by selecting the Debug→Run menu item. The program will run and display “Hello World” in a window, as shown in Figure 2-8.

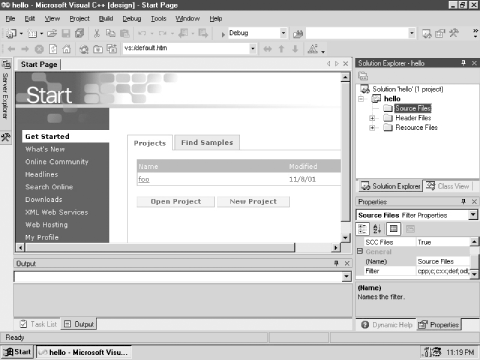
Microsoft Visual C++
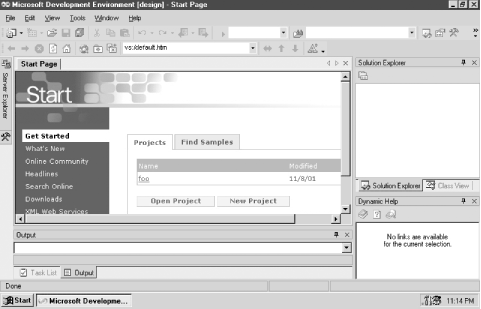
From Windows, start Microsoft Visual Studio .NET. A start screen will be displayed, as shown in Figure 2-9.
Click on File→New→Project to bring up the New Project dialog shown in Figure 2-10.
In the Template pane, select “Manage C++ Empty Project.” Fill in the Name field with hello. Change the Location field to the directory in which you wish to build the project. Click OK. The project screen now appears as shown in Figure 2-11.
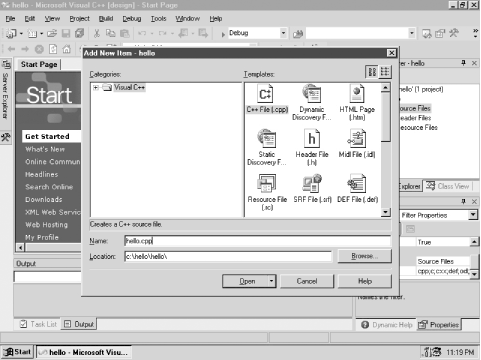
In the Solution Explorer tab, select Source Files. Now create the program using the File→Add New Item menu. The Add New Item dialog appears as shown in Figure 2-12.
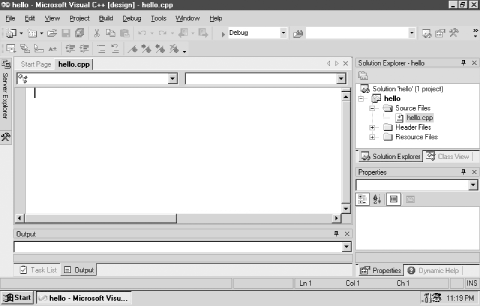
Select C++ file as the file type and put hello.cpp in the name field. Click Done to bring up the editing window shown in Figure 2-13.
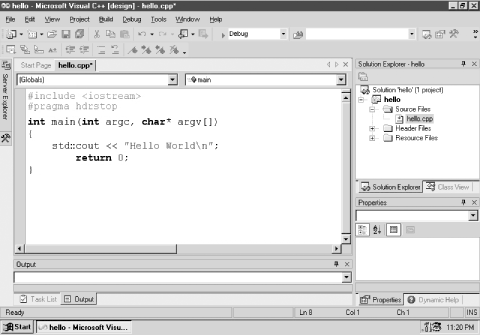
Type the following lines into the hello.cpp window.
#include <iostream>
int main(  )
{
    std::cout << "Hello World
";
    return (0);
}
Your results should look like Figure 2-14.
Compile the program by selecting Build→Build Hello. You may have to resize the windows to view the messages. If everything works, the screen should look something like Figure 2-15.
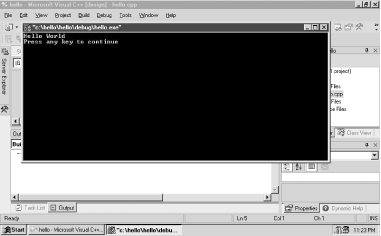
Run the program using the Debug→Start Program without Debugging window menu item. An MS-DOS window appears and the program is run within it. The results are shown in Figure 2-16.

Getting Help in Unix
Most Unix systems have an online documentation system
called the “man pages.” These can be accessed using the man command. (Unix uses man as an abbreviation for “manual.”) To get
information about a particular subject, use the command:
man subjectFor example, to find out about the classes defined in the
iostream package, you would
type:
man iostream
The command also has a keyword search mode:
man -k keywordTo determine the name of every man page with the word “output” in its
title, use the command:
man -k output
Getting Help in an IDE
IDEs such as Borland C++ and Microsoft C++ have a Help menu item. This item activates a hypertext-based help system.
Programming Exercises
Exercise 2-1: On your computer, type in the hello program and execute it.
Exercise 2-2: Take several programming examples from any source, enter them into the computer, and run them.
[1] In the prerelease of Microsoft Visual Studio .NET,
compilation with /Wall
generated a large number of warnings caused by minor
problems in Microsoft’s own libraries. I expect these
problems to be fixed in the production release of this
code.