In the previous chapter, we learned how to use the Node Package Manager or NPM, the command-line tool that allows us to install and update our application packages.
This chapter will examine React function components, which have become the status quo of writing up-to-date React apps, and the syntax to define the props we use for our function components using TypeScript. Simply put, React function components are essentially JavaScript functions that return JSX or JavaScript XML.
We’ll set up a basic create-react-app (CRA) app with TypeScript and examine some key features with the CRA TypeScript template. TypeScript, a strongly typed superset of JavaScript, brings with it intuitive features that extend JS in powerful ways, such as defining the structure of an object in a lot of ways.
We will discuss the apparent benefits of using typings in TypeScript, especially in building large-scale enterprise-level applications. Furthermore, we will write React function components, or React.FC for short, and touch on two commonly used React Hooks: useState and useEffect.
Creating a create-react-app App
create-react-app (CRA) is the most popular as well as the easiest way to start building a single-page application (SPA) . It is also Facebook’s official boilerplate generator to create a simple or starter React application.
CRA, which uses a preconfigured webpack build for development, gives us the capability to dive immediately into our code and build our React application without the need to manually set up and configure our local development environment and production build.
Minimum requirements are Node >= 8.10 and NPM >= 5.6.
NPX (Node Package Execute) comes with NPM. NPX, which is useful for a single-time-use package, executes packages from the NPM registry without installing them locally.
If you’ve previously installed create-react-app globally via npm install -g create-react-app, you need to uninstall it using
This is to ensure that NPX always uses the latest version. Global install of CRA is no longer supported.
The naming convention is to use all small letters and separate the words with a dash. The --template TypeScript flag tells CRA to use TS as the default syntax and add the required configurations. To start your development server, run either <npm start> or <yarn start>.
You can find the complete command scripts under “scripts” in your package.json.

Initial loading page of CRA with TypeScript
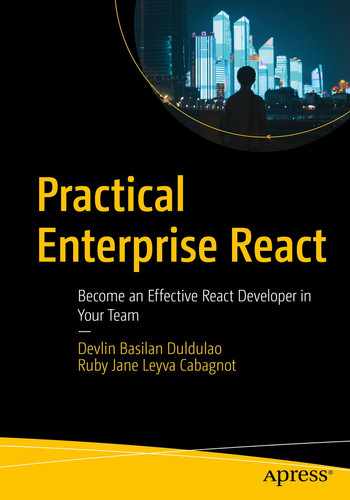
Files initially created with create-react-app (CRA)
Let’s review some of the files generated with create-react-app. First, let’s check out the two critical files for the project to be built:
The following is a short definition and usage of some of the files and folders included with CRA:
node_modules: It contains the JavaScript libraries and some dependencies of the libraries that we’ve installed. We don’t typically include this folder in our Git repository because it’s quite large, around 100mb–500mb, depending on how many packages we’ve installed in the app.
public/manifest.json: This is a default file included with CRA. When building a Progressive Web App (PWA) off your current React app, the configuration file is needed.
A simplistic explanation of a PWA is that it lets you run your application offline or without Internet connectivity. What it does is that it caches the data or content of your app so you can still see what’s inside your website if the app is offline. FYI, you will never see the T-Rex again when you don’t have Internet connectivity. I’m sure all of us have seen (you can even play it!) that dinosaur, right?
public/robots.txt: Also known as the robots exclusion protocol or standard. You can declare here the pages or HTML that you want to hide from Google’s search results. Sample pages include the admin page because your users don’t need to know your app’s admin page. You can likewise specify here which search engine you want or don’t want to index your site.
src: Contains the app UI code, including components and CSS styling. This is the core of the React app. We can also see the App.tsx, our application’s entry point, and index.tsx, which bootstraps our app.
gitignore: A text file located at the root file; this is where you put files you want Git to ignore, such as your node_modules and .env files. Files already tracked by Git are not affected. Use the command git rm –cached to stop indexing a file that’s already been tracked.
package-lock.json: If you’ve installed Yarn in your machine, by default, CRA will search for the Yarn package manager, but if it’s not available, it will fall back to NPM. If you’re using Yarn, then you’ll see the yarn-lock.json file instead.
package.json: We’ve already discussed package.json in the previous chapter, but to recap, it manages dependencies, scripts, versions, and other metadata of our project app.
tsconfig.json: This file in the directory root indicates that the said directory is the TypeScript project root.
"target": "es5": Modern browsers support all ES6 features, but you want your code to be backward-compatible to the ECMAScript 2009 or older environments.
"lib": The standard type definition to be included in the type-checking process.
"strict": true: This is the strict compiler option in TypeScript; it means you are opting for a strict-by-default mode of type safety without having to enable each compiler option separately.
"module": "esnext": Specifies the code generation.
"noEmit": true: Do not emit JavaScript source code, source maps, or declarations and instead use Babel.
"jsx": Whether to support JSX in .tsx files.
"include": The files and folders for TypeScript to check.
Declaration Files for TypeScript with React
Declaration files also called .d.ts files are prefixed with @types.
Using declaration files – also known as definition files – we avoid mishandling libraries and get the ever helpful and powerful “IntelliSense” or autocompletion in our editor.
To determine if we need a declaration file (@types) for the library we’ve recently installed, we go to the GitHub repository called DefinitelyTyped, where declaration files are being hosted. Another way is to simply go to www.npmjs.com and prefix the library name with @types/ in the search box. Fortunately, many people have already written declaration files for the most common and popular JavaScript libraries out there.
You will get errors or your IDE will complain if you’re using an external library that requires a type declaration file and you fail to install it.
The Typings in TypeScript
The typings in TypeScript serve as documentation itself. Yes, it may seem to be a bit of extra work at first, but it pays off with a significant return in the long run. Many React developers who couldn’t see its value initially say they now cannot imagine not using it.
You’ll note that the description of the code is part of the code itself when you write the TypeScript yourself.
If you’re familiar with JavaScript, you know that it is untyped. JavaScript is probably the only programming language that is equally loved and hated for being flexible – maybe a bit too much sometimes – in its “rule” to pass around data and objects as we want or how we want it.
Now, imagine building an application with thousands of codes with a bunch of people in a team. Codes can quickly get messy and convoluted. You’ll likely encounter methods being called in an object that doesn’t exist or variables that were never declared.
But in TypeScript, we are required to define our objects and data format. In doing so, the compiler can then search or detect our code intelligently and catch potential errors such as calling a function with the wrong kind of argument or referencing a variable that’s not available in the current scope.
Significant benefits of using TypeScript include having enhanced tooling options such as autocompletion, refactoring, and finding usages in our entire application. You can read up more on TypeScript here: www.typescriptlang.org/docs/handbook/basic-types.html.
Understanding React Function Components with Props
A React function component (React.FC ) is a JavaScript/ES6 function that accepts arguments as properties of the component and returns valid JavaScript XML (JSX). It also takes props as a parameter if needed.
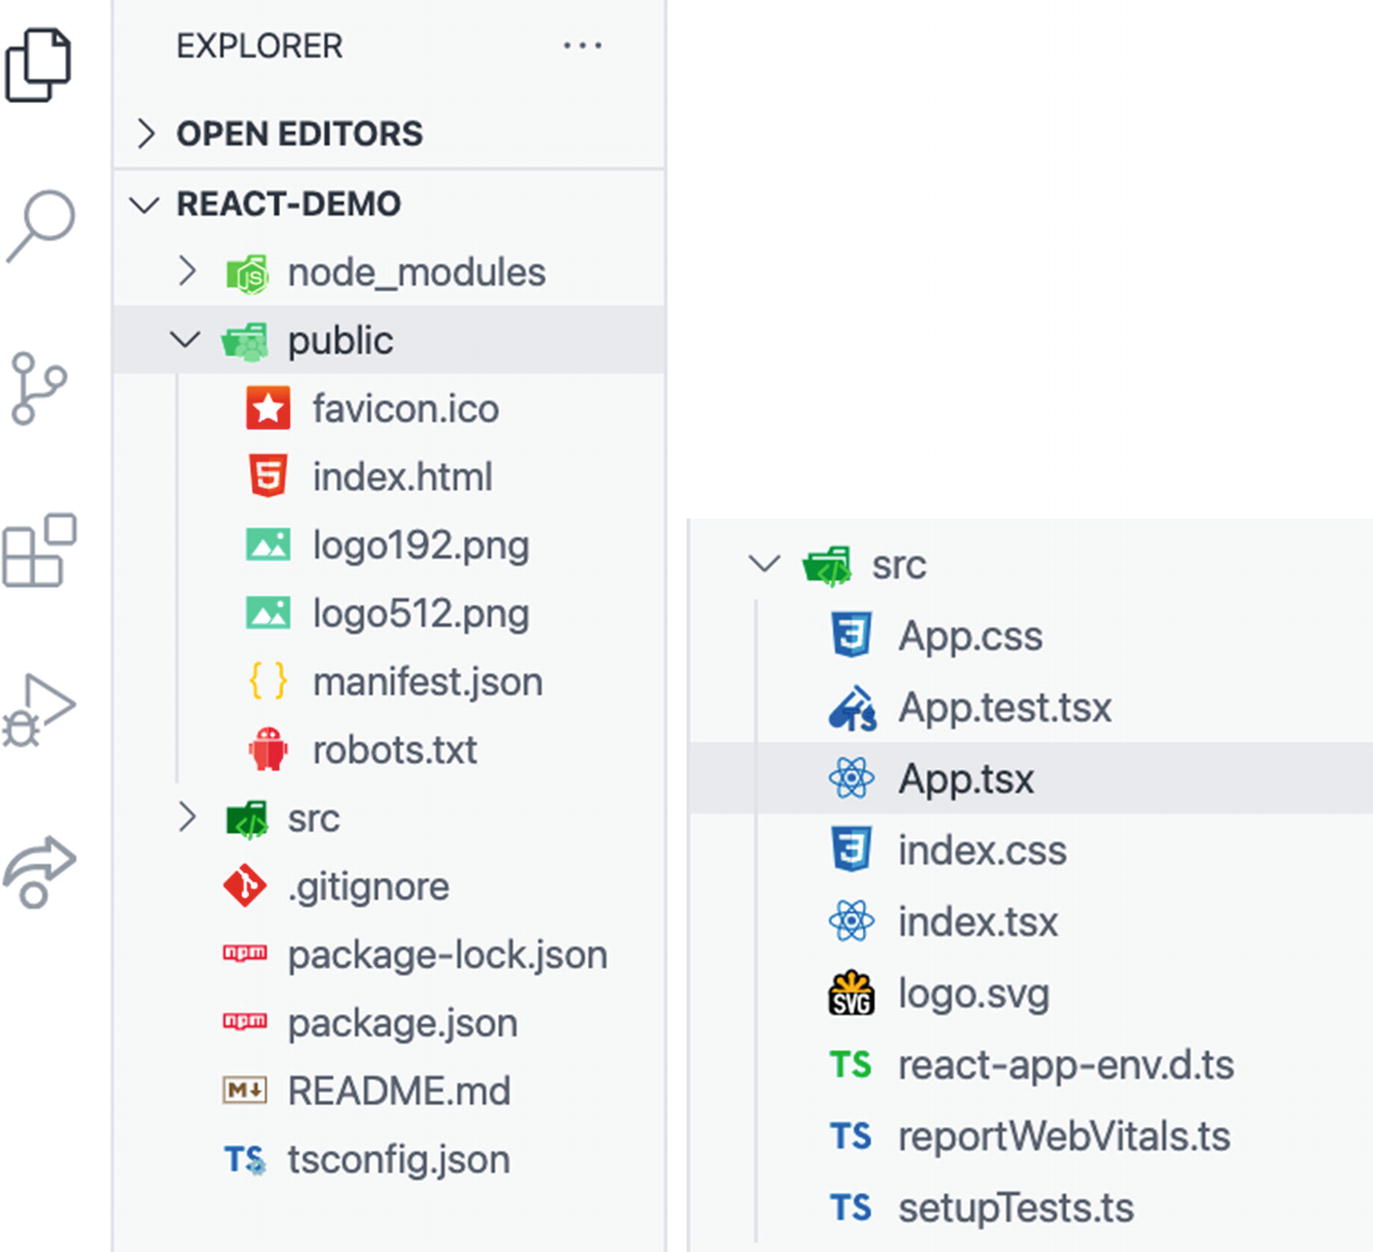
Now let’s create a React function component. In the src folder, create a directory named components, and inside the folder components, create a file named Customer.tsx.
Note here that we defined a type named Person that specifies the properties our components will take. firstName and lastName are required strings, while age is a required number and isLegal is a required boolean.
By creating a type, we can now then use it anywhere in our project as if it were a string, number, or any of the primitive or reference types.
We can see that Customer is a stateless function component that takes a props object and destructures all the required properties of <Person>.
Now that we have our function component with props, let’s get to our App.tsx to render it.
Creating the type definition is also useful when we are using the Code IntelliSense feature in the code editor.
The Added IntelliSense in the Code Editor
Code suggestion/IntelliSense in the editor

TypeScript error in the compiler
The point is you have an option not to define all of the typings in your component to achieve that excellent tooling of autocompletion and type safety features of TypeScript.
Yes, it might take a bit of effort, in the beginning, to set up and get used to using typings in your variables and functions. Still, it would give us a better developer experience and a maintainable app in the long run.
Before we proceed, let’s talk a bit more about React Hooks and two popular Hooks, namely, useState and useEffect.
React Hooks
React Hooks, which are essentially JavaScript functions, are a “new addition in React 16.8. They let you use state and other React features without writing a class.”
- 1.
Call Hooks only at the top level of your React functions.
- 2.
Call Hooks only from React function components – not from regular JavaScript functions.
- 3.
Call Hooks only from custom Hooks.
React Hooks: useState
useState is a Hook that will allow state variables in function components. useState is also most likely the one we will be using a lot.
Let’s say we want to update a state in our JSX. How do we do that inside our function component? Well, we use useState for that!
The state variables inside the square brackets are a JavaScript syntax called array destructuring. The first variable, [title], which is the getter, is positioned as the first value returned by useState, and [setTitle] is a setter or set function that lets us update it.

Screenshot of rendering the UI using the local state
Now we have the local value, but how to update the value [title]? That’s the job of the setter function [setTitle]. Btw, if you’re asking about the className in the div here, we use className in React instead of class to prevent name clashing because the latter is a reserved keyword in modern JavaScript and TypeScript.
Before we go on, we need to discuss briefly what is JSX or JavaScript XML. In React JSX, we can write HTML and JavaScript combined together. We can run JS code (logic, functions, variables, etc.) inside the HTML directly by using curly braces {}, like when we declare {title} or {setTitle()}.

Code suggestion in the IDE

Updating the UI using the local state
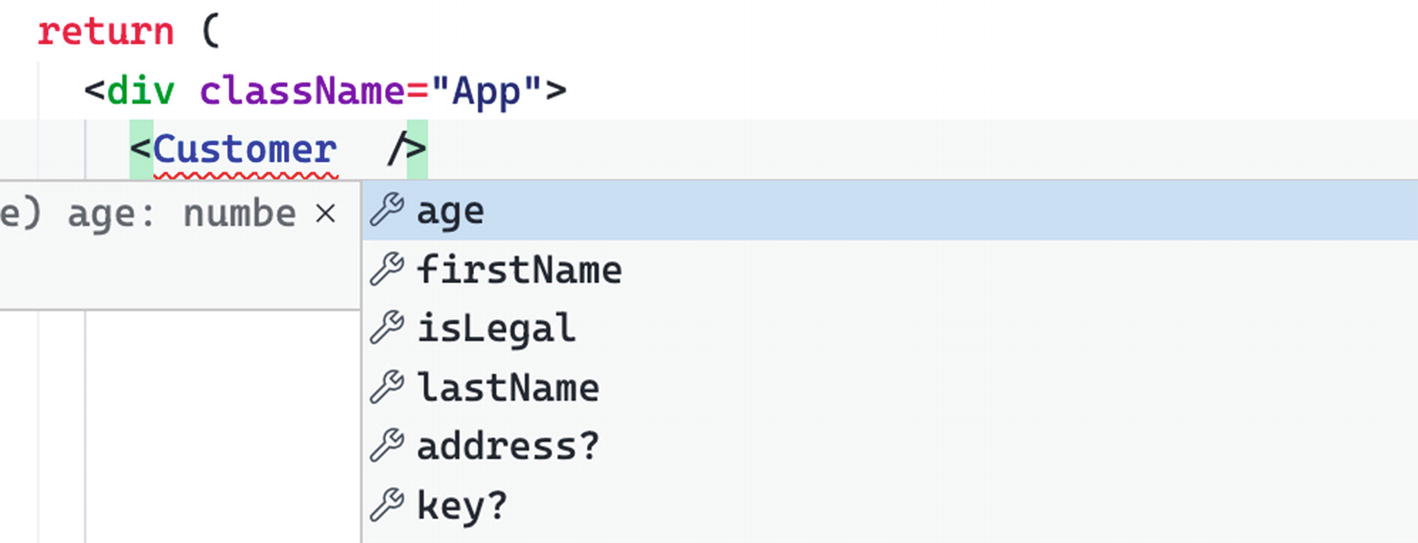
Go to your browser and click the title “Practical React Enterprise” to update the local state title.

Alert message pop-up
React Hooks: useEffect
useEffect is used for all side effects and essentially replaced the lifecycle methods we have worked with before (componentDidUpdate, componentDidMount, componentWillUnmount). This all-around Hook accepts two parameters – the first is a required function and the second an optional parameter for specific states.
Now, let’s say we want to trigger an event as soon as the user lands on our app or trigger an event BEFORE everything in the UI gets rendered.
Alert message with useEffect
A use case example of useEffect is when you want to send a request to a web service to get data of your user or a list of values like customer names, addresses, etc.
- 1.
The array brackets will prevent useEffect from running continuously on an infinite loop.
- 2.
You can also add a state inside the array. And any change in the value of the state (i.e., title) will trigger useEffect to re-render:
Tips
- 1.
Don’t use the "eject": "react-scripts eject" command unless you need to expose the plumbing, such as Babel RC and Webpack, that CRA included at the start of the application. Do this only when you need to do some customization inside your React project. Keep in mind that you cannot go back to the original boilerplate structure of create-react-app once you eject.
- 2.
Declare types before runtime code implementation. The types used within the current module must be seen at the top.
- 3.
In the naming convention, components should be in PascalCase, while methods should be in camelCase.
Summary
In this chapter, we used a simple create-react-app boilerplate with TypeScript to show the easiest way for us to get up and running in building a React app. We learned some of CRA’s essential elements with TypeScript and how they all go together to run our app correctly.
The code suggestions and options to make it easier for us to read the code of others. And this allows for efficiency in team communication and consistency in the code base.
IntelliSense and error catching early on and before running the code
Somehow, we managed to deconstruct the React function component with TypeScript.
But what we have touched here is just the tip of the iceberg, especially in understanding the full powers of TypeScript with React and what TS can bring to your JavaScript code.
As this book is about building a practical enterprise-level app, we will delve into it more in depth as we apply it to our code. In the next chapter, I will show you how to set up the foundations of our project app in a useful and efficient way so you’ll become a productive React developer from day 1.