LXC provides operating system–level containers, as you saw in previous chapters. In this chapter we will look at various tools that may be used for managing LXC containers. Some of the tools that will be discussed here are common tools that work with different containerization and virtualization technologies, but others are specific to LXC. In some sense LXD can be considered as a tool that provides a new user space experience with which to manage LXC.
libvirt
libvirt is a library that works with many virtualization technologies and provides a common interface to interact with these technologies. libvirt can be used to manage LXC containers in the same way, with the help of the libvirt LXC driver. Installing libvirt in Ubuntu is easy, which you can do with the following command:
$ sudo apt install libvirt-bin lxcYou can find out the version of the libvirt-bin package that was installed with this command:
$ sudo dpkg -s libvirt-bin | grep '^Version:'Version: 2.5.0-3ubuntu5.1$
At the time of this writing, the version of libvirt-bin available in Ubuntu 17.04 is 2.5.0. The preceding command should also install the LXC driver for libvirt, but you can double-check its installation with the following command:
$ /usr/lib/libvirt/libvirt_lxc -h/usr/lib/libvirt/libvirt_lxc: option requires an argument -- 'h'syntax: /usr/lib/libvirt/libvirt_lxc [OPTIONS]Options-b, --background-n NAME, --name NAME-c FD, --console FD-v VETH, --veth VETH-s FD, --handshakefd FD-S NAME, --security NAME-N FD, --share-net FD-I FD, --share-ipc FD-U FD, --share-uts FD-h, --help$
As noted, libvirt is a library to manage virtual machines or containers based on the different drivers available in the libvirt library. Many command-line tools use libvirt. One such tool is virsh, which you can use to manage LXC using the hypervisor connection URI argument as lxc:///—that is, virsh -c lxc:///. Instead of passing the -c option to every virsh command, you can set the LIBVIRT_DEFAULT_URI environment variable to lxc:/// to use LXC as the default connection URI.
libvirt takes an XML definition in order to manage containers or virtual machines. Let’s create a simple XML definition for our container that will be managed by libvirt. The XML definition will look like the following:
$ cat lxc-vm1.xml<domain type='lxc'><name>lxc-vm1</name><memory>1048576</memory><os><type>exe</type><init>/sbin/init</init></os><vcpu>1</vcpu><clock offset='utc'/><on_poweroff>destroy</on_poweroff><on_reboot>restart</on_reboot><on_crash>destroy</on_crash><devices><emulator>/usr/lib/libvirt/libvirt_lxc</emulator><filesystem type='mount'><source dir='/var/lib/lxc/lxc-vm1/rootfs'/><target dir='/'/></filesystem><interface type='network'><source network='default'/></interface><console type='pty'/></devices></domain>
This XML configuration document can be used to create a domain in libvirt and save it to disk:
$ sudo virsh -c lxc:/// define lxc-vm1.xmlDomain lxc-vm1 defined from lxc-vm1.xml
The stored XML configuration can be viewed as follows:
$ sudo virsh -c lxc:// dumpxml lxc-vm1<domain type='lxc'><name>lxc-vm1</name><uuid>232530c7-2ddf-40d5-9082-670dfd87b2b3</uuid><memory unit='KiB'>1048576</memory><currentMemory unit='KiB'>1048576</currentMemory><vcpu placement='static'>1</vcpu><os><type arch='x86_64'>exe</type><init>/sbin/init</init></os><clock offset='utc'/><on_poweroff>destroy</on_poweroff><on_reboot>restart</on_reboot><on_crash>destroy</on_crash><devices><emulator>/usr/lib/libvirt/libvirt_lxc</emulator><filesystem type='mount' accessmode='passthrough'><source dir='/var/lib/lxc/lxc-vm1/rootfs'/><target dir='/'/></filesystem><interface type='network'><mac address='52:54:00:6b:e9:4f'/><source network='default'/></interface><console type='pty'><target type='lxc' port='0'/></console></devices></domain>$
This XML dump shows some additional parameters that were not defined in our original configuration, such as uuid, currentMemory and unit for memory, mac address, and so forth. These were generated automatically using defaults by virsh define.
Now that the domain is defined, let’s create a Debian Stretch–based LXC container , which should have the same name defined in the previous XML configuration (i.e., lxc-vm1):
$ sudo lxc-create -t debian -n lxc-vm1 -- --release stretchNote
In the previous chapters, you have seen that by default containers are created inside the directory /var/lib/lxc/{container-name}. This directory should be used in the source dir parameter pointing to the container’s rootfs in the XML configuration (with the container-name previously given) using the -n option. There are other methods available to point to the rootfs without using the lxc-create command, which you can explore with the help of libvirt’s documentation.
Everything required to manage an LXC container is in place, so let’s now look at some management commands to manage our newly created LXC container.
Starting the Container
Use the virsh start command to start the container:
$ sudo virsh -c lxc:/// start lxc-vm1Domain lxc-vm1 started$
Use the virsh list command to see the current state of the container:
$ sudo virsh -c lxc:/// listId Name State----------------------------------------------------22595 lxc-vm1 running$
Connecting to the Container Console
To connect to the container started in the previous section, use the virsh connect command as follows:
$ sudo virsh -c lxc:/// console lxc-vm1Connected to domain lxc-vm1Escape character is ^]systemd 232 running in system mode. (+PAM +AUDIT +SELINUX +IMA +APPARMOR +SMACK +SYSVINIT +UTMP +LIBCRYPTSETUP +GCRYPT +GNUTLS +ACL +XZ +LZ4 +SECCOMP +BLKID +ELFUTILS +KMOD +IDN)Detected virtualization lxc-libvirt.Detected architecture x86-64.Welcome to Debian GNU/Linux 9 (stretch)!Set hostname to <lxc-vm1>.[email protected]: Cannot add dependency job, ignoring: Unit [email protected] is masked.[email protected]: Cannot add dependency job, ignoring: Unit [email protected] is masked.[email protected]: Cannot add dependency job, ignoring: Unit [email protected] is masked.[email protected]: Cannot add dependency job, ignoring: Unit [email protected] is masked.[email protected]: Cannot add dependency job, ignoring: Unit [email protected] is masked.[ OK ] Reached target Swap.[ OK ] Reached target Remote File Systems.[ OK ] Started Forward Password Requests to Wall Directory Watch.[ OK ] Listening on Journal Audit Socket.[ OK ] Listening on Journal Socket.[ OK ] Listening on /dev/initctl Compatibility Named Pipe.[ OK ] Listening on Journal Socket (/dev/log).[ OK ] Reached target Sockets.[ OK ] Created slice System Slice.----------OUTPUT TRUNCATED----------[ OK ] Started Getty on tty1.[ OK ] Started Getty on tty3.[ OK ] Started Console Getty.[ OK ] Started Getty on tty2.[ OK ] Started Getty on tty4.[ OK ] Reached target Login Prompts.[ OK ] Started OpenBSD Secure Shell server.[ OK ] Reached target Multi-User System.Starting Update UTMP about System Runlevel Changes...[ OK ] Started Update UTMP about System Runlevel Changes.Debian GNU/Linux 9 lxc-vm1 tty1lxc-vm1 login:
If there are multiple consoles in the container, then you can use the following command to connect to different consoles based on the console device name. In LXC, usually console devices are named as console0, console1, console2, and so on.
$ sudo virsh -c lxc:/// console lxc-vm1 --devname console0Note
Use ^] or press Ctrl+] to exit from the console, similar to how you exit from a telnet terminal.
Monitoring Container Utilization
You can monitor resource utilization and activities of all the containers on a host using a command called virt-top. This command is not installed by default with libvirt-bin, so you must install it separately as follows:
$ sudo apt install virt-top$ sudo virt-top -c lxc:///(will open a "top" like interface to show container activities)$
Rebooting the Container
Use the virsh reboot command as follows to reboot an LXC container. The command first sends a message to the init process via device node /dev/initctl; if this device doesn’t exist in the container, then the command sends a SIGHUP to PID 1 inside the LXC container.
$ sudo virsh -c lxc:/// reboot lxc-vm1Domain lxc-vm1 is being rebooted$
Stopping and Destroying the Container
Use the virsh shutdown command as follows to request a graceful shutdown of the LXC container. The command first sends a message to the init process via device node /dev/initctl, and if such device doesn’t exist in the container, then it sends a SIGHTERM to PID 1 inside the LXC container.
$ sudo virsh -c lxc:/// shutdown lxc-vm1Domain lxc-vm1 is being shutdown$
Use the virsh destroy command to forcefully stop the container, if graceful shutdown does not work:
$ sudo virsh -c lxc:/// destroy lxc-vm1Domain lxc-vm1 destroyed$
Note
The virsh destroy command is used to shut down the container rather than delete or remove the container as in the case of lxc-destroy (covered in Chapter 4).
Undefining or Deleting a Container from libvirt
To delete or undefine a container from libvirt, use the virsh undefine command:
$ sudo virsh -c lxc:/// undefine lxc-vm1Domain lxc-vm1 has been undefined$ sudo virsh -c lxc:/// dumpxml lxc-vm1error: failed to get domain 'lxc-vm1'error: Domain not found: No domain with matching name 'lxc-vm1'$
Note
It is recommended to undefine a container after stopping the container. Otherwise, a running container will move from persistent to transient state. Read more about persistent and transient states in the libvirt documentation if you want to know more.
Virtual Machine Manager GUI
virt-manager is a desktop application to manage virtual machines. It was primarily created for use with KVM, but later support was added for other visualization technologies such as XEN and later containers such as LXC. It can also show the graphical console of the container using the inbuilt VNC or SPICE client viewer, if the container has one. virt-manager uses the libvirt lxc driver to manage LXC containers; hence, installing libvirt-bin is mandatory for managing LXC containers within virt-manager. Install the Virtual Machine Manager desktop application using the following command in Ubuntu:
$ sudo apt install virt-managerThe Virtual Machine Manager GUI application can be started from the Ubuntu Dash by searching for “virtual” as shown in Figure 5-1.
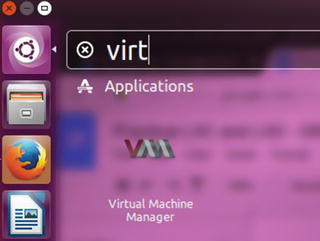
Figure 5-1. Searching for Virtual Machine Manager in Ubuntu Dash
Alternatively, you can open Virtual Machine Manager from the terminal with the following command:
$ sudo virt-managerEither way, the application opens a GUI that looks like Figure 5-2.
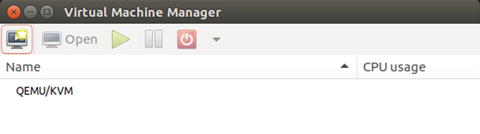
Figure 5-2. Virtual Machine Manager first screen
To work with LXC containers in virt-manager, you need to add a new connection type for LXC. The default connection type (as shown in Figure 5-2) is QEMU/KVM. Choose File ➤ Add Connection from the menu, as shown in Figure 5-3.

Figure 5-3. Choosing to add a connection
The Add Connection dialog opens, as shown in Figure 5-4.
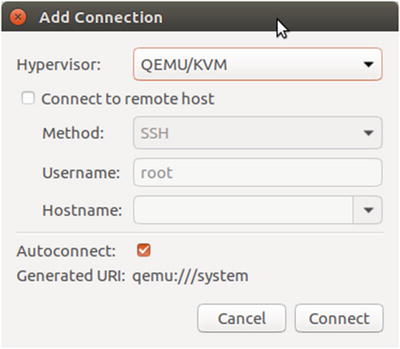
Figure 5-4. Add Connection dialog
Then choose the LXC connection Libvirt-LXC (Linux Containers) from the Hypervisor drop-down, as shown in Figure 5-5.
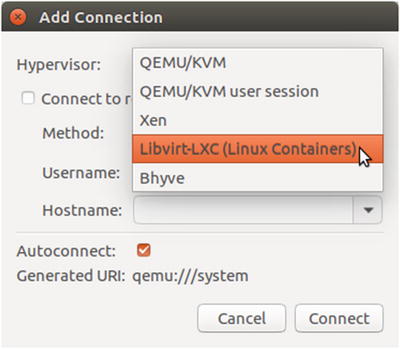
Figure 5-5. Choosing the LXC connection
Leave the rest of the settings as they are and click Connect. This will list the new connection type that was added in the Virtual Machine Manager application, as shown in Figure 5-6.
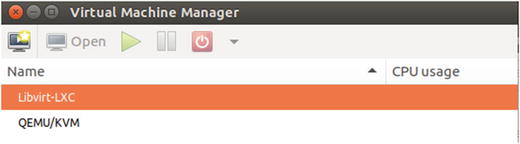
Figure 5-6. Listing connection types
Before you start to manage an LXC container using virt-manager, you need to create an LXC container using the lxc-create command as follows:
$ sudo lxc-create -t debian -n lxc-vm1 -- --release stretchNote
This is required because virt-manager expects an OS directory tree to exist, and creating the OS directory tree is not supported in virt-manager yet. This also appears as a warning in the New VM creation screen.
Let’s create an LXC OS-level container and then manage it using virt-manager. Click the Create a new virtual machine icon as shown in Figure 5-7.
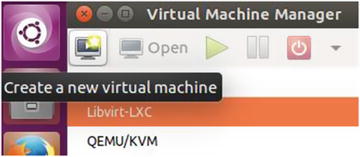
Figure 5-7. Click Create new virtual machine
This opens the Step 1 of the Create a new virtual machine wizard, shown in Figure 5-8, in which you should choose Operating system container since that is what you intend to create with LXC. The Connection field should be set to Libvirt-LXC. Click Forward.
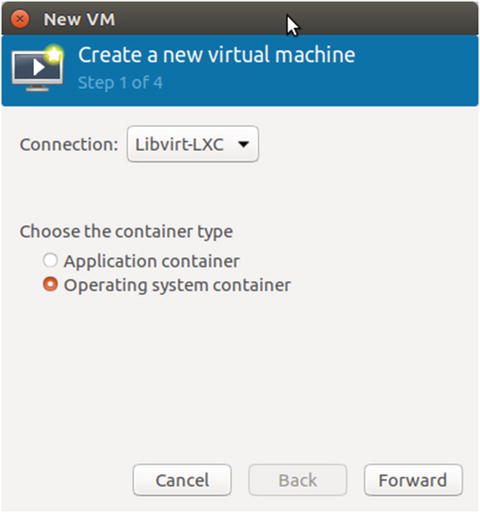
Figure 5-8. Step 1 of the Create a new virtual machine wizard
In Step 2 of the Create a new virtual machine wizard, shown in Figure 5-9, provide an existing OS root directory. This is the LXC container that you created already with the lxc-create command prior to launching the wizard. Use the rootfs of this container, which will get created by default in /var/lib/lxc/{container-name}/rootfs as shown in Figure 5-9. Click Forward.
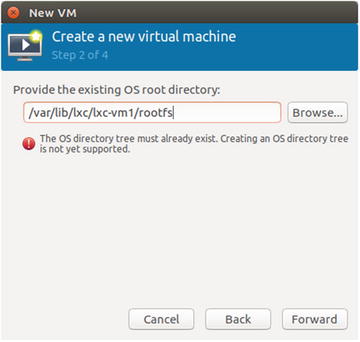
Figure 5-9. Step 2 of the Create a new virtual machine wizard
In Step 3 of the Create a new virtual machine wizard, provide the values for memory and CPU that should be used by the LXC container. The maximum allowed value is shown in Figure 5-10. Click Forward.
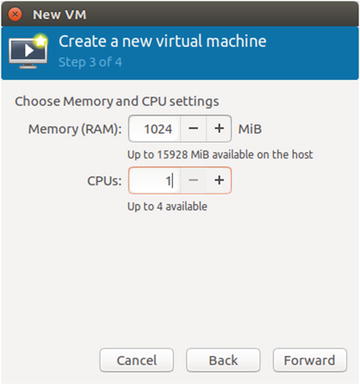
Figure 5-10. Step 3 of the Create a new virtual machine wizard
In Step 4 of the Create a new virtual machine wizard, shown in Figure 5-11, name the container and choose the network setup. The default NAT network should work in most cases.
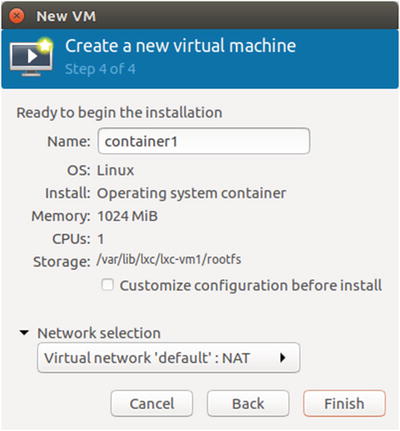
Figure 5-11. Step 4 of the Create a new virtual machine wizard
Click Finish to begin creation of the container within virt-manager, shown in progress in Figure 5-12.
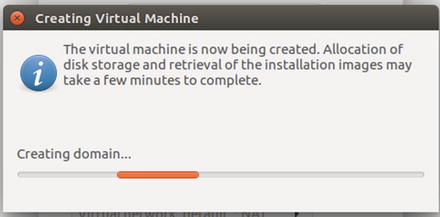
Figure 5-12. Creating the virtual machine
After creating the container, virt-manager brings up the console of the containerin a separate window. You can use this console to interact with the container, as shown in Figure 5-13.
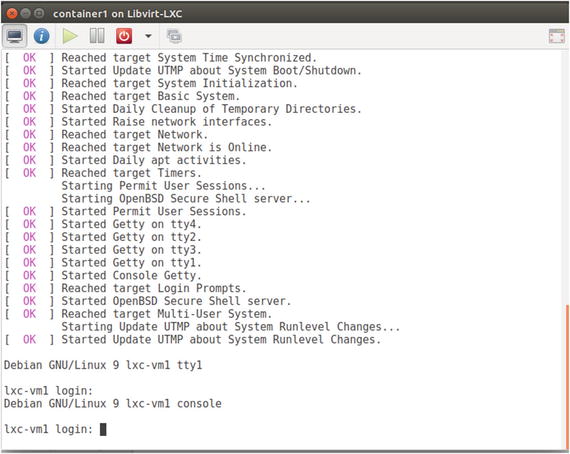
Figure 5-13. Container console
Figure 5-14, shows the overview of the container that was just created in virt-manager. Click other navigation menu items such as Performance, CPUs, Memory, Boot Options, NIC, Console1, and Filesystem to get detailed information on other parameters of the container.
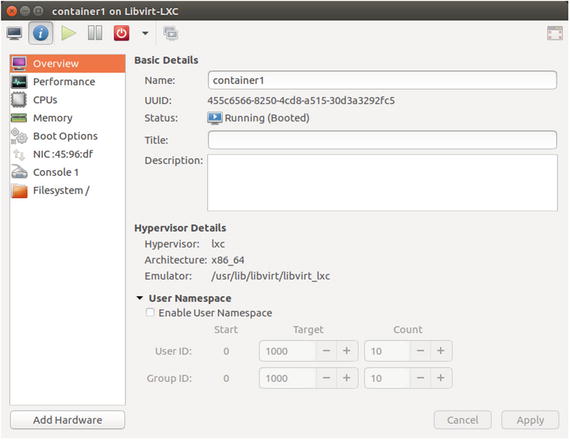
Figure 5-14. Container overview
The container will be listed in the virt-manager GUI as shown in Figure 5-15, which provides a convenient way of managing the container.
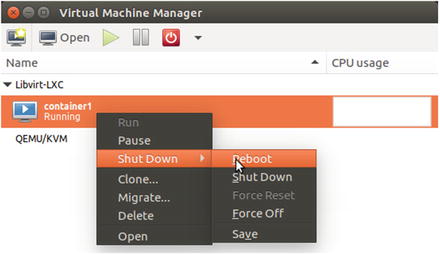
Figure 5-15. List container
The GUI of Virtual Machine Manager is quite simple and easy to follow. virt-manager also provides other commands, such as the following, for various virtual machine management tasks that can be performed from the command line; you already saw how to install the virt-top command to monitor the container activities. You can explore the other commands listed on your own.
virt-admin virt-login-shell virt-viewervirt-clone virt-xml virt-convertvirt-pki-validate virt-xml-validate virt-host-validatevirt-sanlock-cleanup virt-install virt-top
LXC with SaltStack
SaltStack is a highly flexible and powerful configuration management and remote execution system that is used to manage computing infrastructure from a centralized location, minimizing manual or repetitive steps required for maintenance. SaltStack can be used to manage almost any kind of computer system. When given a task of maintaining a large number of computer systems, SaltStack comes in handy. This section assumes prior knowledge of SaltStack. The setup we are going to create has the requirements in the following list. Though there could be any number of minions, we will create a single salt minion machine for demonstration purposes. Figure 5-16 shows a schematic of our setup.
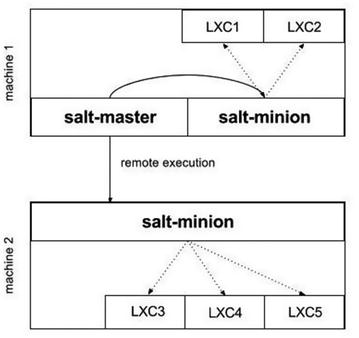
Figure 5-16. SaltStack setup schematic
Configure machine 1 as the salt master server.
Configure machine 2 as the salt minion.
Create two LXC containers on machine 1 with the help of salt, since salt master is also a minion.
Create three LXC containers on machine 2 with the help of salt.
Note
Both the machines, salt master and salt minion, use Ubuntu Server 17.04 (Zesty Zapus) as the operating system.
Salt Master Setup
We will start with setting up the salt master server. In my local network, the salt master machine has Ubuntu Server 17.04 installed and has an IP address of 192.168.1.9, which will be used to communicate with the machine. Log in to the machine that will be used as the salt master server and install SaltStack—both salt master and salt minion daemon packages, as shown here:
stylesen@salt-master:∼$ sudo apt install salt-master salt-minion salt-ssh salt-cloudNote
The salt master server we are setting up will also act as a salt minion, so that we can control the salt master server with SaltStack.
Create the necessary directories in the default location where salt looks for various files:
stylesen@salt-master:∼$ sudo mkdir -p /srv/saltstylesen@salt-master:∼$ sudo mkdir -p /srv/formulasstylesen@salt-master:∼$ sudo mkdir -p /srv/pillar
Open the file /etc/salt/master and add the following content to the end of the file:
file_roots:base:- /srv/salt- /srv/formulaspillar_roots:base:- /srv/pillar
Note
The configuration file /etc/salt/master is written in YAML, so be careful not to mix spaces and tabs, and also be consistent with indentation.
In the preceding configuration, base specifies the default environment. The file_roots section is defined first, which specifies the location where salt master will look for configuration management instructions. Similarly, the pillar_roots section specifies the directory for pillar configurations.
Minion Configuration
Since the master will also act as a minion, we will also set up minion configuration on the master server. To do this, edit the file /etc/salt/minion and add the following content to the end of the file:
master: 127.0.0.1This specifies that the salt master server for this minion is itself, since the minion and master exist in the same machine.
Restart Daemons
After you have completed all of the preceding setup, restart the daemons to apply the new configuration changes:
stylesen@salt-master:∼$ sudo service salt-master restartstylesen@salt-master:∼$ sudo service salt-minion restart
Accept Minion Key
We need to verify and accept the minion key for the minion that is running in this (master) machine. List all the keys that salt master knows:
stylesen@salt-master:∼$ sudo salt-key --list allAccepted Keys:Denied Keys:Unaccepted Keys:salt-masterRejected Keys:stylesen@salt-master:∼$
The rejected key shown in the previous line is that of the salt minion labeled salt-master, which is the hostname of the master machine. Now, manually verify the fingerprint of both the minion and the salt-master as follows:
stylesen@salt-master:∼$ sudo salt-call key.finger --locallocal:e5:89:95:ca:7b:c1:ed:80:09:4a:32:e1:9b:1f:c7:47:05:ab:c2:de:a0:d3:c0:0e:f9:80:fa:1d:b0:25:c4:c3stylesen@salt-master:∼$ sudo salt-key -f salt-masterUnaccepted Keys:salt-master: e5:89:95:ca:7b:c1:ed:80:09:4a:32:e1:9b:1f:c7:47:05:ab:c2:de:a0:d3:c0:0e:f9:80:fa:1d:b0:25:c4:c3stylesen@salt-master:∼$
Once you have verified that the keys match, mark them as accepted:
stylesen@salt-master:∼$ sudo salt-key -a salt-masterThe following keys are going to be accepted:Unaccepted Keys:salt-masterProceed? [n/Y] yKey for minion salt-master accepted.stylesen@salt-master:∼$ sudo salt-key --list allAccepted Keys:salt-masterDenied Keys:Unaccepted Keys:Rejected Keys:stylesen@salt-master:∼$
Test if the setup is working fine, using the salt test.ping module as follows:
stylesen@salt-master:∼$ sudo salt '*' test.pingsalt-master:Truestylesen@salt-master:∼$
The salt master server setup is complete now, with a salt minion running in the same machine.
Remote Salt Minion Setup
The remote salt minion setup is similar to the setup of the local one demonstrated in the previous section, with the obvious slight difference that it is being done on a different machine. In my local network, the salt minion machine has an IP address of 192.168.1.7, which will be used to communicate with the machine. Log in to the remote machine and install the salt minion daemon as shown here:
stylesen@salt-minion:∼$ sudo apt install salt-minionOnce the salt-minion package is installed, we will again verify the fingerprints manually. Log in to the salt master machine and get the keys; we will specifically need the value for master.pub:
stylesen@salt-master:∼$ sudo salt-key -F masterLocal Keys:master.pem: 49:07:9e:6a:d3:ed:47:98:46:6a:e7:a0:02:5e:60:e9:35:43:3c:c8:95:5d:77:f8:4d:bd:e6:9d:b2:ef:ea:36master.pub: b5:61:ed:2f:fe:6e:f9:53:d0:57:a7:fa:7a:57:68:cb:6e:74:04:37:ab:eb:28:9d:43:43:ed:f4:52:ee:ec:ecAccepted Keys:salt-master: e5:89:95:ca:7b:c1:ed:80:09:4a:32:e1:9b:1f:c7:47:05:ab:c2:de:a0:d3:c0:0e:f9:80:fa:1d:b0:25:c4:c3stylesen@salt-master:∼$
In the salt-minion machine, modify the minion configuration file /etc/salt/minion and add the following content toward the end of the file:
master: 192.168.1.9master_finger: 5:61:ed:2f:fe:6e:f9:53:d0:57:a7:fa:7a:57:68:cb:6e:74:04:37:ab:eb:28:9d:43:43:ed:f4:52:ee:ec:ec
Change the IP address of the salt master server from 192.168.1.9 to the appropriate value within your network. master_finger is the value of master.pub obtained from salt master.
After you have made the preceding configuration changes, restart the salt minion daemon as follows:
stylesen@salt-minion:∼$ sudo service salt-minion restartAccept Minion Key
The minion should now contact the salt master to send its key for the master to accept. This is done with the following command:
stylesen@salt-minion:∼$ sudo salt-call key.finger --locallocal:f8:2c:c5:b3:b6:52:37:68:de:b5:5f:25:f6:70:a7:1b:91:2a:16:a4:e9:43:56:d7:54:dd:bb:33:c2:f4:16:95stylesen@salt-minion:∼$
On the salt master machine, list the keys, manually verify the fingerprint, and then accept the keys as follows:
stylesen@salt-master:∼$ sudo salt-key --list allAccepted Keys:salt-masterDenied Keys:Unaccepted Keys:salt-minionRejected Keys:stylesen@salt-master:∼$ sudo salt-key -f salt-minionUnaccepted Keys:salt-minion: f8:2c:c5:b3:b6:52:37:68:de:b5:5f:25:f6:70:a7:1b:91:2a:16:a4:e9:43:56:d7:54:dd:bb:33:c2:f4:16:95stylesen@salt-master:∼$ sudo salt-key -a salt-minionThe following keys are going to be accepted:Unaccepted Keys:salt-minionProceed? [n/Y] yKey for minion salt-minion accepted.stylesen@salt-master:∼$ sudo salt-key -a salt-minionThe following keys are going to be accepted:Unaccepted Keys:salt-minionProceed? [n/Y] yKey for minion salt-minion accepted.stylesen@salt-master:∼$ sudo salt-key --list allAccepted Keys:salt-mastersalt-minionDenied Keys:Unaccepted Keys:Rejected Keys:stylesen@salt-master:∼$
Test sending to the minions with the following command:
stylesen@salt-master:∼$ sudo salt '*' test.pingsalt-minion:Truesalt-master:Truestylesen@salt-master:∼$
Thus, we have the second minion set up successfully. We will move on to see how to create LXC containers on the minions with the help of SaltStack.
Salt LXC Management
We must create profiles in order to create LXC containers in the minions. Profiles are configurations defined in either master or minion config files.
Note
This section assumes LXC is already installed in both salt-master and salt-minion machines. LXC installation is explained in detail in Chapter 2.
Let’s put a simple container profile in the salt master configuration file /etc/salt/master with the following content. Also there should be a network profile so that the containers get created with networking in place.
lxc.container_profile:debian_stretch:template: debianoptions:release: stretcharch: amd64debian_jessie:template: debianoptions:release: jessiearch: amd64lxc.network_profile:debian_stretch:eth0:link: virbr0type: vethflags: updebian_jessie:eth0:link: virbr0type: vethflags: up
With the preceding configuration in place, let’s create our two containers in the salt-master machine as planned with the following command:
stylesen@salt-master:∼$ sudo salt salt-master lxc.create container1 profile=debian_stretch template=debian network_profile=debian_stretchsalt-master:----------result:Truestate:----------new:stoppedold:Nonestylesen@salt-master:∼$
The second container may be cloned from the first container as follows:
stylesen@salt-master:∼$ sudo salt salt-master lxc.clone container2 orig=container1salt-master:----------result:Truestate:----------new:stoppedold:Nonestylesen@salt-master:∼$
We can now see if the container exists using the lxc-ls command on the salt master server:
stylesen@salt-master:∼$ sudo lxc-ls --fancyNAME STATE AUTOSTART GROUPS IPV4 IPV6container1 STOPPED 0 - - -container2 STOPPED 0 - - -stylesen@salt-master:∼$
Similarly, let’s create three Debian Jessie–based LXC containers on the salt-minion machine by executing salt commands from the salt-master as follows:
stylesen@salt-master:∼$ sudo salt salt-minion lxc.create container3 profile=debian_jessie template=debian network_profile=debian_jessiesalt-minion:----------result:Truestate:----------new:stoppedold:Nonestylesen@salt-master:∼$ sudo salt salt-minion lxc.create container4 profile=debian_jessie template=debian network_profile=debian_jessiesalt-minion:----------result:Truestate:----------new:stoppedold:Nonestylesen@salt-master:∼$ sudo salt salt-minion lxc.create container5 profile=debian_jessie template=debian network_profile=debian_jessiesalt-minion:----------result:Truestate:----------new:stoppedold:Nonestylesen@salt-master:∼$
We can ensure that the three containers were created on the salt-minion machine by issuing the following command on the salt-minion machine:
stylesen@salt-minion:∼$ sudo lxc-ls --fancyNAME STATE AUTOSTART GROUPS IPV4 IPV6container3 STOPPED 0 - - -container4 STOPPED 0 - - -container5 STOPPED 0 - - -stylesen@salt-minion:∼$
LXC with Vagrant
Vagrant is a popular virtual machine manager used for managing VirtualBox-based virtual machines. Vagrant has been extended to manage other virtual machines using provider plugins. Vagrant can be used to manage LXC containers using the vagrant-lxc provider plugin, which is available as a package in Ubuntu Zesty. To use the vagrant-lxc provider plugin, install it as follows:
$ sudo apt install vagrant-lxcIn vagrant terms, a new instance is called a vagrant box. To create a vagrant box, we first need to create a directory where our vagrant box will reside, as shown next. The container itself will still be created in the default location /var/lib/lxc.
$ mkdir vagrant-box-holder$ cd vagrant-box-holder/$
Inside this directory, create a vagrant config file with the name Vagrantfile. Vagrant looks for the config file with the exact name. The contents of the vagrant file are as follows, to create our LXC container:
Vagrant.configure(2) do |config|config.vm.hostname = "vagrant-debian-jessie-lxc"config.vm.box = "debian/jessie64"config.vm.box_url = "https://atlas.hashicorp.com/debian/boxes/jessie64"config.vm.provider :lxc do |lxc, override|lxc.container_name = "vagrant-debian-jessie-lxc"lxc.customize 'network.type', 'veth'lxc.customize 'network.link', 'lxcbr0'endend
Most of the preceding parameters should seem obvious, and will be familiar for any Ruby language developer. Let’s see what each parameter does:
config.vm.hostname defines the hostname of the vagrant box.
config.vm.box is the box image name that will be downloaded from the box image URL specified in config.vm.box_url.
All the parameters that start with lxc.* are configuration parameters for the LXC container.
To create the vagrant box of our LXC container via vagrant, cd into the vagrant-box-holder directory where Vagrantfile exists and then run vagrant up as shown here:
$ sudo vagrant upBringing machine 'default' up with 'lxc' provider...==> default: Box 'debian/jessie64' could not be found. Attempting to find and install...default: Box Provider: lxcdefault: Box Version: >= 0==> default: Loading metadata for box 'https://atlas.hashicorp.com/debian/boxes/jessie64'default: URL: https://atlas.hashicorp.com/debian/boxes/jessie64==> default: Adding box 'debian/jessie64' (v8.7.0) for provider: lxcdefault: Downloading: https://atlas.hashicorp.com/debian/boxes/jessie64/versions/8.7.0/providers/lxc.box==> default: Successfully added box 'debian/jessie64' (v8.7.0) for 'lxc'!==> default: Importing base box 'debian/jessie64'...==> default: Checking if box 'debian/jessie64' is up to date...==> default: Setting up mount entries for shared folders...default: /vagrant => /home/stylesen/vagrant-box-holder==> default: Starting container...==> default: Waiting for machine to boot. This may take a few minutes...default: SSH address: 10.0.3.188:22default: SSH username: vagrantdefault: SSH auth method: private keydefault:default: Vagrant insecure key detected. Vagrant will automatically replacedefault: this with a newly generated keypair for better security.default:default: Inserting generated public key within guest...default: Removing insecure key from the guest if it's present...default: Key inserted! Disconnecting and reconnecting using new SSH key...==> default: Machine booted and ready!==> default: Setting hostname...$
Thus, the vagrant box is created and started via the LXC provider. We can see the newly created vagrant box as follows:
$ sudo lxc-ls --fancy
NAME                    STATE   AUTOSTART GROUPS IPV4           IPV6
vagrant-debian-jessie-lxc RUNNING 0             -          10.0.3.188 -
$
We can log in to the vagrant box using the vagrant way via vagrant ssh as follows:
$ sudo vagrant sshThe programs included with the Debian GNU/Linux system are free software;the exact distribution terms for each program are described in theindividual files in /usr/share/doc/*/copyright.Debian GNU/Linux comes with ABSOLUTELY NO WARRANTY, to the extentpermitted by applicable law.vagrant@vagrant-debian-jessie-lxc:∼$ ls /bin dev home lib64 mnt proc run selinux sys usr varboot etc lib media opt root sbin srv tmp vagrantvagrant@vagrant-debian-jessie-lxc:∼$
lxc-attach should also work:
$ sudo lxc-attach -n vagrant-debian-jessie-lxcroot@vagrant-debian-jessie-lxc:/#
LXD-WebGUI
LXD-WebGUI is a lightweight web management interface for LXD written in AngularJS. Due to the way this web GUI is written, it does not require any special application server or database server to run. This allows LXD to be installed and initialized in the same system from which the web GUI will be accessed. Also, LXD should be available over the network.
If you did not previously run sudo lxd init as part of installing LXD, as explained in Chapter 2, then run the following:
$ sudo lxd initDo you want to configure a new storage pool (yes/no) [default=yes]? yesName of the new storage pool [default=default]: defaultName of the storage backend to use (dir, lvm) [default=dir]: dirWould you like LXD to be available over the network (yes/no) [default=no]? yesWould you like stale cached images to be updated automatically (yes/no) [default=yes]? yesWould you like to create a new network bridge (yes/no) [default=yes]? yesWhat should the new bridge be called [default=lxdbr0]? lxdbr0What IPv4 address should be used (CIDR subnet notation, "auto" or "none") [default=auto]? autoWhat IPv6 address should be used (CIDR subnet notation, "auto" or "none") [default=auto]? autoLXD has been successfully configured.$
LXD-WebGUI is still in the beta release state. It is unavailable as a native Ubuntu package from the Ubuntu repositories. The following illustrates how to install LXD-WebGUI dependencies using the Node Package Manager (npm) and install LXD-WebGUI itself from its git sources:
Install npm using the following command:
$ sudo apt install npmThen install two packages via npm, namely bower and http-server:
$ sudo npm install -g bowernpm WARN deprecated [email protected]: ..psst! While Bower is maintained, we recommend Yarn and Webpack for *new* front-end projects! Yarn's advantage is security and reliability, and Webpack's is support for both CommonJS and AMD projects. Currently there's no migration path but we hope you'll help us figure out one./usr/local/bin/bower -> /usr/local/lib/node_modules/bower/bin/bower/usr/local/lib`-- [email protected]$ sudo npm install -g http-server
Symlink or copy nodejs as node as follows:
$ sudo ln -s /usr/bin/nodejs /usr/bin/nodeClone the LXD-WebGUI git repository as follows:
$ git clone https://github.com/dobin/lxd-webgui.git lxd-webgui.git$ cd lxd-webgui.git/
Note
git is a distributed version control system. Install git using the following command if you have not installed it previously:
$ sudo apt install git-allInstall all the web dependencies for LXD-WebGUI using bower (installed previously using npm):
$ bower installbower not-cached https://github.com/angular/bower-angular.git#∼1.4.0bower resolve https://github.com/angular/bower-angular.git#∼1.4.0----------OUTPUT TRUNCATED----------Unable to find a suitable version for angular, please choose one by typing one of the numbers below:1) angular#1.4.14 which resolved to 1.4.14 and is required by angular-loader#1.4.14, angular-mocks#1.4.14, angular-route#1.4.142) angular#∼1.4.0 which resolved to 1.4.14 and is required by angular-seed3) angular#^1.2 which resolved to 1.4.14 and is required by ng-table#0.8.34) angular#>=1.4.0 which resolved to 1.4.14 and is required by angular-bootstrap#1.3.35) angular#>=1.2.18 which resolved to 1.4.14 and is required by ui-select#0.16.16) angular#1.6.4 which resolved to 1.6.4 and is required by angular-sanitize#1.6.4Prefix the choice with ! to persist it to bower.json? Answer 6bower install angular-mocks#1.4.14bower install angular-sanitize#1.6.4bower install angular-route#1.4.14bower install angular-bootstrap#1.3.3bower install ui-select#0.16.1bower install html5-boilerplate#5.2.0bower install angular#1.6.4bower install components-font-awesome#4.7.0bower install angular-loader#1.4.14bower install angular-ui#0.4.0bower install ng-table#0.8.3bower install bootstrap#3.3.7bower install underscore#1.8.3bower install jquery#3.2.1angular-mocks#1.4.14 bower_components/angular-mocks└── angular#1.6.4angular-sanitize#1.6.4 bower_components/angular-sanitize└── angular#1.6.4angular-route#1.4.14 bower_components/angular-route└── angular#1.6.4angular-bootstrap#1.3.3 bower_components/angular-bootstrap└── angular#1.6.4ui-select#0.16.1 bower_components/ui-select└── angular#1.6.4html5-boilerplate#5.2.0 bower_components/html5-boilerplateangular#1.6.4 bower_components/angularcomponents-font-awesome#4.7.0 bower_components/components-font-awesomeangular-loader#1.4.14 bower_components/angular-loader└── angular#1.6.4angular-ui#0.4.0 bower_components/angular-uing-table#0.8.3 bower_components/ng-table└── angular#1.6.4bootstrap#3.3.7 bower_components/bootstrap└── jquery#3.2.1underscore#1.8.3 bower_components/underscorejquery#3.2.1 bower_components/jquery$
Pay attention to the question Prefix the choice with ! to persist it to bower.json? for which we answered 6, which chooses Angular version 1.6.4—the highest and latest version that is shown in the list.
Create an SSL certificate for the http-server and then start the server at port 8000 in order to serve lxd-webgui as follows:
$ openssl req -x509 -newkey rsa:2048 -keyout key.pem -out cert.pem -days 365 -nodesGenerating a 2048 bit RSA private key.........................................++++.......................................................................+++unable to write 'random state'writing new private key to 'key.pem'-----You are about to be asked to enter information that will be incorporatedinto your certificate request.What you are about to enter is what is called a Distinguished Name or a DN.There are quite a few fields but you can leave some blankFor some fields there will be a default value,If you enter '.', the field will be left blank.-----Country Name (2 letter code) [AU]:INState or Province Name (full name) [Some-State]:TamilNaduLocality Name (eg, city) []:ChennaiOrganization Name (eg, company) [Internet Widgits Pty Ltd]:Linaro LtdOrganizational Unit Name (eg, section) []:LAVACommon Name (e.g. server FQDN or YOUR name) []:lxd.stylesen.orgEmail Address []:[email protected]$ http-server -S -a 0.0.0.0 -p 8000Starting up http-server, serving ./ through httpsAvailable on:https://127.0.0.1:8000https://192.168.1.4:8000Hit CTRL-C to stop the server
LXD Configuration
Begin by creating a self-signed certificate to authenticate to LXD:
$ openssl req -x509 -newkey rsa:2048 -keyout key.pem -out cert.pem -days 365 -nodesGenerating a 2048 bit RSA private key.........................................................................+++........+++unable to write 'random state'writing new private key to 'key.pem'-----You are about to be asked to enter information that will be incorporatedinto your certificate request.What you are about to enter is what is called a Distinguished Name or a DN.There are quite a few fields but you can leave some blankFor some fields there will be a default value,If you enter '.', the field will be left blank.-----Country Name (2 letter code) [AU]:INState or Province Name (full name) [Some-State]:TamilNaduLocality Name (eg, city) []:ChennaiOrganization Name (eg, company) [Internet Widgits Pty Ltd]:Linaro LtdOrganizational Unit Name (eg, section) []:LAVACommon Name (e.g. server FQDN or YOUR name) []:lxd-api.stylesen.orgEmail Address []:[email protected]$
Convert the newly created certificate into a PKCS#12 certificate that could be loaded as a client certificate in the user’s web browser:
$ openssl pkcs12 -export -out cert.p12 -inkey key.pem -in cert.pemEnter Export Password:Verifying - Enter Export Password:$
Note
During the execution of the preceding command, if you receive an error stating unable to write 'random state', issue the following command to remove the .rnd file created by root and then rerun the preceding command to generate PKCS#12 client certificate:
$ sudo rm ∼/.rndThe PKCS#12 client certificate is now generated as the file cert.p12 in the current directory. The following list shows how to load the client certificate in Chrome and Firefox:
In Chrome: Click the icon with three vertical dots in the upper-right corner, choose Settings, click Advanced at the bottom of the page, click Manage certificates, click Import, click Next to launch the Certificate Import Wizard, click Browse, and select the cert.p12 certificate.
In Firefox: Choose Preferences from Edit menu, click Advanced on the left side menu, click Certificates tab on the page, click View Certificates to launch the Certificate Manager wizard, click Import and then select the cert.p12 certificate.
Note
If you are prompted for a password during the certificate import, then supply the same Export Password that you provided during the previous client certificate creation.
Now we need to add the cert.pem client certificate generated in the same directory as trusted certificates of LXD, which is done as follows:
$ sudo lxc config trust add cert.pemThe following commands are used to configure LXD to listen on port 9000 and allow access from localhost port 8000 where the lxd-webgui runs and also some HTTP-specific configuration to run LXD API server:
$ sudo lxc config set core.https_address 0.0.0.0:9000$ sudo lxc config set core.https_allowed_methods "GET, POST, PUT, DELETE, OPTIONS"$ sudo lxc config set core.https_allowed_headers "Origin, X-Requested-With, Content-Type, Accept"$ sudo lxc config set core.https_allowed_credentials "true"$ sudo lxc config set core.https_allowed_origin "*"$ sudo service lxd restart
Now the LXD API server will listen on port 9000, which can be verified as follows:
$ netstat -ant | grep 9000tcp6 0 0 :::9000 :::* LISTEN$
Access the LXD API server from your web browser with the correct IP address and port, or https://localhost:9000/ if it is served from the same machine, and select the certificate with which you want to authenticate yourself and then click OK as shown in Figure 5-17.
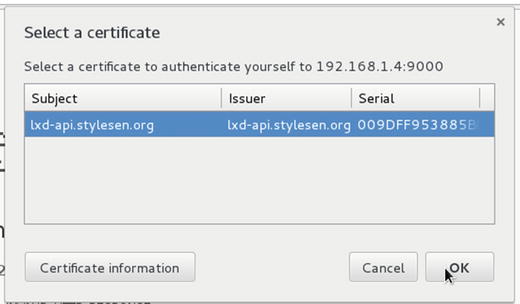
Figure 5-17. Select client certificate
Once the certificate warning is accepted, the LXD API server responds as shown in Figure 5-18.

Figure 5-18. LXD API server response
Using LXD-WebGUI
Now we are all set to access our LXD-WebGUI, which is hosted at port 8000. The Settings page shown in Figure 5-19 opens when we access LXD-WebGUI server .
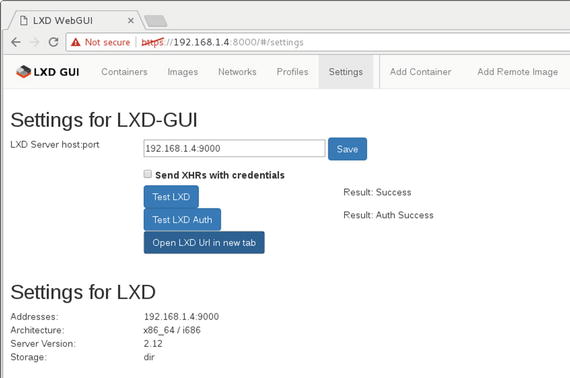
Figure 5-19. Settings page
Note
Uncheck Send XHRs with credentials if there is a connection error to the LXD API server, especially when you are accessing it from a different machine via an IP address other than localhost. Read more about XHR here: https://developer.mozilla.org/en-US/docs/Web/API/XMLHttpRequest/withCredentials .
Let’s create a new container using the LXD-WebGUI. Before creating the container, check out Figure 5-20 to see the images available in this LXD server.
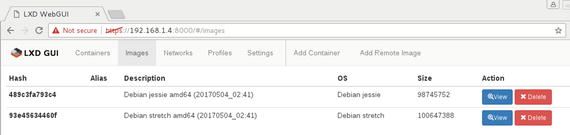
Figure 5-20. Available images in LXD server
Note
The available images shown in Figure 5-20 are the ones that are copied to the local: image server. See the “Importing Images” section in Chapter 4 for details.
Let’s create a Debian Stretch–based container using lxd-webgui, for which we need to go to the Add Container page, as shown in Figure 5-21.
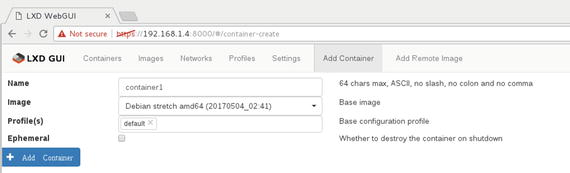
Figure 5-21. Add Container page
Click the Add Container button, and the container will be created immediately and listed on the Containers page. The container will be added in the Stopped state, as shown in Figure 5-22.
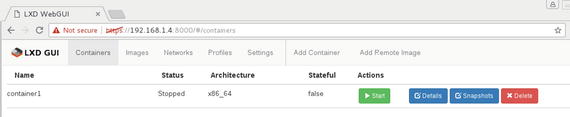
Figure 5-22. Containers list
Click the Start button in the Actions column for the specific container to start running the container. Once the container starts running, we can get access to the container’s console right in the web page, as shown in Figure 5-23.
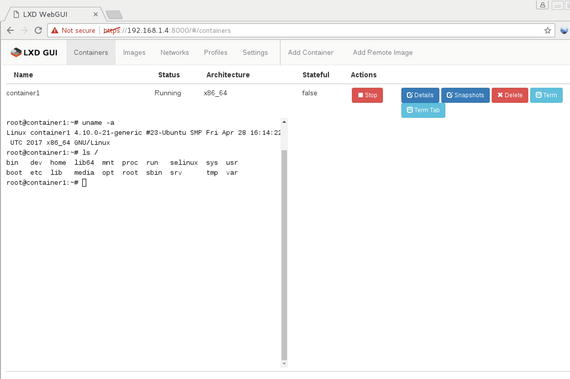
Figure 5-23. Running Container
Click the Details button to get more information about the container, as shown in Figure 5-24.
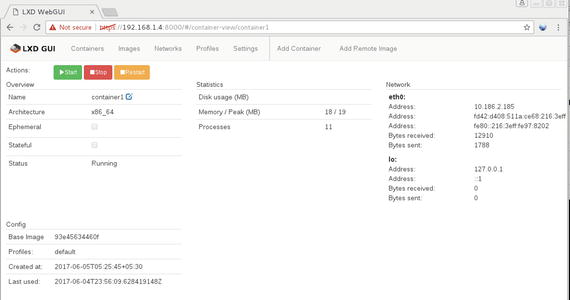
Figure 5-24. Container details
The LXD-WebGUI provides a lightweight, easy-to-use GUI for managing LXD containers.
Summary
Containers are similar to virtualization; many of the common virtualization management tools are capable of handling containers. It becomes important to use a management tool when you need to handle huge swarms of containers. This chapter introduced just a few management and orchestration tools, though there are many available. Almost all modern orchestration tools such as Ansible, Puppet, and so on provide LXC integration in the form of plugins. Users who are already comfortable with particular management or orchestration tools can continue to use them to manage containers without any difficulties.