
Learning about a new technology is a worthwhile pursuit, but to fully comprehend that technology, you need to put it to use. Now that you have a solid understanding of LXC and LXD from the previous chapters, this chapter suggests some use cases that you can follow to apply LXC and LXD in practice. Naturally, there are many possible applications for LXC and LXD beyond the ones discussed in this chapter. The use cases described in this chapter give you an excellent foundation for exploring other possibilities on your own.
Some of the common use cases of LXC and LXD come from the following requirements:
The need for an isolated development environment without polluting your host machine
Isolation within production servers and the possibility to run more than one service in its own container
A need to test things with more than one version of the same software or different operating system environments
Experimenting with different and new releases of GNU/Linux distributions without having to install them on a physical host machine
Trying out a software or development stack that may or may not be used after some playing around
Installing many types of software in your primary development machine or production server and maintaining them on a longer run
Doing a dry run of any installation or maintenance task before actually executing it on production machines
Better utilization and provisioning of server resources with multiple services running for different users or clients
High-density virtual private server (VPS) hosting, where isolation without the cost of full virtualization is needed
Easy access to host hardware from a container, compared to complicated access methods from virtual machines
Multiple build environments with different customizations in place
Using the Pelican Static Site Generator
In this section we explore how to install and set up a static website using a static site generator called Pelican within a container. Pelican is written in Python.
Begin by creating an Ubuntu Zesty container called ubuntu-pelican with the following command:
$ sudo lxc-create -t ubuntu -n ubuntu-pelican -- --release zestyOnce the container is created, start and then log in to the container using the following commands:
$ sudo lxc-start -n ubuntu-pelican$ sudo lxc-attach -n ubuntu-pelicanroot@ubuntu-pelican:/#
As in any Debian-based system, it is always a good practice to make sure the system is up to date before installing any software on it. Updating the system ensures that you have the latest versions of software packages and that security updates (if any) are applied to the system. Do this with the following commands within the Ubuntu container we just created:
root@ubuntu-pelican:/# apt updateroot@ubuntu-pelican:/# apt upgrade
Now that the system is confirmed to be up to date, we will install Pelican, the Emacs text editor, and net-tools, along with the Apache2 web server to serve static pages that will be generated by Pelican. The following command installs the necessary packages:
root@ubuntu-pelican:/# apt install pelican emacs25-nox net-tools apache2 Pelican is now installed in the container. We are ready to start a new website project with Pelican:
root@ubuntu-pelican:/# pelican-quickstartWelcome to pelican-quickstart v3.7.1.This script will help you create a new Pelican-based website.Please answer the following questions so this script can generate the filesneeded by Pelican.> Where do you want to create your new web site? [.] demosite> What will be the title of this web site? Demo Static Website> Who will be the author of this web site? stylesen> What will be the default language of this web site? [en]> Do you want to specify a URL prefix? e.g., http://example.com (Y/n) n> Do you want to enable article pagination? (Y/n) y> How many articles per page do you want? [10]> What is your time zone? [Europe/Paris] Asia/Kolkata> Do you want to generate a Fabfile/Makefile to automate generation and publishing? (Y/n) y> Do you want an auto-reload & simpleHTTP script to assist with theme and site development? (Y/n) y> Do you want to upload your website using FTP? (y/N) n> Do you want to upload your website using SSH? (y/N) n> Do you want to upload your website using Dropbox? (y/N) n> Do you want to upload your website using S3? (y/N) n> Do you want to upload your website using Rackspace Cloud Files? (y/N) n> Do you want to upload your website using GitHub Pages? (y/N) nDone. Your new project is available at /demositeroot@ubuntu-pelican:/#
With the preceding script, Pelican has bootstrapped our new website project in the directory /demosite:
root@ubuntu-pelican:/# cd demosite/root@ubuntu-pelican:/demosite# lscontent fabfile.py output publishconf.pydevelop_server.sh Makefile pelicanconf.pyroot@ubuntu-pelican:/demosite#
During our Pelican quickstart, we have chosen to automate generation and publishing using a Makefile. Pelican has therefore created a Makefile in this directory, hence we also need make (a build tool) installed in the container to generate our static website:
root@ubuntu-pelican:/demosite# apt install makeAs shown next, we create a pages directory inside the content directory to hold all the static pages of the demo site. Then, we create a home page in our demo site using the file home.md in content/pages/ directory, with the sample content.
root@ubuntu-pelican:/demosite# mkdir content/pagesroot@ubuntu-pelican:/demosite# emacs content/pages/home.mdroot@ubuntu-pelican:/demosite# cat content/pages/home.mdTitle: My Home PageCategory: HomeTags: pelican, publishing, demo, sampleAuthors: Senthil Kumaran SThis is the home page of this demo site.root@ubuntu-pelican:/demosite #
Now that we have our simple demo site with one page in it, let’s generate the website using make as follows:
root@ubuntu-pelican:/demosite# make htmlpelican /demosite/content -o /demosite/output -s /demosite/pelicanconf.pyDone: Processed 0 articles, 0 drafts, 1 page and 0 hidden pages in 0.08 seconds.root@ubuntu-pelican:/demosite#
The preceding command generates the static files for the website within the directory output, as shown here:
root@ubuntu-pelican:/demosite# ls output/ -alhtotal 36Kdrwxr-xr-x 4 root root 4.0K Jun 10 17:12 .drwxr-xr-x 4 root root 4.0K Jun 10 17:08 ..-rw-r--r-- 1 root root 2.2K Jun 10 17:12 archives.html-rw-r--r-- 1 root root 2.2K Jun 10 17:12 authors.html-rw-r--r-- 1 root root 2.1K Jun 10 17:12 categories.html-rw-r--r-- 1 root root 2.1K Jun 10 17:12 index.htmldrwxr-xr-x 2 root root 4.0K Jun 10 17:12 pages-rw-r--r-- 1 root root 2.2K Jun 10 17:12 tags.htmldrwxr-xr-x 4 root root 4.0K Jun 10 17:08 themeroot@ubuntu-pelican:/demosite#
Next, we copy the website contents to the Apache2 web root directory from which our website will get served by the Apache2 web server:
root@ubuntu-pelican:/demosite# cp output/* /var/www/html/ -rfTo access our newly published website, we need to find out the IP address of the container, using the following command:
root@ubuntu-pelican:/demosite# ifconfig eth0eth0: flags=4163<UP,BROADCAST,RUNNING,MULTICAST> mtu 1500inet 192.168.122.150 netmask 255.255.255.0 broadcast 192.168.122.255inet6 fe80::216:3eff:fee2:98da prefixlen 64 scopeid 0x20<link>ether 00:16:3e:e2:98:da txqueuelen 1000 (Ethernet)RX packets 72250 bytes 105161334 (105.1 MB)RX errors 0 dropped 0 overruns 0 frame 0TX packets 28468 bytes 1931727 (1.9 MB)TX errors 0 dropped 0 overruns 0 carrier 0 collisions 0root@ubuntu-pelican:/demosite#
We now know the IP address of the container is 192.168.122.150. Accessing the website using this IP address using a web browser opens our demo site’s index page as shown in Figure 6-1.

Figure 6-1. Demo site generated by Pelican
Clicking the My Home Page link on our demo site takes us to the home page shown in Figure 6-2.

Figure 6-2. Demo site home page
As demonstrated, we can publish a static website using the Pelican static site generator within an LXC container.
Running Android CTS Within LXC
This is the main use case that caused me to start looking into LXC. To communicate with Android devices such as smartphones, tablets, and so forth, there are tools like fastboot and adb. The Android Compatibility Test Suite (CTS) is a suite of tests that is run on an Android device to check compatibility of the Device Under Test (DUT) . CTS is a huge test suite that runs for a long time. It is driven by a host machine; the host will send tests to the DUT and collect test results as each test case completes on the DUT. Depending on the version of CTS you are running, there may be requirements for specific versions of Java and other tools installed in the host machine. This makes it difficult to maintain and use more than one version of CTS on the same machine. Using LXC in this scenario will help us to run CTS with an option of running CTS from different operating systems and different Java versions.
In this section, I will demonstrate running CTS from an LXC container running Debian Jessie . The DUT is a Nexus 4 phone with a factory image loaded and user debug mode enabled. The factory image of Android in Nexus 4 is Lollipop (i.e., 5.1.1, LMY48T). The CTS version is Android 5.1 R20 Compatibility Test Suite (CTS) - ARM, which was the latest compatible CTS available at the time of this writing. The setup is shown in Figure 6-3.

Figure 6-3. LXC communication with Nexus 4
Note
This section assumes you have some Android knowledge, including how to work with Android tools such as fastboot and adb. Also, you should know how to get a DUT to fastboot and enable user debug mode.
Debian Jessie is our container operating system in this use case. Android 5.1 R20 Compatibility Test Suite (CTS) - ARM requires OpenJDK version 7.0, which is available in Debian Jessie. This is a great demonstration of the previously highlighted flexibility to run specific versions of software.
To start, create, start, and attach to a Debian Jessie LXC container:
$ sudo lxc-create -t debian -n jessie-cts -- --release jessie --packages "systemd,systemd-sysv"$ sudo lxc-start -n jessie-cts$ sudo lxc-attach -n jessie-ctsroot@jessie-cts:/#
As before, update and upgrade the packages within the jessie-cts container to make sure we have the latest packages and security updates:
root@jessie-cts:/# apt updateroot@jessie-cts:/# apt upgrade
First, we will see how we can access an Android device from an LXC container via adb or fastboot. When the Nexus 4 is plugged in via the USB cable to my host machine, I see the following in the lsusb output:
$ lsusbBus 002 Device 005: ID 17ef:1013 LenovoBus 002 Device 001: ID 1d6b:0003 Linux Foundation 3.0 root hubBus 001 Device 005: ID 138a:0017 Validity Sensors, Inc. Fingerprint ReaderBus 001 Device 004: ID 5986:0706 Acer, IncBus 001 Device 003: ID 8087:0a2b Intel Corp.Bus 001 Device 002: ID 058f:9540 Alcor Micro Corp. AU9540 Smartcard ReaderBus 001 Device 016: ID 0835:1601 Action Star Enterprise Co., LtdBus 001 Device 015: ID 17ef:1013 LenovoBus 001 Device 035: ID 18d1:4ee2 Google Inc. Nexus 4 (debug)Bus 001 Device 001: ID 1d6b:0002 Linux Foundation 2.0 root hub$
Note
lsusb is a command available via the package usbutils. Install usbutils with the following command, if it is not previously installed both in your host machine and within the LXC container jessie-cts:
$ sudo apt install usbutilsThe preceding output shows the Nexus 4 (Google Inc.) is connected in USB bus 001 as device 023. The actual path of the Nexus 4 device translates to the following:
/dev/bus/usb/001/035Within the LXC, although the Nexus 4 appears in lsusb output as follows, adb or fastboot does not have access to this device yet:
root@jessie-cts:/# lsusbBus 002 Device 005: ID 17ef:1013 LenovoBus 002 Device 001: ID 1d6b:0003 Linux Foundation 3.0 root hubBus 001 Device 005: ID 138a:0017 Validity Sensors, Inc. Fingerprint ReaderBus 001 Device 004: ID 5986:0706 Acer, IncBus 001 Device 003: ID 8087:0a2b Intel Corp.Bus 001 Device 002: ID 058f:9540 Alcor Micro Corp. AU9540 Smartcard ReaderBus 001 Device 016: ID 0835:1601 Action Star Enterprise Co., LtdBus 001 Device 015: ID 17ef:1013 LenovoBus 001 Device 035: ID 18d1:4ee0 Google Inc.Bus 001 Device 001: ID 1d6b:0002 Linux Foundation 2.0 root hubroot@jessie-cts:/#
Install fastboot, adb, and all other required packages inside the container and try accessing the device as shown next. The LXC container cannot see the Nexus 4.
root@jessie-cts:/# apt install openjdk-7-jdk aapt android-tools-adb android-tools-fastboot wget unzip----------OUTPUT TRUNCATED----------root@jessie-cts:/# fastboot devicesroot@jessie-cts:/# adb start-serverroot@jessie-cts:/# adb devicesList of devices attachedroot@jessie-cts:/#
To make this device accessible from within the container, use the following command on the host machine. The DUT is in fastboot mode at this point.
$ sudo lxc-device -n jessie-cts add /dev/bus/usb/001/035Now we can access the Nexus 4 via fastboot or adb within the container as follows:
root@jessie-cts:/# fastboot devices04f228d1d9c76f39 fastbootroot@jessie-cts:/#
Reboot the DUT to use the Android operating system installed on it:
root@jessie-cts:/# fastboot rebootrebooting...finished. total time: 3.017sroot@jessie-cts:/#
Every time the Nexus 4 is disconnected from a USB port and reconnected (which also includes a reboot or reboot-bootloader ), the device number within the USB bus changes, though the bus number remains the same. For example, after every reboot or disconnect, the device path will increment like the following:
after reboot: /dev/bus/usb/001/035after reboot: /dev/bus/usb/001/036...after reboot: /dev/bus/usb/001/0NN
This behavior makes it difficult to refer to the DUT consistently, since every time you must check the output of lsusb to identify the device number. To make things more deterministic and easier, I added the following udev rule in /etc/udev/rules.d/51-android.rules:
SUBSYSTEM=="usb", ATTR{idVendor}=="18d1", ATTR{idProduct}=="4ee2", ATTRS{serial}=="04f228d1d9c76f39", MODE="0666", GROUP="plugdev", SYMLINK+="android-nexus4"Note
ATTRS{serial} and SYMLINK+="android-nexus4" can help us to uniquely identify the Nexus 4 device consistently and create a symlink for it, without worrying about the USB device number on the bus.
After adding the previous rule, reload the udev rules so that the rule will take effect without a restart to the host machine:
$ sudo service udev stopWarning: Stopping udev.service, but it can still be activated by:systemd-udevd-control.socketsystemd-udevd-kernel.socket$ sudo udevadm control --reload-rules$ sudo service udev start
With the preceding configuration in place, we get a device as shown here:
$ ls -alh /dev/android-nexus4lrwxrwxrwx 1 root root 15 Jun 11 01:15 /dev/android-nexus4 -> bus/usb/001/036$
Now it should be easier to add the Android device to the container with the following command:
$ sudo lxc-device -n ubuntu-cts add /dev/android-nexus4Within the container, we can access the Nexus 4 via adb as follows:
root@ubuntu-cts:/# adb kill-serverroot@ubuntu-cts:/# adb start-server* daemon not running. starting it now on port 5037 ** daemon started successfully *root@ubuntu-cts:/# adb devicesList of devices attached04f228d1d9c76f39 deviceroot@ubuntu-cts:/#
Note
When accessing a device within an LXC container via adb, ensure the host is not running an adb daemon too, otherwise it will mask the visibility of the adb device within the container.
Let’s download CTS and unzip the compressed file with the following commands:
root@jessie-cts:/# wget -c https://dl.google.com/dl/android/cts/android-cts-5.1_r6-linux_x86-arm.ziproot@jessie-cts:/# unzip android-cts-5.1_r6-linux_x86-arm.zip----------OUTPUT TRUNCATED----------root@jessie-cts:/#
We start running the CTS test as follows:
root@jessie-cts:/# ./android-cts/tools/cts-tradefed run cts --plan Android --disable-rebootAndroid CTS 5.1_r6Using commandline arguments as starting command: [run, cts, --plan, Android, --disable-reboot]06-11 02:25:41 I/DeviceManager: Detected new device 04f228d1d9c76f3906-11 02:25:41 I/TestInvocation: Starting invocation for 'cts' on build '5.1_r6' on device 04f228d1d9c76f3906-11 02:25:41 I/04f228d1d9c76f39: Created result dir 2017.06.11_02.25.4106-11 02:25:41 I/CtsTest: ABIs: [armeabi-v7a]06-11 02:25:52 I/04f228d1d9c76f39: Collecting device info06-11 02:25:53 I/CtsTest: Start test run of 84 packages, containing 65,097 tests06-11 02:25:53 I/CtsTest: Installing prerequisites06-11 02:25:06 I/04f228d1d9c76f39: -----------------------------------------06-11 02:25:06 I/04f228d1d9c76f39: Test package armeabi-v7a android.JobScheduler started06-11 02:25:06 I/04f228d1d9c76f39: -----------------------------------------06-11 02:25:40 I/04f228d1d9c76f39: android.jobscheduler.cts.TimingConstraintsTest#testCancel PASS06-11 02:25:45 I/04f228d1d9c76f39: android.jobscheduler.cts.TimingConstraintsTest#testScheduleOnce PASS06-11 02:25:00 I/04f228d1d9c76f39: android.jobscheduler.cts.TimingConstraintsTest#testSchedulePeriodic PASS----------OUTPUT TRUNCATED----------root@jessie-cts:/#
The same principle is used in Linaro Automated Validation Architecture (LAVA) , which automates running a wide range of testing, including CTS on Android DUTs. To see some sample jobs that are run in LAVA and how results are collected, check out https://validation.linaro.org/ . To discover more about LAVA, helpful documentation is available at https://validation.linaro.org/static/docs/v2/ .
Running Unit Tests in LXC
LXC containers can be used to run unit tests of different projects. LXC provides the flexibility to run unit tests on different operating systems and distributions. When scripted properly, it can prove to be a powerful tool to automate unit test runs across platforms. In this section we will see how to run unit tests for a Scrapy project on a Debian Stretch container. Scrapy is a fast, high-level web crawling and web scraping framework that is used to crawl websites and extract structured data from web pages.
Create the container with all the packages that we will use preinstalled during container creation:
$ sudo lxc-create -t debian -n stretch-scrapy-unit-test -- --release stretch --packages "python,git-all,python-pip,python-setuptools,python-dev,libssl-dev,tox,build-essential"Let’s start the container and clone the Scrapy git repository after attaching to the container:
$ sudo lxc-start -n stretch-scrapy-unit-test$ sudo lxc-attach -n stretch-scrapy-unit-testroot@stretch-scrapy-unit-test:/# git clone https://github.com/scrapy/scrapy.git scrapy.gitCloning into 'scrapy.git'...remote: Counting objects: 45066, done.remote: Compressing objects: 100% (22/22), done.remote: Total 45066 (delta 6), reused 12 (delta 5), pack-reused 45039Receiving objects: 100% (45066/45066), 15.38 MiB | 1.93 MiB/s, done.Resolving deltas: 100% (24435/24435), done.root@stretch-scrapy-unit-test:/#
From the scrapy.git directory, run tox. This installs all the dependencies required for running the Scrapy project’s unit tests and then runs the unit tests as shown here:
root@stretch-scrapy-unit-test:/scrapy.git# toxpy27 create: /scrapy.git/.tox/py27py27 installdeps: -rrequirements.txt, botocore, Pillow != 3.0.0, leveldb, -rtests/requirements.txtpy27 inst: /scrapy.git/.tox/dist/Scrapy-1.4.0.zippy27 installed: asn1crypto==0.22.0,attrs==17.2.0,Automat==0.6.0,backports.shutil-get-terminal-size==1.0.0,blessings==1.6,botocore==1.5.65,bpython==0.16,brotlipy==0.7.0,certifi==2017.4.17,cffi==1.10.0,chardet==3.0.4,click==6.7,constantly==15.1.0,coverage==4.4.1,cryptography==1.9,cssselect==1.0.1,curtsies==0.2.11,decorator==4.0.11,docutils==0.13.1,enum34==1.1.6,Flask==0.12.2,funcsigs==1.0.2,greenlet==0.4.12,hyperlink==17.1.1,idna==2.5,incremental==17.5.0,ipaddress==1.0.18,ipython==5.4.1----------OUTPUT TRUNCATED----------identity==17.0.0,simplegeneric==0.8.1,six==1.10.0,testfixtures==5.1.1,traitlets==4.3.2,Twisted==17.5.0,urllib3==1.21.1,urwid==1.3.1,w3lib==1.17.0,wcwidth==0.1.7,Werkzeug==0.12.2,zope.interface==4.4.1py27 runtests: PYTHONHASHSEED='2963483774'py27 runtests: commands[0] | py.test --cov=scrapy --cov-report= scrapy tests============================= test session starts ==========================platform linux2 -- Python 2.7.13, pytest-2.9.2, py-1.4.34, pluggy-0.3.1rootdir: /scrapy.git, inifile: pytest.iniplugins: twisted-1.5, cov-2.2.1collected 1688 items----------OUTPUT TRUNCATED----------tests/test_cmdline/__init__.py .....tests/test_settings/__init__.py .................................tests/test_spiderloader/__init__.py ............tests/test_utils_misc/__init__.py ....============ 1669 passed, 5 skipped, 14 xfailed in 345.75 seconds ============_________________________________ summary _________________________________py27: commands succeededcongratulations :)root@stretch-scrapy-unit-test:/scrapy.git#
With the preceding simple steps, we get the convenience of being able to run unit tests on different platforms without needing to worry about installing software in our host machine. You can apply similar logic to set up complex development environments that require many types of software to be installed.
Running an Application Inside LXC
To quickly run an application inside an LXC container , we can use lxc-execute, which runs the specific command inside a container previously defined by lxc-create. It also accepts a configuration file in order to define parameters that were not available during the original container creation. The specified command is run within the container via an intermediate process called lxc-init. The lxc-init process will be started as the first process with PID 1 and the application that we want to run will be started as PID 2.
We will create a Debian Stretch–based container with Apache2 preinstalled:
$ sudo lxc-create -t debian -n stretch-apache2 -- --release stretch --packages "apache2"As per normal, this command has created the container but has not started it.
Instead of starting the container normally, let’s just start Apache2 in this container:
$ sudo lxc-execute -n stretch-apache2 -- /etc/init.d/apache2 start &[2] 4862[1] Done sudo lxc-execute -n stretch-apache2 -- /etc/init.d/apache2 startinit.lxc.static: initutils.c: mount_fs: 36 failed to mount /proc : Device or resource busyStarting Apache httpd web server: apache2AH00557: apache2: apr_sockaddr_info_get() failed for stretch-apache2AH00558: apache2: Could not reliably determine the server's fully qualified domain name, using 127.0.0.1. Set the 'ServerName' directive globally to suppress this message.$
The preceding command runs just the apache2 process within the container. The container info is as follows:
$ sudo lxc-info -n stretch-apache2Name: stretch-apache2State: RUNNINGPID: 4877CPU use: 0.16 secondsBlkIO use: 8.00 KiBMemory use: 9.84 MiBKMem use: 3.35 MiBLink: veth43CQKXTX bytes: 796 bytesRX bytes: 4.03 KiBTotal bytes: 4.81 KiB$
Rolling Out Memcached Instances with LXC
Memcached is a distributed, general-purpose memory object caching system. In this section we will see a simple way to roll out container-based Memcached servers with a default configuration. Save the following content to a file named memcached-init.sh:
#!/bin/shLXC_NAME=$1# create the container with some packages in place.sudo lxc-create -q -t debian -n $LXC_NAME -- --release jessie --arch amd64 --packages systemd,systemd-sysv,memcached,emacs24-nox,openssh-server,inetutils-ping,wget,netcatecho "Created $LXC_NAME container successfully"# start the container.sudo lxc-start -d -n $LXC_NAME# copy some files.sleep 10sudo cp -v ./memcached.conf /var/lib/lxc/$LXC_NAME/rootfs/etc/sudo lxc-attach -n $LXC_NAME -- service memcached restartsudo cp -v ./resolv.conf /var/lib/lxc/$LXC_NAME/rootfs/etc/
This script will create and run an LXC container with Memcached installed. The file contents of memcached.conf and resolv.conf are as follows, specifying the Memcached configuration and name servers, respectively:
memcached.conf file contents:
# memcached default config file# 2003 - Jay Bonci <[email protected]># This configuration file is read by the start-memcached script provided as# part of the Debian GNU/Linux distribution.# Run memcached as a daemon. This command is implied, and is not needed for the# daemon to run. See the README.Debian that comes with this package for more# information.-d# Log memcached's output to /var/log/memcachedlogfile /var/log/memcached.log# Be verbose# -v# Be even more verbose (print client commands as well)# -vv# Start with a cap of 64 megs of memory. It's reasonable, and the daemon default# Note that the daemon will grow to this size, but does not start out holding this much# memory-m 1000# Default connection port is 11211-p 11211# Run the daemon as root. The start-memcached will default to running as root if no# -u command is present in this config file-u memcache# Specify which IP address to listen on. The default is to listen on all IP addresses# This parameter is one of the only security measures that memcached has, so make sure# it's listening on a firewalled interface.-l 0.0.0.0# Limit the number of simultaneous incoming connections. The daemon default is 1024# -c 1024# Lock down all paged memory. Consult with the README and homepage before you do this# -k# Return error when memory is exhausted (rather than removing items)# -M# Maximize core file limit# -r
resolv.conf file contents:
nameserver 8.8.8.8
nameserver 8.8.4.4
nameserver 192.168.1.1
Note
All the preceding files should be in the same directory.
Invoking the memcached-init.sh script to create and run the memcached-1 LXC container is shown here:
$ chmod +x ./memcached-init.sh$ ./memcached-init.sh memcached-1Created memcached-1 container successfully'./memcached.conf' -> '/var/lib/lxc/memcached-1/rootfs/etc/memcached.conf''./resolv.conf' -> '/var/lib/lxc/memcached-1/rootfs/etc/resolv.conf'$
Now our memcached-1 server is ready to use, listening on port 11211:
$ sudo lxc-attach -n memcached-1root@memcached-1:/# netstat -antActive Internet connections (servers and established)Proto Recv-Q Send-Q Local Address Foreign Address Statetcp 0 0 0.0.0.0:22 0.0.0.0:* LISTENtcp 0 0 0.0.0.0:11211 0.0.0.0:* LISTENtcp6 0 0 :::22 :::* LISTENroot@memcached-1:/#
Rolling a second Memcached server is as simple as the following:
$ ./memcached-init.sh memcached-2Created memcached-2 container successfully'./memcached.conf' -> '/var/lib/lxc/memcached-2/rootfs/etc/memcached.conf''./resolv.conf' -> '/var/lib/lxc/memcached-2/rootfs/etc/resolv.conf'$ sudo lxc-attach -n memcached-2root@memcached-2:/# netstat -antActive Internet connections (servers and established)Proto Recv-Q Send-Q Local Address Foreign Address Statetcp 0 0 0.0.0.0:11211 0.0.0.0:* LISTENtcp 0 0 0.0.0.0:22 0.0.0.0:* LISTENtcp6 0 0 :::22 :::* LISTENroot@memcached-2:/#
We can quickly set up any number of Memcached servers with the preceding script and files in place.
Doing a Live Migration with LXD
LXD provides a feature to checkpoint and restore containers. Checkpointing is saving a particular state of the container to disk and restoring is bringing back the container to a particular state from the saved checkpoint. When a checkpoint saved on one host is restored on a different host, that is called live migration. We will use Checkpoint/Restore In Userspace (CRIU) to do the live migration of containers.
To start, install CRIU on the host machine as follows:
$ sudo apt install criuWe will launch an LXD Ubuntu 16.04 container to illustrate live migration:
$ sudo lxc launch ubuntu:16.04 container1Creating container1Starting container1$
A snapshot of the preceding container can be taken as follows:
$ sudo lxc snapshot container1 checkpoint-1 This results in a stateless snapshot where the container’s state is not saved to disk:
$ sudo lxc info container1 | grep checkpoint-1checkpoint-1 (taken at 2017/06/11 08:08 UTC) (stateless)$
When the state of the container is saved, we can restore the container from the snapshot and the container need not boot from scratch. Instead, it can boot and start running services with the state that was saved in the snapshot. To save the current states of the container to disk, use the following command:
$ sudo lxc snapshot container1 checkpoint-2 --stateful$ sudo lxc info container1 | grep checkpoint-2checkpoint-2 (taken at 2017/06/11 08:09 UTC) (stateful)$
Similarly, we can stop and start the container and preserve the state as follows:
$ sudo lxc stop container1 --statefulThe preceding command writes the container state to disk. If you look in the LXD storage area, you can see how this is stored:
$ sudo ls /var/lib/lxd/containers/container1/statecgroup.img fs-23060.img mountpoints-12.img rule-9.imgcore-132.img fs-33.img netdev-9.img seccomp.imgcore-1.img fs-89.img netlinksk.img sigacts-132.imgcore-23057.img ids-132.img netns-9.img sigacts-1.imgcore-23058.img ids-1.img packetsk.img sigacts-23057.imgcore-23059.img ids-23057.img pagemap-132.img sigacts-23058.imgcore-23060.img ids-23058.img pagemap-1.img sigacts-23059.imgcore-33.img ids-23059.img pagemap-23057.img sigacts-23060.imgcore-89.img ids-23060.img pagemap-23058.img sigacts-33.imgdump.log ids-33.img pagemap-23059.img sigacts-89.imgeventpoll.img ids-89.img pagemap-23060.img signalfd.imgfdinfo-2.img ifaddr-9.img pagemap-33.img stats-dumpfdinfo-3.img inetsk.img pagemap-89.img timerfd.imgfdinfo-4.img inotify.img pages-1.img tmpfs-dev-47.tar.gz.imgfdinfo-5.img inventory.img pages-2.img tmpfs-dev-53.tar.gz.imgfdinfo-6.img ip6tables-9.img pages-3.img tmpfs-dev-54.tar.gz.imgfdinfo-7.img ipcns-var-10.img pages-4.img tmpfs-dev-55.tar.gz.imgfdinfo-8.img iptables-9.img pages-5.img tmpfs-dev-56.tar.gz.imgfdinfo-9.img mm-132.img pages-6.img tty.imgfifo-data.img mm-1.img pages-7.img tty.infofifo.img mm-23057.img pages-8.img tty-info.imgfs-132.img mm-23058.img pstree.img unixsk.imgfs-1.img mm-23059.img reg-files.img userns-13.imgfs-23057.img mm-23060.img remap-fpath.img utsns-11.imgfs-23058.img mm-33.img route6-9.imgfs-23059.img mm-89.img route-9.img$
Detailed information on container1 shows the snapshots that are available as follows and the status of container1 as Stopped:
$ sudo lxc info container1Name: container1Remote: unix:/var/lib/lxd/unix.socketArchitecture: x86_64Created: 2017/06/04 23:55 UTCStatus: StoppedType: persistentProfiles: defaultSnapshots:checkpoint-1 (taken at 2017/06/11 08:08 UTC) (stateless)checkpoint-2 (taken at 2017/06/11 08:09 UTC) (stateful)$
Let’s start the container, restoring its state:
$ sudo lxc start container1$ sudo lxc info container1Name: container1Remote: unix:/var/lib/lxd/unix.socketArchitecture: x86_64Created: 2017/06/04 23:55 UTCStatus: RunningType: persistentProfiles: defaultPid: 22560Ips:eth0: inet 10.186.2.185 veth56JKGXeth0: inet6 fe80::216:3eff:fe97:8202 veth56JKGXlo: inet 127.0.0.1lo: inet6 ::1Resources:Processes: 8CPU usage:CPU usage (in seconds): 0Memory usage:Memory (current): 120.53MBMemory (peak): 125.00MBNetwork usage:eth0:Bytes received: 2.42kBBytes sent: 426BPackets received: 19Packets sent: 5lo:Bytes received: 0BBytes sent: 0BPackets received: 0Packets sent: 0Snapshots:checkpoint-1 (taken at 2017/06/11 08:08 UTC) (stateless)checkpoint-2 (taken at 2017/06/11 08:09 UTC) (stateful)$
Let’s now migrate our container (container1) to another host that is already configured with LXD. (The IP address of this host is 192.168.1.8 on my local network.) Install CRIU in this host machine before attempting live migration. Let’s make this host listen on the network as follows:
$ sudo lxc config set core.https_address [::]:8443$ sudo lxc config set core.trust_password secret
With the preceding setup on the host machine that has container1, add the host as a remote, as follows:
$ sudo lxc remote add stylesen 192.168.1.8Certificate fingerprint: 31343766313334336264366335333539653562373930323064623465333662656464653862633265373265353565396535313334356463396638373235393134ok (y/n)? yAdmin password for stylesen:Client certificate stored at server: stylesen$
We can now see stylesen is listed as a remote LXD server:
$ sudo lxc remote list+---------+----------------------------------+----------+--------+--------+| NAME | URL | PROTOCOL | PUBLIC | STATIC |+---------+----------------------------------+----------+--------+--------+| images | https://images.linuxcontainers.org | simplestreams | YES | NO |+---------+----------------------------------+---------------+-----+------+| local (default) | unix:// | lxd | NO | YES |+---------+----------------------------------+---------------+-----+------+| stylesen| https://192.168.1.8:8443 | lxd | NO | NO |+---------+----------------------------------+---------------+-----+------+| ubuntu | https://cloud-images.ubuntu.com/releases| simplestreams | YES | YES |+---------+----------------------------------+---------------+-----+------+| ubuntu-daily| https://cloud-images.ubuntu.com/daily| simplestreams | YES | YES |+---------+----------------------------------+---------------+-----+------+$
Before live migration, let’s see what containers are available in our remote server 'stylesen:'
$ sudo lxc list stylesen:+------+-------+------+------+------+-----------+| NAME | STATE | IPV4 | IPV6 | TYPE | SNAPSHOTS |+------+-------+------+------+------+-----------+$
Migrate container1 to the remote LXD server 'stylesen:' using the following command:
$ sudo lxc move container1 stylesen:Now the container is live migrated to remote LXD server 'stylesen:', thus listing our 'local:' LXD server will not have container1:
$ sudo lxc list local: container1+------+-------+------+------+------+-----------+| NAME | STATE | IPV4 | IPV6 | TYPE | SNAPSHOTS |+------+-------+------+------+------+-----------+
On the remote LXD server 'stylesen:', we can see container1 migrated and started running:
$ sudo lxc list stylesen:+-------------+---------+----------+-----------+--------------+-----------+|NAME |STATE | IPV4 |IPV6 | TYPE | SNAPSHOTS |+-------------+---------+----------+-----------+--------------+-----------+|container1|RUNNING |10.186.2.185|fd42:17c8:cc98:282b:|PERSISTENT| 2 |(eth0) 216:3eff:fe97:8202 (eth0)+-------------+---------+----------+-----------+--------------+-----------+$
Figure 6-4 depicts the live migration scenario.
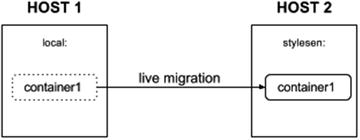
Figure 6-4. Live migration scenario
Thus, LXD combined with CRIU provides a way to live migrate containers from one host to another, which may come in handy in many different scenarios.
Running Other Architectures
LXC has a limitation of running based on the host’s kernel architecture. Running armhf container on top of amd64 is not supported, since the underlying CPU does not know what to do with the new architecture that is requested. However, the ubuntu template can run other architectures by using the qemu-user-static package to invoke a specific architecture’s emulator.
The qemu-user-static package provides emulators for different architectures. Some of the interesting architectures supported by qemu-user-static at the time of this writing are as follows:
SPARC
ARM
AArch64
PowerPC
x86
mips
MicroBlaze
This opens up a huge range of possibilities to play around with different architectures without having actual hardware Consider, for example, building for a different architecture or setting up a build system that will build binaries on a different architecture. Install qemu-user-static as follows:
$ sudo apt install qemu-user-static$
Once qemu-user-static is installed, we can have a look at the supported target emulator binaries that are available using the following command:
$ update-binfmts --displayqemu-aarch64 (enabled):package = qemu-user-statictype = magicoffset = 0magic = x7fx45x4cx46x02x01x01x00x00x00x00x00x00x00x00x00x02x00xb7x00mask = xffxffxffxffxffxffxffx00xffxffxffxffxffxffxffxffxfexffxffxffinterpreter = /usr/bin/qemu-aarch64-staticdetector =qemu-microblaze (enabled):package = qemu-user-statictype = magicoffset = 0magic = x7fx45x4cx46x01x02x01x00x00x00x00x00x00x00x00x00x00x02xbaxab----------OUTPUT TRUNCATED----------$
In the host machine, I can see the architectures enabled and their corresponding interpreter location as shown in Table 6-1.
Table 6-1. Emulator Architectures and Their Interpreter Location
Enabled Architecture | Interpreter Location |
|---|---|
qemu-aarch64 | /usr/bin/qemu-aarch64-static |
qemu-microblaze | /usr/bin/qemu-microblaze-static |
qemu-arm | /usr/bin/qemu-arm-static |
qemu-m68k | /usr/bin/qemu-m68k-static |
qemu-ppc64le | /usr/bin/qemu-ppc64le-static |
qemu-ppc64abi32 | /usr/bin/qemu-ppc64abi32-static |
qemu-sparc64 | /usr/bin/qemu-sparc64-static |
qemu-sparc | /usr/bin/qemu-sparc-static |
qemu-mips64el | /usr/bin/qemu-mips64el-static |
qemu-sparc32plus | /usr/bin/qemu-sparc32plus-static |
qemu-ppc64 | /usr/bin/qemu-ppc64-static |
qemu-ppc | /usr/bin/qemu-ppc-static |
qemu-mipsel | /usr/bin/qemu-mipsel-static |
qemu-alpha | /usr/bin/qemu-alpha-static |
qemu-cris | /usr/bin/qemu-cris-static |
qemu-mips | /usr/bin/qemu-mips-static |
qemu-mips64 | /usr/bin/qemu-mips64-static |
qemu-s390x | /usr/bin/qemu-s390x-static |
qemu-armeb | /usr/bin/qemu-armeb-static |
armhf Container
We will create an ARM-based container using qemu-user-static and ubuntu templates as follows:
$ sudo lxc-create -t ubuntu -n zesty-armhf -- --release zesty --arch armhf --packages "wget"Checking cache download in /var/cache/lxc/zesty/rootfs-armhf ...Installing packages in template: apt-transport-https,ssh,vim,language-pack-enDownloading ubuntu zesty minimal ...I: Running command: debootstrap --arch armhf --foreign --verbose --components=main,universe --include=apt-transport-https,ssh,vim,language-pack-en zesty /var/cache/lxc/zesty/partial-armhf http://ports.ubuntu.com/ubuntu-portsI: Retrieving InReleaseI: Checking Release signatureI: Valid Release signature (key id 790BC7277767219C42C86F933B4FE6ACC0B21F32)I: Retrieving Packages----------OUTPUT TRUNCATED----------update-initramfs: deferring update (trigger activated)update-rc.d: warning: start and stop actions are no longer supported; falling back to defaultsupdate-rc.d: warning: start and stop actions are no longer supported; falling back to defaultsSetting up mountall:amd64 (2.54ubuntu1) ...Processing triggers for libc-bin (2.24-9ubuntu2) ...Processing triggers for dbus (1.10.10-1ubuntu2) ...Processing triggers for systemd (232-21ubuntu3) ...Processing triggers for initramfs-tools (0.125ubuntu9) ...W: --force-yes is deprecated, use one of the options starting with --allow instead.Current default time zone: 'Etc/UTC'Local time is now: Sun Jun 11 04:38:10 UTC 2017.Universal Time is now: Sun Jun 11 04:38:10 UTC 2017.### The default user is 'ubuntu' with password 'ubuntu'!# Use the 'sudo' command to run tasks as root in the container.##$
The host machine on which the container was created uses the amd64 (or x86_64) architecture, as shown here:
$ uname -aLinux hanshu 4.10.0-21-generic #23-Ubuntu SMP Fri Apr 28 16:14:22 UTC 2017 x86_64 x86_64 x86_64 GNU/Linux$ file /bin/pwd/bin/pwd: ELF 64-bit LSB shared object, x86-64, version 1 (SYSV), dynamically linked, interpreter /lib64/ld-linux-x86-64.so.2, for GNU/Linux 2.6.32, BuildID[sha1]=b8ff2ce5a5ef32ab15d8afb775a4c3e0ddd41e99, stripped$
Now, let’s start our newly created container based on armhf and verify the same as follows:
$ sudo lxc-start -n zesty-armhf$ sudo lxc-attach -n zesty-armhfroot@zesty-armhf:/# uname -aLinux zesty-armhf 4.10.0-21-generic #23-Ubuntu SMP Fri Apr 28 16:14:22 UTC 2017 armv7l armv7l armv7l GNU/Linuxroot@zesty-armhf:/# file /bin/pwd/bin/pwd: ELF 32-bit LSB executable, ARM, EABI5 version 1 (SYSV), dynamically linked, interpreter /lib/ld-linux-armhf.so.3, for GNU/Linux 3.2.0, BuildID[sha1]=155a8b5547327c505dc2662b6bc8c86238a2e4bd, strippedroot@zesty-armhf:/#
Let’s try installing the “hello” armhf Debian package and see if it works in this armhf container:
root@zesty-armhf:/# wget http://http.us.debian.org/debian/pool/main/h/hello/hello_2.10-1%2bb1_armhf.deb--2017-06-11 05:17:05-- http://http.us.debian.org/debian/pool/main/h/hello/hello_2.10-1%2bb1_armhf.debResolving http.us.debian.org (http.us.debian.org)... 64.50.236.52, 128.61.240.89, 208.80.154.15, ...Connecting to http.us.debian.org (http.us.debian.org)|64.50.236.52|:80... connected.HTTP request sent, awaiting response... 200 OKLength: 54540 (53K)Saving to: 'hello_2.10-1+b1_armhf.deb'hello_2.10-1+b1_arm 100%[===================>] 53.26K 111KB/s in 0.5s2017-06-11 05:17:06 (111 KB/s) - 'hello_2.10-1+b1_armhf.deb' saved [54540/54540]root@zesty-armhf:/# dpkg -i hello_2.10-1+b1_armhf.debSelecting previously unselected package hello.(Reading database ... 14199 files and directories currently installed.)Preparing to unpack hello_2.10-1+b1_armhf.deb ...Unpacking hello (2.10-1+b1) ...Setting up hello (2.10-1+b1) ...root@zesty-armhf:/# which hello/usr/bin/helloroot@zesty-armhf:/# /usr/bin/helloHello, world!root@zesty-armhf:/#
ppc64el Container
Similarly, let’s try running the ppc64el architecture based Ubuntu Zesty container. ppc64el is a 64-bit Little Endian PowerPC architecture:
$ sudo lxc-create -t ubuntu -n zesty-ppc64el -- --release zesty --arch ppc64elChecking cache download in /var/cache/lxc/zesty/rootfs-ppc64el ...Installing packages in template: apt-transport-https,ssh,vim,language-pack-enDownloading ubuntu zesty minimal ...I: Running command: debootstrap --arch ppc64el --foreign --verbose --components=main,universe --include=apt-transport-https,ssh,vim,language-pack-en zesty /var/cache/lxc/zesty/partial-ppc64el http://ports.ubuntu.com/ubuntu-portsI: Retrieving InReleaseI: Checking Release signatureI: Valid Release signature (key id 790BC7277767219C42C86F933B4FE6ACC0B21F32)I: Retrieving Packages----------OUTPUT TRUNCATED----------Current default time zone: 'Etc/UTC'Local time is now: Sun Jun 11 05:08:33 UTC 2017.Universal Time is now: Sun Jun 11 05:08:33 UTC 2017.### The default user is 'ubuntu' with password 'ubuntu'!# Use the 'sudo' command to run tasks as root in the container.##$
We will start the ppc64el architecture based container and see what is running inside it as follows:
$ sudo lxc-start -n zesty-ppc64el$ sudo lxc-attach -n zesty-ppc64elroot@zesty-ppc64el:/# uname -aLinux zesty-ppc64el 4.10.0-21-generic #23-Ubuntu SMP Fri Apr 28 16:14:22 UTC 2017 ppc64le ppc64le ppc64le GNU/Linuxroot@zesty-ppc64el:/# file /bin/pwd/bin/pwd: ELF 64-bit LSB shared object, 64-bit PowerPC or cisco 7500, version 1 (SYSV), dynamically linked, interpreter /lib64/ld64.so.2, for GNU/Linux 3.2.0, BuildID[sha1]=730338a76710095bd2b651ce823cc9c014333e0f, strippedroot@zesty-ppc64el:/#
Let’s try installing the “hello” ppc64el Debian package and see if it works in this container:
root@zesty-ppc64el:/# wget http://http.us.debian.org/debian/pool/main/h/hello/hello_2.9-2%2bdeb8u1_ppc64el.deb--2017-06-11 05:23:04-- http://http.us.debian.org/debian/pool/main/h/hello/hello_2.9-2%2bdeb8u1_ppc64el.debResolving http.us.debian.org (http.us.debian.org)... 208.80.154.15, 64.50.236.52, 64.50.233.100, ...Connecting to http.us.debian.org (http.us.debian.org)|208.80.154.15|:80... connected.HTTP request sent, awaiting response... 200 OKLength: 50314 (49K) [application/octet-stream]Saving to: 'hello_2.9-2+deb8u1_ppc64el.deb'hello_2.9-2+deb8u1_ 100%[================>] 49.13K 112KB/s in 0.4s2017-06-11 05:23:05 (112 KB/s) - 'hello_2.9-2+deb8u1_ppc64el.deb' saved [50314/50314]root@zesty-ppc64el:/# dpkg -i hello_2.9-2+deb8u1_ppc64el.debSelecting previously unselected package hello.(Reading database ... 14284 files and directories currently installed.)Preparing to unpack hello_2.9-2+deb8u1_ppc64el.deb ...Unpacking hello (2.9-2+deb8u1) ...Setting up hello (2.9-2+deb8u1) ...root@zesty-ppc64el:/# which hello/usr/bin/helloroot@zesty-ppc64el:/# /usr/bin/helloHello, world!root@zesty-ppc64el:/#
As demonstrated, we can run containers based on (almost!) any architecture with the help of the ubuntu template. Sometimes a suitable rootfs and some tweaks are required in order to make certain architecture work with the host machine’s environment.
Booting a VM Image in LXC
Running a raw-format image designed for a virtual machine in LXC is also possible. Obtain a raw disk image using wget as follows on the host machine:
$ wget http://images.validation.linaro.org/kvm/jessie.img.gz--2017-06-11 15:06:38-- http://images.validation.linaro.org/kvm/jessie.img.gzResolving images.validation.linaro.org (images.validation.linaro.org)... 51.148.40.7Connecting to images.validation.linaro.org (images.validation.linaro.org)|51.148.40.7|:80... connected.HTTP request sent, awaiting response... 200 OKLength: 181109804 (173M) [application/x-gzip]Saving to: 'jessie.img.gz'jessie.img.gz 100%[=================>] 172.72M 1.23MB/s in 2m 48s2017-06-11 15:09:27 (1.03 MB/s) - 'jessie.img.gz' saved [181109804/181109804]$
Note
In the jessie.img.gz image downloaded here, the first partition is its root partition.
Decompress the image as follows, which will create the file jessie.img in the current directory:
$ gzip -d jessie.img.gz$ ls -alh jessie.img-rw-rw-r-- 1 stylesen stylesen 954M May 29 2014 jessie.img$
Use the following command to install kpartx, which is a tool used to create device maps from the available partitions in a raw image:
$ sudo apt install kpartxCreate necessary loop devices using kpartx as follows:
$ sudo kpartx -a jessie.img$ ls /dev/mapper/ -alhtotal 0drwxr-xr-x 2 root root 80 Jun 11 15:13 .drwxr-xr-x 21 root root 4.1K Jun 11 15:13 ..crw------- 1 root root 10, 236 Jun 10 22:17 controllrwxrwxrwx 1 root root 7 Jun 11 15:13 loop0p1 -> ../dm-0$
Create an LXC configuration file named vm-img-lxc.conf with the following content:
$ cat vm-img-lxc.conflxc.network.type = vethlxc.network.flags = uplxc.network.link = lxcbr0lxc.utsname = vm-img-lxclxc.tty = 2lxc.pts = 2048lxc.rootfs = /dev/mapper/loop0p1lxc.arch = amd64lxc.cap.drop = sys_module mac_admin
Now start the container and see how it boots the VM image:
$ sudo lxc-start -n vm-img-lxc -f vm-img-lxc.conf -FMount failed for selinuxfs on /sys/fs/selinux: No such file or directoryINIT: version 2.88 bootingUsing makefile-style concurrent boot in runlevel S.findfs: unable to resolve 'UUID=e91502e4-0fcb-41f9-9147-8cec6d059660'mount: block device pstore is write-protected, mounting read-onlymount: cannot mount block device pstore read-onlyudev does not support containers, not started ... (warning).Setting the system clock.hwclock: Cannot access the Hardware Clock via any known method.hwclock: Use the --debug option to see the details of our search for an access method.Unable to set System Clock to: Sun Jun 11 09:48:46 UTC 2017 ... (warning).findfs: unable to resolve 'UUID=e91502e4-0fcb-41f9-9147-8cec6d059660'Activating swap...done.Usage: mountpoint [-q] [-d] [-x] pathmount: you must specify the filesystem typeCannot check root file system because it is not mounted read-only. ... failed!mount: cannot remount block device UUID=e91502e4-0fcb-41f9-9147-8cec6d059660 read-write, is write-protectedfindfs: unable to resolve 'UUID=e91502e4-0fcb-41f9-9147-8cec6d059660'mount: cannot remount block device tmpfs read-write, is write-protectedmount: cannot remount block device tmpfs read-write, is write-protectedmount: cannot remount block device proc read-write, is write-protectedmount: cannot remount block device sysfs read-write, is write-protectedmount: cannot remount block device tmpfs read-write, is write-protectedmount: cannot remount block device devpts read-write, is write-protectedActivating lvm and md swap...done.Checking file systems...fsck from util-linux 2.20.1done.Cleaning up temporary files... /tmp.Mounting local filesystems...done.Activating swapfile swap...done.findfs: unable to resolve 'UUID=e91502e4-0fcb-41f9-9147-8cec6d059660'Cleaning up temporary files....Setting kernel variables ...sysctl: permission denied on key 'vm.min_free_kbytes'failed.Configuring network interfaces...Internet Systems Consortium DHCP Client 4.2.4Copyright 2004-2012 Internet Systems Consortium.All rights reserved.For info, please visit https://www.isc.org/software/dhcp/Listening on LPF/eth0/c6:f8:a6:45:f5:6cSending on LPF/eth0/c6:f8:a6:45:f5:6cSending on Socket/fallbackDHCPREQUEST on eth0 to 255.255.255.255 port 67DHCPNAK from 10.0.3.1DHCPDISCOVER on eth0 to 255.255.255.255 port 67 interval 3DHCPREQUEST on eth0 to 255.255.255.255 port 67DHCPOFFER from 10.0.3.1DHCPACK from 10.0.3.1bound to 10.0.3.24 -- renewal in 1597 seconds.done.Cleaning up temporary files....INIT: Entering runlevel: 2Using makefile-style concurrent boot in runlevel 2.Starting enhanced syslogd: rsyslogd.----------OUTPUT TRUNCATED----------
Use lxc-console as follows to log in to the container:
$ sudo lxc-console -n vm-img-lxcDebian GNU/Linux jessie/sid debian tty1debian login: rootPassword:Last login: Sun Jun 11 09:53:05 UTC 2017 on tty1Linux debian 4.10.0-21-generic #23-Ubuntu SMP Fri Apr 28 16:14:22 UTC 2017 x86_64The programs included with the Debian GNU/Linux system are free software;the exact distribution terms for each program are described in theindividual files in /usr/share/doc/*/copyright.Debian GNU/Linux comes with ABSOLUTELY NO WARRANTY, to the extentpermitted by applicable law.root@debian:∼#
Type <Ctrl+a q> to exit the console. The root password for the image is root.
Stop the container using the following command; there is no need to destroy since the rootfs is mounted via the loop devices.
$ sudo lxc-stop -k -n vm-img-lxcUsing JuJu with LXD
JuJu is an application modeling tool that can be used to deploy, configure, scale, and operate software on both public and private clouds. JuJu supports LXD. In this section we will explore how to work with JuJu and LXD by installing everything in an LXD container except for JuJu and LXD itself on the host machine.
We install JuJu in our host machine with the following command:
$ sudo apt install jujuLet’s start by creating a JuJu controller, which is the management service of JuJu. Install it as a separate LXD container as follows:
$ juju bootstrap localhost juju-controllerSince Juju 2 is being run for the first time, downloading latest cloud information.Fetching latest public cloud list...Updated your list of public clouds with 1 cloud and 11 cloud regions added:added cloud:- oracleadded cloud region:- aws/ca-central-1- aws/eu-west-2- azure/canadacentral- azure/canadaeast- azure/uksouth- azure/ukwest- azure/westcentralus- azure/westus2- google/asia-northeast1- google/asia-southeast1- google/us-west1ERROR creating LXD client: juju doesn't support ipv6. Please disable LXD's IPV6:$ lxc network set lxdbr0 ipv6.address noneand rebootstrap$
As you can see, when JuJu is run for the first time, it updates its list of public clouds. The preceding command failed with an error indicating JuJu does not support IPv6, but helpfully provides the command that has to be run to disable IPv6 in LXD; hence, run the following command:
$ lxc network set lxdbr0 ipv6.address noneAfter disabling IPv6 in LXD, retry bootstrapping our JuJu controller:
$ juju bootstrap localhost juju-controllerCreating Juju controller "juju-controller" on localhost/localhostLooking for packaged Juju agent version 2.0.2 for amd64To configure your system to better support LXD containers, please see: https://github.com/lxc/lxd/blob/master/doc/production-setup.mdLaunching controller instance(s) on localhost/localhost...- juju-d729dc-0 (arch=amd64)Fetching Juju GUI 2.7.3Waiting for addressAttempting to connect to 10.186.2.131:22Logging to /var/log/cloud-init-output.log on the bootstrap machineRunning apt-get updateRunning apt-get upgradeInstalling curl, cpu-checker, bridge-utils, cloud-utils, tmuxFetching Juju agent version 2.0.2 for amd64Installing Juju machine agentStarting Juju machine agent (service jujud-machine-0)Bootstrap agent now startedContacting Juju controller at 10.186.2.131 to verify accessibility...Bootstrap complete, "juju-controller" controller now available.Controller machines are in the "controller" model.Initial model "default" added.$
Confirm that the JuJu controller is running by using the following command:
$ lxc list juju+-------------+---------+---------------------+------+---------+-----------+| NAME | STATE | IPV4 | IPV6 | TYPE | SNAPSHOTS |+-------------+---------+---------------------+------+---------+-----------+| juju-d729dc-0 | RUNNING | 10.186.2.131 (eth0) | | PERSISTENT| 0 |+-------------+---------+---------------------+------+---------+-----------+$
To verify that JuJu is set up properly, use the juju status command as follows:
$ juju statusModel Controller Cloud/Region Versiondefault juju-controller localhost/localhost 2.0.2App Version Status Scale Charm Store Rev OS NotesUnit Workload Agent Machine Public address Ports MessageMachine State DNS Inst id Series AZ$
The JuJu controller is set up successfully now. We can see that there is a JuJu GUI installed as part of the controller setup. We will take a look at the JuJu GUI in just a bit. Before accessing the GUI web application , get the credentials via the following command:
$ juju show-controller --show-passwordjuju-controller:details:uuid: 011cc077-c1b4-4323-847f-d78080093bfeapi-endpoints: ['10.186.2.131:17070']ca-cert: |-----BEGIN CERTIFICATE-----MIIDrDCCApSgAwIBAgIUDSACo861iQXuFKZjFG+WoHzfy0cwDQYJKoZIhvcNAQELBQAwbjENMAsGA1UEChMEanVqdTEuMCwGA1UEAwwlanVqdS1nZW5lcmF0ZWQgQ0EgZm9yIG1vZGVsICJqdWp1LWNhIjEtMCsGA1UEBRMkN2E3NzAzZmItZTY1OS00MjEzLThkYjAtMWE4NGNlMDg0N2E4MB4XDTE3MDYwNDEzMjcwMFoXDTI3MDYxMTEzMjcwMFowbjENMAsGA1UEChMEanVqdTEuMCwGA1UEAwwlanVqdS1nZW5lcmF0ZWQgQ0EgZm9yIG1vZGVsICJqdWp1LWNhIjEtMCsGA1UEBRMkN2E3NzAzZmItZTY1OS00MjEzLThkYjAtMWE4NGNlMDg0N2E4MIIBIjANBgkqhkiG9w0BAQEFAAOCAQ8AMIIBCgKCAQEA5nhETDPrpixCklGf8SNyKUd1QQKOsDFumwz46HCWDxBOPXbJ58eVXAN7pM5Y1sKhrPIRXI+lQ/FWjlGFZVp1jBAG+Y+hNw+vk8Od+KAEimamv7uTFsSkBEGa7P8Tk/7HFu+LpkrGcaP37NYFBNyq2iNap60MrpJUv2WGF+/PvR3hE/sZIiE4+U9sDuGBk4Rj+IJPIzrL2gyKYobV9UmYPNhEaYrsUXv7mCRNaMIvxDabjFCpL8ycEjunSKN2vR+z5sZgcPyjqXqukRU0WH5BUxWNdXUJ3Rms4G4nvgZl0AjPlQa+ujAU1rh6/z1CUqAyaLMv50FJDW0K0igFGdHR0QIDAQABo0IwQDAOBgNVHQ8BAf8EBAMCAqQwDwYDVR0TAQH/BAUwAwEB/zAdBgNVHQ4EFgQUH3ZOs+HFIwvyTSulTBAflbykYi8wDQYJKoZIhvcNAQELBQADggEBAMg/lfIQfp0SVW24z00Tg0QFpMUn2L0ake+3qO5VwpF45i3CERAAk0MgMVNOC7cZ4+RowNYUylrG+dCeD0Td+ZlvhlDZDhfdlE2G21tskd1RvmFG6CJg85IEKlQ29ZW9rITNy0JWVEZz/qDUIv9z49kS39A172xIH/ouujXISwK9SxBPHve3LNzoAh+PE25NgDywrhPXwjpWD9uL1XrD/g3heGE5zw7ckscXVutVS1OELMWTXyck1Q/XSUH4SMHb4tj3y4ONEWySQjjKO2DAwklKC+Pjbwgkx6vvCvFz9L3ipBp6V8q0GtpuVHn0OUGVtHjQLtMPr87pl6YOe2ix/3w=-----END CERTIFICATE-----cloud: localhostregion: localhostagent-version: 2.0.2controller-machines:"0":instance-id: juju-d729dc-0models:controller:uuid: dc86e29d-c9f4-4fb9-868e-db264fd729dcmachine-count: 1default:uuid: 4a1c7ebd-aca2-4f83-89a2-07aace2fdcbfcurrent-model: admin/defaultaccount:user: adminaccess: superuserpassword: 9b520684687f26eadda5bf3df94b37b5$
The preceding output shows various information about the controller instance along with the account credentials for logging into the JuJu web GUI. Issue the following command to access the JuJu GUI in your web browser; if the command’s attempt to open the GUI in a web browser fails, copy and paste the designated URL into a web browser:
$ juju guiOpening the Juju GUI in your browser.If it does not open, open this URL:https://10.186.2.131:17070/gui/4a1c7ebd-aca2-4f83-89a2-07aace2fdcbf/$
The web browser opens the login page, as shown in Figure 6-5, where you enter the credentials previously obtained via juju show-controller --show-password.

Figure 6-5. JuJu controller login page
After entering the credentials and clicking Login, the JuJu controller GUI shown in Figure 6-6 is displayed.
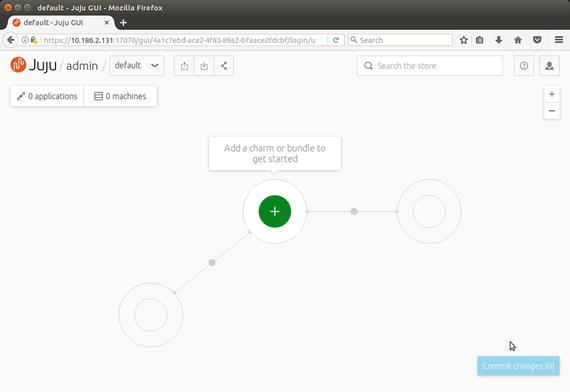
Figure 6-6. JuJu controller home page
To deploy a charm or bundle using the JuJu controller GUI, click the green and white plus icon in the center of the screen showing the tooltip “Add a charm or bundle to get started,” which should open the JuJu Store page as shown in Figure 6-7 (with helpful definitions of charms and bundles).

Figure 6-7. JuJu Store
Click the View all the charms button to view the recommended charms page. Scroll down the page and mouse over “rabbitmq server,” which should show a green and white plus icon at the right side of the row, as shown in Figure 6-8. Click the icon to install the charm via JuJu.

Figure 6-8. Recommended charms page
Figure 6-9 shows the newly available charm, rabbitmq-server, on an LXD container on the JuJu controller GUI.

Figure 6-9. Rabbitmq-server charm installed
As indicated in the button at the bottom-right corner, we need to commit the changes to deploy the actual LXD containers. Click the Commit changes button, which should open the Machines to be deployed page, as shown in Figure 6-10.
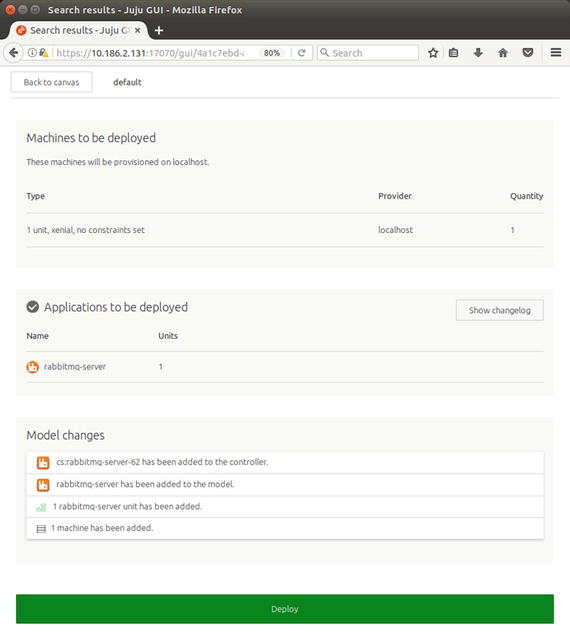
Figure 6-10. Machines to be deployed page
Click the Deploy button at the bottom of the page to deploy and start running the LXD container with rabbitmq-server installed. Figure 6-11 shows that rabbitmq-server is installed, with the rabbitmq-server icon in the JuJu controller GUI.

Figure 6-11. Rabbitmq-server installed in JuJu
Use the following command to see the additional LXD containers created for the rabbitmq-server:
$ lxc list juju-+--------------+---------+--------------------+------+---------+-----------+| NAME | STATE | IPV4 | IPV6 | TYPE | SNAPSHOTS |+--------------+---------+--------------------+------+---------+-----------+| juju-2fdcbf-1 | RUNNING | 10.186.2.160 (eth0) | | PERSISTENT | 0 |+--------------+---------+--------------------+------+---------+-----------+| juju-d729dc-0 | RUNNING | 10.186.2.131 (eth0) | | PERSISTENT | 0 |+--------------+---------+--------------------+------+------------+--------+$
So far, we installed a “charm,” a simple single server application in JuJu terms. Let’s try installing a more complex application called a bundle in JuJu terms, which is a collection of services and can span across multiple LXD containers. Go to the JuJu Store page (as shown earlier in Figure 6-7) by clicking the green and white plus icon on the JuJu controller home page. On the JuJu Store page, click the View all the bundles button to open the recommended bundles page, as shown in Figure 6-12.
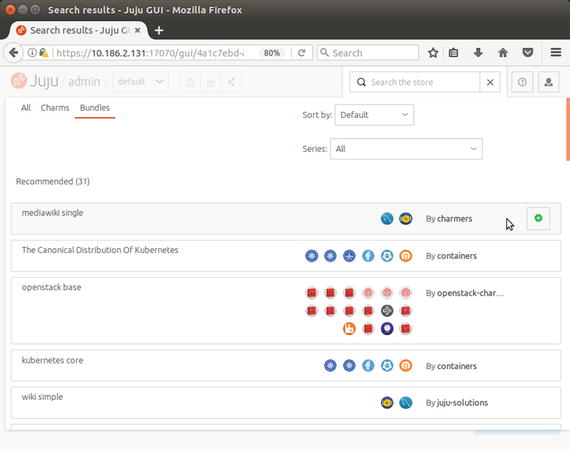
Figure 6-12. Recommended bundles page
Deploy the mediawiki bundle listed at the top of the recommended bundles in Figure 6-12 by hovering your mouse over it and clicking the plus icon. The mediawiki bundle requires a web server and a MySQL server, and is the simplest bundle spanning two LXD containers, as shown in Figure 6-13.

Figure 6-13. Mediawiki JuJu bundle installed
Click the Commit changes button to commit the bundle changes and deploy in order to start running the mediawiki bundle. View the additional containers created for running the mediawiki bundle with the following command:
$ lxc list juju-+-------------+---------+---------------------+-----+-----------+----------+| NAME | STATE | IPV4 | IPV6| TYPE | SNAPSHOTS|+-------------+---------+---------------------+------+----------+----------+| juju-2fdcbf-1 | RUNNING | 10.186.2.160 (eth0) | | PERSISTENT | 0 |+-------------+---------+---------------------+-----+------------+---------+| juju-2fdcbf-2 | RUNNING | 10.186.2.225 (eth0) | | PERSISTENT | 0 |+-------------+---------+---------------------+-----+------------+---------+| juju-2fdcbf-3 | RUNNING | 10.186.2.87 (eth0) | | PERSISTENT | 0 |+-------------+---------+---------------------+-----+------------+-----v---+| juju-d729dc-0 | RUNNING | 10.186.2.131 (eth0) | | PERSISTENT | 0 |+-------------+---------+---------------------+-----+-----------+---------+$
The LXD containers, such as juju-2fdcbf-2 and juju-2fdcbf-3, are created for the mediawiki bundle. Let’s access the mediawiki bundle that was just deployed in an LXD container by accessing the IP address 10.186.2.225 in a web browser, where IP address 10.186.2.225 is the machine that will run the Apache web server in order to serve MediaWiki. Figure 6-14 shows MediaWiki running.

Figure 6-14. MediaWiki running
To find out which service each LXD container created by JuJu is running, use the following command:
$ juju statusModel Controller Cloud/Region Versiondefault juju-controller localhost/localhost 2.0.2App Version Status Scale Charm Store Rev OS Notesmediawiki 1.19.14 active 1/1 mediawiki jujucharms 3 ubuntumysql 5.5.55 active 1/1 mysql jujucharms 29 ubunturabbitmq-server 3.5.7 active 1 bitmq-server jujucharms 62 ubuntuUnit Workload Agent Machine Public address Ports Messagemediawiki/1 active allocating 1 10.186.2.225 80/tcp Unit is readymysql/1 active allocating 2 10.186.2.87 3306/tcp Unit is readyrabbitmq-server/0* active idle 0 10.186.2.160 5672/tcp Unit is readyMachine State DNS Inst id Series AZ0 started 10.186.2.160 juju-2fdcbf-1 xenial1 started 10.186.2.225 juju-2fdcbf-2 trusty2 started 10.186.2.87 juju-2fdcbf-3 trustyRelation Provides Consumes Typedb mediawiki mysql regularcluster mysql mysql peercluster rabbitmq-server rabbitmq-server peer$
That is enough coverage of the JuJu GUI for now! You can explore other JuJu controller options by browsing through the JuJu GUI links.
We will now try bootstrapping a complex and scalable JuJu bundle in order to install WordPress from the command line. The bundle will install WordPress, HAProxy, Memcached, Nagios, and MariaDB on a total of six LXD containers. Run the following command:
$ juju deploy cs:∼arosales/wordpress-siteLocated bundle "cs:∼arosales/bundle/wordpress-site-3"Deploying charm "cs:haproxy-41"Deploying charm "cs:trusty/mariadb-7"Deploying charm "cs:trusty/mariadb-7"Deploying charm "cs:memcached-17"Deploying charm "cs:nagios-15"Deploying charm "cs:trusty/wordpress-5"application wordpress exposedRelated "haproxy:reverseproxy" and "wordpress:website"Related "wordpress:cache" and "memcached:cache"Related "wordpress:db" and "mariadb:db"Related "mariadb-slave:slave" and "mariadb:master"Related "nagios:nagios" and "wordpress:juju-info"Deploy of bundle completed.$
It takes a few minutes for JuJu to create all the required LXD containers and start the services with the preceding wordpress bundle installation . Once it is done, issue the following command to see the six additional containers created:
$ lxc list juju-+--------------+---------+-------------------+------+-----------+----------+| NAME | STATE | IPV4 | IPV6 | TYPE |SNAPSHOTS |+--------------+---------+-------------------+------+-----------+----------+| juju-2fdcbf-1| RUNNING | 10.186.2.160 (eth0) | | PERSISTENT | 0 |+--------------+---------+-------------------+------+-----------+----------+| juju-2fdcbf-10 | RUNNING | 10.186.2.83 (eth0) | | PERSISTENT | 0 |+--------------+---------+-------------------+------+-----------+----------+| juju-2fdcbf-2| RUNNING | 10.186.2.225 (eth0)| | PERSISTENT | 0 |+--------------+---------+-------------------+------+----------+-----------+| juju-2fdcbf-3| RUNNING | 10.186.2.87 (eth0)| | PERSISTENT | 0 |+--------------+---------+-------------------+------+------------+---------+| juju-2fdcbf-5 | RUNNING | 10.186.2.142 (eth0) | | PERSISTENT | 0 |+--------------+---------+-------------------+------+------------+---------+| juju-2fdcbf-6| RUNNING | 10.186.2.21 (eth0)| | PERSISTENT | 0 |+--------------+---------+-------------------+------+------------+---------+| juju-2fdcbf-7| RUNNING | 10.186.2.118 (eth0) | | PERSISTENT | 0 |+--------------+---------+-------------------+------+------------+---------+| juju-2fdcbf-8| RUNNING | 10.186.2.212 (eth0) | | PERSISTENT | 0 |+--------------+---------+-------------------+------+------------+---------+| juju-2fdcbf-9 | RUNNING | 10.186.2.173 (eth0)| | PERSISTENT | 0 |+--------------+---------+-------------------+------+------------+---------+| juju-d729dc-0 | RUNNING | 10.186.2.131 (eth0)| | PERSISTENT | 0 |+--------------+---------+-------------------+------+------------+---------+$
With this installation in place, the JuJu GUI shows the wordpress bundle that was installed, as shown in Figure 6-15.

Figure 6-15. JuJu with wordpress bundle installed
We can access the WordPress website via the juju-2fdcbf-10 LXD container just created, whose IP address is 10.186.2.83. Upon accessing this container using a web browser, we see the installation page of WordPress ready, as shown in Figure 6-16.
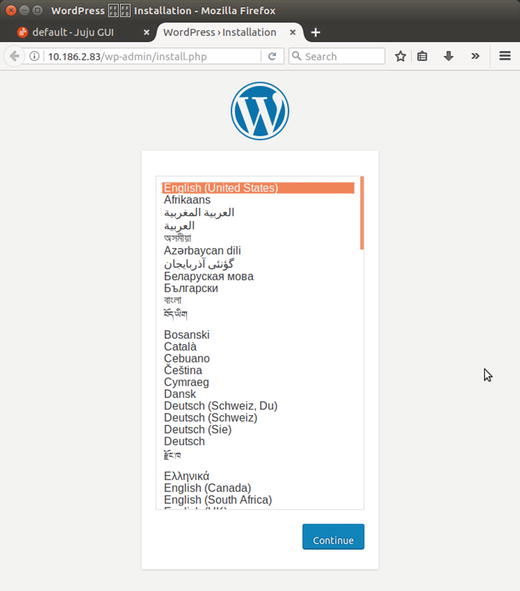
Figure 6-16. WordPress site running
Other services installed as part of this bundle, such as haproxy, nagios, mariadb, and memcached, can be accessed on each of the LXD containers that got created using their respective IP addresses.
We can choose to destroy all the LXD containers created using JuJu at one shot by destroying the JuJu controller as follows:
$ juju destroy-controller juju-controller --destroy-all-modelsWARNING! This command will destroy the "juju-controller" controller.This includes all machines, applications, data and other resources.Continue? (y/N):yDestroying controllerWaiting for hosted model resources to be reclaimedWaiting on 1 model, 9 machines, 9 applications...Waiting on 1 modelAll hosted models reclaimed, cleaning up controller machines$ lxc list juju-+------+-------+------+------+------+-----------+| NAME | STATE | IPV4 | IPV6 | TYPE | SNAPSHOTS |+------+-------+------+------+------+-----------+$
Summary
LXC and LXD are powerful container technologies that can solve many problems, as illustrated in this chapter. This is just an initial guide with some use cases to get you started, but there are many more use cases that could incorporate LXC and LXD. From development, to data center management, to deployment, the possibilities are vast with Linux containers.