
Software is deemed to be production ready when it is secure. Security is highly important when dealing with operating systems, which is clearly what LXC provides using system-level containers. The basic idea of Linux containers is to share resources with isolated environments, and this raises a question about security. Is the isolation safe and is the resource sharing fair? When LXC started, many security considerations went unaddressed, but as LXC has evolved, many security features have been added, and the latest releases of LXC are considered secure based on certain recommended configurations, which we will explore in this chapter. LXD was designed from scratch to be secure, and it has also improved over time.
In LXC, security is ensured through the following:
Control groups (cgroups)
Capabilities
AppArmor
SELinux
Seccomp
User namespaces
Let’s see how these features can be configured with LXC in order to make the LXC deployments secure. The configurations of these security features may differ depending on your use case.
Cgroups
We discussed the resource allocation problem in Chapter 1, and how cgroups are used to control resource allocations to different processes. When using containers, we can set the cgroup values to control the resources allocated to each of the containers. Settings can either go into the LXC configuration file or be changed using the lxc-cgroup command. CPU and memory are very common resources that are controlled using cgroups, though cgroups can also be used for more complex resource constraints. The following lines in the LXC configuration file will set the CPU cores that this container can access, and restrict the memory for the specific container that is created with this configuration in place:
lxc.cgroup.cpuset.cpus = 0-1,3lxc.cgroup.memory.limit_in_bytes = 1073741824
The first line says that the container can use the CPU cores 0, 1, and 3, (i.e., all except core 2 in a host that has four cores in total). The second line says that the maximum memory that the container can use is 1024MB (the limit is defined in bytes). The same values can be set using these lxc-cgroup commands:
$ sudo lxc-cgroup -n stretch-test cpuset.cpus 0,3$ sudo lxc-cgroup -n stretch-test cpuset.cpus 0,3$ sudo lxc-cgroup -n stretch-test memory.limit_in_bytes 1073741824$ sudo lxc-cgroup -n stretch-test memory.limit_in_bytes 1073741824$
These are just a couple of examples; there are more cgroups subsystems that could be controlled. See https://www.kernel.org/doc/Documentation/cgroup-v1/ to explore all the parameters that could be set using cgroups in LXC.
Note
To use the lxc-cgroup command, the container should be in RUNNING state.
Capabilities
The Linux capabilities support can be used to control the list of capabilities that should be retained or dropped when the container starts. The capabilities support was added to the Linux kernel from version 2.2; Linux divides the privileges available to “root” into distinct units. In the LXC configuration file, the following values are set in order to retain or drop capabilities:
lxc.cap.droplxc.cap.keep
For the complete list of available capabilities, have a look at the capabilities(7) manual page.
AppArmor
AppArmor is a tool that allows administrators to restrict a program’s capabilities with a per-program profile. To set an AppArmor profile, use the following parameter in the LXC configuration file:
lxc.aa_profileOnce this is set, the specified AppArmor profile will be applied before starting the container. Ubuntu 17.04 supplies the following standard AppArmor profiles with the default installation:
lxc-default: This is the default profile that is loaded when lxc.aa_profile is unset.
lxc-default-with-mounting: This profile allows mounting filesystems btrfs, zfs, etx4, and so on.
lxc-default-cgns: This profile disallows mounting devpts, since there is a possibility to remount devpts if it is allowed.
lxc-default-with-nesting: This profile allows container nesting, which is not restricted by default.
We can also write our own custom AppArmor profile and put it in the directory /etc/apparmor.d/lxc, from where it will be loaded by AppArmor when the new profile is defined in lxc.aa_profile and AppArmor is reloaded with the following command:
$ sudo service apparmor reloadSELinux
SELinux is another kernel security facility, similar in scope to AppArmor. Different SELinux policies can be set using the following parameter in the LXC configuration file:
lxc.se_contextFor this to work, it requires the operating system image that we are running in our LXC container to be built with SELinux support. In this case, LXC will enforce the SELinux policy just before starting the container. There is a default SELinux policy for RHEL, CentOS, and Oracle 6.5 in /usr/share/lxc/selinux/lxc.te, which can be chosen using the following in the LXC configuration file. The file itself has instructions for building the policy module.
lxc.se_context = system_u:system_r:lxc_t:s0:c62,c86,c150,c228Seccomp
Seccomp is a Linux kernel feature that was introduced in version 2.6.12. Seccomp restricts (filters) the system calls that a program may make. LXC can be configured to use a seccomp policy file, if one is available, via the following parameter in the configuration file:
lxc.seccompA simple seccomp policy file would look like the following, which allows just the syslog system call. Based on the use case for the container, different syscalls could be filtered for accesses from the container by the host’s Linux kernel. Each of these syscalls should be referred to by ID instead of name. Unfortunately, the IDs differ from architecture to architecture.
1Whitelist103
To discover more details about seccomp, refer to its documentation.
User Namespaces
LXC supports user namespaces, and this is the recommended way to secure LXC containers. User namespaces are configured by assigning user ID (UID) and group ID (GID) ranges for existing users, where an existing system user except root will be mapped to these UID/GID ranges for the users within the LXC container.
Based on user namespaces, LXC containers can be classified into two types:
Privileged containers
Unprivileged containers
Privileged Containers
Privileged containers are started by the host’s root user; once the container starts, the container’s root user is mapped to the host’s root user which has UID 0. This is the default when an LXC container is created in most of the distros, where there is no default security policy applied. This can give access to the host machine’s resources when the root user from inside the container gains access to these resources. The only way to restrict that access is by using the methods previously described, such as seccomp, SELinux, and AppArmor. But writing a policy that applies the desired security that is required can be complicated.
When someone gains access to the host machine’s root, that defeats the purpose of running isolated containers; an untrusted user can do harm to the host machine. If you trust the users of the containers, then using privileged containers is OK. But otherwise it is the most insecure configuration.
Unprivileged Containers
Using unprivileged containers is the recommended way of creating and running containers for most configurations. In this case, the UID/GID ranges of users within the container are mapped to a less privileged account on the host system. Then, even if an attacker gains root access within the container, when the root gets mapped to the system user, there should not be any potential harm to the host machine—provided the system user to whom the user is mapped does not have sudo- or superuser-level privileges.
Unprivileged containers are implemented with the following three methods:
lxc-user-net: A Ubuntu-specific script to create veth pair and bridge the same on the host machine.
newuidmap: Used to set up a UID map
newgidmap: Used to set up a GID map
To make unprivileged containers work, the host machine’s Linux kernel should support user namespaces. User namespaces are supported well after Linux kernel version 3.12. Use the following command to check if the user namespace is enabled:
$ lxc-checkconfig | grep "User namespace"User namespace: enabled$
Let’s look at how to set up unprivileged containers with UID/GID mapping. Add the following as part of the container configuration, which should enable the UID/GID mapping:
lxc.id_map = u 0 100000 65536 lxc.id_map = g 0 100000 65536Then make the following changes in the /etc/subuid and /etc/subgid files to add the mapping to a specific user who will be running the container:
$ sudo cat /etc/subuid | grep "cole"cole:100000:65536$ sudo cat /etc/subgid | grep "cole"cole:100000:65536
In this case, cole is a less privileged user on the host machine. With the preceding configuration in place, we could create unprivileged containers.
Containers and Internet of Things (IoT)
The Internet of Things (IoT) is growing rapidly and there will be a huge number of connected “things” in the near future. This increasing number of devices that will be connected pushes every field of computer science to its limits and demands more. Security is of prime importance when so many devices are connected, and it is an active research topic in the IoT world.
We need innovative ways to deploy and manage the software installed on these IoT devices and to quickly update them with security fixes as they are released. Servers and other computers in use today tend to be bigger devices and there are smaller numbers of them compared to the scale at which these IoT devices are proliferating and will continue to grow in future. Managing these IoT devices to deliver software reliably is a major concern. Traditional software deployment, delivery, and updates are done via a pull model, where each of the computers pulls updates from a central server as and when they are available. If something goes wrong during these updates, there are well-established rollback methods, both automated and manual. These same methods do not scale in terms of IoT devices. Rather than asking users to keep their devices up to date, we need a mechanism that pushes updates in a reliable way to these devices. This mechanism should ensure the latest security updates reach these devices on time, and should not rely on the system administration skills of the users of these devices.
Containers can help in achieving a new mechanism to deploy and apply updates to these IoT devices, and many system-on-chip (SoC) vendors and other operating system vendors handling IoT devices are considering this mechanism. At a high level, the host operating system deployed on these devices will be a minimal operating system that is capable of running containers. The containers will run on top of these host operating systems in order to deliver various services that the IoT device is intended for. The host operating system should be hardened and, for the most part, should not be exposed to the outer world. It will act as a management commodity to manage containers installed on top of it.
The containers running on top of the host operating system can be either system-level or application-level containers, depending on the use case. There are certain advantages in establishing such an architecture for the IoT device software:
Applying restrictions to the host operating system means fewer chances of breaking the devices.
When updates are installed within containers, there could be a means to do a transaction-based update; when an update is misbehaving or erroneous, we can roll back the same within that container or simply replace the container.
Updates can be applied reliably to the containers without disturbing the host operating system.
Delivering updates can be done any number of times, as and when they are available, using a push mechanism to update different containers running within the device.
Containers run in an isolated space, which will ensure that updates to one container will not affect the others when each of the containers is crafted with necessary isolation mechanisms.
Many IoT devices come with a dual boot partitions, which can be used to stage an update to the kernel before making it the default. When there is a new kernel update for the host operating system, it is applied to a secondary boot partition, which is then used to try booting the device. If it fails, the old boot partition is used. This can ensure that the device is not left in an inconsistent state after critical kernel updates. This is helpful to ensure the base or host operating system within the device is always working and can reliably push updates to containers running on top of it.
Devices also need to register to a cloud provider from which containers can get their updates. The updates are made available on the cloud and then devices registered to the cloud receive these updates and refresh their containers. Care should be taken to deliver these updates from the cloud to the device in a secure way by using methods like SSL, VPN, and so forth.
Case Study: Ubuntu Snappy Core
Ubuntu Snappy Core is an operating system that works as described in the previous section to bring containerization to IoT devices. Ubuntu Snappy Core is developed by Canonical, the company behind the Ubuntu operating system. Ubuntu snaps are essentially fancy zip files that are secure, sandboxed, containerized applications isolated from the underlying system and from other applications. They are used to allow safe installation of apps on different devices and desktops.
The operating system snap is called the ubuntu-core. It is the first snap that will be installed, and it consists of a minimal rootfs to run and manage snaps. Subsequent snaps are installed on top of ubuntu-core.
Let’s see a simple installation of a hello-world snap in our host machine, which runs Ubuntu 17.04. Before we start, ensure snapd is installed in the host machine. If not, install it with the following command:
$ sudo apt install snapdsnapd is a management system that helps in installing and updating snaps using a transactional mechanism and also manages the garbage collection of old versions of snaps. Similar to apt, use the snap command to install the hello-world snap from Canonical as follows:
$ sudo snap install hello-world2017-06-15T06:51:29+05:30 INFO cannot auto connect core:core-support-plug to core:core-support: (slot auto-connection), existing connection state "core:core-support-plug core:core-support" in the way2017-06-15T06:51:31+05:30 INFO cannot auto connect core:core-support-plug to core:core-support: (slot auto-connection), existing connection state "core:core-support-plug core:core-support" in the wayhello-world 6.3 from 'canonical' installed$ cd /snap/hello-world/current$ tree..├── bin│ ├── echo│ ├── env│ ├── evil│ └── sh└── meta├── gui│ └── icon.png└── snap.yaml3 directories, 6 files$
The important file here is meta/snap.yaml, which describes the snap with the security requirements and its integration with the system. The contents are as follows for the hello-world snap we just installed:
$ cat meta/snap.yamlname: hello-worldversion: 6.3architectures: [ all ]summary: The 'hello-world' of snapsdescription: |This is a simple snap example that includes a few interesting binariesto demonstrate snaps and their confinement.* hello-world.env - dump the env of commands run inside app sandbox* hello-world.evil - show how snappy sandboxes binaries* hello-world.sh - enter interactive shell that runs in app sandbox* hello-world - simply output textapps:env:command: bin/envevil:command: bin/evilsh:command: bin/shhello-world:command: bin/echo$
To run the hello-world snap we just installed, use the following command:
$ which hello-world/snap/bin/hello-world$ hello-worldHello World!$
We can see all the snaps installed in this system using the following command:
$ snap listName Version Rev Developer Notescore 16-2 1689 canonical -hello-world 6.3 27 canonical -$
There is also a GUI web application to manage snaps called Snapweb. It can be installed as follows as a snap itself:
$ sudo snap install snapwebsnapweb 0.26.1 from 'canonical' installed$ sudo snapweb.generate-tokenSnapweb Access Token:SLzikVGA5aFeAF4JhE9mFj1uHepN0jaNgpHn7Y2y0TdnzPWChXp5ACKjIc7Mi4HWUse the above token in the Snapweb interface to be granted access.$
Snapweb runs on port 4201 and can be accessed via a web browser as shown in Figure 7-1. Use the token generated in the preceding output to log in to Snapweb.

Figure 7-1. Snapweb login page
Once logged in, snaps can be managed using the simple Snapweb interface shown in Figure 7-2.
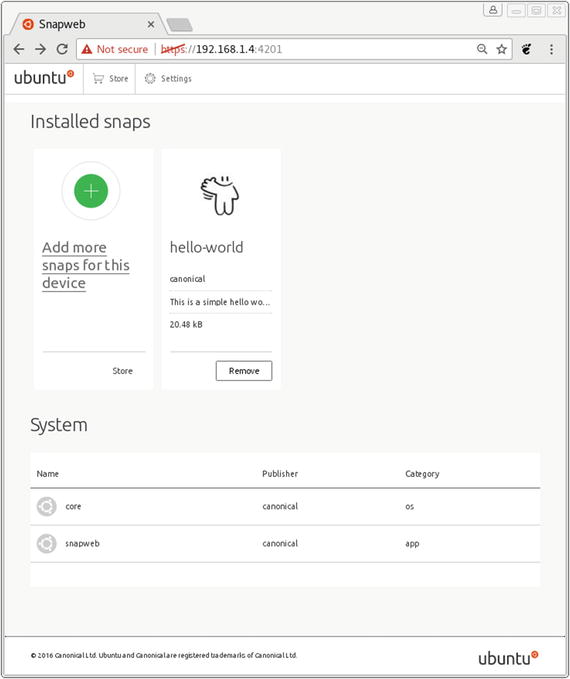
Figure 7-2. Snapweb dashboard
The Snapweb interface is shown here only for demonstration purposes. It may not be practical on very small devices that are used for IoT, where instead the snap command-line tool is recommended.
Summary
Containers can be secured by opting for unprivileged containers and using other security mechanisms available. Containers can also provide a mechanism to deploy, manage, and update software in IoT devices in a reliable way. We reviewed a case study of such an implementation with Ubuntu Snappy Core. There are other alternatives available using different containerization technologies and base operating system using more or less similar architectures to deliver software to IoT devices.