At this point, you should have a working LXC and LXD installation in your host machine. This chapter steps you through the basic usage of LXC and LXD.
Using LXC
LXC is a container within a host machine that runs a full-fledged operating system isolated from the host machine. LXC shares the same kernel as the host machine’s kernel. In order to create different operating system containers we use templates which are scripts to bootstrap specific operating system.
Templates
The templates provided in LXC are scripts specific to an operating system. Each operating system that is supported by the LXC installation has a script dedicated to it. There is also a generic script called “download” that can install many different operating systems with a common interface. As of this writing, the download template can install the operating system distributions described in Table 3-1.
Table 3-1. LXC 2.0.7 - Supported Distributions, Their Releases and Architectures
Distribution | Supported Releases | Supported Architectures |
|---|---|---|
Alpine | 3.1, 3.2, 3.3, 3.4, 3.5, edge | amd64, armhf, i386 |
ArchLinux | current | amd64, i386 |
CentOS | 6, 7 | amd64, i386 |
Debian | jessie, sid, stretch, wheezy | amd64, arm64, armel, armhf, i386, powerpc, ppc64el, s390x |
Fedora | 22, 23, 24, 25 | amd64, i386 |
Gentoo | current | amd64, i386 |
openSUSE | 13.2, 42.2 | amd64 |
Oracle | 6, 7 | amd64, i386 |
Plamo | 5.x, 6.x | amd64, i386 |
Ubuntu | precise, trusty, xenial, yakkety, zesty | amd64, arm64, armhf, i386, powerpc, ppc64el, s390x |
Note the following about Table 3-1:
Debian Wheezy is not supported in arm64 and ppc64el architectures.
Oracle 7 is not supported in i386 architecture.
Ubuntu Precise is not supported in ppc64el and s390x. Ubuntu Trusty is not supported in s390x.
Basic Usage
Figure 3-1 shows the life cycle of an LXC container with the various states the container can get into.
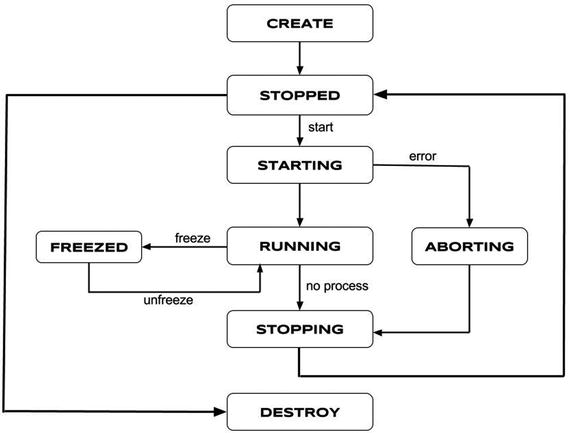
Figure 3-1. LXC container life cycle
A simple LXC lifecycle will have the following steps:
lxc-create: Create a container with the given OS template and options.
lxc-start: Start running the container that was just created.
lxc-ls: List all the containers in the host system.
lxc-attach: Get a default shell session inside the container.
lxc-stop: Stop the running container, just like powering off a machine.
lxc-destroy: If the container will no longer be used, then destroy it.
Using the Download Template
Let’s look at how the preceding steps work in practice by creating a Debian Jessie container using the generic download template.
lxc-create
The lxc-create command creates the container with the given OS template and options provided, if any. As shown next, the -t option specifies the template that should be used to create the container, which in our example is the download template. The -n option is mandatory for most of the LXC commands which specifies the name of the container or in other words the container identifier name, which is an alphanumeric string.
$ sudo lxc-create -t download -n example-debian-jessieSetting up the GPG keyringDownloading the image index---DIST RELEASE ARCH VARIANT BUILD---alpine 3.1 amd64 default 20170319_17:50alpine 3.1 armhf default 20161230_08:09----------OUTPUT TRUNCATED----------archlinux current amd64 default 20170505_01:27archlinux current i386 default 20170504_01:27centos 6 amd64 default 20170504_02:16centos 6 i386 default 20170504_02:16----------OUTPUT TRUNCATED----------debian stretch amd64 default 20170504_02:41debian stretch arm64 default 20170504_22:42----------OUTPUT TRUNCATED----------fedora 25 amd64 default 20170505_02:42fedora 25 i386 default 20170504_01:27gentoo current amd64 default 20170503_14:12gentoo current i386 default 20170504_14:12opensuse 13.2 amd64 default 20170320_00:53opensuse 42.2 amd64 default 20170504_00:53oracle 6 amd64 default 20170505_11:40oracle 6 i386 default 20170505_12:47----------OUTPUT TRUNCATED----------plamo 6.x amd64 default 20170504_22:05plamo 6.x i386 default 20170504_22:05----------OUTPUT TRUNCATED----------ubuntu zesty ppc64el default 20170430_03:49ubuntu zesty s390x default 20170504_03:49---Distribution: debianRelease: jessieArchitecture: amd64Downloading the image indexDownloading the rootfsDownloading the metadataThe image cache is now readyUnpacking the rootfs---You just created a Debian container (release=jessie, arch=amd64, variant=default)To enable sshd, run: apt-get install openssh-serverFor security reason, container images ship without user accountsand without a root password.Use lxc-attach or chroot directly into the rootfs to set a root passwordor create user accounts.$
Now you have created a Debian Jessie container called example-debian-jessie, using the amd64 architecture. As noted at the end of the lxc-create command, there are no user accounts nor root password set up in the container. You can use lxc-attach to start a shell session in the container later to make changes like this.
By default, the lxc-create command creates the containers in the directory /var/lib/lxc/{container-name}; for example, the new container will be created in the /var/lib/lxc/example-debian-jessie directory. The following shows the contents of the container directory:
$ sudo ls -alh /var/lib/lxc/example-debian-jessietotal 16Kdrwxrwx--- 3 root root 4.0K Jun 12 14:47 .drwx------ 4 root root 4.0K Jun 12 14:46 ..-rw-r--r-- 1 root root 844 Jun 12 14:47 configdrwxr-xr-x 22 root root 4.0K May 4 08:55 rootfs$ sudo ls /var/lib/lxc/example-debian-jessie/rootfsbin dev home lib64 mnt proc run selinux sys usrboot etc lib media opt root sbin srv tmp var$
The configuration specific to this container exists in /var/lib/lxc/example-debian-jessie/config, the contents of which are shown here:
$ sudo cat /var/lib/lxc/example-debian-jessie/config# Template used to create this container: /usr/share/lxc/templates/lxc-download# Parameters passed to the template: --release jessie --arch amd64# Template script checksum (SHA-1): 740c51206e35463362b735e68b867876048a8baf# For additional config options, please look at lxc.container.conf(5)# Uncomment the following line to support nesting containers:#lxc.include = /usr/share/lxc/config/nesting.conf# (Be aware this has security implications)# Distribution configurationlxc.include = /usr/share/lxc/config/debian.common.conflxc.arch = x86_64# Container specific configurationlxc.rootfs = /var/lib/lxc/example-debian-jessie/rootfslxc.rootfs.backend = dirlxc.utsname = example-debian-jessie# Network configurationlxc.network.type = vethlxc.network.link = lxcbr0lxc.network.flags = uplxc.network.hwaddr = 00:16:3e:44:8e:e8$
The default container creation path can be overridden using the -P option as shown here, which will create the container in /tmp directory:
$ sudo lxc-create -P /tmp/ -t download -n example-debian-jessieNote
Many lxc-* commands accept the -P option to access the container existing on a specific path. Refer to individual lxc-* command man pages to know which commands accept the -P option.
lxc-start
Before we start using the container, we must first start it by using the lxc-start command. The -d option in lxc-start will start running the container in daemon mode, where the boot process output is not visible:
$ sudo lxc-start -d -n example-debian-jessieBecause -d is the default mode, it is not mandatory to specify it. To instead start running the container in foreground mode, we can use the -F option. This is useful to see debug messages and the entire boot process output. Here is sample output produced by starting our container in foreground mode:
$ sudo lxc-start -F -n example-debian-jessiesystemd 215 running in system mode. (+PAM +AUDIT +SELINUX +IMA +SYSVINIT +LIBCRYPTSETUP +GCRYPT +ACL +XZ -SECCOMP -APPARMOR)Detected virtualization 'lxc'.Detected architecture 'x86-64'.Welcome to Debian GNU/Linux 8 (jessie)!Set hostname to <example-debian-jessie>.Failed to install release agent, ignoring: No such file or directoryCannot add dependency job for unit dbus.socket, ignoring: Unit dbus.socket failed to load: No such file or directory.[ OK ] Reached target Remote File Systems (Pre).[ OK ] Reached target Paths.[ OK ] Reached target Encrypted Volumes.----------OUTPUT TRUNCATED----------Starting Getty on tty4...[ OK ] Started Getty on tty4.Starting Getty on tty3...[ OK ] Started Getty on tty3.Starting Getty on tty2...[ OK ] Started Getty on tty2.Starting Getty on tty1...[ OK ] Started Getty on tty1.Starting Console Getty...[ OK ] Started Console Getty.[ OK ] Reached target Login Prompts.[ OK ] Reached target Multi-User System.Starting Update UTMP about System Runlevel Changes...[ OK ] Started Cleanup of Temporary Directories.[ OK ] Started Update UTMP about System Runlevel Changes.Debian GNU/Linux 8 example-debian-jessie consoleexample-debian-jessie login:
lxc-ls
This command lists the containers available in the host system:
$ sudo lxc-lsexample-debian-jessie$
lxc-ls is also capable of showing more information with the --fancy option:
$ sudo lxc-ls --fancyNAME STATE AUTOSTART GROUPS IPV4 IPV6example-debian-jessie RUNNING 0 - 10.0.3.206 -$
lxc-ls comes in very handy to get an overview of all the containers in the host system.
lxc-attach
Our container example-debian-jessie is now started and running. To log in or get access to a shell on the container, we can use lxc-attach as the first step. The lxc-attach command is used to start a process inside a running container; alternatively, if there are no commands supplied, then lxc-attach gives a shell session within the running container, as shown here:
$ sudo lxc-attach -n example-debian-jessieroot@example-debian-jessie:/# lsbin dev home lib64 mnt proc run selinux sys usrboot etc lib media opt root sbin srv tmp varroot@example-debian-jessie:/# passwdEnter new UNIX password:Retype new UNIX password:passwd: password updated successfullyroot@example-debian-jessie:/# exit$
Note
The preceding sample run shows how to reset the root password within the container.
lxc-stop
Once we are done with our work with the container, we can stop the container. Stopping the container is equivalent to powering down a machine; we can start the container again any time in the future. Again, it is necessary to use the -n option to provide the name of the container when using lxc-stop:
$ sudo lxc-stop -n example-debian-jessieAfter the container is stopped, the lxc-ls fancy output shows the status of the container as STOPPED, as follows, which also shows that the corresponding IPv4 address is released:
$ sudo lxc-ls --fancyNAME STATE AUTOSTART GROUPS IPV4 IPV6example-debian-jessie STOPPED 0 - - -$
lxc-destroy
To permanently delete a container from the host system, use the lxc-destroy command. This command is irreversible and any data or changes made within the container will be lost. Use this command only when you do not need the container any more. Again, this command takes the name of the container that should be destroyed via the -n option:
$ sudo lxc-destroy -n example-debian-jessieDestroyed container example-debian-jessie$
Using an OS Template
In this section, we will create a container using a specific OS template, following the same steps as in the previous section. You can find all the available LXC OS template scripts in /usr/share/lxc/templates. In an LXC 2.0.7 installation, the templates shown in Table 3-2 are available.
Table 3-2. OS Template Scripts in LXC 2.0.7
lxc-alpine | lxc-debian | lxc-plamo |
|---|---|---|
lxc-altlinux | lxc-fedora | lxc-slackware |
lxc-archlinux | lxc-gentoo | lxc-sparclinux |
lxc-busybox | lxc-openmandriva | lxc-sshd |
lxc-centos | lxc-opensuse | lxc-ubuntu |
lxc-cirros | lxc-oracle | lxc-ubuntu-cloud |
In this case, let’s use the fedora template as an example.
Tip
To find the options available with any template, use the --help option on the template, which will provide the complete usage information about that particular template. For example:
$ sudo lxc-create -t fedora --helplxc-create
In case of OS-specific templates, it is good to specify the OS release explicitly, instead of making the OS-specific template script choose a default release. This is shown in the following lxc-create command execution, which creates a container with a fedora template named example-fedora-25 and specifies the Fedora release as 25:
$ sudo lxc-create -t fedora -n example-fedora-25 -- --release=25Host CPE ID from /etc/os-release:Checking cache download in /var/cache/lxc/fedora/x86_64/25/rootfs ...Downloading fedora minimal ...Fetching release rpm name from http://ftp.jaist.ac.jp/pub/Linux/Fedora/releases/25/Everything/x86_64/os//Packages/f...% Total % Received % Xferd Average Speed Time Time Time CurrentDload Upload Total Spent Left Speed100 392 100 392 0 0 820 0 --:--:-- --:--:-- --:--:-- 820100 297k 0 297k 0 0 140k 0 --:--:-- 0:00:02 --:--:-- 361k----------OUTPUT TRUNCATED----------Bootstrap Environment testing...Fedora Installation Bootstrap Build...Downloading stage 0 LiveOS squashfs file system from archives.fedoraproject.org...Have a beer or a cup of coffee. This will take a bit (∼300MB).----------OUTPUT TRUNCATED----------receiving incremental file listLiveOS/LiveOS/squashfs.img----------OUTPUT TRUNCATED----------Container rootfs and config have been created.Edit the config file to check/enable networking setup.You have successfully built a Fedora container and cache. This cache maybe used to create future containers of various revisions. The directory/var/cache/lxc/fedora/x86_64/bootstrap contains a bootstrapwhich may no longer needed and can be removed.A LiveOS directory exists at /var/cache/lxc/fedora/x86_64/LiveOS.This is only used in the creation of the bootstrap run-time-environmentand may be removed.The temporary root password is stored in:'/var/lib/lxc/example-fedora-25/tmp_root_pass'The root password is set up as expired and will require it to be changedat first login, which you should do as soon as possible. If you lose theroot password or wish to change it without starting the container, youcan change it from the host by running the following command (which willalso reset the expired flag):chroot /var/lib/lxc/example-fedora-25/rootfs passwd$
Note
The fedora template uses curl for downloading some artifacts, so you need to install curl using the following command if it is unavailable:
$ sudo apt install curlAs previously noted, the fedora template sets a temporary root password. Now we can proceed to start the container.
lxc-start
The method of starting the container does not change with different templates:
$ sudo lxc-start -n example-fedora-25lxc-ls
Let’s see the list of containers with their fancy status:
$ sudo lxc-ls --fancyNAME STATE AUTOSTART GROUPS IPV4 IPV6example-fedora-25 RUNNING 0 10.0.3.207 -$
lxc-attach
Now let’s run a shell session in our running container example-fedora-25:
$ sudo lxc-attach -n example-fedora-25[root@example-fedora-25 /]# passwdChanging password for user root.New password:Retype new password:passwd: all authentication tokens updated successfully.[root@example-fedora-25 /]# exit$
lxc-stop
The following command stops our running container example-fedora-25:
$ sudo lxc-stop -n example-fedora-25$ sudo lxc-ls --fancyNAME STATE AUTOSTART GROUPS IPV4 IPV6example-fedora-25 STOPPED 0 - - -$
lxc-destroy
To permanently delete our container example-fedora-25 from the host system, we use the lxc-destroy command as follows. Remember: this command is irreversible and any data or changes made within the container will be lost. Use this command only when you do not need the container any more.
$ sudo lxc-destroy -n example-fedora-25Destroyed container example-fedora-25$
Using LXD
Unlike LXC, which uses an operating system template script to create its container, LXD uses an image as the basis for its container. It will download base images from a remote image store or make use of available images from a local image store. The image stores are simply LXD servers exposed over a network.
Note
Somewhat confusingly, LXD also provides an lxc command. This is different from the lxc command in the LXC package described earlier. In the rest of this section, the lxc commands we use are for LXD. LXD uses liblxc APIs, hence the naming problems.
The image store that will be used by LXD can be populated using three methods:
Using a remote LXD as an image server
Using the built-in image remotes
Manually importing an image
Using a Remote LXD As an Image Server
A remote image server is added as a remote image store and you can start using it right away. The following output explains the same:
$ lxc remote add stylesen 192.168.1.8$ lxc launch stylesen:image-name your-container
Here, 192.168.1.8 is the LXD image server that you have configured and is accessible from your host machine, and stylesen is the short name you provide for the remote LXD image server.
Using the Built-in Remotes
By default, the LXD package configures three remotes and a local image store (local) that is communicated with via a local Unix socket. The three default remotes are as follows:
images: For distros other than Ubuntu
ubuntu: For stable Ubuntu images
ubuntu-daily: For daily Ubuntu images
To get a list of remotes, use the following command:
$ lxc remote listIf this is your first time using LXD, you should also run: lxd initTo start your first container, try: lxc launch ubuntu:16.04+---------------+---------------------+-----------------+--------+--------+| NAME | URL | PROTOCOL | PUBLIC | STATIC |+---------------+---------------------+-----------------+--------+--------+| images | https://images.linuxcontainers.org | simplestreams | YES | NO |+---------------+---------------------+-----------------+--------+--------+| local (default) | unix:// | lxd | NO | YES |+---------------+---------------------+-----------------+-----+-----|-----+| ubuntu | https://cloud-images.ubuntu.com/releases | simplestreams | YES | YES |+---------------+---------------------+-----------------+--------+--------+| ubuntu-daily | https://cloud-images.ubuntu.com/daily | simplestreams | YES | YES |+---------------+---------------------+-----------------+-----+-----+-----+$
Manually Importing an Image
You can create LXD-compatible image files manually by following the specification available at https://github.com/lxc/lxd/blob/master/doc/image-handling.md . You can import the images that you create using this specification with the following command:
# lxc image import <file> --alias <my-alias>Running Your First Container with LXD
Before creating your first container, you should run lxd init as follows, if it has not run already:
$ lxd initDo you want to configure a new storage pool (yes/no) [default=yes]?Name of the new storage pool [default=default]:Name of the storage backend to use (dir) [default=dir]:Would you like LXD to be available over the network (yes/no) [default=no]? yesAddress to bind LXD to (not including port) [default=all]:Port to bind LXD to [default=8443]:Trust password for new clients:Again:Would you like stale cached images to be updated automatically (yes/no) [default=yes]?Would you like to create a new network bridge (yes/no) [default=yes]?What should the new bridge be called [default=lxdbr0]?What IPv4 address should be used (CIDR subnet notation, "auto" or "none") [default=auto]?What IPv6 address should be used (CIDR subnet notation, "auto" or "none") [default=auto]?LXD has been successfully configured.$
You can import or copy an Ubuntu cloud image using the ubuntu: image store with the following command:
$ lxc image copy ubuntu:16.04 local: --alias ubuntu-xenialImage copied successfully!$
After importing the image to "local:": image-store, you can launch the first container with the following command:
$ lxc launch ubuntu-xenial first-lxd-containerCreating first-lxd-containerStarting first-lxd-container$
The preceding command will create and start a new Ubuntu container named first-lxd-container, which can be confirmed with the following command:
$ lxc list
+--------------+---------+-----------+-----------+------------+-----------+
| NAME     | STATE   | IPV4           | IPV6           | TYPE       | SNAPSHOTS |
+--------------+---------+-----------+-----------+------------+-----------+
| first-   | RUNNING | 10.79. 218.118 | fd42:fb6:bc78: | PERSISTENT | 0         |
  lxd-                 (eth0)          699c:216:3eff:
  container                            fe54:28d (eth0)
+--------------+---------+-----------+-----------+------------+-----------+
$
If the container name is not given, then LXD will give it a random name.
To get a shell inside a running container, use the following command:
$ lxc exec first-lxd-container -- /bin/bashroot@first-lxd-container:∼# ls /bin dev home lib64 mnt proc run snap sys usrboot etc lib media opt root sbin srv tmp varroot@first-lxd-container:∼#
To run a command directly without starting a shell, use the following command:
$ lxc exec first-lxd-container -- apt-get updateAlternatively, you can use the lxc-console command provided by the lxc-tools package to connect to the LXD container:
$ sudo lxc-console -n first-lxd-container -P /var/lib/lxd/containers -t 0Connected to tty 0Type <Ctrl+a q> to exit the console, <Ctrl+a Ctrl+a> to enter Ctrl+a itselfUbuntu 16.04.2 LTS first-lxd-container consolefirst-lxd-container login:$
The LXD containers are created by default in the /var/lib/lxd/containers/ directory. For example, the preceding LXD container (first-lxd-container) is created in /var/lib/lxd/containers/first-lxd-container, which in turn is a symbolic link (symlink) from the storage pool defined during lxc init. The lxc-console by default searches for the container in /var/lib/lxc/ since it is designed for LXC containers; hence, you need to pass the -P option to point to the LXD container default path. We can see how the LXD container creation default path is structured with the following:
$ sudo ls -alh /var/lib/lxd/containers/total 16Kdrwx--x--x 2 root root 4.0K Jun 12 14:21 .drwxr-xr-x 12 lxd nogroup 4.0K Jun 12 14:22 ..lrwxrwxrwx 1 root root 65 Jun 12 14:21 first-lxd-container -> /var/lib/lxd/storage-pools/default/containers/first-lxd-container-rw-r--r-- 1 root root 2.8K Jun 12 14:22 lxc-monitord.log$ sudo ls -alh /var/lib/lxd/containers/first-lxd-container/total 24Kdrwxr-xr-x+ 4 165536 165536 4.0K Jun 12 14:22 .drwxr-xr-x 3 root root 4.0K Jun 12 14:21 ..-r-------- 1 root root 2.2K Jun 12 14:22 backup.yaml-rw-r--r-- 1 root root 1.6K May 16 20:56 metadata.yamldrwxr-xr-x v 22 165536 165536 4.0K May 16 19:49 rootfsdrwxr-xr-x 2 root root 4.0K May 16 20:56 templates$ sudo ls /var/lib/lxd/containers/first-lxd-container/rootfs/bin dev home lib64 mnt proc run snap sys usrboot etc lib media opt root sbin srv tmp var$
To copy a file from the container to your normal system, use the following command:
$ lxc file pull first-lxd-container/etc/hosts .To put a file inside the container, use the following command:
$ lxc file push hosts first-lxd-container/tmp/To stop a running container, use the following command, which will stop the container but keep the image so it may be restarted again later:
$ lxc stop first-lxd-container$ lxc list+---------------------+---------+------+------+------------+-----------+| NAME | STATE | IPV4 | IPV6 | TYPE | SNAPSHOTS |+---------------------+---------+------+------+------------+-----------+| first-lxd-container | STOPPED | | | PERSISTENT | 0 |+---------------------+---------+------+------+------------+-----------+$
To permanently remove or delete the container, use the following command:
$ lxc delete first-lxd-container$ lxc list+------+-------+------+------+------+-----------+| NAME | STATE | IPV4 | IPV6 | TYPE | SNAPSHOTS |+------+-------+------+------+------+-----------+$
Summary
In this chapter you have created, started, and logged into containers created by each of LXC and LXD. It is easy to create containers using these tools. They are lightweight and easy to use, and you can be up and running in a few seconds. So far, we have just looked at some basic usage of containers to get an operating system working. More advanced usage scenarios will be covered in the coming chapters.