
![]()
You now know all about the hardware on the Raspberry Pi and have all the parts you need to get it up and running. You may have even already got a version of Linux installed. Most likely you have installed the Debian port known as Raspbian. Raspbian is fine and has all the latest fixes and it’s also the easiest to install. I prefer to use Fedora because I deal with Red Hat Enterprise Linux (RHEL) each day at work and it makes it a little easier for me. I am not that familiar with Debian so I feel I can offer you more with Fedora. However, I am not going to force you to use any particular Linux distribution. You are quite free to choose any distribution; use whatever you are comfortable with. All the tools and code in this book will use open source build tools or utilities so any distribution of Linux will be fine. After all, I intend to show you more than one operating system on the Raspberry Pi anyway.
In Chapter 11 I will also help you with how to install my first and favorite Linux distribution, Gentoo. Coming from a NetBSD background, I liked the way the portage system worked. My main goal at the time was to learn Linux, and Gentoo is a great teacher. Centos/RHEL also taught me a lot about enterprise Linux and why doing things a certain way is a very good thing.
A lot of the functionality you need will come from the Linux kernel. All the hardware headers are exported by the kernel as built-in functions or as modules. This is one of the reasons that make Linux so good. No matter what distribution you pick, the kernel will be based off the same tree of code. This is also why you will often see Linux distributions described as being GNU/Linux, because they use GNU applications in user land (applications that you run and use yourself) and Linux to give you an open source kernel. This exciting combination of software makes up your distribution.
WHAT’S A DISTRIBUTION?
In the Linux world a distribution is a bundle of end-user software and a kernel. It is a full working system, if you will, ready to be installed and operated. Each part of the distribution could be distributed independently as well. A distribution just packs it all up in one easy-to-use bundle.
In this chapter I will talk about the different ways you can install Fedora to your SD card and how your SD card will be set up. This is not too hard but it’s good to know the different ways you can set up your card. SD cards are not hard disks and Fedora expects to be installed on a hard disk so you need to take a little care.
I will also talk about the importation files that live on the /boot partition of your SD card. I will talk you through the files’ functions and how you can replace or edit them if you want. These files can have a large effect on the way your Raspberry Pi will work, so it’s important to know where to find them and edit them.
Of course I will talk about the first boot of Fedora and what to expect via traditional access with a keyboard and screen and also via headless with just an Ethernet cable. I will also talk about some of the basic settings you may want to configure on Fedora. The big one will be the network time protocol (NTP), unless you like setting the date and time at each reboot of the Raspberry Pi.
Lastly I will talk about what optimization can increase the performance and life of your SD card. With not a moment to spare, get your SD cards ready because next up is the creation of the SD card.
First you’re going to need two critical pieces of hardware:
- An SD card, or a few of them, with a minimum size of 2 GB. This size will just get you up and running but will leave you only a few 100 MB of space. I would suggest 4 GB as a good starting size.
- An SD card reader and writer. I use Linux to build all my SD cards. I don’t own a Windows or a Mac machine so you may need to change your method to build the SD card if you are using a Windows or Mac machine.
So let’s get down and build the SD card. What’s exactly on this SD card image we’re about to work with? It’s a bit of mystery for the first-time user of the Raspberry Pi. What exactly needs to go on the SD card? Well, not much really. The Fedora image you get will have all the necessary files as well as special files in /boot.
Everything that you need to have a fully functional system is included. You may want to change some of the settings or adjust the memory assignment via the files in /boot. No matter how you look at it, the image is a full operating-system image. It’s a little different from, say, using an install CD. You won’t get to pick the packages you want to install. You get an already configured operating system. All you are doing is placing this image on the SD card.
Fedora has a nice little installer for many different operating systems. For the Linux users out there, myself included, there are two main ways to get the Fedora image on your SD card:
- A GUI installer
- At the command line
The first and most widely used method is the GUI installer, using an application called faii. You can download it from either of the following places:
The installer is a Python script and most distributions will come with Python so there is no need to worry about dependencies on the script. Here’s how you use it:
- Download a copy of the faii-1.0.0.tar.gz tarball to your machine and extract it.
- Once you have extracted it you should see an executable called fedora-arm-installer. You may need to open this executable first. If you are running Fedora or Ubuntu, make sure you also have the python-qt4 package installed, otherwise the GUI will not launch. Now if you run this you will get a nice little GUI pop up, as seen in Figure 2-1.

Figure 2-1. The Fedora Raspberry Pi installer on Linux
- In the Source section of the tool, click the little blue arrows. This will refresh the source list from the Internet.
- Select Raspberry Pi Fedora Remix 14 (r1). If you don’t want to download a new source image, you can also use the Browse button to select an already downloaded image file to use.
- In the Destination section, click the button with the blue arrows again to refresh the device list. You may need root privileges to install to your removable media device. In Figure 2-1 my removable media is /dev/sde.
- Once you’re done, click the Install button and wait for the tool to finish writing the image to your SD card. Once it’s done, remove your SD card. You are ready to place it into the Raspberry Pi; the tool takes care of everything for you. How nice of it to do so!
The second method of installing Fedora to the SD card is my personal favorite. After all I am more than a little bit attached to the command line. I use it every day at work and I use it extensively at home. I prefer a command-line option over a GUI option, especially when you want to make more than one SD card’s worth of images. The command-line option makes this a lot faster. Recall when I said the install was in fact just an image of a working system? Well, this image can be written to the SD card by a tool called dd. dd is used to copy a set number of blocks (or bytes) from one device or image to another. In our case we have an image file, which is the Fedora image. Then you have a device, and that’s your SD card.
You are going to need to find a mirror of the Fedora install image. You can find a list of mirrors on the http://elinux.org web site. Or you can download the image directly from the following places:
In Figure 2-2 you can see the exact tarball you need.

Figure 2-2. Fedora remix download image
Once you have downloaded this image, you need to extract the file. To extract the file use the following command:
# gunzip raspberrypi-fedora-remix-14-r1.img.gz
You should now end up with an .img file. This file is what you will use with dd to write to the SD card. Next up, insert your SD card and find the device name. The quickest way to find the device is by using the dmesg command. I use the following command to see the last few lines of the dmesg output:
# dmesg | tail
You are looking for a line that has sdX where X is a letter: in my case it was sde. Now you want the whole device, not a partition. Don’t try and write the fedora image to sdX1, for example. Now you need to issue the following dd command as root at your shell and type the following, substituting the X for your device letter:
-# dd bs=1M if=raspberrypi-fedora-remix.img of=/dev/sdX
Be very careful with the dd command: it’s quite easy to destroy your data. dd will not give you any feedback while this process is under way. Just wait for it to return your shell prompt. Once this has finished, you must issue the following command as root to flush any data caches to disk:
# sync
Installing the Image on Windows
If you are using Windows to write the image, you need two tools: one to extract and one to write the image.
- To extract, you can use a tool called 7-Zip that can be found at http://7-zip.org/.
- To write the image to the SD card you can use a tool called Win32 Disk Imager that can be found at https://launchpad.net/win32-image-writer/+download.
Of course, it would be nice if you are using Linux on your host machine.
Whatever method you take, you should now have two partitions on your SD card:
- /boot
- /root
For the Fedora image, the /boot is called Raspi_Boot and the /root is called Raspi_Remix_14. See Figure 2-3 for a listing of the partitions.

Figure 2-3. Partition listing on a Fedora SD card
Now that you have a Linux image on your SD card you can insert the image into the Raspberry Pi. Ensure that the power is off to the Raspberry Pi before you do this. Fedora will boot up in different ways, depending on what you have plugged into the Raspberry Pi. If you have a video source and a keyboard and mouse plugged in, you will be booted into the graphical display, whereas if you just have Ethernet plugged in it will acquire an IP address from the local DHCP server and will start SSH. The default username and password are root and fedoraarm.
Unfortunately you may notice that the current 14-r1 release of Fedora hangs the Raspberry Pi’s boot. Your boot process will be stuck on either a USB message or it may just hang at the Ethernet detection stage. These sorts of issues are quite hard to debug. The operating system has hung quite early on in the boot process and you used a ready-made image. What could be the matter? The first step I normally take when I have this sort of issue is to ensure that I have the latest firmware for the device. Remove the power from the Raspberry Pi and take the SD card back to your host machine: it’s time to update the firmware. Remember when I spoke about the special files that live on /boot? Well, that’s where our issue is located. In Figure 2-4 you can see the out-of-date files on the /boot volume of the Fedora image.

Figure 2-4. Boot files for the Raspberry Pi
Now, the above files not only boot the Raspberry Pi but also contain some firmware to drive certain parts of the SoC. So if the above files are corrupted or way out of date they will cause you a lot of boot issues or maybe even hang at the Ethernet detection part of the kernel.
So now that you have a good idea what the issue may be, I will show you how to update the boot files and boot loader on the SD card. I feel it is pretty important to have the latest boot loader and boot files. So out of habit I grab the latest files from the Raspberry Pi Foundation’s GitHub site. There are a few main files you should keep updated and they need to be updated outside of your normal distribution’s update process. You can find the GitHub site at https://github.com/raspberrypi.
It’s quite simple to update the files. First, shut down your Raspberry Pi and mount your SD card into your host machine. You should see two mount points. One will be /boot and the other will be your root filesystem on the SD card. Open up the /boot mount point and replace the following files from the latest copy on the GitHub firmware section. You can find the latest firmware at https://github.com/raspberrypi/firmware/tree/master/boot. The files you need to add and update are
- fixup.dat
- kernel.img
- bootcode.bin
- start.elf
Overwrite all files with the versions from the GitHub site. You don’t need to remove any files from the /boot partition; they no longer will be used during the boot process. Once you’re done, eject your SD card from the host machine and insert it back into the Raspberry Pi.
Your Raspberry Pi will now boot without error. It will then reboot itself the first time in order to resize the filesystem on the SD card. This may take some time if you have a large SD card. Go grab a drink or some food, and by the time you get back it should be done and waiting for your login. The bootup speed is quite quick!
Now that you have a functional Raspberry Pi running Fedora, it’s time to take a look around. If you have no keyboard and screen attached, use SSH on the Raspberry Pi with root and fedoraarm as your username and password. If you have a keyboard and mouse attached, you will find yourself in front of a series of prompts to set up the Raspberry Pi. Because I connected over SSH, all the steps below are for the SSH install.
![]() Note All the projects in this book will require command-line access and I personally prefer the command line although the choice is yours if you want to use a keyboard and monitor.
Note All the projects in this book will require command-line access and I personally prefer the command line although the choice is yours if you want to use a keyboard and monitor.
Whenever I get a new piece of hardware I like to take a look around the hardware. I like to run the following command first:
# dmesg | more
The dmesgcommand stands for display message and its main function is to print the output of the message buffer of the kernel. In this case it should be the boot messages from the time that the power was applied to the Raspberry Pi. It’s a good idea to check over the dmesg for any errors or hardware that are not correctly set up by the kernel.
You may have noticed this error about not having a real-time clock (RTC) during the boot message stage:
drivers/rtc/hctosys.c: unable to open rtc device (rtc0)
If you missed it, you can find it easily by using the following command:
# dmesg | grep rtc
This will search the boot messages for the string rtc. You will then be able to see the error without staring at the output of your boot process. This error occurs because Linux expects most hardware nowadays to have an RTC. Because you have no RTC you need a way to get time set up correctly. I will show you how to set up NTP and set the correct time zone for your Raspberry Pi now.
The first thing you need to do is copy the time zone file for your time zone from /usr/share/zoneinfo/COUNTRY/CITY and overwrite the /etc/localtime file. I did this to set my time zone to Hong Kong, as you can see from the below command:
# cp /usr/share/zoneinfo/Asia/Hong_Kong /etc/localtime
Now just set your time with the date command. Using the date command you would set the date and time like this:
# date MMddHHmmCCyy
An example of this would be:
# date 0102201309302013
This would set the date and time to January 2, 2013, and 9:30 in the morning. Next up take a look at the settings in /etc/ntp.conf; by default this file should have the Fedora NTP servers set up and ready to go so there is no need to edit anything. Start the NTP daemon with this command:
# service ntpd start
Make sure it’s set to start upon boot:
# chkconfig ntpd on
NTP can take a few minutes to adjust to the local time. After a short while, run the following command to see if you have a working time source.
# ntpq -pn
In Figure 2-5 you can see a * alongside one of the IP addresses; this is the time source the machine is currently using. The + indicates a candidate time source.
![]() Note A candidate time source is the next best time source that the system has configured. If the system was to lose the primary time source it would select the next time source marked with a + in the list.
Note A candidate time source is the next best time source that the system has configured. If the system was to lose the primary time source it would select the next time source marked with a + in the list.

Figure 2-5. A working output of the ntpq command
Now that you have fixed the only error in the system’s dmesg output, let’s take a look around at the hardware a little more. Next up I normally like to run:
# lspci
You will notice that you will get an error from this command rather than a listing of your PCI devices. That’s because the Raspberry Pi has no PCI bus; hence the lspci tool cannot find any information. How can you find out what buses the Raspberry Pi has? That’s quite simple with Linux: just do a directory listing on /sys/bus/platform/devices/; as you can see in Figure 2-6 we have our I2C, SPI, and GPIO buses.

Figure 2-6. Available buses on the Raspberry Pi
Last, I like to look at the USB bus with the following command:
# lsusb
You may not have this tool as part of your base install. I would suggest that you install it with:
# yum install usbutils -y
This tool will show you what downstream USB devices you may have connected. In my case in Figure 2-7 you can see I have only one device connected. That is Device 004.

Figure 2-7. USB bus on the Raspberry Pi
“Hang on, in Chapter 1, you said the Ethernet was on the USB bus, didn’t you?” I did and I was right, but it’s not visible via lsusb. That’s because it’s not on the downstream USB bus. It presents itself directly to the internal upstream port. When you think about USB ports you normally think about the port on the back of your PC where you plug something in. This type of connection is known as a downstream USB port because it is connected internally to the USB host controller. On the USB host controller itself, there is an internal connection port called the upstream port. This is how USB devices are interconnected; as an end user you would not plug anything into an upstream USB port.
To see the Ethernet devices, use the grep command to see the kernel’s dmesg output:
# dmesg | grep usb-bcm2708_usb-1.1
Looking at the output of this command in Figure 2-8 you can see that eth0 has registered itself to the smsc95xx device; this provides the physical layer interface. Then you can see that smsc95xx has registered on the upstream USB bus on usb-bcm2708_usb-1.1.
![]()
Figure 2-8. The USB Ethernet interface
Lastly, you may want to have sound on your Raspberry Pi. Sound is provided from the Broadcom SoC as well. Fortunately this module is provided as part of the ALSA kernel modules. You can enable the sound devices by probing the snd_bcm2835 module. In Fedora, if you want this to be loaded on each boot you’re going to need to create a file called bcm-snd.modules in the directory /etc/sysconfig/modules/. The contents of that file should be what is listed below:
-#!/bin/bash
lsmod | grep -q snd_bcm2835 || /sbin/modprobe snd_bcm2835 >/dev/null 2>&1
Now every time your Raspberry Pi boots, it will load the snd_bcm2835 module. You can check that it’s working correctly with this command:
# aplay -l
The output should look similar to Figure 2-9.

Figure 2-9. aplay -l listing for the Raspberry Pi
You can see from the above examples that the Raspberry Pi is a highly integrated unit and you need to make the most of the resources you have on hand.
Now that you know your Raspberry Pi’s hardware a little better, let’s fix and update any issues with Fedora Remix 14. One of the first tasks you should do is update the kernel, firmware, and applications that are provided by the foundation. Unlike with a normal x86 install of Fedora, the kernel is not supplied from the standard upstream repos but from the foundation’s GitHub site. Speaking of GitHub, that’s where our next tool will come from, so make sure your Raspberry Pi has an Internet connection.
Updating the Firmware and Operating System
A nice community member has created a script called rpi-update. This script will download the latest firmware, kernel, and applications for the Raspberry Pi. You can download this script from the following page on GitHub:
Follow the instructions on the web page to download the script. Once you have it downloaded, execute it like this:
# rpi-update
The first time this tool runs, it will take some time to download all the new updates and apply them. You can see in Figure 2-10 the update process on my Raspberry Pi.
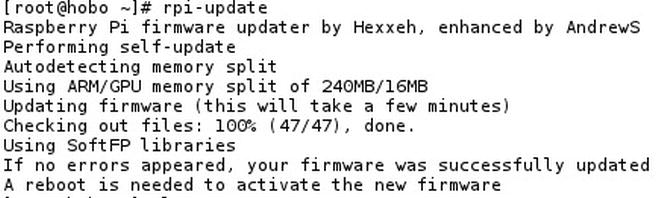
Figure 2-10. Running the rpi-update script
I would suggest at this point you reboot your Raspberry Pi for the new kernel and firmware to take effect. After the reboot it would be wise to check that the updates have applied.
It’s also a good idea to run the following to get all the latest application-level updates:
#yum update
Now that everything is updated, you need to ensure that you are using the correct kernel and VideoCore binary driver versions. First, since the rpi-update script gets the latest VideoCore tools, we should remove the ones that came with Fedora:
# yum erase raspberrypi-vc-utils-20120217-4.armv5tel
The new VideoCore tools are located in /opt/vc. Because we are using the foundation’s version of the VideoCore tools, you need to update your path and library path.
![]() Note In Linux and Unix there is a special system setting called your library path. This setting tells the operating system where it can locate all of your application’s library files that support the application. This path is not updated automatically by the system and if you were to install a library outside of the path the system would not read it when attempting to run an application. This would prevent the application from running.
Note In Linux and Unix there is a special system setting called your library path. This setting tells the operating system where it can locate all of your application’s library files that support the application. This path is not updated automatically by the system and if you were to install a library outside of the path the system would not read it when attempting to run an application. This would prevent the application from running.
First, I will show you how to update the path for all users.
- Create a file in /etc/profile.d/ and call it videocore.sh. Add the following into the file and close it:
pathmunge /opt/vc/bin afterSave - Next you need to update the LD_PATH for all users. To do this, create a file in /etc/ld.so.conf.d/ and call it videocore.conf and add /opt/vc/lib into the file.
- Once you have done this, log out and log back in. You should now be able to run the following command as a test to ensure it’s all working (this should give you a reading in degrees Celsius of the VideoCore’s temperature):
# vcgencmd measure_temp - It’s a good idea to check the kernel version and GPU firmware version. To check the kernel version number, use this command:
# uname -a - To check the GPU firmware version number, use this command:
# /opt/vc/bin/vcgencmd version
Take a look at Figure 2-11; this is the display before I ran the rpi-update script. In this figure you can see that I am running kernel number 143 and VideoCore version 336078.

Figure 2-11. Display of preupdated firmware and kernel versions
After the changes you will now see that the version numbers of the kernel and the VideoCore have changed. You can see in Figure 2-12 that I am now using kernel number 160 and VideoCore version 337601.

Figure 2-12. Versions after the rpi-update script
The best part of the rpi-update script is that it will keep you up to date daily with the foundation’s GitHub repository, unlike your distribution’s repository, which may lag a little.
Lastly, for your handy reference I have included a full kernel module listing with this command:
# lsmod
If you’re having issues with any of the hardware projects, check Figure 2-13 to ensure that you have all the correct modules loaded.
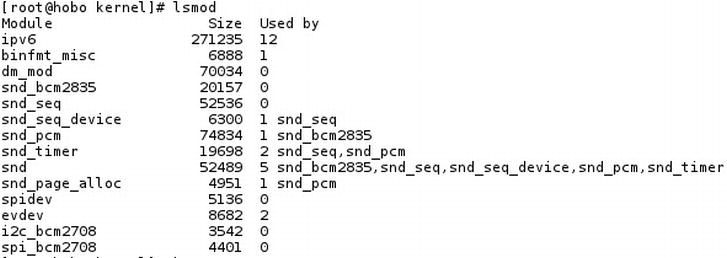
Figure 2-13. Kernel module listing for the Raspberry Pi
Now your Fedora installation is current. It’s now time to strip out the fat and configure the Raspberry Pi.
Why do you need to optimize Fedora, I hear you say, it’s already running quite well? Out of the box, Fedora runs quite well; the Raspberry Pi remix has done really well to have such a low memory footprint. Still, even with this excellent out-of-the-box install, there are a few simple tweaks that will make the Fedora remix on the Raspberry Pi work better under a high load. In addition to just saving CPU cycles the other parts of the Raspberry Pi will benefit too.
An SD card behaves very differently than a standard hard disk drive. SD cards have a limit on the number of write-and-erase cycles that they can perform, unlike a traditional hard disk drive where there is no concept of a write-and-erase cycle.
WHAT IS THIS WRITE-AND-ERASE CYCLE?
With a normal hard drive, every time you write something to the disk a sector on the disk changes its magnetic state. This is a physical change in the disk platter and causes no wear to the platter itself. Now when you read from that same sector the physical platter has no change in state at all.
An SD card obviously has no physical platters but has small memory chips that contain cells. A cell is where the bits of data are stored, much like a sector on the physical hard disk.
Now, unlike the physical hard disk, when you read or write to a flash cell it will change its state.
This is because the flash cell uses a small amount of stored electrical charge to indicate that the data bits are stored. This is where the write-and-erase cycle comes in: each time you read or write to a flash cell a cycle of the cell is used. It moves from one state to another and there are a limited amount of cycles that each cell can sustain before it will no longer hold any charge.
In the case of a standard SD card it has an endurance rating of around one hundred thousand cycles. A cycle can be a write or an erase. Really, any time the voltage state on the flash cell is changed that’s a cycle. Once you have used up all of the one hundred thousand cycles your flash cells will simply stop working. Once your flash cells stop working your SD card will be useless as you can no longer read or write to it.
One hundred thousand cycles may sound like a whole lot at first and for a digital camera, for example, it would be. Now I want you to think about a journaling filesystem like EXT3 that the Fedora remix uses. A journaling filesystem will write small amounts of data (called metadata) to the underlying device quite frequently. On top of the journal writes you also have file and directory update times being written to the disk every time you update a file or directory. You can see the erase cycles getting chewed up now!
By default the mount options for EXT4 on Fedora will use an option called atime, which will update the last accessed time every time a file is touched by the operating system. Think about that in flash cell cycles again: all of a sudden one hundred thousand cycles seems to be quite limited! Let’s put an end to that updating of access time for no valid reason.
There are two mount options that can be used to achieve this:
- The first is noatime, which simply won’t update the access time. This is good for your flash cells but bad for you, if you want date and time stamps on your files, for example. It may also break some applications that rely on the access time stamp on their files.
- To get a good balance of the two extremes you have the option of using the relatime mount option. The relatime option will update only the access time stamp if it’s before the modification time stamp. This will cut down a lot of writes to your flash cells. To turn relatime on, edit your /etc/fstab file and make your root and boot filesystems look like Figure 2-14. Note that in Figure 2-14 the fstab file has no swap set up. We’ll look at this issue in the next section.

Figure 2-14. Root and boot filesystem options
First, remount each filesystem:
# mount -o remount / && mount -o remount /boot
Now check to see you have relatime enabled by using this command:
# mount
This will display all mounted filesystems and their mount options. In Figure 2-15 you can see that the relatime option has been added to the filesystem mount options.

Figure 2-15. Filesystems mounted with relatime
Given that the Raspberry Pi has limited amounts of system memory you would assume a swap device or swap file would help out.
WHY YOU DON’T NEED TO CARE ABOUT SWAP
In the Linux and Unix world, machines are configured to have a swap space on disk. A swap space acts like additional system memory; it’s just a lot slower. If your machine were to run low on system memory it may choose to swap a process running in memory to disk.
With a normal hard disk you would be correct on this assumption. Once again it comes back to the flash cell cycles. A swap would consume a large amount of cycles on the SD card, which in turn would dramatically reduce the life of your SD card. This is yet another reason why it’s important to have your Raspberry Pi set up to best utilize the resources at hand. It’s all about understanding the hardware and its limitations.
Because CPU cycles are precious, a static IP address will be better suited for headless operation. Therefore, I will show you how to first set up the machine to boot with a static IP address. By having a static IP address you won’t need to run a DHCP client agent, thus saving a small amount of CPU cycles. This is an optional step, but I feel it’s wise to give a headless device a static IP address. The reason behind this is that if your machine is headless you won’t be able to see the IP address that the DHCP server has given out to your Raspberry Pi. A static IP solves this issue. If you wish to leave your machine on DHCP you don’t need to do anything because the Fedora image is configured to use DHCP by default.
- Create an ifcfg-eth0 file under /etc/sysconfig/network-scripts/. It may look something like Figure 2-16. Don’t try and use the ifcfg-usb0 file; remove this file to make the network start cleanly.

Figure 2-16. Example of an ifcfg-eth0 file
- Ensure that you have your /etc/resolv.conf set up to have your DNS servers set and /etc/sysconfig/network to have your default gateway set.
- Set the network to start on boot and to not fall back to DHCP by running this command:
# service network start - Ensure it starts up on the next boot:
# chkconfig network on
Another small tweak you can do is change the number of TTYs running. I don’t feel you need six active TTYs. Take a look at the file /etc/sysconfig/init. You will see a line that looks like this:
ACTIVE_CONSOLES=/dev/tty[1-6]
You can change the six to a three, which will spawn only three TTYs on the next reboot. You can see the change to the init file in Figure 2-17. This will only get you a small amount of performance, but it all helps.
![]()
Figure 2-17. TTY spawn settings
Lastly I want to talk about the I/O scheduler. An I/O scheduler is responsible for controlling how the block-level access requests are handled. In the case of the Raspberry Pi the block device is your SD card, and an example of access could be the syslog daemon writing log files to the disk. This is where the I/O scheduler comes into play. Say, for example, that you have syslog doing its thing and writing logs and now you want to save that OpenOffice document you’re working on, what now? It’s not like you can just yell out to the syslog process and ask it nicely to stop writing because you need the disk at the moment. The solution to this is the I/O scheduler. The I/O scheduler will decide who needs access and in what order they can have access. It can create a queue of I/O requests and decide the order in which each needs access to the underlying block device. By default, Linux uses the CFQ, or Completely Fair Queuing, I/O scheduler. This I/O scheduler works very well for most users and most common drives. There is a good reason why it’s the default option for the Linux kernel. The CFQ scheduler is designed to be fair to all running processes and aims to avoid starvation of I/O to any one process.
Understanding the CFQ Scheduler
Let’s take a look at how the CFQ works. In Figure 2-18 you can see two processes called “Process 1” and “Process 2.” Each process has a block of pending I/O. For Process 1 this is “I/O 1 and I/O 2” and for Process 2 this is “I/O 3.” In the CFQ the blocks of I/O get grouped together so that the underlying hard disk won’t need to seek on disk as much. The syslog, for example, may have two blocks of I/O: they are each appended to the same log file on disk. In the case of a traditional hard disk, this makes sense.
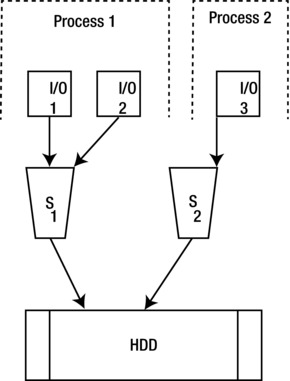
Figure 2-18. The CFQ scheduler
This sounds good. So how can you tell what your I/O scheduler is?
Quite simple. You can make use of the sys filesystem to see what the current I/O scheduler is. Just find the /sys/block/mmcblk0/queue/scheduler file and look at its output. Do note that mmcblk0 is what the Linux kernel sees our block device (SD card) as. If you look at Figure 2-19 you can see that the CFQ has brackets around it; that’s the current scheduler in use.

Figure 2-19. The current I/O scheduler in use
You can see by default that Fedora uses the CFQ. So what’s bad about the CFQ? The CFQ makes two main assumptions that are not the best for Raspberry Pi users; after all, we don’t have standard hardware or a traditional block device. The two assumptions of the CFQ are as follows:
- Your hard drive needs to move a physical read/write head around the disk platter.
- On a modern system, CPU cycles are plentiful.
It also assumes that CPU cycles are plentiful and that the underlying block device has some form of access latency. Now the Raspberry Pi needs all the CPU cycles it can get. If you can make the I/O scheduler put less load on the CPU and still get performance for the workload in question, it would seem like a good idea. Second, an SD card has very little access latency. A block request on the SD card could have less than one millisecond of access time, whereas a traditional hard disk drive could have up to 7 milliseconds of access time. That’s a fairly big difference between the access times. When you have pending operations queued based on a scheduler that is not designed for your I/O subsystem you’re going to have a performance issue.
There is a scheduler that better fits the needs of the Raspberry Pi, and that is the noop scheduler. The noop scheduler is the most basic I/O scheduler in the Linux kernel. It works off a simple File In/File Out (FIFO) queue and makes use of request merging to manage the queue. The noop scheduler is very simple; it has very little CPU overhead. That makes it perfect for the Raspberry Pi. Also the noop scheduler expects that the underlying block device has very little access time latency. Once again this suits our SD card perfectly.
Understanding the Noop Scheduler
Let’s take a quick look at how the noop scheduler works. Unlike the CFQ scheduler the noop scheduler only has one queue.
Take a look at Figure 2-20. Once again you can see our two processes with the same workload I explained for the CFQ scheduler. Unlike the CFQ, there now is one queue only and all the I/O requests go into this single queue on an FIFO basis. The only exception to this is a function called “merging.” This is where the noop scheduler detects that it could group an I/O action together. As you would expect, FIFO to a normal hard disk would cause it to seek all over the platters, but for us there is no seeking because we have no write heads! This is where the advantage of noop comes in for the SD card.
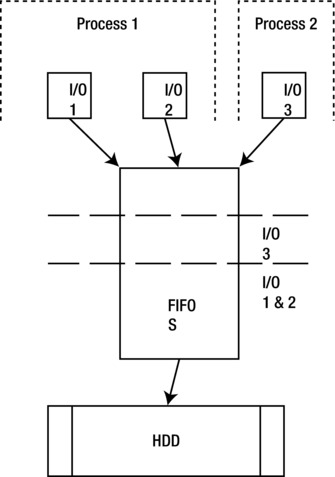
Figure 2-20. The noop scheduler
Now that you know noop is better than the CFQ for your needs, how do you go about changing the scheduler? There are two ways to set the kernel I/O scheduler. The first method I will talk about is a temporary way to change it. After a reboot it will go back to the default CFQ scheduler. In Figure 2-21 you can see all the available I/O schedulers. The one in the brackets is the current scheduler. To change that to the noop scheduler, run this command:
# echo noop > /sys/block/mmcblk0/queue/scheduler
You can see in Figure 2-21 I have changed the scheduler from the CFQ to noop.

Figure 2-21. Changing the I/O scheduler
The next way to change the I/O scheduler is more permanent. This is the method I recommend you do, as it will help your Raspberry Pi’s I/O performance. Ensure that you have your /boot filesystem mounted. If it is not, you can simply mount it with this command:
# mount /boot
Once you have your /boot filesystem mounted, open up the file /boot/cmdline.txt and append it to the end of the kernel boot line:
elevator=noop
You can see in Figure 2-22 an example of my kernel boot line.
![]()
Figure 2-22. Kernel boot settings
After all that effort, you can run top to see how little memory your Raspberry Pi is now using. In Figure 2-23 my Raspberry Pi is actively consuming approximately 21 MB of memory.

Figure 2-23. The top command showing memory usage
Now that the operating system takes up very little memory and system resources, make sure that your applications are also lightweight where possible.
Lighter Applications and Tools
Without major modification to the Fedora install you’ve seen about all you can do to optimize it. With that in mind you should be looking at using lightweight applications and daemons where possible. I tend to use the network scripts to configure my networks as it is less overhead. If you do need a GUI to configure your wired or WiFi networks I suggest you take a look at the Wireless Interface Connection Daemon (WICD). WICD is a lightweight network configuration tool that achieves a similar outcome as a network manager.
You should also try using a lightweight editor. I personally like vi or Vim. Their features are rich and very easy to use, no matter the connection source. There isn’t space in this book to cover vi or Vim, so refer to Learn Raspberry Pi with Linux from Apress, which contains a chapter on the subject, or visit the Vim web site at vim.org.
Whichever resource you use, try it out; give it a go for a few days or weeks. It will grow on you.
Summary
In this chapter I talked you through the two ways to install the Fedora Raspberry Pi remix distribution. I guided you though the first boot issue you had on the Raspberry Pi and helped you though firmware updates and where to get the firmware. After all, did you really expect your Fedora remix for Raspberry Pi to “just work”? I sure did not. If you are after an easy-to-install, no-hassle distribution I would suggest you take a look at Raspbian. After you finally got a working install I went through the steps to update the kernel and firmware from the foundation’s GitHub site. After that we took a walk through the hardware and looked at the buses and tools needed to examine them. Next up, I worked on tweaking the installation for better performance, by removing heavy applications and configuring the system by hand. Not so hard, was it?
I then went on to talk about I/O schedulers and why they are important for the Raspberry Pi. You now know how to change the scheduler on the fly and set it permanently to your desired scheduler. Lastly, I talked quickly about the benefits of using applications that are light on system resources.
In the next chapter you will finally get to make use of the Raspberry Pi as a hardware project. I will guide you through setting up a simple temperature sensor via the GPIO, and I will also help you to access the temperature sensor from the Linux operating system.