
![]()
Unfortunately this chapter will not contain any electronics work, and it will not really contain much work on your Raspberry Pi. In fact you will spend most of this chapter on a host machine and most likely it will be an x86 system. Most systems available today are using an x86 processor type. This is an evolution from the original Intel 8086, and all consumer-grade CPUs from Intel and AMD use the x86 architecture. On that note I also hope your host system has a lot more power than your Raspberry Pi. I don’t want you using that spare Celeron 733-MHz system you may have hidden in the cupboard. At this point I hope you’re a little bit confused as to why I am talking about everything but the Raspberry Pi. There is a good reason for this. This chapter is going to need a lot of resources on what will be referred to as your host system.
This chapter is written for a host system that runs Linux, and any Linux distribution is fine. It may be possible to do this under Cygwin in Windows but I have not tried nor will be trying that. So what has this host system got to do with a Raspberry Pi? To better answer that, you need to think about how any distribution for the Raspberry Pi is put together. Recall in Chapter 2 that you used a tool to install Fedora: where did that tarball come from? Did someone sit down one day and compile a whole distribution on a Raspberry Pi? Given the Raspberry Pi’s limited resources, I would assume not. I know firsthand how much goes into compiling your own Linux distribution. Armed with this knowledge I can assume that someone cross compiled the Fedora remix on a more powerful machine, rather than doing it by hand slowly on the Raspberry Pi. If you’re interested, take a look at the Linux From Scratch project at http://linuxfromscratch.org . This will give you an idea about how to compile your own distribution. It will not only teach you a lot about Linux but also show you why someone did not do this style of work on the Raspberry Pi.
In this chapter you won’t be building a whole distribution so don’t feel too worried! By the end of this chapter you will have set up a basic cross compile environment that is capable of building binary applications for your Raspberry Pi. You will do this without even using a single CPU cycle on the Raspberry Pi. How amazing is that? You will be using your desktop machine to build an application that can be run on your Raspberry Pi, in anticipation of Chapter 7 where you will need to do just that.
So how did you end up with a Linux distribution for your Raspberry Pi? This is where your host machine comes back in with a concept called cross compiling. Cross compiling is where you compile an application for a different machine type than your host system. In this chapter the host will be a 64-bit x86 machine and the target machine will be your little Raspberry Pi, a 32-bit ARM machine.
![]() Note When I use the term “machine type,” I’m talking about the type of CPU the machine uses. For example, your desktop machine type is an x86 whereas the Raspberry Pi’s machine type is ARM. It’s just a simple way to know which type of CPU the machine has. The terms “32-bit” and “64-bit” refer to the width of the instruction that the machine type can process. The Raspberry Pi and some older desktops are 32-bit machines and newer CPUs from AMD and Intel are each 64 bits. For the cross compile it really won’t matter if your desktop machine is 32 bit or 64 bit as you will be compiling for the Raspberry Pi.
Note When I use the term “machine type,” I’m talking about the type of CPU the machine uses. For example, your desktop machine type is an x86 whereas the Raspberry Pi’s machine type is ARM. It’s just a simple way to know which type of CPU the machine has. The terms “32-bit” and “64-bit” refer to the width of the instruction that the machine type can process. The Raspberry Pi and some older desktops are 32-bit machines and newer CPUs from AMD and Intel are each 64 bits. For the cross compile it really won’t matter if your desktop machine is 32 bit or 64 bit as you will be compiling for the Raspberry Pi.
Cross compiling has a few uses and the main one is to compile an application for an embedded or a very resource-limited machine. A secondary use is for a process called bootstrapping, where you compile an application for a new machine type that doesn’t have tools to compile its own applications yet (in other words, you’ll have to compile the compiler). There are also two methods of cross compiling:
- The first one and the most widely used method is where you have one host architecture and one target architecture. This is the type of cross compile you will be performing.
- The second type of cross compiling is called Canadian Cross. The Canadian Cross will always involve a minimum of three systems, as you can see in Figure 6-1.

Figure 6-1. An example of a Canadian Cross build environment
The build system will build a cross compile environment for the second machine called the host system. The host system will then use this cross compile environment to cross compile an application for the third machine known as the target. The target would be where you expect the final application to run. The only machine that will be able to run the final binary would be the target. Setting up a Canadian Cross environment is not needed for this chapter nor will it bring you any advantage. A Canadian cross compile environment would be of value when your build host and your target are very slow machines. For example you have a 700-MHz Celeron as a desktop and you wish to compile for the Raspberry Pi. You could use a powerful middle machine to build the binaries for the target machine. Given that most current desktops are at least five times faster than the Raspberry Pi there is not much gain in this method for you.
This chapter will cover the methods and tools that you need to set up a generic cross compiling environment. Many Linux distributions have their own methods of cross compiling. This is especially true for Gentoo, given the wide range of machine architecture types it supports. I will avoid doing anything distribution-specific. This should allow you to create the cross compile environment on any Linux machine you may have.
Cross compiling may be a new concept for you. This may be your first non-x86 machine. That’s very exciting! Personally I have over six different architectures of machines in my house and they all run Linux. So I am more than used to cross compiling. Not that it makes it any easier: there are always new and interesting errors to be found. Lucky for you I will be using the most common architecture in my collection: the x86. Let’s talk about that next.
You’re going to need a Linux machine. This can be a physical machine or a virtual machine. You may be able to apply the instructions in this chapter to the OSX as it is based on the Berkeley Software Distribution, and getting a working copy of the GNU Compiler Collection (GCC) should not be a hard task. You may be able to get this to work under Cygwin but I do not have the knowledge of Windows to do this. My home contains no Windows or OSX machines so I will be using Linux. You should also use a reasonably fast machine. Some applications such as LibreOffice and GCC itself are very memory- and processor-intensive to compile; they also require a large amount of temporary disk space. GCC will require well over 5 GB of disk just to compile. You’re also going to find out very quickly that cross compiling an application is not a simple process: it will fail and you may need to start the build from scratch. Do you really want to do that on a low-powered machine?
To build a cross compiling environment you’re going to need some basic tools. The most important tool you’re going to need is GCC. If you’re using Gentoo, then you already have a working installation of GCC. More than likely you are not using Gentoo but one of the more common distributions like Fedora or Ubuntu. These distributions by default do not come with GCC installed. You’re going to need to use your distributions package manager to install GCC. To install GCC in Fedora use this command:
# yum groupinstall "Development Tools"
For Ubuntu you can use this command:
# apt-get install build-essential
Now you should have a working GCC version. It’s a wise idea to test GCC to confirm it’s alive and working. First, check that you can execute GCC. A simple test is to run the gcc -v command. This command will list the version and build information about GCC. In Figure 6-2 you can see the output of this command on my machine.

Figure 6-2. The output of the gcc -v command
It is very important that this command execute successfully. If you try and do any part of this chapter without a working GCC you’re never going to get anywhere. Moving on from GCC, you’re going to make use of an open source project called crosstool-NG.
The crosstool-NG project aims to provide a stable, easy-to-build tool chain. A tool chain is a set of tools, including GCC, that allows you to build an application for a different architecture than the one you are building on. As part of crosstool-NG it will take care of downloading and configuring parts of the tool chain for your selected architecture. The tool chain will include the binutils tool and some C libraries that are specific to your target architecture. Crosstool-NG also has a very nice ncurses menu system that will easily allow you to build a tool chain.
With that in mind, it’s time to download and configure this tool. Open up your browser and go to http://crosstool-ng.org/download/crosstool-ng/ . It’s best to sort the file listing by the “Last Modified” field because you want the latest package. You will see a file at the top of this directory that indicates the current version: in my case, that is 1.16.0. You can see in Figure 6-3 the latest version at the time of writing and the download file named crosstool-ng-1.16.0.tar.bz2. I use wget to download files as I spend a lot of time at the command line. I have used the following command to download the file:
# wget
http://crosstool-ng.org/download/crosstool-ng/crosstool-ng-1.16.0.tar.bz2
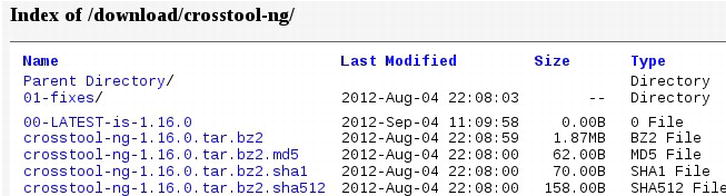
Figure 6-3. The crosstool-NG download site
Download the file to a clean directory. The next steps will configure and build the tool. Extract the tarball with this command:
# tar -xvf crosstool-ng-1.16.0.tar.bz2
Now that you have extracted the tarball, put it into the crosstool-NG directory.
![]() Note Crosstool-NG by default will install into /usr/local/. You may want to change that, depending on your preference. I already have a version of crosstool-NG in /usr/local/bin/ so I will change the install path to /usr/local/crosstool/. This will keep the install a little neater and make exporting crosstool-NG’s path easier for me. If you don’t have anything installed in /usr/local/ then by all means leave the install path as the default.
Note Crosstool-NG by default will install into /usr/local/. You may want to change that, depending on your preference. I already have a version of crosstool-NG in /usr/local/bin/ so I will change the install path to /usr/local/crosstool/. This will keep the install a little neater and make exporting crosstool-NG’s path easier for me. If you don’t have anything installed in /usr/local/ then by all means leave the install path as the default.
In Figure 6-4 you can see my extracted crosstool-NG directory that is ready to be built.

Figure 6-4. The crosstool-NG directory extracted
The next step is to run the configure script. This is where I will tell the crosstool-NG build where crosstool-NG will end up being installed on the system. If you don’t need to set the install directory, then just run the configure command by itself:
#./configure
The ./configure command will configure all defaults and install into /usr/local. If you wanted to install into a different path, say, for example, /usr/local/crosstool, you can use the –prefix option to tell the configure tool to install into /usr/local/crosstool. The full command would be this:
#./configure –prefix=/usr/local/crosstool
Just ensure that the directory exists before you run the configure script because the configure tool will not create it for you.
This process must exit cleanly; if there are any errors, fix them before you make the build. If you do get missing build components, ensure that you have installed the install build-essential group for Ubuntu or, under the Fedora install, the “Development Tools” group; of course, if you are a Gentoo user all the tools will already be present. In Figure 6-5 you can see the command I used and the end result of a successful configure. There is a lot of output in between but I have removed it as long as the exit status is clean.

Figure 6-5. Running the configure script
Why am I echoing $?? Exactly what is the $?? The $? is the numeric exit code of the previously run command on the bash shell. Once the configure stage has run, I echoed the exit code of the configure state to the running terminal. As you can see it has an exit code of zero, so all is well: anything above zero would indicate a problem.
Once you have successfully generated the make file with the configure tool, it’s time to build and install crosstool-NG. The next step is to run the make command. make will read the make file generated by the configure script and will build the install. You can run make as a regular user. make should also exit with no errors. The make process should be pretty quick. Once it’s done, the next step is to install crosstool-NG. This is what the make install command will do. You need to have root privileges for this step. If you’re on Ubuntu or Fedora you may need to use the sudo tool to run make install. Because I am using Gentoo I will become the root user and run the make install command:
# make
Once this has finished, run the following command:
# make install
In Figure 6-6 you can see that my install of the crosstool-NG was a success.

Figure 6-6. A successful install
You only need root privileges to run the make install command; crosstool-NG has no requirement to be run as root. It’s always wise in Linux and Unix to use the fewest number of privileges so please don’t build as root unless your package needs it. Now that you have the tool installed, you need to set up your environment to run crosstool-NG. Depending on how you configured crosstool-NG and depending on your system’s path settings, you may need to add the crosstool-NG bin path to your path variable. I have installed crosstool-NG into /usr/local/crosstool, so I will need to append its bin path to my own path. Because I won’t be running crosstool-NG every day, I just do the export command each time I want to run the tool. The path option is a similar concept to the library path I showed you in Chapter 2.
# export PATH="${PATH}:/usr/local/crosstool/bin"
The next step you must do before running the crosstool-NG application is to create a working directory for your project. This directory can be anything you like. I would suggest it be inside your home directory and it’s best to be a new clean directory. For example, I created the working directory of /home/brendan/ct/rpi/.
Once you have created your working directory, change into it and try and run the crosstool-NG binary called ct-ng. If you have done everything correctly, you will receive the crosstool-NG help page. Please read the help page; help pages are the data sheets of the application world and you know how much I like data sheets. You should notice after you have read the help page that the command that you need is ct-ng menuconfig. Run this command and you should be presented with a nice ncurses screen as you see in Figure 6-7. If you get an error that contains “Unable to find the ncurses libraries,” then you need to install the ncurses libraries. In Fedora you will need to install the ncurses package and the ncurses-devel package. If you are using Ubuntu the ncurses-devel package is simply called ncurses-dev. If you’re using Gentoo you won’t need to do a thing!
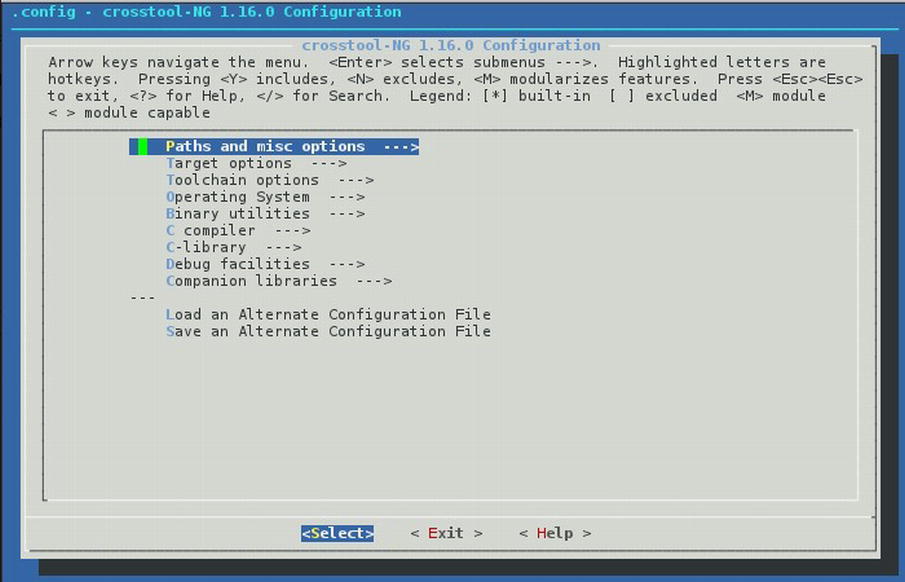
Figure 6-7. The crosstool-NG running
This is a nice-looking tool but what do you do with it? I shall show you how to configure the crosstool-NG tool in the next section. In case you’re not familiar with ncurses, here is a quick rundown on how to use it.
- First, use the arrow keys on your keyboard to navigate up, down, and left or right.
- Use Enter to select a menu item and the spacebar to toggle between options.
- You will notice three buttons at the bottom of the screen: Select, Exit, and Help. You can select each one of these by using the Tab key or you may have noticed that a letter in each word is red. The red letter indicates that it is a hotkey. Pressing “H” when you have selected an item will bring you to the help screen.
There are a lot of menus and options in crosstool-NG. A lot of them you won’t need to worry about, so don’t feel too intimidated by the sheer number of options.
The first menu item, “Paths and Misc Options,” and its suboptions mainly look after the way the crosstool-NG works and how to control its behavior. You should not need to change anything in this section. Feel free to take a look in this section but it’s not wise to change any of the options unless you have a good reason to do so.
The next section is called “Target Options.” This section is much more relevant. If you recall early on in this chapter I talked about the target being the Raspberry Pi. This section contains the options that are applied to the application that will end up running on the target. Select the menu and I will discuss the suboptions that you need to use (you can see in Figure 6-8 all the options I have selected for the “Target Options” screen).

Figure 6-8. The Target Options screen
- The first item, “Target Architecture,” should be an easy guess for you. This needs to be set to “ARM” as our target is the Raspberry Pi.
- Make sure you select “Use the MMU”: the Raspberry Pi’s SoC contains a memory management unit (MMU).
- The next option on the list is the “Endianness” that you will build for. The ARM11 is bi-endian but the default is little endian. Most of the distributions for the Raspberry Pi use little endian. Little endian will be the easiest to cross compile for and the most widely used. So select “Little endian” for this option. The next option should be obvious as well: “Bitness” has to be 32-bit. You have no choice, as the ARM11 is a 32-bit CPU.
- There is one last option on this screen that you must take care of and that is the type of floating point. This option will depend on the distribution installed on your Raspberry Pi. For example, the Fedora 14 distribution still uses the soft-float option, whereas OpenELEC uses the hard-float option. I would suggest following your installed distribution; because I am using Fedora 14 I will select software.
- The rest of the options on this screen can be left at their defaults.
The next screen of options labeled “Toolchain Options” displays options related to the tool-chain build process. You don’t need to configure any of them and the defaults are fine. Feel free to take a look though the submenus if you want.
The next menu item you will see is “Operating System.” This one is important; by default crosstool-NG will default to “bare-metal” as an operating-system type. This selection would be perfect if you were trying to cross compile a boot loader. I won’t be and I am pretty sure you won’t be as well, so let’s change it to “Linux.” Now you will see a whole submenu unfold. There is only one option that you need to select and that’s the “Linux kernel version.”
This option can seem a little misleading. You won’t find every kernel version in this menu, so how can you select the exact kernel on your Raspberry Pi? If you are wondering what kernel version you have on your Raspberry Pi just type the following command and it will print your kernel version:
# uname -r
Well, you can’t. The Linux kernel number is made up of three parts: for example, 3.2.25. The first number (3) indicates the kernel version number, the section number (2) indicates the major revision of the kernel, and the third number (25) indicates the minor number. When selecting a version in this option you must match the kernel version number. Then pick as close as you can for the kernel revision number and the minor revision is not really that important. Leave all the rest of the options on their default settings.
In Figure 6-9 you can see my selection. I have selected kernel version 3.2.25 as my Raspberry Pi is running 3.2.27.

Figure 6-9. The operating-system menu options
The next menu item on your list is “Binary Utilities.” This is where you can configure your binutils version and your linker options. Where possible I like to use the latest binutils version; at the time of writing that was 2.21.1a. Leave the linker as ld; there are other linkers you can use but I strongly recommend you stick with the generic ld linker for the time being. Nothing else needs to be done for this section.

Figure 6-10 . The Binary Utilities menu
The “C Compiler” menu is next. This gets down to the business end of crosstool-NG. You can really break your build or you can really get some good optimization done. As a general rule I like to keep this section generic for my first build. Recall earlier on that I said that building a cross compiled tool chain is a complicated task, so for the moment it’s best to keep it simple. Leave your “C compiler” set to gcc.
Once again select the latest version of GCC; at the time of writing that version was 4.6.3. Make sure that you enable the “C++” option. Most of the user land applications that you will be building will quite often be built using C++ so it’s wise to include support for C++; it can’t hurt even if none of your applications will use it. The section named “Flags to pass to --enable-cxx-flags” can be used to optimize your cross compile tool chain later on. For the moment, leave it empty and leave the rest of the options at their defaults (I’ll cover optimization later in this chapter). Figure 6-11 shows the options I have used at this stage. They are quite safe.
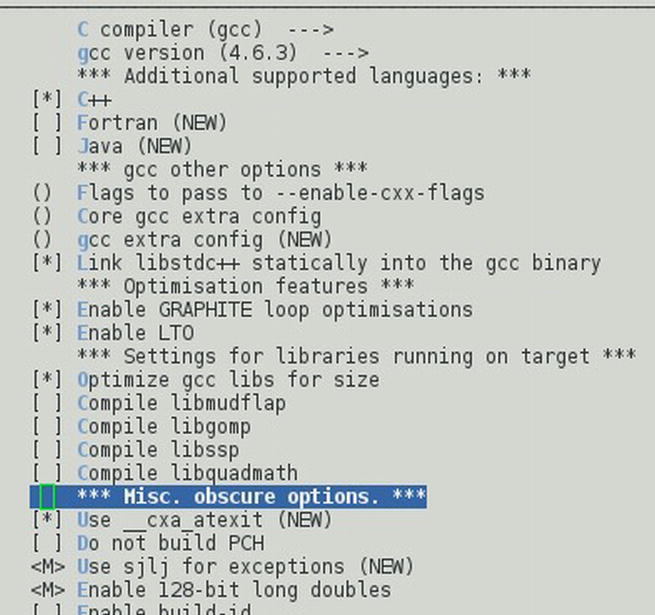
Figure 6-11. The C Compiler page
Of course, because you’re using a C compiler you’re going to need a C library. Take a look at the next menu called “C Library.” The first option is called “C library” and this lets you select what C library will be used alongside GCC in the cross compile environment. I have selected “eglibc.” eglibc stands for Embedded GLIBC. Its goals are to be small and feature-rich in a cross compiling environment. It’s designed for use on embedded systems where size matters.
There are two other options in this submenu: uClibc and generic old glibc. If you’re having issues with eglibc then give uClibc a shot; it has been used extensively in embedded environments as well but is a little less optimized than eglibc. Stay well away from the generic glibc: it’s far from ideal for an embedded or small system. I also selected 2_13 as my version because this is the same version that the Fedora remix uses. I suggest you check to see what your distribution uses. Finding your glib version is also quite simple. Just run the following command:
# ldd --version
Now look for the line that looks like the following, which is your glib version right there:
ldd (GNU libc) 2.13
There are also a lot of options to optimize your tool chain. For your initial build the only option I recommend is the “optimize eglibc for size (-Os)”. By selecting this, your tool chain may be able to produce smaller binary files. Less to execute and less in memory is always a good thing when you are resource-limited. This option will make your compile times longer: no free lunch, remember. Leave the rest of the options at their defaults (see Figure 6-12).
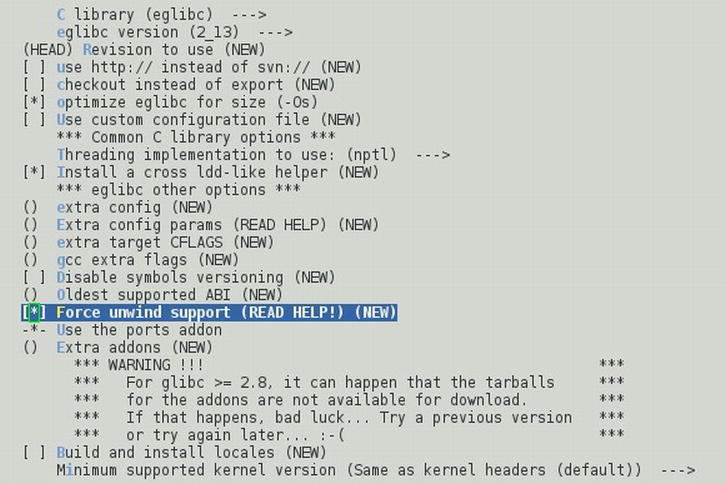
Figure 6-12. The C Library page settings
There is only one other menu you should configure. That is the “Debug Facilities” page. On this page, select gdb and strace; you should not need the other tools for basic debugging. Don’t worry about configuring any suboptions for either of the tools. The default options for each tool will be fine.
Now you’re all done with the configuration tool. Use the Tab key to select “Exit” from the bottom menu. Make sure you select “Yes” to save your new configuration, otherwise you will be redoing all your settings again. Next up it’s time to build your cross compiled tool chain. There are fun times ahead and a lot of waiting. Use the following command to start the build process:
# ct-ng build
At this point in time it’s a good idea to walk away and go get some food or a beer or two. You’re going to need your energy when it’s done. The tool has a lot of work to do. It must download all the sources for the tools and their libraries. It then must build a working copy of these tools using the host’s build tools. This is called the first pass; once crosstool-NG has a working set of tools it will then use the tools it has just built to rebuild the exact same version for your target architecture. This is called the second pass. After this you should have a working cross compile tool chain. Now if you think about that in detail that’s a lot of compile time (maybe you should grab two beers).
You may come back to find that your build failed. In my case I expected it to fail as computers have a habit of not working for me or maybe that’s computers in general. Take a look at Figure 6-13. crosstool-NG has pretty good error screens.

Figure 6-13. The build has failed!
It gives you a lot of information and even a file to read about common errors. More importantly, it has a build log file. This file is called build.log and this can be found in the working directory that you created. Taking a look at this log shows me that for some reason crosstool-NG cannot download the strace tarball. This is a simple fix. All you need to do if you get this type of error is find where to download the tarball and place it into the .build/tarballs directory in your working directory. In the case of the strace example you can download the strace file from http://sourceforge.net/projects/strace/files/strace/. Once you have this downloaded, copy it into the .build/tarballs directory that you had extracted the initial crosstool-NG build into (in my case, this is /home/brendan/ct/rpi/.build/tarballs). Once you have placed any missing tarballs into the sources directory you can resume the build and wait for more errors. crosstool-NG will log what it’s doing to your currently running terminal (standard out). Once it’s done you should see a “finishing installation” message. You can see in Figure 6-14 an example of this.

Figure 6-14. crosstool-NG has finished building the tool chain
Now that you have gone through every menu and all the suboptions I will show you the easy way to use crosstool-NG. If you had read the help screen for crosstool-NG you would have noticed a section on preconfigured tool chains. A really good feature of crosstool-NG that I have purposely not told you about is that it includes sample configurations to build many different tool chains. You can get a list of all preconfigured tool chains by running the following command:
# ct-ng list-samples
This will produce a list of available cross compiler tool chains. You will notice a set of letters in square brackets. These indicate where the profile is stored and its status. I would advise you not to use any tool chains that have a broken status. If you wish to opt for the easy way to build the tool chain that you have just finished manually building you can run the following command:
# ct-ng arm-unknown-linux-gnueabin
This will use a set of predefined and tested options to build the tool chain. Once you have told crosstool-NG what profile to use, you can run the normal build step to build and install the cross compile tool chain. There is a good reason I put this method at the end of the manual process: I am trying to show you what exactly is involved with configuring a cross compile environment because it’s really important that you start to understand the environment and architecture that you are developing for. This way you can optimize your tool chain and produce better binary files for your Raspberry Pi. You can also optimize your applications better if you know where and how to do so. The predefined profiles won’t give you this ability. Now that you have built a tool chain, what can you do with it? You can cross compile an application, of course.
The first thing you’re going to need to know is where did your tool chain get installed? It’s not in /usr/local/crosstool, so where is it? When you run the build steps for crosstool-NG the last step creates a directory called x-tools in your home directory. In this directory there will be a subdirectory for each tool chain you build. In my case the full path to the tool chain I had just created will be /home/brendan/x-tools/arm-unknown-linux-gnueabi. Inside the arm-unknown-linux-gnueabi directory will be the usual directories for a Linux application and a copy of the build log. Given the way that modern make and configure scripts work, you’re going to need to update your path so that the scripts can find where the ARM tool chain has been installed.
This should be a simple case of running the following command:
# export PATH=$PATH:$HOME/x-tools/arm-unknown-linux-gnueabi/bin
This will append the tool-chain bin path to your existing path variable. To test that your tool chain is fully working I recommend that you cross compile a simple well-known application. For this I use the GNU hello application. I am sure you can guess what this application will do. Connect to the following web site to find the latest version of the GNU hello application: http://ftp.gnu.org/gnu/hello/ . For me, it was version 2.8. Download a copy of the application and extract it to any directory you want. I like to create a build directory for each architecture I will be cross compiling for; this will help you later on when you have applications with many dependencies. The GNU hello application requires a configure step and then a make step; this is quite normal.
You’re going to need two pieces of information for the configure stage to succeed. First, you need to update the CC variable, which will ensure that the configure script uses the correct GCC version. This must be specified as the full name of the ARM tool chain. In your case this will be arm-unknown-linux-gnueabi-gcc. You can easily work this out by looking into the bin directory of the tool chain to see the full name of the GCC binary. You can see in Listing 6-1 the full name of my ARM tool-chain GCC binary.
Listing 6-1. The Real GCC Location
/home/brendan/x-tools/arm-unknown-linux-gnueabi/bin/arm-unknown-linux-gnueabi-cc-> arm-unknown-linux-gnueabi-gcc
As you can see it’s a symlink to the CC application. Now that you know the full name of your application you can move on to the configure script parameters. It’s always wise to run the configure script with the –help option the first time:
# ./configure –help
This will print all of the options that the configure script supports for the GNU hello application. There should be one option that stands out right away if you have taken the time to read the output. That option is the --host=HOST option. This option sets what host architecture you will build for. This is not simply ARM. After all, ARM is a very vague term. This is where you come back to the full path of the CC application. This full path can be broken up into five sections. See Table 6-1 for the breakdown.
Table 6-1. The full name breakdown
| Section | Meaning |
|---|---|
| arm | Main architecture type |
| unknown | Subarchitecture type |
| linux | Operating system |
| gnueabi | Application binary interface (ABI) type |
| gcc | Binary application name |
With this information it is quite simple now to work out what your host should be set to. You should use the name of the application up to the last section. For you this will be arm-unknown-linux-gnueabi. You now have the two critical pieces of information for cross compiling any application. You may in the future need more configure options but you will not get away with any less than these two. With that in mind, the full command to configure the GNU hello application is the following:
# CC=arm-unknown-linux-gnueabi-gcc ./configure –host=arm-unknown-linux-gnueabi
This should complete quickly with no errors; if you have errors you need to fix them. The best thing about using configure scripts is that it lessens the amount of options for make. The make file now knows that you’re doing a cross compile and for what architecture and with what tool chain. Make files will become another good friend of yours. Go ahead and run make:
# make
This should also produce no errors. Normally the next step would be to run make install but that won’t be very helpful. Change into the src directory and run the file command:
# file hello
Now take a look at Figure 6-15 and you can see why it’s not helpful.
![]()
Figure 6-15. Why running make install would be bad
It’s now quite clear why make install would not go as planned. It’s always a good idea to run the file tool across your cross compiled binary files: this will make sure that you have in fact cross compiled the application and not just used the local version of GCC. Now copy the hello application across to your Raspberry Pi by whatever means fits best. I like to use scp to copy the file from my build machine to my Raspberry Pi. You could also insert the SD card back into your host machine if you wanted to. Now it’s time to see if it really worked. Run the hello application. The GNU hello application supports a few options; in Figure 6-16 you can see my favorite option and its output.

Figure 6-16. The output of the GNU hello application
Congratulations! You have your first cross compiled application. Unfortunately, GNU hello is not very useful. I do use it to test my tool chains; after all, I know the source code is in a well-maintained and working state.
Now that you have tested your tool chain, try and compile a small simple application. I will show you another example for the application called netcat. You will be surprised at how easy it is. Listing 6-2 shows the build process.
Listing 6-2. Commands to Build netcat
# CC=arm-unknown-linux-gnueabi-gcc ./configure --host=arm-unknown-linux-gnueabi
# make
Look familiar? Those are the exact same commands you used to build the hello application. It’s not hard to cross compile a program if that program depends on nothing else. What would happen if you wanted to compile a more complex program when you can’t use the system library files (after all, they are compiled for an x86 architecture)?
Cross Compiling with Dependencies
A good example of a program that uses system library files is nmap, which depends on the pcap library files. For you to be able to build nmap you’re going to need to build libpcap for the ARM architecture first.
The first step will be to download libpcap into your build directory. You can download libpcap from http://www.tcpdump.org/ . I will be using libpcap-1.3.0. Extract the source once the download is finished. I like to keep the source tarballs as well just in case I make a mess of the compile and install. In Figure 6-17 you can see the source and its tarballs in my build directory.
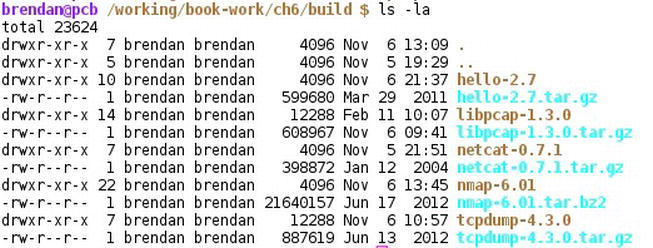
Figure 6-17. My populated build directory
There is a good reason why I am showing you my build directory. When you compile more applications that have more dependencies, you need a clean way to find them all. Change into the libpcap directory; it’s now time to start the build. Because I won’t be installing libpcap onto this machine I like to create a build directory: this way I can use the make install tool. I have called this directory rpi-build; you will need to create this directory under the libpcap directory. Once you have done that it’s time to run the configure command again. The full command looks something like this:
# CC=arm-unknown-linux-gnueabi-gcc ./configure --host=arm-unknown-linux-gnueabi --with-pcap=linux --prefix=/'pwd'/rpi-build
Let me explain the new options.
- The first new option, --with-pcap=linux, tells libpcap what target operating system you are building for. After all, you may be cross compiling libpcap to run on AIX, for example.
- The last option you see, prefix=/'pwd'/rpi-build, tells the configure tool where you want to install the binary files and libraries when you run make install.
The configure process for libpcap should run pretty quickly.
Once again, you cannot allow errors in this stage. When you are certain your configure stage is error-free, run the make tool to build the source files. There is not much to be built for libpcap so this step should be quick. Lastly, install the build into the rpi-build directory you created. You can do this with the make install command; note that if you had not used the prefix option above, your build would be installed into your host system, which is not a good thing:
# make install
Take a look at Figure 6-18 for an example of a finished build of libpcap.
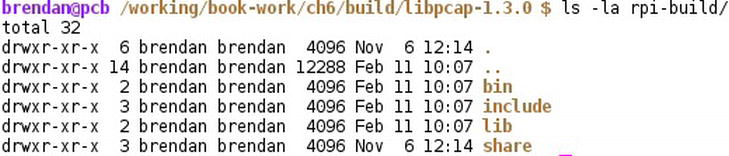
Figure 6-18. Libpcap installed into the rpi-build directory
Now that you have built nmap’s dependencies, it’s time to retrieve nmap and build it. Open your web browser and go to the nmap download page at http://nmap.org/dist/ . For this example, please use the 6.01 version of nmap (nmap-6.01.tar.bz2), because the current version at the time of writing has issues building without liblua. Save the nmap-6.01.tar.bz2 file into the build directory. Next extract the files into this directory.
Now change into the nmap source directory and create an rpi-build directory again. The configure stage for nmap is a little more complicated. For a start, I don’t want to build certain parts of nmap. For example, I do not want the zenmap front end nor do I want to compile in netcat, for example. You now also need to tell nmap’s configure tool where to find libpcap’s ARM install; this is why having a decent build directory layout will save you a lot of pain. Here is the full command to run the configuration for nmap:
# CC=arm-unknown-linux-gnueabi-gcc ./configure --host=arm-unknown-linux-gnueabi --without-ndiff --without-zenmap --without-liblua --without-ncat --with-pcap=linux --with-libpcap=/working/book-work/ch7/build/libpcap-1.3.0/rpi-build –prefix=/'pwd'/rpi-build
There are a lot of new options, though a lot of them are just disabling parts I do not want. They are --without-ndiff, --without-zenmap, --without-liblua, and --without-ncat; these lines just disable parts of nmap. The only other new option is the --with-libpcap option, which tells nmap where to find libpcap.
Don’t try to be clever by using a relative path; it will cause you untold pain. Always use the full path, as make won’t care what your relative path is.
RELATIVE PATH VERSUS FULL PATH
A relative path is a path on your system that won’t take its parent path into consideration. For example, if you wanted to make an empty file in the directory /home/brendan, you could cd into the /home/brendan directory and then create the empty file like this:
touch empty-file
The file named empty-file is relative to your current location in the filesystem. This is called using the relative path. If you wanted to create the empty file using a full path you would need to use the following command:
touch /home/brendan/empty-file
This is the full system path to the empty file.
Configuring nmap takes a little longer than libpcap but you get a cool fire-breathing dragon at the end so it must be worth it. Once you’re done with the configure stage and the dragon, it’s time to move on to the make stages. This time I am going to add an extra parameter for make. This parameter is called static; by using this option you will create a binary that will not depend on shared libraries.
What are shared libraries, I hear you ask? A shared library is a shared group of functions that any program on your system can use. This saves having many copies of the same library on your system. For example, the tcpdump application and Wireshark both use the shared pcap library files. When you statically link all the libraries at build time, your application won’t depend on any shared libraries on the system. This can be good and bad.
- It’s bad because the size of your application on disk and in memory will increase.
- It’s good when you need an application working at a very early stage in your boot process. Early in the boot process, the system’s shared libraries may not be available yet. Another good use for static libraries is if you have an application that depends on some old version of a library. You can statically link the application to the old library and your system will still use the newer shared libraries.
I am also doing this so I can demonstrate another tool: there are only a few applications that really should be built as static. So now run the following to build the statically linked binary files:
#make static
Once that has completed without error, run this command:
# make install
Just like with libpcap you will see a new directory structure under the rpi-build directory. It’s a good idea to check if your binary files are compiled for the correct architecture. In Figure 6-19 you can see the listing of the binary files.
![]()
Figure 6-19. Running the file command on the binary files
Looking at the output, you will notice first that the files are a little larger because you have statically linked them. You will also notice right at the end it says “not stripped.” What exactly does that mean? By default, when you compile a binary you will add in a lot of symbols. Some of these symbols, such as debugging symbols, may be useful. Other symbols may be of no use and just add unnecessary space. Now I’ll show you how to strip out all unneeded symbols; however, this will prevent you from debugging the application on the Raspberry Pi. Stripping an application may also break the application like a lot of things: in the cross compiling world it’s a matter of trial and error.
Now you can’t just use your system’s strip tool: after all, it won’t be able to read an ARM binary file. The cross compiled version of strip lives in the bin directory of your x-tools install. On my system this would be /home/brendan/x-tools/arm-unknown-linux-gnueabi/arm-unknown-linux-gnueabi/bin/strip. To strip all symbols from the two binary files, run the strip command with the -s option and an * to select all files:
strip -s *
You will now notice that the binary file is a little smaller. Run the file tool back across the two files and you will see they are now marked as “stripped” rather than “not stripped.” Copy the nmap binary across to your Raspberry Pi. I like to place the binary into /usr/local/bin but it will work anywhere you want. In Figure 6-20 you can see nmap running on the Raspberry Pi and showing you the compile time options:

Figure 6-20. Compile time and version numbers from nmap on the Raspberry Pi
With this basic knowledge and the crosstool-NG tool chain you can build anything from the Linux kernel to LibreOffice. The two main concepts will apply to pretty much every main build process out there. Cross compiling applications can be a painful process at the best of times. You may have hours of building only to see seconds of failure. As my fiancée sometimes says, you need to take a step back and look at it with a clear head.
If by now you still want to do more with your tool chain or make your code possibly run faster, then this is the section that will give you more details about that. These optimizations may break some applications or may not even work on all distributions. This section also will require you to read and understand the architecture white papers and the GCC manuals. I will provide some examples but you really should read at least the ARM1176 process architecture white paper and the GCC ARM options page for your version of GCC. The first page I open whenever I am going to look at optimizations is the GCC manual. In particular, look at section 3.17.2 on “ARM Options.”
It’s best to get the manual for the exact version of GCC you are using. The link you need is http://gcc.gnu.org/onlinedocs/gcc-4.6.3/gcc/ARM-Options.html#ARM-Options . The good people who work on GCC do a very good job on documentation. You should be happy that there are walls of text for you to read, unlike some other larger OSS projects that have only around four lines of text within their manuals. The GCC manual, while it is very good, is only half the documents that you need. All the options in GCC will be pretty useless if you don’t know what your CPU can support. The ARM is also quite good about supplying decent levels of documentation. Take a look at the following web page: http://arm.com/products/processors/classic/arm11/arm1176.php .
The main page gives a good brief overview of the ARM1176 processor family but you could guess by now you’re going to need more detail. Select the “Resources” tab and find the link called “ARM1176JZF Development Chip Technical Reference Manual”; this will bring you to an online version of the manual. With the ARM and GCC manuals you can now start to work out what you can do with GCC. It’s a good idea to read the whole thing. Now let’s get some optimization happening. Change back into your crosstool-NG working directory (in my case this was /home/brendan/ct/rpi). Ensure that you update your path setting and then launch the ct-ng menu:
ct-ng makemenuconfig
Select the “Target Options” menu. The first thing you should set is the “Architecture level” option, which is the equivalent of the GCC -march option. There are many choices for this but the best choice is armv6j. This sets the architecture type to ARMV6-J; this is the closest fit to the ARM1176JZF-S CPU.
Now that you have set the family of the CPU you should also set the subfamily type. For the “Tune for CPU” option, enter arm1176jzf-s as that’s what the Raspberry Pi uses.
Next up is the value of the floating point unit. You should know by now that the ARM1176JZF-S uses a vector floating point unit. Set this option to vpf. The next option you will see is the one everyone is talking about: the magical hard or soft float. For the best performance you should select “hardware (FPU)”; if your distribution is still using a soft float it’s best to use the “software” option here.
The last option for this section is “CFLAGS.” A lot of people get carried away with adding as many CFLAGS as they can find in the GCC manual but this is not a good idea. The thing with CFLAGS is that, depending on your workload type, they may make your code run much more slowly. On the flip side, if you can see why a certain CFLAG may help your workload, then by all means do use it. Once again you need to read the manuals and really understand your workload to make CFLAGS of any use. Please don’t just add random CFLAGS. With that warning in mind I will heed my own advice and not add any. In Figure 6-21 you can see my final options. Once you’re done, exit and save because there is no need to edit anything else in crosstool-NG.
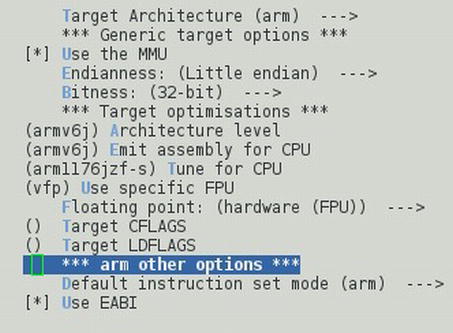
Figure 6-21. The optimized crosstool-NG build
I like to move my old tool chain to a backup location before I make the new one. I will just rename the arm-unknown-linux-gnueabi directory under the x-tools directory to arm-unknown-linux-gnueabi.old. Once that’s done, it’s time to build the tool chain again. When this is done you must recompile your applications that you have already compiled for the new tool chain. Always keep in mind when optimizing the tool chain that there is a lot of potential for things to bake even the same application but a newer or older version may not compile the same way. Reading the manuals and understanding the features is key.
Summary
This chapter has focused heavily on tools that do not directly run on the Raspberry Pi. I have done my best to make this as distribution-free as possible. The steps and tools have all been built from sources using only your distributions and GCC to bootstrap the initial process. You started this chapter by reading about what a cross compile environment is. After all, you may not have a lot of different types of architectures. I hope by reading this that you have found a need or a good reason to consider using a cross compiler. After discovering what a cross compiler can do, I talked about GCC and its many roles in the cross compiling environment. Next up, I introduced you to one of my favorite tools: crosstool-NG. Many years ago I used to do the two stages (GCC and dependency build) by hand; back then it was for a MIPS 64-bit architecture and not an ARM architecture. This process was painful and getting to a working tool-chain stage took weeks of work (and many errors, a lot of foul language, and many beers).
None of that happens anymore; as you saw from the friendly menus in crosstool-NG, you can manage to get a tool-chain build done very quickly and with little pain. Once you had built a very basic tool chain for the Raspberry Pi, the next task was to cross compile your first application. After that I showed you how to build an application with no external dependencies. Lastly I demonstrated how to build a simple application with one dependent application. These steps are building blocks for all cross compiling. It’s just a matter of using configure flags and dependencies from now on. Dependencies will become a lot harder to manage with bigger projects. Lastly I showed you some settings for optimizing the build. More important, I showed you how you can use the hardware’s white papers and the GCC manuals to understand what the GCC is going to do.