In the previous chapter, I gave you an introduction to Cucumber. In this chapter, you learn about the more advanced features of Cucumber, and you also go into implementing a more elaborate example case. There is a lot to cover in this chapter, including the extensive test case, making the chapter a little bit longer than the average.
Learning Goals
- 1.
Learn about the Feature keyword.
- 2.
Learn about the Background keyword.
- 3.
Learn about the Scenario keyword.
- 4.
Learn about the different logical phases a scenario needs to be divided into.
- 5.
Learn about the And and But keywords.
- 6.
Learn about the importance of the Scenario name and description.
- 7.
Learn about the state of Scenarios.
- 8.
Learn about data tables.
- 9.
Learn about the internationalization features of Cucumber.
- 10.
Learn how to use a test-first approach by practicing a more complex Cucumber project.
- 11.
Learn how you can use the Cucumber environment files to set up Cucumber using the application code.
- 12.
Learn how and when to use RSpec alongside Cucumber.
- 13.
Learn about running a dry run.
- 14.
Learn how you can invoke a single Feature file, when you have multiple ones in your project.
- 15.
Learn how to invoke a single Scenario and skip all the others defined in the same or other Feature file.
- 16.
Learn how to invoke a specific Example out of a set of Examples of a Scenario Outline.
- 17.
Learn how to invoke the execution of more than one specific Scenario.
- 18.
Learn how you can use tags to tag specific Scenarios and then invoke or exclude their execution.
- 19.
Learn how you can execute specific Ruby code at specific points in the lifecycle of the execution of a Scenario.
- 20.
Learn about the document strings.
- 21.
Learn how well RubyMine supports Cucumber.
Introduction
In the previous chapter, you had your first encounter with Cucumber and Gherkin. Let’s now see some more advanced features. You will now better understand the Gherkin language.
Gherkin Keywords
Feature
Background
Scenario
Given
When
Then
And
But
*
Scenario Outline
Examples
Let’s see how these keywords work.
Feature
The Feature is used to give a descriptive name and a longer summary description to your set of Scenarios. Otherwise, it does not affect your test/executable specification.
When you start your Feature, you give a title and a summary description. The title is separated from the keyword Feature with a :. The summary description is a multiline text below the title and needs to be indented by two blanks to the right. Note that the lines in the summary description should not start with any of the words Scenario, Background, or Scenario Outline. This is because these three keywords denote the start of other special blocks in the feature file.
Sometimes a feature is quite simple. But there are times in which a feature is complex. In this case, you need to write some extra documentation to reason for the value the feature will bring. This is the purpose of the summary description. It is optional, but if you believe that it will bear useful business value information, it would be good to be there.
Background
The Background groups together the steps that need to take place before each scenario that is part of the feature at hand. In other words, if many of your Scenarios share a common start that is repeated on all Scenarios, you may want to transfer those steps in the Background area.
But you prefer the first version, with the Background, in order to avoid cluttering the main Scenario content with steps that are not really relevant to the actual value of the Scenario.
Scenario
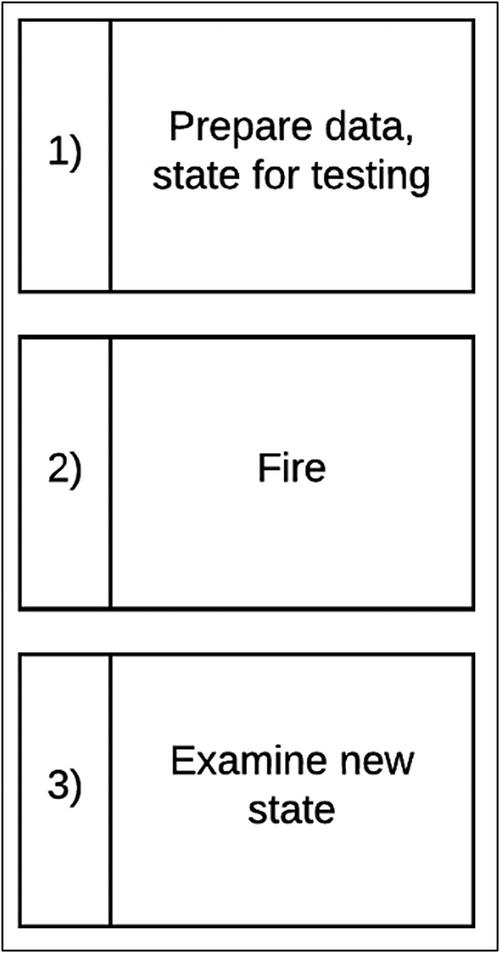
Scenario – Three Phases
- 1.
You prepare the data in your application so that you have the correct state ready for testing. This is what I also call context.
- 2.
You fire the event/action that you want to test.
- 3.
You check that the new state of your application data is as expected.
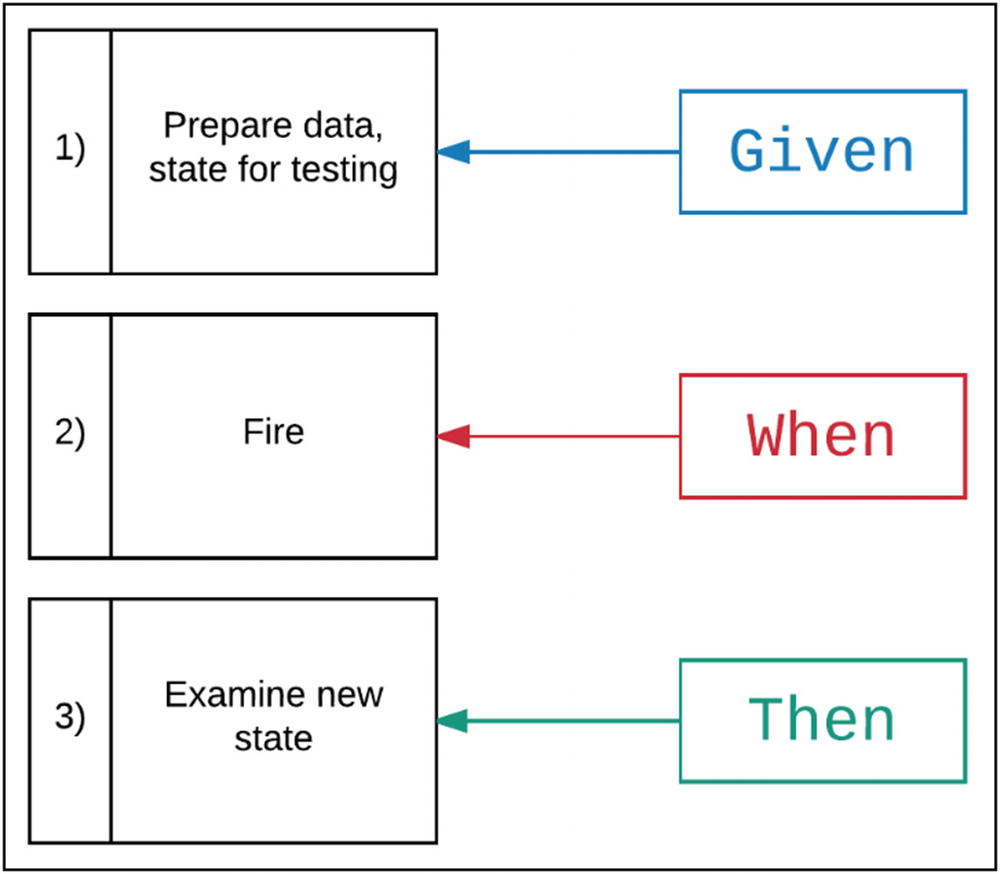
Gherkin Keywords Mapping to Three Scenario Phases
The first two steps are part of the first phase, the preparation of the context. You could have started both with the Given keyword, but Gherkin allows you to use And and But to avoid repeating Given multiple times, one below the other.
The third step starts with a When, and it is the firing action. This is the action that changes the state of the system. Usually, this is one step only, but this is not a hard rule.
The fourth step starts with a Then, and it is the step that checks that the system now has the correct state.
When writing your scenarios, make sure that you clearly identify these three phases in your scenario wording. It helps the reader to understand what the Scenario is trying to specify and test.
And, But, and *
I said that you can use And and But to start your step invocations inside a Scenario. Also, if you find that these keywords add too much of a verbosity to the Scenarios, then you can always use * instead – or a mixture of these. That wouldn’t make any difference to cucumber and the way it would be executing your Scenarios.
It is using a mixture of the Gherkin keywords. It clearly delineates the phases of the Scenario by using the correct keyword at the start of the phase and * for steps in the middle of them.
Scenario Names and Description
As a Feature has a name/title and a description, the same goes for a Scenario. Scenarios should have descriptive names/titles, but they should not be very long. You can always add a multiline summary description to a Scenario as long as the lines of that description do not start with any of the reserved step invocation keywords Given, When, and Then.
Note again that the summary descriptions should not be developer oriented and should not include technical implementation details. They are meant to be read by the business stakeholders and the developers at the same time. So avoid any technical jargon. They need to elaborate on the business aspect of the Scenario they brief about.
Scenario State
Although within the execution of a Scenario you can use instance variables to carry out state from one step to the next, please note that these instance variables do not survive from one Scenario to the next. This is done by design for a good reason. The Scenarios should be independent to each other. Each Scenario should be executable on its own, and its execution should not be dependent on the execution results of the previous Scenarios.
Having said that, make sure that you don’t carry over state from one Scenario to the next using any kind of persistent storage. For example, do not persist state into the file system or into a database, expecting to find it ready to be accessed in the next Scenario. This is really a bad design practice.
Data Tables
You can see that the first three lines of the preceding Scenario are invocations on the same step with different data. Do you have another way to declare these, so that they would have been less verbose and easier to read?
The answer is Cucumber data tables.
Export to CSV Feature
However, it is much easier to read and actually maintain.
customers_steps.rb File
The interesting thing here is that Cucumber has identified that the step the customers takes its input from a table, rather than interpolated. Having done that, it is proposing you the block local variable table, and also it is telling you that the table is of type Cucumber::MultilineArgument::DataTable, the documentation of which can be found here: http://www.rubydoc.info/gems/cucumber/Cucumber/MultilineArgument/DataTable.
How can you use this table variable to have access to the table data specified in the Scenario? One of the most interesting and useful instance methods of this object is the method #hashes which converts this table into an array of Hash where the keys of each Hash are the headers in the table.
Using the table Variable and hashes Method
Do you see how I implement the first step? I iterate over the table.hashes array. Each item of the array is a Hash that has as keys the column headers of the table and values the values of the corresponding row of the table. Hence, the first item has the values of the first row, the second has the values of the third row, and so on. I take advantage of this, and I create the @customers instance variable, which I plan to use in the steps that follow.
If you run cucumber again, you will get an error for the Customer constant, but this is how test-first development works, isn’t it?
You will not progress to the implementation of this project. You are working another project in more detail later on in this chapter.
Spoken Languages
You will be surprised to learn that Cucumber allows you to write your Features and Scenarios in more than 40 different spoken languages. That can be a real buy-in when you try to convince your business stakeholders to work together with you on specifying the requirements of the application using Gherkin.
Which Languages?
The first two-digit code is important if you want to tell that a Feature file is written in a particular language.
Specify the Language of a Feature File
In order for you to tell Cucumber that the language of the Feature is not English (which is the default language), then you need to use the Ruby comment # language: <language-two-digit-code> at the first line of your Feature file.
Localization of Gherkin Keywords
A More Extensive Example
Before you finish with Cucumber, let’s try a more extensive example.
Here is the high-level description of the application that you want to build:
You own a hotel with rooms for booking. You want to implement a new application that would allow you to offer bookings online. The main feature of the application is going to be the booking feature.
Initialize the Project
Initialize the project for the application development. Let’s call it booking-with-joy.
- 1.
Create the .ruby-version file at the root of your project folder. This file should contain the version number of the Ruby that you want to use, for example, 2.6.6. That way, rbenv and RubyMine know which Ruby will be used for your project.
- 2.
Create the RubyMine project.
Gemfile
Gemfile for the booking-with-joy Project
Initialize Cucumber
The Feature File
Feature with One Scenario
I will not expand on what this Scenario specifies as a functional requirement of the application. This is the beauty of Gherkin. You can read the Scenario itself and understand what it is about. Maybe you want to take a note that I have decided to put in the Background section, the setup of the context of the particular Scenario. This is because I want to keep in the Scenario the steps that are relevant to the value it brings and not distract the reader with unnecessary noise.
Undefined Steps
Initial Content for the Steps File
This is telling you that the first step is pending, whereas the rest of the steps have been skipped.
Implementing the First Step
First Step Implementation
It is building an array of the available rooms, based on the information borne into the table given in the step invocation.
Room Class Definition
If you run cucumber again, you will get the same error, although you have defined your Room class. I guess this is expected because cucumber does not know anything about this class.
all.rb Requires All Necessary Files
env.rb File Requires all.rb
Implementing the Second Step
Second Step Implementation
Implementing the Method set_available
Perfect! The second step has now passed.
Implementing the Third Step
Implementation of the Third Step
You have added the statement require 'date' at the beginning of the file. This is necessary because the implementation is using the Ruby standard library class Date (read about it here: https://ruby-doc.org/stdlib-2.6.6/libdoc/date/rdoc/Date.html).
As you can read from the comment in the step implementation, the table variable will always have one row, referring to just one instance of the BookingRequest class .
Introducing Class BookingRequest
all.rb Requires booking_request.rb
The instance variable @hotel is representing your booking management object, the hotel, and needs to be instantiated somehow.
Instantiating @hotel
Defining Constant Hotel in the hotel.rb File
all.rb Requires hotel.rb
Implementing the check_availability Method
Nice! It looks like the third step is now implemented. Let’s proceed to the next step.
Implementing the Fourth Step
In the final step, you need to test that the available rooms presented to the visitor are the ones expected and given by the step invocation inside the feature file. The Scenario says that the available rooms should be the rooms 5 and 6.
Implementation of the Fourth Step
You make sure that the @available_rooms variable holds the correct information, both in terms of number of rooms and in terms of specific rooms.
The step is failing because you are calling size on something that is nil. It is the @available_rooms.size that is raising the error. @available_rooms is nil because the method #check_availability does not return anything.
Correct Hotel Class Implementation
The preceding implementation requires the hotel rooms to be given when constructing the Hotel instance. So let’s enhance the previous step too, the one that instantiates the Hotel class. Instead of @hotel = Hotel.new, it needs to be @hotel = Hotel.new(rooms: @rooms) since @rooms holds the rooms of the hotel, as instantiated in the first step. Do this change in the file features/step_definitions/booking_with_joy_steps.rb before proceeding.
New Room Implementation
Finally, for the BookingRequest instances, you need the public reader for the @guests instance variable. Add the line attr_reader :guests, inside the class BookingRequest (file booking_request.rb ).
Perfect! All the steps run successfully, and the Scenario is green.
Scenario Outline
Let’s introduce some more examples in the same Scenario logic but with different data. In this scenario, it seems that the check-in and checkout dates are not relevant, since all the rooms are initially free. So you will write a Scenario Outline so that you can check the availability depending on the number of guests requested only.
Using Scenario Outline
The preceding code changes the Scenario to Scenario Outline and introduces a new step visitor is provided with rooms "<rooms>". Then you provide the examples list, with a single example for the time being, the example that corresponds to three guests and the expected rooms 5 and 6 given in a comma-separated list. Hence, this single example corresponds to the original Scenario that you had.
Undefined Step Definition
You take the room_list, and you build the array with the expected room numbers (expected_room_numbers). Then comparing this array to the @available_rooms is easy and similar to what you did earlier (in the previous step definition).
Great! The feature is green, and one scenario is defined and passed.
Examples Section with More Examples
Nice!
Some Rooms Are Not Available
Assuming Some Rooms Are Not Available
Implementation of the Undefined Step
New Content of the Step Implementation File
and you have removed the instantiation of the @hotel variable from the When(/^visitor provides the following booking details$/) implementation.
Nevertheless, now, if you run cucumber, you get the error undefined method 'reserve_room' for #<Hotel:0x007fd34d84c240> (NoMethodError), which is expected, since the method #reserve_room has not been defined for instances of the Hotel class.
New Content of the hotel.rb File
See the new lines, 14–16. This is where you define the method #reserve_room for the instances of the Hotel class. If you run cucumber again, you will get errors like undefined method 'reserve' for #<Room:0x007fcd2389dfd0 @number=1, @accommodates=2> (NoMethodError). This is because you are calling #reserve on Room instances. But this class does not expose such method.
New Content of the room.rb File
So the @available_rooms which is instantiated as the result of @hotel.check_availability(@booking_request) returns an empty array.
New Version of the hotel.rb File That Flags Rooms as Available
You have only added line 6, which renders all the rooms the hotel is initialized with to be available.
Excellent! All the Scenarios are now passing successfully!
Increase Your Confidence with Some Extra Examples
Second Scenario Outline Examples, New Version
RSpec and Unit Tests
You will continue writing more Scenarios to cover for the various business cases. These will change/enhance your classes’ public interfaces and their implementation. But relying only on the Cucumber Features and Scenarios to build robust classes is not always/usually enough. You will need to write some unit tests that would demonstrate and cover for the classes being used under edge/unexpected cases.
As you can see, the NoMethodError exception is raised when you call @hotel.reserve_room(1000).
It may not be good for your class to behave like this. Instead of raising the NoMethodError exception, you might want to raise a more meaningful error, like ArgumentError with a descriptive message.
How would you go for the development of this, if you were to do TDD? You would have to go with a unit test.
Then, make sure that the line require_relative '../all' exists at the bottom of the spec/spec_helper.rb file.
Content of the New File spec/hotel_spec.rb
Raise ArgumentError to Cover for the Requirement
See lines 15–19. The new implementation of the Hotel#reserve_room makes sure it raises the correct exception with the correct message, according to the requirement.
Excellent!
What have you seen? You have seen how parts of your tests are covered with business-facing scenarios using Cucumber and Gherkin and how other parts of your code are tests covered with unit tests using RSpec. With Rspec, you specify implementation details that have a technical focus that would make your class design more robust.
Rest of the Feature
The Feature for booking is missing scenarios that would cover the cases to take into account the dates rooms are available. I leave this as an exercise to you.
Cucumber Command Line
Before I close the chapter on Cucumber, I am going to present to you some aspects of the cucumber tool itself. Then I will show you how RubyMine integrates with Cucumber.
Dry Run
cucumber allows you to execute a dry run. The dry run parses your .feature files and makes sure that they are ok with regard to their syntax. Basically, the dry run skips all the steps. Also, it reports any step definitions that are not defined.
Invoking a Single Feature
Usually, your project is going to have multiple .feature files . Calling cucumber will execute all the Scenarios defined in all these files. How can you invoke cucumber for the Scenarios of a particular .feature file only?
Invoking a Single Scenario
Besides being able to specify a specific .feature file, you are able to specify a specific Scenario within a specific .feature file.
As you can see, I have managed to call the Scenarios that correspond to the Scenario Outline on line 22, by specifying the line number next to the filename of the feature: cucumber features/booking_a_room.feature:22.
So, instead of specifying the line of the Scenario Outline, you specified the line of the Example.
Tags
Cucumber allows you to tag your Features and your Scenarios (including Scenario Outlines) with tags. Then, you can tell cucumber which tags you are interested in, and cucumber will only execute the Scenarios tagged with these tags .
Using Tags
I invoked cucumber as cucumber --tags @foo, and this executed only the Scenarios that were tagged with the @foo tag. You can ask for more than one tag to be executed – cucumber --tags @tag1,@tag2,@tag3 – in a comma-separated list after the --tags switch.
But tags can also be useful when you want to exclude some Scenarios from being executed. For example, you may not want some Scenarios to be executed in your continuous integration server.
How can you tell that Scenarios of a specific tag should be excluded? This is done by pre-pending the name of the tag with the ~ symbol.
Hooks
- 1.
Before every Scenario
- 2.
After every Scenario
- 3.
Around every Scenario
- 4.
After every Step
Dummy Hooks Implementation
In the preceding features/support/hooks.rb file, you hook some Ruby code that would be executed both before and after each Scenario. Note that you do have access to the metadata of the Scenario that is executed via the block-level variable (scenario).
You can see how the Ruby code hooked to Before and After hooks is being invoked and its output is being printed in between the standard cucumber output.
Hooks for Specific Tags
Using the Around Hook
The point with the Around hook is that its block takes two arguments: the scenario and the block that you can #call on and execute the Scenario itself. If you don’t call block.call, the Scenario is never actually called, and you get an error. Otherwise, whatever code you put before the block.call statement is executed before the Scenario, and whatever you put after the block.call statement is executed after the Scenario at hand.
Besides the Scenario-level hooks, sometimes you might want to take advantage of the hook that is called after a step has finished. This is the AfterStep hook.
Using the AfterStep Hook
As you can see, the AfterStep hook yields two arguments to the called block. The result holds information about the result of the execution. The step_info is about which step has just finished execution.
Do you see the lines that are printed after the execution of each step?
Doc Strings
The doc string is provided in between two lines, each of which has triple quotes """. You usually write the triple quotes indented by two spaces to the right relative to the beginning column of the step the doc string belongs to. Then each line of the doc string needs to start at that column too.
Cucumber and RubyMine Integration
- 1.When you invoke a new step that is not defined, it underlines the step (Figure 7-3).
 Figure 7-3
How RubyMine Underlines Undefined Steps
- 2.
When you Cmd+Click a step invocation, it takes you directly to the step definition.
- 3.
You can right-click a Scenario, and you can invoke the execution of the specific Scenario.
- 4.
You can right-click a Feature file, and you can invoke the execution of the particular Feature file.
Task Details
You need to implement the following Ruby application covered with both Cucumber Scenarios and RSpec unit tests:
- 1.
If the total price of the products sold in an order is above 50, then a discount of 10% should be applied.
- 2.
When a product is tagged with the tag PROMO25, then a 25% discount should be applied to the product price.
- 3.
All the products have a VAT of 20%. Note that the VAT is applied after any product or order discount is applied.
You will need to write a Feature file containing various Scenarios that would document the proper order total amount. You will also have to implement the order total calculating logic.
Key Takeaways
Cucumber is a fantastic tool to minimize the impedance mismatch between business stakeholders and developers. And it is available for many programming languages, not only for Ruby. It is used by many companies that want to have living documentation of the features of their applications.
The more you read and practice, the better you become on how to apply Cucumber.
Important Gherkin keywords, like Feature, Scenario, Scenario Outline, and Examples
Three different scenario phases
Scenarios states
Data tables
Feature and Scenario internationalization
Using tags
Using hooks
This is the last chapter of this book, your journey to practical test automation. I hope that you have learned something from it, namely, practical tips that I use on a daily basis when I develop a project. Hopefully, they will be useful to you too. They will help you become a better developer with increased quality of your software deliverables.