There are many challenges in developing an enterprise-level system; those challenges are compounded when one begins down the tricky road of developing a plug-in architecture. Contracts and interfaces must be established, boilerplate code must be written, and exceptions must be handled and accounted for. It can be a truly daunting task as it ramps up in complexity. The whole effort can be distilled to a single core challenge: creating a system that is not overly complex but remains safely usable and provides the desired extensibility. This chapter examines the Dynamic Language Runtime and the Managed Extensibility Framework, both newly integrated into .NET 4; our coverage of these technologies will help us create such a system in less time and with less code.
Software reusability is something of a holy grail among developers, a lofty goal that has proven to be quite difficult to achieve in a practical sense. Much code has been written to solve unique problems in distinct situations. Rather than focus on the components themselves and where any given one could be repurposed, the Managed Extensibility Framework (MEF) defines a system that facilitates reuse in a generic fashion, leaving the specifics up to developers so that they may implement their components as the particular situation dictates. MEF was created to elegantly solve a lot of the problems and challenges with developing reusable software components, and it does so very effectively.
It's completely possible in C# to create a flexible plug-in architecture without the aid of a framework such as MEF; at a basic level, one must perform at least the following tasks:
Without question, the largest portion of work and design winds up in the final point; a system to execute plug-ins can quickly become very complex. Assemblies are loaded via .NET's reflection classes and executed by the host application based on both the implementation of the component itself and the abilities that the host application provides. A complete sample Forms application is detailed in Listing 4-1; the application looks in a specified directory for plug-ins that implement the IPlugin interface. This interface defines a method called Calculate that accepts two integers.
Example 4-1. A Complete Implementation of a Basic Plug-in System
using System;
using System.Reflection;
using System.Windows.Forms;

namespace pluginTest
{
    public partial class Form1 : Form
    {
        public Form1()
        {
            InitializeComponent();
        }

        private void Form1_Load(object sender, EventArgs e)
        {
            Assembly objAssembly = Assembly.LoadFrom(Application.StartupPath + "/test.dll");
            IPlugin plugin = (IPlugin)ExamineAssembly(objAssembly, "IPlugin");

            double result = plugin.Calculate(1, 2);
        }

        /// <summary>
        /// Retrieves object metadata about a specified plugin
        /// </summary>
        /// <param name="objAssembly">the Assembly object to examine</param>
        /// <param name="interfaceName">the interface we expect to be defined</param>
        /// <returns>the plugin object</returns>
        public object ExamineAssembly(Assembly objAssembly, string interfaceName)
        {
            foreach(var objType in objAssembly.GetTypes())
            {
                if (!objType.IsPublic) continue;

                Assembly plugin;

                try
                {
plugin = Assembly.LoadFrom(objAssembly.Location);
return plugin.CreateInstance(objType.FullName);
}
catch(Exception ex)
{
// error handling here...
}
}
return null;
}
}
}Although functional, it's somewhat fragile and doesn't open up a lot of options for us. It will certainly allow plug-in capabilities, but it's neither portable nor flexible. If we were to create a new application that required plug-ins, we would have to move this code over and likely repurpose it.
Although it's not really possible for us to escape the first two requirements of our list, MEF does a great job of opening up the third requirement and providing a way for us to include plug-ins in our system without a lot of tedious boilerplate code. Let's create a sample console application and take a look at how MEF handles a similar situation; we'll call our console application MEFPluginTest.
The System.ComponentModel.Composition.dll file is the brains of the whole MEF operation, so the first thing we should do is add a reference to it in our application, as shown in Figure 4-1.

Anecdotally, I find it is beneficial to design code working from the implementation backward. By creating our ideal usage first, rather than the plumbing to support it, we ensure that the code we use most often to accomplish a task is clean and manageable.
In plug-in terms, this approach serves an even greater purpose: designing reusable components is a difficult task, made more complex if the API used within those components is unwieldy or poorly designed. Therefore, for the purposes of this example we will create a new Class Library project called SharedLibrary, which will be used to house our contracts.
One of the cornerstones of reusable, modular software is the use of interfaces. Coding to interfaces effectively decouples software components from one another, allowing the developer to switch methods and implementations on the fly. Listing 4-2 shows an example that compares instantiation types.
Example 4-2. Coding to an Interface Allows for Better Flexibility As Requirements and Software Change
// concrete implementation; tightly coupled
Administrator admin = new Administrator();

// coding to an interface; loosely coupled
IUser admin = new Administrator();
In both cases, a new object called admin is created; the difference in the second case is that any object matching the interface requirements of the IUser type is considered acceptable. In effect, the interface defines a contract that implementing classes must abide by. From a coding standpoint, this means that you could define common properties and methods that a specific user in your system must have and then instantiate based on the IUser interface throughout your code. Adding additional user types would not require a significant modification of code on your part, shortening maintenance and coding times.
Warning
This does have the potential to bite you in the rear if you are a big fan of using the var keyword, which indicates an implicitly typed variable. Consider the following:
var admin = new Administrator();
The var keyword will infer the type from the declaration on the right, creating a statement that is functionally identical to the first case from our previous example.
Administrator admin = new Administrator();
Therefore, you will have to explicitly use the interface declaration on the left side of the assignment for C# to be able to understand that you want to use it.
Now that we have covered coding to an interface, we can create one that will serve to describe a simple plug-in. We will use this contract as a way to communicate to MEF and our application that there are libraries ready to be loaded that implement specific methods and properties.
First, create an interface in the SharedLibrary project called IPlugin. Listing 4-3 shows the code for this interface.
Example 4-3. The Interface for a Simple Plug-In
namespace SharedLibrary
{
    public interface IPlugin
    {
        string MessageProperty { get; }
        string DiagnosticMessage();
        string DiagnosticParameters(int x, int y);
    }
}
Although simple, this plug-in will show us how to communicate between properties in MEF as well as methods (and methods with parameters supplied). Note that we do not need to add a reference to the System.ComponentModel.Composition library in this case; the interface does not need to specify the manner in which it will be applied.
Our interface has been created; now we need a project that will contain the code for an implementation of that interface. Create a new Class Library called MEFTestLib, and add a new Class File called Test. You will also need a reference to the System.ComponentModel.Composition library for this project. Listing 4-4 shows the implementation of a sample MEF plug-in.
Example 4-4. Implementation of the Simple Plug-in in Test.cs
using System;
using System.Collections.Generic;
using System.ComponentModel.Composition;
using System.Linq;
using System.Text;
using SharedLibrary;

namespace MEFTestLib
{
    [Export(typeof(IPlugin))]
    public class Test : IPlugin
    {
        public string MessageProperty
        {
            get { return "MEFTestLib.Test : Message property successfully updated."; }
        }

        public string DiagnosticMessage()
{
return "MEFTestLib.Test.DiagnosticMessage() : Successfully called the DiagnosticMessage() method.";
}
public string DiagnosticParameters(int x, int y)
{
return "MEFTestLib.Test.DiagnosticParameters(int, int) : You passed " + x + " and " + y + ".";
}
}
}Most of this should be familiar ground; the Test class implements the IPlugin interface and returns some sample data. What's worth noting is the Export attribute located above the class declaration, as shown in Listing 4-5.
Tip
For this example, we're exporting the entire class. You're free to expose only certain properties or methods if desired; MEF is very flexible in that respect. In the CMS, it is assumed that the entire class has been exported.
This is the precise reason that we coded to an interface; the Export attribute indicates to MEF that we want to expose the Test class to host applications and that the expected type is IPlugin. Calling code will expect anything of type IPlugin to be exposed and available for use, meaning you could create quite a few libraries that implement IPlugin and have them all integrate seamlessly; this is the heart of how the CMS handles embeddables and extensibility.
Warning
Implementing a single library in MEF is different from implementing multiple libraries. By that I mean if you have a common folder of libraries (which we will create shortly) and place multiple DLLs in it that export common methods and properties, your calling code must account for there being more than one available library. That requirement will become clearer in a moment.
Now we can turn our attention back to the lonely MEFPluginTest console application we created a little while ago. Let's add a class to this project called PluginManager. The code in Listing 4-6 will do the actual legwork of communicating to and from our libraries.
Tip
Notice in Listing 4-6 that I have defined the expected location for MEF plug-ins as C:MEFTestLibraries; you're obviously free to choose any location you like. If you do choose another location and are following along with the source code downloaded from the Apress website, remember to update this location in that code as well.
Example 4-6. The PluginManager Class in the Console Application
using System;
using System.ComponentModel.Composition;
using System.ComponentModel.Composition.Hosting;
using System.Collections.Generic;
using System.Reflection;
using System.Linq;
using System.Text;
using SharedLibrary;

namespace MEFPluginTest
{
    public class PluginManager
    {
        [Import(typeof(IPlugin))]
        public IPlugin TestPlugin { get; set; }

        public void ExecutePlugin()
        {
           try
            {
                var catalog = new AggregateCatalog();
                catalog.Catalogs.Add(new DirectoryCatalog(@"C:MEFTestLibraries"));
                catalog.Catalogs.Add(new AssemblyCatalog(Assembly.GetExecutingAssembly()));

                var container = new CompositionContainer(catalog);
                container.ComposeParts(this);

                Console.WriteLine(TestPlugin.MessageProperty);
                Console.WriteLine(TestPlugin.DiagnosticMessage());
                // please excuse the "magic numbers"...
                Console.WriteLine(TestPlugin.DiagnosticParameters(1, 2));
            }
            catch (Exception ex)
            {
                Console.WriteLine(ex.Message);
                Console.WriteLine(ex.InnerException);
            }
            Console.ReadLine();
        }
    }
}
An AggregateCatalog is created that holds both a DirectoryCatalog and an AssemblyCatalog (more on those in a moment). With the locations defined, the available part is composed, and some of its methods are invoked with different parameters.
Notice that the hosting application has the most knowledge of both the plug-ins and the wiring required; this is how we want things to be. Our plug-ins should be dumb and blind, executing only when desired and having no real knowledge of where, when, or how they will be used. This is a core concept in the CMS.
Now we need to modify the Program.cs file to instantiate our PluginManager class and execute the plug-in, as in Listing 4-7.
Example 4-7. Calling the PluginManager Class
using System;

namespace MEFPluginTest
{
    class Program
    {
        static void Main(string[] args)
        {
            var pm = new PluginManager();
            pm.ExecutePlugin();
            Console.ReadLine();
        }
    }
}
Go ahead and build the application (but do not run it yet). Once the application has compiled successfully, move the SamplePlugin.dll file from the /bin/Debug folder to C:MEFTestLibraries (or whichever location you prefer if you've updated your code). Once that DLL has been moved to the correct location, run the application.
Tip
One timesaving tip for developing MEF parts in this fashion is the use of the post-build events available in .NET projects. Select Properties
Remember that .NET assemblies cannot be unloaded from a running AppDomain, so if your host application is running, you'll need to stop it before trying to overwrite the assembly, or you'll see a message indicating the post-build event failed.
If you are working within a share network environment, you may see a message like the one in Figure 4-2 when you try to run the host application.
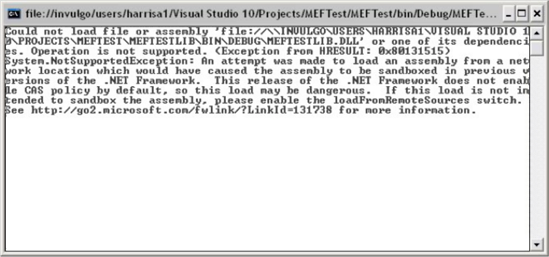
Under the default security settings, .NET is restricting access to assemblies located on network shares. Luckily, it's extremely easy to get around this problem with a quick fix: add a new App.config file to the MEFPluginTest console application, and modify it so that it contains the following.
Example 4-8. Modifying App.config to Support Loading of Unsafe Assemblies
<?xml version="1.0" encoding="utf-8" ?>
<configuration>
    <runtime>
        <loadFromRemoteSources enabled="true"/>
    </runtime>
</configuration>
This instructs the runtime to permit the loading of assemblies in remote locations. Bear in mind that this could present a security risk and is really only necessary if you need to access assemblies located over a network or in some other untrusted location. Running this code with all assemblies on a local machine should not generate an error or require the App.config modification.
If you had previously received an error, this should remedy it, and you should see output as shown in Figure 4-3.

So, we've created an interface that defines a plug-in, we've created a plug-in that implements that interface and exposes methods and properties to MEF via attribute metadata, and we've created a host application that will load assemblies that export the expected functionality we described. How does it all work?
One of the core constructs of MEF is the catalog, demonstrated in Listing 4-9. A catalog tells MEF that we expect imports and exports to exist in a particular location. There are three types of catalogs in MEF: the AggregateCatalog, the DirectoryCatalog, and the AssemblyCatalog.
Example 4-9. Defining Catalogs to Inform MEF Where We Expect Exported Data
var catalog = new AggregateCatalog();
catalog.Catalogs.Add(new DirectoryCatalog(@"C:MEFTestLibraries"));
catalog.Catalogs.Add(new AssemblyCatalog(Assembly.GetExecutingAssembly()));
The DirectoryCatalog indicates that we expect MEF plug-ins, or parts in MEF lingo, to exist in a particular directory; the AssemblyCatalog indicates that parts should live in a particular .NET assembly, and the AggregateCatalog is used for storing a combination of these locations.
With regard to the DirectoryCatalog, any .NET-accessible location will work fine, but I find it's beneficial while testing to have libraries stored in a common location; this is why we created the MEFTestLibraries folder at the root of the C: drive.
Once the location (or locations) for parts are established, MEF can examine those locations and retrieve the expected import types.
The real brain of the operation is the CompositionContainer, shown in Listing 4-10, which is responsible for wiring everything together. We add an instance of the current class so that all library dependences are connected properly, and finally we call ComposeParts, at which point we have access via MEF to our plug-in libraries.
Example 4-10. The CompositionContainer Is Responsible for the Wiring and Composition of Objects
var container = new CompositionContainer(catalog);
container.ComposeParts(this)
Six lines of C# code is, I would argue, a very low barrier to entry in terms of developing a fairly advanced plug-in system. We were able to keep our interface as the primary bridge between components (in reality, the SharedLibrary would consist primarily of DTOs, if not entirely), and there are no concrete instances of plug-ins anywhere in the host application. In fact, the only reference we made was to the SharedLibrary; at compile time, the MEFPluginTest console application doesn't even know the SamplePlugin library exists at all. Is that really all we need to consider?
Earlier I mentioned that if we intend to have multiple MEF plug-ins available from a single location for import, we must accommodate that within our host application.
Create a new class library called SamplePlugin2, and add a new Class Library to it called Test. Next, add a reference to the SharedLibrary DLL so that we can use the IPlugin interface. Also, add a reference to System.ComponentModel.Composition so we can provide MEF metadata. Listing 4-11 details the code for Test in SamplePlugin2.
Example 4-11. The SamplePlugin2 Library Is an Implementation of IPlugin with Different Output
using System;
using System.Collections.Generic;
using System.ComponentModel.Composition;
using System.Linq;
using System.Text;
using SharedLibrary;

namespace MEFTestLib
{
    [Export(typeof(IPlugin))]
    public class Test : IPlugin
    {
        public string MessageProperty
        {
            get { return "A totally different message property from a second plugin!"; }
        }

        public string DiagnosticMessage()
        {
            return "The DiagnosticMessage() method was called in the second plugin.";
        }

        public string DiagnosticParameters(int x, int y)
        {
            return "You passed " + x + " and " + y + ". The sum of these numbers is " + (x + y) + ".";
        }
    }
}
Build (but do not run) the solution; once compiled, move SamplePlugin2.dll to the C:MEFTestLibraries folder (or your desired location). You should now have two libraries in this folder, as shown in Figure 4-4.

Now you can run the application; you should be presented with the rather unfriendly message displayed in Figure 4-5.
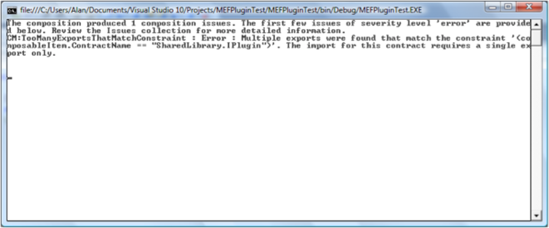
Example 4-12. The Unfriendly, Although Informative, Error Message Provided by MEF
The composition produced 1 composition issues. The first few issues of severity level 'error' are provided below. Review the Issues collection for more detailed information.

CM:TooManyExportsThatMatchConstraint : Error : Multiple exports were found that match the constraint '(composableItem.ContractName == "SharedLibrary.IPlugin")'. The import for this contract requires a single export only.
What's the problem? The issue can be traced to how we actually imported the class in the host application. We assumed (without realizing it) that we would actually have one and only one instance of the plug-in class. Let's take a look at Listing 4-13 and see how to remedy the issue.
Example 4-13. Improper Handling of Imports in Our Design
[Import(typeof(IPlugin))]
public IPlugin TestPlugin { get; set; }
The specific solution to this problem really depends on the implementation and usage of the plug-ins. Since we're simply displaying some test to the screen, we can create a generic list of IPlugin objects, as in Listing 4-14.
Example 4-14. Handling Multiple Plug-in Imports
[Import(typeof(IPlugin))]
public List<IPlugin> TestPlugin { get; set; }
Next, we need to modify the actual calls to the plug-in to make use of a list; specifically, we need to enumerate the items in the list and iterate over them, calling the methods we want or accessing properties. Listing 4-15 shows how to iterate over the list of plug-ins.
Example 4-15. Iterating Over the List of IPlugin Objects
foreach (var plugin in TestPlugin)
{
    Console.WriteLine(plugin.MessageProperty);
    Console.WriteLine(plugin.DiagnosticMessage());
    Console.WriteLine(plugin.DiagnosticParameters(1, 2));
    Console.WriteLine();
}
Running the application again should demonstrate that we have handled the situation, and the output is displayed as expected, as shown in Figure 4-6.

I've included the complete listing of the host application in Listing 4-16, with the most recently updated lines in bold for convenience.
Example 4-16. The Complete Application Host Code
using System;
using System.ComponentModel.Composition;
using System.Collections.Generic;
using System.Reflection;
using System.Linq;
using System.Text;
using SharedLibrary;

namespace MEFPluginTest
{
    public class PluginManager
    {
        [Import(typeof(IPlugin))]
        public List<IPlugin> TestPlugin { get; set; }
public void ExecutePlugin()
{
try
{
var catalog = new AggregateCatalog();
catalog.Catalogs.Add(new DirectoryCatalog(@"C:MEFTestLibraries"));
catalog.Catalogs.Add(new AssemblyCatalog(Assembly.GetExecutingAssembly()));
var container = new CompositionContainer(catalog);
container.ComposeParts(this);
Console.WriteLine(TestPlugin.MessageProperty);
Console.WriteLine(TestPlugin.DiagnosticMessage());
// please excuse the "magic numbers"...
Console.WriteLine(TestPlugin.DiagnosticParameters(1, 2));
foreach (var plugin in TestPlugin)
{
Console.WriteLine(plugin.MessageProperty);
Console.WriteLine(plugin.DiagnosticMessage());
Console.WriteLine(plugin.DiagnosticParameters(1, 2));
Console.WriteLine();
}
}
catch (Exception ex)
{
Console.WriteLine(ex.Message);
Console.WriteLine(ex.InnerException);
}
Console.ReadLine();
}
}
}Another method of providing extensibility in .NET 4 is via the Dynamic Language Runtime. The DLR sits right on top of the existing Common Language Runtime and seeks to provide features and functionality that developers used to dynamic languages (such as Ruby or Python) would be more comfortable with. It also aims to facilitate easier interaction between static .NET languages (such as C#) and dynamic .NET languages (such as IronPython). It's worth taking a moment to examine what a dynamic language is and is not and how it compares to a so-called static language.
Note
We'll look at language interop later in the book; for now we're going to limit the discussion to C# and the use of specific language enhancements within it that change how C# developers can approach their code.
At a very basic level, a dynamic language is one in which the type checking is done at runtime instead of compile time. For example, in C#, the statement in Listing 4-17 is invalid and will prevent the code from compiling at all until the error is resolved.
In a language such as Python (or its .NET implementation, IronPython), the type system is dynamic, meaning types are resolved at runtime; Listing 4-18 would be valid because the type is inferred from the value on the right side of the assignment operator.
Example 4-18. This Is a Valid Python Statement; myNumber Is Assumed to be a String Based on Right Assignment
myNumber = "Foobar!"
Note
It's a common mistake to believe that dynamic languages lack type systems.
The dynamic keyword that is new to C# 4 is another tool in the arsenal of a developer, and it's one to be used judiciously. Let's take a look at some of the concerns behind the dynamic keyword before we explore some interesting things we can accomplish with it.
The dynamic keyword supports the runtime evaluation of assignments in C#. It is distinct in function and purpose with regard to the var keyword, which is an implicit declaration; var is simply a shorthand where type information is still known at compile time. For example, the syntax in Listing 4-19 is invalid in C# and prevents the code from being compiled and executed; without a FooBar() method, the var keyword is unable to resolve properly, and a compile-time error is generated.
Example 4-19. The Foo Class Lacks a FooBar() Method, and a Compile-Time Error Is Generated
public static class Foo
{
    static int Bar()
    {
        return 42;
    }
}

public void Test()
{
var myNumber = Foo.FooBar(); // generates an error
}Compare this with the dynamic keyword shown in Listing 4-20, which has an altogether different effect.
Example 4-20. The Dynamic Keyword Will Resolve at Runtime
public static class Foo
{
    static int Bar()
    {
        return 42;
    }
}

public void Test()
{
    dynamic myNumber = Foo.FooBar(); // generates an error *AT RUNTIME ONLY*
}
This is what keeps C# developers up at night. It is entirely possible to use the dynamic keyword to act upon methods, properties, and so on, that may or may not exist. You will receive no compile-time errors and no red IntelliSense underlines to indicate that the FooBar() method is not a member of the Foo class; you receive nothing because C# has not yet examined the Foo class to even know the method does not exist. If you were to run the application, you would receive an exception when Test() was executed.
The dynamic keyword is a static type; what makes it unique is that the act of type checking does not occur on this particular type, effectively making it dynamic and resolved at runtime. Objects declared with the type dynamic are actually statically typed objects that are ignored until runtime; it's kind of a clever hack to .NET's type system, in a way.
Let's look at a hypothetical use of the dynamic keyword. Earlier in the chapter we discussed the possibility of an interface called IUser that would support users in a system to be instanced without needing to couple to a particular type; the IUser interface provided a contract for us that more specific types could implement, and we could act on those types in an identical fashion because they all contained the same methods and properties (or at least the same basic set).
The dynamic keyword reduces the amount of code we need to create and maintain by establishing a sort of pattern-matching environment; consider the code in Listing 4-21.
Example 4-21. A Theoretical Usage of the dynamic Keyword
public void ProcessUser(dynamic user)
{
    // we always want to greet the user
    DisplayMessage("Welcome, " + user.username);

    if (user is BasicUser)
    {
// do nothing, basic user
}
if (user is Manager)
{
// display a key performance indicator dashboard for the specific manager
DisplayKPIDashboard(user.userID);
}
if (user is Admin)
{
// display an admin console for adjusting site-wide settings
DisplayAdminPanel(user.userID);
}
}Used properly, the dynamic keyword opens a wide variety of doors in terms of eliminating what could be perceived as boilerplate code. Instead of every specific type of user implementing the IUser interface, the dynamic keyword allows us to simply pass in any object that implements those fields naturally. It's roughly the same effect but with less code involved.
The dynamic keyword is not a replacement for interfaces but rather another option for how to approach the challenges of a specific system.
Note
This type of object interaction and operation is affectionately referred to as duck typing. If it looks like a duck and quacks like a duck, it must be a duck. In dynamic programming terms, if two objects have identical properties and methods, then we can operate on them as if they were of identical types (even if they are not). The code in Listing 4-21 demonstrates this: BasicUser, Manager, and Admin are all different types, but we can act on them identically because they expose the same properties and methods. Each type "looks like" the others, so we can work with them interchangeably.
Areas of a content management system lend themselves quite naturally to a plug-in-based architecture. In my experience, it's important to not go overboard with the approach; I've seen in many cases the end result is a system that is so concerned with being abstract that it becomes unwieldy and brittle (which is really the precise situation that a plug-in design is meant to avoid). To the CMS, although MEF is critical to its operation, the implementation is more like a gentle flavoring; it should enhance the end result, not overpower it.
Note
The remainder of this chapter focuses on plug-ins via MEF; the usage of IronPython for additional plug-in behavior is discussed in more detail in Chapter 7, along with coverage of the basic language syntax.
If a single piece of code could be considered the keys to the castle in the CMS, the IEmbeddable interface is it. We discussed it briefly in Chapter 2, but we'll examine it again here in Listing 4-22.
Example 4-22. The IEmbeddable Interface That Embeddables Rely On
using System;
using CommonLibrary.Permissions;

namespace CommonLibrary.Interfaces
{
    /// <summary>
    /// Interface that Embeddables are expected to implement.
    /// </summary>
    public interface IEmbeddable
    {
        Guid ContentID { get; set; }
        string EmbeddableName { get; }
        int EmbeddableID { get; }
        EmbeddablePermissions Permissions { get; }
    }
}
Throughout the CMS, the system relies on this interface as a way to communicate with the embeddable objects that make up a public-facing content page. The code in Listing 4-23, taken from the Business library of the CMS, is responsible for retrieving a catalog of assemblies that are exposed via MEF and implement IEmbeddable. These assemblies are added to a generic list called _embeddables by MEF automatically, and this list is returned by the method so that it can be used elsewhere in the system.
Example 4-23. Loading MEF-Exposed Assemblies via IEmbeddable
[ImportMany(typeof(IEmbeddable))]
private List<IEmbeddable> _embeddables;

/// <summary>
/// Retrieves available plugins from the predefined location.
/// </summary>
/// <returns>A generic list of IEmbeddable objects.</returns>
public List<IEmbeddable> GetEmbeddablePlugins()
{
   var catalog = new AggregateCatalog();

   try { catalog.Catalogs.Add(new
DirectoryCatalog(ConfigurationManager.AppSettings["EmbeddablePluginFolder"])); }

   catch
   {
      // logging snipped
   }

   _container = new CompositionContainer(catalog);
// grab all the available imports for this container
try
{
_container.ComposeParts(this);
}
catch
{
// logging snipped
}
return _embeddables;
}The CMS uses .NET server controls to display public-facing content to users; as discussed, these controls implement IEmbeddable and are exposed via MEF. Examine Listing 4-24, which demonstrates a complete CMS embeddable sever control.
Example 4-24. A Server Control Implementing IEmbeddable
using System.ComponentModel;
using System.ComponentModel.Composition;
using System.ComponentModel.Composition.Hosting;
using CommonLibrary.Interfaces;
using CommonLibrary.Permissions;

namespace Content
{
    [Export(typeof(IEmbeddable))]
    [ToolboxData("<{0}:Content runat=server></{0}:Content>")]
    public class Content : WebControl, IEmbeddable
    {
        public Guid ContentID { get; set; }

        public EmbeddablePermissions Permissions
        {
            get
            {
                return (EmbeddablePermissions.AllowedInContent |
                        EmbeddablePermissions.AllowedInFooter |
                        EmbeddablePermissions.AllowedInHeader |
                        EmbeddablePermissions.AllowedInPrimaryNav |
EmbeddablePermissions.AllowedInSubNav);
}
}
public string EmbeddableName
{
get { return "Content"; }
}
public int EmbeddableID
{
get { return 1; }
}
protected override void Render(HtmlTextWriter writer)
{
StringBuilder sb = new StringBuilder();
sb.AppendLine("<div id="content">");
sb.AppendLine("[Page content here]");
sb.AppendLine("</div>");
writer.Write(sb.ToString());
}
}
}Tip
Why did we override Render() and not RenderContents()? Either is a valid option, but the Render() method won't wrap the output in any tags; typically, overriding RenderContents() triggers calls to RenderBeginTag() and RenderEndTag(), which in this case will cause the markup to be wrapped in <span> tags.
Note that the control must use the Export attribute to indicate to MEF that it uses IEmbeddable; it is this attribute that exposes the control to MEF. As discussed in Chapter 2, an embeddable in the CMS is expected to handle its own version control and data management via the ContentID GUID, which represents the specific version of the content to load.
There are a lot of benefits to opting for server controls as a way to provide this functionality. They're easily versioned, can be reused in the Visual Studio Toolbox, and are capable of being distributed for use in other applications. Also, developers of embeddables are responsible for the precise HTML output of the control. Figure 4-7 shows a page that uses the embeddable code in Listing 4-24.

The embeddables make their way to the page by being loaded into buckets, which themselves are loaded into a PlaceHolder control on the content.aspx page. Listing 4-25 shows the markup of this page.
Example 4-25. The Markup of content.aspx
<%@ Page Language="C#" AutoEventWireup="true" CodeFile="content.aspx.cs" Inherits="content" ClientIDMode="Static" %>
<!doctype html>
<html xmlns="http://www.w3.org/1999/xhtml">
<head id="Head1" runat="server">
<title>CMS Content Page</title>
<!-- client-side libraries -->
<script src="/js/jquery-1.3.2.min.js" type="text/javascript"></script>
</head>
<body>
<form id="form1" runat="server">
<div id="nav" runat="server" visible="false">
<p><a href="/admin/home.aspx">« Back to admin site</a></p>
</div>
<div id="page">
<asp:PlaceHolder ID="cmsControls" runat="server"></asp:PlaceHolder>
</div>
</form>
</body>
</html>Tip
The <div> with an ID of nav is used to display a link back to the admin side of the CMS for users who have logged in and are previewing pages.
The content.aspx page passes off the responsibility for managing embeddable controls to the business tier, as shown in Listing 4-26. The PageAssembler class handles the actual creation of a page, including which buckets exist and which embeddables live within them.
Example 4-26. Calling the Business Tier's PageAssembler Class to Get a Final Page
if (Request.QueryString["id"] != null)
{
   // it's important to set the form action - PostBacks fail if the URL differs from it
   Guid id = new Guid(Request.QueryString["id"]);
   form1.Action = HttpContext.Current.Request.RawUrl.ToString().ToLower();

   // The PageAssembler is where all the action and excitement lives
   PageAssembler pa = new PageAssembler(this);
   this.Page = pa.GetAssembledPage(id);
}
else
{
   return;
}
Note
You may have noticed that the content.aspx page is expecting a GUID; although the system relies on GUIDs to handle the retrieval of data and the creation of content versions, users will arrive via friendly URLs. We will discuss how to create a custom URL-mapping system in Chapter 9. For now, just note that although users will navigate the system using friendly, memorable URLs (such as /about-us/), the system will use GUIDs behind the scenes.
Listing 4-27 shows the MEF-relevant portions of the PageAssembler class in the business tier. It enforces the business rules, such as the singleton nature of buckets on a CMS page and the actual addition of embeddable controls to a bucket.
Example 4-27. The PageAssembler Class, Responsible for Creating CMS Pages
using CommonLibrary.Entities;
using CommonLibrary.Interfaces;
using Business;

namespace Business
{
    public class PageAssembler
    {
        private List<Control> _embeddables;
        private Page _page;
        private PlaceHolder _cmsControls;

        /// <summary>
        /// Loads the content for a page.
        /// </summary>
        /// <param name="id">the ID of the page</param>
        private void LoadContent(Guid id)
        {
            Business.Content business = new Business.Content();
            List<ContentRow> content = business.LoadContent(id);
            foreach (var c in content)
            {
                LoadBuckets(c.bucketControl, c.embeddableID);
            }
        }

        /// <summary>
        /// Loads the top-level buckets for a page
        /// </summary>
        /// <param name="bucketName">the name of the bucket control</param>
        /// <param name="embeddableID">the ID of the embeddable we need to load</param>
        private void LoadBuckets(string bucketName, int embeddableID)
        {
            var bucket = _page.LoadControl("~/core/buckets/" + bucketName);
            bucket.ID = bucketName.Replace(".ascx", "");

            if (_cmsControls.FindControl(bucket.ID) == null)
            {
               _cmsControls.Controls.Add(bucket);
            }

            if (embeddableID > 0)
            {
                LoadEmbeddables(bucketName, embeddableID);
            }
        }

        /// <summary>
        /// Loads the current embeddable(s) for a bucket.
        /// </summary>
        /// <param name="bucketName">the name of the bucket control</param>
        /// <param name="embeddableID">the ID of the embeddable we need to load</param>
        private void LoadEmbeddables(string bucketName, int embeddableID)
        {
            var parentBucket = _cmsControls.FindControl(bucketName.Replace(".ascx", ""));
            var embeddables = parentBucket.FindControl("embeddables");
            foreach (var e in _embeddables)
            {
                if (((IEmbeddable)e).EmbeddableID == embeddableID)
                {
embeddables.Controls.Add(e);
}
}
}
/// <summary>
/// Executes the embeddables for a particular page
/// </summary>
private void ExecuteEmbeddables()
{
var business = new Business.Plugins();
_embeddables = business.ExecuteEmbeddablePlugins(_page);
}
}
}From a development perspective, a page in the CMS is simply a collection of one or more user controls that contain one or more server controls within; Figure 4-8 illustrates this concept. The watch values for this breakpoint show that the LoadBuckets() method will add the content.ascx bucket to the page (if it doesn't already exist, then add an instance of an embeddable to it, in this case an embeddable with an ID of 4). This process repeats until a page is constructed.
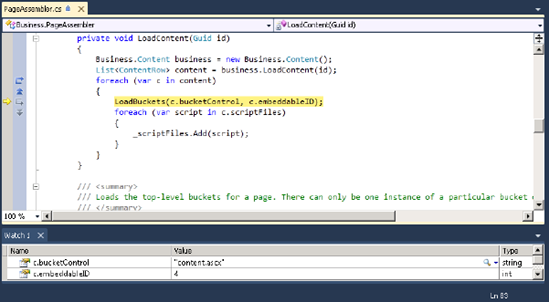
Figure 4-9 shows the data structure behind the scenes as multiple embeddables are loaded by MEF. The CMS passes the relevant information in (the GUID for the content being retrieved) and receives only the most relevant information in return (the ID of the embeddable, the name of it, and the permissions for where it is allowed to live on a page).
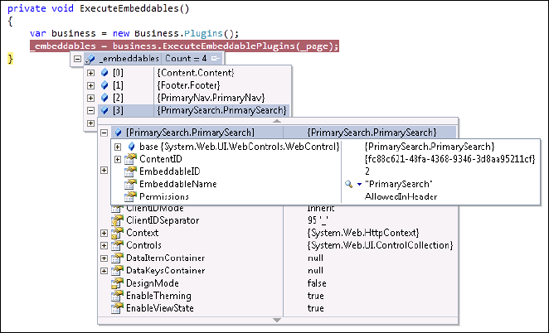
It's a straightforward architecture that emphasizes simplicity and clarity, as well as flexibility. Everything is transparent operationally, and the CMS strives to reduce the chattiness between components as much as possible, relying on a single GUID wherever possible.
It should be obvious at this point that the CMS has a significant amount of behavior provided solely by the strengths of MEF. Besides being a lightweight and easy method of creating complex system behaviors, MEF provides several other benefits, particularly in terms of how we can handle problem situations.
The nature of embeddables in the CMS is that they are fully 100 percent optional, from both a discovery and a usage perspective. That means that even if the database contains an entry for a page indicating that a particular embeddable should be added to the page, the complete lack of that library won't cause a problem during the loading and execution of a page. Plug-ins can be added and removed without triggering application pool recycles or disrupting the loading of pages on the client side.
For example, if we were to delete the embeddable server control we created earlier and load that page again, we would be presented with the markup shown in Listing 4-28. The <div> with an ID of page has been highlighted to indicate where the markup would normally have been added.
Example 4-28. A Page Will Still Load When an Embeddable Is Missing
<!doctype html>
<html xmlns="http://www.w3.org/1999/xhtml">
<head id="Head1" runat="server">
<title>CMS Content Page</title>
<!-- client-side libraries -->
<script src="/js/jquery-1.3.2.min.js" type="text/javascript"></script>
</head>
<body>
<form id="form1" runat="server">
<div id="nav" runat="server" visible="false">
<p><a href="/admin/home.aspx">« Back to admin site</a></p>
</div>
<div id="page">
</div>
</form>
</body>
</html>For example, if we were to delete the embeddable server control we created earlier and load that page again, we would be presented with the markup shown in Listing 4-28. The <div> with an ID of page has been highlighted to indicate where the markup would normally have been added.
MEF is also very forgiving regarding exceptions being thrown in plug-in libraries. Although we want to encourage proper exception handling behavior in developers building CMS controls, it's also desirable that a misbehaving control not bring down a particular page. In general, it would be better to simply display no content rather than an unhandled exception.
If we take the code from Listing 4-24 and modify it to include code that should throw an exception as in Listing 4-29, the page will still load without any notable problems for the client. The markup generated would be identical to Listing 4-28, where the <div> with an ID of page simply didn't have the embeddable's output in it.
Example 4-29. This Should Trigger an Exception When We Attempt to Divide by Zero
protected override void Render(HtmlTextWriter writer)
{
   int zero = 0;
   int test = 0 / zero;

   StringBuilder sb = new StringBuilder();
   sb.AppendLine("<div id="content">");
   sb.AppendLine("[Page content here]");
   sb.AppendLine("</div>");
writer.Write(sb.ToString()); }
Although the tree-based structure of CMS content is discussed in more detail in Chapter 6, it's sufficient at this point to note that pages are stored in a hierarchy; a CMS page may have a single, direct parent or no parent at all. This information is often very useful to display to a user, so one of the embeddables available with the sample code for this book is a Breadcrumb embeddable.
Breadcrumbs are the sets of links, typically located at the top of web pages, that denote the path back to the home page from your current location. Creating a breadcrumb embeddable will allow us to peek back upward into the CMS and create a real-world control.
Listing 4-30 shows the skeleton of a breadcrumb embeddable. At this point, it can be loaded onto a CMS page, although nothing will be displayed; based on its permissions, it is only valid in the Content bucket.
Example 4-30. The Skeleton of a CMS Breadcrumb Embeddable
using System;
using System.ComponentModel;
using System.ComponentModel.Composition;
using System.Text;
using System.Web.UI;
using System.Web.UI.WebControls;
using CommonLibrary.Interfaces;
using CommonLibrary.Permissions;

namespace Breadcrumbs
{
    [Export(typeof (IEmbeddable))]
    [DefaultProperty("Text")]
    [ToolboxData("<{0}:Breadcrumbs runat=server></{0}:Breadcrumbs>")]
    public class Breadcrumbs : WebControl, IEmbeddable
    {
        #region IEmbeddable Members

        public Guid ContentID { get; set; }

        public EmbeddablePermissions Permissions
        {
            get { return (EmbeddablePermissions.AllowedInContent); }
}
public string EmbeddableName
{
get { return "Breadcrumb Navigation"; }
}
public int EmbeddableID
{
get { return 7; }
}
#endregion
protected override void Render(HtmlTextWriter writer)
{
writer.Write();
}
}
}The CMS provides a number of features for exposing both a raw tree structure that contains page information, as well as mapping tools that convert this data into forms that .NET controls (such as the site tree) can use. Listing 4-31 shows the usage of these methods, where a tree is assembled and the basic structure of the breadcrumb HTML is created.
Example 4-31. Getting Access to the Site Tree and Beginning to Construct Links
private string GetLinks()
{
   var mapper = new Mapper();
   Tree tree = mapper.GetTree();
   Node parent = tree.FindPage(ContentID);

   var sb = new StringBuilder();
   sb.Append("<ul class="crumbs">");

   string output = String.Empty;
   GetPreviousParent(ref output, tree, parent, true)

   sb.Append(output);
   sb.Append("</ul>");
   return sb.ToString();
}
The GetPreviousParent method, shown in Listing 4-32, is called recursively to work backward from the current page to the parent, so long as the page has a GUID specified for its parent. The output string is passed by reference to maintain a pointer throughout the iterations, and each new page is inserted to the beginning of that string.
Example 4-32. Assembling Markup to be Delivered to the Client
private void GetPreviousParent(ref string output, Tree tree, Node node, bool isCurrentPage)
{
   var content = new StringBuilder();

   if (isCurrentPage)
   {
      content.Append("<li class="active">");
      content.Append(node.Title);
      content.Append("</li>");
   }
   else
   {
      content.Append("<li><a href="");
      content.Append(node.FriendlyUrl);
      content.Append("">);
      content.Append(node.Title);
      content.Append("</a></li>");
   }

   var innerLinks = new StringBuilder(output);
   innerLinks.Insert(0, content.ToString());
   output = innerLinks.ToString();

   if (node.ParentID.HasValue)
   {
      Node parent = tree.FindPage(node.ParentID.Value);
      GetPreviousParent(ref output, tree, parent, false);
   }
}
Note the conditional check for isCurrentPage, which is marked true only on the first iteration; the desired effect is that the current page is displayed as text rather than a link that can be clicked.
Once the Render method has been updated to call the GetLinks method, as shown in Listing 4-33, the embeddable will be fully functional.
Example 4-33. Listing 4-33.
protected override void Render(HtmlTextWriter writer)
{
   writer.Write(GetLinks());
}
Figure 4-10 shows the output of the Breadcrumb embeddable on a sample site with a small amount of CSS applied to spruce it up.
As you can see, the skeleton for an embeddable is lightweight and designed to stay out of the way; neither the CMS nor the embeddables need know much about one another, but more advanced features can be accessed via the CMS libraries directly if desired.
We began with a discussion of the Managed Extensibility Framework and the problems it was designed to solve. We examined how to create a simple plug-in for a console application and how to accommodate having multiple plug-ins in the same physical location. We expanded the discussion to the Dynamic Language Runtime and the new dynamic keyword in .NET 4. Next, we moved on to the actual creation of server controls that the CMS can use for the assembly of public-facing pages, and we discussed the PageAssembler class that manages that assembly. This code is the real core of the CMS; everything beyond this is layered onto this base functionality. We ended by creating a fully functional embeddable that displays breadcrumb navigation to the end user as they move through a site. As we advance into Chapter 5, we'll begin working with jQuery and look at ways to easily enhance the user experience of the CMS.