
![]()
In this chapter, I describe the two services that the ASP.NET platform provides for creating stateful data: application state and session state. These features are easy to use, but they require forethought and caution to avoid serious performance penalties. I explain how each feature works and how to sidestep the pitfalls. Table 10-1 summarizes this chapter.
Table 10-1. Chapter Summary
For this chapter, I created a new project called StateData, following the same pattern that I have been using in earlier chapters. I used the Visual Studio ASP.NET Web Application template, selected the Empty option, and added the core MVC references. I’ll be using Bootstrap again in this chapter, so enter the following command into the Package Manager Console:
Install-Package -version 3.0.3 bootstrapListing 10-1 shows the contents of the HomeController.cs file, which I used to define the default controller for the project in the Controllers folder.
Listing 10-1. The Contents of the HomeController.cs File
using System;
using System.Collections.Generic;
using System.Web.Configuration;
using System.Web.Mvc;

namespace StateData.Controllers {

    public class HomeController : Controller {

        public ActionResult Index() {
            Dictionary<string, object> data = new Dictionary<string, object>();
            data.Add("Placeholder Property", "Placeholder Value");
            return View(data);
        }
    }
}
The view model data in the Index action method is a dictionary collection that allows me to pass arbitrary key-value pairs to the view. I created the view by right-clicking the action method in the code editor and selecting Add View from the pop-up menu. I called the view Index.cshtml, selected the Empty (without model) template, and unchecked all of the View Option boxes. You can see the content I defined in the view in Listing 10-2.
Listing 10-2. The Contents of the Index.cshtml File
@model Dictionary<string, object>
@{ Layout = null; }
<!DOCTYPE html>
<html>
<head>
    <meta name="viewport" content="width=device-width" />
    <link href="∼/Content/bootstrap.min.css" rel="stylesheet" />
    <link href="∼/Content/bootstrap-theme.min.css" rel="stylesheet" />
    <style>
        body { padding-top: 10px; }
    </style>
    <title>State Data</title>
</head>
<body class="container">
    <div class="panel panel-primary">
        <div class="panel-heading">Data</div>
        <table class="table table-striped">
            <thead>
                <tr><th>Property</th><th>Value</th></tr>
            </thead>
            <tbody>
                @foreach (string key in Model.Keys) {
                    <tr><td>@key</td><td>@Model[key]</td></tr>
                }
            </tbody>
        </table>
    </div>
</body>
</html>
The layout generates a table that displays the contents of the collection, as shown in Figure 10-1.
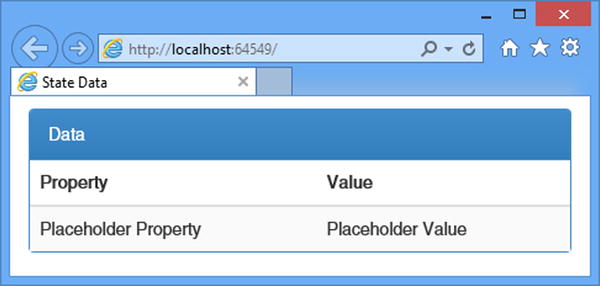
Figure 10-1. Testing the example application
Application state data is common to all components in the application and is shared between all requests. The main purpose of application state is to store data or objects that you need frequently and that are too resource-expensive or time-consuming to create for every use. Application state can improve the performance of an application, but it is easy to create the opposite effect and slow everything down instead. In this section, I’ll demonstrate how application state data is created and used, point out the pitfalls, and show you how to avoid them. Table 10-2 puts application state into context.
Table 10-2. Putting the Appliction State in Context
Question |
Answer |
|---|---|
What is it? |
Application state data allows small amounts of data to be shared throughout an application and is available to every component. |
Why should I care? |
Application state is a convenient way of ensuring that data values are used consistently throughout an application, albeit it works well when the data that is stored has some specific characteristics. |
How is it used by the MVC framework? |
This feature is not used directly by the MVC framework, but it is available for use in application components, including modules, controllers, and views. |
Using Application State
Application state is implemented by the HttpApplicationState class, which is defined in the System.Web namespace. An instance of the HttpApplicationState class is available through the HttpContext.Application property. The HttpApplicationState class defines the properties and methods shown in Table 10-3.
Table 10-3. The Members Defined by the HttpApplicationState Class
Name |
Description |
|---|---|
Add(key, value) |
Adds a value to the state data collection with the specified key |
AllKeys |
Returns the collection keys as a string array |
Clear() |
Removes all the application state data |
Count |
Returns the number of state data items |
Lock() |
Acquires exclusive access to the application state data |
Item[index] |
Returns the item at the specified index |
Item[key] |
Returns the item with the specified key |
Remove(key) |
Removes the value with the specified key |
RemoveAt(index) |
Removes the value at the specified index |
UnLock() |
Releases exclusive access to the application state data |
The HttpApplicationState class is a collection of key-value pairs stored in memory and shared across the application. The collection can be modified when the application is running, and the methods that it defines are thread-safe to prevent multiple updates from colliding when requests are being processed concurrently.
It can be hard to find good uses for application state data because of the way the HttpApplicationState class is implemented. The sweet spot is data that is resource-intensive or time-consuming to create, but also the data has to be the following:
- Can be re-created if the application is started (because the data is not persistent)
- Has a relatively small number of data items, all of which are equally important
- Is common for all users or requests
- Needs to be modified during the life of the application
If the data doesn’t have all those characteristics, then there are better alternatives available than application state, such as session state (see the “Sessions and Session State Data” section), a data cache (see Chapter 11), or just a set of static variables. I’ll show you an example of how the application state data feature is commonly used and then explain why it isn’t always ideal.
WHY COVER APPLICATION STATE AT ALL?
You might be wondering why I have included application state at all, given its limitations. There are several reasons. First, even though I don’t often come across data that fits every characteristic that suits application state, your application may be chock-full of it and the HttpApplicationState class may suit your needs perfectly. One of the most interesting aspects of talking with readers of my books is just how diverse web applications can be.
Second, I am describing the sweet spot for which application state is ideal, but you may be willing to compromise and exchange a little performance for a lot of convenience. The main advantage of the application state feature is that it is simple and easy to use, and that is not to be underestimated, especially when you compare application state to the data caching feature I describe in Chapter 11.
Third, I find application state data useful when I am debugging problems in a web application. Tools such as request tracing and Glimpse (see Chapter 8) are great for figuring out what has gone wrong in an application, but application state is helpful for quickly digging into the detail and prototyping a solution. I use it to short-circuit the separation of concerns in an application just to get a working solution before refactoring controllers and views to put a permanent fix in place. Like every web application developer, I spend a substantial amount of time tracking down and fixing bugs, and I will use any tool that helps me, however imperfect it is.
So, the application state data feature can be useful, even though it is flawed. You should understand its limitations but also be aware of where it is helpful and when it represents a reasonable compromise between performance and convenience.
I don’t like to work directly with the HttpApplicationState class in controllers and views. Instead, I prefer to create a helper class that acts as an intermediary. I’ll explain the reasons for this shortly, but to get started I created an Infrastructure folder in the example project and added to it a class file called AppStateHelper.cs, the contents of which are shown in Listing 10-3.
Listing 10-3. The Contents of the AppStateHelper.cs File
using System;
using System.Web;

namespace StateData.Infrastructure {

    public enum AppStateKeys {
        COUNTER
    };

    public static class AppStateHelper {

        public static object Get(AppStateKeys key, object defaultValue = null) {
            string keyString = Enum.GetName(typeof(AppStateKeys), key);
            if (HttpContext.Current.Application[keyString] == null
                    && defaultValue != null) {
                HttpContext.Current.Application[keyString] = defaultValue;
            }
            return HttpContext.Current.Application[keyString];
        }

        public static object Set(AppStateKeys key, object value) {
            return HttpContext.Current.Application[Enum.GetName(typeof(AppStateKeys),
                key)] = value;
        }
    }
}
The code in this class looks a little gnarly, and that’s one of the reasons why I like to create a helper class. The data stored by the HttpApplicationState class can be modified while the application is running, and that means care must be taken to check that data values actually exist and have not been deleted by another request. For this reason, I have defined the Get method, which accepts a default value that will be used to set the state data when no value is found for the specified key, like this:
...
if (HttpContext.Current.Application[keyString] == null && defaultValue != null) {
    HttpContext.Current.Application[keyString] = defaultValue;
}
...
The argument used for the default value is optional, but its use means I don’t have to check for null values wherever I use application state. Notice that the Get and Set methods accept values from the AppStateKeys enumeration as keys, rather than strings. The nature of application-wide state data means that its use is diffused across multiple components, which presents opportunities for bugs caused by mistyping the key name and maintenance problems when you need to locate and change the name of a key. To prevent this from happening, I use an enumeration to constrain and centralize the keys and use the static methods of the Enum class to convert from enumeration values to names, like this:
...
string keyString =Enum.GetName(typeof(AppStateKeys), key);
...
The final reason that I like to use a helper class is that it makes changes easier because all of the references to the HttpApplicationState class are contained in one place.
The key that I defined in the AppStateKeys enumeration is called COUNTER, and you can see how I have used it in Listing 10-4, which shows changes I made to the Home controller.
Listing 10-4. Using Application State Data in the HomeController.cs File
using System;
using System.Collections.Generic;
using System.Web.Configuration;
using System.Web.Mvc;
using StateData.Infrastructure;

namespace StateData.Controllers {

    public class HomeController : Controller {

        public ActionResult Index() {
            Dictionary<string, object> data = new Dictionary<string, object>();
            data.Add("Counter", AppStateHelper.Get(AppStateKeys.COUNTER, 0));
            return View(data);
        }

        public ActionResult Increment() {
            int currentValue = (int)AppStateHelper.Get(AppStateKeys.COUNTER, 0);
            AppStateHelper.Set(AppStateKeys.COUNTER, currentValue + 1);
            return RedirectToAction("Index");
        }
    }
}
I have changed the Index action method so that it obtains the COUNTER state variable using the helper class and adds it to the collection that is rendered by the view. I have added a new action method, called Increment, which gets the value of the COUNTER variable and increments it. Once the state data value has been incremented, the client is redirected to the Index action, which will display the new value. To test the changes, start the application and request the /Home/Index URL followed by /Home/Increment, as shown in Figure 10-2.
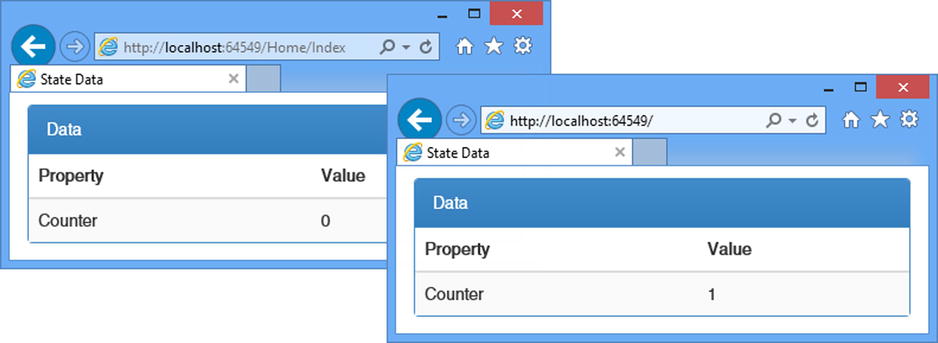
Figure 10-2. Working with application state data
Understanding the Synchronization Effect
This isn’t the most compelling example, but it demonstrates an important aspect (and pitfall) of working with application state data. ASP.NET processes requests concurrently, and to ensure that one request isn’t trying to read data that another is trying to simultaneously modify, the methods and properties of the HttpApplicationState class are synchronized.
The kind of synchronization used in the HttpApplicationState class means that when multiple requests are reading application state data, they can all access that data simultaneously, as shown in Figure 10-3.
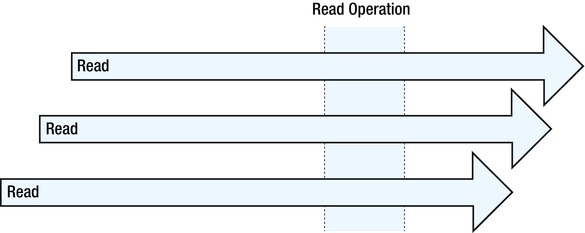
Figure 10-3. Multiple requests reading application state data
All of the requests can read the data without delay, aside from the small overhead required to make sure that only readers are accessing the HttpApplicationState class. However, when a request wants to modify the state data, it has to wait until all the current read operations have completed and gain exclusive access to the HttpApplicationState collection while it makes changes. While the modifications are being performed, no other request can access the state data at all; other requests have to wait until the modifications have been completed, as illustrated by Figure 10-4.
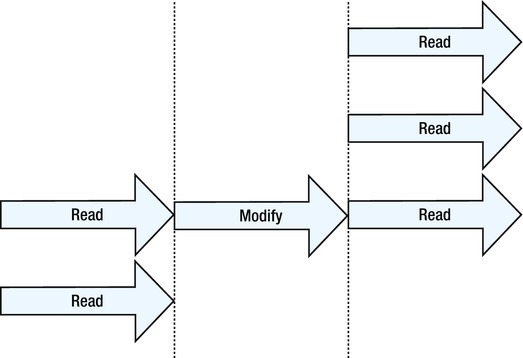
Figure 10-4. The effect of a request modifying application state data
A queue of requests forms each time that one of them wants to modify the data. At the head of the queue is the request that wants to make the modification, waiting for the current readers to complete the work. Following those are all of the other requests that want to access the state data, which have to wait until the modification is complete before they can proceed.
The queuing effect wouldn’t be quite so bad if it applied to individual state data items, but it applies to the entire HttpApplicationState object, so a modification for any state data value causes a queue to form, even if the other requests want to access a different data item.
The impact of the synchronization on performance depends on the number of concurrent requests that the application processes, the ratio of reads to modifications, and the complexity of the operations being performed. For applications with simple state data items, a low volume of requests, and occasional modifications, the performance impact will be negligible. For an application at the other end of the spectrum, the impact is striking, and the application will essentially lock up for each modification. Most applications will fall somewhere between these extremes, and you will have to decide whether the convenience of being able to share data between components through the HttpApplicationState class is worth the performance penalty.
Performing Related Operations
A side effect of the way that the application state data collection is synchronized is that caution must be taken if you need to read or write multiple related values. The problem is that each read or modification operation is synchronized independently and the request goes to the back of the synchronization queue between operations, allowing another request to make a change and create an inconsistency in the data.
The Lock method defined by the HttpApplicationState class provides exclusive access to the state data collection until the UnLock method is called. To be sure that the state data is read or modified consistently, you must use the Lock method whenever multiple related operations are performed and remember to call the UnLock method when they are complete. In Listing 10-5, you can see how I have updated the AppStateHelper class so that there are two related state data variables and that I used the Lock and UnLock methods to ensure that they are read and modified together.
Listing 10-5. Gaining Exclusive Access to the Application State Data in the AppStateHelper.cs File
using System;
using System.Web;
using System.Collections.Generic;

namespace StateData.Infrastructure {

    public enum AppStateKeys {
        COUNTER,
        LAST_REQUEST_TIME,
        LAST_REQUEST_URL
    };

    public static class AppStateHelper {

        public static object Get(AppStateKeys key, object defaultValue = null) {
            string keyString = Enum.GetName(typeof(AppStateKeys), key);
            if (HttpContext.Current.Application[keyString] == null
                    && defaultValue != null) {
                HttpContext.Current.Application[keyString] = defaultValue;
            }
            return HttpContext.Current.Application[keyString];
        }

        public static object Set(AppStateKeys key, object value) {
            return HttpContext.Current.Application[Enum.GetName(typeof(AppStateKeys),
                key)] = value;
        }

        public static IDictionary<AppStateKeys, object>
            GetMultiple(params AppStateKeys[] keys) {

            Dictionary<AppStateKeys, object> results
                = new Dictionary<AppStateKeys, object>();
            HttpApplicationState appState = HttpContext.Current.Application;
            appState.Lock();
            foreach (AppStateKeys key in keys) {
                string keyString = Enum.GetName(typeof(AppStateKeys), key);
                results.Add(key, appState[keyString]);
            }
            appState.UnLock();
            return results;
        }

        public static void SetMultiple(IDictionary<AppStateKeys, object> data) {
            HttpApplicationState appState = HttpContext.Current.Application;
            appState.Lock();
            foreach (AppStateKeys key in data.Keys) {
                string keyString = Enum.GetName(typeof(AppStateKeys), key);
                appState[keyString] = data[key];
            }
            appState.UnLock();
        }
    }
}
I have added GetMultiple and SetMultiple methods to the helper class, and these methods operate on arbitrary numbers of application state data values, all of which are read or modified following a call to the Lock method, ensuring that no other request can read or modify the data until the UnLock method is called. In Listing 10-6, you can see how I have updated the Home controller to use the new helper methods.
Listing 10-6. Performing Related Operations in the HomeController.cs File
using System;
using System.Collections.Generic;
using System.Web.Configuration;
using System.Web.Mvc;
using StateData.Infrastructure;

namespace StateData.Controllers {

    public class HomeController : Controller {

        public ActionResult Index() {
            Dictionary<string, object> data = new Dictionary<string, object>();
            data.Add("Counter", AppStateHelper.Get(AppStateKeys.COUNTER, 0));
            IDictionary<AppStateKeys, object> stateData
                = AppStateHelper.GetMultiple(AppStateKeys.LAST_REQUEST_TIME,
                    AppStateKeys.LAST_REQUEST_URL);
            foreach (AppStateKeys key in stateData.Keys) {
                data.Add(Enum.GetName(typeof(AppStateKeys), key), stateData[key]);
            }
            return View(data);
        }

        public ActionResult Increment() {
            int currentValue = (int)AppStateHelper.Get(AppStateKeys.COUNTER, 0);
            AppStateHelper.Set(AppStateKeys.COUNTER, currentValue + 1);
            AppStateHelper.SetMultiple(new Dictionary<AppStateKeys, object> {
                { AppStateKeys.LAST_REQUEST_TIME, HttpContext.Timestamp},
                { AppStateKeys.LAST_REQUEST_URL, Request.RawUrl}
            });
            return RedirectToAction("Index");
        }
    }
}
To see the effect, start the application and request the /Home/Increment method, which will generate the output shown in Figure 10-5.
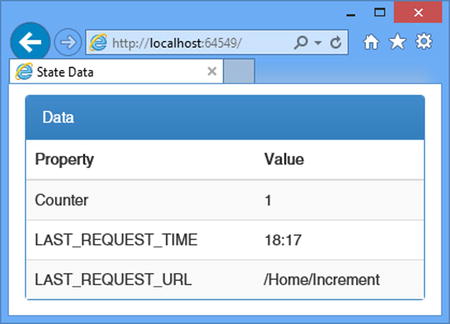
Figure 10-5. Reading and modifying multiple state data properties in a single operation
Using the Lock and UnLock methods ensures that the state data is always consistent, but it does so by forcing each operation that uses them to execute in strict sequence. Each time that the Lock method is called, all of the other requests that use application state data will form a queue and wait until the UnLock method is called, in effect preventing requests from using the application state data concurrently.
WHAT ABOUT VIEW STATE?
You may encounter references to view state and wonder what it is. View state is a feature of Web Forms and tries to provide the stateful development experience that is common with desktop application work. View state isn’t used in the MVC framework.
View state is part of the way that Web Forms abstracts away the details of HTTP and web browsers and works by including hidden form data that describes the state of the user interface presented via HTML, essentially allowing HTML elements to be represented by server-side components. The careless use of view state can result in large amounts of data being sent between the server and the browser and is one of the reasons that Web Forms has gained such a mixed reputation as a web application development platform. The MVC framework is designed to work in concert with HTTP requests and doesn’t need a feature like view state.
Sessions and Session State Data
HTTP is a stateless protocol, but it is often important to be able to identify related requests in order to deliver continuity in a web application. To this end, the ASP.NET platform supports sessions, which allow requests from the same browser to be identified, and session state, which allows data to be stored for one request in a session and retrieved when subsequent requests are being processed.
In this section, I’ll explain how sessions work and how to associate state data with a session. Along the way, I’ll point out a performance issue similar to the one that I described for application state data in the previous section and explain and demonstrate different ways for storing state data. Table 10-4 puts sessions and session state data into context.
Table 10-4. Putting Sessions and Session State Data in Context
Question |
Answer |
|---|---|
What is it? |
Sessions identify requests made by the same client and allow the storage of data in one request to be associated with subsequent requests. |
Why should I care? |
Almost all applications require some degree of statefulness between requests to compensate for the stateless nature of HTTP requests. |
How is it used by the MVC framework? |
This feature is not used directly by the MVC framework, but it is available for use in application components, including modules, controllers, and views. |
Working with Session Data
Session data stores data and makes it available across multiple requests from the same browser. To demonstrate the use of session data, I have added a class file called RegistrationController.cs to the Controllers folder and used it to define the controller shown in Listing 10-7.
Listing 10-7. The Contents of the RegistrationController.cs File
using System.Web.Mvc;

namespace StateData.Controllers {
    public class RegistrationController : Controller {

        public ActionResult Index() {
            return View();
        }

        [HttpPost]
        public ActionResult ProcessFirstForm(string name) {
            System.Diagnostics.Debug.WriteLine("Name: {0}", (object)name);
            return View("SecondForm");
        }

        [HttpPost]
        public ActionResult CompleteForm(string country) {
            System.Diagnostics.Debug.WriteLine("Country: {0}", (object)country);
            // in a real application, this is where the call to create the
            // new user account would be
            ViewBag.Name = "<Unknown>";
            ViewBag.Country = country;
            return View();
        }
    }
}
This controller simulates a user registration process that spans two forms and a summary page. To keep the example simple, I collect only one item of data in each form and then display both data items in a summary view. To complete the example, I added three views to the Views/Registration folder. Listing 10-8 shows the markup for the first view, called Index.cshtml, returned by the Index action method and representing the start of the registration process.
Listing 10-8. The Contents of the Index.cshtml File in the Views/Registration Folder
@{ Layout = null; }
<!DOCTYPE html>
<html>
<head>
    <meta name="viewport" content="width=device-width" />
    <title>First Form</title>
    <link href="∼/Content/bootstrap.min.css" rel="stylesheet" />
    <link href="∼/Content/bootstrap-theme.min.css" rel="stylesheet" />
    <style>body { padding-top: 10px; }</style>
</head>
<body class="container">
    @using (Html.BeginForm("ProcessFirstForm", "Registration")) {
        <div class="form-group">
            <label for="name">Name</label>
            <input class="form-control" name="name" placeholder="Enter name">
        </div>
        <button class="btn btn-primary" type="submit">Submit</button>
    }
</body>
</html>
This is a simple form, styled with Bootstrap, which uses an input element to capture the user’s name and post the result to the ProcessFirstForm action method in the Registration controller. The ProcessFirstForm action uses model binding to extract the name from the request and returns the content shown in Listing 10-9, which shows the SecondForm.cshtml file.
Listing 10-9. The Content of the SecondForm.cshtml File
@{ Layout = null; }
<!DOCTYPE html>
<html>
<head>
    <meta name="viewport" content="width=device-width" />
    <title>Second Form</title>
    <link href="∼/Content/bootstrap.min.css" rel="stylesheet" />
    <link href="∼/Content/bootstrap-theme.min.css" rel="stylesheet" />
    <style>body { padding-top: 10px; }</style>
</head>
<body class="container">
    @using (Html.BeginForm("CompleteForm", "Registration")) {
        <div class="form-group">
            <label for="country">Country</label>
            <input class="form-control" name="country" placeholder="Enter country">
        </div>
        <button class="btn btn-primary" type="submit">Submit</button>
    }
</body>
</html>
This form is similar to the first, except that it captures the user’s country and posts the data to the CompleteForm action in the Registration controller. The CompleteForm action uses model binding to receive the country and renders the CompleteForm.cshtml view in response, which is shown in Listing 10-10.
Listing 10-10. The Contents of the CompleteForm.cshtml File
@{ Layout = null; }
<!DOCTYPE html>
<html>
<head>
    <meta name="viewport" content="width=device-width" />
    <title>Finished</title>
    <link href="∼/Content/bootstrap.min.css" rel="stylesheet" />
    <link href="∼/Content/bootstrap-theme.min.css" rel="stylesheet" />
    <style>body { padding-top: 10px; }</style>
</head>
<body class="container">
    <div class="panel panel-default">
        <div class="panel-heading">Registration Details</div>
        <table class="table table-striped">
            <tr><th>Name</th><td>@ViewBag.Name</td></tr>
            <tr><th>Country</th><td>@ViewBag.Country</td></tr>
        </table>
    </div>
</body>
</html>
This view contains a table that displays the name and country provided by the user. Start the application and request the /Registration URL to test the application. Enter your name and click the Submit button. Enter your country and click the Submit button. The browser will display the summary table, which will be similar to the one shown in Figure 10-6.
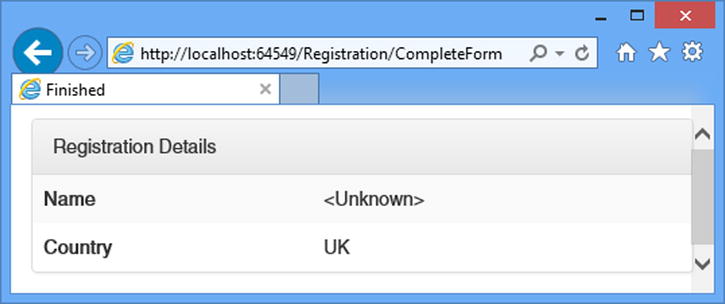
Figure 10-6. Displaying a summary of the registration data
Using Session State Data
HTTP requests are stateless, which is a problem when you need to create application functionality that spans multiple requests. In my example application, this problem can be seen in Figure 10-6, where there the value provided for the Name property isn’t the value entered by the user. This is because the name was sent to the server in an earlier request and isn’t included in the request through which the server receives the user’s country. The session state feature will allow me to store the user’s name in one request and then retrieve it in a subsequent request.
Session state data is accessed through the HttpContext.Session property, which returns an instance of the System.Web.SessionState.HttpSessionState class. This class is responsible for managing the session state data and the session itself. I return to session management later in this chapter, but Table 10-5 describes the members of the HttpSessionState class that support session state data. Within controllers and views, you can use the Session convenience property, without needing to go through the HttpContext object (although this is what is done for you behind the scenes).
Table 10-5. The HttpSessionState Members That Manage Session State Data
Name |
Description |
|---|---|
Count |
Returns the number of session state data items. |
IsReadyOnly |
Returns true if the session state data cannot be modified. See the later “Understanding the Synchronization Effect” section. |
IsSynchronized |
Returns true if the session state data is synchronized. |
Item[index] |
Returns the state data item at the specified index. |
Item[key] |
Returns the state data item with the specified key. |
Clear() |
Removes all of the state data items. |
Remove(key) |
Removes the state data item with the specified key. |
Remove(index) |
Removes the state data item at the specified index. |
![]() Tip If you use the Session convenience property within a controller, you receive an HttpContextBase object, as I explained in Chapter 3. This object has all the same methods and properties as HttpSessionState but can be more readily used in unit testing.
Tip If you use the Session convenience property within a controller, you receive an HttpContextBase object, as I explained in Chapter 3. This object has all the same methods and properties as HttpSessionState but can be more readily used in unit testing.
Just as with application state, I prefer to use a helper class to act as an intermediary between the application and the HttpSessionState instance associated with the request. This allows me to express keys using enumeration values so as to avoid typos and make maintenance easier by keeping all of the session state code consolidated in one place. Listing 10-11 shows the addition of the SessionStateHelper.cs class file that I added to the Infrastructure folder of the example project.
Listing 10-11. The Contents of the SessionStateHelper.cs File
using System;
using System.Web;

namespace StateData.Infrastructure {

    public enum SessionStateKeys {
        NAME
    }

    public static class SessionStateHelper {

        public static object Get(SessionStateKeys key) {
            string keyString = Enum.GetName(typeof(SessionStateKeys), key);
            return HttpContext.Current.Session[keyString];
        }

        public static object Set(SessionStateKeys key, object value) {
            string keyString = Enum.GetName(typeof(SessionStateKeys), key);
            return HttpContext.Current.Session[keyString] = value;
        }
    }
}
The SessionStateHelper class follows the same basic approach that I used for the application state equivalent but is a little simpler because I make no effort to check to see whether values exist or set default values because session state data tends to be set as a result of user interactions and, as a consequence, default values are less useful. Listing 10-12 shows how I have applied session state data in the Registration controller through the helper class.
Listing 10-12. Using Session State Data in the RegistrationController.cs File
using System.Web.Mvc;
using StateData.Infrastructure;

namespace StateData.Controllers {
    public class RegistrationController : Controller {

        public ActionResult Index() {
            return View();
        }

        [HttpPost]
        public ActionResult ProcessFirstForm(string name) {
            SessionStateHelper.Set(SessionStateKeys.NAME, name);
            return View("SecondForm");
        }

        [HttpPost]
        public ActionResult CompleteForm(string country) {
            ViewBag.Name = SessionStateHelper.Get(SessionStateKeys.NAME);
            ViewBag.Country = country;
            return View();
        }
    }
}
When the user submits their name, the ProcessFirstForm action method stores the value as session state data, which is then retrieved by the CompleteForm action method when the user subsequently submits their country in the next request. This allows both form values to be used together, even though they were received by the server in two separate HTTP requests, as shown in Figure 10-7.
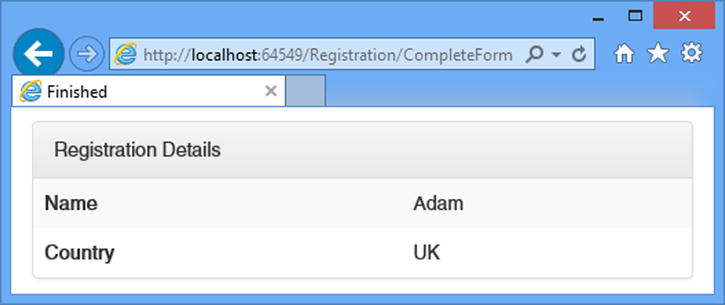
Figure 10-7. Using session state data
Understanding How Sessions Work
As the previous example demonstrated, using session state data is simple, but there is a lot of work that goes on behind the scenes, and understanding it is essential to creating an application that works and performs the way you want. The entry point into the sessions feature is a module called SessionStateModule, which handles the AcquireRequestState request life-cycle event and is responsible for associating session state data with the request.
The SessionStateModule looks for a session identifier in each request that is received by ASP.NET. The identifier is usually a cookie (although this can be changed, as I explain in the “Tracking Sessions Without Cookies” section), and it is used to load the state data into an HttpSessionState object that is attached to the HttpContext object associated with the request. This process, which is repeated for every request, allows session state to be used across requests from the same browser.
![]() Tip You can receive notifications when sessions are created and destroyed by handling the events defined by the SessionStateModule. See Chapter 4 for details.
Tip You can receive notifications when sessions are created and destroyed by handling the events defined by the SessionStateModule. See Chapter 4 for details.
The HttpSessionState class defines methods and properties that describe and manage the session associated with a request, as described in Table 10-6. These are in addition to the state data members that I described in Table 10-5.
Table 10-6. The HttpSessionState Members That Manage Sessions
Name |
Description |
|---|---|
Abandon() |
Terminates the current session. |
CookieMode |
Returns a value from the HttpCookieMode enumeration that describes how sessions are identified. This corresponds to the value of the mode setting in the sessionState configuration section; see the “Tracking Sessions Without Cookies” section. |
IsCookieless |
Returns true if identification is performed without cookies for this request; see the “Tracking Sessions Without Cookies” section. |
IsNewSession |
Returns true if the session has been created during the current request. |
Mode |
Returns a value from the SessionStateMode enumeration, which describes how session state data is stored; see the “Storing Session Data” section. |
SessionID |
Returns the identifier for the current session. |
Timeout |
Returns the number of minutes that are allowed between requests before a session times out. The default is 20. |
![]() Tip The session state data is stored at the server, and only the session identifier is sent to the browser.
Tip The session state data is stored at the server, and only the session identifier is sent to the browser.
The life of a session starts when a request arrives that doesn’t contain a session cookie. The HttpSessionState.IsNewSession property is set to true, and a new session identifier is created and assigned to the HttpSessionState.SessionID property.
What happens next depends on whether the controller stores any session state data. If the controller does store state data, then ASP.NET adds a session cookie to the response so that the client will submit it with subsequent requests. The session and its state data remain active as long as the browser continues to make requests within the limit defined by the Timeout variable or until the Abandon method is called.
The ASP.NET platform does not add the session cookie to the response if no state data has been stored. This means that any subsequent requests from the browser won’t have a session cookie and the process begins again. To demonstrate the life cycle of a session, I added a class file called LifecycleController.cs to the Controllers folder and used it to define the controller shown in Listing 10-13.
Listing 10-13. The Contents of the LifecycleController.cs File
using System.Web;
using System.Web.Mvc;
using StateData.Infrastructure;

namespace StateData.Controllers {
    public class LifecycleController : Controller {

        public ActionResult Index() {
            return View();
        }

        [HttpPost]
        public ActionResult Index(bool store = false, bool abandon = false) {
            if (store) {
                SessionStateHelper.Set(SessionStateKeys.NAME, "Adam");
            }
            if (abandon) {
                Session.Abandon();
            }
            return RedirectToAction("Index");
        }
    }
}
This controller contains two versions of an action called Index, one of which just renders the default view and the other that receives POST requests and manipulates the session or session state based on form values in the request. I created the /Views/Lifecycle/Index.cshtml view to display information about the session, which you can see in Listing 10-14.
Listing 10-14. The Contents of the Index.cshtml File in the /Views/Lifecycle Folder
@{ Layout = null; }

<!DOCTYPE html>
<html>
<head>
    <meta name="viewport" content="width=device-width" />
    <title>Session Lifecycle</title>
    <link href="∼/Content/bootstrap.min.css" rel="stylesheet" />
    <link href="∼/Content/bootstrap-theme.min.css" rel="stylesheet" />
    <style> body { padding-top: 10px; } </style>
</head>
<body class="container">
    <div class="panel panel-primary">
        <div class="panel-heading">Session</div>
        <table class="table">
            <tr><th>Session ID</th><td>@Session.SessionID</td></tr>
            <tr><th>Is New?</th><td>@Session.IsNewSession</td></tr>
            <tr><th>State Data Count</th><td>@Session.Count</td></tr>
        </table>
    </div>
    @using(Html.BeginForm()) {
        <div class="checkbox">
            <label>
            @Html.CheckBox("store") Store State Data</label>
        </div>
        <div class="checkbox">
            <label>
            @Html.CheckBox("abandon") Abandon Session</label>
        </div>
        <button class="btn btn-primary" type="submit">Submit</button>
    }
</body>
</html>
The view contains a table that provides some basic information about the session and its state data, as well as a form that drives the arguments to the POST version of the Index action method from Listing 10-13. To see the view rendered, start the application and navigate to the /Lifecycle/Index URL, as shown in Figure 10-8.
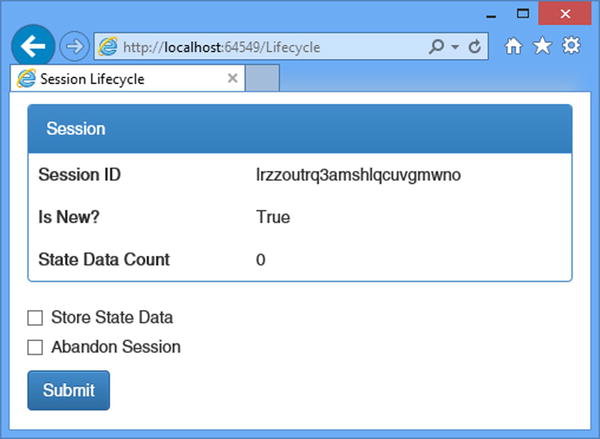
Figure 10-8. Querying and manipulating sessions
When you first start the application, your browser will send its request to the server without a session cookie. The ASP.NET platform will respond by generating a session ID, which you can see in the output from the view, but it won’t add the cookie to the response. The IsNew property is true, and a new session ID will be generated each time you reload or submit the page (because ASP.NET isn’t adding the cookie to the response, the browser doesn’t send any session information back for subsequent requests and the process begins afresh).
Now check the Store State Data box and click the Submit button. When the controller receives this request, it will set a state data item, as follows:
...
SessionStateHelper.Set(SessionStateKeys.NAME, "Adam");
...
The ASP.NET platform responds by adding a session cookie to the response so that subsequent requests from the browser will be associated with the saved state data. If you reload or resubmit the browser now, you will see that the session ID remains fixed and that the IsNew property is false.
![]() Caution Browsers that offer tabbed windows generally share cookies between those tabs. That means requests to the ASP.NET server from different tabs in the same browser window will be associated with the same session.
Caution Browsers that offer tabbed windows generally share cookies between those tabs. That means requests to the ASP.NET server from different tabs in the same browser window will be associated with the same session.
Now check the Abandon Session box and submit the form. When the controller receives this request, it will forcefully terminate the session, as follows:
...
Session.Abandon();
...
This marks the session as expired and releases the state data that has been associated with it.
![]() Tip The state data itself may not be deleted immediately, depending on how it has been stored, but it will no longer be associated with subsequent requests from the browser. See the “Storing Session Data” section for details of storage options.
Tip The state data itself may not be deleted immediately, depending on how it has been stored, but it will no longer be associated with subsequent requests from the browser. See the “Storing Session Data” section for details of storage options.
When you reload or submit the browser now, you will see something slightly different. The number of state data items is zero, but the session ID won’t change for each request, and the IsNew property is shown as true for the first request and then false thereafter. This happens because the session cookie isn’t deleted when the session is abandoned. The browser is still sending a session cookie to the server with each request, and the ASP.NET platform responds by reusing it, rather than generating a new one.
![]() Tip You have to restart the application to return to the point where a new session ID is generated for each request. This clears all the in-memory sessions and session data. In the “Storing Session Data” section I explain how to persistently store the session data.
Tip You have to restart the application to return to the point where a new session ID is generated for each request. This clears all the in-memory sessions and session data. In the “Storing Session Data” section I explain how to persistently store the session data.
Understanding the Synchronization Effect
ASP.NET processes multiple requests concurrently, and modern browsers can make multiple requests concurrently. That means it is possible that two requests from the same browser may try to modify the state data simultaneously, presenting the risk of data corruption or inconsistent.
To mitigate this risk, the ASP.NET platform does something that sounds sensible but actually causes lots of problems and even more confusion: It forces requests that are part of the same session to execute sequentially. Each new request is executed only if there are no other requests that are part of the same session currently being processed.
Queuing concurrent requests for the same session made more sense when the feature was implemented because it was a rare situation and protecting the integrity of the session state data was seen as being important. These days, however, browsers obtain content and data via Ajax, and, as you might expect, the browsers include the session cookie as part of these requests, causing Ajax operations to be queued up and processed sequentially, even when ASP.NET is perfectly capable of processing them concurrently. Worse, the queuing is applied even when a request doesn’t access the session state data; all it takes is that the request contains the session cookie, and the ASP.NET platform will begin queuing requests.
![]() Note To be clear, only requests that are part of the same session are queued. Requests for different sessions are processed concurrently as are those that are not associated with a session. The problem I describe here arises only if you make multiple concurrent requests from the same browser, something that generally happens when working with Ajax.
Note To be clear, only requests that are part of the same session are queued. Requests for different sessions are processed concurrently as are those that are not associated with a session. The problem I describe here arises only if you make multiple concurrent requests from the same browser, something that generally happens when working with Ajax.
Demonstrating the Problem
To demonstrate the problem that session synchronization creates and the effect it has on performance, I added a new controller called SyncTest to the example application. Listing 10-15 shows the definition of the controller.
Listing 10-15. The Contents of the SyncTestController.cs File
using System.Web.Mvc;

namespace StateData.Controllers {
    public class SyncTestController : Controller {

        public ActionResult Index() {
            return View();
        }

        [OutputCache(NoStore = true, Duration = 0)]
        public string GetMessage(int id) {
            return string.Format("Message: {0}", id);
        }
    }
}
This controller consists of an Index action method that renders the default view and a GetMessage action method that I will target from the browser using Ajax requests. The GetMessage method returns a string that is generated from the method argument, which will be set using the built-in MVC framework model binding feature. This controller doesn’t do anything useful, other than provide me with a target for Ajax requests.
![]() Tip I have applied the OutputCache attribute to the GetMessage method to prevent the output strings from being stored in the ASP.NET content cache. I describe the cache and the effect of the attribute in Chapter 12.
Tip I have applied the OutputCache attribute to the GetMessage method to prevent the output strings from being stored in the ASP.NET content cache. I describe the cache and the effect of the attribute in Chapter 12.
I created a view for the Index action method by right-clicking the method in the Visual Studio code editor and selecting Add View from the pop-up menu. I set the name to Index, selected the Empty (without model) option for the template, and unchecked all of the view option boxes. When I clicked the Add button, Visual Studio created the Views/SyncTest/Index.cshtml file, to which I added the content shown in Listing 10-16.
Listing 10-16. The Contents of the Index.cshtml File in the Views/SyncTest Folder
@{ Layout = null;}

<!DOCTYPE html>
<html>
<head>
    <meta name="viewport" content="width=device-width" />
    <title>SyncTest</title>
    <script src="http://code.jquery.com/jquery-1.10.1.min.js"></script>
    <link href="∼/Content/bootstrap.min.css" rel="stylesheet" />
    <link href="∼/Content/bootstrap-theme.min.css" rel="stylesheet" />
    <style>
        body { padding-top: 10px; }
    </style>
    <script>
        $(document).ready(function () {
            var start = new Date();
            var counter = 10;
            for (var i = 0; i < 10; i++) {
                $.get("/SyncTest/GetMessage", { id: i }, function (data) {
                    $("#msgTable tbody").append("<tr><td>" + data + "</th></tr>");
                    counter--;
                    if (counter == 0) {
                        var time = new Date().getTime() - start.getTime();
                        $("#results").text("Time (ms): " + time);
                    }
                });
            }
        });
    </script>
</head>
<body class="container">
    <div id="results" class="alert alert-success"></div>
    <table id="msgTable" class="table table-bordered table-striped">
        <tr><th>Messages</th></tr>
    </table>
</body>
</html>
For this view, I have added a script element that imports the jQuery library from a content delivery network (CDN) and another that uses jQuery to make Ajax requests to the GetMessage action on the SyncTest controller. Ten requests are made in total, and the elapsed time is displayed when all of the requests have completed.
![]() Note I am going to treat the jQuery script in this example as a black box that makes Ajax requests and reports on them. jQuery is an excellent client-side library, but it isn’t part of the ASP.NET platform and is beyond the scope of this book. I describe jQuery in detail in my Pro jQuery 2 book, and I describe client-side development for MVC framework applications in my forthcoming Pro ASP.NET MVC Client Development book.
Note I am going to treat the jQuery script in this example as a black box that makes Ajax requests and reports on them. jQuery is an excellent client-side library, but it isn’t part of the ASP.NET platform and is beyond the scope of this book. I describe jQuery in detail in my Pro jQuery 2 book, and I describe client-side development for MVC framework applications in my forthcoming Pro ASP.NET MVC Client Development book.
To see how this works, start the application and request the /SyncTest/Index URL. The application will render the default view for the Index action, which includes the jQuery code that makes the Ajax requests. The view includes a table that is populated with messages as each Ajax requests. Reload the page a few times by pressing the F5 key to get a sense of how long it takes for all of the requests to complete, as shown in Figure 10-9.
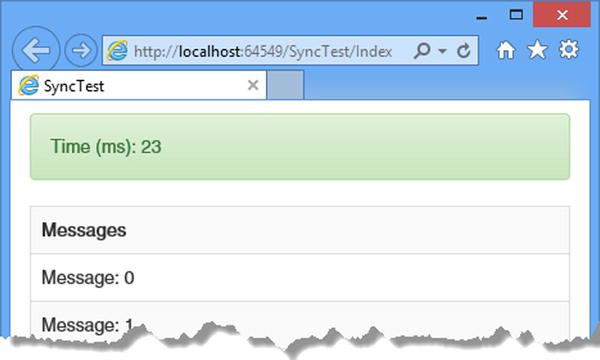
Figure 10-9. Measuring concurrent Ajax requests
On my development desktop, the process takes about 20 to 25 milliseconds. These are short and simple requests to a server running on the same (powerful) machine, and I would expect them to be fast.
Leave the application running and navigate to the /Lifecycle/Index URL to see what happens when the Ajax requests are made as part of a session. Check the Store State Data box and click the Submit button and then navigate back to /SyncTest/Index. Now the Ajax requests will include a session cookie, so the ASP.NET will process them sequentially instead of concurrently. You can see the effect in Figure 10-10.
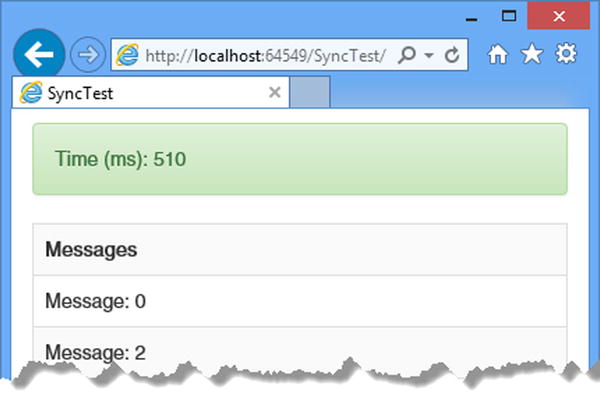
Figure 10-10. Measuring sequential Ajax requests
On my development desktop, the requests now take about 500 milliseconds to complete, which is a striking difference given that the only difference is a session cookie. You may see different timings, but the difference should be loosely comparable.
Controlling Session State
The solution to this problem is to apply the SessionState attribute to control the use of the session state feature. Listing 10-17 shows the application of the attribute to the SyncTest controller.
Listing 10-17. Applying the SessionState Attribute in the SyncTestController.cs File
using System.Web.Mvc;
using System.Web.SessionState;

namespace StateData.Controllers {

    [SessionState(SessionStateBehavior.Disabled)]
    public class SyncTestController : Controller {

        public ActionResult Index() {
            return View();
        }

        [OutputCache(NoStore = true, Duration = 0)]
        public string GetMessage(int id) {
            return string.Format("Message: {0}", id);
        }
    }
}
The attribute is applied to the controller class and affects all of the action methods it contains. The attribute argument is a value from the SessionStateBehavior enumeration, which is defined in the System.Web.SessionState namespace. Table 10-7 describes the range of enumeration values.
Table 10-7. The SessionStateBehavior Values
Name |
Description |
|---|---|
Default |
This is the standard ASP.NET behavior, in which the platform checks to see whether the IHttpHandler implementation that handles the request implements the IRequiresSessionState interface. If so, and the handler for the MVC Framework does implement the interface, then requests within a session will be processed sequentially, and all other requests will be processed concurrently. |
Disabled |
Session state is disabled for the controller, and requests that target the controller will be processed concurrently, even if they are made with the same session cookie. Attempting to access session state will result in an exception. |
ReadOnly |
The action methods in the controller will be able to read, but not modify, the session state data. Read-only requests within a session will be processed concurrently, but read-write requests will still acquire exclusive access to the state data and be processed sequentially (and delay any subsequent read-only requests until they have completed). |
Required |
The action methods in the controller have read-write access to the session state data and will cause other requests within the session to queue while they are processed. For the MVC framework, this is equivalent to the Default value. |
As you can see from the listing, I specified the Disabled value, which ensures that my Ajax requests will be processed concurrently, even when they include a session cookie. However, that also means any attempt to access the session data will throw an exception.
![]() Tip I could also have used the Web API technology stack to solve the problem for the example I created to demonstrate the problem. Web API is used to create web services and doesn’t use the ASP.NET session state feature. Web API doesn’t help, however, when you need to render views to generate fragments of HTML content for which the MVC framework and the SessionState should be used.
Tip I could also have used the Web API technology stack to solve the problem for the example I created to demonstrate the problem. Web API is used to create web services and doesn’t use the ASP.NET session state feature. Web API doesn’t help, however, when you need to render views to generate fragments of HTML content for which the MVC framework and the SessionState should be used.
Configuring Sessions and Session State
The session feature is configured through the sessionState configuration section in the Web.config file (I described the ASP.NET configuration feature in Chapter 9). I have been using the default settings so far in this chapter, but a number of attributes can be applied to the sessionState element to control how sessions work and how session state data is stored. Table 10-8 describes the most useful configuration attributes available.
Table 10-8. The Most Useful Configuration Attributes for the sessionState Section
Name |
Description |
|---|---|
compressionEnabled |
When set to true, the session state data is compressed. The default value is false. |
cookieless |
This controls how cookies are used to identify sessions. See the “Tracking Sessions Without Cookies” section for details. |
cookieName |
This specifies the name of the cookie used to identify sessions. The default value is ASP.NET_<id>. |
mode |
This specifies where session IDs and state data are stored. See the “Storing Session Data” section for details. |
regenerateExpiredSessionId |
When set to true (the default value), expired session IDs will be reissued when used to make a request. |
customProvider |
This is used to define a custom storage system for session data. See the “Using a SQL Database” section later in this chapter for more details. |
timeout |
This specifies the number of minutes after which a session is expired if no requests have been received. The default value is 20. |
Tracking Sessions Without Cookies
The ASP.NET platform identifies sessions with a cookie, relying on the browser to include it in the requests it sends to the server. Although all modern browsers support cookies, there are times when they cannot be used, either because cookies are disabled or because the device making the request doesn’t support them (not all requests originate from browsers in the real world).
ASP.NET has a fallback technique when cookies cannot be used, which is to include the session ID in the URLs that are sent in the response to the client. The cookieless configuration setting determines how the ASP.NET platform decides when to use cookies and when to use query strings and can be set to the values shown in Table 10-9.
Table 10-9. The Values for the Cookieless Configuration Setting
Name |
Description |
|---|---|
AutoDetect |
ASP.NET sends a 302 redirection response to the client that includes a cookie. If the cookie is present when the client follows the redirection, then ASP.NET knows that cookies are supported and enabled. Otherwise, cookies are assumed to be unavailable, and query strings are used instead. |
UseCookies |
This forces ASP.NET to use cookies, even for clients that may not support their use. This presents the possibility that the application may not work for all devices. This is the default value. |
UseDeviceProfile |
ASP.NET uses the device capabilities feature I described in Chapter 7 to determine whether the client supports cookies. |
UseUri |
This forces ASP.NET to use URLs to track sessions, even for clients that support cookies. This option ensures the widest possible device support. |
Using URLs to track sessions ensures that devices that can’t use cookies can still use an application, but it does so by creating ugly URLs. To demonstrate how the URL is used to hold the session ID, I have applied the sessionState configuration section to the application-level Web.config file and set cookieless to UseUri, as shown in Listing 10-18.
Listing 10-18. Setting the Cookie Tracking Mode in the Web.config File
<?xml version="1.0" encoding="utf-8"?>

<configuration>
  <appSettings>
    <add key="webpages:Version" value="3.0.0.0" />
    <add key="webpages:Enabled" value="false" />
     <add key="ClientValidationEnabled" value="true" />
    <add key="UnobtrusiveJavaScriptEnabled" value="true" />
  </appSettings>
  <system.web>
    <compilation debug="true" targetFramework="4.5.1" />
    <httpRuntime targetFramework="4.5.1" />
    <sessionState cookieless="UseUri" />
  </system.web>
</configuration>
I also modified the Index.cshtml file in the Views/Lifecycle folder to display more information about the session and include URLs generated through HTML and URL helper methods, as shown in Listing 10-19.
Listing 10-19. Adding More Session Information to the Index.cshtml File in the Views/Lifecycle File
@{ Layout = null; }

<!DOCTYPE html>
<html>
<head>
    <meta name="viewport" content="width=device-width" />
    <title>Session Lifecycle</title>
    <link href="∼/Content/bootstrap.min.css" rel="stylesheet" />
    <link href="∼/Content/bootstrap-theme.min.css" rel="stylesheet" />
    <style>
        body { padding-top: 10px; }
    </style>
</head>
<body class="container">
    <div class="panel panel-primary">
        <div class="panel-heading">Session</div>
        <table class="table">
            <tr><th>Session ID</th><td>@Session.SessionID</td></tr>
            <tr><th>Is New?</th><td>@Session.IsNewSession</td></tr>
            <tr><th>State Data Count</th><td>@Session.Count</td></tr>
            <tr><td>Mode</td><td>@Session.CookieMode</td></tr>
            <tr><td>Cookieless</td><td>@Session.IsCookieless</td></tr>
            <tr><td>URL</td><td>@Url.Action("Index")</td></tr>
            <tr><td>Link</td><td>@Html.ActionLink("Click Me", "Index")</td></tr>
        </table>
    </div>
    @using (Html.BeginForm()) {
        <div class="checkbox">
            <label>@Html.CheckBox("store") Store State Data</label>
        </div>
        <div class="checkbox">
            <label>@Html.CheckBox("abandon") Abandon Session</label>
        </div>
        <button class="btn btn-primary" type="submit">Submit</button>
    }
</body>
</html>
I have added rows to the table that display the value of the HttpSessionState.CookieMode property, which returns a value from the HttpCookieMode enumeration, whose values correspond to the configuration options I described in Table 10-9. I also included the value of the IsCookieless property, which returns true if ASP.NET uses the URL to track the session. Finally, I included the output from the Url.Action and Html.ActionLink helper methods to demonstrate how closely integrated session management is. To see the effect of these changes, start the application and navigate to the /Lifecycle/Index URL, as shown in Figure 10-11.
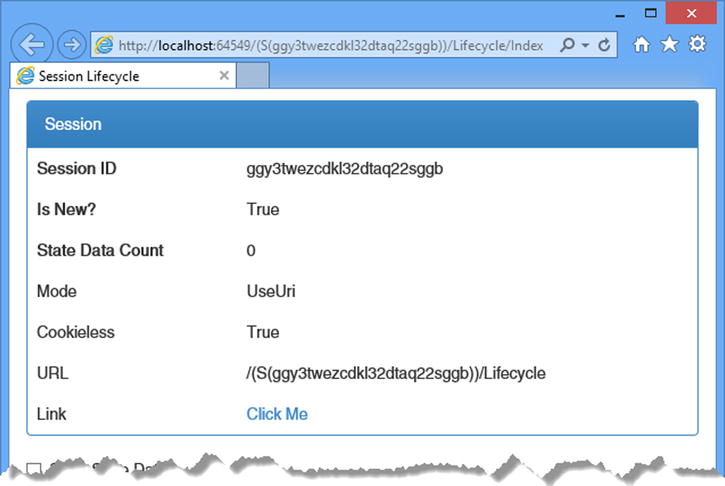
Figure 10-11. Using the URL to track sessions
The first thing to notice is the URL displayed in the browser bar, which is as follows:
http://localhost:64549/(S(ggy3twezcdkl32dtaq22sggb))/Lifecycle/IndexYou will see a different URL because the long sequence of digits is the session ID generated by ASP.NET. ASP.NET redirects the browser to this URL to begin tracking the session. The CookieMode and IsCookieless properties report the configuration of the session feature and the way that the current session is being tracked, and they can be used within the application to adapt to different devices (although this is something I have yet to find useful in a real application).
Finally, notice that the outgoing URLs that I generated with the helper methods automatically include the session ID. Sessions are tightly integrated into the ASP.NET platform, and this extends to the routing system, which is used to generate these URLs. This makes it easy to use sessions without cookies, but it does undermine the idea of clear and simple URLs that the routing system promotes.
By default, details of sessions and session state data are stored in memory within the ASP.NET process. This has the benefit of being fast and simple, but it means that sessions are lost when the server is restarted and that sessions can scale only to the limit of the system memory. ASP.NET supports two other storage options to help sessions scale better and survive application resets, controlled through the mode configuration attribute, which can be set to the values shown in Table 10-10. In the sections that follow, I’ll show you how to configure and these alternative storage options.
Table 10-10. The Values for the mode Configuration Attribute
Name |
Description |
|---|---|
InProc |
This is the default value, which stores session data within the ASP.NET process. |
Off |
This disables sessions for the entire application. Use with care. |
SQLServer |
This specifies that state data be stored in a database. This value is obsolete with the release of the ASP.NET universal database providers. See the “Using a SQL Database” section for details. |
StateServer |
This specifies that state data be stored in a dedicated server process. See the “Using a SQL Database” section. |
Custom |
This specifies that state data be stored using a custom methodology. This option is used with the ASP.NET universal database providers, as described in the “Using a SQL Database” section. |
The ASP.NET framework comes with a separate server that can be used to store session state, which is used when the mode configuration attribute is set to StateServer. The advantage of this approach is that you can host the session state server on a dedicated machine, which means that session data won’t be lost when the application is stopped or restarted.
The session data is still stored in memory—just the memory of another process, potentially running on another server. Performance is not as good as when using the InProc option because the data has to be sent from one process to another, potentially across a network. Data stored in the state server is not persistent and will be lost when the state server process is stopped.
![]() Tip When using the state server, you must ensure that all of your session data can be serialized. See http://msdn.microsoft.com/en-gb/library/vstudio/ms233843.aspx for details of making objects serializable. Built-in types, such as int and string, are already serializable and require no special action.
Tip When using the state server, you must ensure that all of your session data can be serialized. See http://msdn.microsoft.com/en-gb/library/vstudio/ms233843.aspx for details of making objects serializable. Built-in types, such as int and string, are already serializable and require no special action.
The state server is useful if you have a lot of state data and don’t want to isolate it from the application process. The data in the state server will survive the ASP.NET application being restarted, but the data is not truly persistent since the state server can itself crash or restart.
The ASP.NET state server is a Windows service that is installed as part of the .NET Framework. To start the server, open the Services control panel, and locate and start the ASP.NET State Service, as shown in Figure 10-12.
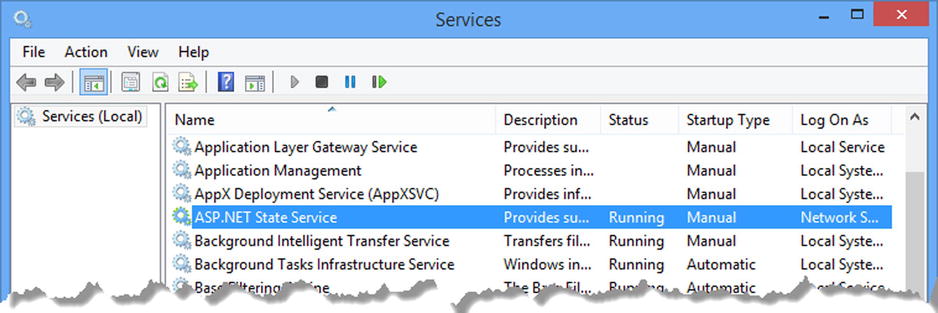
Figure 10-12. Starting the ASP.NET State Service
![]() Tip A couple of extra configuration steps are required if you want to run the state server on another machine. On the machine that will run the service, change the register property HKLMSYSTEMCurrentControlSetServicesaspnet_stateParametersAllowRemoteConnection to 1 and add a firewall rule that allows incoming requests on port 42424. You can now start the service and specify the stateConnectionString attribute in your application as tcpip=<servername>:42424.
Tip A couple of extra configuration steps are required if you want to run the state server on another machine. On the machine that will run the service, change the register property HKLMSYSTEMCurrentControlSetServicesaspnet_stateParametersAllowRemoteConnection to 1 and add a firewall rule that allows incoming requests on port 42424. You can now start the service and specify the stateConnectionString attribute in your application as tcpip=<servername>:42424.
Listing 10-20 shows how I have updated the Web.config file to use the state server by setting the mode and stateConnectionString attributes on the sessionState configuration section element.
Listing 10-20. Configuring the State Server in the Web.config File
<?xml version="1.0" encoding="utf-8"?>

<configuration>
  <appSettings>
    <add key="webpages:Version" value="3.0.0.0" />
    <add key="webpages:Enabled" value="false" />
     <add key="ClientValidationEnabled" value="true" />
    <add key="UnobtrusiveJavaScriptEnabled" value="true" />
  </appSettings>
  <system.web>
    <compilation debug="true" targetFramework="4.5.1" />
    <httpRuntime targetFramework="4.5.1" />
    <sessionState cookieless="UseCookies" mode="StateServer"
         stateConnectionString="tcpip=localhost:42424" />
  </system.web>
</configuration>
I set the mode attribute to StateServer and used the stateConnetionString to specify the name of the server and the port on which the state server is running, which is 42424 by default. There won’t be a visible change to the way the application operates, but the session data won’t be lost if you restart the application.
![]() Tip You can change the port by editing the registry property HKLMSYSTEMCurrentControlSetServicesaspnet_stateParametersPort.
Tip You can change the port by editing the registry property HKLMSYSTEMCurrentControlSetServicesaspnet_stateParametersPort.
Using a SQL Database
Using a database to store session data ensures that data isn’t lost when a process is restarted. The way that ASP.NET stores session data in a database has changed over the years, which has led to some oddities in the configuration settings used in the sessionState configuration section. ASP.NET used to rely on a separate tool that would create a database schema for session data, but this has been superseded by a set of classes known as the universal providers, which use an Entity Framework feature known as Code First to create a schema when making the initial connection to the database—something that is important when using cloud services like Azure that don’t support custom command-line tools.
![]() Note The universal providers are not just for session data; they also store user details for the ASP.NET membership API. However, the membership API has been superseded by the Identity API, which I describe in Chapters 13 to 15. It can be hard to keep up with Microsoft’s sudden changes in direction.
Note The universal providers are not just for session data; they also store user details for the ASP.NET membership API. However, the membership API has been superseded by the Identity API, which I describe in Chapters 13 to 15. It can be hard to keep up with Microsoft’s sudden changes in direction.
To get started, I need to create the database that ASP.NET will use to store the session information. I will be using the localdb feature, which is a simplified version of SQL Server included in Visual Studio that makes it easy for developers to create and manage databases. Select SQL Server Object Explorer from the Visual Studio View menu and right-click the SQL Server object in the window that appears. Select Add SQL Server from the pop-up menu, as shown in Figure 10-13.
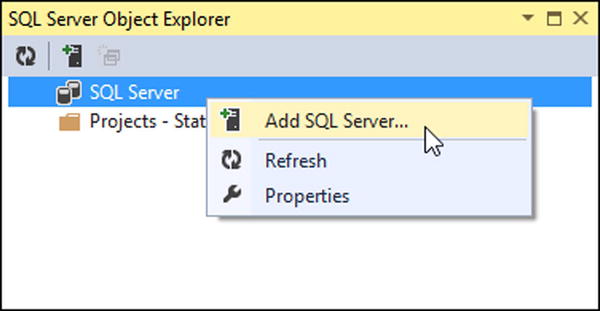
Figure 10-13. Creating a new database connection
Visual Studio will display the Connect to Server dialog window. Set the server name to be (localdb)v11.0, select the Windows Authentication option, and click the Connect button. A connection to the database will be established and shown in the SQL Server Object Explorer window. Expand the new item, right-click Databases, and select Add New Database from the pop-up window, as shown in Figure 10-14.
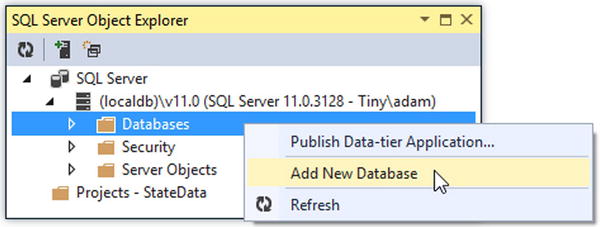
Figure 10-14. Adding a new database
Set the Database Name option to StateDb, leave the Database Location value unchanged, and click the OK button to create the database. The new database will be shown in the Databases section of the SQL connection in the SQL Server Object Explorer.
![]() Tip There is no need to configure the schema for the new database. This will be done automatically the first time a connection is made with the universal provider.
Tip There is no need to configure the schema for the new database. This will be done automatically the first time a connection is made with the universal provider.
The next step is to install the universal providers NuGet package by entering the following command into the Visual Studio Package Manager Console:
Install-Package -version 2.0.0 Microsoft.AspNet.ProvidersNuGet installs the package and updates the Web.config file to configure the different databases that ASP.NET supports. Most of these are for the now-obsolete membership API, so I removed the unwanted additions, as shown in Listing 10-21.
Listing 10-21. Configuring the Universal Provider for Session Data in the Web.config File
<?xml version="1.0" encoding="utf-8"?>
<configuration>
  <connectionStrings>
    <add name="StateDb" providerName="System.Data.SqlClient"
         connectionString="Data Source=(localdb)v11.0;Initial Catalog=StateDb;
             Integrated Security=True" />
  </connectionStrings>
  <appSettings>
    <add key="webpages:Version" value="3.0.0.0" />
    <add key="webpages:Enabled" value="false" />
    <add key="ClientValidationEnabled" value="true" />
    <add key="UnobtrusiveJavaScriptEnabled" value="true" />
  </appSettings>
  <system.web>
    <compilation debug="true" targetFramework="4.5.1" />
    <httpRuntime targetFramework="4.5.1" />
    <sessionState mode="Custom" customProvider="DefaultSessionProvider">
      <providers>
        <add name="DefaultSessionProvider" connectionStringName="StateDb"
             type="System.Web.Providers.DefaultSessionStateProvider,
                 System.Web.Providers, Version=2.0.0.0, Culture=neutral,
                     PublicKeyToken=31bf3856ad364e35"  />
      </providers>
    </sessionState>
  </system.web>
</configuration>
![]() Caution I have had to split some of the strings in the listing across multiple lines to make them fit on the page. You must ensure that all of the text is on a single line when you edit the Web.config file. If in doubt, download the source code for this chapter from www.apress.com.
Caution I have had to split some of the strings in the listing across multiple lines to make them fit on the page. You must ensure that all of the text is on a single line when you edit the Web.config file. If in doubt, download the source code for this chapter from www.apress.com.
I defined a connection string called StateDb for the database I created. The changes to the sessionState configuration section don’t make a lot of sense, but they are required verbatim to use the universal providers, and you should cut and paste them as required, making sure to change the connectionStringName attribute of the providers/add element to match the connection string that refers to the database you want to use, like this:
...
<sessionState mode="Custom" customProvider="DefaultSessionProvider">
  <providers>
    <add name="DefaultSessionProvider"connectionStringName="StateDb"
        type="System.Web.Providers.DefaultSessionStateProvider,
            System.Web.Providers, Version=2.0.0.0, Culture=neutral,
            PublicKeyToken=31bf3856ad364e35"  />
  </providers>
</sessionState>
...
To test the database, start the application, request the /Lifecycle/Index URL, and check the option Store State Data. A connection to the database will be established when you click the Submit button, and the schema for the database will be created so that the session data can be stored. The schema is created only when needed, and subsequent connections will reuse the schema.
Summary
In this chapter I described the two state data features that the ASP.NET platform provides: application and session state. I demonstrated their use, explained the pitfalls of synchronization, and showed you how they can be used to store data across the entire application or across a series of requests from the same client. In the next chapter, I describe a flexible—but more complicated—state data feature: the data cache.