
![]()
Caching Data
In this chapter, I describe the ASP.NET data caching feature, which is a state data service that actively manages the data it contains to limit the amount of memory that it occupies and to ensure that stale data isn’t used by the application. Table 11-1 summarizes this chapter.
Table 11-1. Chapter Summary
Problem |
Solution |
Listing |
|---|---|---|
Cache data for later use. |
Use the Cache class, an instance of which can be obtained through the HttpContext.Cache property. |
|
Configure the cache. |
Use the cache configuration section within the caching section group. |
|
Set a time at which an item will be ejected from the cache. |
Use an absolute time expiration. |
|
Set an interval after which an item will be ejected from the cache if it has not been requested. |
Use a sliding time expiration. |
|
Create a dependency that causes an item to be ejected from the cache when it changes. |
Use the CacheDependency or AggregateCacheDependency class. |
|
Create a custom cache dependency. |
Derive from the CacheDependency class and call the NotifyDependencyChanged method to trigger cache ejection. |
|
Receive a notification when an item has been—or is about to be—ejected from the cache. |
Pass method references to the Cache.Add or Cache.Insert method when adding an item to the cache. |
Preparing the Example Project
For this chapter, I am going to continue using the StateData project I created in Chapter 10. I’ll be using Glimpse in this chapter, which provides information about the cache. Enter the following command into the Visual Studio Package Manager Console:
Install-Package Glimpse.MVC5When you hit Enter, NuGet will download and install the Glimpse packages that support the MVC framework application. Once the installation is complete, start the application, navigate to the /Glimpse.axd URL, and click the Turn Glimpse On button to enable Glimpse diagnostics.
Adding the System.Net.Http Assembly
I’ll be using an example that relies on the System.Net.Http assembly, which isn’t added to MVC projects by default. Select Add Reference from the Visual Studio Project menu to open the Reference Manager window. Ensure that the Assemblies section is selected on the left side and locate and check the System.Net.Http item, as shown in Figure 11-1.
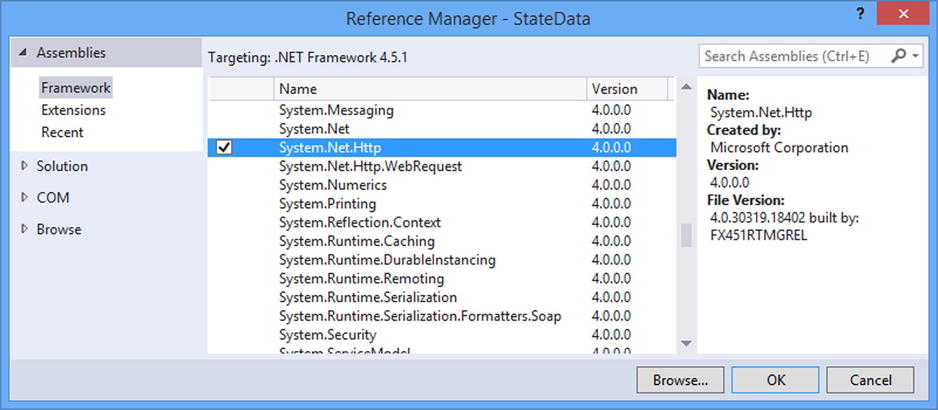
Figure 11-1. Adding an assembly to the project
![]() Tip You will need to stop the application before you can add the assembly reference.
Tip You will need to stop the application before you can add the assembly reference.
The difference between the cache and other state data services, such as application state and session state, is that the cache actively manages the data it receives and will remove data items that it judges are no longer required. The judgment the cache makes about which data items to remove isn’t arbitrary; as you will learn, you can be specific about when a particular item of data is considered useful or not.
The cache stores its data in memory and is useful for data that is resource-intensive or time-consuming to generate, that you expect to need again in the future, and, critically, that you can re-create if it is removed from the cache or if the application is restarted. In the sections that follow, I’ll show you the different ways in which to store and retrieve data in the cache and demonstrate how you can make the cache respond to the needs of your application. Table 11-2 puts the data cache feature into context.
Table 11-2. Putting the Data Cache in Context
Question |
Answer |
|---|---|
What is it? |
Application data caching is a form of state data that is actively managed to ensure that stale or underused data is removed from use. This feature is also the foundation of the output cache, which I describe in Chapter 12. |
Why should I care? |
Caching can improve application performance while ensuring that only current data is used. |
How is it used by the MVC framework? |
The MVC framework does not use application caching directly, but the feature is available in application components such as controllers, views, and modules. |
AVOIDING THE PREMATURE OPTIMIZATION PROBLEM
Caching is a form of optimization that can improve the performance of an application when used judiciously and sparingly—but like all forms of optimization, it can cause more problems than it solves if used carelessly.
Developers have a tendency to apply optimization too early in the project life cycle, in the mistaken belief that optimized code is more elegant and professional. In fact, over-eager optimization hides poorly designed code and makes it harder to test the application properly.
Don’t optimize code until you know that you have a performance problem that breaks your application requirements. Focus on building the functionality of the application first and then, when you are confident that everything works properly, start to optimize. Remember that optimizations such as caching change the behavior of an application and make it harder to figure out what is happening when there is a problem, so make sure you arrange your application so that caching (and other optimizations) can be easily and simply disabled.
Above all, think about why you are optimizing your application. If you papering over the cracks caused by sloppily written code and bad design, then a feature such as caching will provide only temporary respite from your mistakes. You should only ever optimize a healthy application, not one that needs remedial attention.
Using Basic Caching
The cache is accessed through the HttpContext.Cache property, which returns an instance of the Cache class, defined in the System.Web.Caching namespace. The Cache class provides some useful members that make it easy to perform basic caching, which I have described in Table 11-3. Later in this chapter, I’ll describe the facilities for creating more complex caching policies.
Table 11-3. The Basic Members of the Cache Class
Name |
Description |
|---|---|
Item[key] |
Gets or sets the data item with the specified key |
Count |
Returns the number of data items stored in the cache |
To demonstrate the basic caching technique, I added a controller called Cache to the example application, as shown in Listing 11-1.
Listing 11-1. Using the Cache in the CacheController.cs File
using System.Net.Http;
using System.Threading.Tasks;
using System.Web;
using System.Web.Mvc;

namespace StateData.Controllers {
    public class CacheController : Controller {

        public ActionResult Index() {
            return View((long?)(HttpContext.Cache["pageLength"]));
        }

        [HttpPost]
        public async Task<ActionResult> PopulateCache() {
            HttpResponseMessage result
                = await new HttpClient().GetAsync("http://apress.com");
            HttpContext.Cache["pageLength"] = result.Content.Headers.ContentLength;
            return RedirectToAction("Index");
        }
    }
}
![]() Tip When I use the data cache in a project, I usually create a helper class like the ones that I used in Chapter 10 for the application and state data features. I have not created such a class in this chapter because a lot of the techniques I describe are about how to insert data into the cache to control its life cycle, and the handler class just makes all of the examples a little more complex because I would have to adjust the controller and the helper class for each example. I recommend you use a helper class once you have decided on how you are going to use the cache.
Tip When I use the data cache in a project, I usually create a helper class like the ones that I used in Chapter 10 for the application and state data features. I have not created such a class in this chapter because a lot of the techniques I describe are about how to insert data into the cache to control its life cycle, and the handler class just makes all of the examples a little more complex because I would have to adjust the controller and the helper class for each example. I recommend you use a helper class once you have decided on how you are going to use the cache.
This controller uses the cache to store the length of the content returned from the Apress web site. The Index action method retrieves the data item from the cache with the key pageLength and passes it to the view. I cast the cached data value to a nullable long (long?) value so that I can differentiate between a cached value of zero and the null value that is returned from the cache when a nonexistent key is requested. The PopulateCache method uses the HttpClient class from the System.Net.Http namespace to get the contents of the Apress home page and cache the numeric value of the ContentLength header before redirecting the client to the Index action to see the effect.
![]() Tip The data in the example is well-suited to demonstrate caching. It takes time to generate because establishing a connection to Apress.com and getting its content can take a few seconds—something that you wouldn’t want to repeat for every request. Further, the data has a finite life because Apress often changes its site for new books and promotions, meaning that obtaining the data doesn’t give a value that can be used forever. Finally, the data can be created again if need be—something that becomes important when the cache starts actively managing its content, as I explain later in this chapter.
Tip The data in the example is well-suited to demonstrate caching. It takes time to generate because establishing a connection to Apress.com and getting its content can take a few seconds—something that you wouldn’t want to repeat for every request. Further, the data has a finite life because Apress often changes its site for new books and promotions, meaning that obtaining the data doesn’t give a value that can be used forever. Finally, the data can be created again if need be—something that becomes important when the cache starts actively managing its content, as I explain later in this chapter.
I created a view for the Index action by right-clicking the method in the code editor and selecting Add View from the pop-up menu. I set View Name to Index, set Template to Empty (without model), and unchecked the View Option boxes. When I clicked the Add button, Visual Studio created the Views/Cache/Index.cshtml file, which I edited with the content shown in Listing 11-2.
Listing 11-2. The Contents of the Index.cshtml File in the Views/Cache Folder
@model long?
@{Layout = null;}
<!DOCTYPE html>
<html>
<head>
    <meta name="viewport" content="width=device-width" />
    <title>Data Cache</title>
    <link href="∼/Content/bootstrap.min.css" rel="stylesheet" />
    <link href="∼/Content/bootstrap-theme.min.css" rel="stylesheet" />
    <style>body { padding-top: 10px; }</style>
</head>
<body class="container">
    <div class="alert alert-info">
        @if (Model.HasValue) {
            @: Cached Data: @Model bytes
        } else {
            @: No Cached Data
        }
    </div>
    @using (Html.BeginForm("PopulateCache", "Cache")) {
        <button class="btn btn-primary">Populate Cache</button>
    }
</body>
</html>
The view contains a message that either displays the cached value or reports that there is no cached data for the pageLength key. I used the Html.BeginForm helper method to create a form that will invoke the PopulateCache action method when the button element is clicked, making it easy to see the cache in action.
![]() Tip The individual methods defined by the Cache class are thread-safe to protect against concurrent access, but there is no built-in locking feature for performing multiple related operations. See Chapter 10 to understand the contrast against the application state and session state features.
Tip The individual methods defined by the Cache class are thread-safe to protect against concurrent access, but there is no built-in locking feature for performing multiple related operations. See Chapter 10 to understand the contrast against the application state and session state features.
To see the effect, start the application and request the /Cache/Index URL. The message will initially show that there is no cached data. Click the Populate Cache button; after the request to the Apress web site has completed, the length of the response will be shown, as illustrated by Figure 11-2. (You may see a different result because the Apress home page changes regularly.)
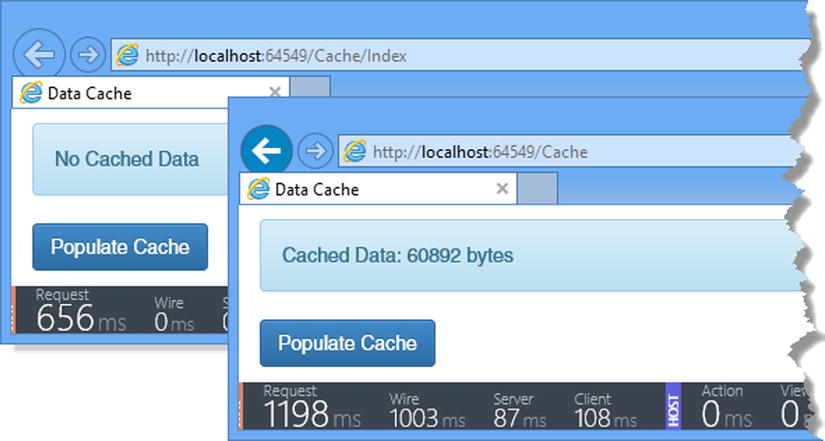
Figure 11-2. Using the cache
The reason that I installed Glimpse at the start of the chapter is because it provides useful information about the cache. Click the G logo at the right edge of the Glimpse ribbon and select the Cache tab, and you will see the contents of the cache and some basic configuration information, as shown in Figure 11-3.
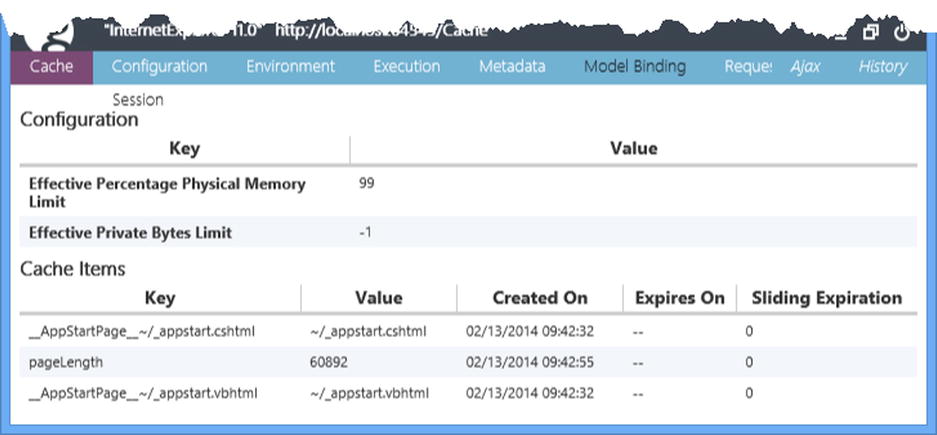
Figure 11-3. The Glimpse Cache tab
The Cache Items section details the contents of the cache. There are three items shown, two of which were added by the ASP.NET platform and one is the pageLength item that is added by the Cache controller.
Configuring the Cache
The Configuration section of the Glimpse Cache tab shows the value of two properties defined by the Cache class that relate to the cache configuration, as described in Table 11-4.
Table 11-4. The Cache Configuration Properties
Name |
Description |
|---|---|
EffectivePercentagePhysicalMemoryLimit |
Returns the percentage of system memory that can be used to store data items before the Cache class starts to remove them. The default value is 90, meaning that the cache can occupy 90 percent of the available memory. |
EffectivePrivateBytesLimit |
Returns the total number of bytes available for storing data in the cache. The default value is 0, meaning that ASP.NET will use its own policy for ejecting items when memory is under pressure. |
By default, items are removed only when the cache starts to fill up and the limits of the cache size are controlled by the values of the properties shown in the table. These values are set in the Web.config file, as shown in Listing 11-3. (I have tidied up the Glimpse additions to the Web.config file to make it easier to read.)
Listing 11-3. Configuring the Cache in the Web.config File
<?xml version="1.0" encoding="utf-8"?>
<configuration>

  <configSections>
        <section name="glimpse" type="Glimpse.Core.Configuration.Section,
            Glimpse.Core" />
    </configSections>

  <glimpse defaultRuntimePolicy="On" endpointBaseUri="∼/Glimpse.axd" />

  <connectionStrings>
    <add name="StateDb" providerName="System.Data.SqlClient"
        connectionString="Data Source=(localdb)v11.0;Initial Catalog=StateDb;
            Integrated Security=True" />
  </connectionStrings>
  <appSettings>
    <add key="webpages:Version" value="3.0.0.0" />
    <add key="webpages:Enabled" value="false" />
    <add key="ClientValidationEnabled" value="true" />
    <add key="UnobtrusiveJavaScriptEnabled" value="true" />
  </appSettings>
  <system.web>
    <compilation debug="true" targetFramework="4.5.1" />
    <httpRuntime targetFramework="4.5.1" />
    <sessionState mode="Custom" customProvider="DefaultSessionProvider">
      <providers>
        <add name="DefaultSessionProvider" connectionStringName="StateDb"
           type="System.Web.Providers.DefaultSessionStateProvider,
              System.Web.Providers, Version=2.0.0.0, Culture=neutral,
                   PublicKeyToken=31bf3856ad364e35" />
      </providers>
    </sessionState>
    <caching>
      <cache percentagePhysicalMemoryUsedLimit="10" />
    </caching>
  </system.web>
  <system.webServer>
        <validation validateIntegratedModeConfiguration="false" />
        <modules>
            <add name="Glimpse" type="Glimpse.AspNet.HttpModule, Glimpse.AspNet"
                 preCondition="integratedMode" />
        </modules>
        <handlers>
            <add name="Glimpse" path="glimpse.axd" verb="GET"
                type="Glimpse.AspNet.HttpHandler, Glimpse.AspNet"
                    preCondition="integratedMode" />
        </handlers>
    </system.webServer>
</configuration>
Configuring the Cache class is performed through the cache configuration section, which in turn is part of the caching configuration group (I explained configuration sections and groups in Chapter 9). In the listing, I set the percentage of the memory that the cache can occupy to 10 percent. Table 11-5 lists all the settings available in the cache configuration section and describes their effect.
Table 11-5. The Settings in the cache Configuration Section
Name |
Description |
|---|---|
disableMemoryCollection |
Sets whether the cache will automatically eject items when the available free memory is limited. The default value is false, meaning that items will be ejected. Use with caution. |
disableExpiration |
Sets whether items are ejected when they expire. The default value is false, meaning that items will expire. See the “Using Advanced Caching” section for details of item expiry. Use with caution. |
privateBytesLimit |
Sets the limit (in bytes) of the cache size before items are ejected to free up memory. The default value is 0, which tells ASP.NET to use its own policy for memory management. |
percentagePhysicalMemoryUsedLimit |
Sets the percentage of the system memory that the cache can occupy before items are ejected to free up space. The default value is 90, meaning that the cache will occupy up to 90 percent of the available memory. |
privateBytesPollTime |
Sets the interval at which the size of the cache is checked to ensure that it is within the limit defined by the privateBytesLimit setting. The default value is 00:02:00, which corresponds to two minutes. |
![]() Tip Don’t configure the cache until you have a sense of how it is affected by real user loads. Limiting the cache too low will cause items to be ejected too aggressively and undermine the optimization effect of the cache, but setting the limits too high will cause the cache to grow indefinitely and ultimately disrupt the ASP.NET application’s performance. When working on a new application, start with the default settings and use the per-item configuration techniques that I describe in the “Using Advanced Caching” section.
Tip Don’t configure the cache until you have a sense of how it is affected by real user loads. Limiting the cache too low will cause items to be ejected too aggressively and undermine the optimization effect of the cache, but setting the limits too high will cause the cache to grow indefinitely and ultimately disrupt the ASP.NET application’s performance. When working on a new application, start with the default settings and use the per-item configuration techniques that I describe in the “Using Advanced Caching” section.
The settings that control the size of the cache are most important when using the basic cache features demonstrated by Listing 11-1 because data items added via the indexer will be removed only when the cache grows too large. The disableExpiration setting affects items that are added to the cache with an expiration policy (which I explain in the next section), and setting the configuration to true will prevent items from being ejected when they expire.
Using Advanced Caching
Basic caching can be useful if the data items you are working with are all of equal importance and should be ejected from the cache only when the amount of available memory is under pressure. If you want more control over the life of your data items or you want to express relative importance so that the cache will eject some before others, then you can take advantage of the advanced features that the ASP.NET cache offers, which are available through the Add and Insert methods defined by the Cache class. Table 11-6 describes these methods and their overloads.
Table 11-6. The Cache Methods for Advanced Caching
Name |
Description |
|---|---|
Insert(key, data) |
Inserts the data into the cache using the specified key. This is equivalent to using the Cache indexer, as demonstrated by Listing 11-1. |
Insert(key, data, dependency) |
Inserts the data into the cache using the specified key with an external dependency (see the “Using Cache Dependency” section for details). |
Insert(key, data, dependency, time, duration) |
Like the previous method, but the object will be removed from the cache at the DateTime specified by the time argument or after the TimeSpan specified by the duration argument. |
Insert(key, data, dependency, time, duration, callback) |
Like the previous method, but the callback will be used to send a notification when the item is removed from the cache. See the “Receiving Dependency Notifications” section for details of cache notifications. |
Insert(key, data, dependency, time, duration, priority, callback) |
Caches the data item with the dependency, time, and duration restrictions but also specifies a priority that is used when the cache is ejecting items to release memory. The callback is used to send a notification when the item is removed from the cache—see the “Receiving Dependency Notifications” section for details of cache notifications. |
Add(key, data, dependency, time, duration,priority, callback) |
Like the previous method, but throws an exception if the cache already contains a data object with the same key. |
I tend not to use the Add method because I rarely want to receive an exception if there is already a data item with the same key, but the range of options available for both the Add and Insert methods allows you to be as specific as you need about when an item should be ejected from the cache. I explain each of the constraints in the sections that follow.
Using Absolute Time Expiration
The simplest way to control the life of a cached data item is to specify the time after which the data is invalid. This is most useful for data that becomes misleading to the user as it becomes stale, such as stock prices. Listing 11-4 shows how I modified the Cache controller so that the example cache item is removed after 30 seconds—this is an extremely short period, but it makes it possible to follow the example without having to wait hours to see the effect.
Listing 11-4. Expiring Cache Items in the CacheController.cs File
using System;
using System.Net.Http;
using System.Threading.Tasks;
using System.Web;
using System.Web.Mvc;
using System.Web.Caching;

namespace StateData.Controllers {
    public class CacheController : Controller {

        public ActionResult Index() {
            return View((long?)(HttpContext.Cache["pageLength"]));
        }

        [HttpPost]
        public async Task<ActionResult> PopulateCache() {
            HttpResponseMessage result
                = await new HttpClient().GetAsync("http://apress.com");
            long? data = result.Content.Headers.ContentLength;
            DateTime expiryTime = DateTime.Now.AddSeconds(30);
            HttpContext.Cache.Insert("pageLength", data, null, expiryTime,
                Cache.NoSlidingExpiration);
            return RedirectToAction("Index");
        }
    }
}
Cache expiration times are expressed using System.DateTime objects and passed as an argument to the Cache.Insert method. There are two time-related options for controlling cache ejection: absolute expiration and sliding expiration (which I describe in the next section). When you use one, you must set the other argument to a static value defined by the Cache class. In the listing, I am using an absolute time, which means I have to set the argument for the sliding expiration like this:
...
HttpContext.Cache.Insert("pageLength", data, null, expiryTime,
    Cache.NoSlidingExpiration);
...
![]() Tip You will notice that the dependency argument for the Insert method is null in the listing. This indicates to the cache that I have not specified a dependency and that the cached data should be expired only based on the specified time or when the cache is short of memory. I show you how to specify dependencies in the “Using Cache Dependencies” section later in this chapter.
Tip You will notice that the dependency argument for the Insert method is null in the listing. This indicates to the cache that I have not specified a dependency and that the cached data should be expired only based on the specified time or when the cache is short of memory. I show you how to specify dependencies in the “Using Cache Dependencies” section later in this chapter.
The NoSlidingExpiration property must be used for the duration argument when specifying an absolute time. To see the effect of the cache expiration, start the application, request the /Cache/Index URL, and click the Populate Cache button. If you look at the Glimpse Cache tab, you will see the time at which the item will expire. Wait 30 seconds and reload the web page by pressing the F5 key, and you will see that the cache is empty.
Using Sliding Time Expirations
Sliding time expirations remove an item from the cache if it hasn’t been accessed for a period of time. This is useful when you want the cache to prune items that are not needed by users, while retaining those that remain in demand. In Listing 11-5, you can see how I have modified the Cache controller to use a sliding expiration.
Listing 11-5. Using a Sliding Expiration in the CacheController.cs File
using System;
using System.Net.Http;
using System.Threading.Tasks;
using System.Web;
using System.Web.Caching;
using System.Web.Mvc;

namespace StateData.Controllers {
    public class CacheController : Controller {

        public ActionResult Index() {
            return View((long?)(HttpContext.Cache["pageLength"]));
        }

        [HttpPost]
        public async Task<ActionResult> PopulateCache() {
            HttpResponseMessage result
                = await new HttpClient().GetAsync("http://apress.com");
            long? data = result.Content.Headers.ContentLength;
            TimeSpan idleDuration = new TimeSpan(0, 0, 30);
            HttpContext.Cache.Insert("pageLength", data, null,
                Cache.NoAbsoluteExpiration, idleDuration);
            return RedirectToAction("Index");
        }
    }
}
Sliding expirations are expressed using a TimeSpan, and in the listing, I created a TimeSpan instance for 30 seconds, which I passed to the Cache.Insert method. When using a sliding expiration, the time argument (as described in Table 11-6) must be set like this:
...
HttpContext.Cache.Insert("pageLength", data, null,
    Cache.NoAbsoluteExpiration, idleDuration);
...
The NoAbsoluteExpiration property must be used for the time argument when specifying a sliding expiration. To see the effect of a sliding expiration, start the application, request the /Cache/Index URL, and click the Populate Cache button.
You can see details of the cached item’s expiration on the Glimpse Cache tab. Reload the page by pressing the F5 key, and you will see that the expiration time is extended each time the item is read for the cache. Wait 30 seconds and then press F5, and you will see that the cache is empty because the item was not accessed before it expired.
Specifying Scavenging Prioritization
Specifying absolute or sliding expirations will cause items to be removed from the cache when they are stale, but it is still possible for the cache to fill up. When this happens, the cache will eject items from the cache to manage its memory footprint—a process known as scavenging. The scavenging process is usually triggered when the cache is being used to store data for every user and there is a sudden spike in application utilization. (If this happens to you, then you should consider whether session state data would be more appropriate given that it can be stored in a database.)
Not all data is equally important, and you can provide the cache with instructions about the data you want ejected first when scavenging begins. The Add method and one of the Insert method overloads take a value from the CacheItemPriority enumeration, which defines the values listed in Table 11-7.
Table 11-7. The Values Defined by the CacheItemPriority Enumeration
Name |
Description |
|---|---|
Low |
Items given this priority will be removed first. |
BelowNormal |
Items given this priority will be removed if scavenging the Low priority items has not released enough memory. |
Normal |
Items given this priority will be removed if scavenging the Low and BelowNormal priority items has not released enough memory. This is the default priority for the Insert method overloads that don’t take a CacheItemPriority value. |
AboveNormal |
Items given this priority will be removed if scavenging the Low, BelowNormal, and Normal priority items has not released enough memory. |
High |
Items given this priority will be removed if scavenging the Low, BelowNormal, Normal, and AboveNormal priority items has not released enough memory. |
NotRemovable |
Items with this priority will not be removed during scavenging—although they will be removed if absolute or sliding expirations are used. |
Default |
This is equivalent to the Normal value. |
I have not included a demonstration of using cache priorities because it is difficult to simulate exhausting the system memory—ASP.NET and the .NET Framework both have aggressive memory management techniques that are applied to prevent scavenging being necessary.
![]() Caution Use the NotRemovable value with caution, especially if you are using it for data items that are cached without an absolute or sliding expiry.
Caution Use the NotRemovable value with caution, especially if you are using it for data items that are cached without an absolute or sliding expiry.
Absolute and sliding expiries are suitable for most cached data, but if you need more control over when an item expired, you can use a dependency. A dependency creates a relationship between the cached data and another object, and the data is removed from the cache when the object changes. There are built-in classes to create dependencies on files and other items in the cache. You can also create dependencies on multiple objects and even implement custom dependencies. I explain each option in the sections that follow.
Creating a File Dependency
The most basic dependency removes an item from the cache when a file changes. This kind of dependency is useful when you are populating the cache with data from a file to improve performance, but caution is required because this means storing files that will change on the ASP.NET server—something that is rarely a good idea in a production environment and usually impossible in a cloud deployment.
I am going to use a simple text file to demonstrate this kind of dependency. Right-click the StateData item in the Solution Explorer and select Add ![]() New Item from the pop-up menu. Select the Text File template from the Visual C#
New Item from the pop-up menu. Select the Text File template from the Visual C# ![]() General section, set the name to data.txt, and click the Add button to create the file. Listing 11-6 shows how I created a dependency on the data.txt file.
General section, set the name to data.txt, and click the Add button to create the file. Listing 11-6 shows how I created a dependency on the data.txt file.
Listing 11-6. Creating a File Dependency in the CacheController.cs File
using System;
using System.Net.Http;
using System.Threading.Tasks;
using System.Web;
using System.Web.Caching;
using System.Web.Mvc;

namespace StateData.Controllers {
    public class CacheController : Controller {

        public ActionResult Index() {
            return View((long?)(HttpContext.Cache["pageLength"]));
        }

        [HttpPost]
        public async Task<ActionResult> PopulateCache() {
            HttpResponseMessage result
                = await new HttpClient().GetAsync("http://apress.com");
            long? data = result.Content.Headers.ContentLength;
            CacheDependency dependency = new
                CacheDependency(Request.MapPath("∼/data.txt"));
            HttpContext.Cache.Insert("pageLength", data, dependency);
            return RedirectToAction("Index");
        }
    }
}
![]() Tip The contents of the data.txt file don’t matter; all that counts is that the file will change, and this change will be detected and used to modify the contents of the cache.
Tip The contents of the data.txt file don’t matter; all that counts is that the file will change, and this change will be detected and used to modify the contents of the cache.
The CacheDependency class takes a file path as its constructor argument. I used the HttpRequest.MapPath method to translate a local path into an absolute one, which is what the CacheDependency class operates on. I pass the CacheDependency object as the dependency argument to the Cache.Insert method. I have used the simplest of the CacheDependency constructors that depend on files, but you can see a complete list in Table 11-8.
Table 11-8. The CacheDependency Constructors That Create Dependencies on Files
Constructor |
Description |
|---|---|
CacheDependency(path) |
Creates a dependency on a single path, which can be a file or a directory. Paths must be absolute. You can use the HttpRequest.MapPath method to translate a path relative to the root of the application to an absolute path. |
CacheDependency(path[]) |
Creates a dependency on multiple paths. A change in any of the paths will invalidate the associated cached data. |
CacheDependency(path, start) |
Creates a dependency on the specified path but will invalidate the cached data only if the last modification time of the path is later than the start argument, which is a DateTime object. |
CacheDependency(path[], start) |
Like the previous constructor, but monitors an array of paths. |
The result is that the data will remain in the cache until the data.txt file is modified or the cache scavenges the item to free up memory. To see the effect of the file modification, start the application, request the /Cache/Index URL, and click the Populate Cache button. If you look at the Glimpse Cache tab, you will see that the cached data has no expiry time. Edit the data.txt file, and when you save the changes, you will see that the data is removed from the cache when you reload the web page.
![]() Tip You can create a dependency on a SQL database by using the SqlCacheDependency class, which is also in the System.Web.Caching namespace. I don’t like this class because it relies on polling the database or reconfiguring the database to issue its own notification. I prefer to create custom notifications that work in a way that is consistent with the data abstractions I use—which usually means the Entity Framework. See http://msdn.microsoft.com/en-us/library/system.web.caching.sqlcachedependency.aspx for details of the SqlCacheDependency class if you are not deterred by direct dependence on databases, and see the “Creating Custom Dependencies” section later in this chapter for details of how to create custom dependencies for your cached data.
Tip You can create a dependency on a SQL database by using the SqlCacheDependency class, which is also in the System.Web.Caching namespace. I don’t like this class because it relies on polling the database or reconfiguring the database to issue its own notification. I prefer to create custom notifications that work in a way that is consistent with the data abstractions I use—which usually means the Entity Framework. See http://msdn.microsoft.com/en-us/library/system.web.caching.sqlcachedependency.aspx for details of the SqlCacheDependency class if you are not deterred by direct dependence on databases, and see the “Creating Custom Dependencies” section later in this chapter for details of how to create custom dependencies for your cached data.
Depending on Another Cached Item
The CacheDependency class can also be used to create dependencies on other items in the cache. To demonstrate how this works, I have added a new action method to the Cache controller, as shown in Listing 11-7.
Listing 11-7. Adding a New Action Method to the CacheController.cs File
using System;
using System.Net.Http;
using System.Threading.Tasks;
using System.Web;
using System.Web.Caching;
using System.Web.Mvc;

namespace StateData.Controllers {
    public class CacheController : Controller {

        public ActionResult Index() {
            return View((long?)(HttpContext.Cache["pageLength"]));
        }

        [HttpPost]
        public async Task<ActionResult> PopulateCache() {
            HttpResponseMessage result
                = await new HttpClient().GetAsync("http://apress.com");

            long? data = result.Content.Headers.ContentLength;
            CacheDependency dependency = new
                CacheDependency(Request.MapPath("∼/data.txt"));
            HttpContext.Cache.Insert("pageLength", data, dependency);

            DateTime timestamp = DateTime.Now;
            CacheDependency timesStampDependency
                = new CacheDependency(null, new string[] { "pageLength" });
            HttpContext.Cache.Insert("pageTimestamp", timestamp, timesStampDependency);

            return RedirectToAction("Index");
        }
    }
}
I added a second data item to the cache to record the timestamp for the content length data. When I created the CacheDependency object, I used the constructor form that takes an array of path names and an array of cache key names to monitor. I set the first argument to null to indicate that I am not interested in paths and specified the pageLength key in the second argument. The result is that the new cached item, pageTimestamp, will remain in the cache until the pageLength item changes or is ejected from the cache. To see the effect, repeat the steps from the previous example and modify the data.txt file. This will invalidate the pageLength item and will, in turn, cause the pageTimestamp item to be removed. Table 11-9 shows the CacheDependency constructors that can be used to create dependencies on other cached items.
Table 11-9. The CacheDependency Constructors That Create Dependencies on Other Cached Items
Constructor |
Description |
|---|---|
CacheDependency(path[], keys[]) |
Creates a dependency on multiple paths and multiple cache keys. Use null for the first argument if you want to work with just keys. |
CacheDependency(path[], keys[], start) |
Like the previous constructor, but with a DateTime object against which the modification date of the paths and the cache keys will be checked. |
CacheDependency(path[], keys[], start, dependency) |
Like the previous constructor, but with a CacheDependency object that, if invalidated, will also invalidate the CacheDependency instance created by the constructor. |
![]() Tip You can see from this example that it is possible to create chains of updates and ejections in the cache. This can be a useful feature, but don’t get carried away with the complexity of your cache because it is easy to lose track of the relationships between data items and start ejecting items unexpectedly.
Tip You can see from this example that it is possible to create chains of updates and ejections in the cache. This can be a useful feature, but don’t get carried away with the complexity of your cache because it is easy to lose track of the relationships between data items and start ejecting items unexpectedly.
Custom dependencies allow items to be ejected from the cache when something other than a file or other cached item changes, which allows you to tailor the caching behavior to fit the needs of the application.
To demonstrate creating a custom dependency, I am going to create a class that acts as a wrapper around a data value and the dependency for that data value. When the data value has been requested a certain number of times, the dependency will cause the cache to eject the value from the cache, creating a data object that can be accessed only a limited number of times.
This isn’t an especially realistic example because the data item will step closer to expiry each time it is read, which is not something you would usually do in an example without paying more attention to why the data is being used, but it allows me to keep the example simple and demonstrate a custom dependency without having to set up some external source of change events. Listing 11-8 shows the contents of the SelfExpiringData.cs file that I added to the Infrastructure folder of the example project.
Listing 11-8. The Contents of the SelfExpiringData.cs File
using System;
using System.Web.Caching;

namespace StateData.Infrastructure {
    public class SelfExpiringData<T> : CacheDependency {
        private T dataValue;
        private int requestCount = 0;
        private int requestLimit;

        public T Value {
            get {
                if (requestCount++ >= requestLimit) {
                    NotifyDependencyChanged(this, EventArgs.Empty);
                }
                return dataValue;
            }
        }

        public SelfExpiringData(T data, int limit) {
            dataValue = data;
            requestLimit = limit;
        }
    }
}
I have created a strongly typed class that accepts a data value and a request limit in its constructor and exposes the data value through a property called Value. Each time the getter for the Value property is used, I increment a counter and check to see whether the use limit has been reached.
If it has, then I call the NotifyDependencyChanged method, which is inherited from the CacheDependency class, which is the base used for custom dependencies. Calling the NotifyDependencyChanged method tells the cache that the dependency has changed and ejects the data item from the cache. Listing 11-9 shows how I applied the SelfExpiringData class in the Cache controller.
Listing 11-9. Applying the Self-expiring Cache Dependency in the CacheController.cs File
using System;
using System.Net.Http;
using System.Threading.Tasks;
using System.Web;
using System.Web.Caching;
using System.Web.Mvc;
using StateData.Infrastructure;

namespace StateData.Controllers {
    public class CacheController : Controller {

        public ActionResult Index() {

            SelfExpiringData<long?> seData =
                (SelfExpiringData<long?>)HttpContext.Cache["pageLength"];
            return View(seData == null ? null : seData.Value);
        }

        [HttpPost]
        public async Task<ActionResult> PopulateCache() {
            HttpResponseMessage result
                = await new HttpClient().GetAsync("http://apress.com");
            long? data = result.Content.Headers.ContentLength;
            SelfExpiringData<long?> seData = new SelfExpiringData<long?>(data, 3);
            HttpContext.Cache.Insert("pageLength", seData, seData);
            return RedirectToAction("Index");
        }
    }
}
Notice that I use the SelfExpiringData object twice when calling the Cache.Insert method, both as the data item and as the dependency. This allows me to track the number of times that the data value is read and to trigger the dependency change notification.
To test the custom dependency, start the application, request the /Cache/Index URL, and click the PopulateCache button. Now start reloading the browser page by pressing the F5 key—each time you reload the content, the Index action in the Cache controller will read the data value, and once the limit has been reached, the data item will be ejected from the cache.
Creating Aggregate Dependencies
You can get a sense from the constructors shown in Table 11-9 that it is possible to create chains of dependencies, such that one CacheDependency instance will eject its data item when another CacheDependency changes. An alternative approach of combining dependencies is to use an aggregate dependency, which allows multiple dependencies to be combined without the need to create chains. The cache item associated with an aggregate dependency will be removed from the cache when any one of the individual dependencies changes.
The AggregateCacheDependency class manages a collection of dependencies, which is populated through the Add method. Listing 11-10 shows the use of this class in the Cache controller.
Listing 11-10. Creating an Aggregate Dependency in the CacheController.cs File
using System;
using System.Net.Http;
using System.Threading.Tasks;
using System.Web;
using System.Web.Caching;
using System.Web.Mvc;
using StateData.Infrastructure;

namespace StateData.Controllers {
    public class CacheController : Controller {

        public ActionResult Index() {

            SelfExpiringData<long?> seData =
                (SelfExpiringData<long?>)HttpContext.Cache["pageLength"];
            return View(seData == null ? null : seData.Value);
        }

        [HttpPost]
        public async Task<ActionResult> PopulateCache() {
            HttpResponseMessage result
                = await new HttpClient().GetAsync("http://apress.com");
            long? data = result.Content.Headers.ContentLength;
            SelfExpiringData<long?> seData = new SelfExpiringData<long?>(data, 3);
            CacheDependency fileDep = new CacheDependency(Request.MapPath("∼/data.txt"));
            AggregateCacheDependency aggDep = new AggregateCacheDependency();
            aggDep.Add(seData, fileDep);
            HttpContext.Cache.Insert("pageLength", seData, aggDep);
            return RedirectToAction("Index");
        }
    }
}
I used the AggregateCacheDependency class to combine two CacheDependency instances, one of which is an instance of my SelfExpiringData class and the other is a CacheDependency object that monitors the data.txt file for changes. The effect is that the data item will be removed from the cache when the data value has been read three times or the data.txt file changes, whichever happens first.
Receiving Dependency Notifications
When I created the SelfExpiringData class in the “Creating Custom Dependencies” section, I signaled that the dependency had changed by calling the NotifyDependencyChanged method.
The Cache class uses this notification to manage the contents of the class, but you can pass a notification handler to the Cache.Insert or Cache.Add method to be notified as well. Listing 11-11 shows how I receive and handle such a notification in the Cache controller.
Listing 11-11. Receiving Dependency Notifications in the CacheController.cs File
using System;
using System.Net.Http;
using System.Threading.Tasks;
using System.Web;
using System.Web.Caching;
using System.Web.Mvc;
using StateData.Infrastructure;

namespace StateData.Controllers {
    public class CacheController : Controller {

        public ActionResult Index() {

            SelfExpiringData<long?> seData =
               (SelfExpiringData<long?>)HttpContext.Cache["pageLength"];
            return View(seData == null ? null : seData.Value);
        }

        [HttpPost]
        public async Task<ActionResult> PopulateCache() {
            HttpResponseMessage result
                = await new HttpClient().GetAsync("http://apress.com");
            long? data = result.Content.Headers.ContentLength;
            SelfExpiringData<long?> seData = new SelfExpiringData<long?>(data, 3);
            HttpContext.Cache.Insert("pageLength", seData, seData,
                Cache.NoAbsoluteExpiration, Cache.NoSlidingExpiration,
                    CacheItemPriority.Normal, HandleNotification);
            return RedirectToAction("Index");
        }

        private void HandleNotification(string key, object data,
                CacheItemRemovedReason reason) {
            System.Diagnostics.Debug.WriteLine("Item {0} removed. ({1})",
                key, Enum.GetName(typeof(CacheItemRemovedReason), reason));
        }
    }
}
The method that handles the notification has to receive three arguments: the key of the item that the notification relates to, the value of the item, and a value from the CacheItemRemovedReason that explains why the item was removed. The CacheItemRemovedReason enumeration defines the values shown in Table 11-10.
Table 11-10. The Values Defined by the CacheItemRemovedReason Enumeration
Name |
Description |
|---|---|
Removed |
Used when the item has been removed from the cache using the Remove method or when an item with the same key is cached with the Insert method. |
Expired |
Used when the item has expired. This value is used for both absolute and sliding expirations. |
Underused |
Used when the item has been removed by the cache scavenging process. |
DependencyChanged |
Used when a dependency that the item relies on has changed. |
In the listing, I handle the notification by calling the System.Diagnostics.Debug.WriteLine method, which will produce a message in the Visual Studio Output window. To see the effect, start the application, navigate to /Cache/Item, and click the Populate Cache button. Repeatedly refresh the page using the F5 key until the item is removed from the cache and the following message is shown in the Output window:
Item pageLength removed. (DependencyChanged)Using Notifications to Prevent Cache Ejection
The problem with the notifications in the previous section is that they are sent after the item has been removed from the cache. This is useful for tracking when data has expired but doesn’t allow you to adjust the cache behavior. Fortunately, there is another kind of notification that is sent before an item is ejected and that can be used to keep the item in the cache. This kind of notification can be received only when using this version of the Cache.Insert method:
...
Insert(key, data, dependency, time, duration, callback)
...
This is the overload that requires expiration values but doesn’t take a cache priority value. In Listing 11-12, you can see how I have updated the Cache controller to handle this kind of notification.
Listing 11-12. Receiving Pre-ejection Cache Notifications in the CacheController.cs File
using System;
using System.Net.Http;
using System.Threading.Tasks;
using System.Web;
using System.Web.Caching;
using System.Web.Mvc;
using StateData.Infrastructure;

namespace StateData.Controllers {
    public class CacheController : Controller {

        public ActionResult Index() {
            SelfExpiringData<long?> seData
                = (SelfExpiringData<long?>)HttpContext.Cache["pageLength"];
            return View(seData == null ? null : seData.Value);
        }

        [HttpPost]
        public async Task<ActionResult> PopulateCache() {
            HttpResponseMessage result
                = await new HttpClient().GetAsync("http://apress.com");
            long? data = result.Content.Headers.ContentLength;
            SelfExpiringData<long?> seData = new SelfExpiringData<long?>(data, 3);
            HttpContext.Cache.Insert("pageLength", seData, seData,
                Cache.NoAbsoluteExpiration, Cache.NoSlidingExpiration,
                    HandleNotification);
            return RedirectToAction("Index");
        }

        private void HandleNotification(string key,
            CacheItemUpdateReason reason,
            out object data,
            out CacheDependency dependency,
            out DateTime absoluteExpiry,
            out TimeSpan slidingExpiry) {

            System.Diagnostics.Debug.WriteLine("Item {0} removed. ({1})",
                key, Enum.GetName(typeof(CacheItemUpdateReason), reason));

            data = dependency
                = new SelfExpiringData<long?>(GetData(false).Result, 3);

            slidingExpiry = Cache.NoSlidingExpiration;
            absoluteExpiry = Cache.NoAbsoluteExpiration;
        }

        private async Task<long?> GetData(bool awaitCon = true) {
            HttpResponseMessage response = await new
                HttpClient().GetAsync("http://apress.com").ConfigureAwait(awaitCon);
            return response.Content.Headers.ContentLength;
        }
    }
}
The handler method for this kind of notification must define the arguments shown in Table 11-11, in the order in which they are listed. As the listing shows, many of these arguments are decorated with the out keyword, which means that the handler method must assign a value to the argument before the method returns.
Table 11-11. The Arguments Required for an Update Callback Handler Method
Type |
Description |
|---|---|
string |
The key for the data item that is about to be ejected from the cache. |
CacheItemUpdateReason |
The reason that the data is about to be ejected. This is a different enumeration than the one used for ejection notifications—see the text after the table for details. |
object |
Set this out parameter to the updated data that will be inserted into the cache. Set to null to allow the item to be ejected. |
CacheDependency |
Set this out parameter to define the dependency for the updated item. Set to null for no dependency. |
DateTime |
Set this out parameter to define the absolute expiry. Use the Cache.NoAbsoluteExpiration property for no expiration. |
TimeSpan |
Set this out parameter to define the sliding expiration. Use the Cache.NoSlidingExpiration property for no expiration. |
![]() Tip You will notice that I call the ConfigureAwait method on the Task returned by the HttpClient.GetAsync method. This method prevents a deadlock when the asynchronous task is invoked from a method that has not been decorated with the async keyword.
Tip You will notice that I call the ConfigureAwait method on the Task returned by the HttpClient.GetAsync method. This method prevents a deadlock when the asynchronous task is invoked from a method that has not been decorated with the async keyword.
The reason that the item is going to be removed from the cache is expressed using a value from the CacheItemUpdateReason enumeration, which defines the values shown in Table 11-12.
Table 11-12. The Values Defined by the CacheItemUpdateReason Enumeration
Name |
Description |
|---|---|
Expired |
Used when the item has expired. This value is used for both absolute and sliding expirations. |
DependencyChanged |
Used when a dependency that the item relies on has changed. |
This kind of notification isn’t made when the cache ejects an item because it is scavenging for memory or when the Cache.Remove method is used. This is because the notification is an opportunity to update a cached item, something that doesn’t make sense when it has been explicitly removed or when the cache is trying to free up memory.
The handler method parameters that are annotated with the out keyword provide the mechanism for updating the cache item, and you must assign a value to each of them before the method returns. If you don’t want to update the cache item, set the object argument to null; otherwise, set it to the updated value and use the other parameters to configure the updated cache item. In the listing, I take the opportunity to update the data and extend its life by creating a new cache dependency.
Summary
In this chapter, I described the data caching feature, which actively manages data to improve application performance. Like all state data features, the data cache should be used with caution, not least because it can mask design or coding flaws in the application, which will then manifest when the application is in production. In the next chapter, I describe the output cache, which allows the content generated by views to be cached and reused by the ASP.NET platform.