C H A P T E R 2
Building C# Applications
As a C# programmer, you may choose among numerous tools to build .NET applications. The point of this chapter is to provide a tour of various .NET development options, including, of course, Visual Studio proper. The chapter opens, however, with an examination of working with the C# command-line compiler, csc.exe, and the simplest of all text editors, the Notepad application that ships with the Microsoft Windows OS, as well as the freely downloadable Notepad++.
While you could work through this entire text using nothing other than csc.exe and a basic text editor, I’d bet you are also interested in working with feature-rich integrated development environments (IDEs). To address this need, you will be introduced to a free, open source .NET IDE named SharpDevelop. Then, after briefly examining the Visual C# Express IDE (which is also free), you will be given a guided tour of the key features of Visual Studio Professional.
![]() Note Over the course of this chapter, you will encounter some C# syntax we have not formally examined. If you are unfamiliar with the syntax, don’t fret. Chapter 3 will formally begin your examination of the C# language.
Note Over the course of this chapter, you will encounter some C# syntax we have not formally examined. If you are unfamiliar with the syntax, don’t fret. Chapter 3 will formally begin your examination of the C# language.
The Role of the .NET Framework 4.5 SDK
One common misconception regarding .NET development is the belief that programmers must purchase a copy of Visual Studio in order to build their C# applications. The truth of the matter is that you are able to build any sort of .NET program using the freely downloadable .NET Framework 4.5 Software Development Kit (SDK).
This SDK provides you with numerous managed compilers, command-line utilities, sample code, the .NET class libraries, and a complete documentation system. Now, be aware that if you are going to be using Visual Studio proper or Visual C# Express, you have no need to manually download or install the .NET Framework 4.5 SDK. When you install either of these products, the SDK is installed automatically, thereby giving you everything you need out of the box. However, if you are not going to be using a Microsoft IDE as you work through this text, be sure to install the SDK before proceeding.
![]() Note The .NET Framework 4.5 SDK setup program (
Note The .NET Framework 4.5 SDK setup program (dotNetFx45_Full_x86_x64.exe) can be obtained from the .NET download web site (http://msdn.microsoft.com/netframework).
The Developer Command Prompt
When you install the .NET Framework 4.5 SDK, Visual Studio, or Visual C# Express, you will end up with a number of new directories on your local hard drive, each of which contains various .NET development tools. Many of these tools are driven from the command prompt, so if you wish to use these utilities from any Windows command window, you will need to register these paths with the operating system.
While you could update your machine’s PATH variable manually to do so, you can save yourself some time by simply making use of the Developer Command Prompt (see Figure 2-1) that is accessible from the Start ![]() All Programs
All Programs ![]() Microsoft Visual Studio 11
Microsoft Visual Studio 11 ![]() Visual Studio Tools folder.
Visual Studio Tools folder.
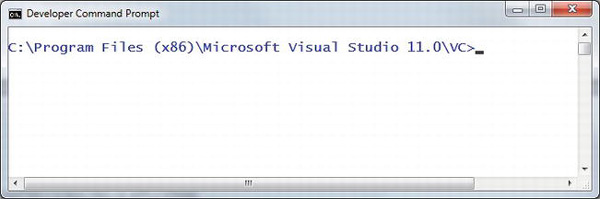
Figure 2-1. The Developer Command Prompt
The benefit of using this particular command prompt is that it has been preconfigured to provide access to each of the .NET development tools. Assuming you have a .NET development environment installed, type the following command and press the Enter key:
csc -?
If all is well, you should see a list of command-line arguments of the C# command-line compiler (where csc stands for the C-sharp compiler). As you can see, this command-line compiler has a bevy of options; however, in practice you will only need to make use of a handful of settings to build C# programs at the command prompt.
Building C# Applications Using csc.exe
While it is true that you might never decide to build a large-scale application using nothing but the C# command-line compiler, it is important to understand the basics of how to compile your code files by hand. I can think of a few reasons you should get a grip on the process.
- The most obvious reason is the simple fact that you might not have a copy of Visual Studio or another graphical IDE.
- You might be in a college or university setting where you are prohibited from using code-generation tools/IDEs in the classroom.
- You plan to make use of automated build tools, such as
msbuild.exe, which require you to know the command-line options of the tools you are utilizing.- You want to deepen your understanding of C#. When you use graphical IDEs to build applications, you are ultimately instructing
csc.exehow to manipulate your C# input files. In this light, it’s edifying to see what takes place behind the scenes.
Another nice by-product of working with csc.exe in the raw is that you become that much more comfortable manipulating other command-line tools included with the .NET Framework 4.5 SDK. As you will see throughout this book, a number of important utilities are accessible only from the command line (such as gacutil.exe, ngen.exe, ilasm.exe, and aspnet_regiis.exe).
To illustrate how to build a .NET application IDE-free, we will build a simple executable assembly named TestApp.exe using the C# command-line compiler and Notepad. First, you need some source code. Open Notepad (using the Start ![]() All Programs
All Programs ![]() Accessories menu option) and enter the following trivial C# class definition:
Accessories menu option) and enter the following trivial C# class definition:
// A simple C# application.

using System;


class TestApp

{

  static void Main()

  {

    Console.WriteLine("Testing! 1, 2, 3");

  }

}
After you have finished, save the file in a convenient location (e.g., C:CscExample) as TestApp.cs. Now let’s get to know the core options of the C# compiler.
![]() Note C# code files take a
Note C# code files take a *.cs file extension. Unlike Java, the name of the file need not have any mapping to the name of the type (or types) it is defining.
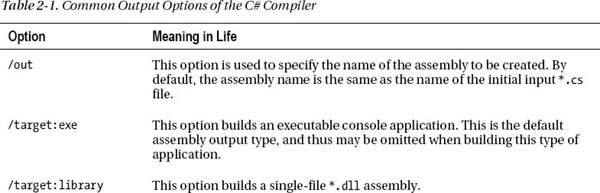
Specifying Input and Output Targets
The first point of interest is to understand how to specify the name and type of assembly to create (e.g., a console application named MyShell.exe, a code library named MathLib.dll, a Windows Presentation Foundation application named Halo8.exe, and so forth). Each possibility is represented by a specific flag passed into csc.exe as a command-line parameter (see Table 2-1).

![]() Note The options sent to the command-line compiler (as well as most other command-line tools) can be prefixed with either a dash (
Note The options sent to the command-line compiler (as well as most other command-line tools) can be prefixed with either a dash (-) or a slash (/).
To compile TestApp.cs into a console application named TestApp.exe, change to the directory containing your source code file using the cd (“change directory”) command:
cd C:CscExample
Then, enter the following command set (note that command-line flags must come before the name of the input files, not after):
csc /target:exe TestApp.cs
Here I did not explicitly specify an /out flag; therefore, the executable will be named TestApp.exe given that TestApp is the name of the input file. Also be aware that most of the C# compiler flags support an abbreviated version, such as /t rather than /target (you can view all abbreviations by entering csc -? at the command prompt).
csc /t:exe TestApp.cs
Furthermore, given that the /t:exe flag is the default output used by the C# compiler, you could also compile TestApp.cs simply by typing the following:
csc TestApp.cs
TestApp.exe can now be run from the command line by typing the name of the executable, as shown in Figure 2-2.
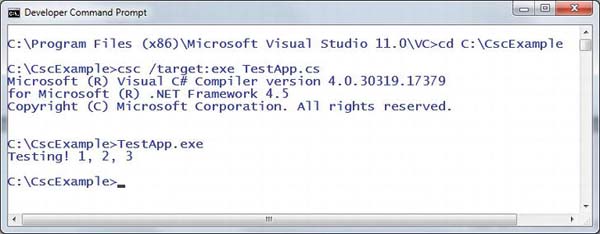
Figure 2-2. Compiling and running TestApp.exe
Referencing External Assemblies
Next, let’s examine how to compile an application that makes use of types defined in a separate .NET assembly. And just in case you are wondering how the C# compiler understood your reference to the System.Console type, recall from Chapter 1 that mscorlib.dll is automatically referenced during the compilation process (if for some strange reason you wish to disable this feature, you may specify the /nostdlib option of csc.exe).
Let’s update the TestApp application to display a Windows Forms message box. Open your TestApp.cs file and modify it as follows:
using System;


// Add this!

using System.Windows.Forms;


class TestApp

{

  static void Main()

  {

    Console.WriteLine("Testing! 1, 2, 3");


    // Add this!

    MessageBox.Show("Hello...");

  }

}
Notice you are importing the System.Windows.Forms namespace via the C# using keyword (introduced in Chapter 1). Recall that when you explicitly list the namespaces used within a given *.cs file, you avoid the need to make use of fully qualified names of a type (which can lead to hand cramps).
At the command line, you must inform csc.exe which assembly contains the namespaces you are using. Given that you have made use of the System.Windows.Forms.MessageBox class, you must specify the System.Windows.Forms.dll assembly using the /reference flag (which can be abbreviated to /r).
csc /r:System.Windows.Forms.dll TestApp.cs
If you now rerun your application, you should see a message box appear (see Figure 2-3) in addition to the console output.
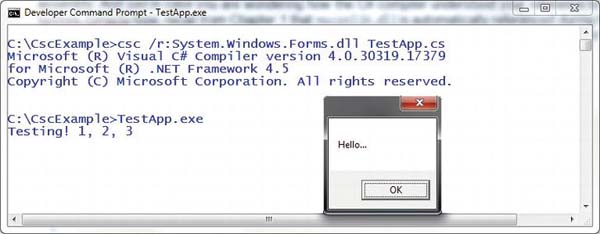
Figure 2-3. Your first graphical user interface application
Referencing Multiple External Assemblies
On a related note, what if you need to reference numerous external assemblies using csc.exe? Simply list each assembly using a semicolon-delimited list. You don’t need to specify multiple external assemblies for the current example, but some sample usage follows:
csc /r:System.Windows.Forms.dll;System.Drawing.dll *.cs
![]() Note As explained a bit later in this chapter, the C# compiler will automatically reference a set of core .NET assemblies (such as
Note As explained a bit later in this chapter, the C# compiler will automatically reference a set of core .NET assemblies (such as System.Windows.Forms.dll), even if they are not specified using the /r flag.
Compiling Multiple Source Files
The current incarnation of the TestApp.exe application was created using a single *.cs source code file. While it is perfectly permissible to have all of your .NET types defined in a single *.cs file, most projects are composed of multiple *.cs files to keep your code base a bit more flexible. Assume you have authored a new class contained in a new file named HelloMsg.cs.
// The HelloMessage class

using System;

using System.Windows.Forms;


class HelloMessage

{

  public void Speak()

  {

    MessageBox.Show("Hello...");

  }

}
Now, update your initial TestApp class to make use of this new class type and comment out the previous Windows Forms logic.
using System;


// Don't need this anymore.

// using System.Windows.Forms;


class TestApp

{

  static void Main()

  {

    Console.WriteLine("Testing! 1, 2, 3");


    // Don't need this anymore either.

    // MessageBox.Show("Hello...");
    // Use the HelloMessage class!

    HelloMessage h = new HelloMessage();

    h.Speak();

  }

}
You can compile your C# files by listing each input file explicitly.
csc /r:System.Windows.Forms.dll TestApp.cs HelloMsg.cs
As an alternative, the C# compiler allows you to make use of the wildcard character (*) to inform csc.exe to include all *.cs files contained in the project directory as part of the current build.
csc /r:System.Windows.Forms.dll *.cs
When you run the program again, the output is identical to the previous compiled code. The only difference between the two applications is the fact that the current logic has been split among multiple files.
Working with C# Response Files
As you might guess, if you were to build a complex C# application at the command prompt, you would have to specify a tedious number of input options to inform the compiler how to process your source code. To help lessen your typing burden, the C# compiler honors the use of response files.
C# response files contain all the instructions to be used during the compilation of your current build. By convention, these files end in a *.rsp (response) extension. Assume that you have created a response file named TestApp.rsp that contains the following options (as you can see, comments are denoted with the # character):
# This is the response file

# for the TestApp.exe example

# of Chapter 2.


# External assembly references.

/r:System.Windows.Forms.dll


# output and files to compile (using wildcard syntax).

/target:exe /out:TestApp.exe *.cs
Now, assuming this file is saved in the same directory as the C# source code files to be compiled, you are able to build your entire application as follows (note the use of the @ symbol):
csc @TestApp.rsp
If the need should arise, you can also specify multiple *.rsp files as input (e.g., csc @FirstFile.rsp @SecondFile.rsp @ThirdFile.rsp). If you take this approach, be aware that the compiler processes the command options as they are encountered. Therefore, command-line arguments in a later *.rsp file can override options in a previous response file.
Also note that flags listed explicitly on the command line before a response file will be overridden by the specified *.rsp file. Thus, if you were to enter the following:
csc /out:MyCoolApp.exe @TestApp.rsp
the name of the assembly would still be TestApp.exe (rather than MyCoolApp.exe), given the /out:TestApp.exe flag listed in the TestApp.rsp response file. However, if you list flags after a response file, the flag will override settings in the response file.
![]() Note The effect of the
Note The effect of the /reference flag is cumulative. Regardless of where you specify external assemblies (before, after, or within a response file), the end result is a summation of each reference assembly.
The Default Response File (csc.rsp)
The final point to be made regarding response files is that the C# compiler has an associated default response file (csc.rsp), which is located in the same directory as csc.exe itself (which is by default installed under C:WindowsMicrosoft.NETFramework<version>, where <version> is a given version of the platform). If you were to open this file using Notepad, you will find that numerous .NET assemblies have already been specified using the /r: flag, including various libraries for web development, LINQ programming, data access, and other core libraries (beyond mscorlib.dll).
When you are building your C# programs using csc.exe, this response file will be automatically referenced, even when you supply a custom *.rsp file. Given the presence of the default response file, the current TestApp.exe application could be successfully compiled using the following command set (as System.Windows.Forms.dll is referenced within csc.rsp):
csc /out:TestApp.exe *.cs
In the event that you wish to disable the automatic reading of csc.rsp, you can specify the /noconfig option.
csc @TestApp.rsp /noconfig
![]() Note If you reference assemblies (via the
Note If you reference assemblies (via the /r option) that you do not actually make use of, they are ignored by the compiler. Therefore, you have no need to worry about “code bloat.” If you reference a library you do not actually make use of, it is ignored by the compiler.
Obviously, the C# command-line compiler has many other options that can be used to control how the resulting .NET assembly is to be generated. You’ll see other important features where necessary over the course of this text; however, full details of these options can be found within the .NET Framework 4.5 SDK documentation.
![]() Source Code The CscExample application can be found under the Chapter 2 subdirectory.
Source Code The CscExample application can be found under the Chapter 2 subdirectory.
Building .NET Applications Using Notepad++
Another simple text editor I’d like to quickly point out is the freely downloadable Notepad++ application. This tool can be obtained from http://notepad-plus.sourceforge.net. Unlike the primitive Windows Notepad application, Notepad++ allows you to author code in a variety of languages and supports various plug-in utilities. In addition, Notepad++ provides a few other niceties, including the following:
- Out-of-the-box support for C# keywords (including keyword color coding)
- Support for syntax folding, which allows you to collapse and expand groups of code statements within the editor (similar to Visual Studio /C# Express)
- The ability to zoom in/zoom out text via Ctrl-mouse wheel
- Configurable autocompletion for a variety of C# keywords and .NET namespaces
Regarding this last point, the Ctrl+space keyboard combination will activate C# autocompletion support (see Figure 2-4).
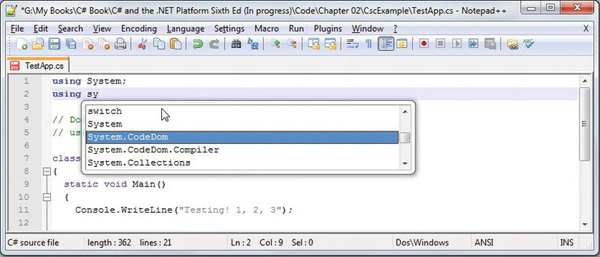
Figure 2-4. Autocompletion using Notepad++
![]() Note The options displayed by the autocomplete window can be modified and extended. Simply open up the
Note The options displayed by the autocomplete window can be modified and extended. Simply open up the C:Program Files (x86)Notepad++pluginsAPIscs.xml file for editing, and add any additional entries.
I won’t go into too many details of Notepad++ beyond what we have examined here. If you require more assistance, select the Help content menu option.
Building .NET Applications Using SharpDevelop
As you might agree, authoring C# code with Notepad++ is a step in the right direction, compared to Notepad. However, these tools do not provide rich IntelliSense capabilities for C# code, designers for building graphical user interfaces, project templates, or database manipulation utilities. To address such needs, allow me to introduce the next .NET development option: SharpDevelop (also known as #Develop).
SharpDevelop is an open source and feature-rich IDE that you can utilize to build .NET assemblies using C#, VB, Iron Ruby, Iron Python, C++ F#, or a Python-inspired .NET language named Boo. Beyond the fact that this IDE is completely free, it is interesting to note that it was written entirely in C#. In fact, you have the choice to download and compile the *.cs files manually or run a setup.exe program to install SharpDevelop on your development machine. Both distributions can be obtained from http://www.sharpdevelop.com.
SharpDevelop provides numerous productivity enhancements. Here is a hit list of some of the major benefits.
- Support for multiple .NET languages, .NET versions and project types
- IntelliSense, code completion, and code snippet capabilities
- An Add Reference dialog box to reference external assemblies, including assemblies deployed to the global assembly cache (GAC)
- Integrated GUI designers for desktop and web applications
- Integrated object browsing and code definition utilities
- Visual database designer utilities
- A C#-to-VB (and vice versa) code-conversion utility
Impressive for a free IDE, is it not? Although this chapter doesn’t cover each of these points in detail, let’s walk through a few items of interest.
![]() Note The current version of SharpDevelop (4.2) does support all C# or .NET 4.5 features. Be sure to check the SharpDevelop web site for future releases.
Note The current version of SharpDevelop (4.2) does support all C# or .NET 4.5 features. Be sure to check the SharpDevelop web site for future releases.
Building a Simple Test Project
After you have installed SharpDevelop, the File ![]() New
New ![]() Solution menu option allows you to pick which type of project you wish to generate (and in which .NET language). For example, assume you have created a C# Windows Application solution named MySDWinApp (see Figure 2-5).
Solution menu option allows you to pick which type of project you wish to generate (and in which .NET language). For example, assume you have created a C# Windows Application solution named MySDWinApp (see Figure 2-5).
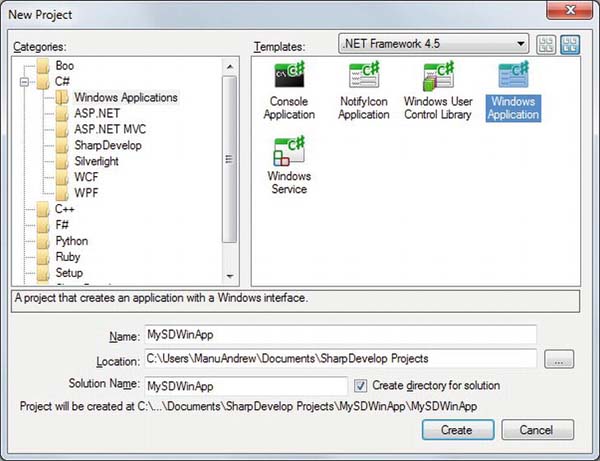
Figure 2-5. The SharpDevelop New Project dialog box
Like Visual Studio, you have a Windows Forms GUI designer toolbox (to drag and drop controls onto the designer), and a Properties window to set up the look and feel of each UI item. Figure 2-6 illustrates configuring a button control using the IDE (note that I clicked on the Design tab mounted on the bottom of the opened code file).
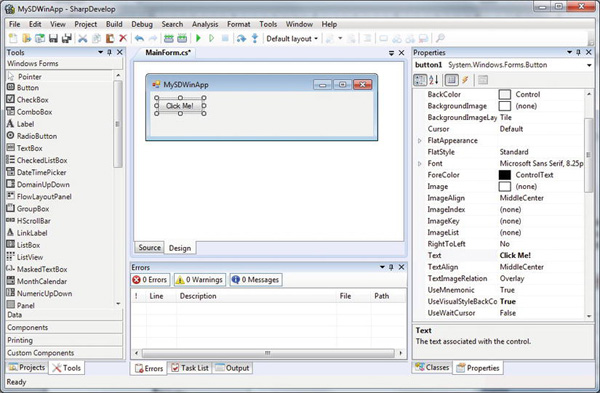
Figure 2-6. Graphically designing a Windows Forms Application with SharpDevelop
If you were to click the Source button mounted to the bottom of the form’s designer, you would find the expected IntelliSense, code completion, and integrated help features (see Figure 2-7).
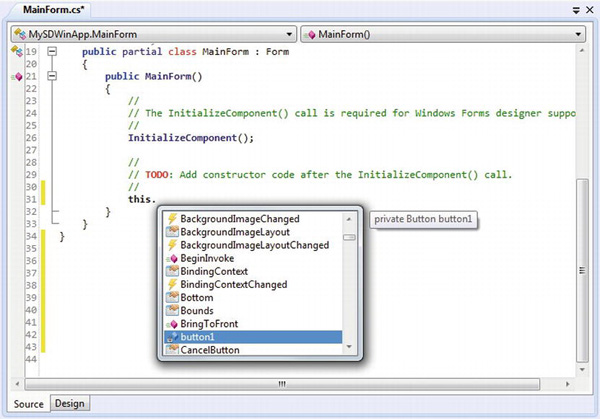
Figure 2-7. SharpDevelop supports numerous code-generation utilities
SharpDevelop was designed to mimic much of the same functionality found within Microsoft’s .NET IDEs (which we will examine next). Given this point, I won’t dive into all of the features of this open source .NET IDE. If you require more information, simply use the provided Help menu.
![]() Note MonoDevelop is an open source IDE based on the SharpDevelop code base. MonoDevelop is the preferred IDE for .NET programmers building applications for Mac OS X or Linux operating systems using the Mono platform. Consult
Note MonoDevelop is an open source IDE based on the SharpDevelop code base. MonoDevelop is the preferred IDE for .NET programmers building applications for Mac OS X or Linux operating systems using the Mono platform. Consult http://monodevelop.com/ for more details on this IDE.
Building .NET Applications Using Visual C# Express
Microsoft provides a line of IDEs that fall under the designation of Express products (http://msdn.microsoft.com/express). To date, there are various members of the Express family (all of which are completely free and supported and maintained by Microsoft Corporation), including the following:
- Visual Web Developer Express: A lightweight tool for building dynamic ASP.NET web sites and WCF services
- Visual Basic Express: A streamlined programming tool ideal for novice programmers who want to learn how to build applications using the user-friendly syntax of Visual Basic
- Visual C# Express and Visual C++ Express: Targeted IDEs for students and enthusiasts who wish to learn the fundamentals of computer science in their syntax of choice
- SQL Server Express: An entry-level, database management system geared toward hobbyists, enthusiasts, and student developers
Some Unique Features of Visual C# Express
By and large, the Express products are slimmed-down versions of their Visual Studio proper counterparts and are primarily targeted at .NET hobbyists and students. Like SharpDevelop, Visual C# Express provides various object browsing tools, GUI designers for desktop applications, the Add References dialog box, IntelliSense capabilities, and code expansion templates.
However, Visual C# Express offers a few (important) features currently not available in SharpDevelop, including the following:
- Rich support for Windows Presentation Foundation (WPF) XAML applications
- The ability to download additional free templates that support Xbox 360 development, WPF applications with Twitter integration, and much more
Because the look and feel of Visual C# Express is so similar to that of Visual Studio proper (and, to some degree, SharpDevelop), I do not provide a walk-through of this particular IDE here. You are free to use this IDE as you work through the book, but do be aware that Visual C# Express does not support project templates for building ASP.NET web sites. If you wish to also build web applications, be sure to also download Visual Web Developer, also available from http://msdn.microsoft.com/express.
Building .NET Applications Using Visual Studio
If you are a professional .NET software engineer, the chances are extremely good that your employer has purchased Microsoft’s premier IDE, Visual Studio, for your development endeavors (http://msdn.microsoft.com/vstudio). This tool is far and away the most feature-rich, enterprise-ready IDE examined in this chapter. Of course, this power comes at a price, which will vary based on the version of Visual Studio you purchase. As you might suspect, each version supplies a unique set of features.
![]() Note There are a staggering number of members within the Visual Studio family. My assumption during the remainder of this text is that you have chosen to make use of Visual Studio Professional as your IDE of choice.
Note There are a staggering number of members within the Visual Studio family. My assumption during the remainder of this text is that you have chosen to make use of Visual Studio Professional as your IDE of choice.
Although I will assume you have a copy of Visual Studio Professional, understand that owning a copy of this IDE is not required to use this edition of the text. In the worst case, I might examine an option that is not provided by your IDE (such as Microsoft C# Express or SharpDevelop). However, rest assured that all of this book’s sample code will compile just fine when processed by your tool of choice.
![]() Note After you download the source code for this book from the Source Code/Downloads area of the Apress web site (
Note After you download the source code for this book from the Source Code/Downloads area of the Apress web site (http://www.apress.com), you may load the current example into Visual Studio (or C# Express) by double-clicking the example’s *.sln file. If you are not using Visual Studio / C# Express, you will need to manually insert the provided *.cs files into your IDE’s project work space.
Some Unique Features of Visual Studio
Visual Studio ships with the expected GUI designers, code snippet support, database manipulation tools, object and project browsing utilities, and an integrated help system. Unlike many of the IDEs we have already examined, Visual Studio provides numerous additions. Here is a partial list.
- Visual XML editors/designers
- Support for Windows mobile device development
- Support for Microsoft Office development
- Designer support for Windows Workflow Foundation projects
- Integrated support for code refactoring
- Visual class designer tools
To be completely honest, Visual Studio provides so many features that it would take an entire book (a rather large book at that) to fully describe every aspect of the IDE. This is not that book. However, I do want to point out some of the major features in the pages that follow. As you progress through the text, you’ll learn more about the Visual Studio IDE where appropriate.
![]() Note If you have used a previous version of Microsoft Visual Studio, you will quickly notice that the entire look and feel has changed quite a bit. If you find the default “Dark” theme is a tad too dark for your liking, you can change to the “Light” theme by selecting the Tools
Note If you have used a previous version of Microsoft Visual Studio, you will quickly notice that the entire look and feel has changed quite a bit. If you find the default “Dark” theme is a tad too dark for your liking, you can change to the “Light” theme by selecting the Tools ![]() Options menu and picking from the Color Theme drop-down list box in the Environment
Options menu and picking from the Color Theme drop-down list box in the Environment ![]() General section. All screen shots in this text are shown in the “Light” theme.
General section. All screen shots in this text are shown in the “Light” theme.
Targeting the .NET Framework Using the New Project Dialog Box
If you are following along, create a new C# Console Application (named VsExample) using the File ![]() New
New ![]() Project menu item. As you can see in Figure 2-8, Visual Studio supports the ability to select which version of the .NET Framework you wish to build against (2.0, 3.0, 3.5, 4.0, or 4.5) using the drop-down list box on the top-center of the New Project dialog box. For each project in this text, you can simply leave the default selection of .NET Framework 4.5.
Project menu item. As you can see in Figure 2-8, Visual Studio supports the ability to select which version of the .NET Framework you wish to build against (2.0, 3.0, 3.5, 4.0, or 4.5) using the drop-down list box on the top-center of the New Project dialog box. For each project in this text, you can simply leave the default selection of .NET Framework 4.5.

Figure 2-8. Visual Studio allows you to target a particular version of the .NET Framework
Using the Solution Explorer Utility
The Solution Explorer utility (accessible from the View menu) allows you to view the set of all content files and referenced assemblies that comprise the current project (see Figure 2-9). Also notice, that you can expand a given file (such as Program.cs) to see the code types defined within the file in question. As you move through this text, I’ll point out other useful features of the Solution Explorer where necessary; however, feel free to take some time to tinker with each option, if you so choose.
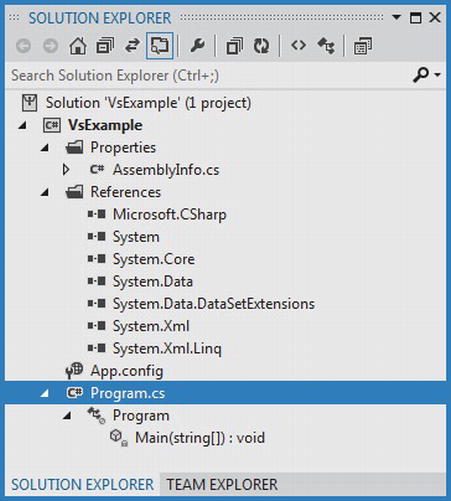
Figure 2-9. The Solution Explorer utility
Notice that the References folder of Solution Explorer displays a list of each assembly you have currently referenced, which will differ based on the type of project you select and the version of the Framework you are compiling against. Because you have created a Console Application, you will find a minimal set of libraries is automatically included (such as System.dll, System.Core.dll, System.Data.dll, and so forth).
![]() Note Recall from Chapter 1 that the primary .NET library is named
Note Recall from Chapter 1 that the primary .NET library is named mscorlib.dll. This library will not be shown in the Solution Explorer; however, you have access to all the contained types regardless.
Referencing External Assemblies
When you need to reference additional assemblies, right-click the References folder and select Add Reference. At this point, you can select your assembly from the resulting dialog box (this is essentially the way Visual Studio allows you to specify the /reference option of the command-line compiler). The Framework tab (see Figure 2-10) displays a number of commonly used .NET assemblies; however, the Browse tab allows you to navigate to any .NET assembly on your hard drive. Also, the very useful Recent tab keeps a running tally of frequently referenced assemblies you have used in other projects.
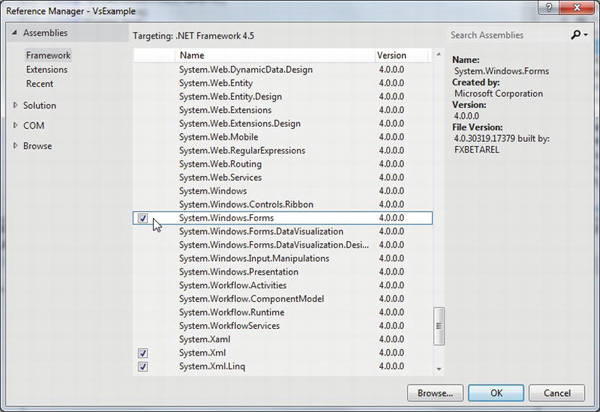
Figure 2-10. The Add Reference dialog box
By way of a simple test, locate the System.Windows.Forms.dll assembly from the Framework area, and check the related check box. After you do so (and close the dialog), you will see this library appear under the References folder of your Solution Explorer. You can delete this reference by selecting it in the Solution Explorer and pressing the Delete key on your keyboard (or via the Delete menu option of a right mouse click).
Viewing Project Properties
Finally, notice an icon named Properties within Solution Explorer. When you double-click this item, you are presented with a sophisticated project configuration editor (see Figure 2-11).
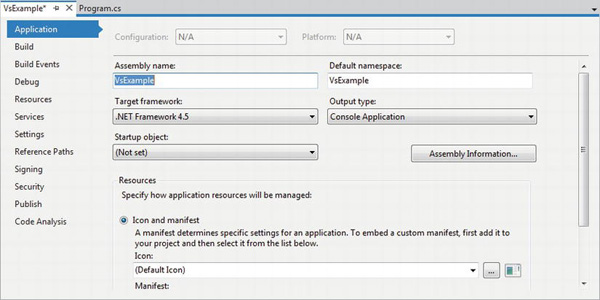
Figure 2-11. The Project Properties window
You will see various aspects of the Project Properties window as you progress through this book. However, if you take some time to poke around, you will see that you can establish various security settings, strongly name your assembly (see Chapter 14), deploy your application, insert application resources, and configure pre- and post-build events.
The Class View Utility
The next tool to examine is the Class View utility, which you can load from the View menu. The purpose of this utility is to show all of the types in your current project from an object-oriented perspective (rather than the default file-based view of Solution Explorer). The top pane displays the set of namespaces and their types, while the bottom pane displays the currently selected type’s members (see Figure 2-12).
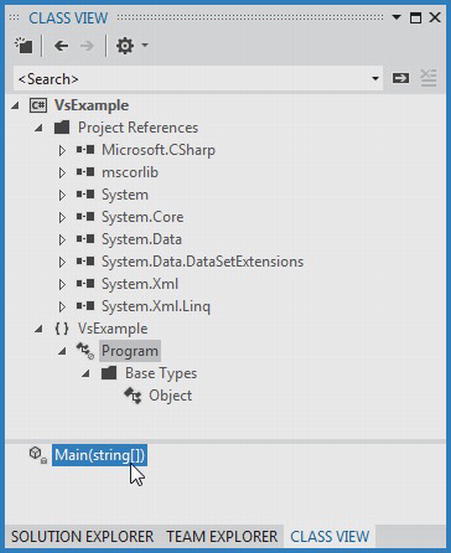
Figure 2-12. The Class View utility
When you double-click on a type or type member using the Class View tool, Visual Studio will automatically open the correct C# code file, and place your mouse cursor at the correct location. Another nice feature of the Visual Studio Class View tool is that you are able to open up any referenced assembly and drill into the contained namespaces, types, and members.
The Object Browser Utility
Visual Studio also provides a second utility to investigate the set of referenced assemblies within your current project. Activate the Object Browser using the View menu, and then select the assembly you wish to investigate (see Figure 2-13).
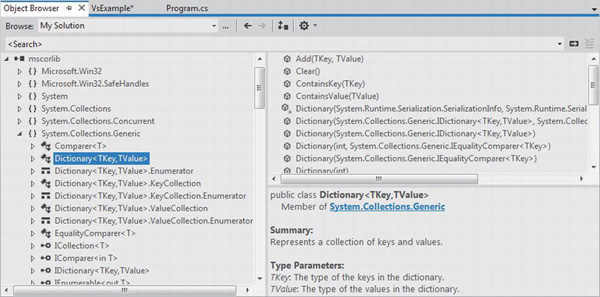
Figure 2-13. The Object Browser utility
Integrated Support for Code Refactoring
One major feature that ships with Visual Studio is support to refactor existing code. Simply put, refactoring is a formal and mechanical process whereby you improve an existing code base. In the bad old days, refactoring typically involved a ton of manual labor. Luckily, Visual Studio does a great deal to automate the refactoring process by supporting a number of commonly used techniques.
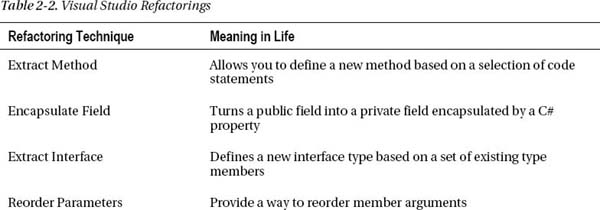
Using the Refactor menu (which will only be available when a code file is open in the IDE for editing), related keyboard shortcuts, smart tags, and/or context-sensitive mouse clicks, you can dramatically reshape your code with minimal fuss and bother. Table 2-2 defines some common refactorings recognized by Visual Studio.

To illustrate refactoring in action, update your Main() method with the following simple code:
static void Main(string[] args)

{

  // Set up Console UI (CUI)

  Console.Title = "My Rocking App";

  Console.ForegroundColor = ConsoleColor.Yellow;

  Console.BackgroundColor = ConsoleColor.Blue;

  Console.WriteLine("*************************************");

  Console.WriteLine("***** Welcome to My Rocking App *****");

  Console.WriteLine("*************************************");

  Console.BackgroundColor = ConsoleColor.Black;


  // Wait for Enter key to be pressed.

  Console.ReadLine();

}
While there is nothing wrong with the preceding code as it now stands, imagine that you want to display this welcome message at various places throughout your program. Rather than retyping the same exact console user interface logic, it would be ideal to have a helper function that could be called to do so. Given this, you will apply the Extract Method refactoring to your existing code.
First, select each code statement within Main() (except the final call to Console.ReadLine()) using the editor. Then right-click the selected text and select the Extract Method option within the Refactor context menu (see Figure 2-14).

Figure 2-14. Activating a code refactoring
Name your new method ConfigureCUI using the resulting dialog box. When you have finished, you will find that your Main() method calls the newly generated ConfigureCUI() method, which now contains the previously selected code.
class Program

{

  static void Main(string[] args)

  {

    ConfigureCUI();


    // Wait for key press to close.

    Console.ReadLine();

  }


  private static void ConfigureCUI()

  {

    // Set up Console UI (CUI)

    Console.Title = "My Rocking App";

    Console.ForegroundColor = ConsoleColor.Yellow;

    Console.BackgroundColor = ConsoleColor.Blue;

    Console.WriteLine("*************************************");

    Console.WriteLine("***** Welcome to My Rocking App *****");

    Console.WriteLine("*************************************");

    Console.BackgroundColor = ConsoleColor.Black;

  }

}
This is a simple example of using the built-in refactorings of Visual Studio, and you’ll see additional examples here and there over the course of this text. However, feel free to activate the remaining refactoring options to see their net effect firsthand (remember, we are not going to use the current VsExample project for anything later in the book, so hack away).
Code Snippets and Surround with Technology
Visual Studio (as well as Visual C# Express) is capable of inserting prefabricated blocks of C# code using menu selections, context-sensitive mouse clicks, and/or keyboard shortcuts. The number of available code expansions is impressive and can be broken down into two main groups.
- Snippets: These templates insert common code blocks at the location of the mouse cursor.
- Surround With: These templates wrap a block of selected statements within a relevant scope.
To see this functionality firsthand, assume that you wish to iterate over the incoming parameters of the Main() method using a foreach construct. Rather than typing the code in by hand, you can activate the foreach code snippet. When you have done so, the IDE will dump out a foreach code template at the current location of the mouse cursor.
To illustrate, place the mouse cursor after the initial opening curly bracket of Main(). One way to activate a code snippet is to right-click the mouse and activate the Insert Snippet (or Surround With) menu option. Here, you will find a list of all code snippets of this category (press the Esc key to dismiss the pop-up menu). As a shortcut, however, you can simply type in the name of the code snippet, foreach in this case. In Figure 2-15, notice how the icon for a code snippet looks a bit like a torn piece of paper.
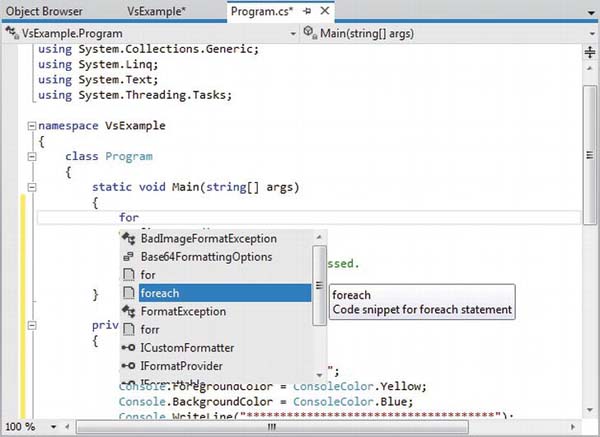
Figure 2-15. Activating a code snippet
After you find the snippet you want to activate, press the Tab key twice. This will autocomplete the entire snippet and leave you with a set of placeholders that you can fill in to complete the snippet. If you press the Tab key, you can cycle between each placeholder and fill in the gaps (press the Esc key to exit the code snippet edit mode). For our example, we can change the first placeholder (the var keyword) with the string data type; the second placeholder (the item variable name) with arg; and the final placeholder with the name of the incoming string array parameter, leaving us with the following:
static void Main(string[] args)

{

  foreach (string arg in args)

  {


  }

...

}
If you were to right-click in an open C# code file and select the Surround With menu, you would likewise be presented with a list of options. When using Surround With snippets, typically you first select a block of code statements to represent what should be used to wrap them (e.g., try/catch block). Be sure to take time to explore these predefined code expansion templates, as they can radically speed up the development process.
![]() Note All code expansion templates are XML-based descriptions of the code to generate within the IDE. Using Visual Studio (as well as Visual C# Express), you can create your own custom code templates. Details of how to do so can be found in my article “Investigating Code Snippet Technology” at
Note All code expansion templates are XML-based descriptions of the code to generate within the IDE. Using Visual Studio (as well as Visual C# Express), you can create your own custom code templates. Details of how to do so can be found in my article “Investigating Code Snippet Technology” at http://msdn.microsoft.com/en-US/library/ms379562.
The Visual Class Designer
Visual Studio gives you the ability to design classes and other types (such as interfaces or delegates) in a visual manner (this functionality is not included in Visual C# Express). The Class Designer utility allows you to view and modify the relationships of the types (classes, interfaces, structures, enumerations, and delegates) in your project. Using this tool, you are able to visually add (or remove) members to (or from) a type and have your modifications reflected in the corresponding C# file. Also, as you modify a given C# file, changes are reflected in the class diagram.
To work with this aspect of Visual Studio, the first step is to insert a new class diagram file. There are many ways to do so, one of which is to click the View Class Diagram button located on Solution Explorer’s right side (see Figure 2-16; be sure your project—not the containing solution—is the selected item in the window).
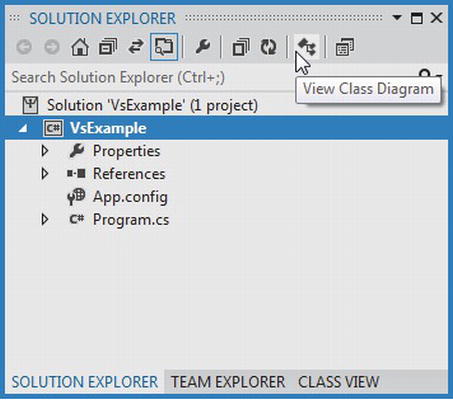
Figure 2-16. Inserting a class diagram file into the current project
After you do so, you will find class icons that represent the types found in your current project. If you click the arrow icon for a given type, you can show or hide the type’s members (see Figure 2-17).
![]() Note Using the Class Designer toolbar, you can fine-tune the display options of the designer surface.
Note Using the Class Designer toolbar, you can fine-tune the display options of the designer surface.
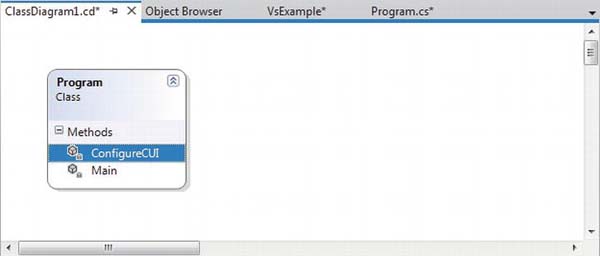
Figure 2-17. The Class Diagram viewer
The Class Designer utility works in conjunction with two other aspects of Visual Studio: the Class Details window (activated using the View ![]() Other Windows menu) and the Class Designer Toolbox (activated using the View
Other Windows menu) and the Class Designer Toolbox (activated using the View ![]() Toolbox menu item). The Class Details window not only shows you the details of the currently selected item in the diagram, but also allows you to modify existing members and insert new members on the fly (see Figure 2-18).
Toolbox menu item). The Class Details window not only shows you the details of the currently selected item in the diagram, but also allows you to modify existing members and insert new members on the fly (see Figure 2-18).
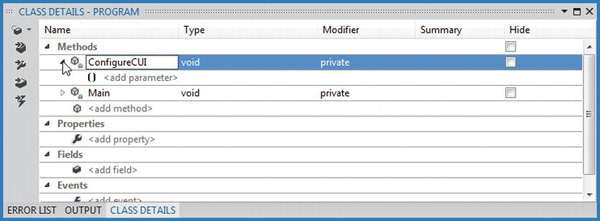
Figure 2-18. The Class Details window
The Class Designer Toolbox, which can also be activated using the View menu, allows you to insert new types (and create relationships between these types) into your project visually (see Figure 2-19). (Be aware you must have a class diagram as the active window to view this toolbox.) As you do so, the IDE automatically creates new C# type definitions in the background.
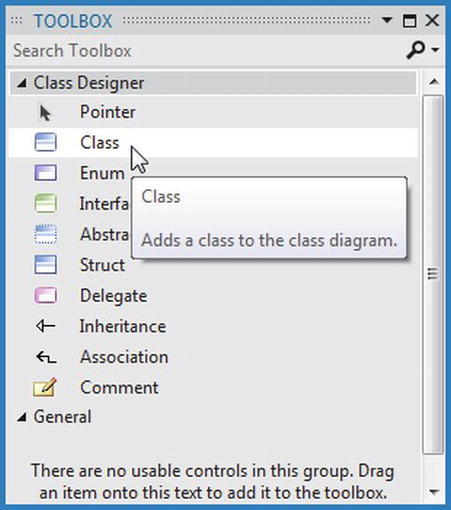
Figure 2-19. The Class Designer Toolbox
By way of example, drag a new Class from the Class Designer Toolbox onto your Class Designer. Name this class Car in the resulting dialog box. Now, using the Class Details window, add a public string field named petName (see Figure 2-20).
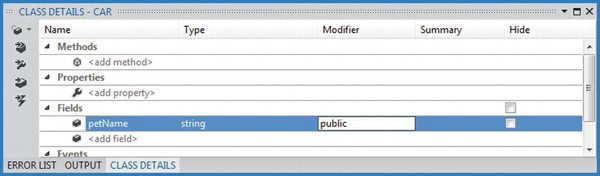
Figure 2-20. Adding a field with the Class Details window
If you now look at the C# definition of the Car class, you will see it has been updated accordingly (minus the additional code comments seen below).
public class Car

{

  // Public data is typically a bad idea; however,

  // it keeps this example simple.

  public string petName;

}
Now, activate the designer file once again and drag another new Class onto the designer and name it SportsCar. Now, select the Inheritance icon from the Class Designer Toolbox and click the top of the SportsCar icon. Next, click the mouse on top of the Car class icon. If you performed these steps correctly, you have just derived the SportsCar class from Car (see Figure 2-21).
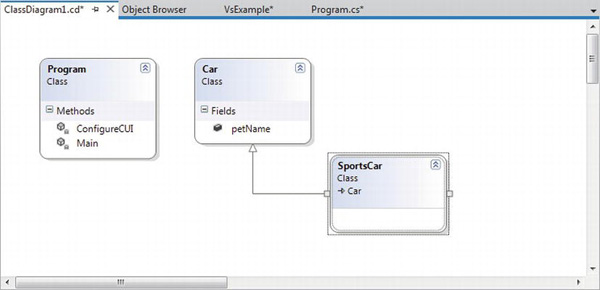
Figure 2-21. Visually deriving from an existing class
To complete this example, update the generated SportsCar class with a public method named GetPetName(), authored as follows:
public class SportsCar : Car

{

  public string GetPetName()

  {

    petName = "Fred";

    return petName;

  }

}
You will make use of these (and other) visual tools of Visual Studio over the course of this book. However, you should now feel a bit more comfortable regarding the basics of the IDE.
![]() Note The concept of inheritance will be fully examined in Chapter 6.
Note The concept of inheritance will be fully examined in Chapter 6.
The Integrated .NET Framework 4.5 SDK Documentation System
The final aspect of Visual Studio you must be comfortable with from the outset is the fully integrated help system. The .NET Framework 4.5 SDK documentation is extremely good, very readable, and full of useful information. Given the huge number of predefined .NET types (which number well into the thousands), you must be willing to roll up your sleeves and dig into the provided documentation. If you resist, you are doomed to a long, frustrating, and painful existence as a .NET developer.
If you have an Internet connection, you can view the .NET Framework 4.5 SDK documentation online at the following web address:
http://msdn.microsoft.com/library
From here, use the tree view navigation on the main page to navigate to the .NET Development area, and select .NET Framework 4.5. After you have done so, you will find the all-important .NET Framework Class Library link, which documents every single type in every single .NET namespace (Figure 2-22).
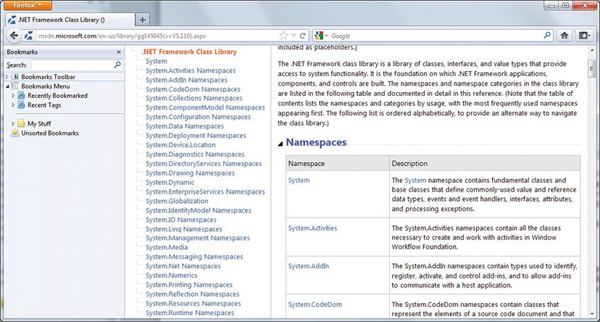
Figure 2-22. Viewing the .NET Framework documentation online
During the installation of Visual Studio, you will be given the option to install the same help system locally to your computer (which can be very helpful when you don’t have an active Internet connection). If you wish to perform a local installation of the help system after the fact, navigate to the All Programs ![]() Microsoft Visual Studio 11
Microsoft Visual Studio 11 ![]() Microsoft Help Viewer tool using your Windows Start button. After you have done so, you can then elect to add the help documentation you are interested in using the Manage Content tab, as seen in Figure 2-23 (if hard drive space allows, I’d recommend adding all possible documentation).
Microsoft Help Viewer tool using your Windows Start button. After you have done so, you can then elect to add the help documentation you are interested in using the Manage Content tab, as seen in Figure 2-23 (if hard drive space allows, I’d recommend adding all possible documentation).
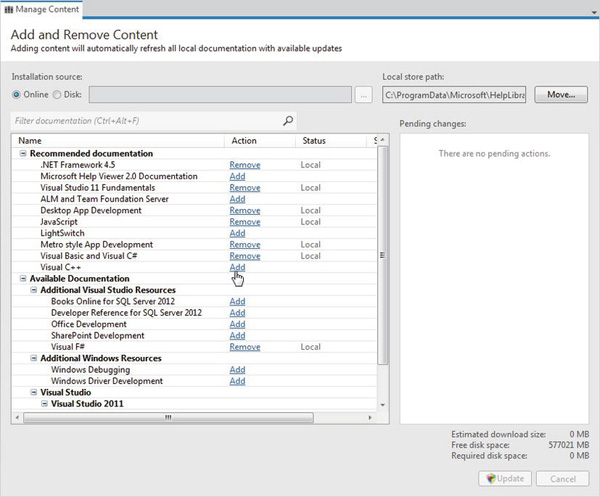
Figure 2-23. The Help Library Manager allows you to download a local copy of the .NET Framework 4.5 SDK Documentation
Regardless if you have installed the help system locally or are going online, the simplest way to interact with the documentation is to highlight a C# keyword, type name or member name within the Visual Studio code window, and press the F1 key. This will automatically open a documentation window for the selected item. For example, select the string keyword within your Car class definition. After you press F1, you will see the Help page for the string type appear.
Another useful aspect of the documentation is the Search tab of the display. Here you can enter in the name of any namespace, type, or member and navigate to the correct location. If you were to try to search for the System.Reflection namespace, you would be able to learn about the details of this namespace, examine the contained types, view code examples, and so forth.
![]() Note At the risk of sounding like a broken record, I really can’t emphasize enough how important it is that you learn to use the .NET Framework 4.5 SDK documentation. No book, no matter how lengthy, can cover every aspect of the .NET platform. Make sure you take some time to get comfortable using the help system—you’ll thank yourself later.
Note At the risk of sounding like a broken record, I really can’t emphasize enough how important it is that you learn to use the .NET Framework 4.5 SDK documentation. No book, no matter how lengthy, can cover every aspect of the .NET platform. Make sure you take some time to get comfortable using the help system—you’ll thank yourself later.
Summary
So as you can see, you have many new toys at your disposal! The point of this chapter was to provide you with a tour of the major programming tools a C# programmer may leverage during the development process. You began the journey by learning how to generate .NET assemblies using nothing other than the free C# compiler (csc.exe) and Notepad/Notepad++ applications, and were walked through the process of using these tools to edit and compile *.cs code files.
You were also introduced three feature-rich IDEs, starting with the open source SharpDevelop, followed by Microsoft’s Visual C# Express and Visual Studio Professional. While this chapter only scratched the surface of each tool’s functionality, you should be in a good position to explore your chosen IDE at your leisure (and remember that you’ll see additional features of Visual Studio as you progress through the book).