C H A P T E R 23
ADO.NET Part III: The Entity Framework
The previous two chapters examined the fundamental ADO.NET programming models—the connected and disconnected layers, specifically. These approaches have enabled .NET programmers to work with relational data (in a relatively straightforward manner) since the initial release of the platform. However, Microsoft introduced a brand-new component of the ADO.NET API called the Entity Framework (or simply, EF) in .NET 3.5 Service Pack 1.
The overarching goal of EF is to allow you to interact with relational databases using an object model that maps directly to the business objects in your application. For example, rather than treating a batch of data as a collection of rows and columns, you can operate on a collection of strongly typed objects termed entities. These entities are also natively LINQ aware, and you can query against them using the same LINQ grammar you learned about in Chapter 12. The EF runtime engine translates your LINQ queries into proper SQL queries on your behalf.
This chapter will introduce you to the EF programming model. You will learn about various bits of infrastructure, including object services, entity client, LINQ to Entities, and Entity SQL. You will also learn about the format of the all-important *.edmx file and its role in the Entity Framework API. Next, you will learn how to generate *.edmx files using Visual Studio and at the command line using the EDM generator utility (edmgen.exe).
By the time you complete this chapter, you will have the final version of AutoLotDAL.dll, and you will learn how to bind entity objects to a Windows Forms desktop application.
Understanding the Role of Entity Framework
The connected and disconnected layers of ADO.NET provide you with a fabric that lets you select, insert, update, and delete data with connections, commands, data readers, data adapters, and DataSet objects. While this is all well and good, these aspects of ADO.NET force you to treat the fetched data in a manner that is tightly coupled to the physical database schema. Recall for example, that when you use the connected layer, you typically iterate over each record by specifying column names to a data reader. On the other hand, if you opt to use the disconnected layer, you find yourself traversing the rows and columns collections of a DataTable object within a DataSet container.
If you use the disconnected layer in conjunction with strongly typed DataSets/data adapters, you end up with a programming abstraction that provides some helpful benefits. First, the strongly typed DataSet class exposes table data using class properties. Second, the strongly typed table adapter supports methods that encapsulate the construction of the underlying SQL statements. Recall the following AddRecords() method from Chapter 22:
public static void AddRecords(AutoLotDataSet.InventoryDataTable tb,

                              InventoryTableAdapter dAdapt)

{

  // Get a new strongly typed row from the table.

  AutoLotDataSet.InventoryRow newRow = tb.NewInventoryRow();


  // Fill row with some sample data.

  newRow.CarID = 999;

  newRow.Color = "Purple";

  newRow.Make = "BMW";

  newRow.PetName = "Saku";


  // Insert the new row.

  tb.AddInventoryRow(newRow);


  // Add one more row, using overloaded Add method.

  tb.AddInventoryRow(888, "Yugo", "Green", "Zippy");


  // Update database.

  dAdapt.Update(tb);

}
Things get even better if you combine the disconnected layer with LINQ to DataSet. In this case, you can apply LINQ queries to your in-memory data to obtain a new result set, which you can then optionally map to a stand-alone object such as a new DataTable, a List<T>, Dictionary<K,V>, or array of data, as follows:
static void BuildDataTableFromQuery(DataTable data)

{

  var cars = from car in data.AsEnumerable()

             where car.Field<int>("CarID") > 5 select car;


  // Use this result set to build a new DataTable.

  DataTable newTable = cars.CopyToDataTable();


  // Work with DataTable...

}
LINQ to DataSet is useful; however, you need to remember that the target of your LINQ query is the data returned from the database, not the database engine itself. Ideally, you could build a LINQ query that you send directly to the database engine for processing, and get back some strongly typed data in return (which is exactly what the ADO.NET Entity Framework lets you accomplish).
When you use either the connected or disconnected layer of ADO.NET, you must always be mindful of the physical structure of the back-end database. You must know the schema of each data table, author complex SQL queries to interact with said table data, and so forth. This can force you to author some fairly verbose C# code because as C# itself does not speak the language of database schema directly.
To make matters worse, the way in which a physical database is constructed (by your friendly DBA) is squarely focused on database constructs such as foreign keys, views, and stored procedures. The databases constructed by your friendly DBA can grow quite complex as the DBA endeavors to account for security and scalability. This also complicates the sort of C# code you must author in order to interact with the data store.
The ADO.NET Entity Framework (EF) is a programming model that attempts to lessen the gap between database constructs and object-oriented programming constructs. Using EF, you can interact with a relational database without ever seeing a line of SQL code (if you so choose). Rather, when you apply LINQ queries to your strongly typed classes, the EF runtime generates proper SQL statements on your behalf.
![]() Note LINQ to Entities is the term that describes the act of applying LINQ queries to ADO.NET EF entity objects.
Note LINQ to Entities is the term that describes the act of applying LINQ queries to ADO.NET EF entity objects.
Another possible approach: rather than updating database data by finding a row, updating the row, and sending the row back for processing with a batch of SQL queries, you can simply change properties on an object and save its state. Again, the EF runtime updates the database automatically.
As far as Microsoft is concerned, the ADO.NET Entity Framework is simply another approach to the data-access APIs, and it is not intended to replace the connected or disconnected layers. However, once you spend some time working with EF, you might quickly find yourself preferring this rich object model over the more primitive world of SQL queries and row/column collections.
Nevertheless, chances are you will find uses for all three approaches in your .NET projects; in some cases, the EF model might complicate your code base. For example, if you want to build an in-house application that needs to communicate only with a single database table, you might prefer to use the connected layer to hit a batch of related stored procedures. Larger applications can particularly benefit from EF, especially if the development team is comfortable working with LINQ. As with any new technology, you will need to determine how (and when) ADO.NET EF is appropriate for the task at hand.
![]() Note You might recall a database programming API introduced with .NET 3.5 called LINQ to SQL. This API is close in concept (and fairly close in terms of programming constructs) to ADO.NET EF. While LINQ to SQL is not formally dead, the official word from those kind folks in Redmond is that you should put your efforts into EF, not LINQ to SQL.
Note You might recall a database programming API introduced with .NET 3.5 called LINQ to SQL. This API is close in concept (and fairly close in terms of programming constructs) to ADO.NET EF. While LINQ to SQL is not formally dead, the official word from those kind folks in Redmond is that you should put your efforts into EF, not LINQ to SQL.
The Role of Entities
The strongly typed classes mentioned previously are called entities. Entities are a conceptual model of a physical database that maps to your business domain. Formally speaking, this model is termed an Entity Data Model (EDM). The EDM is a client-side set of classes that map to a physical database, but you should understand that the entities need not map directly to the database schema in so far as naming conventions go. You are free to restructure your entity classes to fit your needs, and the EF runtime will map your unique names to the correct database schema.
For example, you might recall that you created the simple Inventory table in the AutoLot database using the database schema shown in Figure 23-1.

Figure 23-1. Structure of the Inventory table of the AutoLot database
If you were to generate an EDM for the Inventory table of the AutoLot database (you’ll see how to do so momentarily), the entity will be called Inventory by default. However, you could rename this class to Car and define uniquely named properties of your choosing, which will be mapped to the columns of the Inventory table. This loose coupling means that you can shape the entities so they closely model your business domain. Figure 23-2 shows such an entity class.

Figure 23-2. The Car entity is a client-side reshaping of the Inventory schema
![]() Note In many cases, the client-side entity class will be identically named to the related database table. However, remember that you can always reshape the entity to match your business situation.
Note In many cases, the client-side entity class will be identically named to the related database table. However, remember that you can always reshape the entity to match your business situation.
We will build a full example with EF in just a bit. However, for the time being, consider the following Program class, which uses the Car entity class (and a related class named AutoLotEntities) to add a new row to the Inventory table of AutoLot. This class is termed an object context; the job of this class it is to communicate with the physical database on your behalf (you will learn more details soon).
class Program

{

  static void Main(string[] args)

  {

    // Connection string automatically read from

    // generated config file.

    using (AutoLotEntities context = new AutoLotEntities())

    {

      // Add a new record to Inventory table, using our entity.
context.Cars.AddObject(new Car() { AutoIDNumber = 987, CarColor = "Black",
MakeOfCar = "Pinto",
NicknameOfCar = "Pete" });
context.SaveChanges();
}
}
}
It is up to the EF runtime to take the client-side representation of the Inventory table (here, a class named Car) and map it back to the correct columns of the Inventory table. Notice that you see no trace of any sort of SQL INSERT statement; you simply add a new Car object to the collection maintained by the aptly named Cars property of the context object and save your changes. Sure enough, if you view the table data using the Server Explorer of Visual Studio, you will see a brand-new record (see Figure 23-3).
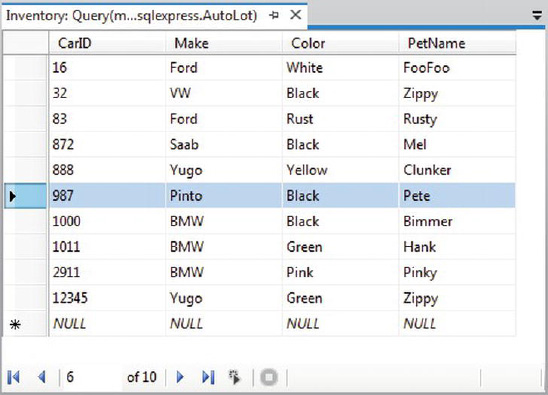
Figure 23-3. The result of saving the context
There is no magic in the preceding example. Under the covers, a connection to the database is made, a proper SQL statement is generated, and so forth. The benefit of EF is that these details are handled on your behalf. Now let’s look at the core services of EF that make this possible.
The Building Blocks of the Entity Framework
The EF API sits on top of the existing ADO.NET infrastructure you have already examined in the previous two chapters. Like any ADO.NET interaction, the entity framework uses an ADO.NET data provider to communicate with the data store. However, the data provider must be updated so it supports a new set of services before it can interact with the EF API. As you might expect, the Microsoft SQL Server data provider has been updated with the necessary infrastructure, which is accounted for when using the System.Data.Entity.dll assembly.
![]() Note Many third-party databases (e.g., Oracle and MySQL) provide EF-aware data providers. Consult your database vendor for details or log on to
Note Many third-party databases (e.g., Oracle and MySQL) provide EF-aware data providers. Consult your database vendor for details or log on to www.sqlsummit.com/dataprov.htm for a list of known ADO.NET data providers.
In addition to adding the necessary bits to the Microsoft SQL Server data provider, the System.Data.Entity.dll assembly contains various namespaces that account for the EF services themselves. The two key pieces of the EF API to concentrate on for the time being are object services and entity client.
The Role of Object Services
Object services is the name given to the part of EF that manages the client-side entities as you work with them in code. For example, object services track the changes you make to an entity (e.g., changing the color of a car from green to blue), manage relationships between the entities (e.g., looking up all orders for a customer named Steve Hagen), and provide ways to save your changes to the database, as well as ways to persist the state of an entity with XML and binary serialization services.
Programmatically speaking, the object services layer micromanages any class that extends the EntityObject base class. As you might suspect, EntityObject is in the inheritance chain for all entity classes in the EF programming model. For example, if you look at the inheritance chain of the Car entity class used in the previous example, you see that Car is-a EntityObject (see Figure 23-4).

Figure 23-4. EF’s object service layer can manage any class that extends EntityObject
The Role of the Entity Client
Another major aspect of the EF API is the entity client layer. This part of the EF API is in charge of working with the underlying ADO.NET data provider to make connections to the database, generate the necessary SQL statements based on the state of your entities and LINQ queries, map fetched database data into the correct shape of your entities, and manage other details you would normally perform by hand if you were not using the Entity Framework.
You can find the functionality of the entity client layer in the System.Data.EntityClient namespace. This namespace includes a set of classes that map EF concepts (such as LINQ to Entity queries) to the underlying ADO.NET data provider. These classes (e.g., EntityCommand and EntityConnection) are eerily similar to the classes you find in an ADO.NET data provider. For example, Figure 23-5 illustrates how the classes of the entity client layer extend the same abstract base classes of any other provider (e.g., DbCommand and DbConnection; you can also see Chapter 21 for more details on this subject).

Figure 23-5. The entity client layer maps entity commands to the underlying ADO.NET data provider
The entity client layer typically works behind the scenes, but it is entirely possible to work directly with an entity client if you require full control over how it performs its duties (most notably, how it generates the SQL queries and handles the returned database data).
If you require greater control over how the entity client builds a SQL statement based on the incoming LINQ query, you can use Entity SQL. Entity SQL is a database-independent dialect of SQL that works directly with entities. After you build an Entity SQL query, it can be sent directly to entity client services (or if you want, to object services), where it will be formatted into a proper SQL statement for the underlying data provider. You will not work with Entity SQL to any significant extent in this chapter, but you will see a few examples of this new SQL-based grammar later in the chapter.
If you require greater control over how a fetched result set is manipulated, you can forego the automatic mapping of database results to entity objects and manually process the records using the EntityDataReader class. Unsurprisingly, the EntityDataReader allows you to process fetched data using a forward-only, read-only stream of data, just as SqlDataReader does. You will see a working example of this approach later in the chapter.
The Role of the *.edmx File (and Friends)
Recapping the story thus far, entities are client-side classes, which function as an Entity Data Model. While the client-side entities will eventually be mapped to the correct database table, there is no tight coupling between the property names of your entity classes and the column names on the data table.
For the Entity Framework API to map entity class data to database table data correctly, you need a proper definition of the mapping logic. In any data model–driven system, the entities, the real database, and the mapping layers are separated into three related parts: a conceptual model, a logical model, and a physical model.
- The conceptual model defines the entities and their relationships (if any).
- The logical model maps the entities and relationships into tables with any required foreign key constraints.
- The physical model represents the capabilities of a particular data engine by specifying storage details, such table schema, partitioning, and indexing.
In the world of EF, each of these three layers is captured in an XML-based file format. When you use the integrated Entity Framework designers of Visual Studio, you end up with a file that takes an *.edmx file extension (remember, EDM = entity data model). This file includes XML descriptions of the entities, the physical database, and instructions on how to map this information between the conceptual and physical models. You will examine the format of the *.edmx file in the first example of this chapter (which you will see in a moment).
When you compile your EF-based projects using Visual Studio, the *.edmx file is used to generate three stand-alone XML files: one for the conceptual model data (*.csdl), one for the physical model (*.ssdl), and one for the mapping layer (*.msl). The data of these three XML-based files is then bundled into your application in the form of binary resources. Once compiled, your .NET assembly has all the necessary data for the EF API calls you make in your code base.
The Role of the ObjectContext and ObjectSet<T> Classes
The final part of the EF puzzle is the ObjectContext class, which is a member of the System.Data.Objects namespace. When you generate your *.edmx file, you get the entity classes that map to the database tables and a class that extends ObjectContext. You typically use this class to interact with object services and entity client functionality indirectly.
ObjectContext provides a number of core services to child classes, including the ability to save all changes (which results in a database update), tweak the connection string, delete objects, call stored procedures, and handle other fundamental details. Table 23-1 describes some of the core members of the ObjectContext class (be aware that a majority of these members stay in memory until you call SaveChanges()).

The ObjectContext-derived class serves as a container that manages entity objects, which are stored in a collection of type ObjectSet<T>. For example, if you generate an *.edmx file for the Inventory table of the AutoLot database, you end up with a class named (by default) AutoLotEntities. This class supports a property named Inventories (note the plural name) that encapsulates an ObjectSet<Inventory> data member. If you create an EDM for the Orders table of the AutoLot database, the AutoLotEntities class will define a second property named Orders that encapsulates an ObjectSet<Order> member variable. Table 23-2 defines some common members of System.Data.Objects.ObjectSet<T>.

Once you drill into the correct property of the object context, you can call any member of ObjectSet<T>. Consider again the sample code shown in the first few pages of this chapter:
using (AutoLotEntities context = new AutoLotEntities())

{

  // Add a new record to Inventory table, using our entity.

  context.Cars.AddObject(new Car() { AutoIDNumber = 987, CarColor = "Black",

                                     MakeOfCar = "Pinto",

                                     NicknameOfCar = "Pete" });

  context.SaveChanges();

}
Here, AutoLotEntities is-a ObjectContext. The Cars property gives you access to the ObjectSet<Car> variable. You use this reference to insert a new Car entity object and tell the ObjectContext to save all changes to the database.
ObjectSet<T> is typically the target of LINQ to Entity queries; as such, ObjectSet<T> supports the same extension methods you learned about in Chapter 12. Moreover, ObjectSet<T> gains a good deal of functionality from its direct parent class, ObjectQuery<T>, which is a class that represents a strongly typed LINQ (or Entity SQL) query.
All Together Now!
Before you build your first Entity Framework example, take a moment to ponder Figure 23-6, which shows you how the EF API is organized.

Figure 23-6. The major components of the ADO.NET Entity Framework
The moving parts illustrated by Figure 23-6 are not as complex as they might seem at first glance. For example, consider this common scenario. You author some C# code that applies a LINQ query to an entity you received from your context. This query is passed into object services, where it formats the LINQ command into a tree that the entity client can understand. In turn, the entity client formats this tree into a proper SQL statement for the underlying ADO.NET provider. The provider returns a data reader (e.g., a DbDataReader-derived object) that client services use to stream data to object services using an EntiryDataReader. What your C# code base gets back is an enumeration of entity data (IEnumerable<T>).
Here is another scenario to consider. Your C# code base wants more control over how client services constructs the eventual SQL statement to send to the database. Thus, you author some C# code using Entity SQL that can be passed directly to entity client or object services. The end result returns as an IEnumerable<T>.
In either of these scenarios, you must make the XML data of the *.edmx file known to client services; this enables it to understand how to map database atoms to entities. Finally, remember that the client (e.g., your C# code base) can also nab the results sent from entity client by using the EntityDataReader directly.
Building and Analyzing Your First EDM
Now that you have a better understanding of what the ADO.NET Entity Framework is attempting to accomplish, as well as a high-level idea of how it all works, it’s time to look at your first full example. To keep things simple for now, you will build an EDM that only allows access to the Inventory table of AutoLot. After you understand the basics, you will build a new EDM that accounts for the entire AutoLot database, and then display your data in a graphical user interface.
Generating the *.edmx File
Begin by creating a new Console Application named InventoryEDMConsoleApp. When you want to use the Entity Framework, your first step is to generate the necessary conceptual, logical, and physical model data defined by the *.edmx file. One way to do this is to use the .NET 4.5 SDK command-line tool, EdmGen.exe. Open a Developer Command Prompt and enter the following instruction:
EdmGen.exe -?
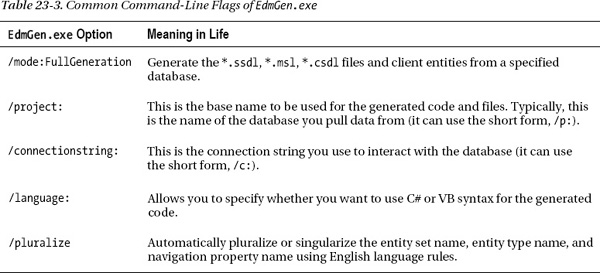
You should see a list of options that you can supply to the tool to generate the necessary files based on an existing database; you should also see options to generate a brand-new database based on existing entity files! Table 23-3 documents some common options of EdmGen.exe.
As of .NET 4.0, the EF programming model supports domain-first programming, which allows you to create your entities (with typical object-oriented techniques) and use them to generate a brand-new database. In this introductory look at ADO.NET EF, you will not use this model-first mentality, nor will you use EdmGen.exe to generate your client-side entity model. Instead, you will use the graphical EDM designers of Visual Studio.
Now activate the Project ![]() Add New Item... menu option and insert a new ADO.NET Entity Data Model item (be sure to highlight the Data node; see Figure 23-7) named
Add New Item... menu option and insert a new ADO.NET Entity Data Model item (be sure to highlight the Data node; see Figure 23-7) named InventoryEDM.edmx.

Figure 23-7. Inserting a new ADO.NET EDM project item
Clicking the Add button launches the Entity Model Data Wizard. The wizard’s first step allows you to select whether you want to generate an EDM from an existing database or define an empty model (for model-first development). Select the Generate from database option and click the Next button (see Figure 23-8).

Figure 23-8. Generating an EDM from an existing database
You can select your database in the wizard’s second step. If you already have a connection to a database within the Visual Studio Server Explorer, you will see it listed in the drop-down combo box. If this is not the case, you can click the New Connection button. Either way, pick your AutoLot database, and then make certain you save the connection string data in the (autogenerated) App.config file (see Figure 23-9).

Figure 23-9. Selecting the database to generate the EDM from
Before you click the Next button, take a moment to examine the format of your connection string.
metadata=res://*/InventoryEDM.csdl|res://*/InventoryEDM.ssdl|res://*/InventoryEDM.msl;

  provider=System.Data.SqlClient;provider connection string=

  "Data Source=(local)SQLEXPRESS;

  Initial Catalog=AutoLot;Integrated Security=True;Pooling=False"
While your connection may differ slightly based on your machine configuration, the main point of interest here is the metadata flag, which you use to denote the names of the embedded XML resource data for your conceptual, physical, and mapping files (recall that the single *.edmx file will be broken into three separate files at compile time, and the data in these files takes the form of binary resources embedded in your assembly).
In the wizard’s final step, you can select the items from the database you want to use to generate the EDM. Again, you are only concerned with the Inventory table in this example (see Figure 23-10).

Figure 23-10. Selecting the database items
Now, click the Finish button to generate your EDM data.
Reshaping the Entity Data
After you complete the wizard, you will see the EDM designer open within the IDE, where you should see a single entity named Inventory. You can view the composition of any entity on the designer using the Entity Data Model Browser window (you open this using the View ![]() Other Windows menu option). Now look at the format of your conceptual model for the
Other Windows menu option). Now look at the format of your conceptual model for the Inventory database table under the Entity Types folder (see Figure 23-11). You can see the physical model of the database under the Store node, where the name of your store will be based on the name of the database itself (AutoLotModel.Store, in this case).

Figure 23-11. The Entity designer and Model Browser window
By default, the names of your entities will be based on the original database object names; however, recall that the names of entities in your conceptual model can be anything you choose. You can change the entity name, as well as property names of the entity, by selecting an item on the designer and renaming it using the Name property in the Visual Studio Properties window. Next, rename the Inventory entity to Car and the PetName property to CarNickname (see Figure 23-12).
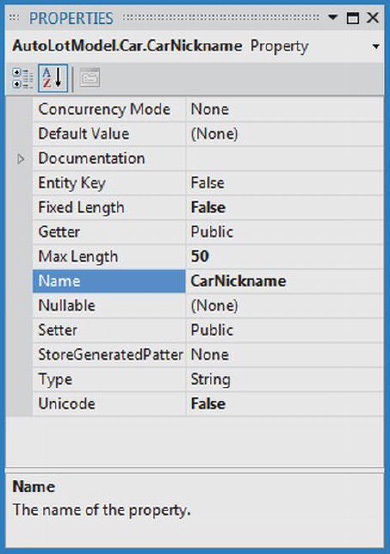
Figure 23-12. Reshaping entities using the Properties window
At this point, your conceptual model should look similar to what is shown in Figure 23-13.
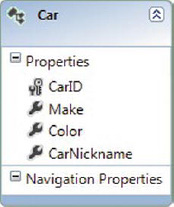
Figure 23-13. The client-side model, reshaped to match your business domain
Now select the entire Car entity on the designer and look at the Properties window again. You should see that the Entity Set Name field has also been renamed from Inventories to Cars (see Figure 23-14). The Entity Set value is important because this corresponds to the name of the property on the data context class, which you will use to modify the database. Recall that this property encapsulates an ObjectSet<T> member variable in the ObjectContext derived class.

Figure 23-14. The name of the ObjectSet<T> property wrapper
Before moving on, compile your application; doing so refreshes your code base and generates the *.csdl, *.msl, and *.ssdl files based on your *.edmx file data.
Viewing the Mappings
Now that you have reshaped the data, you can view the mappings between the conceptual layer and the physical layer using the Mapping Details window (you open this using the View ![]() Other Windows... menu option). Next, look at Figure 23-15 and notice how the nodes on the left-hand side of the tree represent the data names in the physical layer, while the nodes on the right-hand side represent the names of your conceptual model.
Other Windows... menu option). Next, look at Figure 23-15 and notice how the nodes on the left-hand side of the tree represent the data names in the physical layer, while the nodes on the right-hand side represent the names of your conceptual model.

Figure 23-15. The Mapping Details window shows the mappings of your conceptual and physical models
Viewing the Generated *.edmx File Data
Now, let’s see exactly what the EDM Wizard generated for you. Right-click the InventoryEDM.edmx file in the Solution Explorer and select the Open With... menu option. From the resulting dialog box, pick the XML (Text) Editor option. This allows you to see the underlying XML data seen in the EDM designer. The structure of this XML document is contained within the root <edmx:Edmx> element.
If you expand the root element, you have two child elements. First, <edmx:Runtime> contains metadata that’s used by your application at runtime, and <Designer> contains metadata that’s used by Visual Studio at development time.
Within the <edmx:Runtime> element, you find three child elements that describe the physical storage model, the logical C# object model, and the mappings between the two. Let’s take a look at the storage model metadata first.
<!-- SSDL content. -->

<edmx:StorageModels>

  <Schema Namespace="AutoLotModel.Store" Alias="Self"

   Provider="System.Data.SqlClient"

   ProviderManifestToken="2008"

   xmlns:store=

   "http://schemas.microsoft.com/ado/2007/12/edm/EntityStoreSchemaGenerator"

   xmlns="http://schemas.microsoft.com/ado/2009/02/edm/ssdl">

   <EntityContainer Name="AutoLotModelStoreContainer">

     <EntitySet Name="Inventory" EntityType="AutoLotModel.Store.Inventory"

                store:Type="Tables" Schema="dbo" />

   </EntityContainer>

   <EntityType Name="Inventory">

     <Key>

       <PropertyRef Name="CarID" />

     </Key>

      <Property Name="CarID" Type="int" Nullable="false" />

      <Property Name="Make" Type="varchar" Nullable="false" MaxLength="50" />

      <Property Name="Color" Type="varchar" Nullable="false" MaxLength="50" />

      <Property Name="PetName" Type="varchar" MaxLength="50" />

    </EntityType>

  </Schema>

</edmx:StorageModels>
Note that the <Schema> node defines the name of the ADO.NET data provider that will use this information when communicating with the database (System.Data.SqlClient). The <EntityType> node marks the name of the physical database table, as well as each column in the table.
The next major chunk of the *.edmx file is the <edmx:ConceptualModels> element, which defines the shaped client-side entities. Notice that the Cars entity defines the CarNickname property, which you change using the designer.
<!-- CSDL content. -->

<edmx:ConceptualModels>

  <Schema Namespace="AutoLotModel" Alias="Self"

    xmlns:annotation="http://schemas.microsoft.com/ado/2009/02/edm/annotation"

    xmlns="http://schemas.microsoft.com/ado/2008/09/edm">

    <EntityContainer

      Name="AutoLotEntities" annotation:LazyLoadingEnabled="true">

      <EntitySet Name="Cars" EntityType="AutoLotModel.Car" />
</EntityContainer>
<EntityType Name="Car">
<Key>
<PropertyRef Name="CarID" />
</Key>
<Property Name="CarID" Type="Int32" Nullable="false" />
<Property Name="Make" Type="String" Nullable="false" MaxLength="50"
Unicode="false" FixedLength="false" />
<Property Name="Color" Type="String" Nullable="false" MaxLength="50"
Unicode="false" FixedLength="false" />
<Property Name="CarNickname" Type="String" MaxLength="50"
Unicode="false" FixedLength="false" />
</EntityType>
</Schema>
</edmx:ConceptualModels>
That brings you to the mapping layer, which the Mapping Details window (and the EF runtime) uses to connect names in the conceptual model to the physical model.
<!-- C-S mapping content. -->

<edmx:Mappings>

  <Mapping Space="C-S"

    xmlns="http://schemas.microsoft.com/ado/2008/09/mapping/cs">

    <EntityContainerMapping StorageEntityContainer="AutoLotModelStoreContainer"

       CdmEntityContainer="AutoLotEntities">

      <EntitySetMapping Name="Cars">

        <EntityTypeMapping TypeName="AutoLotModel.Car">

          <MappingFragment StoreEntitySet="Inventory">

            <ScalarProperty Name="CarID" ColumnName="CarID" />

            <ScalarProperty Name="Make" ColumnName="Make" />

            <ScalarProperty Name="Color" ColumnName="Color" />

            <ScalarProperty Name="CarNickname" ColumnName="PetName" />

          </MappingFragment>

        </EntityTypeMapping>

      </EntitySetMapping>

    </EntityContainerMapping>

  </Mapping>

</edmx:Mappings>
The last part of the *.edmx file is the <Designer> element, which is not used by the EF runtime. If you view this data, you will see it contains instructions used by Visual Studio to display your entities on the visual designer surface.
Again, ensure that you have compiled your project at least once and click the Show All Files button of the Solution Explorer. Next, begin by drilling into the objDebug folder; and then drill into the edmxResourcesToEmbed subdirectory. Here you will find three XML files that are based on the entirety of your *.edmx file (see Figure 23-16).

Figure 23-16. You use the *.edmx file to generate three separate XML files
The data in these files will be embedded as binary resources in your assembly. Thus, your .NET application has all the information it needs to understand the conceptual, physical, and mapping layers of the EDM.
Viewing the Generated Source Code
You are almost ready to author some code to use your EDM; before you do, however, you should check out the generated C# code base. Open the Class View window and expand your default namespace. You will see that, in addition to the Program class, the EDM Wizard generated an entity class (which you renamed to Car) and another class named AutoLotEntities.
If you go to the Solution Explorer and expand the InventoryEDM.edmx node, you will see an IDE-maintained file named InventoryEDM.Designer.cs. As with any IDE-maintained file, you should not directly edit this file because the IDE will recreate it each time you compile. However, you can open this file for viewing by double-clicking it.
The AutoLotEntities class extends the ObjectContext class, which (as you probably recall) is your entry point to the EF programming model. The constructors of AutoLotEntities provide various ways for you to feed in connection string data. The default constructor has been configured to read the connection string data automatically from the App.config file.
public partial class AutoLotEntities : ObjectContext

{

  public AutoLotEntities() : base("name=AutoLotEntities", "AutoLotEntities")

  {

    this.ContextOptions.LazyLoadingEnabled = true;

    OnContextCreated();

  }

...

}
Next, notice that the Cars property of the AutoLotEntities class encapsulates the ObjectSet<Car> data member. You can use this property to work with the EDM model to modify the physical back-end database indirectly.
public partial class AutoLotEntities : ObjectContext

{

...

  public ObjectSet<Car> Cars

  {

    get

    {

      if ((_Cars == null))

      {

        _Cars = base.CreateObjectSet<Car>("Cars");

      }

      return _Cars;

    }

  }

  private ObjectSet<Car> _Cars;

}
![]() Note You will also see various methods in your
Note You will also see various methods in your ObjectContext-derived classes that begin with AddTo. While you can use them to add new entities to the ObjectSet<T> member variables, the preferred way to do this is with the ObjectSet<T> member obtained from the strongly typed properties.
The last item of interest in the designer code file is the Car entity class. The bulk of the code for each entity class is a collection of properties that model the shape of your conceptual model. Each of these properties implement its set logic using a call to the static StructuralObject.SetValidValue() method of the EF API.
Also, the set logic includes code that informs the EF runtime that the state of an entity has changed, which is important because the ObjectContext must know about these changes to push updates to the physical database.
In addition, the set logic makes calls on two partial methods. Recall that a C# partial method provides a simple way to deal with change notifications in your applications. If you don’t implement a partial method, it is ignored by the compiler and stripped away. Here is the implementation of the CarNickname property of the Car entity class:
public partial class Car : EntityObject

{

...

  public global::System.String CarNickname

  {

    get

    {

      return _CarNickname;

    }

    set

    {

      OnCarNicknameChanging(value);

      ReportPropertyChanging("CarNickname");

      _CarNickname = StructuralObject.SetValidValue(value, true);

      ReportPropertyChanged("CarNickname");

      OnCarNicknameChanged();

    }

  }

  private global::System.String _CarNickname;

  partial void OnCarNicknameChanging(global::System.String value);

  partial void OnCarNicknameChanged();

}
Enhancing the Generated Source Code
All of the designer-generated classes have been declared with the partial keyword, which as you recall allows you to implement a class across multiple C# code files. This is especially useful when working with the EF programming model because it means you can add “real” methods to your entity classes that help you model your business domain better.
In this example, you override the ToString() method of the Car entity class to return the state of the entity with a well formatted string. You also complete the definitions of the partial OnCarNicknameChanging() and OnCarNicknameChanged() methods to serve as simple diagnostic notifications. You define the following partial class declaration in a new Car.cs file:
public partial class Car

{

  public override string ToString()

  {

    // Since the PetName column could be empty, supply

    // the default name of **No Name**.

    return string.Format("{0} is a {1} {2} with ID {3}.",

      this.CarNickname ?? "**No Name**",

      this.Color, this.Make, this.CarID);

  }

  partial void OnCarNicknameChanging(global::System.String value)

  {

    Console.WriteLine("	-> Changing name to: {0}", value);

  }

  partial void OnCarNicknameChanged()

  {
Console.WriteLine(" -> Name of car has been changed!");
}
}
A friendly reminder: when you provide implementations to these partial methods, you can receive notifications if the properties of the entity classes have changed or are being changed, but not when the physical database has changed. If you need to know when the physical database has changed, you can handle the SavingChanges event on your ObjectContext-derived class.
Programming Against the Conceptual Model
Now you can author some code that interacts with your EDM. Begin by updating your Program class to call a helper method from Main(), which will print out each item in the Inventory database using your conceptual model, and another that will insert a new record to the Inventory table, as follows:
class Program

{

  static void Main(string[] args)

  {

    Console.WriteLine("***** Fun with ADO.NET EF *****
");

    AddNewRecord();

    PrintAllInventory();

    Console.ReadLine();

  }


  private static void AddNewRecord()

  {

    // Add record to the Inventory table of the AutoLot

    // database.

    using (AutoLotEntities context = new AutoLotEntities())

    {

      try

      {

        // Hard-code data for a new record, for testing.

        context.Cars.AddObject(new Car() { CarID = 2222,

             Make = "Yugo", Color = "Brown" });

        context.SaveChanges();

      }

      catch(Exception ex)

      {

        Console.WriteLine(ex.InnerException.Message);

      }

    }

  }


  private static void PrintAllInventory()

  {

    // Select all items from the Inventory table of AutoLot,

    // and print out the data using our custom ToString()

    // of the Car entity class.

    using (AutoLotEntities context = new AutoLotEntities())

    {
foreach (Car c in context.Cars)
Console.WriteLine(c);
}
}
}
You have seen code similar to this earlier in the chapter, but now you should have a much better idea about how it works. Each helper method creates an instance of the ObjectContext-derived class (AutoLotEntities), and uses the strongly typed Cars property to interact with the ObjectSet<Car> field. Enumerating each item exposed by the Cars property enables you to submit a SQL SELECT statement indirectly to the underlying ADO.NET data provider. By inserting a new Car object with the AddObject() method of ObjectSet<Car>, and then calling SaveChanges() on the context, you have preformed a SQL INSERT.
Deleting a Record
When you want to remove a record from the database, you will first need to locate the correct item in the ObjectSet<T>, which you can find by passing an EntityKey object (which is a member of the System.Data namespace) to the GetObjectByKey() method. Assuming you have imported this namespace into your C# code file, you can now author the following helper method:
private static void RemoveRecord()

{

  // Find a car to delete by primary key.

  using (AutoLotEntities context = new AutoLotEntities())

  {

    // Define a key for the entity we are looking for.

    EntityKey key = new EntityKey("AutoLotEntities.Cars", "CarID", 2222);


    // See if we have it, and delete it if we do.

    Car carToDelete = (Car)context.GetObjectByKey(key);

    if (carToDelete != null)

    {

      context.DeleteObject(carToDelete);

      context.SaveChanges();

    }

  }

}
![]() Note For better or for worse, calling
Note For better or for worse, calling GetObjectByKey() requires a round trip to the database before you can delete the object.
Notice that when you are creating an EntityKey object, you need use a string object to inform it which ObjectSet<T> to evaluate in a given ObjectContext-derived class. The second argument is another string; this one represents the property name on the entity class that is marked as the key, and the final constructor argument is the value of the primary key. Once you find the object in question, you can call DeleteObject() off your context and save the changes.
Updating a Record
Updating a record is also straightforward. Locate the object you want to change, set new property values on the returned entity, and save the changes, like so:
private static void UpdateRecord()

{

  // Find a car to delete by primary key.

  using (AutoLotEntities context = new AutoLotEntities())

  {

    // Define a key for the entity we are looking for.

    EntityKey key = new EntityKey("AutoLotEntities.Cars", "CarID", 2222);


    // Grab the car, change it, save!

    Car carToUpdate = (Car)context.GetObjectByKey(key);

    if (carToUpdate != null)

    {

      carToUpdate.Color = "Blue";

      context.SaveChanges();

    }

  }

}
The preceding method might seem a bit off, at least until you remember that the entity object returned from GetObjectByKey() is a reference to an existing object in the ObjectSet<T> field. Thus, when you set properties to change the state, you are changing the same object in memory.
![]() Note Much like an ADO.NET
Note Much like an ADO.NET DataRow object (see Chapter 22), any descendant of EntityObject (meaning, all of your entity classes) has a property named EntityState, which is used by the object context to determine whether the item has been modified, deleted, is detached, and so forth. This is set on your behalf as you work with the programming model; however, you can change this manually as required.
Querying with LINQ to Entities
So far, you have been working with a few simple methods on the object context and entity objects to perform selections, inserts, updates, and deletes. This is useful all by itself; however, EF becomes much more powerful when you incorporate LINQ queries. If you want to use LINQ to update or delete records, you don’t need to make an EntityKey object manually. Consider the following update to the RemoveRecord() method, which will not work as expected at this point:
private static void RemoveRecord()

{

  // Find a car to delete by primary key.

  using (AutoLotEntities context = new AutoLotEntities())

  {

    // See if we have it?

    var carToDelete = from c in context.Cars where c.CarID == 2222 select c;
if (carToDelete != null)
{
context.DeleteObject(carToDelete);
context.SaveChanges();
}
}
}
This code compiles, but you will receive a runtime exception when you attempt to call the DeleteObject() method. The reason: this particular LINQ query returns an ObjectQuery<T> object, not a Car object. Always remember that when you build a LINQ query that attempts to locate a single entity, you will get back an ObjectQuery<T> representing a query that is capable of bringing back the data you are looking for. To execute the query (and bring back the Car entity), you must execute a method such as FirstOrDefault() on the query object, as in the following example:
var carToDelete =

  (from c in context.Cars where c.CarID == 2222 select c).FirstOrDefault();
By calling FirstOrDefault() on the ObjectQuery<T>, you find the item you want; or, if there is no Car with the ID of 2222, a default value of null.
Given that you have already worked with many LINQ expressions in Chapter 13, a few more examples will suffice for the time being.
private static void FunWithLINQQueries()

{

  using (AutoLotEntities context = new AutoLotEntities())

  {

    // Get a projection of new data.

    var colorsMakes = from item in context.Cars select

        new { item.Color, item.Make };

    foreach (var item in colorsMakes)

    {

      Console.WriteLine(item);

    }


    // Get only items where CarID < 1000.

    var idsLessThan1000 = from item in context.Cars

        where item.CarID < 1000 select item;

    foreach (var item in idsLessThan1000)

    {

      Console.WriteLine(item);

    }

  }

}
While the syntax of these queries is simple enough, remember that you are hitting a database each time you apply a LINQ query to the object context! Recall that when you want to obtain an independent copy of data, which can be the target of new LINQ queries, you want to use immediate execution with the ToList<T>(), ToArray<T>() or ToDictionary<K,V>() extension methods (among others). Here is an update of the previous method, which performs the equivalent of a SELECT *, caches the entities as an array, and manipulates the array data using LINQ to Objects:
using (AutoLotEntities context = new AutoLotEntities())

{

  // Get all data from the Inventory table.

  // Could also write:

  // var allData = (from item in context.Cars select item).ToArray();

  var allData = context.Cars.ToArray();


  // Get a projection of new data.

  var colorsMakes = from item in allData select new { item.Color, item.Make };


  // Get only items where CarID < 1000.

  var idsLessThan1000 = from item in allData where

    item.CarID < 1000 select item;

}
Working with LINQ to Entities is much more enticing when your EDM contains multiple related tables. You’ll see some example that illustrate this in a moment; however, let’s wrap up this current example by looking at two other ways you can interact with your object context.
Querying with Entity SQL
To be sure, you will be querying and ObjectSet<T> with LINQ a majority of the time. The entity client will break down your LINQ query into a fitting SQL statement, passing it on to the database for processing. However, you can use Entity SQL if you want to have more control over how the query is formatted.
Entity SQL is a SQL-like query language that can be applied to entities. While the format of an Entity SQL statement is similar to a traditional SQL statement, it is not identical. Entity SQL has a unique syntax because the entities receive the query, not the physical database. Like a LINQ to Entities query, an Entity SQL query is used to pass a “real” SQL query to the database.
This chapter will not dive into the details of building Entity SQL commands, so please consult the .NET Framework 4.5 SDK documentation if you want more information. However, one example might be helpful. Consider the following method, which builds an Entity SQL statement that finds all black cars in the ObjectSet<Car> collection:
private static void FunWithEntitySQL()

{

  using (AutoLotEntities context = new AutoLotEntities())

  {

    // Build a string containing Entity SQL syntax.

    string query = "SELECT VALUE car FROM AutoLotEntities.Cars " +

                   "AS car WHERE car.Color='black'";


    // Now build an ObjectQuery<T> based on the string.

    var blackCars = context.CreateQuery<Car>(query);

    foreach (var item in blackCars)

    {

      Console.WriteLine(item);

    }

  }

}
Notice that you pass in the formatted Entity SQL statement as an argument to the CreateQuery<T> method of your object context.
Working with the Entity Client Data Reader Object
When you use LINQ to Entities or Entity SQL, the fetched data is mapped back to your entity classes automatically, thanks to the entity client service. Typically this is exactly what you require; however, you can intercept the result set before it makes its way to your entity objects and process it manually using the EntityDataReader.
Here is a final helper method for this example, which uses several members of the System.Data.EntityClient namespace to build a connection manually through a command object and data reader. This code should look familiar due to your previous work in Chapter 21; the major difference is that you use Entity SQL, rather than “normal” SQL.
private static void FunWithEntityDataReader()

{

  // Make a connection object, based on our *.config file.

  using (EntityConnection cn = new EntityConnection("name=AutoLotEntities"))

  {

    cn.Open();


    // Now build an Entity SQL query.

    string query = "SELECT VALUE car FROM AutoLotEntities.Cars AS car";


    // Create a command object.

    using (EntityCommand cmd = cn.CreateCommand())

    {

      cmd.CommandText = query;


      // Finally, get the data reader and process records.

      using (EntityDataReader dr =

             cmd.ExecuteReader(CommandBehavior.SequentialAccess))

      {

        while (dr.Read())

        {

          Console.WriteLine("***** RECORD *****");

          Console.WriteLine("ID: {0}", dr["CarID"]);

          Console.WriteLine("Make: {0}", dr["Make"]);

          Console.WriteLine("Color: {0}", dr["Color"]);

          Console.WriteLine("Pet Name: {0}", dr["CarNickname"]);

          Console.WriteLine();

        }

      }

    }

  }

}
Great! This initial example should go a long way toward helping you understand the nuts and bolts of working with the Entity Framework. As mentioned previously, things become much more interesting when your EDM contains interrelated tables, which you will learn about next.
![]() Source Code You can find the InventoryEDMConsoleApp example under the Chapter 23 subdirectory.
Source Code You can find the InventoryEDMConsoleApp example under the Chapter 23 subdirectory.
AutoLotDAL Version Four, Now with Entities
Next, you will learn how to build an EDM that captures the bulk of the AutoLot database, including your GetPetName stored procedure. I strongly suggest that you make a copy of the AutoLotDAL (Version Three) project you created in Chapter 22 and rename this copy to AutoLotDAL (Version Four).
Open the latest version of the AutoLotDAL project in Visual Studio and insert a new ADO.NET Entity Data Model project item named AutoLotDAL_EF.edmx. On step three of the wizard, you should select the Inventory, Orders, and Customers tables (there’s no need to nab the CreditRisks table at this time), as well as the custom stored procedure (see Figure 23-17).

Figure 23-17. The *.edmx file for a majority of the AutoLot database
In contrast to the first EDM example, this time you don’t bother renaming your entity class names or their properties. In any case, if you examine your Model Browser window, you will see each of your Entities is present and accounted for, in addition to your custom stored procedure (see Figure 23-18).

Figure 23-18. The imported model data
The Role of Navigation Properties
If you look at the EDM designer, you will see each table is accounted for, including new entries in the Navigation Properties section of a given entity class (see Figure 23-19).

Figure 23-19. Navigation properties
As the name suggests, navigation properties allow you to capture JOIN operations in the Entity Framework programming model (without the need to author complex SQL statements). To account for these foreign key relationships, each entity in the *.edmx file now contains some new XML data that shows how entities are connected through key data. Feel free to open the *.edmx file using the XML editor if you want to see the markup directly; however, you can see this same information in the Model Browser window, under the Associations folder (see Figure 23-20).

Figure 23-20. Viewing your entity relationships
If you want, change the version number of this new library to 4.0.0.0 (using the Assembly Information button within Applications tab of Properties window). Now compile your modified AutoLotDAL.dll assembly before moving to the first client application.
![]() Source Code You can find the AutoLotDAL (Version 4) project under the Chapter 23 subdirectory.
Source Code You can find the AutoLotDAL (Version 4) project under the Chapter 23 subdirectory.
Using Navigation Properties within LINQ to Entity Queries
Next, you will learn how to use these navigation properties within the context of LINQ to Entity queries (you could also use them with Entity SQL; however, this book doesn’t delve into that aspect of this topic). Before you bind your data to a Windows Forms GUI, you make one final Console Application named AutoLotEDMClient. After you create the project, set a reference to System.Data.Entity.dll and the latest and greatest version of AutoLotDAL.dll.
Next, open the App.config file from your AutoLotDAL (Version Four) project for viewing (using the File ![]() Open…
Open… ![]() File menu option) and copy the connection string into your current configuration file (if you do not happen to have an
File menu option) and copy the connection string into your current configuration file (if you do not happen to have an App.config file in your project, you can simply include the entire file via Project ![]() Add Existing Item…). As well, import the
Add Existing Item…). As well, import the AutoLotDAL namespace into your initial C# code file.
Next, you will update the physical Orders table with a few new records. Specifically, you want to ensure that a single customer has multiple orders. Using the Visual Studio Server Explorer, update the Orders table with one or two new records to ensure that a single customer has two or more orders. For example, in Figure 23-21, customer #4 has two pending orders, for cars #1992 and #83.

Figure 23-21. A single customer with multiple orders
Now update your Program with a new helper method (called from Main()). This method uses the navigation properties to select each Inventory object on order for a given customer.
private static void PrintCustomerOrders(string custID)

{

  int id = int.Parse(custID);


  using (AutoLotEntities context = new AutoLotEntities())

  {

    var carsOnOrder = from o in context.Orders

      where o.CustID == id select o.Inventory;

    Console.WriteLine("
Customer has {0} orders pending:", carsOnOrder.Count());

    foreach (var item in carsOnOrder)

    {

      Console.WriteLine("-> {0} {1} named {2}.",

        item.Color, item.Make, item.PetName);

    }

  }

}
When you run your application, you see something similar to the following output (notice that you specify a customer ID of 4 when you call PrintCustomerOrders() from Main()):
***** Navigation Properties *****

Please enter customer ID: 4


Customer has 2 orders pending:

-> Pink Saab named Pinky.

-> Rust Ford named Rusty.
Here, you find a single Customer entity in the context, which has the specified CustID value. Once you find the given customer, you can navigate to the Inventory table to select each car on order. The return value of your LINQ query is an enumeration of Inventory objects, which you print out using a standard foreach loop.
Invoking a Stored Procedure
In the AutoLotDAL EMD, you now have the information you need to invoke the GetPetName stored procedure. You can do this using either of two approaches. Here is the full code listing:
private static void CallStoredProc()

{

  using (AutoLotEntities context = new AutoLotEntities())

  {

    // Approach #1.

    ObjectParameter input = new ObjectParameter("carID", 83);

    ObjectParameter output = new ObjectParameter("petName", typeof(string));


    // Call ExecuteFunction off the context....

    context.ExecuteFunction("GetPetName", input, output);


    // Approach #2.

    // ....or use the strongly typed method on the context.

    context.GetPetName(83, output);


    Console.WriteLine("Car #83 is named {0}", output.Value);

  }

}
In this code listing, you can see our first approach is to call the ExecuteFunction() method of your object context. In this case, the stored procedure is identified by a string name, and each parameter is represented by an object of type ObjectParameter, which is in the System.Data.Objects namespace (don’t forget to import this into your C# code file!).
However the second approach (again, seen in the previous code listing) is to use the strongly typed name in your object context. This approach proves a tad simpler because you can send input parameters (such as the carID) as typed data, rather than as an ObjectParameter object.
![]() Source Code You can find the AutoLotEDMClient example under the Chapter 23 subdirectory.
Source Code You can find the AutoLotEDMClient example under the Chapter 23 subdirectory.
Data Binding Entities to Windows Forms GUIs
To conclude this introductory examination of the ADO.NET Entity Framework, you will create a simple example where you bind entity objects to a Windows Forms GUI. As mentioned earlier in this chapter, you will examine data-binding operations in WPF and ASP.NET projects.
Create a new Windows Forms application named AutoLotEDM_GUI and rename your initial form to MainForm.cs. Next, set a reference to System.Data.Entity.dll and the latest and greatest version of AutoLotDAL.dll. Finally, modify the App.config file of this new project to include the connection string from your AutoLotDAL (Version Four) project and import the AutoLotDAL namespace into your Form’s primary code file.
Now add a DataGridView object to the form designer and rename the control to gridInventory. After you have renamed this control, select the inline grid editor (the tiny arrow on the upper right of the widget). From the Choose Data Source drop-down box, add a project data source (see Figure 23-22).

Figure 23-22. Designing the Windows Forms DataGridView control
In this case, you do not bind directly to the database; instead, you bind to an entity class, so pick the Object option (see Figure 23-23).

Figure 23-23. Binding to a strongly typed object
In the final step, check off the Inventory table of AutoLotDAL.dll as shown in Figure 23-24 (if you don’t see it listed, you probably forgot to reference this library).

Figure 23-24. Selecting the Inventory table
When you click the Finish button, you’ll see that the grid displays each property of the Inventory entity class, including the navigation properties.
To finish the UI, add a single Button control and rename it to btnUpdate. At this point, your designer should look something like what you see in Figure 23-25.

Adding the Data-Binding Code
At this point, you have a grid that can display any number of Inventory objects; however, you need to write the code to do so. Thanks to the runtime engine of the EF, the code could not be simpler. Begin by handling the FormClosed and Load events of your MainForm class (using the Properties window) and the Click event of the Button control. After you do this, update your code file with the following snippet:
public partial class MainForm : Form

{

  AutoLotEntities context = new AutoLotEntities();


  public MainForm()

  {

    InitializeComponent();

  }


  private void MainForm_Load(object sender, EventArgs e)

  {

    // Bind the ObjectSet<Inventory> collection to the grid.

    gridInventory.DataSource = context.Inventories;

  }


  private void btnUpdate_Click(object sender, EventArgs e)

  {

    context.SaveChanges();

    MessageBox.Show("Data saved!");

  }
private void MainForm_FormClosed(object sender, FormClosedEventArgs e)
{
context.Dispose();
}
}
This is all you need to do! If you run your application, you can now add new records to the grid, select a row and delete it, and modify existing rows. When you click your Update button, the Inventory database is updated automatically because the object context has been kind enough to generate all the necessary SQL statements for selecting, updating, deleting, and inserting automatically. Here are some key takeaways from this preceding example:
- The context remains allocated throughout the application.
- The call to
context.Inventoriesexecutes SQL to fetch all rows from theInventorytable into memory.- The context tracks dirty entities, so it knows what SQL to execute upon
SaveChanges().- After
SaveChanges(), the entities are considered clean again.
Going Forward with .NET Data-Access APIs
Over the last three chapters, you have been provided with a tour of three approaches to data manipulation using ADO.NET, specifically the connection layer, the disconnected layer, and the Entity Framework. Each approach has merit, and many of your applications will likely use various aspects of each of them. Now to be sure, we have only scratched the surface of all of the topics found within the ADO.NET technology set. To dive deeper into any of the topics presented in this book (as well to examine a number of related items), I recommend consulting the .NET Framework 4.5 SDK documentation. Specifically, look up the topic “Data and Modeling.” Here you will find numerous code examples (see Figure 23-26).

Figure 23-26. The Data and Modeling section of the .NET Framework documentation
Summary
This chapter wrapped up your formal investigation of database programming using ADO.NET by examining the role of the Entity Framework. EF allows you to program against a conceptual model that closely maps to your business domain. While you can reshape your entities in any way you choose, the EF runtime ensures that the changed data is mapped to the correct physical table data.
You learned about the role of (and composition of) *.edmx files and how to generate them using the Visual Studio IDE. Along the way, you also learned how to map stored procedures to functions in your conceptual layer, how to apply LINQ queries to the object model, the role of Entity SQL, and how to consume fetched data at the lowest level using the EntityDataReader.
You wrapped up this chapter with a simple example of binding entity classes to graphical user interfaces within the context of a Windows Forms application. You’ll see other examples of binding entities to GUI applications when you examine Windows Presentation Foundation and ASP.NET.